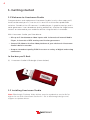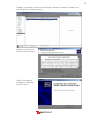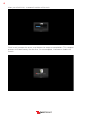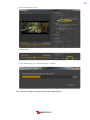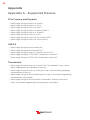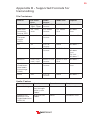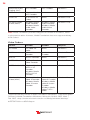
1
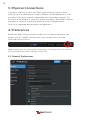
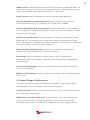
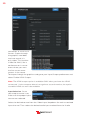
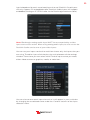
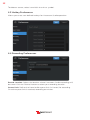
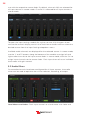
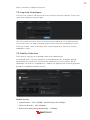
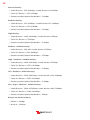
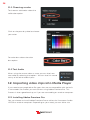
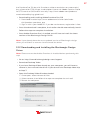
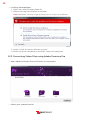
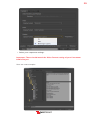
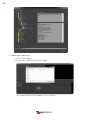
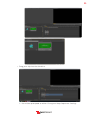
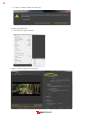
TM
Live Production Switcher
User Manual
For Livestream Studio version 1.1
ivestream
Table of Contents
1. Getting Started
1.1. Welcome to Livestream Studio
1.2. Installing Livestream Studio
2. User Interface Overview
3. Physical Connections
4. Preferences
4.1. General Prefereces
4.2. Input/Output Preferences
4.3. Hotkey Preferences
4.4. Recording Preferences
4.5. Streaming Preferences
5. The Audio Mixer
5.1. Input Settings
5.2. Audio Mixer
6. Preview/Program Switching
6.1. Mouse Control
6.2. Keyboard Control
7. Streaming
7.1. Log into Livestream
7.2. Livestream Account Creation
7.3. Creating and Managing Events
7.4. Quality Selection
7.5. Active Stream
7.6. Stream to other services
7.7. Stream to RTMP
8. Recording
9. GFX Channels
9.1. GFX Templates
9.2. GFX Mixing and Overlays
10. Media Player Channels
11. Color Source
12. Importing Files with Adobe Premiere Pro
12.1. Installing Adobe Premiere Pro
12.2. Downloading and Installing the Blackmagic Design® Driver
12.3. Converting Video Files using Adobe Premiere Pro
Appendix
A. Tech Specs
B. Supported Formats for Transcoding
C. Input Source Troubleshooting
Warranty
ivestream
4
1. Getting started
1.1 Welcome to Livestream Studio
Congratulations and welcome to Livestream Studio. In only a few steps you’ll
have transformed your PC into an all-in-one HD multi camera production
switcher. Combine Live HD sources, 2 media players, 2 graphic overlays and 2
color generators into a broadcast quality production, whether for large format
screens or streamed to your audience online using the built-in encoder.
With Livestream Studio, you’ll be able to:
• Mix up to 5 simultaneous video inputs with 2 channels of internal Media
Player, 2 channels of GFX overlays and 2 color generators.
• Stream HD video to the live video platform of your choice via Livestream
Studio’s built in encoder.
• Output a broadcast quality PGM line cut on a variety of digital and analog
connectors.
In the box you’ll find:
(1) Livestream Studio USB dongle (shown below)
1.2 Installing Livestream Studio
Note: Blackmagic Desktop Video drivers must be updated to version 9.6 or
higher for use with Livestream Studio v1.1. Go to blackmagicdesign.com/
support to update drivers.
ivestream
5
To begin installation insert the USB dongle and open the drive. Double click
the Livestream Studio Launcher.
Agree to the Terms of
Service and Click Next.
Follow the steps to
complete installation
and click finish.
ivestream
6
After you click finish, a second installer will launch.
Click install, accept the terms, and follow the steps to completion. This second
process will look exactly like the first. Once complete, Livestream Studio will
launch.
ivestream
7
2. User Interface Overview
The Livestream Studio software will launch to the main operating UI.
1
2
3
4
7
5
6
9
9
9
10
8
9
11
1
Stream Button
2
Streaming info Pane
3
Record Button
4
CPU Usage Monitor
5
Preview Window
6
Program Window
7
Main Mix Window
8
GFX Overlay WIndow
9
Multiview
10
Audio Mixer
11
Modules (Input Settings, Streaming, Media Editor, Graphics)
Note: Audio mixer, Input Settings, GFX, Media, and Streaming modules can be
moved freely between left and right side windows by dragging and dropping
tabs to the desired window.
ivestream
8
3. Physical Connections
Livestream Studio only works with Blackmagic Design® Products. Since
working with live video requires utmost reliability, we decided to focus all of
our efforts making the software compatible with Blackmagic Design®. This
ensures that the product is extremely reliable and robust. Blackmagic Design®
also offers a variety of high quality products at very affordable prices.
For a list of supported devices please see Appendix A.
4. Preferences
Before you begin using Livestream Studio, you will need to configure your
project settings. To begin configuration, click the gear icon in the top
righthand corner of the UI.
Note: Preferences are locked when streaming is in progress. Be sure to set all
of your preferences before taking a stream live.
4.1 General Preferences
ivestream
9
Video Format: Defines the project format for Livestream Studio operation. All
video input sources must match this selected format. Output format will also
match this selection unless downconversion is necessary.
Audio Format: Allows selection of mono or stereo audio operation.
Preview Method (interlaced operation): Allows selection of multiview
interlaced field viewing. This reduces CPU usage when needed.
Preview Method (progressive operation): Allows operation in ‘Half Speed Low
CPU’ mode which removes every other frame from multiview display in order
to minimize CPU usage.
Audio Cross fade duration: Sets the speed (in frames) for audio cross fades
following CUT functionality only. Audio cross fades associated with video
cross fades (follow) will follow the ‘Speed’ setting in the ‘Main Mix’ window (see
‘Preview/Program Switching’ section below).
Media Autoplay Mode Behavior: Defines the method for Media Player
playback as ‘Pause Playback’ or ‘Continue Playback’.
Recordings: When a recording is terminated, it will immediately be
added to the selected media bin. Both bins can be selected or deselected
simultaneously.
Auto Start with Windows: When selected, Livestream Studio software will
launch with Windows.
Different GFX Templates: Allows for different settings and templates between
GFX 1 and 2.
4.2 Input/Output Preferences
Livestream Studio launches with default settings for 5 Blackmagic Inputs.
Configurations will vary based on your capture devices.
Output Selection: Select your output source first, as this will lock/unlock the
fifth video input accordingly.
HDMI output through video card: To reduce latency on your program out
you can output directly through the graphics card. Outputting through
the Blackmagic card has varied latency depending on your project format,
ivestream
10
sometimes as much as 11
frames. Output through
the graphics card does
not have sound. It is
only video. This function
is ideal for IMAG, like a
conference or in venue
event where you want
the line cut on some
screens in the venue.
To output through the graphics card go to your Input/Output preferences and
select Enable HDMI Output..
Note: The HDMI output option is available ONLY when you have the HDMI
connected. If the computer doesn’t recognize a second monitor, the option
to enable HDMI out won’t be available.
Input Selection: Once
your output source is set,
make sure the proper input
sources are selected.
Select the desired source from the ‘Video input’ dropdown for each associated
input channel. Then select the desired audio input method from the ‘Audio
ivestream
11
input’ dropdown for each associated input channel (Decklink Quad inputs
will only support SDI embedded audio. Decklink Studio inputs will support
embedded, analog or AES/EBU Audio via the Blackmagic breakout cable).
Note: Blackmagic analog audio input MUST be accompanied by a video
input source to be active. When using analog audio input, be sure to use the
Decklink Studio card as one of your video inputs.
You can set your inputs so that the multiview shows only the inputs that you
are using. To add an input click the plus sign at the bottom of the settings
window. From there you can select which kind of input source you need,
either video sources or graphics, media, or color bars.
You can also rename each input channel as it will appear in your multiview
by changing the associated name under the ‘Camera’ column of the input
selection menu.
ivestream
12
To delete a source, select it and click the minus symbol.
4.3 Hotkey Preferences
Allows you to set user defined hotkeys for Livestream Studio operation.
4.4 Recording Preferences
Record Location: Selects the location where Livestream Studio recordings will
be saved. Click the ‘Browse’ button to select your recording location.
Queue Limit: Defines the frame buffer queue limit (in frames) for recording.
Once the queue limit is reached, recording terminates.
ivestream
13
4.5 Streaming Preferences
Antilag: When enabled, the antilag feature works to reduce latency on the
viewing end of the stream; if delay on the encoding side builds up past the
user selected ‘Antilag Duration’, the frame buffer will be cleared. In general,
this option should remain off unless low latency is a critical component of the
broadcast. It should only be used when a solid internet connection is available
for streaming.
Antilag Duration: Defines the antilag duration (in frames) for use with the
antilag streaming feature (see above).
Key Frame Interval: Set the keyframe interval.
Stop streaming when encoder queue size is: Livestream Studio will terminate
streaming if the queue limit (set in frames) is reached.
Bitrate (Variable vs Constant): Variable bitrate selection will optimize the
encoder’s bitrate when possible. Constant bitrate selection will maintain
outgoing bitrate, regardless of incoming video bitrate.
5. The Audio Mixer
Livestream Studio accepts up to 8ch of embedded audio on all digital (SDI
and HDMI) inputs. When a DeckLink Studio card is configured as an input,
Livestream Studio can also ingest up to 4ch of analog audio via 1/4”, or 6ch
AES/EBU audio (analog inputs 3-6 can be used as additional AES inputs when
analog audio is not in use) via the Blackmagic breakout cable.
Audio mixer control is broken down into two modules: ‘Input Settings’ and
‘Audio Mixer’.
5.1 Input Settings
The input settings module allows you to select 2 audio channels per input
source in stereo mode, or up to 8 audio channels per input in mono mode, for
ivestream
14
use with the respective source fader. By default, channels 1&2 are selected for
all input sources in stereo mode. Channel 1 is selected for all input sources in
mono mode.
To open the input settings module for a given source, click the gear wheel
next to the source’s display name in the multiview or audio mixer or select the
desired source from the Input Settings dropdown menu.
Available audio channels are displayed for the selected source. In stereo mode,
use the ‘L’ and ‘R’ buttons along the bottom of the module to assign left and
right audio channels to the input source fader. In mono mode, click the ‘On’ to
assign input channels to the source fader. Each input channel has an individual
level meter with gain control.
5.2 Audio Mixer
Once audio channels have been configured for all input sources, the audio
mixer can be used to optimize the mix for webcast, recording, or output.
Level Meters and faders: Each input source has a level meter with fader and
ivestream
15
gain stage control.
Peak Hold: To enable peak hold for a particular level meter, click the lock icon
associated with the desired input or master output source.
Air: Pushes the selected input source audio to the master fader.
Follow: Audio transitions will follow video transitions. When selected,
Livestream Studio will fade between sources based on the ‘Audio cross fade
duration’ setting in ‘General Preferences’.
Link (input source fader): Works in conjunction with the ‘follow’ setting to
group multiple video inputs to a single audio input. Click the link icon to select
the audio source you would like to use with each video source.
Link (stream out/record out fader): When selected, streaming and recording
audio will follow the same fader. Deselecting this option gives the user control
over stream out and record out audio faders individually.
Mute: Source faders, as well as master stream and record out faders can be
muted individually via the mute button.
Audio Monitoring: Audio monitoring is supported through Livestream Studio’s
1/8” headphone jack. Individual sources can be solo’d or master audio can
be monitored. To add a source to the audio monitor, click the headphone
icon below the desired audio level meter. Master audio monitor levels can be
adjusted via the volume control in the top right hand corner of the UI.
6. Preview/Program Switching
Livestream Studio is designed for traditional preview/program switching, with
control available via mouse or user defined keyboard shortcuts. When a source
is selected for preview, it is highlighted in green. When a source is selected for
program, it is highlighted in red.
6.1 Mouse Control
To preview a source, left click on it. To take a
source to program, right click on it. The mouse
can also control switching via the ‘Main Mix’
window. Click the ‘Cut’ button to cut between
preview and program sources. Click the ‘Fade’
button to fade between preview and program
sources; fade time is defined by the ‘Speed’
(in frames) setting in the Main Mix window.
The T-bar can also be used to manually fade
ivestream
16
between preview and program sources.
6.2 Keyboard Control
Keyboard controls are defined by user selected hotkeys (see ‘Hotkey
Preferences’ above).
7. Streaming
Livestream Studio comes with Livestream’s proprietary encoder built in,
allowing for multibitrate streaming to the New Livestream platform with
the click of a mouse. Before starting a stream, you will need to setup a New
Livestream account and create an event associated with the stream.
7.1. Livestream Account Creation
The easiest way to stream to the web is via the
Livestream Platform. In order to stream through Livestream
you must first make an account. Go to www.livestream.com.
Click log in located in the top right corner, and choose create
an account.
You can either join via your Facebook account or with an
email address.
7.2. Creating and Managing Events
To create an event, click on your account name in the top right corner of the
plan and select “Create an Event” from the drop down menu.
You will be prompted to set the event title (by default the current date) as
well as a start and end time for the event.
Draft Events - By default new event will be in draft mode until you Publish &
Announce them. Draft events are not displayed publicly on your account page,
but you can broadcast to them to test and view them when logged into your
ivestream
17
New Livestream Producer Account.
7.3. Log into Livestream
Click on the ‘Stream’ tab to launch the streaming control module. Enter your
username and password to login.
You can create an event within the streaming module or via a web browser.
Once the event has been created, select it from the event dropdown menu.
Give the stream a title and select your streaming quality from the ‘Quality’
dropdown menu.
7.4 Quality Selection
Each quality setting has a locked audio and video bitrate
associated with it. Quality selection should be based on available upload
bandwidth for streaming. To check the speed of your connection, go to
speedtest.net and run a speed test. Choose the appropriate streaming profile
based on upload bandwidth results.
Mobile Quality:
• Video Bitrate = 130-170Kbps, Audio Bitrate=46-48Kbps
• Total A/V Bitrate = 190-200Kbps
• Recommended Upload Bandwidth = 0.5Mbps
ivestream
18
Normal Quality:
• Video Bitrate = 300-420Kbps, Audio Bitrate=94-96Kbps
• Total A/V Bitrate = 435-455Kbps
• Recommended Upload Bandwidth = 1.0Mbps
Medium Quality:
• Video Bitrate = 470-620Kbps, Audio Bitrate=127-128Kbps
• Total A/V Bitrate = 650-678Kbps
• Recommended Upload Bandwidth = 1.2Mbps
High Quality:
• Video Bitrate = 1400-1600Kbps, Audio Bitrate=256Kbps
• Total A/V Bitrate = 1750Kbps
• Recommended Upload Bandwidth = 2.2Mbps
Medium + Mobile Quality:
• Video Bitrate = 600-800, Audio Bitrate=176Kbps
• Total A/V Bitrate = 850-880Kbps
• Recommended Upload Bandwidth = 1.3Mbps
High + Medium + Mobile Quality:
• Video Bitrate = 1900-2400Kbps, Audio Bitrate=432Kbps
• Total A/V Bitrate = 2570-2610Kbps
• Recommended Upload Bandwidth = 3.0Mbps
HD + Medium + Mobile Quality:
• Video Bitrate = 2500-2900Kbps, Audio Bitrate=430-448Kbps
• Total A/V Bitrate = 3050-3100Kbps
• Recommended Upload Bandwidth = 3.5Mbps
HD + High + Medium + Mobile Quality:
• Video Bitrate = 3900-4500Kbps, Audio Bitrate=686-704Kbps
• Total A/V Bitrate = 4586-5204Kbps
• Recommended Upload Bandwidth = 6Mbps
Bitrates for Audio in Mono:
• Mobile = 24Kbps
• Normal = 48Kbps
ivestream
19
• Medium = 64Kbps
• High = 128Kbps
• HD = 256Kbps
Once quality selection is complete, click the ‘Stream’ button to begin the
stream.
7.5. Active Stream
When streaming is active, the stream info window and Streaming Log provide
live updates on streaming status.
Streaming Info Window: Displays live streaming status info.
Duration: Displays the current streaming duration.
FPS: Displays the current outgoing fps.
KBPS: Displays the current outgoing Kbps.
Viewers: Displays the number of concurrent viewers connected to the stream.
Stream Status: Displays the current status of the stream.
Perfect Streaming: The stream is going out with no issues.
Internet Too Slow for Quality: Upload
bandwidth does not support selected quality.
This is generally an on site IT issue and should
be escalated to the IT department. Changing
quality requires the stream to be stopped and
restarted.
Lost Internet Connection: Internet connection
has been lost. Again, check with onsite IT if this
happens.
CPU Warning: CPU is above 95%.
Streaming Log: Displays live streaming updates.
Antilag Feature Triggered: Antilag has been
triggered based on user selected queue limit
(see ‘Streaming preferences above).
Press the ‘Stream’ button again to end the stream. When a stream is
terminated, you will be prompted to post the clip live to the event feed, save
the clip as a draft on the event page or delete the server recording.
ivestream
20
7.6. Stream To Other Services
Livestream Studio also is built to stream directly to other services and
platforms. Services include Original Livestream, Youtube™ Live, Ustream,
Wowza, and Akamai.
To stream to another service just select your platform and log in.
RTMP: RTMP streaming in Livestream Studio is supported through FME3.0
plugin.
With RTMP streaming, you need to generate an RTMP URL in order for the
encoder to know where to publish the stream. This URL varies from platform
to platform, so you need to know how to generate the right RTMP URL for
each particular use case.
Once you have the right URL enter it in Livestream Studio.
ivestream
21
Give the stream a name and select a quality before going live.
You can also select an option to authenticate the stream with a UN/PW.
8. Recording
Livestream Studio records local files as Motion JPEG .avi at the selected project
format spec. Recordings are saved in a user selected destination folder (see
‘Recording Preferences’ above). Click the ‘Record’ button to begin recording.
Click again to end the recording.
Clips recorded locally on Livestream Studio are available for immediate use
in Media Players once recording is terminated. Additionally, clips recorded
locally on Livestream Studio are available for immediate use with Blackmagic
media express, as well as editing software (Adobe Premiere, Fcp, etc.) with the
Blackmagic codec pack installed.
Recording Media: Available recording time is dictated by available internal
disk space. If necessary, an optional SSD expansion bay is available. Visit Store.
Livestream.com for more info. Additionally, external devices with transfer
speeds of at least 50MB/sec may be used for recording, though performance
may vary with external devices—just make sure your external device is
connected and save to that location. Studio also lets you know how much
space is remaining on your Hard Drive.
Note: Best practices recommendation: when multiple read/write processes are
in play (Media, GFX, recording), it is recommended that multiple media sources/
destinations be used.This will improve overall performance of your system.
9. GFX Channels
Livestream Studio has two built in GFX overlay channels. When both GFX
channels are active, GFX 2 is overlaid on top of GFX1. Click the ‘GFX 1’ or ‘GFX
2’ tab to access the corresponding GFX module.
9.1 GFX Templates
To add a template, click the + button at the bottom left of the GFX module.
Templates will always be added to both GFX modules. To rename a template,
double click on the display name.
ivestream
22
Template Design: Launches template design
layout preview window.
Template Data: Launches dynamic text data
window.
Template Background Selection: While working on a
template design, you can choose the background to work
against. Alpha transparency will be maintained regardless of
background selection.
Importing Assets: Once a template has been created, you can
add components to it via the text or asset addition buttons.
Text: Text can be added to a template in
one of two styles: static or dynamic. Once
text has been added, click the arrow in the
top right hand corner of the asset within
the template to adjust font style, size, and
color.
Static Text: Single line of text that never changes.
Dynamic Text: Single line of text that can be altered live without changing
templates. To edit a dynamic text asset once it has been added:
1.
Switch to template ‘data’ view.
ivestream
23
2.
Click the ‘+’ button at the bottom of the template to add a dynamic text
line. Rename each line by double clicking on the existing name
3.
To preview a template with dynamic text, click the ‘eye’ icon associated
with the desired text line. Click the ‘Air’ button to take it to the template to
PGM. Taking a different text line to air will cross fade between the two
lines of text.
Image Assets: Locally hosted
PNG (with alpha support) or JPEG
image assets can be added to a
template via the Asset Addition button
below the template preview. Once
added, images can be scaled and
positioned with the mouse. Image
opacity can also be adjusted by
clicking on the arrow in the top right hand corner of the asset within the
template.
Note: Best practices recommendation: when multiple read/write processes are
in play (Media, GFX, recording), it is recommended that multiple media sources/
destinations be used.This will improve overall performance of your system.
GFX Template Layering: A single GFX template can
support an infinite number of text or image layers. As
assets are imported, they are added to the top layer
of the template. Right click on the desired image to
move it to another layering position.
9.2 GFX Mixing and Overlays
GFX mixing is controlled by the ‘GFX
Overlay’ window.
GFX Preview: To preview a GFX
channel, click the eye icon for the
associated channel.
GFX Air: To air a GFX channel, click the
‘Air’ button for the associated channel.
Link GFX Channels: When selected,
ivestream
24
both GFX channels will preview or air together.
Cut/Fade Selection: Assigns cut or fade insert method to GFX channels. Fade
time is defined by the ‘Speed’ (in frames) setting in the Main Mix window.
10. Media Player Channels
Livestream Studio has two built in Media Player channels. Click the ‘Media 1’ or
‘Media 2’ tab to access the corresponding Media Player module.
Importing Clips: To add a clip to the selected Media Player channel, click the +
button at the bottom left of the Media Player module and select the locally
hosted file. You can add as many clips to a Media Player playlist as you want.
Once added, you can rename clips by double clicking on their displayed name
within the playlist.
Livestream Studio requires AVI files with MJPEG Video Codec and
uncompressed PCM audio (48Khz).
The video clip resolution and frame rate must match Livestream Studio’s user
selected Video Format (Preferences >> General Preferences >> Video Format)
Transcoder: Livestream Studio encodes other video files to the required file
type and specification of the project. When importing a clip that does not
match your project settings, Studio automatically transcodes the file.
ivestream
25
Transcoding time depends on the length of the clip. Please See Appendix B
for all supported formats. All transcoded files will be stored in your My Videos
folder. (Computer>Local Disk (C:)> Users>”User”>My Videos> Transcoding).
Note: Best practices recommendation: when multiple read/write processes are
in play (Media, GFX, recording), it is recommended that multiple media sources/
destinations be used.This will improve overall performance of your system.
Removing Clips: To remove a clip from the Media Player playlist, click the ‘x’
next to the clip name.
Clip Playback Control: To control playback on a clip, use the playback tools at
the bottom of the clip preview window.
Setting Clip In and Out Points: To set an in or out point on an imported clip,
navigate to the desired timecode and click the In or Out point set button.
Autoplay: When selected, clips will automatically
play when a transition to the associated Media
Player channel is triggered. Autoplay behavior is
defined by the ‘Media Autoplay Mode Behavior’ setting in general preferences.
(see ‘General Preferences’ above). When a clip is 20 seconds or less from its
endpoint, the Media Player preview window will highlight yellow. When a clip
is 10 seconds or less from its endpoint, the Media Player preview window will
highlight red.
Playlist Mode: When selected, the associated media bin will act as a playlist.
Loop Play: When selected, clips or playlists will loop play until the option is
deselected.
Clips recorded locally on Livestream Studio are available for immediate use in
Media Players once recording is terminated.
11. Color Source
Livestream Studio comes with two Color Sources that can be used as
backgrounds or for as a color test for programs. There is also a tone generator
to test sounds.
ivestream
26
11.1 Choosing a color
To choose a solid color select the
solid color option.
Click on the pound symbol to choose
your color.
For color bars select the color
bars option.
11.2 Test Audio
When using the source color as a test you can also have
test audio by selecting that option.. You can also link sound
to any of the other audio inputs.
12. Importing video clips into Media Player
If you need to transcode other file types that are not compatible with the built
in transcoder, like ProRes you can convert using Adobe Premiere Pro. This
Process is also a good back up, or if you are transcoding on another computer.
12.1 Installing Adobe Premiere Pro
You can choose to install Adobe Premiere Pro on either the Livestream Studio
HD500 or another computer. Depending on your need, you can either use
ivestream
27
the Premiere Pro 30-day trial (functions without restrictions or watermarks),
buy a license for $799, or get a subscription license via Adobe Creative Cloud
for $75/month or $49/month annually. http://www.adobe.com/products/
creativecloud/buying-guide.html
• Downloading and installing Adobe Premiere Pro CS6
1.Download Installer http://www.adobe.com/cfusion/tdrc/index.
cfm?product=premiere_pro
2.Sign in with a your Adobe ID. If you do not have one, registration is free.
• Once the download is complete, the installer should automatically launch.
Follow the steps to complete installation.
• Once Adobe Premiere Pro is installed you will have to install the latest
version of the Blackmagic Design Driver.
Note: if you already have the most updated version of Blackmagic design
driver you will have to remove it and reinstall the driver.
12.2 Downloading and Installing the Blackmagic Design
Driver
Note: Please ensure that Adobe Premiere is installed before performing this
step.
• Go to: http://www.blackmagicdesign.com/support
• Download Desktop Video
• If you have Desktop Video already on your computer, you will have to
remove it, then reinstall the driver. If you do not have Desktop video skip
to Step 3
• Open the Desktop Video file downloaded
1.Once open, select remove all files
2.Select remove, then follow the steps to complete the uninstall
3.Restart the computer
ivestream
28
• Installing DesktopVideo
1.Open the saved Desktop Video file
2.Follow the steps to complete installation
Note: Windows Security might prompt you to verify the publisher:
3.Select “Install this driver software anyway”.
4.When the driver completes installation, restart the computer
12.3 Converting Video Files using Adobe Premiere Pro
• Open Adobe Premiere Pro and Choose a new project:
• Select your capture format:
ivestream
29
• Select your sequence settings.
Important: These should match the Video Format setting of your Livestream
Studio Project.
Here are two examples:
ivestream
30
• Import your video clip.
1.Go to: File>Import
2.Select your video file and select open
The imported file should appear in your clip bin:
ivestream
31
• Drag your clip into the timeline.
1.You will be prompted to either Change or Keep Sequence Settings
ivestream
32
2.Choose “Keep Sequence Settings”
• Exporting video clip.
1.Go to File>Export>Media
• Select “Match Sequence Settings”
ivestream
33
• Enter an output name
• Click Export
• Once exporting you should see this window:
See section 10 about adding clips to the media player.
ivestream
34
Appendix
Appendix A - Supported Devices
PCIe Capture and Playback
•
•
•
•
•
•
•
•
Blackmagic Design® DeckLink Quad™
Blackmagic Design® DeckLink SDI™
Blackmagic Design® DeckLink Duo™
Blackmagic Design® DeckLink Optical Fiber™
Blackmagic Design® DeckLink Studio™
Blackmagic Design® Intensity Pro™
Blackmagic Design® DeckLink HD Extreme 3D™
Blackmagic Design® DeckLink 4K Extreme™
USB 3.0
•
•
•
•
•
Blackmagic Design® UltraStudio Pro™
Blackmagic Design® UltraStudio SDI™
Blackmagic Design® Intensity Shuttle™ for USB 3.0
Blackmagic Design® ATEM 1 M/E Production Switcher™
Blackmagic Design® ATEM 2 M/E Production Switcher™
Thunderbolt
• Blackmagic Design® Intensity Shuttle™ for Thunderbolt™ http://www.
blackmagicdesign.com/products/intensity/
• Blackmagic Design® Intensity Extreme™ http://www.blackmagicdesign.
com/products/intensity/
• Blackmagic Design® UltraStudio Express™ http://www.blackmagicdesign.
com/products/ultrastudio/
• Blackmagic Design® UltraStudio Mini Recorder™ and Mini Monitor™
http://www.blackmagicdesign.com/products/ultrastudio/
ivestream
35
Appendix B - Supported Formats for
transcoding
File Containers
Format
File Extensions
Media
Source
Media Sink
Requires
3GP
.3g2, .3gp,
.3gp2, .3gpp
MPEG-4 File
Source
3GP File Sink
Windows 7
Advanced
Streaming
Format (ASF)
.asf, .wma,
.wmv
ASF Media
Source
ASF Media
Sink
Windows
Vista
Audio Data
Transport
Stream
(ADTS).
.aac, .adts
ADTS File
Source
None
Windows 7
AVI
.avi
AVI File
Source
None
Windows 7
MP3
.mp3
MP3 File
Source
MP3 File Sink
File source:
Windows
Vista
File sink:
Windows 7
MPEG-4
.m4a, .m4v,
.mov, .mp4
MPEG-4 File
Source
MPEG-4 File
Sink
Windows 7
Synchronized Accessible Media
Interchange
(SAMI)
.sami, .smi
SAMI Media
Source
None
Windows
Vista
WAVE
.wav
AVI File
Source
None
Windows 7
Audio Codecs
Format
Decoder
Encoder
Requires
μ-law Coding
Audio Compression Manager
(ACM) μ-law
Codec
None
Windows Vista
Adaptive Differential Pulse
Code Modulation
(ADPCM)
ACM ADPCM
Codec
None
Windows Vista
ivestream
36
Advanced Audio
Coding (AAC)
AAC Decoder
AAC Encoder
Windows 7
MP3
Windows Media
MP3 Decoder
None
Windows Vista
GSM 6.10
ACM GSM 6.10
Codec
None
Windows Vista
Windows Media
Audio (WMA)
Windows Media
Audio Decoder
Windows Media
Audio Voice
Decoder
Windows Media
Audio Decoder
Windows Media
Audio Voice
Decoder
Windows Vista
Note: Media Foundation provides wrappers for several ACM codecs, listed
in the previous table. However, Media Foundation does not support arbitrary
ACM codecs.
Video Codecs
Format
Decoder
Encoder
Requires
DV Video
DV Video Decoder
None
Windows 7
H.264
H.264 Video
Decoder
H.264 Video
Encoder
Windows 7
MJPEG
MJPEG Decoder
None
Windows 7
MPEG-4 Part 2
MPEG-4 Part 2
Video Decoder
None
Windows 7
MPEG-4 v1/v2/v3
Windows Media
MPEG-4 V3
Decoder
Windows Media
MPEG4 V1/V2
Decoder
None
Windows Vista
Windows Media
Video (WMV)
Windows Media
Video 9 Decoder
Windows Media
Video 9 Screen
Decoder
Windows Media
Video 9 Encoder
Windows Media
Video 9 Screen
Encoder
Windows Media
Video 7/8 Encoder
Windows Vista
“Supported Media Formats in Media Foundation (Windows).” Supported Media
Formats in Media Foundation (Windows). Microsoft, 28 Nov. 2012. Web. 7
Feb. 2013. <http://msdn.microsoft.com/en-us/library/windows/desktop/
dd757927%28v=vs.85%29.aspx>.
ivestream
37
Appendix C - Input Source Troubleshooting
If you are unable to receive a video signal in your Studio software please make
sure you confirm the following:
Are you using a Blackmagic capture device?
The Studio software only accepts video signals from certified Blackmagic
capture devices. If you are using a non-Blackmagic device there is a chance
your signal will not appear in the software.
Do you have the latest version of the Blackmagic drivers?
Stock drivers are often out of date as Blackmagic frequently releases updates.
Please be sure you are using the latest version of the Blackmagic drivers, which
you can download at blackmagicdesign.com/support
• Select your Computer Type (Windows) in Step 1
• Select your Series (Decklink, Intensity, etc) in Step 2
• Select your Product in Step 3
• Click Search
• Download the latest ‘Desktop Video’ for Windows and run the file
Are you getting a video signal in Blackmagic Media Express?
Click the Start button, search for Media Express, and click Blackmagic Media
Express to open the program. Select the ‘Log and Capture’ tab to display the
video input. Click Edit on the menu bar at the top of the program and select
‘Preferences’, then confirm that your Project Video Format matches the format
of your video source. If you receive a video signal in Media Express, you should
check Studio’s video format settings. If you do not receive a video signal in
Media Express, confirm you are connected to the correct input and your
camera is configured properly.
Does Studio’s video format match your input source?
Open Studio’s Preferences by clicking the Gear icon at the top right hand side
of the program window. Click the ‘General’ tab at the left hand side of the
Preferences window, and choose the video format that matches your input
source’s format. Please note that all your input sources should match Studio’s
video format setting.
Are you connected to the correct input of your Blackmagic device?
ivestream
38
Generally, Blackmagic doesn’t specifically mark the input/outputs of the device
on the actual hardware. Please check your capture device’s documentation to
confirm the proper input.
Is your camera configured properly?
Many cameras with multiple output formats allow you to define your specific
output method. Check your camera’s settings to confirm your are properly
configured for HD-SDI, HDMI, or analog depending on your input to the
Blackmagic device.
Does your camera output to an external display?
Connect the camera’s output to an external display such as a monitor to verify
the video signal. If you do not receive a signal, try a new wire of the same type
or double-check your camera’s settings.
Warranty
Livestream provides a limited one (1) year warranty for Livestream Studio. The
limited warranty covers defects in components and workmanship as well as
functionality of the Livestream Studio software. The warranty start date begins
on the day the item is shipped.
The limited warranty does not cover the following:
• Software, including the operating system and any third party software
• Failure due to viruses, bugs, or any type of malicious software
• Hardware or components not included in the original assembly
• External computer hardware products and peripherals
• Problems that result from:
1. Accident, abuse, or misuse
2. Servicing not authorized by Livestream
3. Usage that is not in accordance with product instructions
4. Failure to follow the product instructions or failure to perform preventive
maintenance
5. Failure to follow Livestream’s technical support or RMA instructions
including improper packaging
• Product that has been damaged by actions that are beyond Livestream’s
control, including for example, impacts, fluids, fire, flood, wind,
earthquake, lightning or similar disaster, war, strike, lockout, epidemic,
ivestream
39
destruction of production facilities, riot, insurrection, or material
unavailability
Livestream will replace or repair any component or system free of charge.
Livestream will ship free of charge any item covered by warranty back to
the customer in the continental United States via ground delivery. Any other
shipping fees will be covered by the customer. Customer must insure both
ways if insurance is desired. Livestream does not insure RMA shipments. To
request an RMA, go to help.livestream.com and fill out a support claim.
Livestream Studio Dongle Policy
Lost or stolen dongle’s are your responsibility. The only way to replace
a dongle is to buy another one. If you think your dongle is broken or
malfunctioning you can contact support at [email protected] to request
an RMA.
Livestream Store Return Policy
All returns must be shipped with an RMA (Returned Merchandise Authorization)
number visibly printed on the outside of the return packaging. Any product
returned without an RMA number will be returned to the customer. To request
an RMA e-mail [email protected]. Returns may be assessed a restocking fee
as described below.
Livestream reserves the right to reject any RMA or refund request for a
damaged unit or unit returned with missing parts.
ivestream