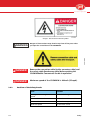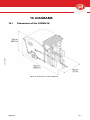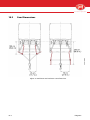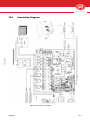
1
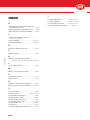
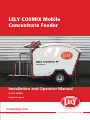
LELY COSMIX Mobile
Concentrate Feeder
Installation and Operator Manual
D-I022.1004EN
English Original
www.lely.com
Lely Industries N.V.
innovators in agriculture
INTENTIONALLY BLANK
ii
D-I022.1004EN
innovators in agriculture
innovators in agriculture
TRADEMARKS, COPYRIGHT AND
DISCLAIMER
D-I022.1004EN
Lely, Astronaut, Astri, Astrodata, Atlantis, Attis, Calm, Commodus,
Compedes, Cosmix, Discovery, E-link, Fertiliner, Gravitor, Grazeway,
Hibiscus, Hubble, Juno, L4C, Lely Center, Lelywash, Lotus, Luna, Nautilus,
Orbiter, Shuttle, Splendimo, T4C, Tigo, Viseo, Voyager and Welger are
registered trademarks of the Lely Group. The right of exclusive use
belongs to the companies of the Lely Group. All rights reserved. The
information given in this publication is provided for information
purposes only and does not constitute an offer for sale. Certain products
may not be available in individual countries and products supplied may
differ from those illustrated. No part of this publication may be copied
or published by means of printing, photocopying, microfilm or any other
process whatsoever without prior permission in writing by Lely Holding
S.à r.l. Although the contents of this publication have been compiled
with the greatest possible care, Lely cannot accept liability for any
damage that might arise from errors or omissions in this publication.
The English language manual is the original manual. Translations into
other languages use the English language manual as the source
document. Lely accepts no liability for discrepancies between the
original English language manual and versions in other languages. If
there is a conflict over the content and accuracy of any translated
manual, the English language manual is the authority document.
Copyright © 2010 Lely Industries N.V.
All rights reserved
Lely Industries N.V.
Weverskade 110
3147 PA Maassluis
the Netherlands
Phone: +31 (0)10 5996333
Fax: +31 (0)10 5996403
Website: www.lely.com
iii
INTENTIONALLY BLANK
iv
D-I022.1004EN
innovators in agriculture
innovators in agriculture
LIST OF INCLUDED AMENDMENTS
No:
Issue Date
(yy/mm)
Remarks
Initial issue
D-I022.1004EN
10/05
Chapter(s)
v
INTENTIONALLY BLANK
vi
D-I022.1004EN
innovators in agriculture
innovators in agriculture
PREFACE
Manual Contents
This manual contains the information necessary for the correct
installation and operation of a COSMIX Mobile Concentrate Feeder.
Study and understand this information thoroughly before configuration
of the COSMIX M. Failure to do so could result in damage to equipment.
Please consult your local Lely service provider if you do not understand
the information in this manual, or if you need additional information.
All information in this manual has been compiled with care. Lely shall
not be liable for errors or faults in this manual. The recommendations
are meant to serve as guidelines. All instructions, pictures and
specifications in this manual are based on the latest information that
was available at the time of publication. Your COSMIX M may comprise
improvements, features or options that are not covered in this manual.
Applicability
D-I022.1004EN
The table below shows the type numbers of COSMIX M for which this
manual is applicable.
Model designation
Model
Type number
COSMIX Mobile Concentrate Feeder
5.2306.0000.1
Standard Torque Loading of Parts
All the nuts, bolts and screws used on the COSMIX Mobile Concentrate
Feeder are torque tightened to standard torque loadings applicable to
the construction materials used.
If a part has a non-standard torque loading, it is specified in the
applicable part of the manual.
vii
innovators in agriculture
Registration
The Type and Serial Number Plate is attached to the middle fence of the
COSMIX Mobile Concentrate Feeder. Always include the type and serial
number of your concentrate feeder when you contact your local Lely
service provider or order spare parts.
Type and Serial Number Plate
We suggest you complete the table below with the type and serial
numbers of your concentrate feeder. This makes sure you can easily find
the information.
Serial number
Maintenance Authorization
WARNING
Only technicians certified by Lely Industries are authorized to do
maintenance on the COSMIX M, except for the maintenance done by
the operator as indicated in the Operator Manual.
If people who are not certified by Lely Industries do maintenance on
the COSMIX M, the warranty on the COSMIX M becomes invalid.
Before a technician does maintenance on an COSMIX M, the owner must
examine the service pass of the technician and make sure the technician
is currently certified to do maintenance on the COSMIX M.
At the end of each visit, all work done on the COSMIX M must be
written in the logbook and the logbook must be signed by the certified
technician. The logbook must always be kept near the COSMIX M for the
entire life of the product. The information in the logbook must include:
•
•
•
•
viii
The maintenance done
The date of the maintenance
The name of the technician
The certification number of the technician.
D-I022.1004EN
Type number
innovators in agriculture
Technician Training
All the technicians certified by Lely Industries have completed an
approved training program, and passed written and practical
examinations during and at the end of the training program. The
training is given by a product specialist. The examinations are done
under supervision of a master product specialist and include
troubleshooting and corrective maintenance of the COSMIX M.
There are five certification levels:
•
•
•
•
•
Installation Technician (certification valid for two years)
Service Engineer (certification valid for two years)
Senior Service Engineer (certification valid for two years)
Product Specialist (certification valid for one year)
Master Product Specialist (certification valid for one year).
During training, a trainee is permitted to work for up to a maximum of
six months under close supervision of a certified technician. A trainee
can do work on the milking robot can only in the presence of a certified
technician.
D-I022.1004EN
When the training program is completed successfully, Lely issue a
certificate and a service pass to the technician. The service pass contains
the following information:
•
•
•
•
The name of the technician
A photograph of the technician
The certification number of the technician
The date of expiry of the certification.
Contact Number Local Service Provider
We suggest you write the telephone number and email address of your
local service provider contact in the table below. This makes sure you
can easily find the information.
Telephone number
email address
ix
INTENTIONALLY BLANK
x
D-I022.1004EN
innovators in agriculture
innovators in agriculture
Table of Contents
1. Introduction
1-1
2. Safety
2-1
2.1
2.2
2.3
2-1
2-1
2-2
Introduction
Signal Words
Safety Instructions
2.3.1
2.3.2
2.3.3
2.3.4
2.3.5
2.4
General Safety
Electrical Safety
Installation Safety
Operating Safety
Maintenance Safety
Safety Decals
2.4.1
2.4.2
2.4.3
2.4.4
Safety Decal Messages
Position of the Safety Decals
Maintenance of Safety Decals
Installation of Safety Decals
D-I022.1004EN
3. Specifications
3.1
3.2
3.3
Dimensions and Weight
Batteries
Speed
4. Description and Operation
4.1
4.2
Introduction
Component Description
4.2.1
4.2.2
4.2.3
4.2.4
4.2.5
4.2.6
4.2.7
4.3
E-Link Software User Interface
4.3.1
4.3.2
4.3.3
4.3.4
4.3.5
4.4
Trailer Wagon
Feeding Station
Fencing
Power System
Cow detection System
Control Unit
The E-Link Manual Controller
Feed Settings
Working
Reports
Testing
Settings
Operation
4.4.1
4.4.2
Cow Identification
Feeding Process
2-2
2-2
2-2
2-3
2-3
2-3
2-3
2-4
2-5
2-5
3-1
3-1
3-1
3-1
4-1
4-1
4-1
4-1
4-3
4-4
4-5
4-6
4-7
4-9
4-10
4-11
4-12
4-12
4-13
4-13
4-13
4-13
4-13
xi
innovators in agriculture
5.1
5.2
Introduction
Assemblage
5.2.1
5.2.2
5.3
Preparation
5.3.1
5.3.2
5.4
5.5
List of Supplied Parts
Assemble and test the COSMIX M
Preparation by the Owner
Transport the COSMIX M
5-1
5-1
5-1
5-1
5-1
5-2
5-2
5-2
Install the Cosmix
Setup the COSMIX M
5-3
5-6
6. Operating Instructions
6-1
6.1
6.2
6.3
6.4
6.5
6.6
6.7
6.8
6.9
Take the COSMIX M out of Operation
Put the COSMIX M in Operation
Fill the Feed Hopper
Get the E-Link Manual Controller
Display the actual Status
List Details about the last Visits
List Details about Cows with low Consumption
List Details per Group about the last 24 Hours
List Attentions
6-1
6-1
6-2
6-2
6-3
6-3
6-3
6-3
6-3
7. Maintenance
7-1
8. Test and Adjustment
8-1
8.1
8.2
8.3
Introduction
Display the Software Version
Adjust the COSMIX M
8.3.1
8.3.2
8.4
Make Basic Software Settings
8.4.1
8.4.2
8.4.3
8.4.4
8.4.5
8.4.6
8.4.7
8.5
8-1
8-1
8-2
8-2
8-3
8-3
8-4
8-4
8-5
8-5
8-5
Set the Feed Dose per Day
Set the Maximum Credit
Set the Entrance Credit
Move a Cow to another Group
Remove a Cow from the Database
Set a Cow Name
8-5
8-6
8-6
8-6
8-7
8-7
Test the Operation of the COSMIX M
8-7
8.6.1
xii
Adjust the Refill Level of the Feed Bin
Calibrate the Load Cell Sensors
Set the Weighing Unit ON or OFF
Set the Antennas
Set the Portion Size
Set the Time
Set the Display Language
Make Feeding Settings
8.5.1
8.5.2
8.5.3
8.5.4
8.5.5
8.5.6
8.6
Adjust the Position of the Solar Panel
Adjust the Detection Distance from the Photoelectric Sensors
8-1
8-1
8-1
Test the Auger Motors
8-7
D-I022.1004EN
5. Installation
innovators in agriculture
8.6.2
8.6.3
8.6.4
Test the Load Cell Sensors
Test the Photoelectric Sensors
Test the ID-Sensors
9. Troubleshooting
9.1
9.2
Troubleshooting Table
Recovery Procedures
9.2.1
9.2.2
Clean the Auger
Reset the Solar Charge Controller
10. Diagrams
10.1 Dimensions of the COSMIX M
10.2 Cow Dimensions
10.3 Connection Diagram
8-8
8-8
8-8
9-1
9-1
9-1
9-1
9-3
10-1
10-1
10-2
10-3
Glossary of Terms
D-I022.1004EN
Index
xiii
INTENTIONALLY BLANK
xiv
D-I022.1004EN
innovators in agriculture
innovators in agriculture
1. INTRODUCTION
The COSMIX Mobile Concentrate Feeder is a stand-alone feeding system
that supplies the correct amount of concentrates to each cow
individually, based on her built-up feed credit and a previously set total
amount.
An electronic tag on each cow enables the system to identify the cow via
an unique number.
The control system has information about each cow and adjusts the feed
amount based on this information.
The information in this manual is for farmers and technicians.
D-I022.1004EN
• Farmers use the information to operate and setup the COSMIX M.
• Technicians use the information to setup the COSMIX M.
Introduction
1-1
D-I022.1004EN
innovators in agriculture
INTENTIONALLY BLANK
1-2
Introduction
innovators in agriculture
2. SAFETY
2.1
Introduction
The safety alert symbol identifies important safety messages on your
COSMIX Mobile Concentrate Feeder and in the manual. When you see
this symbol, be alert to the possibility of personal injury or death. Follow
the instruction of the safety message.
Safety Alert Symbol
2.2
Signal Words
D-I022.1004EN
Note the use of the signal words DANGER, WARNING and CAUTION with
the safety messages. The signal word for each message uses the
following guidelines:
DANGER
Indicates an imminently hazardous situation that, if not
avoided, will result in death or serious injury.
WARNING
Indicates a potentially hazardous situation that, if not avoided, could
result in death or serious injury, and includes hazards that are exposed
when guards are removed.
CAUTION
Indicates a potentially hazardous situation that, if not avoided, may result in
minor or moderate injury or product or property damage.
Note:
Safety
This shows extra information that may help the reader.
2-1
innovators in agriculture
2.3
Safety Instructions
YOU are responsible for the SAFE operation and maintenance of your
concentrate feeder. YOU must make sure that you and anyone else who
is going to operate, maintain or work in the vicinity of the concentrate
feeder knows all the related SAFETY information in this manual.
YOU are the key to safety. Good safety practices protect you and the
people around you. Make these practices a working part of your safety
program. Make sure EVERYONE who operates, maintains or works near
the concentrate feeder obeys the safety precautions. Do not risk injury
or death by ignoring good safety practices.
2.3.1
General Safety
• Read and understand the manual and all safety signs before you
connect power supplies to operate, maintain or adjust the COSMIX
Mobile Concentrate Feeder
• Only trained persons are permitted to operate the COSMIX Mobile
Concentrate Feeder
• Install all protective covers and guards before you operate the
COSMIX Mobile Concentrate Feeder
• Wear the correct protective clothing and equipment
• Disconnect and isolate the electrical power supply before you clean
or do maintenance on the concentrate feeder
• Know the emergency medical center number for your area
• Contact your nearest Lely service provider if you have any questions
• Review safety related items with all operators frequently (annually)
• The maximum speed during transportation is 40 km/h (25 mph)
• The COSMIX Mobile Concentrate Feeder must only be transported by
a car or tractor, connected tot the towbar at the rear of the vehicle
2.3.2
Electrical Safety
• Replace any damaged electrical lines, conduits, switches and
components immediately
• Isolate the electrical power supply before you work on the electrical
system
2.3.3
Installation Safety
• Read and understand the instructions in this manual
• The concentrate feeder is not stable until it is correctly installed
• Make sure it is correctly supported at all times during movement and
installation
• Make sure the concentrate feeder is correctly installed.
2-2
Safety
D-I022.1004EN
• COSMIX M owners must train operators before they operate the
concentrate feeder. This training must be repeated at least annually
• The operator must read, understand and obey all safety and
operating instructions in the manual
• A person who has not read and understood all safety and operating
instructions is not permitted to operate the concentrate feeder
• Do not modify the equipment in any way. Unauthorized modification
may impair the function and/or safety and could affect the life of the
equipment, and persons
• Only use approved spare parts, and make sure they are only installed
by authorized technicians.
innovators in agriculture
2.3.4
Operating Safety
• Read and understand the applicable manual and all safety signs
before you connect power supplies to operate, maintain or adjust the
COSMIX Mobile Concentrate Feeder
• Only trained persons are permitted to operate the COSMIX Mobile
Concentrate Feeder
• Install all covers and guards before you operate the COSMIX Mobile
Concentrate Feeder
• Keep hands, feet, hair and clothing away from all moving parts
• Keep unauthorized persons, especially small children away from the
COSMIX Mobile Concentrate Feeder at all times
• Always be alert for unexpected movement of the cow. Cows can
transmit large forces to parts of the machine
• Contact your nearest Lely service provider if you have any questions
• Review safety related items with all operators frequently (annually)
D-I022.1004EN
2.3.5
Maintenance Safety
• Read and understand the applicable manual and all safety signs
before you connect power supplies to operate, maintain or adjust the
COSMIX Mobile Concentrate Feeder
• Only trained persons are permitted to maintain the COSMIX Mobile
Concentrate Feeder
• Disconnect and isolate the electrical power supply before you clean
or do maintenance on the COSMIX Mobile Concentrate Feeder
• Make sure all covers and guards are installed when maintenance
work is complete
2.4
Safety Decals
2.4.1
Safety Decal Messages
General safety messages appear in this safety messages section. Specific
safety messages are in applicable parts of this manual when potential
hazards may occur if the instructions or procedures are not followed.
Rotating Parts - Entanglement Hazard Symbol
WARNING
Safety
Danger of being entangled by rotating parts.
Keep hands, loose clothing, and long hair away from moving parts
during operation of the COSMIX M.
2-3
innovators in agriculture
Danger - Electrocution Hazard Symbol
Danger of electrocution. Keep hands away from all live parts when
you open the control box of the COSMIX M.
DANGER
Remove the connection cable (trailer connector cable) and
the safety cable (breakaway cable) before putting the
COSMIX Mobile Concentrate Feeder in operation.
DANGER
Maximum speed of the COSMIX M is 40 km/h (25 mph).
D-I022.1004EN
WARNING
2.4.2
2-4
Position of the Safety Decals
Decal
Position
Rotating Parts - Entanglement
Hazard
On both feed augers
Electrocution Hazard
On the door of the control box
Remove Cables
On the front support column
Maximum Speed
On the back canvas
Safety
innovators in agriculture
2.4.3
Maintenance of Safety Decals
Safety decals on the COSMIX Mobile Concentrate Feeder display
important and useful information that will help you safely operate and
maintain the COSMIX M.
Obey the instructions below to make sure all the decals stay in the
correct position and condition.
• Keep the safety decals clean and legible at all times. Clean the safety
decals with soap and water. Do not use mineral spirits, abrasive
cleaners or other similar agents that may damage the safety decals
• Replace safety decals that are missing or are illegible
• Safety decals can be purchased from your local Lely service provider.
D-I022.1004EN
2.4.4
Safety
Installation of Safety Decals
1.
Make sure the installation surface is clean and dry.
2.
Make sure the temperature of the mounting surface is not less than
5 °C (41 °F).
3.
Identify the correct position for the decal before you remove the
backing paper.
4.
Remove a small part of the backing paper.
5.
Put the decal in the correct position on the mounting surface and
carefully press the small part of exposed adhesive surface of the
decal onto the mounting surface.
6.
Slowly remove the backing paper and attach the rest of the decal
to the mounting surface.
7.
Puncture small air pockets in the decal with a pin and use the
backing paper to smooth the decal.
2-5
D-I022.1004EN
innovators in agriculture
INTENTIONALLY BLANK
2-6
Safety
innovators in agriculture
3. SPECIFICATIONS
3.1
Dimensions and Weight
•
•
•
•
•
3.2
Height: 230 cm (90.5 in)
Length: 405 cm (159.5 in)
Width: 285 cm (73 in)
Weight: approx. 665 kg (1466 lb)
Feed hopper capacity: 1400 l (369 gal)
Batteries
• No. of batteries: 2
• Type: CPC110 (gel)
• Voltage and capacity: 12 VDC, 110 Ah
Batteries are connected in series to make 24 VDC
3.3
Speed
D-I022.1004EN
• Maximum speed: 40 km/h (25 mph)
Specifications
3-1
D-I022.1004EN
innovators in agriculture
INTENTIONALLY BLANK
3-2
Specifications
innovators in agriculture
4. DESCRIPTION AND OPERATION
4.1
Introduction
The COSMIX M supplies exact portions of concentrates to the visiting
cows up to a calculated total. The information about the portion size is
stored in the control system. The control system calculates, for each cow,
the feed credit based the previously supplied amount and the allowed
total consumption.
Each cow can be assigned to a group with set feeding characteristics.
The cow is identified by the ISO identification system. The ISO
identification system has a MIMI antenna to identify FDX and/or HDX
ear tags.
The COSMIX M is installed in the field.
The COSMIX M has the following main parts:
D-I022.1004EN
•
•
•
•
•
•
Trailer wagon
Feeding station for two cows
Fencing
Control unit with E-Link manual controller
Power system
Cow detection system.
The COSMIX M is not connected to a data network.
4.2
Component Description
4.2.1
Trailer Wagon
The feeding station is built upon a trailer wagon. The trailer wagon is
suited for driving behind a car or a tractor, on the field or on the public
road.
The trailer wagon has:
•
•
•
•
•
•
•
•
•
•
•
Description and Operation
Frame
Wheels (2×)
Draw bar with coupling
Support columns (1× front, 2× rear)
Crank to lift the front support column
Rear lights, brake lights and turn signal
Trailer connector cable (connection cable)
Breakaway cable (safety cable)
Top canvas
Side canvas (2×)
Back canvas.
4-1
Figure 1. Trailer wagon
KEY:
1. Top canvas - 2. Side canvas - 3. Rear lights, brake lights and turn signal - 4. Rear support
column - 5. Frame - 6. Front support column - 7. Trailer connection cable - 8. Breakaway
cable - 9. Draw bar with coupling - 10. Crank
4-2
Description and Operation
D-I022.1004EN
innovators in agriculture
innovators in agriculture
4.2.2
Feeding Station
There are two feeding stations to feed two cows simultaneously. The
feedings stations are built upon the trailer wagon and have the
following parts:
• Feed hopper
• Dosing unit (2×), each with:
• Auger
• Auger motor with encoder.
• Feed bin (2×)
• Load cell sensor (2×).
The auger motor gets inputs from the multiboard pcb (fig. 18, page 103).
D-I022.1004EN
The auger motor encoder sends outputs to the multiboard pcb. The load
cell sensors send outputs to the multiboard pcb.
Figure 2. Feeding station (without covering)
KEY:
1. Feed hopper - 2. Feed bin 1 - 3. Feed bin 2 - 4. Auger 1 - 5. Auger 2
Description and Operation
4-3
innovators in agriculture
4.2.3
Fencing
The fences must make sure that the eating cows are not disturbed by
other cows.
The COSMIX M has the following fences:
•
•
•
•
Middle fence, to separate the two parts of the feeding station
Side fence (2×), to enclose the cow on the side
Sub fence (2×), to enlarge the side fence (long cows)
Upper bracket (2×), to keep the fencing in position.
D-I022.1004EN
The distance between the side fences and the middle fence must be
adjusted to the width of the cows. The length of the side fence,
together with the sub fences must be adjusted to the length of the cow.
Figure 3. Fencing (without side canvas)
KEY:
1. Sub fence - 2. Top fence - 3. Side fence - 4. Setting positions for side fence - 5. Middle
fence
4-4
Description and Operation
innovators in agriculture
4.2.4
Power System
The power system generates, stores and distributes the electrical power
for the driving mechanism, the control system and the feed system. It
has the following primary parts:
•
•
•
•
Solar panel
Solar charge controller
Battery (2×)
Fuse.
The solar panel is on top of the COSMIX M, the solar charging controller
and the fuse are in the control unit and the two batteries are installed
on the frame of the trailer wagon, each on a side.
D-I022.1004EN
The power system sends output to the multiboard pcb.
Figure 4. Power system
KEY:
1. Solar panel - 2. Control box with solar charge controller - 3. Battery (one out of two)
Description and Operation
4-5
innovators in agriculture
4.2.5
Cow detection System
The cow detection system detects and identifies cows that enter the
feeding station. It has the following parts:
• Photoelectric sensors to detect a cow
• The ISO identification system to identify a cow.
4.2.5.1
Photoelectric Sensor
Both feeding stations have a photoelectric sensor to detect a visiting
cow (fig. 5, page 4-7). The sensors are installed on the top frame of each
feeding station (fig. 5, page 4-7).
The photoelectric sensors have a housing that contains an emitting
element (infrared LED) and a receiving element (photodiode).
The detection distance can be adjusted to the dimensions of the herd
and must be set well above ground level to avoid detecting other
animals or objects.
The photoelectric sensor gets input when a cow is in the COSMIX M.
The photoelectric sensor sends output to the multiboard pcb.
4.2.5.2
ISO Identification System
• The HDX or FDX ear tag
• The MIMI antenna.
The ear tag is installed in the right ear of the cow.
The MIMI antenna is in a sealed plastic box that is installed on the side
frame near the feed bin. The data cable of the antenna is connected to
the multiboard pcb.
4-6
Description and Operation
D-I022.1004EN
The ISO identification system has two components:
D-I022.1004EN
innovators in agriculture
Figure 5. Cow detection system
KEY:
1. Photoelectric sensor 2 - 2. Photoelectric sensor 1 - 3. ID-reader 1 - 4. ID-reader 2
4.2.6
Control Unit
The control unit controls the supply of feed and the power supply.
It is installed in the control box on the left side of the COSMIX M and
has the following parts:
• Multiboard pcb
• Solar charge controller.
The control software together with the local database on the
multiboard pcb control the supply of feed.
The solar charge controller controls the loading process of the batteries.
The multiboard gets input from:
•
•
•
•
•
•
Description and Operation
E-Link manual controller
Cow Identification readers
Photoelectric sensors (page 4-6)
Encoder auger motors (page 4-3)
Load cell sensors (page 4-3)
Solar charge controller (page 4-5)
4-7
innovators in agriculture
• Laptop (only for service).
The multiboard sends output to:
•
•
•
•
E-Link manual controller
Photoelectric sensors
Auger motors
Laptop (only for service).
The solar charge controller gets input from:
• Solar panels
• Batteries.
The solar charge controller sends output to:
D-I022.1004EN
• Multiboard pcb
• Batteries.
Figure 6. Control unit with E-Link manual controller
KEY:
1. E-Link manual controller - 2. Multiboard pcb - 3. Solar charge controller
4-8
Description and Operation
innovators in agriculture
4.2.7
The E-Link Manual Controller
The E-Link Manual Controller controls and monitors the COSMIX M and
communicates with the management software.
The E-link Manual Controller has an LCD display and nine buttons that
enable the user to give commands and change values in the COSMIX M.
The LCD display also shows reports and alarms.
The connector of the E-Link Manual Controller is connected to the left
side of the multiboard PCB box.
The E-Link has the following buttons:
D-I022.1004EN
• Button (1) confirms the action on the LCD display above the
applicable button
• Button (2) starts or stops an action
• Button (3) opens the selected function or the next menu screen
• Button (4) returns to the previous screen
• Button (5) moves the selector down one item, decreases a value by
one or confirms a command
• Button (6) moves the selector up one item, increases a value by one
or confirms a command.
The E-Link Manual Controller
Description and Operation
4-9
innovators in agriculture
4.3
E-Link Software User Interface
The table shows the menu structure of the E-Link software user
interface.
Menu level 1
Feed settings
Menu level 2
> Group 1
Menu level 3
>
Menu level 4
Feeding
>
gr/day: %d
Max credit: %d
Ent credit: %d
:
Group 8
Working
Move/Remove cows
>
TAG
COW GR
Set cow name
>
TAG
COW GR
>
Return
>
Cow Gr Cons Time
Low consumption
>
Cow Gr Last24 hr
Group 24 hr report
>
Group 1 - 8
>
Test auger 1
+, -, Stop
Test auger 2
+, -, Stop
> Tag id
Weight
Credit
Last day
Reports
> Last visit
D-I022.1004EN
Supplied
Attentions
Testing
> Motors
Sensors
>
Load cell
Identification
photocell
Enc Augers
Encoder 1
Encoder 2
Battery: <
Reset/Clear DB
>
>
Reset print
Clear data base
Clear feed amount
4-10
Description and Operation
innovators in agriculture
Settings
> Dispensing
>
Portion / Rev. 1
Portion / Rev. 2
Refill level 1
Refill level 2
Food bin
>
Load cell 1
>
Turn off
Calibration
Load cell 2
>
Turn off
Calibration
Antenna 1
Antenna 2
Power level
Squelch level
Attentions
Configuration
>
Clock
Network
D-I022.1004EN
Language
Software version
4.3.1
Feed Settings
The submenu 'Feed settings' is used to set per group (1 - 8):
• Dose per day (page 8-5)
• Maximum credit (page 8-6)
• Entrance credit (page 8-6).
Dose per day
For each group a dose per day must be set (0 - 999 gr, 0 - 2.2 lb). This
setting applies to all cows in the group. The dose per day is released step
by step and added to the feed credit of each cow individually.
Maximum credit
If a cow does not consume her feed credit during a day, the rest is added
to the credit for the following day, up to a maximum. The maximum
credit must be set per group.
Entrance credit
The COSMIX M only supplies feed when the feed credit for a cow is
more than the the entrance credit. The reason for this is to discourage
cows to visit the COSMIX M too often.
Properly set feed settings make sure that each cow can eat her feed dose
whenever she wants. The entrance credit limits the number of visits and
thus the accessibility for non-dominant cows.
Description and Operation
4-11
innovators in agriculture
The submenu is also used to:
• Move cows to another group (page 8-6)
• Remove cows from the database (page 8-7)
• Set a cow name (page 8-7).
Cows that did not visit the COSMIX M before, and that are identified as
a new cow with the correct identification, are added to group 8.
Therefore they are fed according to the 'Feed settings' of group 8. You
can move the cow to another group, if needed.
Cows that are no in the herd can be removed from the database.
A cow is identified on her 'Tag id' and the cow information is displayed
accordingly. You can set for each cow a name that is easier to identify,
for example the last three digits of the 'Tag id'.
4.3.2
Working
The submenu 'Working' displays the actual status of identified cows in
both feed stations:
4.3.3
Tag id
Weight of the feed
Feed credit
Consumed feed in the last day (in kg)
Supplied feed (in kg).
Reports
The submenu 'Reports' is used to display the following reports:
• 'Last visit' lists details of the last visits:
• Cow name
• Group number
• Consumed quantity
• Time.
This report can be used to list per cow the consumed feed quantity and
the time of the last visit.
• 'Low consumption' lists all low consuming cows:
• Cow name
• Group number
• Consumed quantity in the last 24 hours.
This report gives an overview of all cows that did not eat their feed dose
during the last day.
• 'Cow consumption' list per group
• Cow name
• Average consumed quantity
• Days.
• 'Group 24 hr report' list per group for the last 24 hours:
• Cow name
• Consumed quantity
• Number of visits.
• 'Attentions'
• Type of the attention
• Name of the attention
• Time the attention first occurred.
4-12
Description and Operation
D-I022.1004EN
•
•
•
•
•
innovators in agriculture
The list can be cleared with button [Clear list].
4.3.4
Testing
The menu 'Testing' is used to:
• Test the auger motors (page 8-7)
• Test the following sensors:
• Load cell, this procedure must be done after the COSMIX M has
been transported (page 8-8)
• Identification, this procedure must be done during installation
or troubleshouting (page 8-8)
• photocell, this procedure must be done during installation or
troubleshouting (page 8-8)
• Encoder auger motors, this procedure must be done during
installation or troubleshouting.
• Reset or clear:
• Reset print
• Clear data base
• Clear the feed amount.
The reset and clear procedures are only done during troubleshooting.
4.3.5
Settings
The menu 'Settings' is used to:
D-I022.1004EN
•
•
•
•
•
•
•
Set the portions sizes and refill levels (page 8-2)
Set the weighing system (page 8-3)
Set the weighing unit ON or OFF (page 8-3)
Set the displayed attentions
Set the identification system (page 8-4)
Set the internal clock and the display language (page 8-5, page 8-5)
Display the software version (page 8-1).
Settings are done during installation. It can be necessary to adjust
settings when for example the feed type is changed, the herd is changed
or the COSMIX M is transported.
4.4
Operation
4.4.1
Cow Identification
A cow enters the COSMIX M and stands in front of the feed bin. The
photocell above the cow detects her presence and the antenna in the ID
reader reads the tag of the cow. The ID reader sends the data of the tag
to the control unit.
If the cow is known, that means if her tag number is in the database, the
feeding process starts. If the cow is not known, the feed station supplies
portions of feed based on the settings of the default group 8. The tag
number is stored in the default group 8.
As long as the cow is in the feed station, the photocell detects her
presence. This makes sure the feeding process is continued if the IDdetection signal is interrupted.
4.4.2
Feeding Process
Description and Operation
4-13
innovators in agriculture
Start of visit
Feeding starts when:
• the cow is identified
• the maximum credit is more than the entrance credit.
If these conditions are met, the feed dosing unit supplies portions of
feed sized the refill level plus an extra portion.
The load cell measures the amount of feed in the feed bin. If the
amount drops below the refill level, and the maximum credit is not
reached, the COSMIX M supplies an extra portion.
End of visit
The supply of feed continues until:
• the cow left the feeding station
• the maximum credit is reached.
D-I022.1004EN
At the end of the visit, the amount eaten is stored in the database.
Leftovers are added to the feed portion of the next visiting cow.
4-14
Description and Operation
innovators in agriculture
5. INSTALLATION
5.1
Introduction
The installation process of the COSMIX M has the following phases:
•
•
•
•
Prepare the installation
Install the COSMIX M
Connect the COSMIX M
Setup the software.
5.2
Assemblage
5.2.1
List of Supplied Parts
D-I022.1004EN
The COSMIX M and the accessory package must contain the parts listed
below. Make sure all these items are present before you start the
installation. If items are missing, contact your local Lely service provider.
•
•
•
•
•
•
5.2.2
COSMIX M vehicle
E-Link manual controller
Trailer connector cable (connection cable)
Breakaway cable (safety cable)
Operator manual
Operating instructions Solar Charge Controller (in the control box).
Assemble and test the COSMIX M
1.
Assemble the COSMIX M, refer to the assembly instructions (FM001.1001VT).
2.
Make sure the battery selection jumpers in the solar charge
controller are set to 'Gel' (refer to the manual "Operating
instructions, Solar Charge Controller").
3.
Make sure the pink colored wires to the two ID-readers are
connected with each other (fig. 6, page 4-8).
4.
Make sure the gray colored wires to the two ID-readers are
connected with each other.
5.
Test the photocells (page 8-8).
6.
Set the ID-sensors (page 8-4).
7.
Test the ID-sensors (page 8-8).
8.
Calibrate the load cell sensors (page 8-3).
9.
Test the load cell sensors (page 8-8).
10. If the test results are not correct, repeat steps 8 and 9.
11. Test the auger motors (page 8-7)
12. Make sure the rear lights, brake lights and turn signals function
correctly.
Installation
5-1
innovators in agriculture
5.3
Preparation
5.3.1
Preparation by the Owner
Before the installation can be done, same tasks must be done by the
owner of the COSMIX M with support from the Lely service provider.
Example tasks are:
• Make sure all cows have an FDX or HDX tag in the right ear
• Read and understand the COSMIX M user manual.
Transport the COSMIX M
CAUTION
Do not lift the draw bar by hand.
1.
Use the front support column crank (4, fig. 7, page 5-3) to raise the
coupling (2) above the towbar ball (1).
2.
Make sure the coupling is in the correct position above the towbar
bal.
3.
Lower the coupling on the towbar bal.
4.
Fully raise the front support column (5) with the front support
column crank (4).
5.
Connect the breakaway cable (3) to both the car or tractor and the
COSMIX M.
6.
Connect the trailer connector cable to the connectors on both the
COSMIX M and the car or tractor (6).
7.
Make sure the rear lights, brake lights and turn signal function
correctly.
8.
Adjust the solar panel (1, fig. 8, page 5-4) to the transport position
(approximately horizontal).
9.
Make sure the handle (2) is fully tightened.
10. Set the fences in the smallest position (fig. 10, page 5-6).
DANGER
Maximum speed of the COSMIX M is 40 km/h (25 mph).
CAUTION
Only transport the COSMIX M connected to a towbar on the rear side of a car
or tractor.
11. Transport the COSMIX M to a position where the solar panel will
receive maximum sunlight.
5-2
Installation
D-I022.1004EN
5.3.2
D-I022.1004EN
innovators in agriculture
Figure 7. Prepare the COSMIX M for transport
5.4
Install the Cosmix
DANGER
Remove the connection cable (trailer connector cable) and
the safety cable (breakaway cable) before putting the
COSMIX Mobile Concentrate Feeder in operation.
CAUTION
Wear safety shoes.
Installation
1.
Make sure the solar panel is in the direction of the sun (at 12:00).
2.
Remove the cables (3, fig. 7, page 5-3) and (6) from both the car or
tractor and the COSMIX M and store them in a safe place.
3.
Use the front support column crank (4, fig. 7, page 5-3) to raise the
coupling (2) above the towbar ball (1).
4.
Lower both rear support columns to the ground.
5.
Make sure the COSMIX M is level, adjust the columns if necessary.
5-3
innovators in agriculture
6.
Raise the front support column approximately 1 cm (0.4 in) with the
crank (4).
7.
Lower both rear support columns to the ground.
8.
Fully lower the front support column with the crank (4).
9.
Make sure the columns are firmly standing on the ground, adjust
them if necessary.
10. Make sure the columns are fully tightened.
11. Adjust the position of the solar panel to 60 degrees (page 8-1).
12. Make sure the cow sizes in the herd are as equal as possible.
13. Fold out the fences to the correct position for the herd (fig. 9, page
5-5):
1. Make sure the width is correct.
2.
Attach both side fences to the frame (fig. 10, page 5-6).
14. Make sure the length is correct (fig. 9, page 5-5):
1. Fold back the sub fence for small cows.
Fold out the sub fence for big cows.
3.
Tighten the bolts to secure the sub fence.
D-I022.1004EN
2.
Figure 8. Adjust the solar panel
5-4
Installation
D-I022.1004EN
innovators in agriculture
Figure 9. Minimum and maximum cow dimensions
Installation
5-5
D-I022.1004EN
innovators in agriculture
Figure 10. Adjust the fences
5.5
5-6
Setup the COSMIX M
1.
Calibrate the load cell sensors (page 8-3).
2.
Test the load cell sensors (page 8-8).
3.
If the test results are not correct, repeat steps 1 and 2.
4.
Set the portion size for each feed station (page 8-4).
Installation
innovators in agriculture
6. OPERATING INSTRUCTIONS
6.1
Take the COSMIX M out of Operation
Note:
1.
Open the left side canvas.
2.
Open the control box.
3.
Push the right button (fig. 11, page 6-1) on the solar charge
controller.
The power supply to the multiboard pcb is interrupted, the battery charge
process continues.
4.
Put the COSMIX M in Operation
D-I022.1004EN
6.2
Close the left side canvas.
1.
Open the left side canvas.
2.
Open the control box.
3.
Push the right button (fig. 11, page 6-1) on the solar charge
controller.
4.
If the display on the solar charge controller indicates an error, reset
the power system (page 9-3).
Figure 11. Take the COSMIX M out of operation
Operating Instructions
6-1
innovators in agriculture
Fill the Feed Hopper
1.
Remove the top canvas (fig. 12, page 6-2).
2.
Fill the feed hopper with concentrates.
3.
Install the top canvas.
4.
If the feed type or humidity is different from before set the portion
size (page 8-4).
D-I022.1004EN
6.3
Figure 12. Remove the top canvas
6.4
Get the E-Link Manual Controller
Note:
6-2
1.
Open the side canvas on the left side.
2.
Get the E-Link Manual Controller.
3.
Push [ESC] or [
] to wake up the E-Link.
The E-Link Manual Controller automatically goes into sleep mode when it is
not used for 10 minutes.
Operating Instructions
innovators in agriculture
6.5
6.6
6.7
6.9
1.
Get the E-Link Manual Controller (page 6-2).
2.
In the main menu, select 'Working' and push button [
].
List Details about the last Visits
1.
Get the E-Link Manual Controller (page 6-2).
2.
In the main menu, select 'Reports' and push button [
3.
Select 'Last visit' and push button [
].
].
List Details about Cows with low Consumption
1.
Get the E-Link Manual Controller (page 6-2).
2.
In the main menu, select 'Reports' and push button [
3.
Select 'Low consumption' and push button [
].
].
List Details per Group about the last 24 Hours
D-I022.1004EN
6.8
Display the actual Status
1.
Get the E-Link Manual Controller (page 6-2).
2.
In the main menu, select 'Reports' and push button [
3.
Select 'Group 24 hr report' and push button [
4.
Select the group to report about and push button [
].
].
].
List Attentions
Operating Instructions
1.
Get the E-Link Manual Controller (page 6-2).
2.
In the main menu, select 'Reports' and push button [
3.
Select 'Attentions' and push button [
].
].
6-3
D-I022.1004EN
innovators in agriculture
INTENTIONALLY BLANK
6-4
Operating Instructions
innovators in agriculture
7. MAINTENANCE
D-I022.1004EN
This section will be included at a later date.
Maintenance
7-1
D-I022.1004EN
innovators in agriculture
INTENTIONALLY BLANK
7-2
Maintenance
innovators in agriculture
8. TEST AND ADJUSTMENT
8.1
Introduction
This chapter contains the following test and adjustment procedures for
the COSMIX Mobile Concentrate Feeder:
•
•
•
•
•
D-I022.1004EN
8.2
Display the software version
Adjust the COSMIX M
Make basic software settings
Make feeding settings
Test the operation of the COSMIX M.
Display the Software Version
1.
Get the E-Link Manual Controller (page 6-2).
2.
In the main menu, select 'Settings' and push button [
3.
Select 'Software version' and push button [
8.3
Adjust the COSMIX M
8.3.1
Adjust the Position of the Solar Panel
8.3.2
].
].
1.
Loosen the handles (2, fig. 8, page 5-4) of the mechanism that
keeps the solar panel in its position.
2.
Turn the solar panel (1) until the angle with the ground is
approximately 60 degrees.
3.
Fully tighten the two handles.
4.
Make sure the solar panel in a position to receive maximum solar
light.
Adjust the Detection Distance from the Photoelectric Sensors
Test and Adjustment
1.
Remove the bracket that attaches the photoelectric sensor to the
frame.
2.
Turn the set screw:
• Clockwise to enlarge the detection distance (nearer to the
ground)
• Counterclockwise to lower the detection distance (further away
from the ground).
3.
Install the bracket with the photoelectric sensor on the frame.
8-1
D-I022.1004EN
innovators in agriculture
Figure 13. Adjust the detection distance from the photoelectric sensor
8.4
Make Basic Software Settings
8.4.1
Adjust the Refill Level of the Feed Bin
Note:
8-2
Find out the best refill level. If it is too high, dominant cows will be
encouraged push away the eating cow to steal rest food. If it is too low, the
feeding time will be long.
1.
Get the E-Link Manual Controller (page 6-2).
2.
In the main menu, select 'Settings ' and push button [
3.
Select 'Dispensing' and push button [
4.
Select 'Refill level 1' for feed bin 1 or 'Refill level 2' for feed bin 2
and push button [
].
5.
Use soft buttons [>>] or [<<] to select the next or previous item.
6.
Use buttons [
] or [
].
].
] to change the value.
Test and Adjustment
innovators in agriculture
8.4.2
7.
Push soft button [OK] to confirm.
8.
Push button [ESC] to go up one level.
Calibrate the Load Cell Sensors
1.
Get the E-Link Manual Controller (page 6-2).
2.
In the main menu, select 'Settings ' and push button [
3.
Select 'Food bin' and push button [
4.
Select 'Load cell 1' and push button [
5.
Select 'Calibration'
6.
Make sure both feed bins are empty.
7.
In the menu 'CALIBRATE BIN' push soft button [Next].
8.
Put a known weight (approximately 1 kg (2.2 lb)) in feed bin 1.
9.
Adjust the field 'Weight' to the known weight:
1. Select the position you want to change with button [>>].
].
].
2.
Use buttons [
3.
Push soft button [OK] to confirm.
] or [
].
] to change the value.
D-I022.1004EN
10. Push button [ESC] to go up one level.
11. Select 'Load cell 2' and push button [
].
12. Repeat steps 4 to 9 for feed bin 2.
8.4.3
Set the Weighing Unit ON or OFF
1.
Get the E-Link Manual Controller (page 6-2).
2.
In the main menu, select 'Settings ' and push button [
3.
Select 'Food bin' and push button [
].
].
Set the load cell ON of OFF
1.
Select 'Load cell 1' for feed bin 1 or 'Load cell 2' for feed bin 2 and
push button [
].
2.
Use soft buttons [>>] or [<<] to select the feed bin and push button
[
].
3.
Use soft buttons [>>] or [<<] to select the next or previous item.
4.
Use buttons [
5.
Push soft button [OK] to confirm.
] or [
] to change the value.
Set the feed speed
Note:
The default value of the feed speed is 50 gr/min.
1.
Test and Adjustment
Use soft buttons [>>] or [<<] to select the next or previous item.
8-3
innovators in agriculture
Use buttons [
] or [
] to change the value.
3.
Push soft button [OK] to confirm.
4.
Push button [ESC] to go up one level.
Set the Antennas
WARNING
Danger of electrocution. Keep hands away from all live parts when
you open the control box of the COSMIX M.
1.
Open the control box.
2.
Remove the connectors from the joined connector to CON401 on
the multiboard pcb (page 10-3).
3.
Find the connector to feed bin 1 and feed bin 2.
4.
Get the E-Link Manual Controller (page 6-2).
5.
In the main menu, select 'Settings ' and push button [
6.
Select 'Food bin' and push [
7.
Select 'Antenna 1' and push [
8.
Select soft button [START].
9.
Connect the connector to feed bin 1 to the joined connector to
CON401.
].
].
].
10. Wait until the E-Link display displays the text "ID ready".
11. Push button [ESC] to go up one level.
12. Disconnect the connect to feed bin 1 from the joined connector to
CON401.
13. Select 'Antenna 2' and push button [
].
14. Select soft button [START].
15. Connect the connector to feed bin 2 to the joined connector to
CON401.
16. Wait until the E-Link display displays the text "ID ready".
17. [ESC] to go to the previous menu
18. Connect the connector to feed bin 1 to the joined connector to
CON401.
19. Close the control box.
20. Test the ID-sensors (page 8-8).
8.4.5
8-4
Set the Portion Size
1.
Get the E-Link Manual Controller (page 6-2).
2.
In the main menu, select 'Settings ' and push button [
3.
Select 'Dispensing' and push button [
].
].
Test and Adjustment
D-I022.1004EN
8.4.4
2.
innovators in agriculture
Calculate the supplied portion
1.
Select 'Portions/Rev. 1' for feed bin 1 or 'Portions/Rev. 2' for feed
bin 2 and push button [
].
2.
In the menu 'FOOD PORTION' push button [START].
3.
Wait until the counter displays 10.
4.
Weigh the supplied feed with a balance.
5.
Calculate the portion size (weighted amount / 10).
Set the portion size
8.4.7
Push button [SET].
2.
Use soft buttons [>>] or [<<] to select the next or previous item.
3.
Use buttons [
4.
Push soft button [OK] to confirm.
5.
Push button [ESC] to go up one level.
1.
Get the E-Link Manual Controller (page 6-2).
2.
In the main menu, select 'Settings ' and push button [
3.
Select 'Clock' and push button [
4.
Use soft buttons [>>] or [<<] to select the next or previous item.
5.
Use buttons [
6.
Push soft button [OK] to confirm.
After a few seconds you return to the menu 'Settings '.
] or [
] to change the value.
Set the Time
D-I022.1004EN
8.4.6
1.
] or [
].
].
] to change the value.
Set the Display Language
1.
Get the E-Link Manual Controller (page 6-2).
2.
In the main menu, select 'Settings ' and push button [
3.
Select 'Language' and push button [
4.
Use buttons [
5.
Push soft button [OK] to confirm.
After a few seconds you return to the menu 'Settings '.
8.5
Make Feeding Settings
8.5.1
Set the Feed Dose per Day
Test and Adjustment
] or [
].
].
] to change the value.
1.
Get the E-Link Manual Controller (page 6-2).
2.
In the main menu, select 'Feed settings' and push button [
3.
Select 'Feeding' and push button [
].
].
8-5
innovators in agriculture
8.5.3
8.5.4
] or [
5.
Use soft buttons [>>] or [<<] to select the next or previous item.
6.
Use buttons [
7.
Push soft button [OK] to confirm.
] or [
] to select 'gr/day: %d' and push button
] to change the value.
Set the Maximum Credit
1.
Get the E-Link Manual Controller (page 6-2).
2.
In the main menu, select 'Feed settings' and push button [
3.
Select 'Feeding' and push button [
4.
Push buttons [
button [
].
5.
Use soft buttons [>>] or [<<] to select the next or previous item.
6.
Use buttons [
7.
Push soft button [OK] to confirm.
] or [
] or [
].
].
] to select 'Max credit: %d' and push
] to change the value.
Set the Entrance Credit
1.
Get the E-Link Manual Controller (page 6-2).
2.
In the main menu, select 'Feed settings' and push button [
3.
Select 'Feeding' and push button [
4.
Push buttons [
button [
].
5.
Use soft buttons [>>] or [<<] to select the next or previous item.
6.
Use buttons [
7.
Push soft button [OK] to confirm.
] or [
] or [
].
].
] to select 'Ent credit: %d' and push
] to change the value.
Move a Cow to another Group
Note:
8-6
Push buttons [
[
].
New identified cows are default put in group 8.
1.
Get the E-Link Manual Controller (page 6-2).
2.
In the main menu, select 'Feed settings' and push button [
3.
Select the group the cow is in and push button [
4.
Push buttons [
].
] or [
] to select the cow and push button [
5.
Push buttons [
button [
].
] or [
] to select the new group and push
6.
Push button [ESC] to go up one level.
].
].
Test and Adjustment
D-I022.1004EN
8.5.2
4.
innovators in agriculture
8.5.5
D-I022.1004EN
8.5.6
Remove a Cow from the Database
1.
Get the E-Link Manual Controller (page 6-2).
2.
In the main menu, select 'Feed settings' and push button [
3.
Select the group the cow is in and push button [
4.
Select 'REMOVE COW !!!'.
5.
Push soft button [OK] to confirm.
6.
Push button [ESC] to go up one level.
].
].
Set a Cow Name
1.
Get the E-Link Manual Controller (page 6-2).
2.
In the main menu, select 'Feed settings' and push button [
3.
Select the group the cow is in and push button [
4.
Push buttons [
].
5.
Use soft buttons [>>] or [<<] to select the next or previous item.
6.
Use buttons [
7.
Push soft button [OK] to confirm.
] or [
] or [
] to change the value.
Test the Operation of the COSMIX M
8.6.1
Test the Auger Motors
Test and Adjustment
].
] to select the cow and push button [
8.6
WARNING
].
Danger of being entangled by rotating parts.
Keep hands, loose clothing, and long hair away from moving parts
during operation of the COSMIX M.
1.
Get the E-Link Manual Controller (page 6-2).
2.
In the main menu, select 'Testing' and push button [
3.
Select 'Motors' and push button [
4.
Select 'Test auger 1' and push button [
5.
Push soft button [+].
6.
Make sure the auger motor turns.
7.
If the auger motor does not turn:
1. Push button [-] and immediately after that button [Stop].
].
].
].
2.
Repeat steps 4 to 6.
3.
If the auger motor does not turn, clean the auger (page 9-1).
8.
Select 'Test auger 2' and push button [
9.
Repeat steps 4 to 6.
].
8-7
innovators in agriculture
8.6.2
Test the Load Cell Sensors
1.
Get the E-Link Manual Controller (page 6-2).
2.
In the main menu, select 'Testing' and push button [
3.
Select 'Sensors' and push button [
4.
Select 'Load cell' and push button [
5.
Make sure both feed bins are empty.
6.
Make sure the E-Link indicates for both feed bins 0 gr.
7.
Put a known weight in one of the feed bins.
8.
Make sure the E-Link indicates the known weight.
9.
Repeat steps 6 and 7 for the other feed bin.
].
].
].
10. If the test fails, calibrate the load cell sensors (page 8-3).
Test the Photoelectric Sensors
Note:
1.
Get the E-Link Manual Controller (page 6-2).
2.
In the main menu, select 'Testing' and push button [
3.
Select 'Sensors' and push button [
4.
Select 'photocell' and push button [
5.
Make sure the displayed value for both photocells is 0.
6.
Put a sheet of paper under the left photocell (sensor 2) at a
distance of approximately 10 cm (4 in).
7.
Make sure the displayed value for sensor 2 is '1'.
8.
Move the sheet of paper down.
1. Make sure the displayed value for sensor 2 changes to '0',
approximately 50 - 80 cm (20 - 31 in) above the ground.
].
].
].
The photoelectric sensor detects objects that are approximately 50 - 80 cm
(20 - 31 in) and more above ground level.
9.
If the value does not change to 0 within a distance of
approximately 50 - 80 cm (20 - 31 in) above the ground, adjust the
distance (page 8-1).
10. Repeat the procedure for the right photocell (sensor 1).
8.6.4
8-8
Test the ID-Sensors
1.
Get the E-Link Manual Controller (page 6-2).
2.
In the main menu, select 'Testing' and push button [
3.
Select 'Sensors' and push button [
4.
Select 'Identification' and push button [
5.
Make sure the E-Link displays "No cow" and "No Tag" for both ID1
and ID2.
].
].
].
Test and Adjustment
D-I022.1004EN
8.6.3
innovators in agriculture
6.
Put an object under both photocells and keep them there.
7.
Put an ID-tag next to feed bin 2.
8.
Make sure ID2 displays a Tag id while 'COW' = 1.
9.
If ID2 displays no Tag id, set the antennas (page 8-4).
10. Remove the ID-tag.
11. Make sure the values for 'COW' and 'TAG' do not change.
12. Put the same ID-tag next to feed bin 1.
13. Make sure the E-Link displays "No Cow" and "No TAG" for ID 1.
14. Put a different ID-tag next to feed bin 1.
15. Make sure ID2 displays a Tag id while 'COW' = 1.
16. Remove the ID-tag.
17. Make sure the values for 'COW' and 'TAG' do not change.
18. Remove both objects that activate the photocells.
D-I022.1004EN
19. Make sure the E-Link displays "No cow" and "No Tag" for both ID1
and ID2.
Test and Adjustment
8-9
D-I022.1004EN
innovators in agriculture
INTENTIONALLY BLANK
8-10
Test and Adjustment
innovators in agriculture
9. TROUBLESHOOTING
9.1
Troubleshooting Table
Symptom
Possible Cause
Solution
The auger motor does not
turn.
The auger is blocked,
probably due to dirty or
moist feed.
1.
2.
The feed is delivered too
fast.
The cow recognition and
Call your local Lely service provider.
feed delivery starts when the
cow is away from the feed
unit.
The solar charge controller
indicates a power failure.
The power supply to the
batteries has been
interrupted.
Reset the power system (page 9-3).
The solar charge controller
indicates that the battery
voltage is too low (E07).
•
•
•
D-I022.1004EN
Not enough sun.
Weak battery.
•
•
9.2
Recovery Procedures
9.2.1
Clean the Auger
WARNING
Troubleshooting
Test the auger (page 8-7).
If the auger motor does not run,
clean the auger (page 9-1).
Make sure the solar panel faces the
sun.
Charge both batteries with a battery
charger that is suitable for charging
gel batteries.
Make sure both batteries have the
same voltage. If the voltage of one of
the batteries is lower than the other,
replace both batteries with similar
batteries from the same production
series.
Danger of being entangled by rotating parts.
Keep hands, loose clothing, and long hair away from moving parts
during operation of the COSMIX M.
1.
Remove the two wing nuts (1, fig. 14, page 9-2) and washers that
attaches the latch to the auger housing.
2.
Rotate the latch 180 degrees (2) and slide it into the slot (3) in the
feed supply pipe.
3.
Remove the six nuts and washers (fig. 15, page 9-3) that attach the
covering of the auger to the auger housing.
4.
Remove any dirt from the auger.
5.
Install the covering of the auger with the six nuts and washers.
6.
Install the latch with the wing nuts and washers.
9-1
D-I022.1004EN
innovators in agriculture
Figure 14. Clean the auger
9-2
Troubleshooting
D-I022.1004EN
innovators in agriculture
Figure 15. Remove/install the auger cover
9.2.2
Reset the Solar Charge Controller
Note:
WARNING
A reset is necessary when the power supply from the batteries has been
interrupted.
1.
Cover the solar panel with a cloth.
2.
Disconnect the connector from the E-Link manual controller from
the control box.
The solar module produces electricity when exposed to light. Cover all
modules in the solar panel with opaque material before making any
wiring connections or opening the control box.
3.
Troubleshooting
Open the control box.
9-3
innovators in agriculture
4.
Remove jumper CON201 from the multiboard pcb.
5.
Disconnect one of the cables to the solar panel on the left side of
the solar charge controller.
6.
Insulate the copper wire with insulation tape.
7.
Disconnect the fuse.
8.
Connect the fuse.
9.
Remove the insulation tape from the cable to the solar panel.
10. Connect the cable to the solar charge controller.
11. Wait until the display on the solar charge controller displays a
'smiling face'-symbol and a 'energy saving lamp'-symbol.
12. Install the jumper CON201 on the multiboard pcb.
13. Connect the connector from the E-Link manual controller to the
control box.
D-I022.1004EN
14. If the display on the solar charge controller indicates an error, refer
to the 'Operating instructions Solar Charge Controller' (page 5-1).
9-4
Troubleshooting
innovators in agriculture
10. DIAGRAMS
Dimensions of the COSMIX M
D-I022.1004EN
10.1
Figure 16. Dimensions of the COSMIX M
Diagrams
10-1
innovators in agriculture
Cow Dimensions
D-I022.1004EN
10.2
Figure 17. Minimum and maximum cow dimensions
10-2
Diagrams
innovators in agriculture
Connection Diagram
D-I022.1004EN
10.3
Figure 18. Connection diagram
Diagrams
10-3
D-I022.1004EN
innovators in agriculture
INTENTIONALLY BLANK
10-4
Diagrams
innovators in agriculture
GLOSSARY OF TERMS
approx: approximately
Astronaut: Lely Astronaut A3 milking robot
cm: centimeter
dosing unit: pneumatically controlled device for
dispensing food
E-Link manual controller: control device, used to
adjust the settings or manually control the
installation.
EU: European Union
gal: gallon
ID reader: Cow identification device
in: inch
ISO-reader: Reader with standardized method and
format of transfer of data between sensors.
D-I022.1004EN
kg: kilogram
kPa: kiloPascal
lb: pound
LED: Light Emitting Diode
m: metre
mA: milliAmperes
multiboard: standardized control board used in
most Lely products
PC: Personal Computer
PCB: printed circuit board with electrical
components.
portion size: size of one portion of concentrates
psi: pounds per square inch
Qwes: identification tag for ISO identification
system
Qwes H/HR: identification tag for Qwes H or Qwes
HR identification system
T4C: Lely Time 4 Cows Farm Management Software
titania kit: pneumatically controlled unit that
dispenses nutrition fluid into the feed bin
V: Volt
yd: yard (36 inches)
Glossary of Terms
1
D-I022.1004EN
innovators in agriculture
INTENTIONALLY BLANK
2
Glossary of Terms
innovators in agriculture
INDEX
A
Adjust the Detection Distance from the
Photoelectric Sensors..............................8-8
Adjust the Position of the Solar Panel.........5-4
Adjust the Refill Level of the Feed Bin.......4-13
T
Test the Auger Motors .............. 4-13, 5-1, 9-1
Test the ID-Sensors.................... 4-13, 5-1, 8-4
Test the Load Cell Sensors......... 4-13, 5-1, 5-6
Test the Photoelectric Sensors .......... 4-13, 5-1
C
Calibrate the Load Cell Sensors .......................
4-13, 5-1, 5-6, 8-8
Clean the Auger................................. 8-7, 9-1
Connection Diagram .......................... 4-3, 8-4
D
Display the Software Version....................4-13
F
Feeding Station ..........................................4-7
D-I022.1004EN
G
Get the E-Link Manual Controller
....6-3, 8-1, 8-2, 8-3, 8-4, 8-5, 8-6, 8-7, 8-8
L
List of Supplied Parts ..................................9-4
M
Move a Cow to another Group ................4-12
P
Photoelectric Sensor...................................4-7
Power System ............................................4-7
R
Remove a Cow from the Database...........4-12
Reset the Solar Charge Controller ...... 6-1, 9-1
S
Set a Cow Name ......................................4-12
Set the Antennas ...................... 4-13, 5-1, 8-9
Set the Display Language .........................4-13
Set the Entrance Credit ............................4-11
Set the Feed Dose per Day .......................4-11
Set the Maximum Credit ..........................4-11
Set the Portion Size ............................ 5-6, 6-2
Set the Time.............................................4-13
Set the Weighing Unit ON or OFF.............4-13
Index
1
D-I022.1004EN
innovators in agriculture
INTENTIONALLY BLANK
2
Index
innovators in agriculture
D-I022.1004EN
INTENTIONALLY BLANK
D-I022.1004EN
innovators in agriculture
LELY INDUSTRIES NV
Weverskade 110
NL-3147 PA Maassluis
Tel +31 (0)10 - 59 96 333
Fax +31 (0)10 - 59 96 444
www.lely.com
Live Life Lely