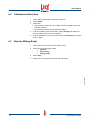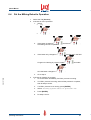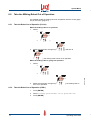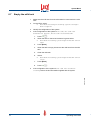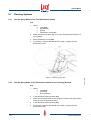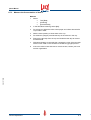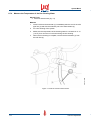
1
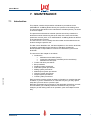
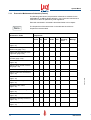
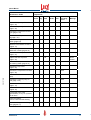
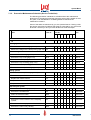
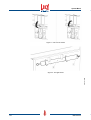
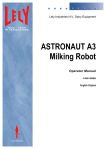
Lely Industries N.V. Dairy Equipment
ASTRONAUT A3
Milking Robot
Operator Manual
D-A001.0703EN
English Original
Operator Manual
D-A001.0703EN
INTENTIONALLY BLANK
ii
Operator Manual
LIST OF INCLUDED AMENDMENTS
Issue Date
(yy/mm)
Chapter(s)
Remarks
1
07/03
7, 8, 9
Update of the Maintenance and Test and Adjustment procedures for the
Operator Manual D-H001.0609.
D-A001.0703EN
No:
iii
Operator Manual
D-A001.0703EN
INTENTIONALLY BLANK
iv
Operator Manual
PREFACE
Manual Contents
This manual contains the updated information necessary to do operator
maintenance on an ASTRONAUT A3 Milking Robot. This manual update
contains the following chapters:
•
•
•
Chapter 6, Operating Instructions
Chapter 7, Maintenance
Chapter 8, Test and Adjustment.
Chapter 6 (Operating Instructions) is added for reference purposes for
chapters 7 and 8 only and does not replace chapter 6 of the current
Operator Manual.
Chapter 7 of this update replaces both chapters 7 (Preventive Maintenance)
and 8 (Corrective Maintenance) of the current Operator Manual (DH001.0609).
Chapter 8 of this update replaces chapter 9 (Test and Adjustment) of the
current Operator Manual (D-H001.0609). Therefore chapter 9 as a chapter
number expires.
Study and understand this information thoroughly before you do
maintenance on the milking robot. Failure to do so could result in personal
injury or damage to equipment. Please consult your local Lely service
provider if you do not understand the information in this manual, or if you
need additional information.
Refer to the ASTRONAUT A3 Milking Robot Operator Manual for all
operating procedures.
D-A001.0703EN
All information in this manual has been compiled with care. Lely shall not be
liable for errors or faults in this manual. The recommendations are meant to
serve as guidelines. All instructions, pictures and specifications in this
manual are based on the latest information that was available at the time of
publication. Your milking robot system may comprise improvements,
features or options that are not covered in this manual.
v
Operator Manual
D-A001.0703EN
INTENTIONALLY BLANK
vi
Operator Manual
Table of Contents
6. Operating Instructions
6.1
Start the System
6-1
6.2
Calibrate the Robot Arm
6-2
6.3
Start the Milking Robot
6-2
6.4
Put the Milking Robot In Operation
6-3
6.5
Take the Milking Robot Out of Operation
6-4
6.5.1
6.5.2
6.6
Take the Robot Out of Operation (X-Link)
Take the Robot Out of Operation (CRS+)
Robot Arm Movements
6.6.1
6.6.2
Move the Robot Arm to the Service Position
Robot arm in service position
6-4
6-4
6-5
6-5
6-5
6.7
Empty the milk tank
6-6
6.8
Cleaning System
6-7
6.8.1
6.8.2
X-Link
CRS+
7. Maintenance
7.1
Introduction
7.1.1
7.1.2
7.1.3
7.2
D-A001.0703EN
6-1
Preventive Maintenance Schedule (Farmer)
Preventive Maintenance Schedule (Service Technician)
Maintenance Visit Report
Covers and Doors
7.2.1
7.2.2
7.2.3
7.2.4
7.2.5
7.2.6
Open the Multiple Function Box
Close the Multiple Function Box
Remove the Between Cover
Install the Between Cover
Remove the Mothership Cover
Install the Mothership Cover
6-7
6-10
7-1
7-1
7-2
7-4
7-6
7-7
7-7
7-8
7-9
7-10
7-11
7-12
7.3
Box
7-13
7.4
Feeding System
7-14
7.4.1
7.4.2
7.5
Examine the Feed Funnel
Clean the Feed Funnel
Robot Arm Systems
7.5.1
7.5.2
7.5.3
7.5.4
7.5.5
7.5.6
7.5.7
7.5.8
Clean the Bleed Holes
Clean the Outside of the Teat Cups
Examine the Cup Cords
Replace the Cup Cords
Examine the Teat Cup Sleeves
Examine the Cup Centring
Replace the Centering Cup
Clean the Robot Arm and the Box
7-14
7-16
7-18
7-18
7-19
7-20
7-22
7-26
7-27
7-28
7-30
vii
Operator Manual
Milking System
7.6.1
7.6.2
7.7
Milk Transport System
7.7.1
7.7.2
7.7.3
7.7.4
7.8
Examine the Twin Tubes
Shorten the Twin Tubes
Replace the Filter Element of the Single Filter
Replace the Filter Element of the Twin Filter
Cleaning Systems
7.8.1
7.8.2
7.8.3
7.8.4
7.8.5
7.8.6
7.9
Examine the Teat Cup Liners
Replace the Teat Cup Liners
Examine the Cleaning Brushes
Replace the Cleaning Brushes
Examine the Quantity of Astri-Uc
Examine the Quantity of Astri-Cid
Examine the Quantity of Astri-Lin
Examine the Quantity of Astri-L
Support Systems
7.9.1
7.9.2
7.9.3
7.9.4
Clean the sTDS Screen
Examine the Air Compressor and the Air Dryer
Examine the vacuum pump oil level
Clean the Exterior of the Vacuum Pump
7.10 Control Systems
7.10.1
7.10.2
7.10.3
7.10.4
Examine the Attention Alarms
Examine the Attention List
Examine the Robot Performance List
Clean the Touch Screen of the X-Link
8. Test and Adjustment
7-31
7-32
7-35
7-35
7-36
7-39
7-40
7-41
7-41
7-42
7-44
7-45
7-46
7-47
7-48
7-48
7-48
7-48
7-49
7-51
7-51
7-51
7-52
7-52
8-1
8.1
Covers and Doors
8-1
8.2
Box
8-1
8.3
Feeding System
8-2
8.3.1
8.4
Measure the Weight of the Feed Portion
Robot Arm System
8.4.1
Shorten the Cup Cords
8-2
8-4
8-4
8.5
Milking System
8-8
8.6
Milk Transport System
8-9
8.6.1
8.6.2
8.6.3
8.7
Adjust the Milk Separation Settings for Calving Cows
Adjust the Milk Separation Settings for Sick Cows
Adjust the Milk Separation Manually
Cleaning Systems
8.7.1
8.7.2
8.7.3
8.7.4
8.7.5
8.7.6
viii
7-31
Test the Spray Beam of the Teat Disinfection Nozzle
Test the Spray Beam of the Disinfection Nozzle for the Cleaning Brushes
Measure the Concentration of Astri-L
Measure the Temperature of the Hot Cleaning Water
Adjust the ACID:HYPO ratio
Adjust the Quantity of Pre-treatments
8-9
8-10
8-11
8-12
8-12
8-12
8-13
8-14
8-15
8-15
D-A001.0703EN
7.6
Operator Manual
8.8
Support Systems
8.8.1
8.8.2
8.9
Test the Save-Life Switch
Test the Earthing
Control Systems
8-16
8-16
8-18
8-19
D-A001.0703EN
Index
ix
Operator Manual
D-A001.0703EN
INTENTIONALLY BLANK
x
Operator Manual
6. OPERATING INSTRUCTIONS
6.1
Start the System
1.
Select Tab [System].
2.
In the field Robot operation, select [Restart].
3.
Wait for a maximum of 10 seconds, then make sure:
1. The following pop-up windows appear:
•
Choose startup mode
•
Calibration robotarm.
2.
The status of the components BS, ICS, MMS, MQC, MS, RCS,
TAS and TS is Init.
4.
If both the pop-up windows appear and the status of the components is
correct, calibrate the robot arm. Refer to Calibrate the Robot Arm (page
6-1).
5.
If both the pop-up windows do not appear:
1. Select:
•
[Shutdown]
•
[Reset all].
Wait for 10 seconds and make sure the status of the components
BS, ICS, MMS, MQC, MS, RCS, TAS and TS is Init.
3.
If the status of one or more of the components is not Init, select
[Reset all] again.
4.
When the status of all the components BS, ICS, MMS, MQC,
MS, RCS, TAS and TS is Init, select [Start].
5.
When both pop-up windows appear, calibrate the robot arm.
Refer to Calibrate the Robo (page 6-1)t Arm.
D-A001.0703EN
2.
Operating Instructions
6-1
Operator Manual
6.2
Calibrate the Robot Arm
1.
Select the pop-up window: Calibration robotarm.
2.
Select [Start].
3.
4.
If all the cylinders move to their limits, select [Accept] and make sure
the robot arm moves to the home position.
5.
If all the cylinders do not move to their limits, select [Stop] and do steps
2 thru 4 again.
Start the Milking Robot
1.
Select the pop-up window Choose startup mode.
2.
Select one of the following modes:
•
[Normal]
•
[Short rinse]
•
[Empty boiler].
3.
Select [OK].
4.
Make sure all components have the status Running.
D-A001.0703EN
6.3
Make sure:
The robot arm moves up, out, up again and then forward to the limits
of all the cylinders
• The robot arm stops at the fully forward position.
•
6-2
Operating Instructions
Operator Manual
6.4
Put the Milking Robot In Operation
1.
Select the Tab [Process].
2.
If the text is Out of operation:
1. Select:
•
[^]
•
.
2.
If the button changes to
the milking robot is in operation.
3.
If the button only changes to
and then to
and the text in the field
and make
Progress is Cleaning in progress, select
sure the button changes to
4.
D-A001.0703EN
3.
Operating Instructions
,
.
Go to step 3.
If the text is Cleaning in progress:
1. Go to the CRS+ and identify if a CRS+ process is running.
2.
If a CRS+ process is running, wait until the process is complete,
then do steps 1 and 2.
3.
If a CRS+ process is not running, press [ENTER].
4.
Select: Cleaning system > Robots in operation > Yes.
5.
Press [ENTER].
6.
Do steps 1 thru 3.
6-3
Operator Manual
6.5
Take the Milking Robot Out of Operation
It is possible to take the milking robot out of operation with the X-Link (page
6-4) or the CRS+ (page 6-4).
6.5.1
Take the Robot Out of Operation (X-Link)
When the milking robot is in operation:
1.
Select:
•
•
2.
[^]
]
[
Make sure the button changes to [
] and then to
], the milking robot is then out of operation.
[
When the milking robot is going into operation:
1.
Select:
•
[^]
2.
6.5.2
6-4
Make sure the button changes to [
then out of operation.
], the milking robot is
Take the Robot Out of Operation (CRS+)
1.
Press [ENTER].
2.
Select: Cleaning system > Robots out of operation > Yes.
3.
Press [ENTER].
Operating Instructions
D-A001.0703EN
•
Operator Manual
6.6
Robot Arm Movements
6.6.1
Move the Robot Arm to the Service Position
1.
WARNING
Wait until the robot arm stops in the service position before you do
maintenance on the milking robot.
2.
3.
6.6.2
Take the milking robot out of operation with the X-link (page 6-4).
Select:
•
•
•
•
Tab [Test]
[Robot arm]
[Service-3]
[Move robotarm].
Wait until the robot arm stops in the service position.
Robot arm in service position
WARNING
Wait until the robot arm stops in the service position before you do
maintenance on the milking robot.
1.
Select:
•
•
•
•
Tab [Test]
[Robot arm]
[Home]
[Move robotarm].
Wait until the robot arm is in the home position.
3.
If applicable, Put the milking robot in operation with the X-link (page 62).
D-A001.0703EN
2.
Operating Instructions
6-5
Operator Manual
6.7
Empty the milk tank
1.
Make sure the milk hose from the milk tanker is connected to the milk
tank.
2.
On the CRS+ select:
Main Menu > Settings > Cleaning system settings >
•
Milk reception.
3.
Identify the configuration of the system.
4.
If the configuration of the system is one tank, one tank with
bufferbarrel Boetech , or one tank with buffertank:
1.
Press
2.
When the LED on the left of the button is green select:
•
Main Menu > Cleaning system > Open milktank valve >
Open.
3.
Press [Enter].
4.
When the tank is empty, disconnect the milk hose from the milk
tank.
5.
Clean the milk tank.
6.
Select:
•
Main Menu > Cleaning system > Open milktank valve >
Close .
7.
Press [Enter].
8.
Press
.
If the configuation of the system is one tank with automatic
cleaning refer to the documentation supplied with the system.
D-A001.0703EN
5.
.
6-6
Operating Instructions
Operator Manual
6.8
Cleaning System
6.8.1
X-Link
Start Main Cleaning with X-Link
1.
Select:
•
•
•
[^]
[<]
[
].
2.
A pop-up window appears with the text The following types of cleaning
can be started manually.
3.
In the field Main cleaning, select:
•
[Automatic]
•
[OK].
Start Astri-Lin Main Cleaning (X-Link)
1.
Select:
•
•
D-A001.0703EN
•
Operating Instructions
[^]
[<]
[
].
2.
A pop-up window appears with the text The following types of cleaning
can be started manually.
3.
In the field Main cleaning, select:
•
[Astri-Lin]
•
[OK].
6-7
Operator Manual
Start Astri-Cid Main Cleaning (X-Link)
1.
Select:
•
•
•
[^]
[<]
[
].
2.
A pop-up window appears with the text The following types of cleaning
can be started manually.
3.
In the field Main cleaning, select:
•
[Astri-Cid]
•
[OK].
Rinse the Milkline (X-Link)
1.
Select:
•
•
•
[^]
[<]
[
].
2.
A pop-up window appears with the text The following types of cleaning
can be started manually.
3.
In the field Cluster, select:
•
[Rinse]
•
[OK].
1.
Select:
•
•
•
6-8
D-A001.0703EN
Do a Short Rinse with the X-Link
[^]
[<]
[
].
2.
A pop-up window appears with the text The following types of cleaning
can be started manually.
3.
In the field Local, select:
•
[Short rinse]
•
[OK].
Operating Instructions
Operator Manual
Start a Lelywash (X-Link)
1.
Select:
•
•
•
[^]
[<]
[
].
2.
A pop-up window appears with the text The following types of cleaning
can be started manually.
3.
In the field Local, select:
•
[Lelywash]
•
[OK].
Start an sTDS Cleaning (X-Link)
1.
Select:
•
•
•
[^]
[<]
[
].
2.
A pop-up window appears with the text The following types of cleaning
can be started manually.
3.
In the field Local, select:
•
[sTDS cleaning]
•
[OK].
D-A001.0703EN
Cancel rinse
Operating Instructions
1.
Select the Tab [Process].
2.
In the field Cleaning, select [Cancel rinse].
6-9
Operator Manual
6.8.2
CRS+
Start Automatic Main Cleaning (CRS+)
1.
2.
Select:
•
•
Main Menu > Cleaning system > Start maincleaning
Yes.
Press [Enter].
Start Astri-Lin Main Cleaning (CRS+)
1.
Select:
•
•
2.
Main Menu > Cleaning system > Start main Cleaning
Hypo
Yes.
Press [Enter].
Start Astri-Cid Main Cleaning (CRS+)
1.
Select:
•
•
2.
Main Menu > Cleaning system > Start main Cleaning
acid
Yes.
Press [Enter].
Start Rinsing the Milkline
1.
Select:
•
•
2.
Main Menu > Cleaning system > Main Rinsing
Yes.
Press [Enter].
Blow the Milkline Empty (CRS+)
1.
Select:
•
•
Press [Enter].
D-A001.0703EN
2.
Main Menu > Cleaning system > Blow empty milkline
Yes.
6-10
Operating Instructions
Operator Manual
7. MAINTENANCE
7.1
Introduction
This chapter contains the preventive maintenance procedures for the
ASTRONAUT A3 Milking Robot done by the operator of the milking robot.
The procedures are based on the maintenance schedule (farmer), as shown
in the next chapter.
The preventive maintenance schedule (service technician) contains the
tasks that must be done during the seven visits of the service technician,
spread out over two years, to an ASTRONAUT A3 Milking Robot as defined
in the maintenance contract.
The sub-columns 1 thru 7 identify the visit number and the tasks that must
be done during the specific visit.
The last column identifies who, the farmer/operator or the service technician,
is primarily responsible for the execution of that task. All tasks the
farmer/operator is responsible for are done for verification by the service
technician.
The structure of this chapter is as follows:
•
D-A001.0703EN
•
•
•
•
•
•
•
•
•
Introduction
•
Maintenance schedule (farmer)
•
Preventive maintenance schedule (service technician)
•
Maintenance visit report
Covers and doors procedures
Box procedures
Feeding system procedures
Robot arm system procedures
Milking system procedures
Milk transport system procedures
Cleaning system procedures
Support system procedures
Control system procedures.
Each procedure contains all the necessary information to complete the task.
Therefore, if you do maintenance on more than one part, you may repeat
steps that you have done o a previous part.
Read and understand all procedures for the applicable visit before you start.
This will enable you to identify tasks that can be done only once (for
example: put the milking robot out of operation, open the multiple function
box).
Maintenance
7-1
Operator Manual
7.1.1
Preventive Maintenance Schedule (Farmer)
The following table shows the preventive maintenance schedule for the
ASTRONAUT A3 Milking Robot defined by Lely. Preventive maintenance
must also be done as specified by local regulations.
Each task mentioned in this table is described further in this chapter.
The frequencies of the tasks shown in the table are the minimum
frequencies recommended.
Maintenance Tasks
Frequencies
Hours Day Week
Examine the attention alarms
(page 7-51)
8
Examine the milking robot
attention list (page 7-51)
8
Replace the filter element of the
single filter (page 7-38)
8
Replace the filter element of the
twin filter (page 7-40)
8-15
Clean the sTDS screen
(page 7-48)
12
Clean the touch screen of the XLink (page 7-52)
1
Clean the bleed holes (page 7-18)
1
Clean the robot arm and the box
(page 7-29)
1
Clean the outside of the teat cups
(page 7-18)
1
Examine the cleaning brushes
(page 7-41)
1
Examine the twin tubes
(page 7-35)
1
Examine the cup centering
(page 7-27)
1
Examine the teat cup sleeves
(page 7-26)
1
Examine the quantity of Astri-Uc
(page 7-43)
1
Examine the quantity of Astri-Cid
(page 7-44)
1
7-2
Month
Year Operating
Hours
Milkings
D-A001.0703EN
Note:
Maintenance
Operator Manual
Maintenance Tasks
Frequencies
D-A001.0703EN
Hours Day Week
Examine the quantity of Astri-Lin
(page 7-45)
1
Examine the quantity of Astri-L
(page 7-46)
1
Examine the compressor and air
dryer (page 7-48)
1
Examine the robot performance
list (page 7-51)
1
Measure the weight of the feed
portion (page 8-2)
1
Measure concentration of Astri-L
(page 8-13)
1
Test the spray beam of the teat
disinfection nozzle (page 8-12)
1
Examine the teat cup liners
(page 7-31)
1
Replace the teat cup liners
(page 7-32)
8-10
Measure the temperature of the
hot cleaning water (page 8-13)
1
Examine the cup cords
(page 7-20)
1
Month
Year Operating
Hours
silicon
10.000
Examine the compressor for leaks
(page 7-48)
3
Clean the exterior of the vacuum
pump
6
2.000
Examine the vacuum pump oil
level (page 7-48)
2.000
Examine the feed funnel
(page 7-14)
1
Test the save-life switch
(page 8-16)
1
Cut the tails of the cows
approximately 3 cm (1.2 in) below
the tail bone
3
Shave the udders.
Refer to udder and tail shaving
3
Test the earthing of the milking
robot (page 8-17)
Maintenance
Milkings
1
7-3
Operator Manual
7.1.2
Preventive Maintenance Schedule (Service Technician)
The following preventive maintenance schedule shows the maintenance
tasks done by the service technician during the seven visits, spread out over
two years, to an ASTRONAUT A3 Milking Robot as defined in the
maintenance contract.
Some of the tasks are also done by you, the operator/owner. If during a visit
the service technician find defects that must be corrected by you, the service
technician consults you and you must decide who will do the repair.
Task
Task no.
Visit No.
Who
1
2
3
4
5
6
7
x
x
x
x
x
x
x
Farmer
x
x
Farmer
Box
n/a
Feeding system
Examine the Feed Funnel (page 7-14)
155
x
Measure the weight of the feed portion (page 8-2) 275
x
Robot arm system
Clean the bleed holes (page 7-18)
121a
x
x
x
x
Farmer
Examine the cup cords (page 7-20)
121b
x
x
x
x
Farmer
Examine the teat cup angle
121c
x
x
x
x
Technician
Examine the cup centering (page 7-27)
121d
x
x
x
x
Farmer
Examine the teat cup milking position
121e
x
x
x
x
Technician
Examine the teat cup sleeves (page 7-26)
121f
x
x
x
x
Farmer
Examine the teat cup liners (page 7-31)
135
x
x
Farmer
Examine the pre-milk device
185
Replace the 4effect sleeves
170
x
x
x
x
Technician
Replace the 4effect valve rubbers
175
x
x
x
x
Technician
Replace the 4effect air filter
180
Milking system
x
x
x
x
x
x
x
Technician
x
Technician
Milk transport system
7-4
Examine the twin tubes (page 7-35)
145
x
Examine the 5-folded tube
130
x
Clean the milk level meter
225a
x
x
Technician
Do the water test
225b
x
x
Technician
Examine the correct function of the sampling
cylinder
245
Examine the blow-empty valve of the milk line
280
x
Examine the robot 3-way valve(s)
250a
x
x
x
x
x
x
x
x
x
x
x
x
x
x
x
x
Farmer
x
Technician
x
Technician
x
Technician
Technician
Maintenance
D-A001.0703EN
x
Operator Manual
Examine the milk tank 3-way valve
250b
Replace the silicon non-return valve of the milk
filter
265
Examine the twin filter 3-way valves
250c
x
x
x
x
x
x
x
x
Technician
x
x
x
Technician
Technician
Cleaning system
Confirm the availability of Astri-TDS
235
x
x
x
x
x
x
x
Technician
Confirm the use of the correct Astri-products
240
x
x
x
x
x
x
x
Technician
Test the main cleaning system
205
x
x
x
x
Technician
Examine the jetters
255
x
Test the spray beam of the teat disinfection
nozzle (page 8-12)
270
x
Examine the cleaning brushes (page 7-41)
140
x
Lubricate the air motor of the cleaning brush unit
260
x
x
x
x
x
x
x
x
x
x
Examine the running hours of the air motor
x
x
x
Technician
x
x
Farmer
x
Farmer
x
x
Technician
x
x
Technician
x
Technician
x
D-A001.0703EN
Support systems
Calibrate the sTDS
125
x
x
Test the save-life switch (page 8-16)
165
x
Test the earthing of the milking robot
160
x
x
Technician
Test the pressure sensor
150
x
x
Technician
Replace the 5µ filter cartridge of the pressure
regulator
285a
x
x
Technician
Replace the filter cartridge of the active carbon
filter
285b
x
x
Technician
Do the air compressor maintenance
290
x
Complete the measure and recommendation
report
190
x
x
Measure the vacuum level and pulsation curve
195
x
x
Clean the vacuum pump unit
200
x
x
Replace the tube of the Astri-cid pump
210
x
x
Technician
Replace the tube of the Astri-lin pump
210
x
x
Technician
Replace the tube of the Astri-L pump
210
x
x
Technician
Replace the milk pump seals
220
x
Technician
Replace the rubber non-return valve of the milk
pump
215
x
x
x
x
x
x
x
Technician
120
x
x
x
x
x
x
x
Technician
295
x
x
x
x
x
x
x
Technician
x
x
x
x
x
x
x
x
x
x
Technician
x
x
Technician
x
x
Technician
x
x
Farmer
x
Technician
Control system
Examine the X-link report list
Miscellaneous
Confirm the contents of the toolbox
Maintenance
7-5
Operator Manual
7.1.3
Maintenance Visit Report
After a visit, when all the maintenance tasks are done, the service technician
completes the visit report. The report is completed by hand or with the
computer. The report must be signed by both the farmer/owner and by the
service technician. The original is for the farmer/owner and the copy is for
the service technician's/Lely's record.
D-A001.0703EN
An example of a completed visit report is shown hereafter.
7-6
Maintenance
Operator Manual
7.2
Covers and Doors
7.2.1
Open the Multiple Function Box
D-A001.0703EN
Open
1.
Use a screwdriver to turn the locks (fig. 1/1) and (3) 90°
counterclockwise to release the cover of the multiple function box.
2.
Pull the bottom edge of the cover (2) toward you to open the multiple
function box.
Figure 1: Open the multiple function box
Maintenance
7-7
Operator Manual
7.2.2
Close the Multiple Function Box
Close
1.
Pull the cover (fig. 1/2) down to close the multiple function box.
2.
Use a screwdriver to turn the locks (1) and (3) 90° clockwise.
D-A001.0703EN
Figure 1: Close the multiple function box
7-8
Maintenance
Operator Manual
7.2.3
Remove the Between Cover
Removal
1.
Remove the locking pin (fig. 1/2).
2.
Remove the between cover (1).
D-A001.0703EN
Figure 1: Remove the between cover
Maintenance
7-9
Operator Manual
7.2.4
Install the Between Cover
Installation
1.
Make sure the tubes and the cables are in the correct position and
install the between cover (fig. 1/1).
2.
Install the locking pin (2).
D-A001.0703EN
Figure 1: Install the between cover
7-10
Maintenance
Operator Manual
7.2.5
Remove the Mothership Cover
Removal
CAUTION
1.
Remove the screw (fig. 1/5) and the locking pin (4).
2.
Loosen the bolts (1) and (2) until the mothership cover (3) can move
easily.
Make sure the sTDS cable does not become tight or damaged when you
remove the mothership cover.
3.
Carefully move the mothership cover away from the teat cups and the
mothership.
4.
Carefully put the mothership cover on the ground next to the
mothership.
D-A001.0703EN
Figure 1: Remove the mothership cover
Maintenance
7-11
Operator Manual
7.2.6
Install the Mothership Cover
Installation
1.
CAUTION
Carefully position the mothership cover (fig. 1/3) on the mothership.
Make sure the sTDS cable does not get stuck between the mothership and
the mothership cover.
2.
Tighten the two bolts (1) and (2).
3.
Install the screw (5) and the locking pin (4).
D-A001.0703EN
Figure 1: Install the mothership cover
7-12
Maintenance
Operator Manual
7.3
Box
D-A001.0703EN
There are no maintenance procedures for the box.
Maintenance
7-13
Operator Manual
7.4
Feeding System
7.4.1
Examine the Feed Funnel
Preparation
WARNING
Block the cow traffic to the milking robot before you do this
procedure.
1.
Take the milking robot out of operation with the X-link (page 6-4).
2.
Select:
•
•
•
3.
Tab [Test]
[Box]
[Gates].
In the field Gates, select Exit gate, [Open].
Examine
Go into the box via the exit gate.
2.
Remove the locking pins (fig. 1/1) and (7).
3.
Remove the feed funnel cover (8).
Do not touch or put your fingers near the moving parts.
4.
Make sure:
•
The deflector funnel is clean
•
The pneumatic feed cylinder is installed correctly and cannot
be removed.
5.
Empty the feed bin.
6.
Install the feed funnel cover.
7.
Install the locking pins.
8.
Go out of the box via the exit gate.
D-A001.0703EN
WARNING
1.
Close-up
1.
7-14
Select:
•
•
•
Tab [Test]
[Box]
[Gates].
2.
In the field Gates, select, Exit gate, [Close].
3.
Unblock the cow traffic.
4.
Put the milking robot in operation with the X-link (page 6-2).
Maintenance
Operator Manual
D-A001.0703EN
Figure 1: Removal of the feed funnel
Maintenance
7-15
Operator Manual
7.4.2
Clean the Feed Funnel
Preparation
WARNING
Block the cow traffic to the milking robot before you do this
procedure.
1.
Take the milking robot out of operation with the X-link (page 6-4).
2.
Select:
•
•
•
Tab [Test]
[Box]
[Gates].
3.
In the field Gates, Exit gate, select [Open].
4.
Go into the box via the exit gate.
Clean
1.
Remove:
•
•
•
•
The two locking pins (fig. 1/1) and (7)
The feed funnel cover (8)
The four deflector plate bolts (2), (3), (4) and (5)
The deflector plate (6).
2.
Clean all the parts with a hard broom brush.
3.
Empty the feed bin.
4.
Install:
•
•
•
•
The deflector plate
The four deflector plate bolts
The feed funnel cover
The two locking pins.
Close-up
7-16
1.
Go out of the box via the exit gate.
2.
Select:
•
•
•
D-A001.0703EN
Tab [Test]
[Box]
[Gates].
3.
In the field Gates, Exit gate, select [Close].
4.
Unblock the cow traffic.
5.
Put the milking robot in operation with the X-link (page 6-2).
Maintenance
Operator Manual
D-A001.0703EN
Figure 1: Removal of the feed funnel
Maintenance
7-17
Operator Manual
7.5
Robot Arm Systems
7.5.1
Clean the Bleed Holes
Special Tools
• Bleed hole needle (fig. 1/1)
Preparation
1.
Take the milking robot out of operation with the X-link (page 6-4).
2.
Move the robot arm to the service position (page 6-5).
Clean
1.
Clean the bleed hole (2) in each teat cup with the bleed hole needle (1).
Close-up
Move the robot arm to the home position (page 6-5).
2.
Put the milking robot in operation with the X-link (page 6-2).
3.
Do a short rinse with the X-link (page 6-8).
D-A001.0703EN
1.
Figure 1: Clean the bleed holes
7-18
Maintenance
Operator Manual
7.5.2
Clean the Outside of the Teat Cups
CAUTION
Do not use a high pressure cleaner to clean the teat cups. Damage to the
teat cups may occur.
Preparation
1.
Take the milking robot out of operation with the X-link (page 6-4).
2.
Move the robot arm to the service position (page 6-5).
Clean
1.
Use a bucket of water and a brush, or a soft spray hose to clean the
outside of the teat cups.
Close-up
Move the robot arm to the home position (page 6-5).
2.
Put the milking robot in operation with the X-link (page 6-2).
3.
Start a Short Rinse (X-Link).
D-A001.0703EN
1.
Maintenance
7-19
Operator Manual
7.5.3
Examine the Cup Cords
Preparation
1.
Take the milking robot out of operation with the X-link (page 6-4).
2.
Move the robot arm to the service position (page 6-5).
Examine
Select:
•
•
•
Tab [Test]
[Mothership]
[Cups].
2.
In the field Tilt cups, select:
•
LF [Straight]
•
LR [Straight]
•
RF [Straight]
•
RR [Straight].
3.
In the field Tilt cups, select:
•
LF [Loose]
•
LR [Loose]
•
RF [Loose]
•
RR [Loose].
4.
Examine the cup cords for dirt and damage.
5.
If the cords are (much) thicker or thinner than the original thickness of
the cup cord, shorten the cup cords (page 8-4).
6.
Measure the cup cords (fig. 1) and make sure the length is between
22.5 and 23.5 cm (8.86 in and 9.25 in).
7.
If necessary, shorten the cup cords (page 8-4).
8.
In the field Cord cups, select:
•
LF [Fixed]
•
LR [Fixed]
•
RF [Fixed]
•
RR [Fixed].
Close-up
7-20
1.
Move the robot arm to the home position (page 6-5).
2.
Put the milking robot in operation with the X-link (page 6-2).
Maintenance
D-A001.0703EN
1.
Operator Manual
D-A001.0703EN
Figure 1: Measure the cup cords
Maintenance
7-21
Operator Manual
7.5.4
Replace the Cup Cords
Preparation
1.
Take the milking robot out of operation with the X-link (page 6-4).
2.
Move the robot arm to the service position (page 6-5).
3.
Remove the mothership cover (page 7-10).
4.
Remove the between cover (page 7-8).
Removal
1.
Select:
•
•
•
Tab [Test]
[Mothership]
[Cups].
2.
In the field Tilt cups, select:
•
LF [Straight]
•
LR [Straight]
•
RF [Straight]
•
RR [Straight].
3.
In the field Tilt cups, select:
•
LF [Loose]
•
LR [Loose]
•
RF [Loose]
•
RR [Loose].
4.
Remove the two Allen screws (fig. 1/5) and (6) and the centering piece
(4) from the milk collector (1).
5.
Untie (2) the cup cord from the centering piece.
6.
Remove bolt (12), the washer (11) and the guide profile (10).
7.
Remove the cup cord (8) by pulling it from the mothership side.
1.
Put the new cup cord (8) through the hole (13) in the mothership.
2.
Route the cup cord as shown in the figure, through the washer (14) and
the holes (13), (9) and (7).
3.
Push the cup cord through the centering piece (4) and the washer (3).
4.
Tie a knot (2) in the cup cord.
5.
Install the centring piece with the two screws (5) and (6) on the milk
collector (1).
6.
Install the guiding profile (10) with the washer (11) and the bolt (12).
7.
In the field Cord cups, select [Fixed] for the applicable teat cup.
8.
Make sure the cup cord (fig. 3/3) is put through the washer (2).
9.
Pull the cup cord on the mothership side. Make sure the teat cup is
firmly in the tilt cup.
10. Use a ballpoint pen to mark (1) the cup cord where it goes into the
mothership.
11. In the field Cord cups, select [Loose] for the applicable teat cup.
12. Tie a slip knot (fig. 4/1) in the cup cord just behind the mark (3).
7-22
Maintenance
D-A001.0703EN
Installation
Operator Manual
13. In the field Cord cups, select [Fixed] for the applicable teat cup.
14. Make sure the teat cup is firmly in the tilt cup.
15. Put the cup cord(s) into the mothership (2).
16. Put the cup cord(s) into the mothership (2).
Close-up
Install the mothership cover (page 7-11).
2.
Install the between cover (page 7-9).
3.
Move the robot arm to the home position (page 6-5).
4.
Put the milking robot in operation with the X-link (page 6-2).
D-A001.0703EN
1.
Maintenance
7-23
D-A001.0703EN
Operator Manual
7-24
Maintenance
Operator Manual
Figure 1: Remove the cup cords
D-A001.0703EN
Figure 2: Mark the cord
Figure 3: Tie the cord just behind the mark
Maintenance
7-25
Operator Manual
7.5.5
Examine the Teat Cup Sleeves
Preparation
1.
Take the milking robot out of operation with the X-link (page 6-4).
2.
Move the robot arm to the service position (page 6-5).
3.
Select:
•
•
•
Tab [Test]
[Mothership]
[Cups].
4.
In the field Tilt cups, select:
•
LF [Straight]
•
LR [Straight]
•
RF [Straight]
•
RR [Straight].
5.
In the field Cord cups, select:
•
LF [Loose]
•
LR [Loose]
•
RF [Loose]
•
RR [Loose].
Examine
1.
Examine the teat cup sleeves for damage.
2.
Examine the teat cup sleeves are installed straight on the milk
collection cup.
3.
If necessary, replace the teat cup sleeves (page 7-32).
7-26
1.
In the field Cord cups, select:
•
LF [Fixed]
•
LR [Fixed]
•
RF [Fixed]
•
RR [Fixed].
2.
Move the robot arm to the home position (page 6-5).
3.
Put the milking robot in operation with the X-link (page 6-2).
Maintenance
D-A001.0703EN
Close-up
Operator Manual
7.5.6
Examine the Cup Centring
Preparation
1.
Take the milking robot out of operation with the X-link (page 6-4).
2.
Move the robot arm to the service position (page 6-5).
Examine
1.
Select:
•
•
•
Tab [Test]
[Mothership]
[Cups].
2.
In the field Tilt cups, select:
•
LF [Straight]
•
LR [Straight]
•
RF [Straight]
•
RR [Straight].
3.
In the field Tilt cups, select:
•
LF [Loose]
•
LR [Loose]
•
RF [Loose]
•
RR [Loose].
4.
Examine the centering cups for erosion and damage.
5.
If necessary, replace the centring cups (page 7-27).
6.
Examine the tilt cups for erosion and damage.
7.
If necessary, replace the tilt cups.
8.
In the field Cord cups, select:
•
LF [Fixed]
•
LR [Fixed]
•
RF [Fixed]
•
RR [Fixed].
9.
Make sure the teat cups are not loose in the tilt cups.
D-A001.0703EN
10. If necessary, shorten the cup cords (page 8-4).
Close-up
Maintenance
1.
Move the robot arm to the home position (page 6-5).
2.
Put the milking robot in operation with the X-link (page 6-2).
7-27
Operator Manual
7.5.7
Replace the Centering Cup
Preparation
1.
Take the milking robot out of operation with the X-link (page 6-4).
2.
Move the robot arm to the service position (page 6-5).
Removal
1.
Select:
•
•
•
Tab [Test]
[Mothership]
[Cups].
2.
In the field Tilt cups, select:
•
LF [Straight]
•
LR [Straight]
•
RF [Straight]
•
RR [Straight].
3.
In the field Tilt cups, select:
•
LF [Loose]
•
LR [Loose]
•
RF [Loose]
•
RR [Loose].
4.
Remove the two screws (fig. 1/6) and (7) and the centering cup (4) from
the milk collector (1).
5.
Untie (2) the cup cord (5) at the centering cup.
6.
Remove the cup cord from the washer and the centering cup.
Installation
1.
Push the cup cord (5) through the centering cup (4) and the washer (3).
2.
Make a knot (2) in the end of the cup cord.
3.
Install the centering cup on the milk collector (1) with the two screws (6)
and (7).
1.
Examine the cup cords (page 7-20).
2.
In the field Cord cups, select:
•
LF [Fixed]
•
LR [Fixed]
•
RF [Fixed]
•
RR [Fixed].
D-A001.0703EN
Examine
Close-up
7-28
1.
Move the robot arm to the home position (page 6-5).
2.
Put the milking robot in operation with the X-link (page 6-2).
Maintenance
Operator Manual
D-A001.0703EN
Figure 1: Replace the centring cup
Maintenance
7-29
Operator Manual
7.5.8
Clean the Robot Arm and the Box
CAUTION
Do not use a high pressure cleaner when you clean the robot arm and the
box.The robot arm contains many electronic parts. A high pressure cleaner
may cause damage to these parts.
Preparation
1.
Take the milking robot out of operation with the X-link (page 6-4).
2.
Move the robot arm to the service position (page 6-5).
Clean
1.
Use a bucket of water and a brush, or a soft spray hose to clean the
robot arm and the box.
Close-up
Move the robot arm to the home position (page 6-5).
2.
Put the milking robot in operation with the X-link (page 6-2).
3.
Start a Short Rinse with the X-Link.
D-A001.0703EN
1.
7-30
Maintenance
Operator Manual
7.6
Milking System
7.6.1
Examine the Teat Cup Liners
Preparation
1.
Take the milking robot out of operation with the X-link (page 6-4).
2.
Move the robot arm to the service position (page 6-5).
Examine
1.
Examine the teat cup liners for dirt and damage.
2.
If necessary, replace the teat cup liners (page 7-32).
Close-up
Move the robot arm to the home position (page 6-5).
2.
Put the milking robot in operation with the X-link (page 6-2).
3.
Do a short rinse with the X-link (page 6-8).
D-A001.0703EN
1.
Maintenance
7-31
Operator Manual
7.6.2
Replace the Teat Cup Liners
Special Tools
• Teat cup liner installation tool (fig. 3/1)
Preparation
1.
Take the milking robot out of operation with the X-link (page 6-4).
2.
Move the robot arm to the service position (page 6-5).
3.
Select:
•
•
•
Tab [Test]
[Mothership]
[Cups].
4.
In the field Tilt cups, select:
•
LF [Straight]
•
LR [Straight]
•
RF [Straight]
•
RR [Straight].
5.
In the field Cord cups, select:
•
LF [Loose]
•
LR [Loose]
•
RF [Loose]
•
RR [Loose].
Removal
Do the steps in this sub-section for all four teat cup liners.
1.
Turn the teat cup liner (fig. 1/3) counterclockwise until you can remove
them from the milk collector (2).
2.
Make sure the milk collector cup is clean.
3.
If necessary, clean the milk collector cup.
4.
Pull the teat cup liner (1) at the upper side to remove them from the teat
cup sleeve.
Do the steps in this sub-section for all four teat cup liners.
7-32
1.
Install the teat cup liner in the teat cup sleeve.
2.
Push the upper part of the teat cup liner on the teat cup sleeve.
3.
Make sure the mark (fig. 2/1) on the teat cup liner is aligned with the
mark (2) on the teat cup sleeve.
4.
If necessary, turn the liner.
5.
Make sure the teat cup liner is not twisted (fig. 2/right) in the teat cup
sleeve.
6.
Rub the lower part of the teat cup liner and the teat cup sleeve in with
soapy water.
Maintenance
D-A001.0703EN
Installation
Operator Manual
CAUTION
Do not turn the installation tool when you push the teat cup liner in the teat
cup sleeve.
7.
Use the teat cup liner installation tool (fig. 3/1) to push the lower part of
the liner in the teat cup sleeve.
8.
Make sure the bottom of the teat liner (2) engages correctly in the
bottom of the teat cup sleeve.
9.
Examine the O-ring (3) of the teat cup sleeve for damage.
10. If necessary, replace the O-ring.
11. Lubricate the thread and O-ring of the teat cups with vaseline.
12. Install the teat cups in the milk collectors and turn them clockwise.
13. In the field Cord cups, select:
•
LF [Fixed]
•
LR [Fixed]
•
RF [Fixed]
•
RR [Fixed].
Close-up
Move the robot arm to the home position (page 6-5).
2.
Put the milking robot in operation with the X-link (page 6-2).
3.
Do a short rinse with the X-link (page 6-8).
D-A001.0703EN
1.
Figure 1: Remove the teat cup sleeve and teat cup liner
Maintenance
7-33
Operator Manual
D-A001.0703EN
Figure 2: Insert the new teat cup liner in the teat cup sleeve
Figure 3: Install the teat cup liner in the teat cup sleeve
7-34
Maintenance
Operator Manual
7.7
Milk Transport System
7.7.1
Examine the Twin Tubes
Preparation
1.
Take the milking robot out of operation with the X-link (page 6-4).
2.
Move the robot arm to the service position (page 6-5).
3.
Select:
•
•
•
Tab [Test]
[Mothership]
[Cups].
4.
In the field Tilt cups, select:
•
LF [Straight]
•
LR [Straight]
•
RF [Straight]
•
RR [Straight].
5.
In the field Cord cups, select:
•
LF [Loose]
•
LR [Loose]
•
RF [Loose]
•
RR [Loose].
Examine
1.
Examine the twin tubes for damage.
2.
If necessary, shorten the twin tubes (page 7-35) or replace the twin
tube.
3.
Put a finger in the teat cup and hold the teat cup in a position similar to
the milking position.
4.
Make sure the teat cup hangs vertically.
5.
If the teat cup does not hang vertically, adjust the twin tube connection
on the applicable teat cup.
D-A001.0703EN
Close-up
Maintenance
1.
In the field Cord cups, select:
•
LF [Fixed]
•
LR [Fixed]
•
RF [Fixed]
•
RR [Fixed].
2.
Move the robot arm to the home position (page 6-5).
3.
Put the milking robot in operation with the X-link (page 6-2).
7-35
Operator Manual
7.7.2
Shorten the Twin Tubes
Special Tools
• Clamp pliers (fig. 1/1)
• Hose scissors (fig. 2/3)
Preparation
1.
Take the milking robot out of operation with the X-link (page 6-4).
2.
Move the robot arm to the service position (page 6-5).
Shorten
1.
Select:
•
•
•
Tab [Test]
[Mothership]
[Cups].
In the field Tilt cups, select:
•
LF [Straight]
•
LR [Straight]
•
RF [Straight]
•
RR [Straight].
3.
In the field Tilt cups, select:
•
LF [Loose]
•
LR [Loose]
•
RF [Loose]
•
RR [Loose].
4.
Use the clamp pliers (fig. 1/1) to release the clamp (2) on the applicable
twin tube.
5.
Disconnect the twin tube from the teat cup.
6.
Use the hose scissors (fig. 2/3) to cut off the damaged part (2) of the
twin tube.
7.
Cut off a part with the same length of the other part (1) of the twin tube.
8.
Use a knife (fig. 3/1) to make an incision in the twin tube, with the same
length as the part you cut off.
D-A001.0703EN
2.
Installation
7-36
1.
Connect the twin tube to the milk collector.
2.
Use the clamp pliers to tighten the clamp on the twin tube.
3.
Hold the teat cup, and with one finger in the liner make sure the teat
cup does not turn.
4.
Make sure the shortened twin tube has sufficient freedom of movement.
5.
If the there is not sufficient freedom of movement, replace the twin tube.
6.
If necessary, turn the twin tubes to align the teat cup.
7.
Fully tighten the clamps with the special tool.
8.
In the field Cord cups, select:
•
LF [Fixed]
•
LR [Fixed]
•
RF [Fixed]
•
RR [Fixed].
Maintenance
Operator Manual
Close-up
1.
Move the robot arm to the home position (page 6-5).
2.
Put the milking robot in operation with the X-link (page 6-2).
3.
Do a short rinse with the X-link (page 6-8).
D-A001.0703EN
Figure 1: Release the clamp from the twin tube
Figure 2: Cut off the damaged part of the twin tube
Maintenance
7-37
Operator Manual
D-A001.0703EN
Figure 3: Make an incision in the twin tube
7-38
Maintenance
Operator Manual
7.7.3
Replace the Filter Element of the Single Filter
Replace
1.
Select:
•
•
[^]
[
].
2.
When the pop-up window with the text Continue milk filter exchange>
opens, select [OK].
3.
A pop-up window opens with the text The milk filter is being prepared
for exchange and the button changes to [
].
4.
Wait until the text in the pop-up window changes to The milk filter is
ready for exchange.
5.
Hold the filter housing and remove the cap.
6.
Remove the filter housing.
7.
Remove the filter sock and the spring from the filter housing.
8.
Examine the filter sock for flakes that indicate mastitis in the herd.
9.
Remove the filter ring and the filter sock from the spring.
10. Rinse the filter ring and the filter housing with clean water.
11. Make sure the thread and the top of the filter housing are clean and dry.
D-A001.0703EN
12. Slide the spring into a new filter sock and fold the sock top into the top
of the spring.
13. Install the filter ring on the spring.
14. Slide the filter sock and the spring in the filter housing until
approximately 15 cm (5.90 in) of the filter sock is outside the filter
housing.
15. Hold the filter housing in position below the milkline and push the filter
sock fully into the tapered part of the milkline.
16. Connect the cap to the filter housing and tighten the cap hand-tight.
17. Select [Milk filter has been exchanged].
18. The pop-up window closes and the button changes to
[
Maintenance
].
7-39
Operator Manual
7.7.4
Replace the Filter Element of the Twin Filter
Replace
1.
On the CRS+, press:
•
•
[ENTER].
2.
Hold the filter housing and remove the cap.
3.
Remove the filter housing.
4.
Remove the filter sock and the spring from the filter housing.
5.
Examine the filter sock for flakes that indicate mastitis in the herd.
6.
Remove the filter ring and the filter sock from the spring.
7.
Rinse the filter ring and the filter housing with clean water.
8.
Make sure the thread and the top of the filter housing are clean and dry.
9.
Slide the spring into a new filter sock and fold the sock top into the top
of the spring.
10. Install the filter ring on the spring.
11. Slide the filter sock and the spring in the filter housing until
approximately 15 cm (5.90 in) of the filter sock is outside the filter
housing.
12. Hold the filter housing in position below the milkline and push the filter
sock fully into the tapered part of the milkline.
13. Connect the cap to the filter housing and tighten the cap hand-tight.
D-A001.0703EN
14. On the CRS+, press [ENTER].
7-40
Maintenance
Operator Manual
7.8
Cleaning Systems
7.8.1
Examine the Cleaning Brushes
Preparation
1.
Take the milking robot out of operation with the X-link (page 6-4).
2.
Move the robot arm to the service position (page 6-5).
Examine
1.
Make sure there are enough hairs with sufficient length on the brushes
to clean the teats.
2.
If there are not enough hairs with sufficient length on the cleaning
brushes, replace the cleaning brushes (page 7-42).
Close-up
Move the robot arm to the home position (page 6-5).
2.
Put the milking robot in operation with the X-link (page 6-2).
D-A001.0703EN
1.
Maintenance
7-41
Operator Manual
7.8.2
Replace the Cleaning Brushes
Preparation
1.
Take the milking robot out of operation with the X-link (page 6-4).
2.
Move the robot arm to the service position (page 6-5).
Removal
1.
Select:
•
•
•
•
Tab [Test]
[Mothership]
[Other]
Pre treatment arm [On].
2.
Loosen the two Allen screws (fig. 1/2).
3.
Remove the two brushes (1) from the shaft.
Installation
1.
Install the two new brushes (1) on the shaft.
2.
Tighten the two Allen screws (2).
3.
Select:
•
•
•
•
Tab [Test]
[Mothership]
[Other]
Pre treatment arm [Off].
Close-up
Move the robot arm to the home position (page 6-5).
2.
Put the milking robot in operation with the X-link (page 6-2).
3.
Do a short rinse with the X-link (page 6-8).
D-A001.0703EN
1.
7-42
Maintenance
Operator Manual
D-A001.0703EN
Figure 1: Replace the cleaning brushes
Maintenance
7-43
Operator Manual
7.8.3
Examine the Quantity of Astri-Uc
WARNING
Note:
Block the cow traffic to the milking robot before you do this
procedure.
The transparent hose goes to the Astri-Uc container.
Preparation
1.
Take the milking robot out of operation with the X-link (page 6-4).
2.
Open the doors of the machine room.
Examine
1.
Make sure there is sufficient Astri-Uc in the container and the hose is
sufficiently into the liquid to suck correctly.
2.
If necessary, replace the container with a full one when the level is too
low.
Close-up
Close the doors of the machine room.
2.
Unblock the cow traffic.
3.
Put the milking robot in operation with the X-link (page 6-2).
D-A001.0703EN
1.
7-44
Maintenance
Operator Manual
7.8.4
Examine the Quantity of Astri-Cid
WARNING
Block the cow traffic to the milking robot before you do this
procedure.
WARNING
Astri-Cid is a chemical hazard. Always wear protective gloves when
you do work on the Astri-Cid.
Note:
The red hose goes to the Astri-Cid container.
Preparation
1.
Take the milking robot out of operation with the X-link (page 6-4).
2.
Open the doors of the machine room.
Examine
1.
Make sure there is sufficient Astri-Cid in the container and the hose is
sufficiently into the liquid to suck correctly.
2.
If necessary, replace the container with a full one when the level is too
low.
Close-up
Close the doors of the machine room.
2.
Unblock the cow traffic.
3.
Put the milking robot in operation with the X-link (page 6-2).
D-A001.0703EN
1.
Maintenance
7-45
Operator Manual
7.8.5
Examine the Quantity of Astri-Lin
WARNING
Block the cow traffic to the milking robot before you do this
procedure.
WARNING
Astri-Lin is a chemical hazard. Always wear protective gloves when
you do work on the Astri-Lin.
Note:
The blue hose goes to the Astri-Lin container.
Preparation
1.
Take the milking robot out of operation with the X-link (page 6-4).
2.
Open the doors of the machine room.
Examine
1.
Make sure there is sufficient Astri-Lin in the container and the hose is
sufficiently into the liquid to suck correctly.
2.
If necessary, replace the container with a full one when the level is too
low.
Close-up
Close the doors of the machine room.
2.
Unblock the cow traffic.
3.
Put the milking robot in operation with the X-link (page 6-2).
D-A001.0703EN
1.
7-46
Maintenance
Operator Manual
7.8.6
Examine the Quantity of Astri-L
WARNING
Block the cow traffic to the milking robot before you do this
procedure.
WARNING
Astri-L is a chemical hazard. Always wear protective gloves when you
do work on the Astri-L.
Note:
The green hose goes to the Astri-L container.
Preparation
1.
Take the milking robot out of operation with the X-link (page 6-4).
2.
Open the doors of the machine room.
Examine
1.
Make sure there is sufficient Astri-L in the container and the hose is
sufficiently into the liquid to suck correctly.
2.
If necessary, replace the container with a full one when the level is too
low.
Close-up
Close the doors of the machine room.
2.
Unblock the cow traffic.
3.
Put the milking robot in operation with the X-link (page 6-2).
D-A001.0703EN
1.
Maintenance
7-47
Operator Manual
7.9
Support Systems
7.9.1
Clean the sTDS Screen
Preparation
1.
Take the milking robot out of operation with the X-link (page 6-4).
2.
Move the robot arm to the service position (page 6-5).
Clean
CAUTION
Only clean the sTDS screen with Astri-TDS. The use of other fluids can
cause damage to the sTDS screen.
1.
Use a soft moist towel with a small quantity of Astri-TDS to clean the
sTDS screen.
Close-up
7.9.2
1.
Move the robot arm to the home position (page 6-5).
2.
Put the milking robot in operation with the X-link (page 6-2).
Examine the Air Compressor and the Air Dryer
Note:
You must obey local rules and standards. For certain countries a yearly
report of the pressure vessel must be made.
Examine
7.9.3
Select:
•
•
Tab [Test]
[Facilities].
2.
In the field Air supply, compare the Temperature dewpoint value with
the Temperature environment value.
3.
If the environment temperature is higher than the dew point
temperature, call your local service organization.
4.
Refer to the compressor and air dryer manual for further maintenance
information.
Examine the vacuum pump oil level
Examine
1.
7-48
Refer to the vacuum pump manual for details.
Maintenance
D-A001.0703EN
1.
Operator Manual
7.9.4
Clean the Exterior of the Vacuum Pump
Preparation
WARNING
Block the cow traffic to the milking robot before you do this
procedure.
CAUTION
During operation the temperature of the surface of the vacuum pump may
be more than 70 ºC (158 ºF). Make sure the vacuum pump is cool before
you do maintenance on the vacuum pump.
1.
Take the milking robot out of operation with the X-link (page 6-4).
2.
Open the multiple function box (page 7-7).
Clean
1.
Set the vacuum pump switch (fig. 1/1) to the down position.
2.
Select:
•
•
•
Tab [Test]
[Vacuum pump]
Vacuum pump [On].
3.
Make sure the vacuum pump does not start.
4.
If the vacuum pump starts, see the Service Manual for more
information.
5.
In the field Vacuum pump, select [Off].
6.
Open the doors of the machine room.
7.
Set the light switch (fig. 2/1) of the inspection lamp (2) in the on
position.
8.
Make sure the pump house, the fan cowling, the fan wheel, the
ventilation grills and the cooling fans are free of dust and debris.
9.
If necessary, clean the parts.
D-A001.0703EN
10. Set the vacuum pump switch (fig. 1/1) to the up position.
Close-up
Maintenance
1.
Set the light switch (fig. 2/1) of the inspection lamp (2) in the off
position.
2.
Close the doors of the machine room.
3.
Close the multiple function box (page 7-7).
4.
Unblock the cow traffic.
5.
Put the milking robot in operation with the X-link (page 6-2).
7-49
Operator Manual
Figure 1: The vacuum switch
D-A001.0703EN
Figure 2: The light switch
7-50
Maintenance
Operator Manual
7.10 Control Systems
7.10.1 Examine the Attention Alarms
Examine
Note:
1.
Examine the attention alarms on the X-Link, T4C or the CRS+ as
follows:
•
On the X-Link, select Tab [Indications].
•
On the T4C system, refer to the T4C manual.
•
On the CRS+, select Main Menu > Alarm system > List
active alarms.
2.
If necessary, correct the problems shown by the attention alarms.
Cows with a milking interval of more than 10 hours must be guided into the
milking robot.
Cows with a different conductivity, color attention, feed intake or milk yield
must be examined for (udder) health.
7.10.2 Examine the Attention List
Examine
1.
– Cows with a milking interval of more than 10 hours must be guided into
the milking robot.
– Cows with a different conductivity, color attention, feed intake or milk yield
must be examined for (udder) health.
D-A001.0703EN
Note:
Examine the attention list on the X-Link or the T4C as follows:
•
On the X-Link, select tab [T4C].
•
On the T4C system, refer to the T4C manual.
Maintenance
7-51
Operator Manual
7.10.3 Examine the Robot Performance List
Examine
In the T4C-software:
1.
2.
Note:
Select:
•
•
•
Tab [Reports]
Tab [Milking]
Tab [Report].
If necessary:
•
Select the robot(s) to make the report from
•
Select the days. The first field is the most recent day of the
period, the second field is last day of the period. The value 0
(nul) is used for the present day.
•
Select the sort order
•
Select the output format.
- You must have Adobe Reader installed on your computer in order to use
the PDF output format.
- You must have Microsoft Excel installed on your computer in order to use
the Excel output format.
3.
Select [Make report].
7.10.4 Clean the Touch Screen of the X-Link
Clean
Select:
•
•
[^]
[<]
•
7-52
2.
Clean the X-Link touch screen with a soft lint-free cloth made moist with
warm water.
3.
Press one of the three black buttons on the X-Link below the touch
screen to enable the touch screen.
Maintenance
D-A001.0703EN
1.
Operator Manual
8. TEST AND ADJUSTMENT
This chapter contains the preventive test and adjustment procedures for the
ASTRONAUT A3 Milking Robot. The procedures are based on the
maintenance schedule (farmer) as shown in the chapter Maintenance.
8.1
Covers and Doors
There are no test and adjustment procedures for the covers and doors.
8.2
Box
D-A001.0703EN
There are no test and adjustment procedures for the box.
Test and Adjustment
8-1
Operator Manual
8.3
Feeding System
8.3.1
Measure the Weight of the Feed Portion
Preparation
WARNING
Block the cow traffic to the milking robot before you do this
procedure.
1.
Take the milking robot out of operation with the X-link (page 6-4).
2.
Select:
•
•
•
Tab [Test]
[Box]
[Gates].
3.
In the field Gates, Exit gate, select [Open].
4.
Go into the box via the exit gate.
5.
Empty the feed bin.
6.
Go out of the box via the exit gate.
Measure the Feed Portion
The steps in this sub-section must be done for all installed feeding valves.
1.
Select:
•
•
Tab [Test]
[Feeding].
Select [Valve feeding 1].
3.
Wait until the feed unit is finished and select [Valve feeding 1] again.
4.
Do the previous step eight times, so the total of portions given is 10.
5.
Put a bucket on the scales.
6.
Reset the scales to zero.
7.
Remove the bucket.
8.
Go into the box via the exit gate.
9.
Put the feed from the feed bin in the bucket.
D-A001.0703EN
2.
10. Go out of the box via the exit gate.
11. Put the bucket with the feed on the scales.
12. Make a note of the weight.
13. Empty the bucket.
8-2
Test and Adjustment
Operator Manual
Adjust the Feed Portion
The steps in this sub-section must be done for all installed feeding valves.
1.
Divide all the values made a note of by 10.
2.
Select:
•
•
•
Tab [Settings]
[Advanced settings]
[Feeding system].
3.
Compare your values with the value in the corresponding field.
4.
If a value is not the same, select the field for the applicable feeding
valve.
5.
Type the value you made a note of in the field and select [OK].
Close Up
1.
Select:
•
•
•
Tab [Test]
[Box]
[Gates].
In the field Gates, Exit gate, select [Close].
3.
Unblock the cow traffic.
4.
Put the milking robot in operation with the X-link (page 6-2).
D-A001.0703EN
2.
Test and Adjustment
8-3
Operator Manual
8.4
Robot Arm System
8.4.1
Shorten the Cup Cords
Preparation
1.
Take the milking robot out of operation with the X-link (page 6-4).
2.
Move the robot arm to the service position (page 6-5).
3.
Remove the between cover (page 7-8).
4.
Remove the mothership cover (page 7-10).
Shorten
Select:
•
•
•
Tab [Test]
[Mothership]
[Cups].
2.
In the field Tilt cups, select:
•
LF [Straight]
•
LR [Straight]
•
RF [Straight]
•
RR [Straight].
3.
In the field Tilt cups, select:
•
LF [Loose]
•
LR [Loose]
•
RF [Loose]
•
RR [Loose].
4.
Untie the knot (fig. 1/1) of the cup cord at the mothership side.
5.
Remove the two Allen screws and centering piece (fig. 2/4) from the
milk collector (1).
6.
Pull the cup cord until the damaged part of the cup cord is
approximately 20 cm [8 in] away from the cup holder.
7.
If the is not enough cord left at the mothership side, replace the cup
cord (page 7-21).
8.
Cut off the damaged part of the cup cord.
9.
Make sure the cup cord is through the centering piece (4) and the
washer (3).
10. Tie a knot (2) in the cup cord.
11. Install the centering piece on the milk collector with the two Allen
screws.
12. In the field Cord cups, select [Fixed] for the applicable teat cup.
13. Make sure the cup cord (fig. 3/3) is put through the washer (2).
14. Pull the cup cord on the mothership side. Make sure the teat cup is
firmly in the tilt cup.
15. Use a ballpoint pen to mark (1) the cup cord where it goes into the
mothership.
16. In the field Cord cups, select [Loose] for the applicable teat cup.
8-4
Test and Adjustment
D-A001.0703EN
1.
Operator Manual
17. Tie a slip knot (fig. 4/1) in the cup cord just behind the mark (3).
18. In the field Cord cups, select [Fixed] for the applicable teat cup.
19. Make sure the teat cup is firmly in the tilt cup.
20. Put the cup cord(s) into the mothership (2).
Close-up
1.
Install the mothership cover (page 7-11).
2.
Remove the between cover (page 7-8).
3.
Move the robot arm to the home position (page 6-5).
4.
Put the milking robot in operation with the X-link (page 6-2).
D-A001.0703EN
Figure 1: Untie the cord
Test and Adjustment
8-5
Operator Manual
D-A001.0703EN
Figure 2: Measure the cord length
Figure 3: Mark the cord
8-6
Test and Adjustment
Operator Manual
D-A001.0703EN
Figure 4: Tie the cord just behind the mark
Test and Adjustment
8-7
Operator Manual
8.5
Milking System
D-A001.0703EN
There are no test and adjustment procedures for the milking system.
8-8
Test and Adjustment
Operator Manual
8.6
Milk Transport System
8.6.1
Adjust the Milk Separation Settings for Calving Cows
Adjust
In the T4C software:
CAUTION
Note:
1.
Select the survey tab Farm.
2.
Select the applicable cow from the list.
3.
Select:
•
•
Modules tab Calendar
Work sheet tab Overview.
4.
In the field Expected action, select Calve.
5.
Click Execute.
6.
When the form appears, type all necessary data in the form.
7.
Click Submit.
Before you continue, T4C must have confirmed a successful
communication with the milking robot.
The window will close automatically after 10 seconds if the communication
with the milking robot is successful.
Click Close.
D-A001.0703EN
8.
Test and Adjustment
8-9
Operator Manual
8.6.2
Adjust the Milk Separation Settings for Sick Cows
WARNING
Always adjust the separation settings in the T4C software before the
applicable cow receives the medication that makes separation
necessary.
Adjust
In the T4C software:
CAUTION
Note:
1.
Select the survey tab Farm.
2.
Select the applicable cow from the list.
3.
Select:
•
•
Modules tab Health
Work sheet tab Disease.
4.
In the field Add plan/treatment, select Diagnose.
5.
Click Add.
6.
When the form appears, type all necessary data in the form.
7.
Click Submit.
8.
When the form appears, type all necessary data in the form.
9.
Click Submit.
Before you continue, T4C must have confirmed a successful
communication with the milking robot.
The window will close automatically after 10 seconds if the communication
with the milking robot is successful.
D-A001.0703EN
10. Click Close.
8-10
Test and Adjustment
Operator Manual
8.6.3
Adjust the Milk Separation Manually
Adjust
In the T4C software:
CAUTION
Note:
1.
Select the tab Farm.
2.
Select the applicable cow from the list.
3.
Select:
•
•
Module tab Milking
Work sheet tab Separation.
4.
Click New.
5.
When the form appears, type all necessary data in the form.
6.
Click Submit.
Before you continue, T4C must have confirmed a successful
communication with the milking robot.
The window will close automatically after 10 seconds if the communication
with the milking robot is successful.
Click Close.
D-A001.0703EN
7.
Test and Adjustment
8-11
Operator Manual
8.7
Cleaning Systems
8.7.1
Test the Spray Beam of the Teat Disinfection Nozzle
Test
Select:
•
•
•
•
Tab [Test]
[Mothership]
[Other]
Disinfection nozzle [On].
2.
Make sure the spray beam (fig. 2/1) is cone-shaped and provides a full
spray pattern.
3.
Select Disinfection nozzle [Off].
4.
If necessary, clean the teat disinfection nozzle or replace the teat
disinfection nozzle.
Figure 1: Test the spray beam
8.7.2
Test the Spray Beam of the Disinfection Nozzle for the Cleaning Brushes
Test
1.
8-12
Select:
•
•
•
Tab [Test]
[Cleaning]
[Pre treatment].
2.
In the field Brush cleaning, select [On].
3.
Make sure the spray beam is cone-shaped, provides a full spray pattern
and fully cover the cleaning brushes.
4.
In the field Brush cleaning select [Off].
5.
If necessary, clean the teat disinfection nozzle or replace the teat
disinfection nozzle.
Test and Adjustment
D-A001.0703EN
1.
Operator Manual
8.7.3
Measure the Concentration of Astri-L
Measure
1.
Select:
•
•
•
Tab [Test]
[Cleaning]
[Pre treatment].
In the field Brush cleaning, select [On].
3.
Put a large cup below the roller rinse sprayer and collect almost half a
cup of Astri-L water.
4.
Add the same quantity of clean water to the cup.
5.
Put a Merck hydrogen peroxide test strip in the mixture in the cup.
6.
Remove the test strip from the cup and shake the test strip to remove
excessive fluid.
7.
Wait approximately 30 seconds then compare the color of the test strip
with the color scale on the container of the Merck hygrogen peroxid.
8.
If the color value is less than 600 or more than 800, contact your local
service organization.
D-A001.0703EN
2.
Test and Adjustment
8-13
Operator Manual
8.7.4
Measure the Temperature of the Hot Cleaning Water
Special Tools
• Min/max thermometer (fig. 1/1)
Measure
Install a min/max thermometer (1) immediately after the end of the milk
pipe line (3) and with the measure part in the water stream (2).
2.
Do a hot cleaning of the system.
3.
Make sure the temperature of the cleaning water is not less than 77 ºC
(170 ºF) for a minimum of 2 minutes during the hot cleaning.
4.
When the hot cleaning is complete, remove the thermometer (1) from
the milk line (2).
D-A001.0703EN
1.
Figure 1: Install the min/max thermometer
8-14
Test and Adjustment
Operator Manual
8.7.5
Adjust the ACID:HYPO ratio
Adjust
8.7.6
1.
On the CRS+, select Main Menu > Settings > Cleaning system
settings > Main cleaning > Ratio Acid:Hypo.
2.
Use the arrow up and arrow down buttons to adjust the value.
3.
Press [Enter].
Adjust the Quantity of Pre-treatments
Adjust
Refer to the T4C manual for the procedure to adjust the quantity of pretreatments.
D-A001.0703EN
1.
Test and Adjustment
8-15
Operator Manual
8.8
Support Systems
8.8.1
Test the Save-Life Switch
Preparation
1.
On the CRS+, make sure a main cleaning is not being prepared.
2.
If a main cleaning is being prepared, wait until the main cleaning is
complete before you continue this procedure.
3.
Take the milking robot out of operation with the X-link (page 6-4).
4.
Open the multiple function box (page 7-7).
Test
1.
Make sure the back-up batteries in the multiple function box are
correctly connected.
2.
Press the test-button (fig. 1/1) of the save-life switch (2).
3.
If the save-life switch does not operate immediately (the switch goes to
the down position (fig. 2/1)), replace the save-life switch.
4.
Set the save-life switch (2) to the up position.
Close-up
Close the multiple function box (page 7-7).
2.
If necessary, start the milking robot (page 6-2).
3.
Put the milking robot in operation with the X-link (page 6-2).
D-A001.0703EN
1.
Figure 1: Push the test button
8-16
Test and Adjustment
Operator Manual
D-A001.0703EN
Figure 2: Reset the save-life switch
Test and Adjustment
8-17
Operator Manual
8.8.2
Test the Earthing
Test
Note:
You must obey local rules and standards. For certain countries a yearly
report of the electrical installation and the earthing must be made.
•
•
D-A001.0703EN
•
An authorized electrician must test the earthing of the electrical
installation of the barn (the milking robot included) and supply an
official report that is given to the Lely service provider.
Earthing of the milking robot(s) must comply with current earthing
regulations for barns.
The earthing of the milking robot must be installed according to the
ASTRONAUT A3 Milking Robot Building Specifications Manual.
•
The two earth wires for each robot are to be connected to the
earth point.
•
The feeding fence, gates and milk delivery lines must also be
connected to the earth point (to balance potential).
8-18
Test and Adjustment
Operator Manual
8.9
Control Systems
D-A001.0703EN
There are no test and adjustment procedures for the control systems in this
manual.
Test and Adjustment
8-19
Operator Manual
D-A001.0703EN
INTENTIONALLY BLANK
8-20
Test and Adjustment
Operator Manual
R
INDEX
C
Calibrate the Robot Arm
6-1
Clean the Outside of the Teat Cups
7-2
Clean the Robot Arm and the Box
7-2
Clean the sTDS Screen
7-2
Clean the Touch Screen of the X-Link 7-2
Close the Multiple Function Box 7-49, 8-16
D
Remove the Between Cover 7-22, 8-4, 8-5
Remove the Mothership Cover
7-22, 8-4
Replace the Centering Cup
7-27
Replace the Cup Cords
8-4
Replace the Filter Element of the Single
Filter ............. 7-2
Replace the Filter Element of the Twin Filter
..................... 7-2
Robot arm in service position7-18, 7-19, 720, 7-23, 7-26, 7-27, 7-28, 7-30, 7-31, 733, 7-35, 7-37, 7-41, 7-42, 7-48, 8-5
S
Do a Short Rinse with the X-Link7-18, 7-31,
7-33, 7-37, 7-42
E
Examine the Air Compressor and the Air
Dryer............. 7-3
Examine the Attention Alarms
7-2
Examine the Attention List
7-2
Examine the Feed Funnel
7-3, 7-4
Examine the Quantity of Astri-Cid
7-2
Examine the Quantity of Astri-L
7-3
Examine the Quantity of Astri-Lin
7-3
Examine the Quantity of Astri-Uc
7-2
Examine the Robot Performance List 7-3
Examine the Twin Tubes
7-2, 7-4
Examine the vacuum pump oil level
7-3
Shorten the Cup Cords
Shorten the Twin Tubes
Start the Milking Robot
7-20, 7-27
7-35
8-16
T
Take the Robot Out of Operation (CRS+)6-4
Take the Robot Out of Operation (X-Link)6-4,
6-5, 7-14, 7-16, 7-18, 7-19, 7-20, 7-22, 726, 7-27, 7-28, 7-30, 7-31, 7-32, 7-35, 736, 7-41, 7-42, 7-44, 7-45, 7-46, 7-47, 748, 7-49, 8-2, 8-4, 8-16
Test the Earthing7-3
Test the Save-Life Switch
7-3, 7-5
I
Install the Between Cover
Install the Mothership Cover
7-23
7-23, 8-5
D-A001.0703EN
M
Measure the Concentration of Astri-L 7-3
Measure the Temperature of the Hot
Cleaning Water7-3
Move the Robot Arm to the Service Position
7-18, 7-19, 7-20, 7-22, 7-26, 7-27, 7-28, 730, 7-31, 7-32, 7-35, 7-36, 7-41, 7-42, 748, 8-4
O
Open the Multiple Function Box 7-49, 8-16
P
Put the Milking Robot In Operation6-5, 7-14,
7-16, 7-18, 7-19, 7-20, 7-23, 7-26, 7-27, 728, 7-30, 7-31, 7-33, 7-35, 7-37, 7-41, 742, 7-44, 7-45, 7-46, 7-47, 7-48, 7-49, 8-3,
8-5, 8-16
Test and Adjustment
8-1
Operator Manual
D-A001.0703EN
INTENTIONALLY BLANK
8-2
Test and Adjustment
D-A001.0703EN
Operator Manual
D-A001.0703EN
Operator Manual