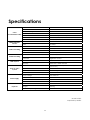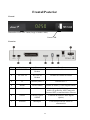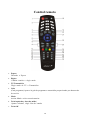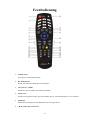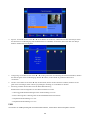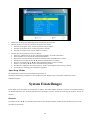
1
MANUEL D'UTILISATION / USER MANUEL / MANUEL DEL USUARIO / BEDIENUNGSANLEITUNG
1
2
Consignes de sécurité
Le récepteur ne doit être utilisé que branché à une prise 220-240V VAC 50Hz, à l’intérieur dans un
endroit sec et aéré.
La prise secteur sert de dispositif de sectionnement de l’alimentation 230V, même si l’appareil est éteint.
La fiche d’alimentation doit être aisément accessible.
N’ouvrez jamais le capot de votre récepteur ! Il y a risque de choc électrique.
Toute intervention éventuelle doit être effectuée par un personnel qualifié.
SURCHARGE
Ne surchargez pas une prise murale, une rallonge électrique ou un adaptateur, ceci pourrait provoquer un
incendie ou une décharge électrique.
Assurez-vous que la source d’alimentation (prise) est facilement accessible.
LIQUIDES
Ce récepteur ne doit pas être exposé aux gouttes ou projections de liquide; aucun objet rempli de liquide, tel
qu’un vase, ne doit être placé sur le récepteur.
NETTOYAGE
Débranchez le récepteur de l’alimentation principale avant le nettoyage. N’utilisez aucun solvant pour
nettoyer l’adaptateur, utilisez uniquement un chiffon doux et sec.
VENTILATION
Les fentes en haut du récepteur ne doivent pas être recouvertes afin de permettre une bonne circulation d’air
dans l’appareil.
Laissez un espace minimal de 5cm autour de l’appareil afin de garantir une ventilation suffisante.
Veillez à ce que la ventilation ne soit pas entravée par des éléments recouvrant les ouvertures de ventilation
(journaux, nappes, rideaux, etc.).
Ne posez pas le récepteur sur des meubles mous ou des tapis.
N’exposez pas l’appareil à la lumière directe du soleil et ne le placez pas près d’un chauffage.
N’empilez pas d’appareils électroniques sur le récepteur.
Ne posez pas de sources de flamme nue (bougies allumées, par exemple) sur l’appareil.
3
ACCESSOIRES
N’utilisez aucun accessoire non recommandé; cela pourrait être une source de danger ou endommager le
récepteur.
BRANCHEMENT SUR LA TV
Débranchez l’appareil de l’alimentation principale avant de brancher ou de débrancher le câble TV.
LE NON-RESPECT DE CETTE CONSIGNE POURRAIT ENDOMMAGER LA TV.
EMPLACEMENT
Placez le récepteur à l’intérieur pour ne pas l’exposer à la foudre, à la
pluie ou au soleil.
N’utilisez l’appareil que dans des climats modérés (pas dans des climats tropicaux).
MANIPULATION DES PILES
Les piles peuvent contenir des produits toxiques dangereux pour l’environnement. Eliminez donc immédiatem
ent les batteries conformément à la réglementation légale en vigueur. Ne jetez jamais les piles dans les ordure
s ménagères normales.
Le récepteur ne doit être utilisé que branché à une prise 220-240V VAC 50Hz, à l’intérieur dans
un endroit sec et aéré.
La prise secteur sert de dispositif de sectionnement de l’alimentation 230V, même si l’appareil est
éteint.
La fiche d’alimentation doit être aisément accessible.
N’ouvrez jamais le capot de votre récepteur ! Il y a risque de choc électrique.
Toute intervention éventuelle doit être effectuée par un personnel qualifié.
SURCHARGE
Ne surchargez pas une prise murale, une rallonge électrique ou un adaptateur, ceci pourrait provoquer
un incendie ou une décharge électrique.
Assurez-vous que la source d’alimentation (prise) est facilement accessible.
LIQUIDES
Ce récepteur ne doit pas être exposé aux gouttes ou projections de liquide; aucun objet rempli de
liquide, tel qu’un vase, ne doit être placé sur le récepteur.
NETTOYAGE
Débranchez le récepteur de l’alimentation principale avant le nettoyage. N’utilisez aucun solvant pour
nettoyer l’adaptateur, utilisez uniquement un chiffon doux et sec.
VENTILATION
4
Les fentes en haut du récepteur ne doivent pas être recouvertes afin de permettre une bonne circulation
d’air dans l’appareil.
Laissez un espace minimal de 5cm autour de l’appareil afin de garantir une ventilation suffisante.
Veillez à ce que la ventilation ne soit pas entravée par des éléments recouvrant les ouvertures de
ventilation (journaux, nappes, rideaux, etc.).
Ne posez pas le récepteur sur des meubles mous ou des tapis.
N’exposez pas l’appareil à la lumière directe du soleil et ne le placez pas près d’un chauffage.
N’empilez pas d’appareils électroniques sur le récepteur.
Ne posez pas de sources de flamme nue (bougies allumées, par exemple) sur l’appareil.
ACCESSOIRES
N’utilisez aucun accessoire non recommandé; cela pourrait être une source de danger ou endommage
r le récepteur.
BRANCHEMENT SUR LA TV
Débranchez l’appareil de l’alimentation principale avant de brancher ou de débrancher le câble TV.
LE NON-RESPECT DE CETTE CONSIGNE POURRAIT ENDOMMAGER LA TV.
EMPLACEMENT
Placez le récepteur à l’intérieur pour ne pas l’exposer à la foudre, à la
pluie ou au soleil.
N’utilisez l’appareil que dans des climats modérés (pas dans des climats tropicaux).
Manipulation des piles
l’environnement. Eliminez donc im
Les piles peuvent contenir des produits toxiques dangereux pour
médiatement les batteries conformément à la réglementation légale en vigueur. Ne jetez jamais les piles
dans les ordures ménagères normales.
5
Introduction
Ce manuel vous aidera à apprendre les fonctions de base comme l’installation, la sélection des
chaînes et les nombreuses autres fonctions de l’appareil. Toutes les fonctions peuvent être
commandées à l’aide de la télécommande
La télécommande est conçue pour accéder facilement à toutes les fonctions tout de suite et pour
une tenue en main confortable. Elle est programmée pour commander toutes les fonctions et
regarder facilement les programmes TV via votre adaptateur.
AVERTISSEMENT
L’utilisation d’un logiciel non officiel peut causer toutes sortes de problèmes. L’utilisation de versions
de logiciel autres le logiciel officiel des vendeurs ou distributeurs annulera la garantie du fabricant.
Nous vous conseillons d’utiliser uniquement le logiciel officiel fourni par les vendeurs ou les
distributeurs.
6
Principales caractéristiques
•
Sortie Multimédia haute définition (HDMI)
•
Compatible avec les standards de diffusion
HD et SD
•
Sortie composante YUV (Y/Pb/Pr)
•
Sortie audio numérique optique: S/PDIF
•
Sortie composite CVBS
•
USB2.0 Host pour la lecture des fichiers vidéo
et MP3 ,images JPEG et mise à jour Software
•
Definitions vidéo: 576i/ 576p/720p/1080i
•
Recherche des chaînes automatique et
manuelle
•
Télécommande infrarouge complète
•
Sélection de bande: 7MHz & 8MHz
•
Tuner à passage “loop-through”
•
Quality audio CD (stéréo)
•
Liste des Tv et radio favorites
•
EPG: Guide électronique des programmes
•
Formats d’image 4:3 et 16:9
•
Indicateurs niveau de signal et qualité
•
Sous-titres
•
Verrous parentaux
•
8 programmes d’enregistrement
•
Mise à jour part prise USB
•
Démodulation COFDM
•
Compatible DVBT et MPEG-4(H.264)
•
HD LCN et LCN
•
Décodage dolby digital +
7
Sommaire
Consignes de sécurité...................................................................................................................................................... 3
Introduction ....................................................................................................................................................................... 6
Principales caractéristiques............................................................................................................................................. 7
Sommaire........................................................................................................................................................................... 8
Introduction ....................................................................................................................................................................... 9
Face avant / face arrière............................................................................................................................................... 10
Télécommande .............................................................................................................................................................. 11
Branchements sur l’adaptateur TNT .............................................................................................................................. 13
Branchement à l’antenne terrestre .................................................................................................................. 13
Raccordement au Téléviseur........................................................................................................................... 14
Connexion audio numérique (optionnel).......................................................................................................... 14
Dolby Digital..................................................................................................................................................... 14
Sortie antenne (Loop Out) ............................................................................................................................... 14
Mise en service ............................................................................................................................................................... 15
1ère utilisation.................................................................................................................................................. 15
Utilisation.......................................................................................................................................................................... 15
Manipulation de base....................................................................................................................................... 15
Choisir une chaîne ........................................................................................................................................ 15
Réglage du volume ...................................................................................................................................... 16
Optenir des informations sur la chaîne ....................................................................................................... 17
Sous-titres (SUB) .............................................................................................................................................. 17
Arrêt sur image .............................................................................................................................................. 18
Liste favorite .................................................................................................................................................... 18
Ajout d’une chaîne dans la liste favorite ................................................................................................... 18
Afficher une chaîne favorite........................................................................................................................ 19
Organiser les chaînes...................................................................................................................................... 19
USB.................................................................................................................................................................. 20
Guide des programmes (GUIDE) .................................................................................................................... 22
Installation........................................................................................................................................................ 23
Réglages utilisateur......................................................................................................................................................... 24
Réglage affichage............................................................................................................................................ 24
Réglages AV.................................................................................................................................................... 25
Programmateur................................................................................................................................................ 26
Mise en veille auto. .......................................................................................................................................... 27
Réglages système........................................................................................................................................................... 27
Heure locale .................................................................................................................................................. 27
Econome ........................................................................................................................................................ 27
Restaurer les paramètres par défaut.......................................................................................................... 27
Information terminal...................................................................................................................................... 27
Alimentation antenne................................................................................................................................... 27
Dépannage ..................................................................................................................................................................... 28
Spécifications .................................................................................................................................................................. 29
8
Introduction
DEBALLAGE
Déballez l’appareil et vérifiez que tous les éléments suivants sont inclus dans l’emballage :
1 x télécommande
1 x manuel d’utilisation
2 x piles AAA
1 x adaptateur TNT TVT250HD
Nous espérons que vous prendrez plaisir à utiliser votre adaptateur TNT TVT250HD.
9
Face avant / face arrière
Face avant
Dimensions: 220x 124x 32mm (L x P x H)
Port USB disponible sur le panneau avant.
Face arrière
No.
Nom
Connecteur
1
LOOP OUT
IEC 169-24 female
Sortie antenne
2
TV ANT IN
IEC 169-24 female
Entrée antenne
3
TV
Péritel TV
4
HDMI
Connecteur HDMI
USB
USB2.0
6
S/PDIF
OPTICAL S/PDIF
Sortie audio numérique (optique)
7
POWER
Interrupteur
Mise Sous/ hors tension de l’appareil
5
Fonction
Prise péritel TV
Connecteur HDMI Audio Vidéo
numérique
Prise USB2.0 Host pour lecture
Video&MP3,affichage image JPEG et
Software
10
Télécommande
1.
STANDBY
Bascule entre le mode Opération et le mode Standby.
2.
BOUTONS NUMERIQUES
Changent les chaînes ou sélectionnent les options des menus.
3.
TV/RADIO
Bascule entre le mode TV et le mode Radio.
4.
Guide
(Guide électronique des programmes) affiche la diffusion du guide des programmes TV/radio
par le fournisseur TV.
5.
MENU
Accède au menu principal ou retourne au menu précédent
6.
(◄/►)
Monte/baisse le volume; Change la page de la liste des chaînes.
11
7.
OK
Entre dans le menu choisi ou sélectionne l’option en cours
8.
PAGE
/
Appuyez pour passer à la page suivante / précédente
9.
CH (▲/▼)
Changent les chaînes ou les éléments de haut en bas sur les menus.
10. SUB
Affiche les informations des sous-titres.
11. AUDIO
Fait passer le mode audio à gauche, droite et stéréo.
12. FAV
Affiche la liste favorite
13. PAUSE
Gèle l’image
14. USB
Accès direct au menu enregistreur
15.
Retour rapide en mode lecture sur média USB
16.
Avance rapide en mode lecture sur média USB
17.
Retourne au fichier précédent en mode lecture sur média USB
18. MUTE
Coupe le son
19. Format
Change la résolution de l’image
20. BACK
Affiche le programme précédent
21. EXIT
Retour au menu précédent
22. (▲/▼):
Changent les chaînes ou les éléments de haut en bas sur les menus
23. VOL (▲/▼)
Monte/baisse le volume
24. TXT
Visualise les informations du Télétexte de la chaîne en cours.
25. INFO
Affiche les informations des programmes et les informations d’aide pour les boutons du menu en cours
26. Aspect
Modifie le cadrage de l’image 4:3 ,16:9
12
27. STOP
Arrête la lecture du média USB
28. RECORD
Lance l’enregistrement du programme en cours
29. PLAY
Appuyez pour lire le média USB
30.
Passe au fichier suivant en mode lecture sur média USB
Branchements sur l’adaptateur TNT
Branchement à l’antenne terrestre
Connecter la fiche de l’antenne terrestre à l’entreé TV IN de l’adapataeur .
13
Raccordement au Téléviseur
L’adapateur peut être connecté au téléviseur via la prise HDMI ou la prise péritel.
A: Prise HDMI
Si votre téléviseur possède une prise HDMI ,connecter un câble HDMI entre le connecteur HDMI du
TV et le connecteur HDMI du TVT250HD.
Penser à sélectionner le canal auxiliaire sur le TV correspondant au connecteur HDMI utilisé.
Connexion audio numérique (optionnel)
Dolby Digital
Le flux audio numérique Dolby Dolby est acheminé vers l’amplificateur home cinema au moyen
d’une fibre optique. (fibre non fourni).
Le flux Dolby est également décodé afin d’avoir de la stéréo disponible via la prise péritel.
Sortie antenne (Loop Out)
Racordement d’un 2ème appreil à l’antenne terrestre.il êut s’agir d’un enregisteur externe ou du
téléviseur.Connecter un câble coaxial (non fourni) depuis la sortie “loop out” à l’entrée de votre
deuscième appareil .
14
Mise en service
1ère utilisation
Une fois les raccordements effectués, vous devez :
1. Allumer le téléviseur.
2. Mettre le TVT250 sous tension .
4. Choisir le canal auxilliaire sur le téléviseur correspondant à l’entrée sur laquelle le TVT250 est
raccordé. (Voir le manuel d’utilisateur du téléviseur)
5. Lancer la recherche des chaînes de la TNT en appuyant sur OK. L’écran de recherche
automatique s’affichera montrant l’avancée du scanning.
Pour effectuer une recherche manuelle des chaînes , consulter la page 22 du manuel.
Les chaînes trouvées durant le scanning apparaissent dans cette fenêtre.
Utilisation
Manipulation de base
Choisir une chaîne
Il existe plusieurs façon de choisir une chaîne:
•
Par son numéro de canal : Si vous connaissez son numéro de canal, utiliser les touches
numériques de la télécommande puis valider par OK.5Si ok n’est pas pressé, le canl sélectionné
apparaitra dans environ 2s) .
NOTE : Les chaînes sont automatiquement classées suivant l’ordre de numérotaion logique
défini par le CSA
15
•
Par la liste des chaînes : Appuyer sur OK pour afficher la liste des chaînes.
Utiliser les touches ▲/▼ pour sélectionner la chaîne désirée.
Puis appeler la chaîne en validant par OK.
Astuce : utiliser les boutons “page” pour naviguer plus rapidement dans la liste
Par liste favorite : Appuyer sur le bouton FAV pour afficher vos chaînes favorites. utiliser les touches
▲/▼ pour sélectionner la chaîne désirée. Puis appeler la chaîne en validant par OK.
Voir page 17 pour créer une liste favorite.
•
Par zapping : Utiliser les touches CH (▲/▼) pour afficher les chaîne suivant l’ordre de la liste des
chaînes .
•
Par le guides programmes : Appuyer sur EPG et choisir le programme désiré.
•
Apputer à nouveau sur EPG pour afficher la chaîne.L’EPG est expliqué page 21
•
Par la touche BACK : La touche back affiche la chaîne précédemment regardée.
Réglage du volume
Pendant le visionnage , appuyer sur les touches VOL (▲/▼) pour ajuster le volume
Couper le son
Pour couper le son ,lors d’un appel téléphonique par exemple ,appuyer sur la touche
couper le son.Appuyer à nouveau sur cette touche pour rétablir le son.
16
pour
Optenir des informations sur la chaîne
•
Appuyer INFO pour afficher la bandeau d’information.
Les informations sur le programmme en cours et le programme suivant sont affichées.
Les informations sur la disponibilité des sous-titres (SUB) ,télétexte(TTX) sont également signalés
par l’affichage en gras de TTX ou SUB.
Sous-titres (SUB)
L’activation/Désactivation des sous-titres se fait par la touche SUB de la télécommande
Pour désactiver les sous-titres :
1. Appuyer sur la touche SUB de la télécommande et choisir Arrêt.
17
Arrêt sur image
•
Appuyer sur PAUSE pour geler l’image.
•
Appuyer sur PAUSE à nouveau pour dégeler l’image.
Liste favorite
Vous pouvez créer une liste favorite de chaîne (Par exemple si vous habitez proche d’une frontiére
et que vous désirez intégrer des chaines étrangères dans votre numérotation.La liste favorite est
appelée en appuyant sur le bouton FAV ,puis les touches ▲/▼ pour choisir la liste favorite.
Ajout d’une chaîne dans la liste favorite
Suivre cette procédure pour ajouter ou supprimer une chaîne de la liste favorite.
1. Appuyer sur MENU
2. Si le menu Gestion des chaînes ne s’affiche pas,utiliser les touches ◄/► .
3. Pour créer une liste favorite, sélectionner EDITION chaînes TV puis OK
La liste des chaînes apparaît :
18
4. Choisir la chaîne à ajouter à la liste avec les touches ▲/▼.
5. Appuyer sur le bouton FAV , un “coeur” apparait pour signaler que la chaîne est sélectionnée
comme favorite.
6. Pour sélectionner une autre chaîne ,répéter l’opération depuis l’étape 4 .
7. Apuuyer sur EXIT lorsque la séléction des chaîne favorite est terminée.Un message apparaitra
pour confirmer si vous voulez sauver la liste .
8. Pour sauver , choisir OUI , pour annuler choisir Non.
9. Appuyer sur OK valider et retourner au mode visualisation.
Afficher une chaîne favorite
Appuyer sur FAV. La liste favorite est affichée. Choisir la chaîne à afficher avec les touches ▲/▼
puis appuyer sur OK.
Organiser les chaînes
Les chaînes peuvent être organisée via le menu gestion des chaînes .
1. Appuyer sur MENU
2. Si le menu Gestion des chaînes
ne s’affiche pas, utiliser les touches ◄/►
3. Pour créer une liste favorite,
sélectionner EDITION chaînes TV puis OK La liste des chaînes apparaît :
19
4.
Verrouiller : Choisir la chaîne à
bloquer avec les touches ▲/▼ puis
valider
rouge
avec
la
.Confimer
le
touche
blocage
en
saissant le code parental (Code par
dégaut
bouton
000000).Appuyer
rouge
à
sur
nouveau
le
pour
déverrouiller le programme.le code
est également demandé.
Déplacer : Choisir la chaîne à
5.
déplacer avec les touches ▲/▼ puis valider avec la touche verte . Utiliser les touches les
touches ▲/▼ pour déplacer la chaîne à la position souhaitée.
6. Supprimer:Choisir la chaîne à supprimer avec les touches ▲/▼ puis valider avec la touche
jaune
Un message apparait pour confirmer la suppresion ou non de la chaîne.
7. Tri:Appuyer sur le boutton bleu pour trier les chaînes .
Les chaînes peuvent être triées par :
- Numéro logique (LCN)
- Clair / Codé (FTA)
- Ordre alphabétique croissant
- Order alphabétique décroissant
(A-Z)
(Z-A)
USB
Ulitiser un support de stockage USB pour
lire des fichiers multimédias ,enregistrer une
chaîne ou mettre à jour le firmware .
Les formats de lecture supporté sont les
plus courrants sont les suivants:
TS,TRP,DAT,MPG,MPEG,AVI,MKV,MO&&V,M
P4,VOB,3PG,MP3,WMA,ACC,BMP,JPG,PNG
….
1. Appuyer sur MENU
2. Si le menu USB ne s’affiche pas, utiliser
les touches ◄/►
20
USB Update
1. Pour mettre à jour le récepteur, copier le nouveau firmware sur une clé USB (non fournie) à la
racine de cette dernière.Ne pas copier le fichier dans un dossier
2. Insérer la clé usb dans un port USB du TVT250HD
3. Selectionner Mise à jour / USB et appuyer sur OK.
Le récepteur cherchera la mise à jour sur la clé USB et chargera le nouveau logiciel
Media USB
Sélectionner l’option Média USB puis valider par OK.
1. Musique: Cliquer sur Musique et naviguer parmi les fichiers contenus sur le périphérique USB
pour trouver les fichiers musicaux à jouer
2. Photo: Cliquer sur photo et naviguer parmi les fichiers contenus sur le périphérique USB pour
trouver les photo à afficher.
Utiliser les touches
pour afficher les photos du répertoire en cours.
2. Film: Cliquer sur Film et naviguer parmi les fichiers contenus sur le périphérique USB pour trouver
les vidéos à jouer.
3. DVR (Enregistreur video): Permet de lire et gérer les enregistrements précédemments réalisés
Disque USB supportés::
1) La plus part des disques USB du marché sont supportés.Cependants si un modèle n’était pas
supporté , merci de nous signalé avec quel produits vous avez rencontré des soucis.
2) Le système de fichier recommandé est le FAT32
Instructions pour enregistrer une chaîne:
1. Pour enregistrer le programme que vous regardez , presser la touche enregistrement
La durée d’enregistrement par défaut est de 2 heures. Pour modifier la durée
d’enregistrement appuyer à nouveau sur la touche enregistrement
et saisir la durée
souhaitée avec les touches numériques du clavier.
2. Pour enregistrer une chaîne depuis le guide des programmes,
- Presser le bouton GUIDE,
- Phoisir la chaîne avec les boutons ▲/▼,
- Choisir le programme désiré dans la colonne de droite en appuyant sur la touche ► puis
les touches▲/▼
- Appuyer sur le bouton VERT pour paramétrer le programmateur d’enregistrement. Bien
faire attention de de modifier le mode sur “enregistrer” puis faire OK pour valider.
•
Pendant l’enregistrement les touches GUIDE, SUB, AUDIO ne fonctionnent pas.
•
Les chaînes enregistrées ne supportent pas le guide des programme, le sous-titrage et
plusieurs langues audio.
21
Choix du périphérique
Utiliser les touches ◄/► pour choisir l’option choix du prériphérique et appuyer sur OK .
Habituellement il y a plusieurs partitions disponibles sur le disques dur. Le TVT250 vous permet
de choisir le disque et la partition sur laquelle vous désirez enregistrer . Le fichier sera enregistré
dans la partition selectionnée, dossier”PVRRECORD”.
Avertissement
Utilisation des clé usb USB1.1 ou USB2.0 (Incluant un lecteur MP3)
1) Nous vous recommandons de ne pas enregistrer sur ce type de clé usb .
2) Ne pas retirer la clé pendant la lecture.
Guide des programmes (GUIDE)
Les informlation concernant le guide des programmes sont disponibles via la touche GUIDE de la
télécommande.
Il est possible de naviguer dans le guide des programmes et d’afficher les informations en cours en
utilisant les touches de navigation. Pour quitter le guide des programmes appuyer à nouveau sur
GUIDE ou EXIT .
22
Installation
Le menu installation permet d’effectuer une recherche des chaînes disponibles via votre antenne.
Il est nécessaire d’effectuer une nouvelle recherche de s chaînes si une nouvelle chaîne est
transmise, ou bien que vous désirez ajouter une chaîne précédemment effacée. Une nouvelle
recherche est également nécessaire si vous installez l’adaptateur dans un nouveau site.
Il existe 2 méthodes pour rechercher les chaînes :
•
Recherche automatique
L’adaptateur recherchera et mémorisera toutes les chaînes reçues.
•
Recherche manuelle
Cette option permet de rechercher une chaîhe en particulier
Recherche automatique
1. Appuyer sur MENU .
2. Choisir le menu Installation avec les touches de navigation puis appuyer sur.
Le menu Installation apparaît.
3. Sélectionner le sous menu Recherche automatique puis valider par OK.
La recherche automatique des chaînes démarre automatiquement.Lorsque la recherche est
terminée,les menus sont quittés , et l’image des programmes apparaît.
Recherche manuelle
1. Appuyer sur MENU.
2. Choisir le menu Installation avec les touches de navigation puis appuyer sur.
Le menu Installation apparaît.
3. Sélectionner le sous menu Recherche manuelle puis valider par OK.
4. Choisir la fréquence puis appuyer sur OK pour debuter la recherche Press OK . Lorsque la
recherche est terminée,les menus sont quittés , et l’image des programmes apparaît.
5. il est possible d’ajouter une fréquence absente de la liste avec la touche verte
23
Multi-audio
Certaines chaînes diffusent plusieurs langue audio. La langue française et la langue en version
originale par exemple.
1. Appuyer sur la touche verte
5. Choisir la langue audio désirée et appuyer sur OK pour valider
3. Appuyer sur EXIT pour fermer quitter le réglage de la langue audio.
La langue choisi sera alors la langue par défaut pour ce programme.
Réglages utilisateur
Réglage affichage
1. Appuyer sur MENU
2. Si le menu réglage utilisateur ne s’affiche pas,utiliser les touches ◄/►
Sélectionner Réglage affichage, puis valider par OK.
Ensuite régler le temps d’affichage du bandeau d’information de 1 à 5 secondes
24
Réglages AV
1. Sélectionner Réglages AV puis valider par OK
Les réglages ci-dessous peuvent être ajustés :
•
Mode vidéo HDMI: 576i, 576p, 720p et 1080i
•
Ratio écran : 4:3 ou 16:9
•
Format vidéo – Plein écran,recadrage,boite
au lettre
•
S/PDIF output :
PCM ,AC3,RAW,arrêt
•
Sortie Vidéo
péritel :RVB,YUV,CVBS
Presser la touche EXIT une fois les réglages accomplis
Contôle parental
Le code parental par défaut est 000000 .Il est nécessaire pour modifier les paramètres parentaux
1. Sélectionner le contrôle parental.
2. Saisir le code parental puis appuyer sur OK.
3. Accès chaîne & menu, si activé, permet de protoger l’accès aux menus et chaînes via la saisie
du code parental si la fonction est activée.
4. Contrôle parental permet de verrouiller l’accès aux chaînes de manière dynamique en fonction
25
de l’age du téléspectateur. Les options diponibles sont -10,-12,-16,-18
Programmateur
8 programmes d’enregistrements peuvent pêtre définis dans le menu programmateur .
1. Choisir Programmateur puis valider par OK.
2. Appuyer sur la touche ROUGE pour crée une programmation .
La touche Verte pour modifier une programmation
La touche Bleu pour supprimer une programmation
La touche EXIT pour quitter le menu
3. Création d’une programmation (Touche Rouge)
- Type de chaîne N : Choisir le type de chaîne à enregistrer : Tv ou radio
- Chaîne N : choisir le n° de la chaîne à enregistrer
- Nom de la chaîne : le nome de la chaîne s’affiche automatiquement en fonction du numéro de
la chaîne.
- Date de début :Modifier la date avec les touches ◄/► et les touche numériques
- Heure de début : Modifier la date avec les touches ◄/► et les touche numériques
- heure de fin : Modifier la date avec les touches ◄/► et les touche numériques
- Répétition : choisir la fréquence des enregistrements : Une fois ,quotidienne , hebdommadaire
- Mode : Voir ou enregistrer le programme
26
Mise en veille auto.
Par défaut , la mise en veille automatique est activée.
L’adaptateur passera automatiquement en veille au bout de 3 heures si aucune action de la
télécommande n’est détectée.
Réglages système
Ce menu permet notament de modifier le fuseau horaire,régler les paramètres de mise en veille,
restaurer les paramètres par défaut ,d’afficher les informations sur le terminal et d’activer
l’alimentation de l’antenne amplifiée.
Heure locale
Pour modifier le fuseau horaire ,modifer le
mode de Automatique vers manuel à
l’aide des touches ◄/►, puis sélectionner
le décalage horaire (GMT) souhaité.
Econome
Permet de modifier le mode de mise en
veille
Econome : consommation <1w en veille
Normal :
le
mode
économique
est
désactivé, et permet un redémarrage plus rapide de l’adaptateur
Restaurer les paramètres par défaut
Re initialise les paramètres par défaut .
Effacement des réglages utilisateurs ainsi que les chaînes.
Nécessite une confirmation par mot de passe
Information terminal
Affiche les informations relatives à l’adaptateur.
Alimentation antenne
Permet d’activer d’alimentation de l’antenne électronique
27
Dépannage
Si vous rencontrez des problèmes avec votre adaptateur, consultez le tableau ci-dessous.
Cela n’est peut-être pas un problème :
Symptôme
Cause probable
Solution
Appareil sous tension, mais
aucun affichage à l’écran
Vérifiez soigneusement la prise
d’alimentation pour s’assurer qu’elle est
bien insérée dans la prise murale. Y a-t-il
une interruption de courant ?
L’antenne est-elle correctement
installée ?
Insérez entièrement les fiches
dans la prise murale
Le câble d’entrée de l’antenne n’est
pas connecté
L’émetteur s’éteint
Connectez le câble d’entrée de
l’antenne
Réessayez jusqu’à ce que le
signal revienne
Réessayez plus tard
Adaptateur sous tension,
mais l’écran indique
"No signal"
Les ondes ionosphériques perturbent le
dispositif
Les paramètres des programmes sont
incorrects
Le récepteur émet un son
inhabituel
La chaîne contient plus de pistes ou de
langues audio
Réinstallez l’antenne et calibrezla
Définissez des paramètres
corrects poru les programmes
reçus dans le menu « Paramètres
système »
Appuyez sur le bouton Audio de
la télécommande pour
sélectionner la piste ou la langue
audio correcte
Astuces :
Si vous ne trouvez pas la solution à votre panne dans le tableau de dépannage ci-dessus, merci de
contacter votre revendeur ou le support technique.
N’ouvrez pas l’appareil car cela peut être dangereux pour vous-même comme pour l’appareil.
28
Spécifications
Tuner
& Channel Decoder
MPEG Transport
Stream
Video Decoding
Audio Decoding
Main System
Audio & Video
In/Out
Power Supply
Physical
Input Connector Antenna
IEC 169-2 Female
Output Connector – RF Loop Out
IEC 162-2 Male
Frequency range
174MHz–230MHz, 474MHz–868MHz
Input impedance
75Ω
IF bandwidth
7 and 8 MHz (switchable)
Code Rate
1/2, 2/3, 3/4, 5/6, 7/8
Guard Interval
1/4, 1/8, 1/16, 1/32
Standard
MPEG-4 [email protected] 1920 × 1080 @ 50MHz
Rate
64 Mbps
Profile Level
MPEG-4 [email protected] 1920 × 1080 @ 50MHz
Input Rate
80 Mbps
Aspect Ratio
4:3, Letter Box, 16:9, Pan & Scan
Video Resolution
1080i, 720p, 576p, 576i
Standard
MPEG Layer 1,2, 3; Dolby AC-3, 12S S/PDIF
Channels
Single, Dual Mono, Stereo, Joint Stereo, Dolby
Digital bit-streams
Main Processor
MSD7828L-LF-L2
Memory
4Mb Flash; 128Mb SDRAM
HDMI
HDMI 1.2 connector (with HDCP copy
protection)
SCART
CVBS,RGB
S/PDIF
Coaxial Digital Audio Output
USB
USB 2.0
Input Voltage
100–240V AC
Power Consumption
15W maximum,ERP Compliant
Protection
Seprate internal fuse
Type
Switch-mode
Dimensions
W220mm x H35mm x D122mm
Weight
0.82 kg
Optimum operating temperature
0–50°C
Made in PRC , importé par MAEC
29
Important Safety Instructions
•
To avoid electric shock, do not open the unit.
•
There are no user-serviceable parts inside. Servicing can only be performed by qualified service
personnel.
•
Connection can only be to a 240V AC mains supply.
•
All safety and operating instructions should be read before the product is operated.
•
All warnings on the product and in this user’s manual should be adhered to.
•
The antenna cable must be earthed.
•
Do not use attachments not recommended by the product manufacturer as they may cause
hazards or damage the equipment.
•
Do not overload adaptors, wall sockets or extension cables as this can result in unit failure or
electric shock.
•
For cleaning, use only a dry or lightly dampened cloth. Do not use liquid cleaners or aerosol
cleaning products.
•
Do not place this product on an uneven surface.
•
Do not block the ventilation slots on the top of the unit.
The receiver must only be connected to a power line 220-240V AC 50Hz, indoor in a dry and ventilated area.
The main AC plug is the disconnecting system from 230V power, even if the receiver himself is off. The main AC
Plug must be of easy access.
Never open your receiver cover! Risk of electrical shock!
Any repairing must be done by qualified people.
OVERLOADING
Do not overload a wall outlet, extension cord or adapter as this may result in fire or electric shock.
Ensure that the power source (socket) is easily accessible.
LIQUIDS
This STB shall not be exposed to dripping or splashing and that no objects filled with liquids, such as vases,
shall be placed on the STB.
CLEANING
Disconnect the STB from the main supply before cleaning. Do not use any kind of solvents to clean the STB,
only use a soft-dry cloth.
VENTILATION
The slots on top of the STB must be left uncovered to allow proper airflow to the unit.
Ensure a minimum distance of 5cm around the apparatus for sufficient ventilation.
3
Ensure that the ventilation is not impeded by covering the ventilation openings with items such as
newspapers, table-cloths, curtains, etc.
Do not stand the STB on soft furnishings or carpets.
Do not expose the STB to direct sunlight or do not place it near a heater.
Do not stack electronic equipments on top of the STB.
Do not place naked flame sources, such as lighted candles on the apparatus.
ATTACHMENTS
Do not use any unrecompensed attachments as these may cause hazard or damage to the STB.
CONNECTION TO THE CABLE
Disconnect the STB from the main supply before connecting or disconnecting the cable.
FAILURE TO DO SO CAN DAMAGE THE BOX.
CONNECTION TO THE TV
Disconnect the STB from the main supply before connecting or disconnecting the cable from TV.
FAILURE TO DO SO CAN DAMAGE THE TV.
LOCATION
Place the STB indoor in order not to expose to lightening , rain or Sunlight.
Use the apparatus only in moderate climates (not in tropical climates).
Battery handling
Batteries may contain toxic agents that are hazardous to the environment. Therefore, dispose of the
batteries immediately according to the prevailing statutory regulations. Never throw the batteries in normal
household waste.
4
•
Main Features
•
High Definition Multimedia Interface (HDMI)
output
•
Decodes high definition and standard
definition broadcasts
•
Component output (Y/Pb/Pr)
•
Dolby Digital audio output: S/PDIF optical
•
Composite output
•
USB2.0 Host for Video&MP3 Playback,JPEG
Viewing and Software
•
Multi-video definitions: 576i/ 576p/720p/1080i
•
Auto and manual channel searching
Fully featured infra-red remote control
•
Band selection: 7M & 8M
•
Tuner loop-through
•
CD-quality audio (stereo)
•
Favourite channels and stations list
•
EPG: Electronic Program Guide
•
16:9 and 4:3 aspect ratios
•
Signal level and quality indicators
•
Subtitles
•
Parental guidance locking
•
8 timer event settings
•
USB port for software upgrades
•
COFDM demodulation
•
DVB/T and MPEG-4(H.264) compliant
5
Contents
Important Safety Instructions ........................................................................................................................................... 3
Contents............................................................................................................................................................................. 6
General Introduction......................................................................................................................................................... 7
UNPACKING....................................................................................................................................................................... 7
pack the unit and check to make sure that all of the following.................................................................................. 7
We hope you enjoy using your digital Terrestrial receiver! .......................................................................................... 7
Controls and Indicators .................................................................................................................................................... 8
Rear panel ......................................................................................................................................................... 9
Remote Control................................................................................................................................................ 10
Installing the batteries in the remote control ............................................................................................. 11
How to Connect .............................................................................................................................................................. 12
Step 1: Connect to the antenna....................................................................................................................... 12
Step 2: Choose an installation method............................................................................................................ 12
Step 3: Coaxial connections ............................................................................................................................ 13
Dolby Digital................................................................................................................................................... 13
Looping Out (for VCR recording) ................................................................................................................ 13
Getting Started ................................................................................................................................................................ 14
First-time use ................................................................................................................................................... 14
Operation......................................................................................................................................................................... 16
Basic operations .............................................................................................................................................. 16
Selecting a channel...................................................................................................................................... 16
Adjusting the volume .................................................................................................................................... 17
Getting channel Information ....................................................................................................................... 17
TV/Radio switching........................................................................................................................................ 17
Closed captions ............................................................................................................................................ 18
Picture freeze ................................................................................................................................................. 18
Favourites list................................................................................................................................................... 18
Adding channels or stations to your favourites list .................................................................................... 19
Selecting a favourite to watch or listen to ................................................................................................. 20
Organising channels and stations ................................................................................................................... 20
USB.................................................................................................................................................................. 22
Electronic Program Guide (EPG) .................................................................................................................... 24
Displaying program information.................................................................................................................. 24
Selecting a channel to watch from the EPG............................................................................................. 25
Rescanning for channels and stations............................................................................................................. 26
User Settings..................................................................................................................................................................... 28
Audio–Visual (AV) settings .............................................................................................................................. 28
Parent control .................................................................................................................................................. 29
Timer settings .................................................................................................................................................. 30
System Maintenance...................................................................................................................................................... 32
System information ........................................................................................................................................ 32
Clearing and resetting data ........................................................................................................................ 32
Troubleshooting............................................................................................................................................................... 34
Specifications .................................................................................................................................................................. 35
6
General Introduction
UNPACKING
pack the unit and check to make sure that all of the following
items are included in the packaging.
1 x Remote Control Unit (RCU)
1 x User Manual
2 x AAA batteries
1 x Digital Terrestrial Receiver
We hope you enjoy using your digital Terrestrial receiver!
7
Controls and Indicators
Front panel
CH: Change channels or items from top to bottom on the menus.
Dimension: 220x 124x 32mm (W x D x H )
8
Rear panel
No.
Name
Connector
Function
1
LOOP OUT
IEC 169-24 female
Loop-through output to VCR, etc.
2
TV ANT IN
IEC 169-24 female
Input from terrestrial antenna
3
TV SCART
TV SCART
For the video/audio input of the TV.
4
HDMI
HDMI cable
HDMI video-and-audio connection
USB
USB2.0
USB2.0 Host for Video&MP3
Playback,JPEG Viewing and Software
6
S/PDIF
OPTICAL S/PDIF
Digital audio output (optical)
7
POWER
POWER
Power ON/OFF switch.
5
Note the presence of this symbol on the rear panel. This indicates that
important operating and maintenance instructions accompany the
product. These are set out in this manual. It is highly recommended
that you read this manual thoroughly before using the product.
To reduce the risk of electric shock, do not remove any panel of the
STB. Even when the unit is turned off, voltages may be present within it
that are of sufficient magnitude to constitute a risk of electric shock.
9
Remote Control
1. STANDBY: To switch to stand-by mode when the
receiver is on (or vice versa)
8. PAGE / : To move to the next or
previous page
2. Numeric Keys (0–9): To choose a channel
directly, or to enter numeric information in a
menu
9. CH (▲/▼): To change the channel, or to
move the cursor
3. TV/RAD: To switch between TV and radio (and
vice versa)
4. GUIDE (Electronic Program Guide): To show the
TV and radio program guide
5. MENU: To display the main menu, or return to a
previous menu
6. (▲/▼): To change the channel, or to move the
cursor left or right in a menu
7. OK: To show the channel list in viewing mode,
10
10.SUB: To turn subtitles on or off
11. AUDIO: To choose speakers (left, right or
stereo), audio format and audio
language
12. FAV: To display the favourites list in
viewing mode, and to select a favourite
13. PAUSE: To freeze the screen
14. USB:To Access DVR Menu directly
15.
To fast rewind a movie or music
and to select an item (or confirm a choice) in a
menu
16.
17.
To fast forward in a movie or music
track
track
24.TXT: Displays TXT information broadcasting
from satellite.
25. INFO: To show information about the
current program
To go to the end of a movie or music
track, or show the next photo
18. MUTE: To turn the sound on or off
26. ASPECT: To cycle through the aspect
ratios: 16:9 and 4:3
19. FORMAT: To cycle through the video
definitions: 576i, 576p, 720p and 1080i
27.STOP: To stop a movie or music track, or
to stop recording a movie
20 . BACK: To return to the previous channel or
station
28.
21. EXIT: To close the current menu and return to
normal viewing
22.
To start recording a movie
29.
/ To start or pause a movie or music
track
30.
To go to the end of a movie or
music track, or show the next photo
(▲/▼): To change the channel, or to move
the cursor up or down in a menu
23. . VOL (▲/▼): To change the volume in viewing
mode, or to change an option or setting in a
menu
Installing the batteries in the remote control
1. Press down on the retaining catch on the lid of the battery recess on the remote control and
remove the lid.
2. Insert two AAA batteries into the recess.
Be careful to insert the batteries as shown in the diagram inside the recess.
3. Replace the lid over the recess and gently push down on the lid until it snaps firmly into place.
11
How to Connect
Refer to the diagram on page 7 for the location of the sockets identified by numbers in the
procedures in this section.
Make sure you have installed the batteries in the remote control before you begin connecting the
receiver to your TV. Depending on the connection method you choose, you may need to adjust
certain settings using the remote control before you can see a digital broadcast.
Step 1: Connect to the antenna
Connect the antenna lead coming from your antenna wall plate to the TV ANT IN socket on the STB.
Step 2: Choose an installation method
There are a number of methods of connecting the STB. These methods are labelled A, B, C and D
below.
A: High Definition Multimedia Interface
If your TV has an HDMI socket, connect an HDMI cable between the HDMI socket on the STB (socket
2) and the HDMI socket on your TV.
A HDMI connection incorporates video and audio. You do not need to make separate connections for
audio.
An HDMI cable is not provided with the STB.
12
Step 3: Coaxial connections
Dolby Digital
Dolby digital bitstream audio S/PDIF can be achieved using an coaxial cable. (This cable is not
supplied.) The cable should be connected between socket 3 on the STB and the S/PDIF socket on
your Dolby Digital decoder amplifier.
Looping Out (for VCR recording)
In order to watch one channel while recording another on a VCR, connect an RF cable (not
supplied) between the LOOP OUT socket on the STB (socket 1) and the RF IN socket on your VCR.
Note that VCR recordings are only analogue, not digital.
13
Getting Started
First-time use
Once you have connected the STB to your antenna and to your television, you need to:
1. Turn on the television.
2. Plug the STB into mains power.
4. Select the video or AV input channel to which the STB is connected: this can be done by
pressing the TV/AV or VIDEO button on your TV remote control. (Refer to your TV user’s manual
for instructions.)
The Technologies banner appears on your TV screen, followed by a message asking if you want
to automatically search for channels and stations.
5. To search for available channels and stations, press OK on the remote control. The Auto Search
window appears and the searching begins.
If you want to search for channels and stations yourself, see “
14
Rescanning for channels and stations” on page 24 or instructions and ignore the rest of this
procedure.
As channels and stations are found, they are displayed on the Auto Search window.
When the STB can find no more channels and stations, the search ends and one of the TV
stations found will appear on the screen.
15
Operation
Basic operations
Selecting a channel
There are a number of ways to select a TV channel or radio station:
•
Number pad on the remote control: If you know the channel number, enter the number using
the number keys on the remote control and then press OK. (If you don’t press OK, the channel
selected appears after approximately 2 seconds.)
To choose a radio station using the number keys, press TV/RADIO first and then enter the
number. (For example, 201 is the number for ABC Dig Jazz.)
NOTE: The STB uses the Logical Channel Numbering system (LCN) by default. Some
samples of primary LCN channel numbers are:
1 = Ten network and affiliates
2 = ABC
3 = SBS
7 = Seven network and affiliates
9 = Nine network and affiliates
Secondary channels can be selected by pressing the primary number followed by another
number. (For example, pressing 2 gives you ABC1, and pressing 22 gives you ABC2.)
•
Channel list: Press OK on the remote control. This displays the channel list. (To list radio stations
instead of TV channels, press TV/RADIO before pressing OK.)
Press ▲ or ▼on the remote control until the channel or station you want is highlighted and then
press OK.
TIP: Press the PAGE button to quickly scroll through a long list of channels.
16
•
Favourites list: Press FAV on the remote control to see the first channel or station in your
favourites list. Press ▲ or ▼to see each favourite in turn. See “Favourites” on page 17 for
instructions on creating a favourites list.
•
Scroll: Press▲ or ▼on the remote control to scroll through the channels in channel number
order. (You can also scroll through the channels in order by pressing the channel up and
channel down buttons on the front panel of the STB.)
•
By EPG: Press EPG on the remote control, select the channel from the electronic program guide
(EPG), and press EPG again. The EPG is explained on page 23.
•
Previous channel: Press the BACK button to return to the previous channel or station.
Adjusting the volume
While you are watching TV or listening to the radio, press ▲ or ▼ on the remote control to decrease
or increase the volume respectively.
Turning the sound off (muting)
To turn off the sound altogether, press the MUTE button on the remote control (button 18 in the
diagram on page 10). The mute icon is displayed on the screen. Press the MUTE button again to
restore the sound.
Getting channel Information
•
Press INFO on the remote control to display the information banner.
Information about the current and the next program is provided. The headings along the top of
the banner are SUB (Subtitles) and LOCK,STEREO. A heading will be highlighted if the
corresponding option applies (for example, if the broadcast is in high definition, if subtitles are
available, if stereo are available, and so on).
The information banner will stay displayed for a few seconds. To hide it sooner, press EXIT on the
remote control.
TV/Radio switching
Press TV/RADIO on the remote control to switch between TV channels and radio stations (or vice
versa).
17
Closed captions
Closed captions are the spoken words written on the screen. This option is particularly useful for the
hard-of-hearing.
To turn on closed captions (or turn them off):
1. Press the SUB button on the remote control. The Subtitle window appears.
2. With Off highlighted, press ▲ or ▼until the option you want—Off or Language—is shown.
3. If the subtitles are being broadcast in more than one language and you want to choose a
language other than the one shown on the screen, press to highlight the Language option
and then press ▲ or ▼until the language you want is shown.
3. Press OK.
Picture freeze
•
Press PAUSE on the remote control to freeze the display.
•
Press PAUSE again to resume normal viewing.
Favourites list
You can create a favourites list of channels and then select a channel from that list. This makes it
easier to choose and switch between channels if there are many channels available in your area.
18
You display your favourites lists by pressing FAV on the remote control. You then press ▲ or ▼to step
through each favourite. Stop pressing when you reach the favourite you want.
Adding channels or stations to your favourites list
Follow this procedure to add channels or stations to your favourites list, or to remove them.
1. Press MENU on the remote control. The Main Menu appears.
2. If Channel Manager is not seen in the main menu, press ▲ or ▼ until it is and then press OK. The
Channel Manager menu appears.
3. If you want to make a TV channel a favourite, make sure Edit TV Channels is highlighted; if you
want to make a radio station a favourite, make sure Edit Radio Channels is highlighted. With the
option you want highlighted, press OK.
A list of channels or stations appears.
4. Press ▲ or ▼until the channel or station you want to select is highlighted.
5. Press the FAV button on the remote control to mark the highlighted channel or station as a
favourite (or to mark it for removal from your favourites list). An icon of a heart appears beside
the channel or station name to indicate that it is to become a favourite (or the icon disappears
if it was already a a favourite).
6. If you want to select another channel or station as a favourite, repeat from step 4.
7. Press EXIT. A message appears asking you to confirm that you want to save the changes.
19
8. To Save,Select Yes,To cancel, Select NO.
9. Press OK. to return to normal viewing.
Selecting a favourite to watch or listen to
Press FAV on the remote control. The first channel or station or channel in your favourites list appears.
Note that the information panel reads FAV channel.
Organising channels and stations
The Channel Manager option on the Main Menu enables you to organise channels and stations.
1. Press MENU on the remote control. The Main Menu appears.
2. If Channel Manager is not highlighted on the main menu, press ▲ or ▼ until it is and then press
OK. The Channel Manager menu appears.
3. If you want to organise a channel, make sure Edit TV Channels is highlighted; or if you want to
delete a station, make sure Edit Radio Channels is highlighted. With the option you want
highlighted, press OK.
A list of channels or stations appears.
20
4. LOCK:Press ▲ or ▼ until the channel or station you want to lock is highlighted.Press SUB
button(the red button)again the program will be un-locked.(The default password is 000000)
5. MOVE:Press ▲ or ▼ until the channel or station you want to lock is highlighted.Press AUDIO
button(the green button),the Move logo will appear on the sreen. Press
or
to move to
the place what you want.
6. DELETE:Press ▲ or ▼ until the channel or station you want to delete is highlighted.
.
Press the INFO button on the remote contron,the following will appear “Do you want to delete
this.” Pessing OK will delete,Pressing EXIT will cancel.
.
If you want to delete another channel or station, repeat from step 4.
7. SORT:Press PAUSE button (the blue button) to sort channels.The sort icon will appear at the top
of the channels list.
8. FAV: Press ▼ or ▲ until the channel or station you want to select is highlighted.
Press the FAV button on the remote control to mark the highlighted channel or station as a
favourite (or to mark it for removal from your favourites list). An icon of a heart appears
beside the channel or station name to indicate that it is to become a favourite (or the icon
disappears if it was already a a favourite).
If you want to select another channel or station as a favourite, repeat from step 4.
Press EXIT. A message appears asking you to confirm that you want to save the changes.
To Save,Select Yes,To cancel, Select NO.
NOTE: You can delete channels and stations that you are never likely to watch or listen to. If you
want to re-instate a channel or station that you have deleted, you will need to rescan for it.
See “
21
Rescanning for channels and stations” on page 24 for instructions.
USB
To play USB files, record a program or update
software through USB port.
The USB function supports a number of file formats:
TS,TRP,DAT,MPG,MPEG,AVI,MKV,MOV,MP4,VOB,3PG,
MP3,WMA,ACC,BMP,JPG,PNG and so on.
1. Press MENU on the remote control. The Main Menu
appears.
2. If USB is not highlighted on the main menu, press
▲ or ▼ until it is and then press OK. The USB menu
appears.
USB Update
If a new version of software STB becomes available, you can download the software to your PC
and then transfer it to your STB. You will need a USB memory stick (not supplied with the STB).
1. Once you have obtained an upgrade file, transfer it to a USB memory stick. You need to place
the file at the root (or top) level on the memory stick, not inside a folder or directory.
2. Insert the stick in the USB port
22
3. Press MENU on the remote control. The Main Menu screen appears.
4. If USB is not highlighted on the menu, press ▲ or ▼ until it is and then press OK.
The USB window appears.
5. press ▲ or ▼Select USB Update and press OK. Receiver will automatically search for software file
on USB memory stick and will load new software on to receiver.
USB Media
.Press ▲ or ▼to select the USB Media option, then Press OK, Multimedia appears.
1. MUSIC: press ▲ or ▼to select Music.Select the audio file what you want to play.
2. PHOTO: press ▲ or ▼to select Photo. Select the photo what you want to view. Press the
PLAY
key to view next picture.
3. Movie: press ▲ or ▼to select Movie. Select the video file what you want to play.
4. DVR:
Supported Device:
1) Most popular USB2.0 Hard Disk Drives are supported by our STB, however due to many types of
HDD being available in the market, if you find one particular HDD that does not work with our
STB, please kindly provide us the details and we will be happy to solve it for you if possible.
2) System required: FAT32
Instructions for recording TV programs:
1. To record a TV program you are currently viewing press the RECORD button. The default
recording time is 2 Hours. If you wish to edit the default recording time, press the RECORD
button again then manually enter the desired time using the numeric buttons.
2. To record a TV program from the EPG, press the EPG button, select the program you wish to
record using the ▲ or ▼buttons then press the Reserve/Rec GREEN button. The program
information will be displyed in the timer menu. Scroll down to MODE and select RECORD,
then press the OK button to confirm and EXIT to return to live viewing. The receiver is now
set to record this program. Please note that if you are watching another channel at this
time the receiver will automatically change to the channel set for the recording.
•
During recording, EPG; SUB; Multi AUDIO functions can not be operated.
•
Recorded TV programs will not support EPG: and SUB: Multi AUDIO.
3. When record button is pressed, the channel group list will be displayed if the current stream
has more than one channels , and you can select which channel you wish to record;
(If the current stream just one channel, it will recording currently viewed channel
immediately);And when channel is recording , you can press up or down botton to
change channel on the same stream.)、
Record Device
.Press ▲ or ▼ to select the Record Device option, then Press OK, Record Device menu appears.
23
Usually there are several partitions available in HDD’s, and our STB can allow you to choose
different partitions for recording purposes, choose from DVR partition menu, press ▲ or ▼ to
choose the one you want, and press the OK button to save. Then the recorded video file will
be stored into this partition. The recorded file will be saved in the DVRRECORD folder.
WARNING
Using USB1.1 or USB2.0 Key or Stick (Including MP3 player)
1) We strongly suggest not to record any TV program by USB Key or Stick. Due to the large variety
of USB Key’s or Stick’s being available in the market with different quality levels, we cannot
guarantee any damage of your USB Key or Stick will occur from attempting to record on to it.
2) Do not remove your USB device from the STB while it is in use during any USB multimedia function.
Electronic Program Guide (EPG)
Some providers broadcast information about their programs. This information is available on screen
via an electronic program guide, displayed by pressing GUIDE on the remote control. An example
is shown below.
You can navigate through the EPG looking for information about channels and programs
(explained in the next section) or press EPG or EXIT to close the guide.
Displaying program information
The information displayed when you press GUIDE is information about the channel that is showing at
the time. At the left of the screen is information about the current channel list; at the right of the
screen is a list of upcoming programs.
24
To display information about the programs on another channel, press ▲ or ▼until the channel you
want information about is highlighted at the left of the screen.
To display more information than is currently shown about a selected channel, you can move the
channel name pane (at the left of the window) and move the program name pane & press OK. (at
the right of the window) and vice versa.
•
To move to the program pane, press OK.
•
To display program information for next day, press INFO key to step through the days.
•
To display program information for previous day, press SUB key to step through the days.
•
To scroll through the programs for a day, press ▲ or ▼.
•
To move back to the channel list in the left pane of the window, press ▲ or ▼
Selecting a channel to watch from the EPG
1. With the channel name panel selected, press CH▲ or CH▼ until the channel you want to watch
is selected.
2. Press GUIDE. The current program of the selected channel is now showing.
Reserve/Rec:Press AUDIO button( the green button) to set a timer.
25
Rescanning for channels and stations
The Install option on the main menu enables you to scan for—that is, detect—digital TV and radio
stations available in your area. You will need to rescan if new channels or stations become
available, if you want to reinstate a channel or station you have deleted, or if you move to a new
location.
There are two scanning options:
•
Auto Search
The STB will automatically search for all digital TV and radio stations it can detect and store their
details.
•
Manual Search
This option lets you search for a particular channel (or all channels from a specified
broadcaster).
Automatic Search
1. Press MENU on the remote control.
2. If Installation is not highlighted on the main menu, press ▼ or ▲ until it is and then press OK.
The Installation sub-menu appears.
3. If Auto Search is not highlighted on the sub-menu, press ▲ or ▼until it is and then press OK.
The Auto window appears, and the search begins automatically. When the search is finished, a
channel that has been found will begin playing.
Manual Searching
NOTE: Automatic searching (described above) is suitable in most cases. You might use
manual searching if you have deleted a channel and now want to access it again. In this
case, you would just search for that particular channel.
1. Press MENU on the remote control.
2. If Installation is not highlighted on the main menu, press ▼ or ▲until it is and then press OK.
26
The Installation sub-menu appears.
3. If Manual Search is not highlighted on the sub-menu, press CH
or CH
until it is and then press
OK.
The Manual Search window appears.
4. Press OK to begin scanning. When the search is finished, the channel will begin playing if it has
been found; otherwise the previous channel will reappear.
5. Press ▲ or ▼to select the Frequency what you wish to search.
6. Press AUDIO button (the green button) to add the Frequency what you wish to add.
Multi-language and Dolby Digital broadcasting
If a channel is being broadcast in more than one audio language, you can choose which
language to listen to. Similarly, if a channel is being broadcast in more than one audio format, you
can choose which format to listen to.
1. Press the AUDIO button (the green button) on the remote control. The Audio setting window
appears.
2. If more than one audio language or format is being broadcast, pressing ▲ or ▼will cycle
through each language and format.
If a channel is being broadcast in Dolby Digital, the language will be shown with an AC3 suffix,
27
as in English (AC3). Non-Dolby broadcasts will have an MP2 suffix, as in English (MPEG2).
3. Press EXIT to close the Audio setting window and return to normal viewing.
User Settings
Audio–Visual (AV) settings
1. Press MENU on the remote control. The Main Menu appears.
2. If User Setting is not highlighted on the main menu, press▼ or ▲until it is and then press OK. The
User Setting menu appears.
If OSD Setting is not highlighted on the menu, press ▲ or ▼ until it is and then press OK. The
OSD Settings menu appears.
3. If AV Setting is not highlighted on the menu, press ▲ or ▼ until it is and then press OK. The AV
Setting menu appears.
With this menu you can control the following settings:
•
Sceen ratio – 4:3 or 16:9
•
•
Aspect mode – Full screen, Letterbox or Pan
& Scan
28
S/PDIF output – PCM ,AC3,RAW
•
HD Video Mode – 576i, 576p, 720p and 1080i
4. Select an option you want to change. If necessary, press ▲ or ▼until the option is highlighted.
5. With the option you want to change highlighted, press ▼ or ▲ to step through the allowable
values (shown in the panel at the right of the screen). Stop when the value you want is
displayed.
6. If there is another option you want to change, repeat this procedure from step 4.
7. When you have finished, press EXIT to save and return previous menu.
Parent control
The STB is shipped with a default personal identification number (PIN). The default PIN is 000000. The
PIN is required if you have enabled the parental lock To change the PIN:
1. Press MENU on the remote control. The Main Menu appears.
2. If User Settings is not highlighted in the main menu, press ▲ or ▼ until it is and then press OK. The
User Settings menu appears.
3. If Parent Control is not highlighted, press ▲ or ▼until it is and then press OK & Input Password.
The Parent Control menu appears.
29
4. If Parent Lock is not highlighted, press ▲ or ▼ until it is and then press OK The Parent Lock menu
appears. You can press ▲ or ▼
to select the Level of parental guidance (All, R and above, AV
and above, MA and above, M and above, PG and above and G above).
5.Press to move to the Change Password option,Press OK to Old Password option
and enter the current PIN using the number keys on the remote control. (If you haven’t previously
changed the PIN, this will be the default PIN: 000000.)
4. Press CH▼ to move to the New pin option and enter a new PIN. (A PIN must be six digits long.)
5. Press CH▼ to move to the Confirm pin option and re-enter the new PIN.
6. Press OK to save your changes, and then EXIT to return to normal viewing.
Timer settings
You can set up to eight timers at which specified channels will automatically come on or the unit
will turn off. Follow this procedure to set or change a timer.
1. Press MENU on the remote control. The Main Menu appears.
2. If User settings is not highlighted in the main menu, press ▲ or ▼ until it is and then press OK. The
User Settings menu appears.
3. If Timer is not highlighted, press ▲ or ▼until it is and then press OK. The Schedule window
appears.
30
4. Press SUB key ( the red button) to add a timer you want to.The Event Add screen appears.
5, All the timer options should now be available to you (see below). Press CH▼ or CH▲to activate
to select a timer you want to set.You can Edit and Delete the timer.
6,If you have selected a timer that has already been set and want to edit it, press thr AUDIO
key(the green button) to edit the timer.
7, If you have selected a timer that has already been set and want to cancel it, press Timer key(the
blue button) to delete the timer.
5,All the timer options should now be available to you (see below). Press CH▼ to select the Channel
Type option. Press VOL▼ or VOL▲ to set channel type . You can set channel type to TV or Radio.
9, Press CH▼ to select the Channel No.option. Press VOL▼ OR VOL▲ to select the channel you want
displayed.
6, Press CH▼ to select the Start Date,Start Time or End time options. Use the number keys on the
remote control to enter the time you what the to turn on or turn off .
Note that times must be entered using the 24-hour clock format. For example, 8 o’clock in the
morning is entered as 0800, while 8 o’clock in the evening is entered as 2000.
7, Press CH▼ to select the Repeat option.You can set the timer to Once, Daily or Weekly. Press
VOL▼ OR VOL▲ until the timer service option you want is displayed.
12. Press the ok button on the remote control. Your timer settings are saved.
31
System Maintenance
You can upgrade the software in your STB as new versions become available. Information about
the current version (and information about the hardware) is available from the menu to help you
determine if you need to upgrade. This information might also be useful if you need to obtain
technical support from Technologies.
You can also reset the STB by reinstating the default settings it had when it left the factory.
System information
To display system information about your STB, such as the model number, software version,
hardware version:
1. Press MENU on the remote control. The Main Menu screen appears.
2. If System Settings is not highlighted on the menu, press ▼ or ▲ until it is and then press OK.
The System Settings window appears.
Make a note of the information on this window if you are intending to contact Technologies for
technical support.
3. Press EXIT or MENU twice to return to normal viewing.
Clearing and resetting data
You can reset the STB, by restoring the unit to the default settings it had when it left the factory. This
clears all channels, stations, preferences and other user settings. You will need to rescan for
channels and stations before you can continue watching digital TV or listening to digital radio.
WARNING: This procedure returns the STB to its default factory settings. All data (such as
time zone, channels, stations and timers) will be lost.
32
1. Press MENU on the remote control. The Main Menu screen appears.
2. If System Settings is not highlighted on the menu, press ▲ or ▼ until it is and then press OK. The
System Settings menu appears.
3. If Factory Default is not highlighted on the menu, press ▲ or ▼until it is and then press OK.
4. A warning message appears asking if you are sure you want to clear all services and reset all
settings. To continue, press OK. To cancel, press EXIT and ignore the rest of this procedure.
33
Troubleshooting
There may be a number of causes of abnormal operation. Occasionally receivers can hang (just as
a PC will do from time to time). In this case, you should disconnect the STB from mains power, wait
30 seconds and then reconnect it to mains power. If the unit is still not operating correctly, refer to
the following table for the indicated problem and likely solution.
Symptoms
Indicators on front
panel do not light up
Possible causes
AC power cord is not
connected
Solution
Check that the power cord is plugged into
the wall socket.
Make sure the power switch is on.
The cables connecting the
TV and the receiver are
not properly connected
Make sure that the correct cable is
connected between the TV and the receiver,
and that the antenna is connected.
The TV mode is not correct
Check that the correct video or AV input has
been selected on your TV.
Incorrect video definition
If you have a Composite or S-Video
connection to your TV, video definition must
be set to 576i. Press EXIT and then FORMAT on
the remote control until you see a picture.
Insufficient signal strength
Check that the antenna cable is securely
plugged in and that the signal is adequate.
Electrical interference
Check that all antenna cabling is quadshielded.
The receiver or TV is in
mute mode
Press the MUTE button on the receiver and on
the TV.
Initial volume level has not
been set on your TV
Select the desired TV volume level using the
TV remote control.
Batteries not inserted
Insert batteries
Batteries are flat
Change the batteries in the remote control.
Remote control is outside
the range of operation
Aim the remote control directly at the
receiver.
Files are of wrong format.
Check that the format is, MP3.
Files are not at the root or
top level.
Move the files out of folders or directories.
No picture and
sound
Picture and/or audio
glitch
No sound
Remote control is not
working
Music files on a USB
memory stick don’t
appear
34
Specifications
Tuner
& Channel Decoder
MPEG Transport
Stream
Video Decoding
Audio Decoding
Main System
Audio & Video
In/Out
Power Supply
Physical
Input Connector Antenna
IEC 169-2 Female
Output Connector – RF Loop Out
IEC 162-2 Male
Frequency range
174MHz–230MHz, 474MHz–868MHz
Input impedance
75Ω
IF bandwidth
7 and 8 MHz (switchable)
Code Rate
1/2, 2/3, 3/4, 5/6, 7/8
Guard Interval
1/4, 1/8, 1/16, 1/32
Standard
MPEG-4 [email protected] 1920 × 1080 @ 50MHz
Rate
64 Mbps
Profile Level
MPEG-4 [email protected] 1920 × 1080 @ 50MHz
Input Rate
80 Mbps
Aspect Ratio
4:3, Letter Box, 16:9, Pan & Scan
Video Resolution
1080i, 720p, 576p, 576i
Standard
MPEG Layer 1,2, 3; Dolby AC-3, 12S S/PDIF
Channels
Single, Dual Mono, Stereo, Joint Stereo, Dolby
Digital bit-streams
Main Processor
MSD7828L-LF-L2
Memory
4Mb Flash; 128Mb SDRAM
HDMI
HDMI 1.2 connector (with HDCP copy
protection)
SCART
CVBS,RGB
S/PDIF
Coaxial Digital Audio Output
USB
USB 2.0
Input Voltage
100–240V AC
Power Consumption
15W maximum,ERP Compliant
Protection
Seprate internal fuse
Type
Switch-mode
Dimensions
W220mm x H35mm x D122mm
Weight
0.82 kg
Optimum operating temperature
0–50°C
Made in PRC
Imported by MAEC
35
2
Advertencia de Seguridad
El sensor usa un voltaje de 220-240V, corriente alterno 50Hz, por favor deje el enchufe
en un lugar seco y ventilado.
El enchufe de alimentación de la unidad se debe cortar de la alimentación 230V, aunque
la unidad este apagada.
El enchufe deber ser fácil de conectar y desconectar.
Para evitar descarga eléctrica, no abra la cubierta de la unidad en ninguna circunstancia.
Cualquiera reparación a la unidad tiene que ser hecha por personal profesional.
Sobre cargado
Para evitar incendio o descarga eléctrica, no sobre funcione la toma de la pared, enchufe de
extensión o Set top box.
Por favor garantice la facilidad de conectar a fuente de alimentación.
Líquidos
La unidad tiene que ser alejada de líquidos, no coloque ningún recipiente con liquido sobre esta
unidad.
Limpieza
Antes de limpieza por favor desconecte la unidad de la fuente de alimentación. Use un
seco para limpiar la unidad, no use ningún solvente.
paño
Ventilación
Para asegurar una buena ventilación interna, prohibido cubrir los orificios de la unidad.
Mantener por lo menos 5cm de espacio alrededor de la unidad, a fines de garantizar la ventilación.
Asegurar que los orificios de ventilación no sean obstruidos por ningún objeto (periódico, paño,
cortina, etc.)
No coloque la unidad en muebles que tienen tela en la superficie o en alfombra.
No coloque la unidad bajo luz del sol directo o cerca a un horno.
No coloque la unidad encima de otros aparatos electrónicos.
No coloque fuentes de llamas encima de la unidad (como velas encendidas, etc.).
Accesorios
Nunca use accesorios no recomendados por el fabricante, a fines de evitar peligros o daño a la
unidad.
Conexión con la TV
Desconecte el cable de alimentación de la unidad antes de conectar o desconectar el cable de
conexión de la TV.
Lo que no obedecer estas advertencias puedan causar daños a la TV.
Colocar
Coloque la unidad en el interior, para evitar el contacto con polvo, lluvia y rayos solares directos.
Use la unidad bajo condiciones climáticas adecuadas (No use la unidad bajo condiciones climáticas
tropicales) .
Uso de la batería
La batería puede tener elementos tóxicos que afectan al medio ambiente, por favor use baterías que
3
cumplan con las reglas y leyes, prohibido botar las baterías en basura regular.
Consignas de seguridad
El receptor debe ser enchufado a una conexión 220-240V VAC 50Hz, en interior, en un
lugar seco y ventilado
El enchufe actua como dispositivo seccionador de la alimentación 230V, aunque el
aparato el mismo esté apagado.
El enchufe de alimentación debe ser facilmente accesible
Nunca abra el capó de su receptor ! Hay un riesgo de choque eléctrico
Cualquier mantenimiento deberá ser efectuado por empleado cualificado
SOBRECARGA
No sobrecargue un enchufe mural, una alargadera eléctrica o un adaptador, esto podría provocar
un incendio o una descarga eléctrica.
Verifique que la fuente de alimentación (enchufe) sea de acceso fácil.
LÍQUIDOS
Este receptor no debe ser expuesto a las gotas o proyecciones de líquido, ningún objeto lleno de
líquido, tal como un vaso, debe colocarse sobre el receptor.
LIMPIEZA
Desconecte el receptor de la alimentación principal antes de su limpieza. No use ningún
disolvente para limpiar el adaptador, sólo use un paño suave y seco.
VENTILACIÓN
Las rejillas sobre el receptor no deben ser cubiertas para que el aire circule libremente en el
aparato.
Deje un espacio mínimo de 5cm alrededor del aparato a fin de garantizar una ventilación
suficiente.
Tenga cuidado que la ventilación no sea obstruida por elementos que cubran las aperturas de
ventilación (periódicos, manteles, cortinas, etc.).
No coloque el receptor sobre muebles blandos o alfombras.
No exponga el aparato a la luz directa del sol y no lo cloque cerca de una calefacción.
No apile los aparatos electrónicos sobre el receptor.
No coloque fuentes de llama viva (velas encendidas, por ejemplo) sobre el aparato.
ACCESORIOS
No use ningún accesorio no recomendado, esto podría ser una fuente de peligro o dañar el
receptor.
4
CONEXIÓN AL TV
Desconecte el aparato de la alimentación principal antes de conectar o desconectar el cable TV.
EL NO RESPETO DE ESTA CONSIGNA PODRÍA DAÑAR EL TV.
EMPLAZAMIENTO
Coloque el receptor al interior para no exponerlo a los rayos, a la
lluvia o el sol.
Sólo use el aparato en climas moderados (no en climas tropicales).
Manejo de las pilas
Las pilas pueden contener productos tóxicos peligrosos para el medio ambiente. En
consecuencia, elimine inmediatamente las baterías de acuerdo con la reglamentación legal en
vigor. Nunca tire las pilas a la basura doméstica normal.
5
Apéndice
Este Manual de instrucciones es para conocer las funciones de la unidad (instalación, selección de
canales) y operación de otras funciones. Todas las funciones se pueden realizar por medio del
control remoto.
El control remoto es para facilitar la operación de cada función, y satisfacer la comodidad de uso.
Con el control remoto puede hacer todas las operaciones, y ver programas de TV por medio del Set
Top Box.
Advertencia
El uso de software no oficiales pueden causar todo tipo de problemas. Fuera de los software
oficiales del fabricante o vendedor al por mayor, los problemas causados por el uso de cualquier
otro software no es cubierto bajo la garantía del fabricante. Por lo tanto, recomendamos usar los
software oficiales del fabricante o vendedor al por mayor.
6
Características principales
•
Conector HDMI
•
Compatible con reproductor de HD estándar y SD
•
Conector YUV (Y/Pb/Pr)
•
Terminal de salida de audio digital: S/PDIF
•
Conector CVBS
•
Unidad principal USB2.0, puede leer archivo de grabación,
MP3, imagen de formato JPEG, actualización de software
•
Resolución de grabación:
576i/ 576p/720p/1080i
•
Búsqueda automática o manual de canales
•
Control remoto de infrarrojo •
•
Salida de loop del
sintonizador
•
Calidad de frecuencia de audio CD (Estéreo)
•
TV´s favoritos y lista de
transmisiones
•
Menú de programas digitales
•
Configuración de imagen: 4:3 •
y 16:9
•
Subtítulos
•
Control paterno
•
Grabación de 8 programas
•
Puerto USB y actualización
•
Demodulador COFDM
•
Compatible con DVBT y MPEG-4(H.264)
•
LCN de Alta definición y
LCN
•
Decodificación de efecto sonoro Dolby digital
Selección de banda de ondas : 7MHz & 8MHz
Indicación calidad de señal
7
8
Contenido
Advertencia de Seguridad.....................................................................................................................................................................3
Apéndice.................................................................................................................................................................................................6
Características principales....................................................................................................................................................................7
Contenido ...............................................................................................................................................................................................9
Apéndice...............................................................................................................................................................................................10
Frontal/Posterior .................................................................................................................................................................................11
Control remoto ....................................................................................................................................................................................12
Conectar con Set Topbox TNT...........................................................................................................................................................14
Conectar con antena de conexión a tierra ......................................................................................................................... 14
Conectar con TV............................................................................................................................................................... 15
Conectar con Audio digital (opcional).............................................................................................................................. 15
Efecto sonoro Dolby Digital ............................................................................................................................................. 15
Terminal de Salida de Antena........................................................................................................................................... 15
Funcionar .............................................................................................................................................................................................16
Primer uso......................................................................................................................................................................... 16
Manera de Uso .....................................................................................................................................................................................16
Operación básica............................................................................................................................................................... 16
Elegir canal ............................................................................................................................................................... 16
Ajustar Volumen....................................................................................................................................................... 17
Adquirir info de canal............................................................................................................................................... 18
Subtítulo ................................................................................................................................................................... 18
Pausar imagen........................................................................................................................................................... 19
Lista de Favoritos ............................................................................................................................................................. 19
Agregar los Canales de Lista de Favoritos ............................................................................................................... 19
Exhibir Canal favorito .............................................................................................................................................. 20
Ordenar Canales ............................................................................................................................................................... 20
USB .................................................................................................................................................................................. 21
Guía de Programas............................................................................................................................................................ 24
Instalación......................................................................................................................................................................... 25
Ajuste de Usuario ................................................................................................................................................................................26
Ajuste de imagen .............................................................................................................................................................. 26
Configurar Audio y Vídeo ................................................................................................................................................ 26
Configurar programa ........................................................................................................................................................ 28
Modo de Auto dormir ....................................................................................................................................................... 28
Configurar Sistema .............................................................................................................................................................................29
Hora local ......................................................................................................................................................................... 29
Modo Ahorro de energía................................................................................................................................................... 29
Restaurar Especificaciones de Defecto............................................................................................................................. 29
Info de Terminal ............................................................................................................................................................... 29
Alimentación por antena................................................................................................................................................... 29
Reparación ...........................................................................................................................................................................................30
Especificaciones ...................................................................................................................................................................................31
9
Apéndice
Desempacar
Abra el empaque de la unidad, confirme que tenga los siguientes componentes:
Control remoto x 1
Manual de instrucciones x 1
Baterías AAA x 2
Set Topbox TNT TVT250HD x 1
Esperamos que le guste nuestro TNT TVT250HD.
10
Frontal/Posterior
Frontal
Dimensión: 220x 124x 32mm (Largo x Ancho x Alto)
Puerto USB
Posterior
No.
1
Nombre
LOOP OUT
Conector
IEC 169-24
Hembra
Función
Terminal de salida de antena
2
TV ANT IN
IEC 169-24
Hembra
Terminal de entrada de antena
3
TV
Conector para TV
Conector de TV
4
HDMI
Puerto HDMI
Puerto de Audio y Vídeo Digital HDMI
5
USB
USB2.0
6
S/PDIF
Conector Óptico
S/PDIF
Unidad principal USB2.0, puede leer
archivo de grabación, MP3, imagen de
formato JPEG, actualización de software
Terminal de salida de audio digital
(óptico)
7
POWER
Interruptor
Conectar/Desconectar fuente de
alimentación
11
Control remoto
1.
Espera
Encender o Espera
2.
Dígitos
Cambiar canales o elegir menú
3.
TV/Transmisión
Elegir modo de TV o Transmisión
4.
Guía
(Guía programas) Aparece la guía de programas o transmisión proporcionado por abastecedor
de servicio
5.
Menú
Activar Menú o volver a menú anterior
6.
Tecla izquierda y derecha (◄/►)
Ajustar volumen, elegir lista de canales
7.
Tecla OK
12
8.
Entrar al menú o elegir articulo actual
Tecla Arriba y Abajo /
Página abajo o Pagina arriba
9.
Canal Arriba y Abajo CH(▲/▼)
Elegir canal o articulo del menú
10.
Subtítulo
Exhibir subtítulos
11.
Audio
Elegir modo de canal de sonido izquierdo, canal de sonido derecho y estereo
12.
Favoritos
Exhibir lista de favoritos
13.
Pausa
Pausar imagen
14.
USB
Entrar a menú de grabación
15.
Retroceder en reproducir multimedia USB
Avanzar en reproducir multimedia USB
Anterior en reproducir multimedia USB
Mudo
Mudo
16.
17.
18.
19.
Formato
Ajustar nitidez de imagen
20.
Volver
Volver a programa anterior
21.
Salir
Volver a menú principal
22.
(▲/▼): Tecla arriba y abajo
Elegir canal o arriba y abajo en artículos de menú
23.
VOL (▲/▼)
Tecla volumen
24.
Datos
Ver datos del canal
25.
Info
Exhibir info de canal y manera de uso de teclas
26.
Aspecto
Elegir configuración de imagen 4:3 o 16:9
27.
Pausa
Pausar reproducción de multimedia USB
28.
Grabar
13
Grabar programa actual
29.
30.
Reproducir
Reproducir multimedia USB
Siguiente en reproducir multimedia USB
Conectar con Set Topbox TNT
Conectar con antena de conexión a tierra
Conecte el cable de la antena de conexión a tierra al terminal TV IN del Set Topbox.
14
Conectar con TV
El Set Top Box puede ser conectado con la TV u otros aparatos por medio del puerto HDMI.
A: Puerto HDMI
Si tu TV no tiene puerto HDMI, puede usar el cable HDMI para conectar el puerto HDMI de la TV
con el puerto HDMI del Set Topbox.
Prestar atención de usar un cable de energía que corresponda a la TV y el puerto HDMI.
Conectar con Audio digital (opcional)
Efecto sonoro Dolby Digital
Efecto sonoro Dolby Digital por medio del cable óptico se conecta con el amplificador al Cine de
Casa. (Cable óptico no incluido)
Por medio de decodificación de Dolby Digital, por medio del interfaz S/PDIF puede generar efecto
sonoro estéreo.
Terminal de Salida de Antena
La antena de conexión a tierra puede ser conectado a una segunda unidad, por ejemplo una Vídeo
Grabadora o TV. La manera de usar un Cable RF (no incluido) para conectar el terminal de salida
de antena al conector de la segunda unidad.
15
Funcionar
Primer uso
Al terminar las conexiones, se deben de hacer los siguientes pasos:
1. Encienda la TV.
2. Conecte la energía del Set TopBox.
3. Elija el cable que corresponda a la conexión entre la TV y Set TopBox. (Vea el Manual de
usuario de la TV)
4. Presione la tecla OK, el Set TopBox comienza a buscar los canales, .a ventana de auto elegir
exhibe el avance de la búsqueda.
Si quiere hacer la búsqueda de forma manual, por favor vea la pagina 22 de este manual.
Los canales encontrados aparecen en esta ventana.
Manera de Uso
Operación básica
Elegir canal
Puede usar las siguientes maneras para elegir el canal:
•
Acuerdo a número de frecuencia: Si usted sabe el numero de frecuencia, puede usar las teclas
de digito del control remoto para hacer la operación, después presione la tecla OK para
confirmar (si no presiona la tecla OK, entonces la frecuencia elegida aparece en 2 segs) .
Atención: Los canales son organizados automáticamente acuerdo a las reglas de CSA.
•
Acuerdo a lista de canales : Presione la tecla OK para adquirir la lista de canales.
Use las teclas ▲/▼ para elegir el canal deseado.
Después presione OK para confirmar.
16
Consejo: Use la tecla “Página” para acelerar la velocidad de búsqueda.
Acuerdo a lista de favoritos: Use la tecla Favorito para exhibir los canales favoritos, por medio de
las teclas ▲/▼ para elegir el canal deseado. Después presione OK para confirmar.
Para crear lista de favoritos véase la pagina 17.
•
Ver por medio de canal: Use la tecla CH (▲/▼) , exhibir el canal acuerdo a la orden de la
lista de canales.
•
Por medio de Guía de programas: Presione EPG para elegir el programa deseado.
•
Presione de nuevo EPG para exhibir el canal. La definición de EPG está en la página 21.
•
Presione la tecla Volver para exhibir el programa pasado.
Ajustar Volumen
Durante ver programas presione las teclas VOL (▲/▼) para ajustar el volumen.
Mudo
Cuando contesta el teléfono, presione la tecla
para mudo. Presione de nuevo para restaurar.
17
Adquirir info de canal
•
Presione Info para exhibir la columna de información.
Exhibe la info del programa actual y siguiente.
Por medio de exhibir letras TTX o SUB, avisa al espectador de los datos de la TV y subtítulos.
Subtítulo
Presione la tecla Subtítulo para activar o desactivar los subtítulos.
Apagar los subtítulos:
1. Presione la tecla Subtítulo en el control remoto, después elija Parar.
18
Pausar imagen
•
Presione Pausa para pausar la imagen.
•
Presione Pausa de nuevo para quitar pausa.
Lista de Favoritos
Usted puede crear la Lista de Favoritos (por ejemplo, su donde usted vive es cerca de la frontera, y
quiere ver canales de otro país). Presione Favorito para adquirir la Lista de Favorito, después
presione ▲/▼ para elegir la Lista de Favorito.
Agregar los Canales de Lista de Favoritos
Siga el siguiente procedimiento para agregar o borrar los canales de favoritos.
1. Presione la tecla Menú.
2. Si el Menú de manejar canales no aparece, entonces presione las teclas ◄/► para checar .
3. Si quiere crear la Lista de Favoritos, elija el canal para editar, después presione OK para
confirmar.
La lista de canal aparece en la pantalla:
19
4. Use las teclas ▲/▼ para elegir el canal a agregar a la lista.
5. Presione Favorito, si aparece un símbolo de corazón, significa que el canal ya fue agregado a la
lista de favorito.
6. Elegir otro canal, repita los pasos 4-5.
7. Al terminar de elegir presione Salir, cuando aparece el aviso favor de confirmar el ahorro de la
lista.
8. Presione Aceptar para ahorrar, presione NO para borrar.
9. Presione OK para confirmar, volver al modo de ver.
Exhibir Canal favorito
Presione Favorito, exhibe la Lista Favorito, use ▲/▼ para elegir el canal que desea ver, después
presione OK para confirmar.
Ordenar Canales
Ordene los canales acuerdo al Menú de manejo de canales.
1. Presione Menú.
2. Si no aparece el Menú de manejo de canales, entonces use ◄/► para elegir.
3. Si quiere crear la Lista de Favoritos, elija el canal para editar, después presione OK para
confirmar, ahora aparece Lista de Favoritos:
20
4. Bloquear: Use ▲/▼ para elegir el canal a bloquear, después presione la tecla Roja. Ingrese la
contraseña para confirmar (Contraseña de defecto 000000). Para desbloquear presione de nuevo
la tecla Roja, e ingrese la contraseña.
5. Mover: Use ▲/▼ para elegir el canal a mover, después presione la tecla Verde para confirmar.
Use ▲/▼ para mover el canal a la posición deseada.
6. Borrar: Use ▲/▼ para elegir el canal a borrar, después presione la tecla amarilla para
confirmar, aparece el dialogo para confirmar si desea borrar.
7. Clasificar: Presione la tecla Verde para clasificar los canales.
Los canales se pueden clasificar acuerdo a lo siguiente:
-Acuerdo a la regla de codificación LCN
- Acuerdo a la regla de codificación o sin codificación LCN
-Acuerdo a orden alfabético A-Z
- Acuerdo a orden alfabético Z-A
USB
Use el USB para almacenar archivos multimedia, grabar canales o actualizar software. Apo
ya los siguientes formatos:
TS,TRP,DAT,MPG,MPEG,AVI,MKV,MO&&V,MP4,VOB,3PG,MP3,WMA,ACC,BMP,JPG,PN
G ….
21
1. Tecla de elegir Menú
2. Si no aparece el menú de USB, use la tecla ◄/► para hacer chequeo.
22
Actualizar USB
1.
Para actualizar el receptor, puede copiar nuevo software en el disco USB (no incluido), no
copie el software en un fichero.
2.
Conecte el disco USB al puerto USB del Set Top Box.
3.
Elija actualizar USB, presione OK para confirmar.
El receptor dentro del USB busca el programa actualizado y baja el nuevo software.
Media USB
Elija Media USB, presione OK para confirmar.
1.
Música: Elija el menú de música, activar la función de ver archivos de música dentro del
USB, descubre los archivos que se pueden reproducir.
2.
Fotos: Elija el menú de música, activar la función de ver archivos de foto dentro del USB,
descubre los archivos que se pueden ver.
Use
para ver las fotos
3.
Película: Elija el menú de película, activar la función de ver archivos de película dentro del
USB, descubre los archivos que se pueden reproducir.
4.
DVR (Vídeo grabadora): Puede leer o manejar las grabaciones hechas.
Apoya disco USB:
1). Puede apoyar la mayoría de los discos USB del mercado. Si encuentra algún disco que no es
apoyado, por favor mándenos el modelo del producto, gracias!
2). Recomendamos usar el formato FAT32.
Procedimiento de Grabar programas:
1. Si desea grabar el programa que está viendo, presione la tecla
, auto configura
la duración de grabar en 2 horas. Para modificar la duración de grabar presione nuevo
, use las teclas de digito del control remoto para configurar la duración.
2. Entrar a grabar programas desde Guía de Programas,
-Presione Guía,
-Use ▲/▼ para elegir el canal,
-Elija el programa que quiere grabar desde la lista del lado derecho , p r e s i o n e
► después use ▲/▼ para elegir.
-Presione la tecla Verde para leer las especificaciones de la grabación. Preste atención en
cambiar el modo a “Grabar” después presione la tecla OK para confirmar.
•
•
Durante la grabación, las tecla Guía, Subtítulo y Audio no funcionan por tiempo corto.
Los programas grabados no apoyan Guía de programas, Subtítulos y Audio de varios
idiomas.
23
Elegir aparato externo
Use ◄/► para elegir el aparato externo, presione OK para confirmar.
En lo normal, en el disco duro tiene varias particiones. Use el Sep Top Box TVT250 pue
de elegir y grabar el programa en alguna partición, el nombre del archivo es PVRRECOR
D.
Advertencia
Usar USB1.1 o USB2.0 (incluyendo reproductor MP3)
1) No recomendamos que use este tipo de USB para hacer la grabación.
2) Prohibido desconectar el USB durante la reproducción.
Guía de Programas
Adquirir info de Guía de Programas por medio de la tecla Guía del control remoto.
Por medio de la tecla de Navegar puede ver la Guía de Programas, exhibe info en tiempo real.
Presione de nuevo Guía o Salir para salir de la Guía de Programas.
24
Instalación
El menú de instalación le ayuda a buscar el canal disponible por medio de la antena, en caso de
agregar nuevo canal, o quiere recuperar los canales borrados del pasado, entonces tiene que hacer la
búsqueda de canales de nuevo. Además, si usted mueve el Set Top Box, también que hacer la
búsqueda de canales de nuevo.
La búsqueda de canales se puede hacer de la siguientes maneras :
•
Búsqueda Automática
La unidad hace la búsqueda y memoriza todos los canales encontrados.
•
Búsqueda Manual
Esta manera se utiliza para buscar un canal designado.
Búsqueda Automática
1. Presione Menú.
2. Use la tecla Navegar para elegir el menú de instalación, después presione confirmar, y el menú
de instalación aparece en la pantalla.
3. Elija el submenú para la Búsqueda automática, después presione OK para confirmar.
Comenzar búsqueda automática, cuando termina la búsqueda automática, se apagan los menús
y la imagen del programa aparece.
Búsqueda Manual
1. Presione Menú.
2. Use la tecla Navegar para elegir el menú de instalación, después presione confirmar, y el menú
de instalación aparece en la pantalla.
3. Elija el submenú para la Búsqueda manual, después presione OK para confirmar.
3. Elija la frecuencia, presione OK para comenzar búsqueda manual, cuando termina la búsqueda
manual, se apagan los menús y la imagen del programa aparece.
5. Use la tecla verde para agregar frecuencias que no han aparecido en la lista.
25
Audio de Multi idioma
Algunos canales tienen audio de multi idiomas, como programas de Francés y sonido original.
1.
Presione la tecla verde.
4.
Elija el idioma que desea escuchar, presione OK para confirmar.
3. Presione Salir para salir del menú de ajustar idioma de audio.
El idioma elegido es el idioma de defecto del canal correspondiente.
Ajuste de Usuario
Ajuste de imagen
1. Presione Menú
2. Si el Menú de ajuste de usuario no aparece, use las teclas ◄/► para checar.
Elija exhibir ajuste, después presione OK para confirmar.
después ajuste el tiempo de exhibición de la columna a 1-5 segs.
Configurar Audio y Vídeo
1. Elija Configurar AV, presione OK para confirmar
26
Los siguientes parámetros se pueden ajustar
•
Modo de grabación HDMI: 576i, 576p, 720p et
1080i
• Aspecto: 4:3 o 16:9
• Tamaño de grabación: Pantalla completa,
Minimizado, Ventana
Al terminar la configuración presione Salir para salir.
•
•
Salida S/PDIF:
PCM ,AC3,RAW,arrêt
Terminal de salida de
grabación:RVB,YUV,CVBS
Control Paterno
La contraseña de defecto de control paterno es 000000, por favor de modificar a la brevedad.
1. Elija el menú de control paterno.
2. Ingrese la contraseña, presione OK.
3.
Entrar por Canal o Menú. Si el menú es activado, puede ingresar la contraseña para bloquear
la entrada del canal o menú.
4.
Menú de control parental: Acuerdo a la edad del espectador puede bloquear ciertos canales, es
fácil de manejar. Las opciones son menores de 10 años, menores de 12 años, menores de 16
años y menores de 18 años.
27
Configurar programa
En el menú de configurar programa puede configurar grabación de 8 programas.
1. Elija el menú de configurar programa, presione OK.
2. Presione la tecla Roja para crear el procedimiento del programa.
Presione la tecla roja para modificar el procedimiento del programa.
Presione la tecla azul para borrar el procedimiento del programa.
Presione la tecla salir para salir del menú.
3. Crear procedimiento de programa (tecla roja)
-Tipo de canales: Elija el tipo de canales para grabar – Televisión o Transmisión.
-Canal: Elija el número del canal a grabar.
-Nombre de canal: Acuerdo al numero del canal, su numero auto aparece en la pantalla.
-Fecha de inicio:Use ◄/► y dígitos para modificar fecha.
-Tiempo de inicio: Use ◄/► y dígitos para modificar hora.
-Tiempo de terminar: Use ◄/► y dígitos para modificar fecha.
-Repetir: Elija la frecuencia de grabación – Una vez, Diario o Semanal.
-Manera: Ver o grabar programa.
Modo de Auto dormir
El sistema por defecto tiene activado el modo de dormir.
Si no hay ninguna operación del control remoto dentro de 3 horas, entonces el Set Top
Box entra en modo de dormir.
28
Configurar Sistema
Este menú es para configurar Zona de Tiempo, Especificaciones de Dormir, Restaurar
Especificaciones de Defecto, Exhibir info de terminal y agregar o extender corriente de antena.
Hora local
Use ◄/► para modificar modo auto a manual, y elija la Zona de Tiempo.
Modo Ahorro de energía
Usado para modificar modo de dormir.
Modo de ahorro de energía: Bajo modo de dormir la energía es menor de 1 vatio.
Modo normal: Apagar modo de ahorro de energía, facilita el inicio rápido del Set Top Box.
Restaurar Especificaciones de Defecto
Restaurar Especificaciones de Defecto.
Borrar configuración de usuario y canales.
Requiere ingresar contraseña.
Info de Terminal
Exhibir info relacionada con Set Top Box.
Alimentación por antena
Usado para activar alimentación por antena.
29
Reparación
En caso de que su Set Top Box tenga algún problema, por favor vea la tabla de abajo par
a hacer la inspección.
Posiblemente no es un problema.
Síntoma
Razón posible
Revise bien los conectores, si están bien
a, pero no aparece nin conectados a los enchufes de la pared, si
guna imagen en la pan
hay apagón ?
La unidad es encendid
Solución
Conecte el conector compl
etamente a la toma.
talla
La unidad es ence Si la antena esta bien instalada?
ndida, pero en la p
antalla aparece ¨Sin La antena no está conectada con el cable
señal¨
de salida
Reinstale la antena, calibr
e.
Transmisor apagado
Ajuste de nuevo, hasta co
nseguir señal
La capa de la ionosfera de la banda de on
da afecta la señal
Intente más tarde
Error de especificación del programa
Use el menú de especifica
ciones del sistema, config
ure las especificaciones co
rrectas
El canal tiene varias pistas o audio de m
ulidiomas
Presione Audio en el cont
rol remoto, elija la pista d
e audio o idioma de audi
o correcto
El receptor tiene s
onidos anormales
Conecte la antena con el
cable de salida
Consejo:
Si no pudo encontrar la solución al problema en la tabla anterior, por favor entre en contac
to con distribuidor o centro de servicio.
No encienda la unidad, para evitar riesgo de daños a la unidad y a usted.
30
Especificaciones
Sintonizador
Y Decodificador
de canal
Corriente del
transporte de
MPEG
Antena del conectador de entrada
Conectador de salida - Salida RF
Loop
Gama de frecuencia
Impedancia de entrada
Anchura de banda IF
Tasa de código
Intervalo del protector
Estándar
Tasa
Nivel del perfil
Descifrar vídeo
Tasa de entrada
Cociente de aspecto
Resolución de vídeo
Estándar
Descifrar audio
Canales
Sistema
principal
Procesador principal
Memoria
HDMI
Audio y Vídeo
Entrada/Salida
Fuente de
alimentación
Físico
SCART
S/PDIF
USB
Voltaje de entrada
Consumo de energía
Protección
Tipo
Dimensiones
Peso
Temperatura óptima de
funcionamiento
IEC 169-2 femenino
IEC 162-2 masculino
174MHz–230MHz, 474MHz–868MHz
75Ω
7 y 8 Mhz (cambiable)
1/2, 2/3, 3/4, 5/6, 7/8
1/4, 1/8, 1/16, 1/32
MPEG-4 [email protected] 1920 × 1080 @
50MHz
64 Mbps
MPEG-4 [email protected] 1920 × 1080 @
50MHz
80 Mbps
4:3, Caja de letra, 16:9, Pan & Scan
1080i, 720p, 576p, 576i
Capa MPEG 1,2, 3; Dolby AC-3, 12S
S/PDIF
Solo, Mono dual, Estéreo, Estéreo unido,
Dolby Digital bit streams
MSD7828L-LF-L2
4Mb flash; 128Mb SDRAM
Conectador HDMI 1.2 (con la protección
de copia HDCP)
CVBS, RGB
Salida audio coaxial Digital
USB 2.0
100–240V CA
15W máximo, ERP obediente
Fusible interno separado
Modo interruptor
W220mm x H35mm x D122mm
0.82 kilogramos
0–50°C
31
Origen: China
Importador: MAEC
32
Sicherheitshinweise
Sensor Spannung mit 220-240V, 50Hz Wechselstrom, Stecker sollte an einem trockenen gelüfteten
Ort platziert werden.
Die Steck von Ausrüstung und 230V Steckdose sollte abgeschaltet werden, auch wenn das Gerät ausgeschaltet ist.
Sollte den Netzstecker einfach zu benutzen.
Auf jeden Fall soll die Decken der Maschine nicht öffnen, um den Stromschlag zu vermeiden.
Wartungsarbeiten an der Maschine muss von den Fachleuten durchfüren.
Überlastung
Steckdosen, Steckerleiste oder Set-Top-Box nicht überlastet, um einem Brand oder Entladung zu vermeiden.
Bitte stellen Sie sicher, dass die Stromversorgung leicht angeschlossen werden kann.
Flüssigkeiten
Die Maschine sollte weite von der Flüssigkeit bleiben, so keine Behälter mit Flüssigkeit in die Maschine gelegt
werden.
Reinigung
Die Maschine sollte vor den Reinigung vom Netz trennen. Verwenden Sie ein weiches, trockenes Tuch, die SetTop-Boxen, und verwenden Sie keine Lösungsmittel.
Belüftung
Verbieten die Bedeckung der Ausfuhr von Flächendeckung, um Luftzirkulation im Inneren der Maschine zu
gewährleisten.
Lassen Sie die Maschine von mindestens 5 cm um den Raum, um die Belüftung zu gewährleisten.
Hinweis: Belüftungsöffnungen sollt nicht ein beliebiges Objekt (z.B. die Zeitung, der Lumpen, die Vorhänge usw.)
verschlossen werden.
Stellen Sie die Maschine nicht auf der Möbel-Oberfläche mit der Matratze oder Teppich.
Stellen Sie das Gerät nicht in der Sonne oder in der Nähe von Feuer.
Stellen Sie die andere Elektrogeräten über dem Maschine.
Stellen Sie die offenen Flamme Zündquellen über der Maschine (z. B. brennende Kerzen, usw.).
Zubehör
Verwenden Sie keine Zubehör, die nicht empfohlen, um den Gefahren oder Schäden an der Maschine zu
vermeiden.
Anschluss mit dem Fernsehgerät
Vor dem Stecken oder Ausziehen der TV-Kabel, bitte Sie die Maschine von haupten Netzstecker ziehen.
Keine Beachtung dieser Vorsicht kann zu Schäden an der TV führen.
3
Setzung
Bitte legen Sie die Maschine in den Raum, um Kontakt mit Staub, Regen oder direkte Sonneneinstrahlung zu
vermeiden.
Nutzen die Maschine in der angemessenen Klima ( Bitte nicht in tropischem Klima verwenden).
Akku-Nutzung
Batterien können Giftstoffe, die schlechte Auswirkungen auf die Umwelt enthalten, verwenden Sie bitte die
Batterie, die die gesetzlichen Anforderungen erfüllt, und ist streng verboten das Verwerfen der Batterien / Akkus
in den Hausmüll.
Grundlegende Sicherheitshinweise
Elektrischer Anschluss
Trennen Sie bei Betriebsstörungen den Receiver von der Stromquelle.
Um Feuergefahr und die Gefahr eines elektrischen Schlags zu vermeiden, setzen Sie den Receiver weder Regen
noch sonstiger Feuchtigkeit aus.
Öffnen Sie niemals das Gehäuse. Andernfalls besteht die Gefahr eines elektrischen Stromschlags.
Schließen Sie den Receiver nur an eine fachgerecht installierte Netz-Steckdose von 100-240V, 50-60 Hz an.
Die Gesamt-Stromaufnahme am Antennen-Anschluss des Receivers ANT IN darf 500mA nicht überschreiten.
Ziehen Sie den Netzstecker aus der Steckdose, falls Sie das Gerät über einen längeren Zeitraum nicht benutzen.
Ziehen Sie nur am Netzstecker, nicht am Kabel.
Ziehen Sie bei Gewitter den Netzstecker des Receivers aus der Steckdose.
Sollten Fremdkörper oder Flüssigkeit in den Receiver gelangen, ziehen Sie sofort den Netzstecker aus der
Steckdose. Lassen Sie das Gerät von qualifiziertem Fachpersonal überprüfen bevor Sie es wieder in Betrieb
nehmen. Andernfalls besteht die Gefahr eines elektrischen Stromschlags.
Beachten Sie bitte, dass die Stromquelle (Steckdose) leicht zugänglich ist.
Knicken oder quetschen Sie das Netzkabel nicht.
Wenn das Netzkabel beschädigt ist, müssen Sie den Receiver von Fachpersonal reparieren lassen bevor Sie ihn
erneut verwenden. Es besteht sonst die Gefahr eines Stromschlags.
Lassen Sie Kinder niemals unbeaufsichtigt den Receiver benutzen oder mit der Antennen-Anlage spielen.
Überlassen Sie Wartungsarbeiten stets qualifiziertem Fachpersonal. Andernfalls gefährden Sie sich und andere.
Bezug von Ersatzteilen nur beim Hersteller.
Änderungen am Gerät führen zum Erlöschen der Verantwortung des Herstellers.
4
Richtiger Standort
Stellen Sie den Receiver auf eine feste, eben Unterlage.
Vermeiden Sie die Nähe von:
¾
Wärmequellen, wie z.B. Heizkörper,
¾
offenem Feuer, wie z.B. Kerzen,
¾
Geräten mit starken Magnetfeldern, wie z.B. Lautsprecher.
¾
Stellen Sie keine Gefäße mit Flüssigkeiten (zum Beispiel Vasen) auf den Receiver.
Vermeiden Sie direkte Sonneneinstrahlungen und Orte mit außergewöhnlich viel Staub.
Decken Sie niemals die Lüftungsschlitze ab. Sorgen Sie für ausreichende Belüftung des Receivers.
Stellen Sie keine schweren Gegenstände auf den Receiver.
Wenn Sie den Receiver von einer kalten in eine warme Umgebung bringen, kann sich im Innern des Receivers
Feuchtigkeit niederschlagen. Warten Sie in diesem Fall etwa eine Stunde, bevor Sie ihn in Betrieb nehmen.
Verlegen Sie das Antennenkabel so, dass niemand darauf treten oder darüber stolpern kann
5
Vorwort
Diese Bedienungsanleitung ist eine Hilfe zu den Grundfunktionen (wie Installation, Kanalwahl) von anderen
Funktionen der Maschine zu verstehen, und zu benutzen. Alle Funktionen können mit der Fernbedienung bedient
werden.
Die Fernbedienung ist um den Abschluss der Durchfuehrung verschiedener Funktionen zu erleichtern, und den
Komfort zu erfüllen. Mit der Fernbedienung können alle Funktionen bedienen und die TV Programm durch die
Set-Top-Boxen fernsehen.
Warnung:
Verwendung von inoffiziellen Software kann die Probleme verursachen. Neben der offiziellen Software von dem
Verkäufer oder Vertreiber sind jede andere Software-Probleme, die sich nicht aus den Hersteller in den
Anwendungsbereich des Schutzes. Daher empfehlen wir dringend, Sie den offizieller Software von dem Verkäufer
oder Vertreiber zu nutzen.
6
Die hauptsächliche Besonderheit
•
Hoche definition multimedia-ausgang (hdmi)
•
Kompatiblen mit hd und sd standard player
•
Yuv (y/pb/pr) component ausgang
•
Optische digitale audio ausgang: S/PDIF
•
Cvbs vermischte ausgang
•
Usb2.0 master-gerät, lesbar video dateien, mp3, jpeg
formatige bilder, software updates
•
Video auflösung: 576i/ 576p/720p/1080i
•
Automatische oder manuelle suche nach kanälen
•
Infrarot fernbedienung
•
Band selection : 7mhz & 8mhz
•
Frequenzmodulation loop ausgang
•
Cd audio qualität (stereo)
•
Persönliche sammlung von tv und radio kanalliste
•
EPG: Elektronische programmzeitschrift
•
Bildschirm einstellungen: 4:3 und 16:9
•
Signal qualitätsindikator
•
Untertitel
•
Eltern blockade kanal
•
8 aufnahmeprogramme
•
USB eingang aktualisieren
•
Cofdm-demodulator
•
Dvb-t und mpeg-4 (h.264) konforme
•
Hd lcn und lcn
•
Dolby digital audio dekodierung
7
Inhaltsverzeichnis
Sicherheitshinweise ............................................................................................................................3
Vorwort ...............................................................................................................................................6
Die hauptsächliche Besonderheit......................................................................................................7
Inhaltsverzeichnis ..............................................................................................................................8
Vorwort ...............................................................................................................................................9
Vorne / hinten ...................................................................................................................................10
Fernbedienung..................................................................................................................................11
Verbinden Sie mit den TNT Set-Top-Box .....................................................................................13
Verbunden mit dem Boden Antenne..............................................................................................13
Verbunden mit einem TV................................................................................................................14
Digitale Audio Anschluss (optional) ...............................................................................................14
Dolby Digital Soundeffekte .............................................................................................................14
Antenne Ausgangsklemmen............................................................................................................14
Bedienung .........................................................................................................................................15
Erste Anwendung.............................................................................................................................15
Verwenden Vergahren.....................................................................................................................15
Grundlagen der Bedienung:............................................................................................................15
Wählen Sie Kanal.............................................................................................................................15
Lautstärkeregelung..........................................................................................................................16
Umfassen Kannel Info .....................................................................................................................17
Untertitel ...........................................................................................................................................17
Stilbild ...............................................................................................................................................18
Favoritenliste ....................................................................................................................................18
Erhöhen Sie die Sammlung der Senderliste ..................................................................................18
Anzeigen der Bevorzugten Sender..................................................................................................19
Kanalsortierung ...............................................................................................................................19
USB....................................................................................................................................................20
Program Guide.................................................................................................................................23
Installation ........................................................................................................................................24
Anwender Inbetriebnahme .............................................................................................................25
Inbetriebnahme Anzeige..................................................................................................................25
Audio Video-Einstellungen..............................................................................................................25
Programm Einstellung.....................................................................................................................26
Auto Sleep Modus ............................................................................................................................27
System Einstellungen .......................................................................................................................27
Ortszeit ........................................................................................................................................27
Stromsparmodus..........................................................................................................................28
Default-Parameter wiederherstellen............................................................................................28
Terminal Information ..................................................................................................................28
Antenne Stromversorgung...........................................................................................................28
Wartung ............................................................................................................................................29
Technische Daten .............................................................................................................................30
8
Vorwort
Auspackung
Entfernung den Verpackung von der Maschine bestätigen, dass das Paket die folgenden Komponenten erhalten:
Eine Fernbedienung
Ein Handbuch
Zwei AAA-Batterien
Eine Set-Top-Box von TNT TVT250HD
Wir hoffen Ihnen viel Freude mit unserem TNT TVT250HD.
9
Vorne / hinten
Die Vorderseite
Größe: 220x 124x 32 mm (Länge x Breite x Höhe)
USB-Schnittstelle an der Vorderseite
Die Rückseite
Nr.
Bezeichnung
1
LOOP OUT
IEC 169-24 Steckdose
Antenne Ausgangsklemmen
2
TV ANT IN
IEC 169-24 Steckdose
Antennen Eingangsklemmen
3
TV
TV Zubehör
TV Peripheriegeräteschnittstelle
4
HDMI
Schnittstelle der
HDMI
HDMI-Schnittstelle, digitaler AudioAufzeichnung
5
USB
USB2.0
USB2.0 Master-Gerät können den Video Dateien,
Bilder von MP3, JPEG Format und Software
lesen
6
S/PDIF
Kabel Schnittstelle zu
S/PDIF
Digitale Audio-Ausgänge (optisch)
7
POWER
Schalter
stecken / ausziehen Sie den Netzteile
Schnittstelle
Funktion
10
Fernbedienung
1.
Standby Taste
Start Spielen- oder Standby-Modus
2.
Die Zifferntasten
Kanäle wechseln oder Menüoptionen auswählen
3.
Taste fuer TV / Radio
Wählen Sie den TV-Modus oder Broadcast-Modus
4.
Guide Taste
(Electronic Programm Guide) zeigt die Leitfaden für TV- oder Radiosendung von TV-Anbieter
5.
Menütaste
Öffnen Sie das Hauptmenü oder Rückkehr zum vorherigen Menü
6.
(◄ / ►) linke und rechte Taste
11
Stellen Sie die Lautstärke, wählen Sie Kanalliste Seite
7.
OK Taste
Geben Sie die Auswahl Menü oder wählen Sie das aktuelle Projekt
8.
Rauf und runter Tasten
Zurück oder auf der nächsten Seite
9.
CH (▲ / ▼) Kanal rauf und runter Tasten
Wählen Sie einen Kanal oder ein Menü zu bestellen von oben nach unten
10. Untertitel Taste
Anzeige Bildunterschrift Informationen
11. Akustik Taste
Wählen Sie den linken Kanal Modus, den rechten Kanal Modus oder den Stereo Modus
12. Aufbewahrung Taste
Anzeige der Favoritenliste
13. Pause Taste
Pause der Bildschirm
14. USB
Direkt in das Aufnahme Menü
15.
die Rücklauf Taste in USB Medien Wiedergabe Modus
16.
die vorspulen Taste in USB Medien Wiedergabe Modus
17.
die Rückspiele Taste in USB Medien Wiedergabe Modus
18. Mute Taste
Umschaltung zu Mute Modus
19. Image Taste
Bildschirmauflösung anzupassen
20. Zurück Taste
Zurück zum vorherigen Programm
21. Exit Taste
Zurück zum Hauptmenü
22. (▲ / ▼)
Rauf und runter Tasten
Wählen Sie einen Kanal oder ein Menüvon oben nach unten zu bestellen
23. VOL (▲ / ▼) Lautstärketasten Taste
12
Stellen Sie die Lautstärke
24. Daten Taste
Zum Kanal Fernsehen Daten
25. Information Taste
Programminformationen und die Menü Taste zu bedienen
26. Seitenverhältnis Taste
Wählen Sie 4:3 oder 16:9 Bildschirm Einstellungen
27. Stopp Taste
Stoppen USB Media Player
28. Aufnahmetaste
Aufzeichnung des aktuellen Programms
29. Wiedergabetaste
USB Media Player ansehen
30.
Das nächste Spielen in USB Medien Player Modus
Verbinden Sie mit den TNT Set-Top-Box
Verbunden mit dem Boden Antenne
Der Boden Antennenkabel in die Set-Top-Box TV in der Schnittstelle einstecken.
13
Verbunden mit einem TV
Set-Top-Box ist über die HDMI-Schnittstelle oder periphere Schnittstelle der Fernseher an einen Fernseher
angeschlossen.
A: HDMI-Schnittstelle
Wenn Ihr Fernseher einen HDMI-Anschluss vorhand ist, kann mann mit HDMI Kabel an einen HDMI
Schnittstelle Fernseher und Set-Top-Boxen verbinden.
Beachten Sie dafür, dass die mit den TV HDMI Schnittstelle entsprechenden Kabeln verwenden.
Digitale Audio Anschluss (optional)
Dolby Digital Soundeffekte
Dolby Digital-Audio-Stream über das Faser Kabel an Hause Theater Audioverstärker Eingang eingeben. (Der
Audio Faser Kabel nicht mitgeliefert).
Dolby Digital Audio Stream decodiert wird, kann durch die Peripheriegeräteschnittstelle des Fernsehens StereoEffekt erzeugt werden.
Antenne Ausgangsklemmen
Die Erdung Antenne kann mit dem zweiten Maschine, wie z.B. einem externen Videorecorder oder Fernseher
angeschlossen werden. Methode besteht darin, dass die zweite Maschine Schnittstelle mit Koaxialkabel eingibt,
(nicht mitgeliefert) an die Antenne Ausgangsanschluss verbindet.
14
Bedienung
Erste Anwendung
Nach einer erfolgreichen Verbindung sollte die folgenden Schritte durchgeführt sein:
1.
Schalten Sie den Fernseher ein.
2.
Für die Set-Top-Box an die Stromversorgung angeschlossen.
3.
Wählen Sie den TV- und Set-Top-Box mit den entsprechenden Drähten zu verbunden (Siehe TV-Handbuch).
4.
Drücken Sie die Taste OK, Set-Top-Box um die Kanal Suche startet wird, wird die automatische Auswahl Fenster
die Suche voran gezeigt.
Wenn Sie manuell suchen möchten, lesen Sie bitte die Anweisungen auf Seite 22.
Kanalsuche Prozess wird in dem Fenster gefunden werden.
Verwenden Vergahren
Grundlagen der Bedienung:
Wählen Sie Kanal
Wählen Sie einen Kanal die folgenden Arten verwenden können:
•
Nach der Wellenfrequenz Zahlen: Wenn Sie die Wellenfrequenz Zahlen kennen, können Sie die Fernbedienung
verwenden, um die numerischen Tasten zu bedienen, danach drücken Sie die OK-Taste zur Bestätigung (wenn Sie
nicht mit der Taste OK bestätigen, wählen Sie die Welle in ca. 2 Sekunden angezeigt) .
Hinweis: die Anzahl der Kanäle wird in Übereinstimmung mit den Bestimmungen Nummer des CSA
automatisch anordnet.
•
Nach der Senderliste:
Drücken Sie die Taste OK, um die Kanalliste zu bekommen.
Verwenden S ▲ / ▼Tasten, um den Kanal zu wählen.
Dann OK-Taste bestätigen drücken.
15
Tipps: Verwenden Sie die "Page"-Taste um den Abfrage Geschwindigkeit zu verbessern.
Durch die Sammlung zum Thema: Verwenden Sie den Favoriten Taste um Ihre Favoritenliste anzuzeigen, durch die
Tasten ▲ / ▼, um den Kanal zu waehlen und drücken Sie dann die OK-Taste bestätigen..
Erstellen Sie eine Favoriten-Liste finden Sie auf Seite 17.
•
Blättern Sie die Sender durch: Verwenden Sie die CH (▲ / ▼)-Taste um den Kanal im Einklang mit der KanalListe angezeigt.
•
Führung durch das Programm: Drücken Sie die EPG-Taste um das erhaltende Programm zu wählen.
•
Drücken Sie die EPG-Taste wieder um den Kanal anzuzeigen. EPG ist in S. 21 definiert.
•
Durch die Zurück Taste kann man die vorherige Programm zusehen.
Lautstärkeregelung
kann man in Anzeigen Prozess mit den VOL (▲ / ▼)-Taste um die Lautstärke einzustellen.
Mute
Unter solchen Umständen des Gesprächs drücken Mute Taste.
beseitigen.
16
Die Mute-Taste noch einmal drücken dann zu
Umfassen Kannel Info
z
Drücken Sie die Informationen, um die Informationsleiste anzuzeigen.
Beobachten die Informationen von nächsten Programminformationen, und Programmvorschau können angezeigt
werden.
Die fetten gedruckten Worte, indem TTX oder SUB an das Publikum des Fernsehens Daten und Untertitel zu erinnern.
Untertitel
Untertitel durch Drücken der Funktionstaste zum Aktivieren oder Deaktivieren Untertiteln.
Die Untertitel Funktion einschlossen:
1. Untertitel Taste auf der Fernbedienung drücken, dann wählen Sie Stopp.
17
Stilbild
•
Drücken Sie die Pausetaste, so dass der Bildschirm Stilnoch Steht wird.
•
Drücken Sie die Pause Taste noch einmal, um den Stil Bildschirm zu heben.
Favoritenliste
Sie können Favoritenlisten (z. B. Sie leben in der Nähe von dem Grenzgebiet, Sie moechten die ausländische
Sender sehen.) selbst aufstellen. drücken Sie Sammlung Taste, Zugriff auf Ihre Favoritenliste zu folgen, und
drücken Sie Taste ▲ / ▼, um die Favoriten-Liste wählen.
Erhöhen Sie die Sammlung der Senderliste
Beachten Sie die folgende Prozesses, zum Hinzufügen oder Löschen von Kanälen in Favoriten-Liste.
1. Drücken Sie die Menütaste.
2. Wenn der Kanal-Management-Menü nicht angezeigt wird, verwenden Sie die ◄ / ►-Taste Abfrage.
3.
Wenn Sie eine Favoriten-Liste erstellen, wählen Sie "Bearbeiten" derTV-Sender, und drücken Sie dann die OKTaste zu bestätigen.
Senderliste auf dem Bildschirm erscheint:
18
4.
Mit ▲ / ▼ wählen Sie den gewünschten Kanal, in die Liste beizutreten.
5.
Nach dem Druck von der Sammlung-Taste, wenn es einem herzförmigen Symbol auf den Bilodschirm zeigt wird,
dass der Kanal zu Ihren Favoriten hinzugefügt wurde.
6.
Wählen Sie einen anderen Kanal, wiederholen Sie die Schritte 4-5.
7.
Wählen Sie die Esc-Taste beendet, werden Sie aufgefordert zu bestätigen, die Liste zu speichern.
8.
Drücken Sie Ja, um diesen zu speichern, drücken Sie eine beliebige Taste um zu löschen.
9.
Drücken Sie die Taste OK zu bestätigen, und zurueck ins Anzeigemodus.
Anzeigen der Bevorzugten Sender
Drücken Sie Sammlung Taste um die Favoriten-Liste anzuzeigen, mit ▲ / ▼ Taste um den gewünschten Kanal zu
wählen, dann drücken Sie die OK Taste zur Bestätigung.
Kanalsortierung
Mit Kanal Management Menü werden der Kanal angeordnet.
1.
Drücken Sie die Menütaste.
2.
Wenn der Kanal Management Menü nicht erscheinen, verwenden Sie die Taste ◄ / ►, um den Menü auszuwählen.
3.
Wenn Sie eine Favoritenliste erstellen moechten, wählen Sie den TV-Kanal zu bearbeiten, und drücken Sie die OKTaste zu bestätigen, dann die Favoritenliste gezeigt wird:
19
4.
Sperren: Verwenden Sie die Tasten ▲ / ▼ um die Kanäle zu blockieren, und drücken Sie den roten Knopf. Geben
Sie das Passwort zur Bestätigung (das Standard-Passwort ist 000000). freishcalten, müssen Sie den roten Knopf
drücken und das Passwort eingeben.
5.
Verlagerung: Verwenden Sie die Tasten ▲ / ▼, um die gewünschte Verschiebung der Kanal auszuwählen, drücken
Sie dann die grüne Taste zur Bestätigung. Mit ▲ / ▼-Tasten, um den Kanal zu gewünschte Position zu
verschieben.
6.
Löschen: Verwenden Sie die Taste ▲ / ▼, um den Kanal, den Sie löschen möchten zu wählen, drücken Sie die
gelbe Taste zu bestätigen, dann in der Pop-up-Dialogbox bestätigt, ob an den Kanal zu löschen.
7.
Sortierung: Drücken Sie die blaue Taste für Kanal Klassifizierung.
Kanäle können nach der folgenden Art und Weise klassifiziert werden:
- Codierung gemäß den Bestimmungen in der Größenordnung von LCN
- Keine Codierung oder Codierung unter das Freihandelsabkommen erforderlich
- In alphabetischer Reihenfolge von A-Z
- In alphabetischer Reihenfolge von Z-A
USB
Verwenden von USB-Speichergerät lesen Multimedia Dateien, Aufzeichnen oder Kanal update software.
20
Die häufigste Format der Unterstützung wie folgt lauten:
TS, TRP, DAT, MPG, MPEG, AVI, MKV,MO&&V, MP4, VOB, 3PG, MP3, WMA, ACC, BMP,
JPG, PNG ….
1. Wählen Sie die Menü Taste
2. Wenn der USB-Menü nicht angezeigt wird, verwenden Sie die Taste ◄ / ► zur Anfrage.
21
USB Update
1. Zur Aktualisierung der Receiver im USB-Stick (nicht mitgeliefert) an die neue Software zu kopieren,
kopieren Sie nicht die Software im Ordner.
2. Der USB-Stick in die USB-Schnittstelle an die Set-Top-Boxen einsteckt wird.
3. Wählen Sie USB zu aktualisieren, drücken Sie die OK-Taste zu bestätigen.
USB-Empfänger in der Abfrage zu aktualisieren und neue Software zu unterladen.
USB Medium
Wählen Sie USB-Medien, und drücken Sie OK Taste zur Bestätigung.
1
Musik: Wählen Sie Menü "Musik", starten Sie den USB Musik Datei in die Suchfunktion, die Musikdateien
abspielen kann.
2
Foto: Wählen Sie das Foto- Menü, starten Sie die USB- Abfrage Funktion innerhalb der Fotodatei und fand
man Foto- Dateien anzeigen.
Verwenden Sie die
Taste, um Fotos anzuzeigen.
3. Movie: Wählen Sie im Menü Film, starten Sie die USB-Abfrage Funktion innerhalb der Filmdatei und fand,
dass man den Film abzuspielen.
4. DVR (Video Recorder): Sie können die fertigen Video lesen oder verwalten.
Unterstützte USB Stick:
1) Erhältlich die meisten USB Stick in den Markt unterstützt wird. Wenn Sie feststellen, dass eine Festplatte
nicht unterstützt wird, lass es uns die Modelle wissen, danke!
2) Empfohlene Dateiformat für FAT32.
Beschreibung der Verfahren zur Erfassung Kanal Programm:
1. Wenn Sie die aktuelle Sendung aufzeichnen wünschen, die Aufnahmetaste
drücken, die Aufnahme
automatisch Zeit beträgt 2 Stunden. Um die Aufnahme lange zu verändern, drücken Sie wieder die RecordTaste
, verwenden Sie die Fernbedienung Zifferntasten auf der Tastatur um längere Zeit einzustellen.
2. Aus dem Guide Programm in den Kanal der Aufnahme
-
Drücken Sie die Guide-Taste,
-
Verwenden Sie ▲ / ▼-Taste, um den Kanal zu wählen
-
Von der rechten Seite der Liste, um die gewünschte Sendung auswählen, drücken Sie die Taste ► und
dann ▲ / ▼ wählen.
-
Drücken Sie die grüne Taste, um der Aufzeichnung Prozessparameter auszulesen. Bitte beachten Sie,
dass der "Record" Modus übergeträgt wird, und drücken Sie die OK-Taste zu bestätigen.
•
In der Aufzeichnung sind die Führung Taste, Untertitel Taste und Audio Taste eine vorübergehende
ungültigen Taste.
•
Der verzeichnete Kanal Programme unterstützen nicht die Programmzeitschrift, Untertitel und
Sprachen.
Wählen Peripheriegerät
22
Verwenden Sie ◄ / ► Tasten um das externe Gerät zu wählen, dann drücken Sie die OK-Taste zu bestätigen.
Unter normalen Umständen gibt es mehrere Partitionen auf Ihrer Festplatte. Verwenden TVT250 Set-Top-Box
können um Programme auf einer Partition aufnehmen zu wählen, wird der Dateiname als PVRRECORD
eingezeigt.
Warnung:
Mit USB1.1 oder USB2.0 (einschließlich MP3-Player)
1) Wir empfehlen, dass Sie keine beispielsweise USB für die Aufnahme verwenden.
2) Ziehen Sie das USB aus ist strengstens verboten während der Wiedergabe.
Program Guide
Durch die Führung Taste auf der Fernbedienung erfassen Programmführer Informationen.
Mit der Führung Taste kann man den Programm Guide um Echtzeit-Informationen anzuzeigen. Wieder drücken
Sie die Führung Taste oder die Exit Taste um das Programm Guide Seite zu verlassen.
23
Installation
Setup Menü hilft Ihnen, die Suche nach verfügbaren Kanälen über eine Antenne, wenn das neuer Kanäle
hinzufügen, oder wenn Sie zuvor gelöschten Kanal abrufen möchten, müssen Sie erneut Kanal suchen. Auch
wenn Sie den Speicherort der Set-Top-Box zu verschieben, auch wieder Sendersuchlauf machen müssen.
Kanalsuche kann auf folgende zwei Arten durchgeführt werden:
•
Auto Suche
Set-Top-Boxen automatisch die Kanal durchsucht und alle empfangenen Kanal speichert werden.
•
Manuelle Suche
Diese Methode wird für einen bestimmten Kanal zu suchen verwendet.
Auto Suche
1. Drücken Sie die Menütaste.
2. Verwenden Sie die Navigationstaste um die Installation im Menü auszzuwählen, und drücken die OK-Taste
zu bestaetigen, wird das Installations-Menü auf dem Bildschirm angezeigt.
3. Wählen Sie das Untermenü automatische Suche ein, und drücken Sie die Taste OK bestätigen.
Automatische Suche zu starten, wenn die Suche beendet, schalten alle Menü aus, und das Programm
angezeigt wird.
Manuelle Suche
1. Drücken Sie die Menütaste.
2. Verwenden Sie die Navigationstaste um die Installation im Menü auszzuwählen, und drücken die OK-Taste
zu bestaetigen, wird das Installations-Menü auf dem Bildschirm angezeigt.
3. Wählen manuell Untermenü zu suchen, und dann drücken Sie die OK-Taste zu bestätigen.
3. Wählen Sie die Frequenz, drücken Sie die OK Taste, um den manuellen Suchlauf zu starten. Wenn die Suche
beendet, schalten Sie alle Menü aus und erscheint das Programm angezeigt.
5. Mit der grünen Taste, die nicht erscheint, um die Frequenz der Liste zu ergaentzen.
Multi Tonfrequenz
Ein Teil der Audio-Kanäle in verschiedenen Sprachen wie Französisch und akustische Shows.
24
1. Drücken die grünen Taste.
4. Wählen Sie die gewünschte Sprache aus, drücken Sie die OK-Taste bestätigen.
3. Drücken Sie die Exit-Taste um die Audio Einstellungsmenü zu verlassen.
Wählen Sie die Standardsprache für die Programmiersprache.
Anwender Inbetriebnahme
Inbetriebnahme Anzeige
1. Drücken Sie die Menütaste.
2. Wenn der Benutzer Anwender Inbetriebnahme Menü nicht angezeigt wird,vewenden Sie die Taste ◄ / ►
zur Anfragen.
Wählen Sie Debugging zur Anzeige, und drücken Sie dann die OK-Taste bestätigen.
Dann werden die Zeigzeit an derInformationen Spalte auf 1-5 Sekunden eingestellt.
Audio Video-Einstellungen
1. Wählen Sie AV-Einstellungen, drücken Sie die OK Taste zur Bestätigung
25
Folgende Parameter können eingestellt werden:
•
Video-ModusHDMI: 576i, 576p, 720p et 1080i
•
Bildformat: 4:3 oder 16:9
•
Videogröße: Vollbild-, schmal, Fenster
•
S/PDIF output :
PCM ,AC3,RAW,arrêt
•
TV Peripheriegeräte der Video
Ausgang:RVB,YUV,CVBS
Nach der Einstellung drücken Sie die Esc-Taste.
Eltern Kontroll
Elterliche Kontrolle voreingestellte Passwort lautet 000000 und sollte geändert werden.
1. Wählen Sie Menü Kindersicherung.
2.
Geben Sie das Kennwort, drücken Sie die OK Taste.
3.
Einloggen in Kanal oder Menü. Wenn die Menü getartet wird, können Sie durch Eingabe des Passworts auf
Anmeldung dieser Kanal oder Menü zu verhindern.
4.
Elterliche Kontrolle Menü: Nach dem Alter des Publikums, können die Eltern einiger Kanäle blockiert werden, die
Methoden ist flexibel und bequem. Altere Entscheidungen gibt es weniger als 10 Jahren, weniger als 12 Jahre,
weniger als 16 Jahren und weniger als 18 Jahre.
Programm Einstellung
Menü "Einstellungen" im Programm zu 8 Aufnahmen Programme eingesetzt werden.
26
1.
Wählen Sie das Programm Einstellungsmenü, drücken Sie die Taste OK.
2.
Drücken Sie die rote Taste, um eine Show-Programm zu erstellen.
• Drücken Sie die grüne Taste, um die Programmierung zu ändern.
• Drücken Sie die blaue Taste, um das Programm zu löschen.
• Drücken Sie auf Exit-Taste, um das Menü zu verlassen.
3.
Erstellen Sie ein Programm Prozess (roter Knopf)
• Kanal Typ: Wählen Sie die Art der Aufzeichnung Kanäle - Fernsehen oder Radio.
• Kanal: Wählen Sie die Anzahl der Aufzeichnung-Kanäle.
• Kanalname: Nach dem Kanal, die Nummer automatisch auf dem Bildschirm erscheint.
• Startdatum: Verwenden Sie die ◄ / ► Tasten und Zifferntasten zu änderen.
• Startzeit: Verwenden Sie die ◄ / ► Tasten und Zifferntasten, um Zeit zu ändern.
• Endzeit: Verwendung ◄ / ► Tasten und Zifferntasten geändert.
• Wiederholen: Wählen Sie die Video Frequenz - Einzel, einmal täglich oder einmal pro Woche.
• Art und Weise: Watching oder Aufnahme Programme.
Auto Sleep Modus
Der Standardwert automatische Sleep Modus eingeschaltet ist.
Wenn die Fernbedienung innerhalb von drei Stunden kein jede Tätigkeit gibt, Set-Top-Box automatisch zu den
Ruhezustand gehen.
System Einstellungen
Dieses Menü wird verwendet, um die Zeitzone zu ändern, den Schlaf Modus Parameter zu setzen, zur Wiederherstellung
der Default-Parameter, das Terminal Informationen anzuzeigen, und die aktuelle Erweiterung der Antenne Strome zu
erhöhen.
Ortszeit
Verwenden Sie die ◄ / ► zur automatischen Modus in den manuellen Modus, wählen Sie den Zeitunterschied, um die
der Zeitzone zuermitteln.
27
Stromsparmodus
Verwendet, um den Sleep-Modus zu ändern.
Stromsparmodus: die Leistungsaufnahme im Ruhezustand beträgt weniger als 1 Watt.
Normal-Modus: Energiespar-Modus ausgeschaltet ist leicht zu Set-Top-Box um schneller zu starten.
Default-Parameter wiederherstellen
Die Standard Initialisierung Parameter.
Entfernen Sie Benutzereinstellungen und Kanäle.
Brauchen Sie ein Passwort eingeben.
Terminal Information
Die Informationen in Bezug auf Set-Top-Box anzuzeige.
Antenne Stromversorgung
Gebrauchte um die Antenne Stromversorgung zu beginnen.
28
Wartung
Wenn Sie Probleme mit Set-Top-Box haben, überprüfen Sie bitte nach den folgenden Tabelle.
Das ist veilleicht kein Problem:
Symptome
Mögliche Ursache
Solution
Schalten Sie das Gerät, aber es
Prüfen Sie sorgfältig, den Stecker sollecht in
Der Stecker vollständig in die
gibt kein Bild auf dem Bildschirm
den Steckdose der Wand zu stecken. Ob der
Steckdose einsteckt.
Stromausfall ist?
Set-Top-Box an das Stromnetz
Die Antenne ist korrekt installiert?
angeschlossen, aber der
Bildschirm zeigt "kein Signal"
Installieren Sie die Antennewieder
einmal, Kalibrierung.
Antenne wird nicht mit dem Eingang
Schließen Sie das Antennenkabel an
verbunden
der Eingang
Sender aus
ReInbetriebnahme, um das Signal zu
erfassen,
Band der Ionosphäre störtet Das Signal
Versuchen Sie es später erneut
Programm Parameterfehler
Mit der System-Parameter im Menü
einstelltdie korrekten Parameter
Ein Geräusch des Empfängers
Kanal enthält zusätzliche Audio-Tracks oder
Drücken Sie die Audio Tasteauf der
Sprache
Fernbedienung, wählen Sie die
richtige Sprache oder Tonspur
Tipps:
Wenn Sie die Problemlösungen Ansatz in der obigen Tabelle nicht gefunden, kontaktieren Sie Ihren Händler oder
technischen Service-Center.
Öffnen Sie nicht die Maschine, um nicht eine Gefahr für Sie und die Maschine stellen.
29
Technische Daten
Tuner & KanalDecoder
MPEG
Eingangssteckverbinder Antenne
IEC 169-2 Steckdose
Ausgangsstecker - RF Loop Out
IEC 162-2 Stecker
Frequenzbereich
174MHz–230MHz, 474MHz–868MHz
Eingangsimpedanz
75Ω
ZF-Bandbreite
7 und 8 MHz (Umschaltbar)
Coderate
1/2, 2/3, 3/4, 5/6, 7/8
Guard Interval
1/4, 1/8, 1/16, 1/32
Transport Standard
Stream
Video-Decodierung
Audio-Decodierung
Main-System
MPEG-4 [email protected] 1920 × 1080 @ 50MHz
Bewerten
64 Mbps
Profil Standard
MPEG-4 [email protected] 1920 × 1080 @ 50MHz
Input Rate
80 Mbps
Bildseitenverhältnis
4:3, Letter Box, 16:9, Pan & Scan
Videoauflösung
1080i, 720p, 576p, 576i
Standard
MPEG Layer 1,2, 3; Dolby AC-3, 12S S / PDIF
Single, Dual Mono, Stereo, Joint Stereo, Dolby
Kanäle
Digital bit-streams
Hauptprozessor
MSD7828L-LF-L2
Speicher
4Mb Flash, 128 MB SDRAM
HDMI
HDMI 1.2-Anschluss (mit HDCP-Kopierschutz)
Audio & Video In / SCART
CVBS,RGB
Out
S/PDIF
Coaxial Digital Audio Ausgang
USB
USB 2.0
Eingangsspannung
100-240V AC
Stromverbrauch
15W maximal, ERP-konform
Schutz
Seprate interne Sicherung
Typ
Switch-Mode-
Abmessungen
W220mm x H35mm x D122mm
Gewicht
0,82 kg
Optimale Betriebstemperatur
0-50 ° C
Netzteil
Physische
30
Originalle Stelle : Volksrepublik China
Export Firma : MAEC
31
réalisation : Service Communication Visiosat®