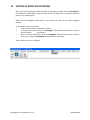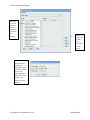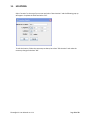
1
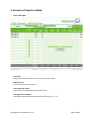
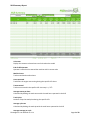
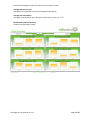
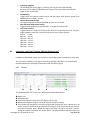
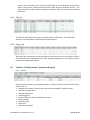
U S E R M A N U A L Fleetm@tic II User Manual ver. 1.11 Table of Contents TABLE OF CONTENTS Page 1 of 60 TABLE OF CONTECT 1. INTRODUCTION ..................................................................................................................................................... 4 2. PACKAGES ............................................................................................................................................................. 5 2.1 2.2 2.3 2.3 FLEETM@TIC® II LITE ...............................................................................................................................5 FLEETM@TIC® II STANDARD PACKAGE ..............................................................................................................5 FLEETM@TIC® II MAX PACKAGE ...........................................................................................................................6 FLEETM@TIC® II MAX PLUS PACKAGE....................................................................................................................6 3. EXAMPLES OF REPORTS AVAILABLE ....................................................................................................................... 7 4. GETTING STARTED ............................................................................................................................................... 16 5. CHANGE THE “LOOK & FEEL” OF YOUR DISPLAY SCREEN ..................................................................................... 23 6. QUICK VIEW OF MACHINES ................................................................................................................................. 24 6.1 6.2 6.3 6.4 6.5 6.6 7. TRACE ON MAP ...............................................................................................................................................24 REPLAY..........................................................................................................................................................25 RELOAD UNIT INFO ..........................................................................................................................................25 TRACE IN GOOGLE EARTH ..................................................................................................................................26 CONFIGURE MACHINE .......................................................................................................................................26 DRIVER ID......................................................................................................................................................27 MAPS................................................................................................................................................................... 31 7.1 TYPES OF MAPS...............................................................................................................................................31 7.2 ENTER LOCATION ON MAPS ...............................................................................................................................32 7.3 GOTO LOCATION .............................................................................................................................................33 7.4 GOTO COORDINATES ........................................................................................................................................33 7.5 CREATE A GEOFENCE ........................................................................................................................................33 RIGHT CLICK ON THE MAP, AND SELECT “CREATE GEOFENCE”..................................................................................................34 SELECT “CIRCLE” ..........................................................................................................................................................34 7.6 RELOAD MAP TILES ..........................................................................................................................................35 8. APPLICATION DESCRIPTIONS ............................................................................................................................... 36 8.1 8.2 8.3 8.4 8.4.1 8.4.2 8.4.3 8.5 8.5.1 8.5.2 8.5.3 8.6 8.7 9. FLEET ............................................................................................................................................................36 ALERTS ..........................................................................................................................................................37 EVENTS..........................................................................................................................................................37 PRODUCTION – SUBS TABS ( TIMEBAR, SHIFT INFO & HISTORY LOG)...........................................................................40 TIMEBAR........................................................................................................................................................40 SHIFT INFO .....................................................................................................................................................41 HISTORY LOG ..................................................................................................................................................41 TECHNICAL – SUB TABS (VEHICLE, TRANSMISSION & ENGINE) ...................................................................................41 VEHICLE .........................................................................................................................................................41 TRANSMISSION................................................................................................................................................42 ENGINE..........................................................................................................................................................42 MACHINE SPECIFICATIONS .................................................................................................................................43 FAULT CODES..................................................................................................................................................43 REPORTS SETUP ................................................................................................................................................... 44 9.1 9.2 9.3 SETTING UP REPORTS ........................................................................................................................................44 BACK DATING REPORTS......................................................................................................................................45 ADDING A CONTACT .........................................................................................................................................46 Fleetm@tic II User Manual ver. 1.11 Page 2 of 60 10. SETTING UP EVENT NOTIFICATIONS..................................................................................................................... 51 11. LOCATIONS .......................................................................................................................................................... 54 12. REMOTE DATA EXPORT ....................................................................................................................................... 55 13. OPTIONS AND/OR SETUP ON THE MACHINE ....................................................................................................... 57 13.1 13.2 13.3 13.4 13.5 13.6 SERVICE DUE NOTIFICATION ................................................................................................................................57 AUTO OFF TIME ...............................................................................................................................................57 MATERIAL SELECTION .......................................................................................................................................57 SETTING UP THE SHIFT REPORTS ON THE MACHINE....................................................................................................58 SETTING UP THE TIME OFFSET ON THE MACHINE ......................................................................................................58 SETTING UP THE STATIONARY EVENT TIME ON THE MACHINE ......................................................................................59 14. FLEETM@TIC CONTACT INFORMATION ............................................................................................................... 60 Fleetm@tic II User Manual ver. 1.11 Page 3 of 60 1. Introduction Fleetm@tic® II is a carefully designed fleet management system, which can greatly assist you in running your operations. By taking ownership of your fleet with the support of Fleetm@tic® II, you will be capable of keeping your projects on schedule, maintain machine health and reduce the costs of running your fleet. Access the secure website from any location with an internet connection, as this is your gateway to detailed information of your fleet. Remote monitoring of your machines will include vital detail such as fuel consumption, when and where a machine is operating, vehicle speed, machine health, driver access and much more. Our service indicator will ensure that you and your closest Bell Customer Care Centre receive sufficient notice that the service on a specific machine is due, thus avoiding machines running over their service hours. Fleetm@tic® II is a satellite based system, driven by a series of satellites with worldwide coverage. Production and machine data gathered, is sent via a satellite modem, mounted on the machine, which in turn will send the data to our server. From here the data is compiled into reports which will make it more reader friendly for the user (Fleet Manager). A selection of reports is available on each machine, ranging from Shift, Daily, Weekly, Monthly, Load and Event reports. These reports can be set up and the automated system will ensure that your reports are delivered to you promptly, ensuring you have detailed information at your fingertips at all times. Advanced maps will display your machine's location on the Fleetm@tic website. Activating the Driver ID Access feature, will enable you to be familiar with the driver operating your machine during a specific shift. This will ensure that your staff will take responsibility for the machine during their shift. *Driver ID Access is only available on the Max and Max Plus packages. Fleetm@tic® II is available in 4 different packages to meet our customers’ requirements. Fleetm@tic II User Manual ver. 1.11 Page 4 of 60 2. Packages 2.1 Fleetm@tic® II Lite The Lite package comes standard on all Articulated Dump Trucks (ADT), manufactured after November 2008. The reports are free for the first year or until the Warrantee expires. Thereafter, the customer has the option to subscribe to one of the packages. Automated report available on this package: Basic Shift Summary 2.2 Fleetm@tic® II Standard Package Shift report - Once daily is sent from the machine after the shift end time, containing a summary of the day’s production information, for more detail refer to the examples on shift reports. This shift can be setup by the customer to start at a specific time. This shift will report on the previous 24 hours production data. Time bar report – Once daily, is sent from the machine at midnight, local time. Showing the machine’s utilization, broken down in 10 minute intervals. Statistical data log on website – Once daily is send from the machine at midnight, local time. Statistical data indicating the usage of machine, transmission and engine. For example, the time spent in 5 different levels of loading. This data will include a fault code list of up to 19 fault codes that where active that day. Automated report available on this package: Shift Summary Shift Detail Shift per model group Timebar Fleetm@tic II User Manual ver. 1.11 Page 5 of 60 2.3 Fleetm@tic® II Max Package Fleetm@tic® II Max package offers the exact same features as Fleetm@tic® II Standard package, plus: Three Shift reports - Sent from the machine after the end of each shift. These shifts can be set up by the customer to start and end at a specific time. The combined time of all three shifts may not exceed 24 hours. Event report – As and when events takes place, these are sent to the website and can be viewed immediately or an automated event report can be set up to be e-mail on a daily basis. Ignition on and off – By looking on the website, a user will know almost immediately when his machine has been switched on or off. Automated report available on this package: 3 X Shift Summary 3 X Shift Detail 3 X Shift per model group Timebar Event Report 2.3 Fleetm@tic® II Max Plus Package Fleetm@tic® II Max Plus package offers the exact same feature as Fleetm@tic® II Max package as well as: Loading and tipping report – Track your machine almost live on the website with every load and tip or wait for the automated load report to be e-mailed to you after each day. This report will include a GPS co-ordinate for every loading and tipping location as well as the material type moved (if this option is enabled on the machine). This will enable the customer to track the production of different materials, load by load. Automated report available on this package: 3 X Shift Summary 3 X Shift Detail 3 X Shift per model group Timebar Event Report Load Report Fleetm@tic II User Manual ver. 1.11 Page 6 of 60 3. Examples of Reports available Basic shift report Unit name Display the customer selected name and in brackets the model Machine hours Total accumulated machine hours Hours operated in Shift Engine hours accumulated during the specific shift Average fuel consumption Average fuel consumed during the specific shift. Accuracy is +/- 5%. Fleetm@tic II User Manual ver. 1.11 Page 7 of 60 Shift Summary Report Unit name Display the customer selected name and in brackets the model End of shift Operator Operator’s name that last started the machine with his access code Machine hours Total accumulated machine hours Hours operated Total hours the engine was running during the specific shift hours Tonnes moved Total tonnes moved in the specific shift. Accuracy is +/- 5% Average tonnes per hour Calculated by dividing the total tonnes with the total hours operated in the shift Total Cycles Number of tips that took place during the specific shift Average cycle rate Calculated by dividing the total tips with the total hours operated in the shift Average tonnage per cycle Fleetm@tic II User Manual ver. 1.11 Page 8 of 60 Calculated by dividing the total tonnes by the total number of cycles Average Distance per cycle Average distance travelled by the machine between each tipping Average fuel consumption Average fuel consumed per hour during the specific shift. Accuracy is +/- 5% Shift Summary Report (continue) Graphical representation of data. Fleetm@tic II User Manual ver. 1.11 Page 9 of 60 Shift detail report The shift detail report is available on the next tab and by clicking on the plus sign on the report, it can be expanded to show more information. The different machines models are also grouped together on the following tab so that all the same models can be compared to each other. Expand report Definitions Unladen – The on board weighing system measures less than 5 tonnes Laden – The on board weighing system measures more than 7.5 tonnes Idle – Engine RPM is between 600-800 RPM Moving – Output shaft speed is greater than 80 RPM Tabs to select Shift Detail report and shift per model group Unit name Display the customer selected name and in brackets the model Machine hours Total accumulated machine hours Ignition cycle count Amount of times the engine was started during the specific shift Fleetm@tic II User Manual ver. 1.11 Page 10 of 60 Working hours Engine hours accumulated during the specific shift Distance Total distance the machine travelled during the specified shift Unladen Idle time Percentage of the working hours that the machine was unladen and idling Unladen moving time Percentage of the working hours that the machine was unladen and moving Unladen distance Total distance machine travelled unladen during the specific shift Laden Idle time Percentage of the working hours that the machine was laden and idling Laden moving time Percentage of the working hours that the machine was laden and moving Laden distance Total distance machine travelled laden during the specific shift Average tonnage per cycle Calculated by dividing the total tones by the total number of cycles Overload count Number of times the machine was overloaded Brake applied time Percentage of the working hours that the service brake was applied while the machine was moving Retarder active time Percentage of the working hours that the transmission and engine retarder was applied while the machine was moving Over rev count The number of engine over revs that took place during the specified shift Auto off time Time saved due to the enabling of the auto off time option. Refer to options for more detail on this functionality. Tyre status Status of the tyres at the end of the shift. This is an option that needs to be fitted. Service indicator Service indicator to remind customer of service due Fleetm@tic II User Manual ver. 1.11 Page 11 of 60 Event Report Unit name Display the customer selected name and in brackets the model Operator Operator that last started the machine Timestamp Date and time the event triggered Description Description of the type of event Duration The duration of the event Value The maximum value that the event reached Location GPS co-ordinates where the event was triggered Fleetm@tic II User Manual ver. 1.11 Page 12 of 60 Timebar Report Unit name Display the customer selected name and in brackets the model Working hours Hours the engine was running in this shift Machine moving Hours the engine was running and the machine was moving faster than 5km/h Time Bar The time bar will indicate the time that the engine was running. Each hour is broken up into 10 minute intervals. Should the engine have been running for 5-10 minutes during this interval, we make the timebar green. Should the engine have been running for less than 5 minutes during this interval the timebar will remain “blank”. The effect would be that the timebar and machine hours worked per shift, could not match 100%, as we calculate the machine hours worked in the shift using second intervals and the timebar only with 10 minute intervals. Therefore the engine could have been running for 14 minutes, but the timebar will only indicate 10 minutes. Fleetm@tic II User Manual ver. 1.11 Page 13 of 60 Load Report Unit name Display the customer selected name and in brackets the model Operator Operator that last started the machine Time of Tip The time that the tip took place (Tipping, is when the bin position is at more than 70%) Material Material type tipped. Please refer to options for more info Load Tonnes tipped. Accuracy is +/- 5% Unladen fuel Fuel consumption when the machine was unladen for the cycle. Accuracy is +/- 5% Unladen Idle time The time that the machine was unladen and idling for the cycle Unladen distance The distance machine travelled unladen during the cycle Laden fuel Fuel consumption when the machine was laden during the cycle. Accuracy is +/- 5% Laden Idle time The time that the machine was laden and idling for the cycle Fleetm@tic II User Manual ver. 1.11 Page 14 of 60 Laden distance The distance machine travelled unladen during the cycle Cycle time Time measured from tipping to tipping Loading position GPS co-ordinates of the loading position Tipping position GPS co-ordinates of the tipping position Fleetm@tic II User Manual ver. 1.11 Page 15 of 60 4. GETTING STARTED The Fleetm@tic® II application is Java based and first time user are required to download a free Java version if not already installed on their computer. There after the Fleetm@tic® II application needs to be downloaded once or when new updates are available. The updates should start to download automatically. Follow the following steps to download the software. Go to the following Website: http://www.fleetmatic.bellequipment.com Select “Install Java Runtime” (First time users only) Fleetm@tic II User Manual ver. 1.11 Page 16 of 60 Select “Free Java Download” Click on the line as indicated by the orange arrow below Fleetm@tic II User Manual ver. 1.11 Page 17 of 60 Once you have right clicked onto the bar, select “Active X Control” Select “Install” Fleetm@tic II User Manual ver. 1.11 Page 18 of 60 Java will be downloaded onto your PC / Laptop. This may take several minutes, depending on the network speed. Restart your system to enable Java to run. JAVA SETTINGS Click on start Click on the control panel Right click on the Java icon Click on settings Fleetm@tic II User Manual ver. 1.11 Page 19 of 60 Ensure that the “Keep temporary files on my computer” is selected (tick in box) Click on OK Once you have re-started your system, go to the Website (http://www.fleetmatic.bellequipment.com) and click on LOGIN The application will start to download depending on network speed, this may take some time. Fleetm@tic II User Manual ver. 1.11 Page 20 of 60 The Log-in screen will appear. Enter username and password (case sensitive), as provided by the System Administrator, select your preferred language and click on Login Fleetm@tic II User Manual ver. 1.11 Page 21 of 60 Fleetm@tic® II will open and the screen below will appear, displaying your entire fleet of machines Fleetm@tic II User Manual ver. 1.11 Page 22 of 60 5. Change the “Look & Feel” of your Display screen You can change the “Look” of your display by following the next few easy steps: Select options Select Change Look & Feel (this will give you 3 options, namely Standard, System, Motif) The columns on the bottom tab can be made wider by moving your mouse to the end of the column and then keeping the select button down and dragging the column wider. The colums can also be hidden if the info is not required. Right click on the top section of the tab and select Customize columns By selecting or removing the tick marks, the columns will be displayed or not. Once the user is satisfied with the layout, he needs to right click on the tab again and select “save column” layout so that the changes can be stored. Fleetm@tic II User Manual ver. 1.11 Page 23 of 60 6. Quick view of machines Right click on a machine and a prompt will appear. 6.1 Trace on Map The system will take you to a selection of maps and you will be able to see the last known location where your machine reported from. The last known position can differ significantly from the machine’s current location, due to the package selection. For example, on the Standard package the machine will only report its position once a day when it sends the shift info, compared to a machine on Max Plus package which will report its position with every loading and tipping. Fleetm@tic II User Manual ver. 1.11 Page 24 of 60 6.2 Replay When you would like to replay your machine’s history during a specified time, you can right click on the machine and select “Replay”. A calendar will be displayed. Select the date from when you would like the information, and click on “OK”. A second pop-up will be displayed with the start and end dates, click on “OK”. A map similar to the one below will be displayed with data relating to it, displayed below the map. 6.3 Reload Unit Info Selecting this tab, the system will collect the latest available data from your machine. Fleetm@tic II User Manual ver. 1.11 Page 25 of 60 6.4 Trace in Google Earth This function will take you to Google Earth and pinpoint the last known location of your machine. Please note Google earth must be installed on the user’s computer before this option will work 6.5 Configure machine Right clicking on the machine will allow the user to configure certain parameter or settings on his machine. The following can be changed. Machine Name If you would like to change the machine’s name, simply type in the required name and click on the “change machine name” tab. Fleetm@tic II User Manual ver. 1.11 Page 26 of 60 Service Interval Should you wish to service your machine at a different service interval than the 500 hours default, the user can request this to be changed by entering the requested service interval and clicking on the “Request Service Interval Change” tab. This request will be actioned by the Fleetm@tic Administrator once the Bell warranty team has agreed on the new service interval. Disabling a machine The “Request Machine Disable” is a tool that can be used when you require to remotely having your machine immobilized. This function will prevent your machine from being started by locking the machine out with an 8 digit security code. To start the machine again, one needs to request the Fleetm@tic Administrator to enable the machine again or enter the 8 digit unlock code that has been supplied by the factory. Once the “Request Machine Disable” has been submitted, the Fleetm@tic Administrator will disable the machine. The “Request Machine Enable” is used when you require having your machine remotely enabled. Once the “Request Machine Enable” has been submitted, the Fleetm@tic Administrator will enable the machine. Ping Request The “Send a ping request to the machine” is a function that can be used when you would like to receive the latest machine hours and position of your machine, if the machine is running at the time the request is send. Once you have clicked on the button, the system will reply with the message below The ping request is limited to once a day per machine. 6.6 Driver ID This function links the Driver ID’s created in the Driver ID access program to the Driver names entered. The Driver ID access program can be downloaded from our website or alternatively one can contact the Fleetm@tic Administrator who can e-mail the program to you. Fleetm@tic II User Manual ver. 1.11 Page 27 of 60 The Driver ID’s can be linked manually one by one or automatically by loading the Driver ID file (*.bda) that was generated by the Driver ID program. The Drivers has to be created and linked to their Driver ID’s before they can be linked to the machines. Link / Unlink Drivers to Machines Manually Right click on the machine and select “Drivers”. The following prompt will appear on your screen: To add a Driver, click on the “Add Driver” tab. Enter the Driver name and Driver number (This is the driver number generated by the Driver ID program) and select “Add driver”. Click “Save” To remove a Driver, select the driver and click on “Delete Selected”. Once all the Driver’s have been created and linked to the Driver ID’s, they can be linked to the machines. To link the Drivers to the machines, click on the “Link Drivers to machines” tab. The following screen will appear. Fleetm@tic II User Manual ver. 1.11 Page 28 of 60 Select the machine to which you would like to link driver to. Select the first driver that you would like to link to the machine and click on the “Link Driver” tab. Select the next driver/s and click on the “Link Driver” tab till all the drivers that you want to link to the machine has been moved over into the “Drivers linked” column. Click on the “save” tab. Select the next machine and repeat the process. Link Drivers to Machines Automatically The Driver ID access program can also be used to create a file that can be imported directly. This feature will over right any existing driver links and will link the drivers automatically to all the machines selected. Select all the machines that you want to assign drivers to. Click on the “import from file” button Select the file name. Should be a file with a *.bda extension Fleetm@tic II User Manual ver. 1.11 Page 29 of 60 You will get the following notice. Click on the “save” tab Fleetm@tic II User Manual ver. 1.11 Page 30 of 60 7. MAPS Fleetm@tic® II offers you a selection of maps, which you can use to establish the last known position of your machine. Maps range from VE Maps to Google Maps. Some maps will have more detail than others in specific areas and it is thus advised that the user have a look at all the possibilities to find the maps that best suits his/her needs. To enable the maps to work, the following website must be opened on your firewall: Virtual Earth Maps (VE Maps) http://r1.ortho.tiles.virtualearth.net http://r2.ortho.tiles.virtualearth.net http://r3.ortho.tiles.virtualearth.net http://h1.ortho.tiles.virtualearth.net Google Maps: http://maps.google.com 7.1 Types of Maps Locations: VE Maps: Shows location entered by User. Please refer to location set up for more detail Virtual Earth Maps – indicates the last known position of your machine on a street map VE Sat: Virtual Earth Sat – indicates the last known position of your machine on a satellite map Google Map: Using Google maps to view machine’s last known position Google Sat: Using Google satellite maps to view your machines last known position Measure: Tool than can be used to measure straight line distances between two points. Click on the measure icon, then click from where to where you want to measure the distance on the map. Should you wish to exit, double click. Geofences: Selecting this icon, will show all geofences that has been setup. Fleetm@tic II User Manual ver. 1.11 Page 31 of 60 There is a selection of maps available from which you can choose. Depending on your geographical location, you will be able to access certain of these maps. Your location will determine the quality and information made available. While the maps are downloading, the system will inform you as to how many parts of the map is still to be downloaded as shown in the top left corner. 7.2 Enter Location on Maps Right click on the map Enter the Name of the new location Click on “OK” to save settings. Fleetm@tic II User Manual ver. 1.11 Page 32 of 60 7.3 Goto Location Click on this function if you want to go to a location that you have created. 7.4 Goto Coordinates Go to specific coordinates on the map once you have entered the coordinates. 7.5 Create a Geofence On the Max and Max plus packages a user can setup a Geofence area to which the user want to ‘restrict’ the machines. Please note that this geofences alert will only go out once a message has been received from the machine containing a location. Once this location has been received it will be checked against the Geofence setup to determine if the machine is still within its limitations. Messages that contain locations are Loading, Tipping and Events. Before setting up a geofences, a group needs to be created to which the geofences will belong to. Click on the tab “create geofence” and select “circle” Click on the map to place the geofence middle point. Click again once you are satisfied with the radius of the geofence. The following screen will appear Fleetm@tic II User Manual ver. 1.11 Page 33 of 60 Click on the “Edit” tab to create a group first, else the system will not allow you to create a geofence. The following screen will appear. Enter the new Description Select the group colour Select the machines that will be linked to this group Select the contacts that will get the notification or create a new contact by clicking on the “Edit” tab next to contacts. Do not assign a geofences item at this stage Enter the text that you want to be displayed when leaving the geofences and entering the geofences. Click “save”. Go back to the map page Right click on the map, and select “Create Geofence” Select “circle” By doing so, a circle will appear on your screen. Drag the circle to the size required. The blue script will indicate the radius of the circle. Fleetm@tic II User Manual ver. 1.11 Page 34 of 60 Once you are satisfied with the radius of the Geofence, click again and the following pop-up will appear. Select the group to which this geofences will belong to. Enter the name off the geofence. Enter the radius of the Geofence. Click on “Save”. 7.6 Reload Map Tiles Update the current map. Fleetm@tic II User Manual ver. 1.11 Page 35 of 60 8. APPLICATION DESCRIPTIONS 8.1 Fleet Clicking on “Fleet” will display your entire fleet. Unit name Machine hours Last Report Last Message Type Status Service Indicator Location Note: Name allocated to the machine by Administrator on request of Customer Accumulative hours machine has worked Last time the machine reported Last message received from the machine Ignition off Ignition on Machine serviceable Machine due for a service Machine is overdue for a service Provide the co-ordinates of the machine By clicking on the headings, this will automatically filter based on your selection, I.e. If you click on the unit name; it will automatically filter the units alphabetically. If you click on the Machine hours, the machines will be filter based on their machine hours. Fleetm@tic II User Manual ver. 1.11 Page 36 of 60 8.2 Alerts This tab will provide you with almost live events as they occur on your machine (Events are only available on the Max and Max Plus packages and are limited to the daily event credits). Unit name Event Time Event Type Duration Value Acknowledge Location Co-ordinates 8.3 Name allocated to the machine by Administrator on request of Customer The time the event took place Type of event that took place Duration time of the Event The value of the Event, e.g. How long did the machine over speed, or how many tonnes was loaded when an overload was triggered By clicking on the square block, you will acknowledge that you have taken note of the Event and the system will erase it from this screen. For history purposes, all events are placed in the events tab at the bottom of the page. Provides the location where the event took place Provides the co-ordinates where the event took place Events Fleetm@tic II User Manual ver. 1.11 Page 37 of 60 Events are categorized into two criteria’s. General Events – Events that will not cause immediate damage Priority Event – Events that require immediate action by the customer as they can cause serious damage to property or persons. The reason for categorizing events is to ensure that priority is given to the priority events. Each machine on the Max or Max Plus package will have a daily limit of 10 events it can send. This limit is broken up into 5 general event and 5 priority events, ensuring that priority events are sent when triggered. Event credits are rolled over to the next day, if not used, but is void at the end of each month. Clicking on this event tab, will display two sub-tabs, “General Events” and “Priority Events”. An Event description will clearly stipulate the time the event was trigged, the operator, event description, duration thereof, value, where it happened and additional comments regarding the event. List of General events Hydraulic temperature too high Triggered after the temperature has exceeded 100°C for more than 30 seconds. Battery voltage too high Triggered when the battery voltage exceeds 29.5V for more than 1 second. Excessive idling Trigger after 20 min of machine idling Payload too high Triggered when machines tips and the payload exceeded the below limits. B20D - 20 Tonnes B25D - 25 Tonnes B30D - 30Tonnes B35D - 35 Tonnes B40D - 40 Tonnes B50D - 50 Tonnes Fleetmatic Test message For testing purposes only. Sent by Bell personnel from the machine. SDM Acknowledgement For testing purposes only. Sent by the Fleetmatic server to acknowledge the Fleetmatic test message sent from the machine. Service reset Sent by Bell personnel once they have completed the service off the machine. Please refer to automatic service due notification for more info. Park brake burnout Triggered when output shaft speed is higher than 300 RPM and the park brake is engaged for more than 1 second. VIN reload Sent when machine has been programmed by Bell personnel Material selection changed Triggered when operator changed the material type on the MDU. Unexpected engine shutdown When the engine RPM goes below 400 RPM without a request to shut down. i.e. stalling the machine OBW Fault Fleetm@tic II User Manual ver. 1.11 Page 38 of 60 When the On-board weighing module sends values that is not within specified parameters. Possibility of wiring to the OBW module or strain gauge problem. Exhaust brake protection When the exhaust brake valve fails in the closed position. Coasting in neutral Triggered when the output shaft speed is greater than 275 RPM(+- 5km/h) and the actual gear is Neutral and both these conditions has existed uninterrupted for longer than 5 seconds. The duration is defined as the total time starting when actual gear is Neutral while output shaft speed is greater than 275 RPM, until either the output shaft speed is less than 275 RPM or the actual gear is not equal to Neutral. The value of this event is defined as the max value that the output shaft speed reached during the trigger period. Leaving geofence Notification of time when machine left the geofence. Refer to options for more detail. Entering geofence Notification of time when machine entered the geofence. Refer to options for more detail. Excessive standing still Triggered after standing still for more than the set time limit. Harsh Braking Triggered when the output speed shaft reduce at a rate of more than 1233RPM per second. List of Priority Events Engine speed too high When the engine RPM exceeds the values below for more than 500 milliseconds. B20D – 2900 RPM B25D – 2900 RPM B30D – 2900 RPM B35D – 3000 RPM B40D – 3000 RPM B45D – 3000 RPM B50D – 3000 RPM Engine coolant temperature too high Triggered when engine coolant temperature exceed 106°C for 1 second. Transmission temperature too high When the transmission temperature exceeds the values below, for 30 seconds. B20D – 101 degrees Celsius B25D – 101 degrees Celsius B30D – 101 degrees Celsius B35D – 118 degrees Celsius B40D – 118 degrees Celsius B45D – 118 degrees Celsius B50D – 118 degrees Celsius Vehicle speed too high When the vehicle speed exceeds the values below for 1 second B20D – 67 km/h B25D – 59 km/h B30D – 59 km/h B35D – 60 km/h B40D – 58 km/h B45D – 53 km/h B50D – 53 km/h Fleetm@tic II User Manual ver. 1.11 Page 39 of 60 8.4 Critical log triggered The following events will trigger a critical log. This log will record the following parameters on the Memory Module on the machine 5 minutes before the event was trigger until 5 minutes after. Freewheeling Trigger when the Operator selects neutral and the output shaft speed is greater than 3000RPM for more than 1 second. Output shaft speed too high The output shaft speed exceeds 3700 RPM for more than 1 second. Wet disk brake temperature to high Triggered when temperature exceeds 108°C, for longer than 30 seconds. Oil Pressure too low Triggered when the engine oil pressure falls below the required pressure for the given engine speed for more than 1 second. The pressure versus engine speed is: 50 rpm – 0.2 bar 600 rpm – 0.5 bar 1000 rpm – 0.9 bar 1400 rpm – 1.3 bar 1800 rpm – 1.6 bar 2200 rpm – 2.0 bar 2600 rpm – 2.5 bar Production – Subs Tabs ( Timebar, Shift Info & History Log) In addition to automated reports, one can look at the raw data under the production tab as well. The information available is once again limited to the package subscribe to. For example only the Max and Max plus will display information under the History log tab. 8.4.1 Timebar This window displays the 7 most recent data entries and will show you the: Report time Production date Engine running hours (actual hours the engine was running) Machine moving hours (engine running & machine moving at >5km/h) The Time Bar will indicate the time that the Engine was running. Each hour is broken up in 10 minute intervals. Should the engine have been running for 5-10 minutes during this interval, we make the timebar green. Should the engine have been running for less than 5 minutes during this interval the timebar will remain “blank”. The effect would be that the timebar and Fleetm@tic II User Manual ver. 1.11 Page 40 of 60 machine hours worked per shift, could not match 100%, as we calculate the machine hours work in the shift with second intervals and the timebar only with 10minute intervals. The engine therefore could have been running for 14minutes, but the timebar will only indicate 10 minutes. 8.4.2 Shift Info The Shift Info tab displays the 9 most recent data entries of information. This information contains all the information in the detail shift report and more. 8.4.3 History Log The History Log will provide you with the 200 most recent data entries for the specific machine. This information will include ignition on and off, loading and tippings etc. Once again the data is limited to the package subscription. 8.5 Technical – Sub Tabs (Vehicle, Transmission & Engine) 8.5.1 Vehicle Displays the 9 most recent statistical data available, to indicate various parameters and the time spent in each, i.e. Measures the number of seconds the machine was overloaded in 5 different levels Hydraulic oil temperature Wet disc temperature Events triggered Number of Events credits available for the month Battery voltage Speed limit type Speed limit Speed limit exceeded Fleetm@tic II User Manual ver. 1.11 Page 41 of 60 8.5.2 Transmission Displays the 9 most recent statistical data entries relating to Transmission information: Retarder torque in specific levels Transmission sump oil temperature Output shaft speed Retarder oil temperature Number of Up-shifts Number of Down-shifts Amount of time machine was engaged in a specific gear 1st and 2nd gear lock-up time Service indicator 8.5.3 Engine Displays the 9 most recent statistical data entries relating to Engine information: Engine speed over revs in specific levels Coolant temperature Oil pressure Idle time Engine torque Retarder torque Engine oil temperature Throttle position Total engine hours Exhaust brake count Fleetm@tic II User Manual ver. 1.11 Page 42 of 60 8.6 Machine Specifications Displays the machine specifications as well as optional extras that have been activated. Software versions OBW gain factor Fleetm@tic® II Package Geofence radius in km Tyre size Machine type Optional extras available (a indicates that the specific “extra” has been activated) 8.7 Fault Codes Fault code tab will display any “Faults” which were recorded on the machine for the previous day. The report time indicates when the fault code was transmitted and does not indicate the time when the fault occurred. Fleetm@tic II User Manual ver. 1.11 Page 43 of 60 9. REPORTS SETUP Fleetm@tic® II will generate Automated Reports and e-mail them to you on a daily basis, after the end of each shift, Weekly, Monthly or once only. The reports you will be able to receive are linked to the package you have subscribed to. 9.1 Setting up reports Select “Automated Reports” and then “Configure” The screen below will appear. At the “Description” tab, highlight “New” and type in a report name. Only use alphabetical characters in your name of the report – no *&^%$# Select the machines you would like to have included in this specific report. Machines with a gray block behind them are limited due to their package. Fleetm@tic II User Manual ver. 1.11 Select the type of report (Shift, Timebar, etc.) Remember that the type of reports are linked to the package you have subscribed to Select the frequency on which you would like to receive this report, per shift, daily, weekly or monthly Click on the “Edit” icon to add a new recipient’s contact detail Page 44 of 60 Select the contacts who should be receiving this report Click on the dropdown to select the language in which you would like to receive this report After you have activated the report, click on “Save” to save the report 9.2 Back dating reports Reports can be backdated, should the user require reports from the past. Please see the limits below for back dating the reports. Report Type Frequency LIMIT_BACKDATE_DAYS LIMIT_RPT_PERIOD_FLEET LIMIT_RPT_PERIOD_UNIT A limit (days) of the days backward in history that you can select A limit (days) of the time window that you can select for more than one unit A limit (days) of the time window that you can select for one unit 1 1 Shift Report Every Day 90 Shift Report Every Week 90 7 7 Shift Report Every Month 90 31 31 Shift Report Per Shift 90 1 1 Shift Report Only Once 90 62 62 Timebar Report Every Day 90 1 1 Timebar Report Every Week 90 7 7 Timebar Report Every Month 90 31 31 Timebar Report Per Shift 90 1 1 Timebar Report Only Once 90 62 62 Load Report Every Day 90 1 1 Load Report Every Week 90 7 7 Fleetm@tic II User Manual ver. 1.11 Page 45 of 60 Every Month 90 0 31 Load Report Per Shift 90 1 1 Load Report Only Once 90 7 62 Event Report Every Day 90 1 1 Event Report Every Week 90 7 7 Event Report Every Month 90 31 31 Event Report Per Shift 90 1 1 Event Report Only Once 90 62 62 Load Report 9.3 Adding a Contact Click on “Add Contact. Enter a Contact’s name and select the sms option to enter a cell phone number or the email option to enter an email address The SMS function can be activated by the Fleetm@tic® Administrator once the Customer has subscribed Click on “save” and the contact will be added to your list. Fleetm@tic II User Manual ver. 1.11 Page 46 of 60 9.4 De-activating a Report By following the easy steps below, you can de-activate reports should you wish to no longer receive them. Select the report name which you would like to Deactivate Click on the “Save” button. System will indicate that the change had been saved 9.5 Click on the “Deactivate ” tab. It will change to Activate and today’s date and the current time will show Live Reports Using “Live Reports” you are capable of calling up the latest information on Shifts, Events, Loads, Activity Log and Shift summaries (Lite package). Selecting the “Shift Summaries” will prompt you to select either one or all of your machines. Once you have selected the machine(s) and have clicked on “OK”, a date prompt will appear. Simply select the date in question and then “OK”. Fleetm@tic II User Manual ver. 1.11 Page 47 of 60 The screen below will be displayed with the machine(s) shift history. You may print or save the reports, using these buttons Selecting “Events” will enable you to view events as requested by yourself for specified dates. Once again the reports can be saved or printed. Fleetm@tic II User Manual ver. 1.11 Page 48 of 60 Live Load reports are also available. Simply select the machine(s) and the dates you require the information for. Reports can be printed or saved. Activity log supplies you with a list of activities, ie. Ignition on and off and any events. Reports can be printed or saved. Fleetm@tic II User Manual ver. 1.11 Page 49 of 60 The Live Report – Shift summaries (Lite) will only apply to users on the Lite package. Reports can be printed or saved. Fleetm@tic II User Manual ver. 1.11 Page 50 of 60 10. SETTING UP EVENT NOTIFICATIONS When you have subscribed to the Max and Max Plus packages, an option exists in Fleetm@tic® II to subscribe to a SMS bundle, which will allow the user to setup event notifications to be sent directly to his mobile phone. Please ask the Fleetm@tic administrator or your branch for costs on the various packages available. To activate this option, you need to send an order number to the Branch / Dealer On receipt of an order number, the Fleetm@tic® Administrator will credit your account with the Bundle you selected Once you receive confirmation from the Fleetm@tic® Administrator that this had been done, you can log onto Fleetm@tic® II and follow the steps below: Select “SMS” and click on “Configure” Fleetm@tic II User Manual ver. 1.11 Page 51 of 60 The screen below will appear. Select one or more of the Event types. A will appear next to the ones selected Click on the “New” icon to add a new recipient’s contact detail Enter a Contact’s name and select whether you would like to send the report via SMS or an E-mail. When changing to Email, the “Phone number” will change to E-mail address Fleetm@tic II User Manual ver. 1.11 Page 52 of 60 Click on the “Save” button to activate this feature Fleetm@tic II User Manual ver. 1.11 Page 53 of 60 11. LOCATIONS Select “Location” at the top of your screen and select “New Location” and the following pop-up will appear. Complete the fields and select “OK”. To edit the location, follow the same steps as above, but select “Edit Location” and make the necessary changes and select “OK”. Fleetm@tic II User Manual ver. 1.11 Page 54 of 60 12. REMOTE DATA EXPORT This function enables the user to export selected data in .xml format for further use. The software to request the data from the Bell server is the customer’s responsibility. Users should note that the availability of data is dependent on the package subscribed to. The download is configured to give the user all New Data, a Retry mode and then Flag Delete Data. The data will be exported to xml format with the character “!” as the delimiter. New Data This is all the data from the previous 2 days up to date of the request. The data will be made available for the user in XML format . Once the data is downloaded the data status flag will change from New Data to Retry data. To request new data the following should be entered in the webpage. (The username and password is the same as your client application login details.) http://www.fleetmatic.bellequipment.com/bellweb/javaweb.aspx?getdownload=Username,password All new data from the previous 2 days will be requested. Should the user want to automate the download of data, take note that the data request period should not be less than a 15 minute intervals. Retry Retry will allow the user to re-download data that has been flagged for retry. The data status flag will then change from Retry to Delete. http://www.fleetmatic.bellequipment.com/bellweb/javaweb.aspx?getdownload=username,password&retry=1 Setup on client application Click on the “remote data export” Click on “configure” Fleetm@tic II User Manual ver. 1.11 Page 55 of 60 The following screen will be displayed Select the data that you would like to receive. Data that will be received is depended on the subscription ie. Standard, Max or Max Plus Click on save Vehicle info – Supplies detail about the vehicle. Software version, make etc. Engine info – Supplies statistical information about the engine Transmission info – Supplies statistical information about the transmission Fault codes – Supplies previous day fault codes that occurred Shift Messages – Production information Timebar – Reports on the units time in production Shift Schedules – What shift schedules is setup on machine Ignition Status – Ignition on and off messages Events – Events as they happen Loading and Tipping – Loading and tipping information as it happens Fleetm@tic II User Manual ver. 1.11 Page 56 of 60 13. OPTIONS AND/OR SETUP ON THE MACHINE 13.1 Service due notification Service due notification can be set up by the Administrator on request by the customer. Once these service due notification has been setup, a series of automated reports will be sent to the customer to assist him with the planning of services for his fleet. These service notifications are scheduled according to the Bell recommended service intervals. Should a customer prefer a different service interval, technical approval from Bell need to be obtained. Service plan: E-mail sent to user 100 hours before service is due on machine according to the last service reset that was done on the machine. Service Due: E-mail sent to user 24 hours before machine is due for service Service overdue: E-mail sent to user when the service has not been done within 24 hours of the due hours. Service done: E-mail sent to user when service technician has sent a service reset message from machine. 13.2 Auto off time This is an option than can be enabled on the machine. This option will switch off the engine after it has been idling for longer than the set time. As soon as the engine has been switched off, the memory module start to calculate the time, until the ignition is switched off. This time will indicate to the user the fuel that was saved by switching the engine off, rather than to have it idling. This will time will be reflected in the shift report, under the “Auto off” column. Please contact your customer support for activation of this feature or for more information about it. 13.3 Material selection Each time the operator selects a different material number on the Monitor Display unit, Fleetm@tic® II will report the number with each tipping event if the machine id on the Max Plus package. Example: Material type 1 = Coal Material type 2 = Overburden The operator needs to select the applicable material type before the machine is loaded. The load report on Fleetm@tic® II will then indicate load by load what material was loaded and how much. How to change to material selection on the MDU Press Menu Press next and scroll down to “Machine Config” Press select Press next and scroll down to “Prod option” Press select Press next and scroll down to “Material selection” Press select Select the material type bu scrolling down with the next button Press and hold down the select button for 3 seconds to select the material Fleetm@tic II User Manual ver. 1.11 Page 57 of 60 13.4 Setting up the shift reports on the machine Please take note that when shift report start times are changed the shift report start time change request will only be send at the end of the shift. This can cause the shift reports not to be send out correctly the first time as the Shifts on the machine and the shifts in the shift report server are not syncronized. The shift reports however will be correct the day after. Shift report are limited to the packages subscribe to and can be setup as follow on the machine. 13.5 Go into service mode Go to menu 4 – “Machine Conf” by pressing the Menu button. At menu 4 press the Select button. Press the Next button until “MM Config” is displayed and press the Select button. Scroll down to “Shift setup”. Press select. Enter the number of shifts that is required per day. Please note that this is limited to the type of package. Press Menu Select Monday Enter the start time of the first shift by pressing the next button. Press select Press menu Follow the same procedure to set up the remaining shift if applicable The rest of days will default to Monday’s shifts automatically. If a user requires different start dates, you need to set them up individually. Setting up the time offset on the machine Changing the time off set will change the time your reports are send. The time offset on the machine needs to match the local time. Example: For South Africa, the time offset is +2hours GMT. Go into service mode Go to menu 4 – “Machine Conf” by pressing the Menu button. At menu 4, press the Select button. Press the Next button until “MM Config” is displayed and press the Select button. Scroll down to “Monitor settings” Press select Scroll down to “Time offset” Enter the GMT time offset for the region Fleetm@tic II User Manual ver. 1.11 Page 58 of 60 13.6 Setting up the stationary event time on the machine The machine will send a stationary (Only looking at engine on and zero ground speed) event when the time exceeds the specified time. Go into service mode Press menu Press next and scroll down to “machine Config” Press select Press next and scroll down to MM Config Press select and scroll down to “Stationary event” Press select Enter the time after which an event should be send if the machine is standing and idling for longer than the specified time. Press and hold select down for 3 seconds Fleetm@tic II User Manual ver. 1.11 Page 59 of 60 14. Fleetm@tic Contact Information Call Centre: 080-FTMATIC (080 386 2842) E-mail: [email protected] Web Site: http://www.fleetmatic.bellequipment.com Direct landline: Fleetm@tic Administrator +27 (0) 35 907 9538 Fleetm@tic II User Manual ver. 1.11 Page 60 of 60