1
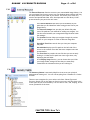
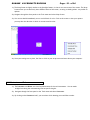
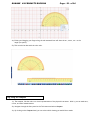
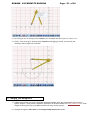
Dukane Notes
Dukane Notes Software Manual
This guide will provide you with information on using
the software tools and features.
Version 2.5.1.0
5/11/2010
`
430-DUKANENOTES-00
Information in this Guide may change due to product improvements. To obtain
the latest manuals, literature, and software please visit the Dukane web site at
www.dukane.com/av and look at the specific model SUPPORT or
DOWNLOADS section.
Table of Contents
Chapter 1. Getting Started: A Guide to Your Toolbars
1
1.1 Installing and Starting your software………………………………………………………………………...........
1.2 Main toolbar definitions and descriptions…………………………………………………………………………. 2-5
1.2a-w Toolbar buttons outlined……………………………………………………………………………………….. 5
1.3 Functional Panel definitions and descriptions………………………………………………………………….. 6-8
1.3a Index………………………………………………………………………………………………………………………..…...
6
1.3b Setup(Interface)………………………………………………………………………………………………………….. 6
1.3c Setup (User Info)………………………………………………………………………………………………………..…7
1.3d User Manager………………………………………………………………………………………………………………. 7
1.3c External Resource……………………………………………………………………………………………………… 8
1.3d Geometry Pallet………………………………………………………………………………………………………….…..
8
Chapter 2. How To’s
2.1 How to insert media files………………………………………………………………………………………………... 9-10
2.2 How to add content to your Image Library………………………………………………………………………. 10-11
12
2.3 How to change users …………………………………………………………………………………………………………….
2.4 How to use the on-screen keyboard……………………………………………………………………………………13-14
2.5 How to annotate over slides, videos, & embed into Office files……………………………………...15-16
2.6 How to use your Tools………………………………………………………………………………………………………...16-21
2.6a Making a screen recording……………………………………………………………………………………………..16-17
2.6b Setting your Timer/Clock……………………………………………………………………………………………..17-18
18-19
2.6c Using your Spotlight function………………………………………………………………………………………….
2.6d Using Image Capture…………………………………………………………………………………………………… 19-20
2.6e Using your Wrap Screen………………………………………………………………………………………………….21
2.6f Using the Protractor and Rulers……………………………………………………………………………….. 22
2.6g Using the Compass……………………………………………………………………………………………………… 23
2.7 Changing Background Images…………………………………………………………………………………………... 24
DUKANE AV PRODUCTS DIVISION
Page - 1 - of 24
CHAPTER ONE- Getting Started: A Guide to Your Toolbars
1.1 Getting Started
Installation
Launching your Software
Go to the Start menu on the bottom left corner of your screen. Select the All Programs option and
navigate to the Dukane folder. Scroll to the Dukane Notes program and select it to launch the software.
You will immediately be greeted by a blank screen that corresponds to the touch screen/active area on
your wireless tablet. On the bottom of the page, you will find your main toolbar.
DUKANE AV PRODUCTS DIVISION
Page - 2 - of 24
1.2 MAIN TOOLBAR
1.2a
The Start Button allows the user to print, save, email, and edit the
background on the current page. It holds a number of different functions
that are detailed here:
The New button allows the user to open a new page in the existing
window.
The Open button allows one to open different folders and files from
his or her computer.
The Save buttons allow you to preserve your work for a later time.
Use this function to Close up an existing page of work as Dukane
Notes remains open for the next project at hand.
The Print button will allow you to print your creation as a hard copy.
Print Preview will show you an electronic image of what your printed
document will look like.
The Export function will allow you to export picture, PowerPoint,
HTML, and PDF files.
Dukane Notes allows you to Send your newly-created
document as an HHT, PDF, or PP attachment via email.
The Tools button is your window into a whole host of unique
options and choices for your document creation:
Highlight and focus in on key areas of your page.
Record your own movie by clicking
on this button to track your drawing and edits.
Take a Snapshot of any screen, region, or logo you
like with this tool. It will allow you to import those
graphics into Dukane Notes for editing.
Hide or Display different areas on your screen using
this virtual cover page. Provides shading and coverage.
Utilize the on Screen Keyboard feature to enter text
onto the page via text boxes.
This function will allow you to set a timer into Dukane
Notes for activities with limited time or have a clock
displayed on the board.
DUKANE AV PRODUCTS DIVISION
Page - 3 - of 24
Use this virtual Protractor to measure precise
angles and create designs.
Rulers aide in your line-drawing and precision.
Use the Compass tool to create precise circles
of all sizes- a click of your mouse controls its
radius.
The Switch User function allows you to shift from one
user to another among differing categories.
Select from any number of files to choose a customized
Background Picture for your page.
You can choose from an array of Color palettes to tint
your Dukane Notes creation.
This function enables you to Erase your chosen
background picture with one click.
Select Device enables you to toggle through other
devices connected to your computer like a visualizer.
Acquire allows you to capture a picture from a visualizer.
Information About the version number and copyright can
be found here.
System Setting will allow you to adjust certain pen
functions as you see fit: width, smoothness, and
transparency.
Selecting Exit will allow you to end your session with
Dukane Notes. Be sure to save your information before
closing down.
1.2b
1.2c
1.2d
1.2e
1.2f
The Switch Mode function allows one to navigate between screens on your
computer- in and out of the Dukane Notes software so that you can work on
multiple projects simultaneously.
Screen Annotation will enable you to write and make notes using the digital
pen on any screen, in any program on your computer. You can then embed the
annotation to permanently save the text in the file you are annotating.
The New button will allow you to add new slides including fresh screens in
varying colors and backgrounds.
The Delete function will erase the slides of your choosing.
Scroll between the Previous and Next slides with this function.
DUKANE AV PRODUCTS DIVISION
Page - 4 - of 24
1.2g
1.2h
Zoom; Can zoom in on and out from content written or drawn on the current
slide
Rover lets you pull the screen up, down, and all around to get the best
view and optimize your drawing space.
1.2i
The Pen is the straightforward writing device - you can choose your
own color and line width as you navigate across the pages.
1.2j
1.2k
1.2l
1.2m
The Brush lends an artist’s edge to your creations- short, swift strokes
for your more detailed work. Stroke width and color are customizable
for you. This tool is pressure sensitive and the stroke width will be
altered as more or less force is applied.
The Laser Pen enables you to bring attention to certain points of
interest on the screen with its draw and fade function. Ie: circle a
point of interest and the mark will fade away as you move your cursor
to another area of the screen.
Highlight text or pictures in any number of shades with Dukane Notes
highlighter function- adjust the level of transparency and thickness of
the pen to your liking.
The Intelligent Pen allows you to draw perfect shapes with its selfadjusting feature. Draw a swirl and it will create a circle for you.
1.2n
Insert text with the Text Box function- draw a box and type in your
text using any kind of font or color scheme.
1.2o
Using the Media function, you can insert pictures and video into your
document, along with a variety of multimedia.
1.2p
The Image Library is a collection of images sorted by theme which are
easily added to your slide by clicking and dragging. You can always add
new topics and additional pictures.
1.2q
The External Link tool allows you to create an active button that opens
up a website or executable file on your computer when clicked.
1.2r
The Select tool enables you to choose different items or areas for
copying, pasting, and layering.
1.2s
Erase by region, pixels, or you can clear it all at once.
1.2t
You can Select Pen Width and thickness with this tool.
DUKANE AV PRODUCTS DIVISION
1.2u
Page - 5 - of 24
Alter your pen’s Color and Texture with this function.
1.2v
You can fill in a drawn object or shape with any color using this tool.
Create your own recording with the File Recorder for immediate
playback or to display your work’s progress for a later showing.
1.2w
1.2x
Undo and Redo buttons serve as simple editing of your page.
1.2y
Use the Stretch and Rotate function to expand or minimize the
main toolbar.
)
1.3 FUNCTIONAL PANEL
Look to the left on your screen. You will notice a tab bordering the side of your page. Click on that sidebar
to expand the Functional Panel which includes your Index, External Resource, Geometry Palette, Setup,
and User Manager fields.
At the top of the sidebar, you’ll notice the header:
To navigate between fields, click on the flowered icon to the far left:
DUKANE AV PRODUCTS DIVISION
Page - 6 - of 24
1.3a
The Index serves as your one stop shop for viewing and organizing your work-inprogress slides along with handling your editing needs:
If you’ve used Rover to create graphics on areas of the
slide outside of the screen area, clicking on Bird’s-Eye will
bring it all into view on one screen.
The Cut Slide function lets you eliminate any unwanted
work/slides as you see fit.
The Copy and Paste Slides enable one to select slides
directly in the Index window for copying and editing
purposes.
The Delete Slide allows you to select and erase slides as
you go.
Format the order of your slides using the Move to Top or
Bottom functions. Simply select the slide you’d like to be
listed first or last, click the corresponding key, and the
slides will be reorganized for you.
The Move to Upper and Lower keys allow you to select a
slide that you’d like to be moved higher or lower in the
cache. Just click these keys as many times as necessary to
continue to move up or down in the slide order.
Using Multi-Select Mode makes your editing a snap- it
enables you to select multiple slides at the same time in
order to make any changes you see fit.
1.3b
The Setup (Interface) allows you to customize your toolbars according to your
own preferences. For example, you may decide that one of the tools/commands
from the Start menu should be more accessible and thus you can move it to the
Main Toolbar for your convenience. There are three categories you may choose
from when selecting your commands for relocation: Writing Mode Toolbar, Office
Mode Toolbar, and Desktop Mode Toolbar. Simply drag and drop the chosen
command to the toolbar on the screen you’d like to access it from.
The Restore Current function will return the specific
toolbar category you’re working in to its previous
settings.
The Restore All function will restore all of your
toolbars to their default settings, regardless of the
category you are currently working in.
DUKANE AV PRODUCTS DIVISION
1.3c
Page - 7 - of 24
The Setup (User Info) allows you to change and edit your user information,
including password, icon, name, and background.
The Changing Icon function allows you to browse
through any files on your computer to locate an
icon that you feel suits your personality.
The Changing Password button allows you to
revise your password for security purposes.
Change and validate your User Name with this
key.
Set a default Background color or picture with
this function.
Set or check on your Default Save Path in this
area.
The Restore Current function will return the
specific user settings you’re working in to their
default setup.
The Restore All function will restore all of the
users saved to their default settings, regardless of
the specific user you are currently working in.
1.3c
The User Manager allows you to monitor and organize the users within the
software. You can add as many users as necessary, set start-up defaults, and switch
between users as you see fit. (Note: Customized settings and saved data are
password protected for each user)
Add or Delete Users as necessary with these keys. (Note:
setup includes option of password protection)
Select the Switch Users function to move between fields
and to view the saved data or other accounts.
The Set as Startup User key allows you to set a user as a
default account that automatically loads with each startup
of the software.
DUKANE AV PRODUCTS DIVISION
Page - 8 - of 24
1.3d
The External Resource function serves as your customizable Image Library. You
can save image files from any source into your Dukane Notes software and drag
and drop them into your slides as you choose. This allows you to craft very
creative and specialized slides. Also, data imported into this library is Userprotected under your particular user name.
The Favorite Resource tab allows you to bookmark any file
paths that you find beneficial when saving picture files to your
image library.
The Resource Manager lets you edit your default file paths
(note: file paths are your method for adding new images). You
can also move between your categorized image libraries within
the manager.
The Upwards function helps you navigate through the various
folders on your computer in order to add new image files.
Show/Hide Tree View controls how you view your computer
file paths.
Normal Mode displays your file paths on the left side of the
screen in the common tree view that most computer users are
accustomed to.
The Show Root key reveals the root file that you are currently
looking in- it hides the file path/tree view to get there, only
displaying the end folder.
In the Display Usage function, you can choose how you’d like
your image folders arranged so that they are most easily
viewed with the information that you are looking for.
1.3e
The Geometry Palette is extremely helpful as it serves as your principal
mathematical drawing tool. You can craft anything from a rhombus to a Cosine
function.
There are two categories for you to select tools from: Planar Figure and
Function. Simply click on the shape or function you want, and then draw in the
screen space as you would normally. You can control color, size, shaping, and of
course, placement of the item.
CHAPTER TWO- How To’s
DUKANE AV PRODUCTS DIVISION
Page - 9 - of 24
2.1 How to Insert Media Files
Note: Dukane Notes is compatible with the following media/image files:
1.) Click on the Media File key
, located on the Main toolbar, on the right hand side of your
screen.
2.) From here, you can select files from any folder on your computer, including pulling files from your
User account:
3.) Select the media file you would like to insert into your slide.
4.) Once you have selected the image or media, click on your slide and use the cursor to expand the
size of your file. Once you are done with the sizing, your media file is ready to play!
DUKANE AV PRODUCTS DIVISION
Page - 10 - of 24
2.2 How to Bring Outside Images and Material into Dukane Notes
Remember that you can pull image files from any source. You can access those images/pictures through
the External Resource tab in your Functional Panel (Using Tree View). The following will show you how to
pull images from outside sources into Dukane Notes with the External Resource tab.
1.) Locate the image you’d like to add and right click on it. Select Save Picture As.
2.) You will use the following file path to save the picture in your Image Store:
C:\programfiles\Dukane Notes\Images
DUKANE AV PRODUCTS DIVISION
Page - 11 - of 24
3.) To add the selected image to a slide within Dukane Notes, simply navigate to your Functional
Panel (Sidebar), click on the External Resource option, and click on the second button from the
left- your Resource Manager:
This will lead you to your Image folder.
Click on the image you’d like to insert and use the cursor in your slide to size and format the
image to your preference:
2.3 How to Change Users
DUKANE AV PRODUCTS DIVISION
Page - 12 - of 24
1.) Go to the Functional Panel (left sidebar on your screen). Navigate to the User Manager tab. From
here you will notice that one of the users has a red box around it- this informs us that that
particular user is the default user and will be automatically launched at startup of Dukane Notes.
Another user, or possibly the same one, will have brackets around the username. This delineates
the user currently operating, also known as you. For example, in the tab below, you can see that
Intermediate is the default user, but Beginner is the user who is currently operating and whose
settings are in use.
2.) Now, to simply switch between users, it is very straightforward. Select the user you’d like to move
to (ie: Amy) and then click the Switch User button:
3.) To switch between default startup users, do the same as you would to switch users, but instead of
clicking the Switch User button when selecting your desired user, click the Set as Startup User
button:
DUKANE AV PRODUCTS DIVISION
Page - 13 - of 24
2.4 How to Use the On-Screen Keyboard
1.) To use the keyboard on a plain slide, simply click the Text Box key on the Main Toolbar and then
use the cursor to create the text box to the size and specifications you’d prefer. You can then type
using your computer keyboard. Step 2 will show you how to use the text box with your on-Screen
Keyboard.
Dukane notes
2.) Navigate over to Tools and select the Screen Keyboard option. You are now ready to type in the
text box. You may use either your Wireless Tablet or mouse to do so.
Dukane notes
Dukane notes
3.) You can also type in Office files using your Screen Keyboard. First, go to your Functional Panel
(sidebar) and select the Setup (Interface) tab. Select the Desktop Mode category and scroll down
to click on your Screen Keyboard and drag and drop the function into your Main Toolbar at the
bottom of the screen:
DUKANE AV PRODUCTS DIVISION
Page - 14 - of 24
4.) Open up a document in any Microsoft Office file and click on the keyboard icon in your Desktop
toolbar on the bottom of your screen. You will now be able to type anywhere within the text
fields.
2.5 How to Annotate Over Slides, Videos, & Embed into Office Files
DUKANE AV PRODUCTS DIVISION
Page - 15 - of 24
1.) If you wish to annotate over video, simply click the Annotate key and proceed to write on the
screen, via your tablet, as though it were any other slide. You can do this with web videos and
static files alike.
Dynamic File:
Static File:
2.) When making annotations, you may want to permanently mark and save your edits in the
documents you are working on. You can do this by embedding your annotations. Once you’ve
annotated on your document, click on the embed function on your Main Toolbar at the bottom of
your screen to permanently alter the document:
DUKANE AV PRODUCTS DIVISION
Page - 16 - of 24
2.6 How to Use Your Tools
2.6a Making a Screen Recording
1.) Click on the File Recorder
of the screen.
2.) Select the Record option:
, located on the right hand side of the Main Toolbar on the lower part
DUKANE AV PRODUCTS DIVISION
Page - 17 - of 24
3.) Start to create your drawing or file:
4.) Once you have completed your work, or wish to finish your recording, simply go back to the File
Recorder button on the Main Toolbar and click Stop.
5.) Now you can save your file and press play to watch the project in action:
»
2.6b Setting your Timer/Clock
1.) Go to the Start button on the Main Toolbar. Scroll through it’s menu until you come to the Tools
option. Navigate through the Tools and click on Timer/Clock.
2.) The Timer/Clock is mobile and can be dragged around the screen until you find an appropriate
place to drop it. You may also choose to make it digital. Any Timer options can be found by
clicking on the clock itself.
DUKANE AV PRODUCTS DIVISION
Page - 18 - of 24
3.) You can choose to put the tool in either clock or timer mode. In clock mode, the hours are
recorded in military time. In timer mode, you can decide whether you’d like to simply time
yourself, or to set a countdown time to control how long you spend completing a task. The
countdown can be set for any length of time between 5 and 60 minutes. Your options include Stop,
Pause, and Reset. You may also alter the transparence level of your timer/clock according to your
preference.
2.6c Using your Spotlight Function
1.) You can highlight different areas of the page with the Spotlight function. To access this key,
navigate through your Start menu and head over to Tools. Select Spotlight and your screen should
change immediately:
2.) To change the settings of your spotlight, click anywhere on the screen.
DUKANE AV PRODUCTS DIVISION
Page - 19 - of 24
3.) You can edit the level of transparency, the color, and the shape of your moving Spotlight:
2.6d Using Image Capture
1.) Image Capture can be very helpful when importing pictures, logos, or media files into your slide creations.
Start out by finding the image you’d like to capture. This can be static (unmoving) or dynamic (video). The
video file, however, will only be captured in a freeze frame.
2.) Navigate through your Start menu, click on Tools, and select Image Capturer. The Capture Image screen will
appear:
3.) Now, according to what you want to select on the screen, you will have to choose between three options:
Capturing the entire screen, a region of the screen, or an anomaly (hand-selected area). Before you click on
the option you want, first select whether you would like to save, import, or save & import the file. In the
example below, the file is being saved and imported into the Image Library:
DUKANE AV PRODUCTS DIVISION
Page - 20 - of 24
Dukane
4.) Once you have done that, select the area you wish to be captured.
5.) Now, head over to the Image Library, located within your Functional Panel, to use your image file in your
slides:
2.6e Using your Wrap Screen
DUKANE AV PRODUCTS DIVISION
Page - 21 - of 24
1.) The Wrap Screen is slightly similar to the Spotlight feature, in that it can cover areas of the screen. The Wrap
Screen allows you to selectively show different areas of the screen, covering or shading others- very useful for
quizzes.
2.) Navigate through the Start panel to the Tools menu and select Wrap Screen.
3.) Your screen should immediately turn to a solid block of color. Click on the screen to view your options:
you may alter the direction in which it can move and its color.
4.) Once your settings are in place, feel free to click on your wrap screen and move about your computer.
2.6f Protractor and Rulers
1.) The Protractor and Rulers are virtual representations of the real instruments. You can make
straight lines along the red measuring lines at specific lengths.
2.) Navigate through the Start panel to the Tools menu and select Protractor.
3.) By clicking on the Protractor itself, you can select which drawing you would like to make.
DUKANE AV PRODUCTS DIVISION
Page - 22 - of 24
4.) Clicking and dragging your finger along the red measured lines will draw the arc, sector, etc… to the
length you specify.
5.) This can also be done with the ruler tools.
2.6g Using the Compass
1.) The compass, like the rulers is a virtual representation of the physical instrument. With it, you can make arcs,
circles, and other measurements.
2.) Navigate through the Start panel to the Tools menu and select Compass.
3.) By clicking on the Compass head, you can select which drawing you would like to make.
DUKANE AV PRODUCTS DIVISION
Page - 23 - of 24
4.) By clicking on one of the legs of the Compass, you can adjust the size of your arc, sector, etc…
5.) Finally, click on the grey, lead tip of the Compass and dragging it around, you can size your
drawing to which length you would like.
2.7 Changing your Background
1.) Dukane Notes comes with a set of different background images which are customizable and tailored to
specific subjects. Along with the expansion packs that can be downloaded from www.dukane.com/av, these
images can be a great way to use Dukane Notes with every teaching lesson.
2.) Navigate through the Start Panel to the Change Background Picture option.
DUKANE AV PRODUCTS DIVISION
Page - 24 - of 24
3.) Select one of the following images and it will be fitted to your background screen. You can now
annotate over it just like the white screen background.
*Note: You can always add more images into the backgrounds folder, or any file you specify. The
Dukane Notes expansion packs contain many such images that are at your disposal once moved
into the Backgrounds folder. Look in the Image Library and the Expansion Pack for the product
on the Dukane web site
We hope the Dukane Notes Software User Manual was a benefit for you. Please contact Dukane if you have any
corrections or suggestions for improvements of the manual or software.
DUKANE CORP AV SERVICE DEPT
2900 Dukane Drive
St Charles, IL 60174
800-676-2487
/
630-762-4032
Fax 630-584-5156
[email protected]
www.dukcorp.com/av