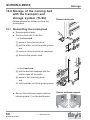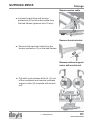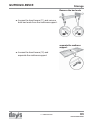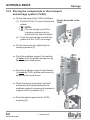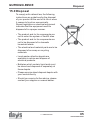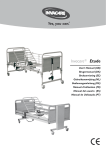
1
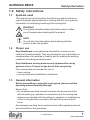
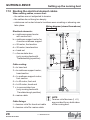
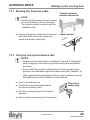
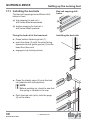
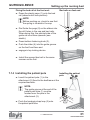
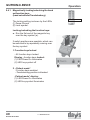
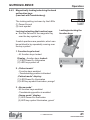
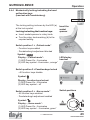
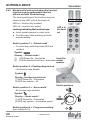
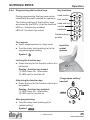
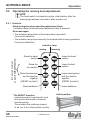
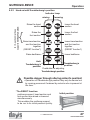
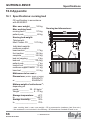
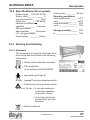
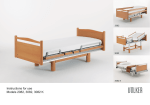
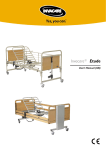
NURSING BEDS
OPERATING MANUAL
Casa Med Classic FS
®
with DEWERT drive systems
Doc.-No.: E1-04-143-001
NURSING BEDS
Introduction
All Days Healthcare nursing beds are manufactured using the most
modern technical facilities to ensure the highest lying and operating
comfort possible. Furthermore, the construction has been designed
placing great value on simple handling and operation.
The nursing beds described in this manual are constructed to the
following standards:
DIN EN 1970 - 2000 (standard for nursing beds)
and
DIN EN 60601-2-38 (standard for hospital beds) in addition.
Since the nursing bed motor system has a control system with a clock
frequency of > 9 kHz, and is mainly driven by motor for short periods,
EN 55014-1 applies in this case in accordance with EN 60601-1-2
36.201.1.4.
A large variety of useful accessories rounds off our range
of nursing beds.
This operating manual will help you get to know the function of our
nursing beds and, in addition, describes
• assembling the nursing bed
• operating the adjustment controls
• care and maintenance of the nursing bed
The manual has been drawn up using information available at the time
of printing with regard to construction and operation of the nursing bed.
We reserve the right to make changes due to technical improvements.
If you have any other questions about this nursing bed, please contact
your supplier.
Casa Med Classic FS
3
Issued: 25.07.2007
NURSING BEDS
1.0
2.0
3.0
4.0
5.0
6.0
7.0
Contents
Safety instructions ............................................................................. 7
1.1 Symbols used .............................................................................. 7
1.2 Proper use ................................................................................... 7
1.3 General information ...................................................................... 7
1.4 Notes on electrical fittings ........................................................... 8
1.5 Notes for nursing personnel, attendants and operator .................. 9
1.6 Notes on setting up the nursing beds ......................................... 10
1.7 Notes on maintenance and inspection ........................................ 11
Nursing bed model .......................................................................... 12
Extent of delivery ............................................................................. 12
Components ..................................................................................... 15
Fittings: bed frame ........................................................................... 15
5.1 Bed rails .................................................................................... 15
5.2 Mattress support ....................................................................... 16
5.3 Angle adjustment foot section (Rastomat) ................................. 16
5.4 Bed ends ................................................................................... 16
Fittings: Electrics ............................................................................. 17
6.1 Lift motor ................................................................................... 17
6.2 Hand set .................................................................................... 17
6.2.1 Hand set locking function ............................................... 17
6.3 Mattress support motor ............................................................. 18
6.4 Control unit ................................................................................ 18
Setting up the nursing bed .............................................................. 19
7.1 Location selection and space requirements ............................... 19
7.2 Preparation - only when supplied with transport and
storage system .......................................................................... 20
7.3 Connecting the mattress support head and foot section ............ 20
7.4 Fixing the bed ends ................................................................... 21
7.5 Connecting the lift motor, hand set, mattress support motor
and Accumulator box ................................................................. 22
7.6 Inserting the mattress support motor with control unit ............... 24
7.7 Assembly of accumulator box to the nursing bed
(only nursing beds with Trendelenburg’s position) ....................... 25
7.8 Inserting the mattress support motor for foot section adjustment 26
7.9 Routing and fixing the control unit mains cable .......................... 27
7.10 Routing the electrical element cables ......................................... 28
7.11 Routing the hand set cable ........................................................ 29
7.12 Carrying out a performance test ................................................. 29
7.13 Installing the bed rails ................................................................ 30
7.14 Installing the patient pole ........................................................... 31
4
Issued: 25.07.2007
Casa Med Classic FS
NURSING BEDS
Contents
8.0
Safety devices .................................................................................. 32
8.1 Control unit ................................................................................ 32
8.2 Accumulator box
(only nursing beds with Trendelenburg’s position) ....................... 33
8.2.1 General information ......................................................... 33
8.2.2 Charging the accumulator box ........................................ 33
8.2.3 Storage of the accumulator box ...................................... 33
8.3 Headrest adjustment emergency unlocking ................................ 34
9.0 Operating the nursing bed .............................................................. 35
9.1 General notes on operation ........................................................ 36
9.2 Plugging in the mains cable ....................................................... 36
9.3 Raising or lowering the bed rails ................................................. 37
9.4 Locking the function keys for the nursing bed adjustments ........ 38
9.4.1 Magnetically locking/unlocking the hand set function keys
(hand set without Trendelenburg) ..................................... 40
9.4.2 Magnetically locking/unlocking the hand set function keys
(hand set with Trendelenburg) .......................................... 41
9.4.3 Mechanically locking/unlocking the hand set function keys
(hand set without Trendelenburg) ..................................... 42
9.4.4 Mechanically locking/unlocking the hand set function keys
(hand set with Trendelenburg) .......................................... 43
9.4.5 Mechanically locking/unlocking the hand set function keys
(programmable hand set without and with Trendelenburg) .. 44
9.4.6 Programming the function keys ...................................... 45
9.5 Operating the nursing bed adjustments ...................................... 46
9.5.1 Hand set ......................................................................... 46
9.5.2 Hand set with Trendelenburg’s position ............................ 47
9.6 Adjusting the foot section (Rastomat) ........................................ 48
9.7 Operating the brakes .................................................................. 49
9.8 Pushing the nursing bed and patient transport ........................... 49
9.9 Adjusting the slatted frame springiness ..................................... 50
10.0 Patient-related safety measures and adjustments made by
nursing personnel ........................................................................... 51
10.1 Limits of use .............................................................................. 51
10.2 Gap dimensions and bed rail spacing ......................................... 51
10.3 Locking the nursing bed adjustments at the hand set ................ 52
11.0 Cleaning ........................................................................................... 52
12.0 Testing plan for nursing beds ......................................................... 53
12.1 Daily checks .............................................................................. 52
12.2 6-monthly inspection - check control unit ................................... 55
Casa Med Classic FS
5
Issued: 25.07.2007
NURSING BEDS
13.0
14.0
15.0
16.0
17.0
Contents
12.3 Testing intervals ......................................................................... 54
12.4 Inspection of mechanical components ....................................... 55
12.5 Inspection of electrical components ........................................... 57
12.6 Measurements ........................................................................... 58
Troubleshooting ............................................................................... 59
Storage of the nursing bed with the transport and storage system
(TLSU) ............................................................................................... 60
14.1 Dismantling the nursing bed ....................................................... 60
14.2 Placing the components in the transport and storage system .... 64
Disposal ............................................................................................ 65
Appendix .......................................................................................... 66
16.1 Specifications: nursing bed ........................................................ 66
16.2 Specifications: Drive system ..................................................... 67
16.3 Nursing bed labelling .................................................................. 67
16.3.1 Nameplate ...................................................................... 67
16.3.2 Patient pole component sign ........................................... 68
16.4 Accessories ............................................................................... 68
16.5 Spare parts ................................................................................ 68
Warranty ............................................................................................ 69
6
Issued: 25.07.2007
Casa Med Classic FS
NURSING BEDS
Safety information
1.0 Safety instructions
1.1
Symbols used
This instruction manual contains the following symbols which are
used to highlight special hazards in dealing with the nursing bed or
information for simplifying handling of the nursing bed.
Caution!
This symbol identifies safety information which notifies
you of hazards when dealing with the product
NOTE
You will also find information about dealing with the
product under this symbol.
1.2
Proper use
Days Healthcare nursing beds are intended for continuous use
instead of household beds. They are intended for use in alleviation or
compensation of a handicap or inability and for making the working
conditions of nursing personnel easier.
Days Healthcare nursing beds are only approved for use by
persons of over 12 years of age due to their complexity.
The nursing beds are intended for use in:
• home nursing
• nursing home and rehabilitation institutions
1.3
General information
Before assembling or using the nursing bed, please read this
operating manual carefully through!
Ensure that:
• the complete operating manual is read by all persons entrusted
with the setting up, operation or maintenance of the nursing bed.
• all persons entrusted with the setting up, operation or maintenance
of the nursing bed have access to this operating manual at all
times.
Any damages resulting from nonobservance of this operating manual
are excluded from the guarantee.
Casa Med Classic FS
7
Issued: 25.07.2007
NURSING BEDS
Safety information
Limitations of use!
• Patients taller than 195 cm (6´-5´´) should not use this nursing bed.
N.b. An extended bed frame to suit patients up to 219 cm
(7´-1´´) is available from Days Healthcare.
Accident hazard!
• Always check that the cabling is in perfect working order and
that the tension protection is functioning before use.
• Only use the nursing bed for its proper intended use.
• Maximum safe working load = see technical spezification
• Only use this nursing bed when it is in perfect working order.
• Always lower the nursing bed to its lowest height when not
under supervision.
• It is imperative that you always rectify any faults which could
influence the function and safety of the nursing bed
immediately.
• Always secure the nursing bed against rolling by engaging the
wheel brakes when unattended!
• Always use all of the wheel brakes on the nursing bed.
• Only use accessories approved by Days Healthcare.
1.4
Notes on electrical fittings
Risk of short-circuit and fire!
• Always ensure that the mains cable cannot be run over
when moving the nursing bed or bedside tables, or by
cleaning and lifting equipment such as hoists.
• Always check the cabling for correct positioning before use,
jamming or kinking of the cable must be avoided.
• Always remove the mains plug before long periods of non-use.
8
Issued: 25.07.2007
Casa Med Classic FS
NURSING BEDS
1.5
Safety information
Notes for nursing personnel, attendants and operator
Accident hazard!
• Do not use electrical medical appliances on patients in
these nursing beds.
• Do not use the nursing bed in the vicinity of strong electromagnetic fields (for example major medical equipment).
• Always plug the nursing bed mains plug into a separate
wall socket.
• Route the mains cable to the power supply socket so that no
mechanical tension results, and so that it cannot be crushed,
bent or run over.
• Please observe the appropriate equipment operating and
installation instructions with regard to any additional safety
risks that may arise when combining the nursing care bed
with other equipment.
Should you have any questions in this respect, please contact
your orthopaedic and sanitary supplier or Days Healthcare
directly.
Danger to life and injury hazard through crushing!
• When carrying out adjustments, observe the patient in the
bed and the bed’s surroundings.
• If the patient is underweight, ensure that the patient cannot slip
down between the mattress and bed rails.
• If the patient is underweight, always use the bed rail protectors
supplied by Days Healthcare .
• Always ensure that the bed rails are locked in properly.
Possible danger through altering patient’s position!
• Always lock all hand set adjustment functions on the hand set
which could cause danger to the patient’s health if adjusted
(consult doctor).
• Always take into account the patient’s condition before locking
the adjustment options
Accident hazard due to falling out!
• Always move the nursing bed to the lowest height when
unsupervised or for entering or exiting the bed.
Casa Med Classic FS
9
Issued: 25.07.2007
NURSING BEDS
Safety information
Risk of short-circuit and fire!
• Before moving the nursing bed, unplug the mains cable and
ensure that the mains cable cannot be run over.
• The nursing bed may not be used in surroundings in which it is
possible that flammable gases or vapours
(e.g. from anaesthetics) are present.
Danger due to actuator motor overheating!
• Before adjusting the bed height, ensure that nothing is blocking
the full adjustment movement.
• Avoid using the actuator motors for more than two minutes.
Maximum continuous operation of actuator motors = 2 minutes.
Minimum pause after 2 minutes operation = 18 minutes.
• Never use more than two actuator motors simultaneously.
1.6
Notes on setting up the nursing beds
Injury hazard due to improper assembly!
• Ensure that all components in the nursing bed have been
correctly assembled.
• Check that all adjustment options are in perfect working
order after assembly.
Accident hazard!
• Only carry out assembly work using suitable tools.
• Only carry out assembly work if you are a competend
person who is used to working with the tools required.
Trapping hazard!
There is a possible danger of trapping at all joints on the nursing
bed and at support points for the mattress support. All hazard
points on the nursing bed are identified by this symbol.
• If the mattress support has been folded up, secure it against
unintentional unfolding by suitable methods.
Always carry out a performance test after any
assembly work!
10
Issued: 25.07.2007
Casa Med Classic FS
NURSING BEDS
1.7
Safety information
Notes on maintenance and inspection
All inspection work must only be carried out by competent engineers,
capable of evaluating the condition status and recognising any possible
effects and hazards, due to their specialist training, knowledge and
experience in addition to knowledge of all relevant regulations.
Always read the relevant chapters thoroughly before carrying out
maintenance work.
Any damages resulting from nonobservance of this manual are excluded
from any guarantee of liability.
Always carry out a performance test after
maintenance work and inspections!
• When operating the adjustment motors, ensure that the nursing
bed cabling cannot be crushed or overstretched.
Hazards due to electrical and mechanical faults!
• Always remove faulty nursing beds from operation and secure
them against unauthorised use (remove mains plug).
• Only use original spare parts supplied by Days Healthcare.
• Always carry out the prescribed maintenance work at the
intervals stated.
• Do not carry out any alterations to the electrical or mechanical
fittings supplied with the bed unless authorised to do so by the
manufacturer. Any manufacturer’s guarantee liability is voided
by unauthorised alterations.
• Only carry out maintenance and repair work with suitable tools.
• Do not open electrical components.
Casa Med Classic FS
11
Issued: 25.07.2007
NURSING BEDS
Nursing bed models
2.0 Nursing bed model
Casa Med Classic FS
3.0 Extent of delivery
All components are packed in cartons in
accordance with your order, and packed as
a group on a transport pallet or bound up
using transport and storage systems to
form one transport unit.
Transport and storage
system (TLSU)
Before commencing assembly of the nursing bed, check the package contents
against the list supplied.
Small parts and fixings are included in the
delivery depending on the nursing bed
version and are not shown in detail.
If any faults are apparent or components are
missing, please contact Days Healthcare or
your supplier.
Mattress support
Contents: 1 x (1) Mattress support,
head section
1 x (2) Mattress support,
foot section
Mattress support
Version: 4-part separation of mattress
support
4-part separation
12
Issued: 25.07.2007
Casa Med Classic FS
NURSING BEDS
Extent of delivery
Bed end
2 x model Casa Med Classic FS
Bed end
Bed rails
bed rails*
8 x (1) plastic cap for bed rails
4 x (2) bed rail panels
4 x (3) slider for bed rails
Electrical elements
1 x (1) Mattress support motor with
control unit and mains cable
2 x (2) Dummy plugs for non-used
jack sockets
1 x (3) Tension protection for control unit
socket strip
Electrical elements
1 x (4) mattress support motor
Casa Med Classic FS
13
Issued: 25.07.2007
NURSING BEDS
Extent of delivery
Depending on nursing bed version:
1 x (5) Hand set, without pushbutton for
Trendelenburg’s position
1 x (6) Hand set, with pushbutton for
Trendelenburg’s position
Hand set
For electrically lockable hand set:
1 x (7) Magnetic key
For mechanically lockable hand set:
(can be recognised from rotary knob (a)
on rear of hand set)
1 x (8) Rotary key
Accumulator box
only for nursing beds with Trendelenburg’s
position:
1 x rechargeable battery (Accumulator box)
with metal support and fixing screw
Patient pole
1 x patient pole with strap and
handhold
14
Issued: 25.07.2007
Casa Med Classic FS
Patient
pole
NURSING BEDS
Assembling the nursing beds
4.0 Components
Patient pole
Bed rails
Mattress support
Bed end
Bed end
(head section)
(foot section)
Hand set
Bed rails
5.0 Fittings: bed frame
5.1
bed rails
Bed rails
The bed rails (1) are fixed to the head end
and foot end on the bed using plastic
sliders.
Both the upper lock for lowering and the
lower lock for removing the bed rails can
be unlocked using the fastening knob (2).
Casa Med Classic FS
15
Issued: 25.07.2007
NURSING BEDS
5.2
Fittings: bed frame
Mattress support
The mattress support is separated into 4
parts. The wooden slats can be wiped clean,
and are fixed to the frame with plastic fixings.
The mattress is fixed securely to the mattress Mattress support
support using four mattress fixings (3).
4-part separation of mattress support:
The head section (2) can be electrically
adjusted up to 70°, the foot section (3)
up to 20°.
5.3
Angle adjustment foot section
(Rastomat)
Rastomat
The automatic catch (1) mounted at the foot
end of the mattress support enables
incremental adjustment of the lower leg
adjustment (3) of the 4-part mattress
support.
5.4
Bed ends
Bed end
The bed ends are fitted with a lift motor (1)
and two castors (2).
The castors are provided with brakes.
The brakes lock both rolling and swiveling
movements.
16
Issued: 25.07.2007
Casa Med Classic FS
NURSING BEDS
Fittings: Electrics
6.0 Fittings: Electrics
6.1
Lift motor
Lift motor
The lift motor (1) is mounted directly on the
nursing bed head section or foot section.
The motor lift movement is 40 cm. This
enables the nursing bed lying area to be
raised from 40 cm to 80 cm.
6.2
Hand set
Hand set
The hand set is used to operate all nursing
bed actuator motors. Operation takes place
using the keypad on the front side of the
hand set.
The fixing bracket on the rear of the hand
set can be used to hold it in an easily
reachable position on the nursing bed.
Magnetic key
6.2.1 Hand set locking function
Depending on the version, the hand set is
fitted with an electrical or mechanical
pushbutton locking device.
The locking device secures the nursing bed
against unauthorised use.
Rotary switch
The electrical locking device is switched on
and off using the magnetic key supplied.
The mechanical locking device is switched
using the rotary switch on the rear of the
hand set (a).
Casa Med Classic FS
17
Issued: 25.07.2007
NURSING BEDS
6.3
Fittings: Electrics
Mattress support motor
Mattress support motor
The nursing bed with 4-part mattress
support is fitted with two mattress support
motors. They are fitted under the mattress
support. One of the motors is used for
adjusting the head section, and one for
adjusting the foot section of the mattress
support.
6.4
Control unit
The control unit (1) mounted under the
mattress support is fitted with a first-errorproof electronics unit. This prevents
undesirable functional sequences due to
first component defects.
This is implemented as a splashproofed
housing.
The mains cable in its strengthened version
is fitted with a push-on anti-kink device and
tension protection.
18
Issued: 25.07.2007
Casa Med Classic FS
Mattress support motor
with control unit
NURSING BEDS
Setting up the nursing bed
7.0 Setting up the nursing bed
Before commencing assembly of the nursing bed, check the package
contents against chapter 3.0 „Extent of delivery“.
If any faults are apparent or components are missing, please contact
Days Healthcare or your supplier.
Trapping hazard!
There is a possible danger of trapping at all joints on the nursing
bed and at support points for the mattress support.
• If the mattress support has been folded up, secure it against
unintentional unfolding by suitable methods.
Injury hazard due to improper assembly!
• Ensure that all components in the nursing bed have been
correctly assembled.
• Check that all adjustment options are in perfect working
order after assembly.
Accident hazard!
• Only carry out assembly work using suitable tools.
• Only carry out assembly work if you are used to working with
the tools required.
Location selection and space requirements
2,06 m
When selecting the bed’s
location, ensure that:
• there is enough space to nurse
the patient in the bed on at
least one of the bed’s sides.
1,01 m
7.1
• there must be a mains socket
near the location in an easily
reachable position.
The illustration shows you the
required dimensions for setting
up the nursing bed and the
space around it.
space to nurse
the patient
Casa Med Classic FS
19
Issued: 25.07.2007
NURSING BEDS
7.2
Setting up the nursing bed
Preparation - only when supplied
with transport and storage system
➨ Pull the patient pole out of the
mounting tube (1) in the transport and
storage system.
➨ Remove all cartons from the transport
and storage system.
NOTE
You should retain all cartons if
possible for storage of the nursing
bed at a later date.
➨ Loosen all safety screws (a) and remove
both bed sections (2) from the transport
and storage system.
7.3
Connecting the mattress support
head and foot section
➨ Push the foot section (1) with the
guides into the head section frame
(2) as far as the stop.
➨ Secure the mattress support tube
connections by screwing in and
tightening the hand levers (3).
20
Issued: 25.07.2007
Casa Med Classic FS
Connecting the mattress
support
NURSING BEDS
7.4
Setting up the nursing bed
Fixing the bed ends
➨ Loosen the safety screws (b) and
remove the bed end with the transport
and storage system nameplate.
NOTE:
Lock the brakes on the castors
(see chapter 9.7) on the remaining
fronts and place these against a
wall before you separate the bed
ends.
➨ Fold both guides (1) at the front
towards the lying area.
Push bed end on
➨ Push the bed end with the guides (1)
into the the bedframe tube (2) as far
as the stop.
➨ Screw both hand levers (3) for the bed
end screwed connection into the flat.
➨ Secure the connection by tightening the
hand levers.
Casa Med Classic FS
21
Issued: 25.07.2007
NURSING BEDS
Setting up the nursing bed
➨ Loosen the safety screws (c) and remove
the transport and storage system (d) from
the bed end.
➨ The second bed end is fixed in a similar
manner to that above to the foot of the
bed.
➨ Undo the securing strap (4) on the head
section and remove all transport
securing devices on the head and foot
sections.
To open the retaining belt, press the side
tabs (5) on the locking device and pull
back the lock.
7.5
Connecting the lift motor, hand set,
mattress support motor and
Accumulator box
When connecting, ensure that:
• the sealing rings (a) on the plug must not
be damaged while being plugged in.
• The ribs (b) on the plug must be aligned
with the guide grooves (c) on the jack
socket.
22
Issued: 25.07.2007
Casa Med Classic FS
Opening the retaining belt
NURSING BEDS
Setting up the nursing bed
➨ Plug the electrical component plugs
into the jack sockets as shown in the
following diagram.
Plug arrangement
The labels on the plug arrangement shown
in the photo correspond to those on the
control unit.
Plug arrangement:
1 = Not in use
2 = Hand set
3 = Mattress support motor
(pre-fitted on the control unit)
4 = mattress support motor for foot
section adjustment
5 = Cable for lift motor; foot section
6 = Cable for lift motor; head section
7 = Accumulator box
(only nursing beds with
Trendelenburg’s position)
*NOTE
Jack sockets not in use must be
closed using dummy plugs.
Insert tension protection
➨ Insert the tension protection (2).
To do this:
1. Push the pegs into the drill holes.
2. Engage the clips into the recesses.
Casa Med Classic FS
23
Issued: 25.07.2007
NURSING BEDS
7.6
Setting up the nursing bed
Inserting the mattress support motor with control unit
➨ Open the quick-release bolt retainer (1).
Insertion direction = the mattress
support motor with control unit is fixed
under the mattress support with the motor
housing (2) pointing towards the foot end.
Caution!
• Ensure that the mattress support
motor with control unit is aligned
correctly (label on nursing bed).
➨ Pass the receptacle of the motor side (2)
between the mattress support frame tabs
(3).
➨ Insert the quick-release bolt (4) and
secure by closing the retainer.
➨ Pass the second receptacle (5) between
the head end adjustment frame tabs (6).
➨ Insert the quick-release bolt (7) and
secure by closing the retainer.
24
Issued: 25.07.2007
Casa Med Classic FS
Head end
Foot
NURSING BEDS
7.7
Setting up the nursing bed
Assembly of accumulator box to
the nursing bed (only nursing beds fixing the accumulator
with Trendelenburg’s position)
box
The accumulator box is to be fixed close to
the control unit on a cross bar positioned to
the head part of the mattress support (see
photo/drawing).
➨ Remove the fixing screw from the metal
support of the accumulator box.
➨ Slide the metal support of the
accumulator box over the cross
bar of the mattress support.
➨ Insert the fixing screw, rotate the fixing
nut along thread and tighten to secure.
Casa Med Classic FS
25
Issued: 25.07.2007
NURSING BEDS
7.8
Setting up the nursing bed
Inserting the mattress support
motor for foot section adjustment
➨ Open the quick-release bolt retainer (1).
Head end
Insertion direction = The mattress support
motor with the motor housing (2) is fixed
under the mattress support pointing towards
the head end (observe label on nursing bed).
➨ Pass the receptacle of the motor side (2)
between the mattress support frame tabs
(3).
➨ Insert the quick-release bolt (4) and
secure by closing the retainer.
➨ Pass the second receptacle (5) between
the foot end adjustment frame tabs (6).
➨ Insert the quick-release bolt (7) and
secure by closing the retainer.
26
Issued: 25.07.2007
Casa Med Classic FS
Foot
NURSING BEDS
7.9
Setting up the nursing bed
Routing and fixing the control
unit mains cable
When routing cables, ensure that:
• the cables are not subjected to tension
• the cables do not hang too deeply
• cables are not routed close to locations
were crushing or shearing can take place
Fixing for anti-kink and
tension protectors
Head end
NOTE
There is one fixing (1) for screwing in
the mains cable anti-kink and tension
protectors on the head and foot of the
bedframe.
Routing the mains cable along the
head of the bed is recommended.
➨ Route the mains cable to one of the
fixings (1) on the head section for fixing
the anti-kink and tension protectors.
➨ Fix the mains cable and bolted
connection (2) through the fixing (1)
on the bedframe and bolt tight with
the nut (3) (size 19 mm).
Detail: anti-kink and
tension protectors
➨ Screw the anti-kink and tension
protector cover (4) onto the bolted
connection (2) and screw tight
(size 19 mm).
Casa Med Classic FS
27
Issued: 25.07.2007
NURSING BEDS
Setting up the nursing bed
7.10 Routing the electrical element cables
When routing cables, ensure that:
• the cables are not subjected to tension
• the cables do not hang too deeply
• cables are not routed close to locations were crushing or shearing can
take place.
Wiring diagram (viewed from above)
Head end
Electrical elements:
a = mattress support motor
with control unit
b = mattress support motor for
4-section mattress support
c = lift motor; foot section
d = lift motor; head section
e = hand set
f = Accumulator box
(only nursing beds with
Trendelenburg’s position)
Cable routing:
2 = to hand set
3 = to mattress support motor;
head section
4 = to mattress support motor;
foot section
5 = to lift motor; foot end
6 = to lift motor; head end
7 = to accumulator box
(only nursing beds with
Trendelenburg’s position)
8 = mains cable
d
6
28
e
8
f
b
7
4
a
2 3
I
Cable fixings:
I = tension relief for hand set cable
II = tension relief for mains cable
Issued: 25.07.2007
II
Casa Med Classic FS
I
5
c
II
NOTE
Tension relief devices (I + II)
are provided for on both sides
of the nursing bed.
NURSING BEDS
Setting up the nursing bed
7.11 Routing the hand set cable
Tension protector
position (head end)
NOTE
Tension relief devices (e) are provided
for on both sides of the nursing bed.
You should select the side to suit the
installation site.
➨ Loosen the tension relief (e) for the hand
set cable (HB), insert the cable and
screw the tension relief tight.
Cable hand set
HB
e
7.12 Carrying out a performance test
NOTES
• Please note the information in chapters 9.2 and 9.4 “Operation”
when plugging in the mains plug and checking the adjustment
functions.
• Ensure that the transport safety devices at the head and footpieces of the mattress support have been removed (Chapter 7.4).
• When operating the adjustment motors, ensure that the nursing
bed cabling cannot be crushed or overstretched.
➨ Plug in the mains plug.
➨ Check all nursing bed adjustments
for correct working order.
Plug in the
mains plug
➨ Run the nursing bed up to its highest
position.
➨ Remove the mains plug from the socket.
Casa Med Classic FS
29
Issued: 25.07.2007
NURSING BEDS
Setting up the nursing bed
7.13 Installing the bed rails
The bed rail cappings have different drill
holes in them.
Bed rail capping drill
holes
(a) top capping for bed rail =
drill holes offset downwards
(b) bottom capping for bed rail =
drill holes offset upwards
Fixing the bed rail at the head end:
➨ Press bottom fastening knob (1),
➨ push the slider (2) with the point facing
upwards into the guide groove (3) on the
head front face and
➨ engage in top locking device.
➨ Press the plastic caps (4) onto the bed
rail (observe drill hole position).
NOTE
Before pushing on, check to see that
the spring is located in the cap.
➨ Push the bed rails (a+b) onto the pegs
(5) on the slider.
30
Issued: 25.07.2007
Casa Med Classic FS
Installing the bed rails
NURSING BEDS
Setting up the nursing bed
Fixing the bed rail at the foot end:
➨ Press the plastic caps (1) onto the bed
rail (observe drill hole position).
Bed rails on foot end
NOTE
Before pushing on, check to see that
the spring is located in the cap.
➨ Die Guide the pegs (2) on the sliders into
the drill holes in the cap and bed rails.
When doing this, the pointed side of the
guide rail must face upwards (see
sketch).
➨ Press bottom fastening knob (3),
➨ Push the slider (4) into the guide groove
on the foot front face and
➨ engage in top locking device.
➨ Install the second bed rail in the same
manner as the first.
7.14 Installing the patient pole
➨ Insert the patient pole (1) in the
attachment (2) fixed to the bedframe at the
required bed side.
Installing the patient
pole
NOTE:
The guide groove at the end of the
patient pole tube (1) must be
located over the pins in the
attachment (2).
➨ Push the handgrip strap loop (3) onto
the patient pole tube.
Casa Med Classic FS
31
Issued: 25.07.2007
NURSING BEDS
Setting up the nursing bed
8.0 Safety devices
8.1
Control unit
The Control unit is fitted with the following
safety devices as overload protection:
Control unit
• Limit switches switch the actuator motors
off when they reach their limit position.
• Thermoswitches switch the Control unit
off if it overheats.
The Control unit can be operated again
after a pause of between 20 and 30
minutes.
CAUTION!
The nursing beds are not fitted with an emergency-off switch!
• In cases of emergency, remove the mains plug!
If the battery is fitted, it is possible that the movement will be
continued even if the mains plug has been removed, in this case:
• Unplug the accumulator box cable.
32
Issued: 25.07.2007
Casa Med Classic FS
NURSING BEDS
8.2
Safety devices
Accumulator box
(only nursing beds with Trendelenburg’s position)
8.2.1 General information
Accumulator box
If you are using a control box with push
buttons for Trendelenburg positions, the
nursing bed is fitted with rechargeable
batteries (accumulator box).
You must use the accumulator box for
beds with the Trendelenburg’s position
function.
The accumulator box guarantee that the
nursing bed can be put into the Trendelenburg positions even in cases of power
failure (a requirement of EN 60601-2-38).
Any adjustments carried out on the nursing
bed can be operated between 5 and 15
times with the accumulator box. The number
of operations is dependent on patient weight
and the adjustment selected.
8.2.2 Charging the accumulator box
The accumulator box / battery is automatically charged when the mains
plug is plugged in.
• the charging time is at least 12 hours (for example overnight)
• the mains plug can be left connected for longer periods because
protective circuitry ensures that the battery cannot be overcharged.
NOTE
If adjustment is carried out several times without a power supply,
the accumulator box gives off a warning tone to signal that the
charging limit has been reached.
8.2.3 Storage of the accumulator box
Do not store the discharged accumulator box for long periods.
Recharge the accumulator box once a month.
Casa Med Classic FS
33
Issued: 25.07.2007
NURSING BEDS
8.3
Safety devices
Headrest adjustment emergency unlocking
The nursing bed head section can be raised or lowered by removing the
quick-release bolts on the mattress support motors if the adjustment
motors should break down.
Accident hazard!
• Operating the emergency unlocking
system may only be carried out by
two people.
Raise head section and
remove quick-release
bolts
Unlocking the headrest adjustment:
➨ Lift the mattress support head section
slightly (1).
➨ Remove the quick-release bolts (2) as
follows (second person must do this!):
1. Open up the securing bar.
2. Pull the quick-release bolts out of
the receptacle.
Lowering the headsection
➨ Slowly lower the mattress support headsection (3).
Inserting the quick-release bolts
➨ Run the mattress support motors as
far as the limit position by pressing the
„Lower head section“ (4) button on the
hand set.
➨ Fit the quick-release bolts as described
in Chapter 7.6 „Inserting the lying area
motors“.
34
Issued: 25.07.2007
Casa Med Classic FS
hand set
NURSING BEDS
Operation
9.0 Operating the nursing bed
Accident hazard!
• Do not use electrical medical appliances on patients in these
nursing beds.
• Do not use the nursing bed in the vicinity of strong
electromagnetic fields (for example major medical equipment).
Trapping hazard!
There is a possible danger of trapping at all joints on the nursing
bed and at support points for the mattress support.
• If the mattress support has been folded up, secure it against
unintentional unfolding by suitable methods.
When carrying out adjustments, please observe the following
points:
• Before adjusting the bed height, ensure that nothing is blocking the
full adjustment movement.
• Avoid operating the actuator motors continuously for more than two
minutes (intermittent operation).
Maximum continuous operation of actuator motors = 2 minutes.
Minimum pause after 2 minutes operation = 18 minutes.
• Do not operate more than two actuator motors at once.
• Always move the nursing bed to the lowest height when
unsupervised or for entering or exiting the bed.
• When carrying out adjustments, observe the patient in the
bed and the bed’s surroundings.
Casa Med Classic FS
35
Issued: 25.07.2007
NURSING BEDS
9.1
Operation
General notes on operation
Backrest foot section and’ bed height
adjustment is infinitely variable.
The adjustment range for the reclining
surface height is between 40 and 80 cm.
The head section can be inclined upwards
up to 70°.
The foot section can inclined by 20°. In
addition, the lower leg support can be
lowered mechanically (automatic catch).
9.2
Plugging in the mains cable
Accident hazard!
• Always plug the nursing bed mains plug into a separate wall socket.
The mains cable may not be run over.
• Route the mains cable to the power supply socket so that no
mechanical tension results, and so that it cannot be crushed,
bent or run over.
• Only plug the mains plug into sockets
(230 V~ / 50Hz) which are easily
accessible at any time (main plug fuse
size = 5A).
• Always check that the mains cable, the
mains socket and plug are in perfect
working order before plugging the bed in.
CAUTION!
The nursing beds are not fitted with an emergency-off switch!
• In cases of emergency, remove the mains plug!
If the battery is fitted, it is possible that the movement will be
continued even if the mains plug has been removed, in this case:
• Unplug the accumulator box cable.
36
Issued: 25.07.2007
Casa Med Classic FS
NURSING BEDS
9.3
Operation
Raising or lowering the bed rails
Raising the bed rails
Raising the bed rails:
➨ Pull the bed rails up until the top
fastening knob (1) engages.
Lowering the bed rails:
➨ Raise the bed rail slightly.
Lowering the
bed rails
➨ Press the fastening knob (1) in and
lower the bed rail.
Caution!
Do not allow bed rails to fall unsecured
onto the bottom locking clip!
• When lowering the bed rail, use
your other hand to lower it as far
as the locking clip.
Always place the head and foot end
of the siderail in the same position.
• Do not set the siderail in a diagonal
position.
Casa Med Classic FS
37
Issued: 25.07.2007
NURSING BEDS
9.4
Operation
Locking the function keys for the nursing bed
adjustments
Before locking, make sure you know which hand set is fitted to the
nursing bed.
Depending on the hand set version, the following locking functions can
be used:
Handset version
Feature 1
Feature 2
Description
IPROXX SE
Hand set
without
Trendelenburg
Magnetically
locking
Magnetic key
see
chapter 9.4.1
Magnetic key
see
chapter 9.4.2
IPROXX SE+
Hand set
with
Trendelenburg
Magnetically
locking
IPROXX SM
Hand set
without
Trendelenburg
Mechanically
locking
38
Issued: 25.07.2007
2
1
a
(a) Rotary switch
(b) Rotary key
Casa Med Classic FS
2 switch
positions
see
chapter 9.4.3
NURSING BEDS
Operation
Handschalter
Ausführung
Merkmal 1
Merkmal 2
Beschreibung
IPROXX SM+
Hand set
with
Trendelenburg
Mechanically
locking
2
3
1
b
(a) Rotary switch
(b) Rotary key
3 switch
positions
see
chapter 9.4.4
IPROXX SMP
Hand set
without
Trendelenburg
2
3
1
b
Mechanically
locking
programmable
4
(a) Rotary switch
(b) Rotary key
4 switch
positions
see
chapter 9.4.5
IPROXX SMP+
Hand set
with
Trendelenburg
2
3
1
b
Mechanically
locking
programmable
4
(a) Rotary switch
(b) Rotary key
Casa Med Classic FS
4 switch
positions
see
chapter 9.4.5
39
Issued: 25.07.2007
NURSING BEDS
Operation
9.4.1 Magnetically locking/unlocking the hand
set function keys
(hand set without Trendelenburg)
The locking setting is shown by the LEDs
(1) Power On and
(2) Lock symbol.
Locking/unlocking the function keys:
➨ Run the flat end of the magnetic key
over the key symbol (a).
2 switch positions are possible, which can
be switched to by repeatedly running over
the key symbol:
1. Function keys locked
- All function keys locked
Display - function keys locked:
(1) LED Power On illuminates
(2) LED key symbol off
2. „Patient mode“
- Function keys enabled
- Trendelenburg position is blocked
„Patient mode“ display:
(1) LED Power On illuminates
(2) LED key symbol illuminates
40
Issued: 25.07.2007
Casa Med Classic FS
NURSING BEDS
Operation
9.4.2 Magnetically locking/unlocking the hand
set function keys
(hand set with Trendelenburg)
The locking setting is shown by the LEDs
(1) Power On and
(2) Lock symbol.
Locking/unlocking the function keys:
➨ Run the flat end of the magnetic key
over the key symbol (a).
Locking/unlocking the
function keys
3 switch positions are possible, which can
be switched to by repeatedly running over
the key symbol:
1. Function keys locked
- All function keys locked
Display - function keys locked:
(1) LED Power On illuminates
(2) LED key symbol off
2. „Patient mode“
- Function keys enabled
- Trendelenburg position is blocked
„Patient mode“ display:
(1) LED Power On illuminates
(2) LED key symbol illuminates „orange“
3. „Nurse mode“
- All function keys enabled
- Trendelenburg position is enabled
„Nurse mode“ display:
(1) LED Power On illuminates
(2) LED key symbol illuminates „green“
Casa Med Classic FS
41
Issued: 25.07.2007
NURSING BEDS
Operation
9.4.3 Mechanically locking/unlocking the hand
set function keys
(hand set without Trendelenburg)
Insert the
socket
spanner
The locking setting is shown by the LED (a)
at the lock symbol.
Locking/unlocking the function keys:
➨ Insert socket spanner in rotary knob.
➨ Turn the rotary knob marking (b) to the
required setting.
LED display hand set
Switch position 1 = „Patient mode“
- All function keys enabled
Symbol:
Display - „Patient mode“:
(1) LED Power On - illuminates
(2) LED key symbol - illuminates
Switch positions
Switch position 2 = Function keys locked
2
- All function keys disable.
1
Symbol:
Display - function keys locked:
(1) LED Power On - illuminates
(2) LED key symbol - off
42
Issued: 25.07.2007
Casa Med Classic FS
b
NURSING BEDS
Operation
9.4.4 Mechanically locking/unlocking the hand
set function keys
(hand set with Trendelenburg)
The locking setting is shown by the LED (a)
at the lock symbol.
Locking/unlocking the function keys:
➨ Insert socket spanner in rotary knob.
Insert the
socket
spanner
➨ Turn the rotary knob marking (b) to the
required setting.
Switch position 1 = „Patient mode“
- Function keys enabled
- Trendelenburg’s adjustment blocked
Symbol:
LED display
Display - „Patient mode“:
hand set
(1) LED Power On - illuminates
(2) LED key symbol - illuminates „orange“
Switch position 2 = Function keys locked
- All function keys disable.
Symbol:
Display - function keys locked:
(1) LED Power On - illuminates
(2) LED key symbol - off
Switch position 3 = „Nurse mode“
- All function keys enabled
- Trendelenburg’s adjustment enabled
Symbol:
Switch positions
2
3
1
Display - „Nurse mode“:
(1) LED Power On - illuminates
(2) LED key symbol - illuminates „green“
Casa Med Classic FS
b
43
Issued: 25.07.2007
NURSING BEDS
Operation
9.4.5 Mechanically locking/unlocking the hand set
function keys (programmable hand set
without and with Trendelenburg)
The locking settings of the function keys are
shown by the LED´s (2) at the hand set.
LED on = function key enabled
LED off = function key locked
Locking/unlocking the function keys:
➨ Insert socket spanner in rotary knob.
LED´s at
the hand
set
➨ Turn the rotary knob marking (a) to the
required setting.
Switch position 1 = „Patient mode“
- Function keys with illuminated LED are
enabled.
Symbol:
Display - „Patient mode“:
Insert the
(1) LED Power On - illuminates
(2) LED for enabled functions - illuminates socket
spanner
Switch position 2 = Function keys locked
- All function keys disable.
Symbol:
Display - function keys locked:
(1) LED Power On - illuminates
(2) LED key symbol - off
Switch positions
Switch position 3 = „Nurse mode“
- All function keys enabled
Symbol:
Display - „Nurse mode“:
(1) LED Power On - illuminates
(2) LED key symbol - illuminates „green“
Switch position 4 = „Programme setting“
(see chapter 9.4.5)
44
Issued: 25.07.2007
Casa Med Classic FS
2
3
1
a
4
NURSING BEDS
Operation
Key functions
9.4.6 Programming the function keys
During programming, the key rows can be head section
individually blocked / enabled for operation.
foot section
The locking settings of the function keys
are shown by the LED´s (2) at the hand set. head and foot
section
LED on = function key enabled
bedframe
LED off = function key locked
Trendelenburg´s
position
To program:
➨ Insert socket spanner in rotary knob.
➨ Turn the rotary knob marking (a) to the
required program setting.
Insert the
socket
spanner
Symbol:
Locking the function key:
➨ Press the key for the function which is to
be locked
Display - function key locked:
(1) LED Power On - illuminates
(2) LED next to function off
Unlocking the function key:
„Programme setting“
hand set
➨ Press the key for the function which is to
be enabled
Display - function key enabled:
(1) LED Power On - illuminates
(2) LED next to function on
a
After programming:
➨ Turn the rotary knob marking (a) to
„patient setting“.
4
Symbol:
Casa Med Classic FS
45
Issued: 25.07.2007
NURSING BEDS
9.5
Operation
Operating the nursing bed adjustments
NOTE
The hand switch is locked during the initial startup, after the
mains plug has been removed or after a power cut.
9.5.1 Hand set
Hand set signals when operating adjustment keys:
• Indicator lamp illuminates when adjustment key is pressed.
Error messages:
• The indicator lamp does not illuminate when operated =
Control unit defective
• The indicator lamp is permanently illuminated without being operated=
Control unit defective
Indicator lamp
for 3-section mattress
supports without function
raising
Raise the head
section
Raise the
foot section
Raise head section
and foot section
together
(RESET function*)
Raise bedframe
* The RESET function:
mattress support, head section and
foot section are raised or lowered
simultaneously.
This enables the mattress support
to be run to its initial position quickly.
46
Issued: 25.07.2007
Casa Med Classic FS
lowering
Lower the head
section
Lower the foot
section
Lower head section
and foot section
together
(RESET function*)
Lower bedframe
Initial position
NURSING BEDS
Operation
9.5.2 Hand set with Trendelenburg’s position
Indicator lamp
for 3-section mattress
supports without function
raising
Lower the head
section
Raise the head
section
Lower the foot
section
Raise the
foot section
Raise head section
and foot section
together
(RESET function*)
Lower head section
and foot section
together
(RESET function*)
Lower bedframe
Raise bedframe
AntiTrendelenburg´s
position
lowering
Trendelenburg´s
position
Pushbutton for adjusting
Trendelenburg’s position.
Possible danger through altering patient’s position!
• Operation of Trendelenburg’s position may only be carried out
by nursing personnel if ordered by a doctor who is present at
the time.
* The RESET function:
mattress support, head section and
foot section are raised or lowered
simultaneously.
This enables the mattress support
to be run to its initial position quickly.
Casa Med Classic FS
Initial position
47
Issued: 25.07.2007
NURSING BEDS
9.6
Operation
Adjusting the foot section (Rastomat)
NOTE
• Hold the frame in the middle (a)
when raising or lowering the foot
section.
• The automatic catch is intended for
raising the lower leg support on the
4-part mattress support.
Raising the lower leg support on the
electrically-driven foot section
➨ Raise the foot section slowly into the
required position until the Rastomat
audibly engages.
NOTE
• Raising the foot section until the
top stop unlocks the automatic
catch.
Lowering the foot section (2)
➨ a) Unlock the automatic catch by raising
the foot section.
➨ b) Lower the foot section as far as the
bottom stop.
or
➨ c) Lower the foot section to the central
position and then ensure the automatic
catch is audibly engaged by raising the
foot section slightly.
48
Issued: 25.07.2007
Casa Med Classic FS
Raising
NURSING BEDS
9.7
Operation
Operating the brakes
Danger of crushing!
• Before locking, turn the steering
rollers to point towards the mattress
support under the nursing bed.
Ensure that the brake and unlocking
levers (a+b) are freely accessible.
Wheel brakes
➨ (a) = engage wheel brakes
➨ (b) = disengage wheel brakes
9.8
Pushing the nursing bed and patient transport
NOTE:
• only transport patients in a lying position
• if the patient pole is fitted, ensure low hanging
objects (ceiling lamps) are avoided.
Raise bed rails, initial
Before moving:
position
➨ Run the reclining surface into the initial
position.
Lower mattress support head and foot
sections (observe chapter 9.5).
➨ Pull the bed rails up until the fastening
knob engages.
➨ Remove the mains plug from the socket.
Transport safety device
➨ Secure the mains cable against being
run over by tying up with the safety strap
(1) at the head of the bedframe.
Risk of short-circuit and fire!
• Always secure the mains cable
against being run over using the
safety strap (1) before moving the
nursing bed.
Release wheel brakes
➨ (b) = disengage wheel brakes.
➨ Move the nursing bed.
Casa Med Classic FS
49
Issued: 25.07.2007
NURSING BEDS
Operation
After moving:
➨ Engage all wheel brakes (a).
Engabe wheel brakes
Danger of crushing!
• Before locking, turn the steering
rollers to point towards the mattress
support under the nursing bed.
Ensure that the brake and unlocking
levers (a+b) are freely accessible.
➨ Remove the mains plug from the safety
strap.
Opening the transport
safety device
To open the safety device, press the
side tabs (2) on the locking device
and pull back the lock.
➨ Plug the mains plug into the socket
(see information in chapter 9.2).
9.9
Adjusting the slatted frame springiness
The springiness for the individual slats
can be adjusted using the six bars (1)
fixed to the centre of the slatted frame.
This enables the slatted frame to be
adjusted to suit the user’s weight within
certain limits.
Pull bar out (+) = increase hardness
Push bar in (-) = decrease hardness
50
Issued: 25.07.2007
Casa Med Classic FS
Adjusting the bars
NURSING BEDS
Safety measures
10.0 Patient-related safety measures and
adjustments made by nursing personnel
10.1 Limits of use
Particular patient illnesses (clinical condition) can lead to limitations
being imposed on the nursing bed application capabilities. Before using
the nursing bed, consult the specialist responsible for the patient.
Limitations of use!
• Patients taller than 195 cm (6´-5´´) should not use this nursing bed.
N.b. An extended bed frame to suzit patients up to 219 cm
(7´-1´´) is available from Days Healthcare.
10.2 Gap dimensions and bed rail spacing
Danger to life and injury hazard through crushing!
• If the patient is underweight, ensure that the patient cannot slip
down between the mattress and bed rails.
• If the patient is underweight, always use the bed rail protectors
supplied by Days Healthcare .
• Always ensure that the bed rails are locked in properly.
The following checks must be made on the nursing bed and suitable
preventive measures must be taken in the case of extremely thin
patients:
Distance between
Check:
It must not be possible for the patient to slip mattress and bed rails
between the mattress (1) and the bed rails
(2).
Preventive measure:
Only use mattresses which have a reclining
surface width of 90 cm!
Check:
It must not be possible for the patient to slip
between the bed rail capping.
Bed rail protectors
Preventive measure:
Use the bed rail protectors supplied by
Days Healthcare.
Casa Med Classic FS
51
Issued: 25.07.2007
NURSING BEDS
Cleaning
10.3 Locking the nursing bed adjustments at the hand set
Possible danger through altering patient’s position!
• Always lock the nursing bed adjustment functions on the hand
set which could cause danger to the patient’s health if adjusted
(consult doctor).
Locking the adjustments takes place using the hand set.
The hand set operation is described in Chapter 9.4.
➨ Test locking by operating the function keys on the hand set.
The adjustment must not move.
If the locking system is faulty, replace the hand set or the control
unit.
11.0 Cleaning
NOTE:
• When cleaning this bed, do not use any sharp-edged tools
(knives, metal scrapers) or aggressive solvents.
• Do not use high-pressure cleaners to clean this bed.
• Observe the instructions issued with the cleansing agent
in order to avoid damage to component surfaces.
➨ Use damp cloths to carry out cleaning work.
➨ Only use mild cleansers free of scouring agents for cleaning
any metal, wooden or plastic surfaces.
52
Issued: 25.07.2007
Casa Med Classic FS
NURSING BEDS
Testing plan
12.0 Testing plan for nursing beds
Hazards due to electrical and mechanical faults!
• Always remove faulty nursing beds from operation and secure
them against unauthorised use (remove mains plug).
• Always report any faults found immediately to the responsible
persons!
Accident hazard!
• It is imperative that you always rectify any faults which could
influence the function and safety of the nursing bed
immediately.
12.1 Daily checks
The following routine checks can be carried
out by nursing personnel or attendants:
➨ Lower the nursing bed until both bed end
motors are turned off.
➨ Check bed rails for easy movement and
damage.
➨ Check the locking device on the bed
rails for correct functioning.
Lower the nursing bed
Each time the nursing bed has been
adjusted:
➨ Check the mains cable and mains plug
for damage and kinks.
➨ Route the mains cable between the bed
and mains socket so that it cannot be
crushed or run over.
Casa Med Classic FS
53
Issued: 25.07.2007
NURSING BEDS
Testing plan
12.2 6-monthly inspection - check
control unit
Preparation:
➨ Lock all adjustment functions at the
hand set, then carry out performance
test as described in the following
“Check” section.
Check:
➨ Test all functions by activating the
head section
relevant function keys on the hand set.
None of the adjustment functions
should react.
If an adjustment functions correctly,
the control unit must be replaced.
Bed height
foot section
head- und
foot section
Trendelenburg
positions
(depending on
bed version)
12.3 Testing intervals
Testing intervals are dependant on the type of usage for Days
Healthcare nursing beds.
• Days Healthcare prescribes testing intervals of two years for safety
inspections in accordance with MPBetriebV (Germany) under normal
environmental and operating conditions.
• If being brought back into use, inspections should take place before
every new usage (after being assembled at the patient’s location) and
then every two years.
• Testing intervals should be shortened if the nursing bed has been
subjected to higher loading (for example by frequent patient changes
in a nursing home). In case of doubt, please contact Days Healthcare
for advice.
54
Issued: 25.07.2007
Casa Med Classic FS
NURSING BEDS
Testing plan
12.4 Inspection of mechanical components
All inspection work described below may only be carried out by expert
trained personnel.
Evaluation of the checklist and maintenance work carried out on the
nursing bed may only be carried out by expert personnel with suitable
training, knowledge and experience.
Description
Assessment
OK
defective
Mattress support and its plastic elements
❐
❐
Bedframe side panels
❐
❐
❐
❐
❐
❐
❐
❐
❐
❐
❐
❐
❐
❐
❐
❐
❐
❐
patient pole attachment
❐
❐
❐
❐
all patient pole components
❐
❐
Visible inspection of all frames and housing parts for
deformation, damage, wear and corrosion:
Bedframe head and foot
Backrest adjustment guides
Bed rails
All lifting device components
Track rollers
Check all connecting elements (e.g. nuts, bolts,
rivets..) for completeness, function and correct
seating.
all casings
existing casing seals
casing bolt seating
Casa Med Classic FS
55
Issued: 25.07.2007
NURSING BEDS
Testing plan
Description
Assessment
OK
defective
castor locking in “straight ahead” setting
❐
❐
❐
❐
function and locking of brakes
❐
❐
easy movement in running guides
❐
❐
locking (easy movement, play)
❐
❐
❐
❐
Performance check to track rollers and brakes:
easy running gear movement (rolling and steering )
Performance check for bed rails:
difference between bar caps, max. 12 cm, even under load
(see dimension A, chapt. 17.1 “Specifications”)
Distance between bed rails and bed frame max. 12 cm,
❐
even under load (see dimension B, chapt. 17.1 “Specifications”)
❐
❐
❐
Check triangle belt for integrity
❐
❐
❐
❐
Check patient pole tube for deformation under load
❐
❐
Deformation under load
Mechanical testing of patient pole under load:
Check triangle for integrity
56
Issued: 25.07.2007
Casa Med Classic FS
NURSING BEDS
Testing plan
12.5 Inspection of electrical components
Description
Assessment
OK
defective
Visual inspection of electrical components:
mains cable for kinks and damage
❐
❐
hand set cabling for kinks and damage
mains plug for damage
❐
❐
❐
❐
internal cabling for kinks and damage
❐
❐
❐
❐
❐
❐
❐
❐
❐
❐
tension protection
❐
❐
❐
❐
anti-kink sheaths
❐
❐
❐
❐
❐
❐
❐
❐
(especially at critical locations such as cable leadthroughs,
movable mattress support parts and the lifting device)
correct cable routing
Correct seating and condition of all:
plug contacts
plug contact sealing rings
cable leadthroughs
cable fixings
Performance inspection of electrical components:
Motor switch-off caused by limit position switches
by running all adjustments up as far as the possible
limit position
Switch-off is working correctly if:
• the switching noise in the switch-off relay is audible
motors (noises, speed)
keys on remote control
(function, use of movement, damage)
Casa Med Classic FS
57
Issued: 25.07.2007
NURSING BEDS
Testing plan
12.6 Measurements
Some countries in the European Union have a legal requirement to carry
out the measurements listed below.
The nursing bed operator is responsible for determining the appropriate
national regulations.
All measurements described below may only be carried out by expert
trained personnel and with the use of suitable measuring instruments.
Any faults noted must be reported to the responsible person
immediately and rectified.
Hazards due to electrical and mechanical faults!
• Always remove faulty nursing bed from operation and secure
them against unauthorised use (remove mains plug).
Accident hazard!
• It is imperative that you always rectify any faults which could
influence the function and safety of the nursing bed
immediately.
Description
Assessment
OK
defective
The following measurements must be carried out in
accordance with DIN VDE 0751 :
Earth conductor resistance (only Class I devices)
Equivalent leakage currents
❒
❒
❒
❒
Information about measurement of equivalent leakage currents:
Typical value:
< 20 µA
Measurement locations: shorted-out power plug (L+N) against...
1.) ...metallic lift motor parts (bed end motors)
2.) ...blank metallic bedframe locations
(bolts etc.)
58
Issued: 25.07.2007
Casa Med Classic FS
NURSING BEDS
Troubleshooting
13.0 Troubleshooting
Fault
Model
Mattress support
all models
head section or foot
section, or bed
frame, cannot be
raised/lowered
Cause
Remedy
Mains plug not
plugged in
see chapt. 9.2
Hand set locked
see chapt. 9.4
Thermoswitch
active
try again after
20-30 minutes
Hand set defective
Control unit
defective
Inform your dealer
Mattress support
foot section does
not locate when
being raised
all models
Automatic catch
defective
Inform your dealer
Castors cannot be
locked
all models
Castor defective
Inform your dealer
Locking bar or
castors defective
Inform your dealer
Bed rails jam
all models
Fixing dirty or
broken
see chapt. 7.13
Hand set indicator
lamp is never
illuminated when
operated
all models
Adjustment locked
(hand set)
see chapt. 9.4
Drive load
exceeded
Reduce drive load
Controller defective Inform your dealer
Casa Med Classic FS
59
Issued: 25.07.2007
NURSING BEDS
Storage
14.0 Storage of the nursing bed
with the transport and
storage system (TLSU)
Remove bed rails
Please proceed as follows to store the
nursing bed:
14.1 Dismantling the nursing bed
➨ Remove patient pole.
2
➨ Remove bed rails, to do this ..
...at the foot end:
1
(1) press in the unlocking lever
4
(2) pull the slider out of the guide groove
3
and
(3) remove it from the bed rail cappings.
(4) Remove the plastic caps.
7
...at the head end:
(5) pull the bed rail cappings and the
plastic caps off the slider.
5
(6) press in the unlocking lever
and
(7) pull the slider out of the guide groove.
➨ Secure the mattress support with the
retaining belts (1) on the bed frames.
60
Issued: 25.07.2007
Casa Med Classic FS
5
6
Secure mattress support
NURSING BEDS
Storage
Remove mains cable
➨ Loosen the anti-kink and tension
protectors (2) for the mains cable from
the bed frames (spanner size 19 mm).
Remove hand set cable
➨ Remove the hand set cable from the
tension protection (3) on the bed frames.
Remove mattress support
motor with control unit
➨ Pull both quick-release bolts (4 + 5) out
of the receptacle and remove mattress
support motor (6) complete with control
unit.
Casa Med Classic FS
61
Issued: 25.07.2007
NURSING BEDS
Storage
➨ Unlock the tension relief by pressing in
the side clamps (7) and remove.
Disconnect the plugs
➨ Disconnect the following electrical
component plugs from the control unit:
2 = Hand set
4 = mattress support motor for
foot section adjustment
5 = Cable for lift motor; foot section
6 = Cable for lift motor; head section
7 = Accumulator box
(only nursing beds with
Trendelenburg’s position)
Remove accumulator box
➨ Remove the accumulator box from the
nursing bed (only nursing beds with
Trendelenburg’s position).
Remove mattress
support motor
➨ Pull both quick-release bolts (8 + 9) out
of the receptacle and remove mattress
support motor (10).
62
Issued: 25.07.2007
Casa Med Classic FS
NURSING BEDS
Storage
Remove the bed ends
➨ Loosen the hand levers (11) and remove
both bed ends from the mattress support.
separate the mattress
support
➨ Loosen the hand levers (12) and
separate the mattress support.
Casa Med Classic FS
63
Issued: 25.07.2007
NURSING BEDS
Storage
14.2 Placing the components in the transport
and storage system (TLSU)
➨ Fix the bed ends to the TLSU as follows:
(1.) Push the TLSU (1) onto the bed end
guides.
NOTE:
The mountings (a) with the
clamping screws must be
pointing in the same direction.
(2.) Push the second bed end with the
guides into the TLSU mountings.
➨ Fix the connection by tightening the
clamping screws (2).
➨ Push the mattress support foot section
(3) into the TLSU guides and secure by
tightening the hand levers.
➨ Push the mattress support head section
(4) onto the TLSU guides and secure by
tightening the hand levers.
➨ Place the laying area motor, bed rails
and small parts upright between the
mattress support components (packed in
original carton if possible (5)).
➨ Push the patient pole into the TLSU
mounting (6).
64
Issued: 25.07.2007
Casa Med Classic FS
Fix the bed ends to the
TLSU
NURSING BEDS
Disposal
15.0 Disposal
To comply with national law, the following
instructions are guidelines for the disposal
of your product at the end of its life or when
it ceases to function economically.
Recent legislation on electrical equipment
indicates that the equipment must be
disposed of in a proper manner.
• The product and /or its components are
not to enter the system of landfill sites.
• The product and /or its components are
not to be disposed of in domestic
household waste.
• The electrical and material parts are to be
disposed of as scrap or recycling
materials.
• Local waste collection depots are
available to advise and dispose of
electrical products.
• Batteries which contain liquid acid must
be stored and disposed of separately at
these depots.
• Please enquire about disposal depots with
your local authority.
• Should you require further advice, please
contact your supplier or nearest dealer.
Casa Med Classic FS
65
Issued: 25.07.2007
NURSING BEDS
Specifications
16.0 Appendix
16.1 Specifications: nursing bed
CE certification in accordance
with 93/42/EEC
Max. user weight _____ 140 kg
Max. working load:
nursing bed 1) ______________ 175 kg
patient pole ___________ 80 kg
Nursing bed dimensions:
Nursing bed weight:
Total weight:
Med Classic FS ____ 107.6 kg
Individual weights:
mattress support,
head section __________ 17 kg
foot section ________ 15.0 kg
complete ___________ 32.0 kg
bed rail capping ________ 2 kg
bed end ___________ 25,4 kg
patient pole ____________ 7 kg
control unit __________ 1,8 kg
mattress support motor 2.1 kg
hand set ____________ 0.3 kg
Mattresses to be used 2):
Dimensions (width x length x height):
90x200x10
or _____________ 90x200x12
Matters weight of unit volume 2):
depending on
model ________ 25 - 50 kg/m3
Weight ___________ 6 - 12 kg
Storage temperature: __ +5°C
to _________________ +45°C
Storage humidity: _____ 30%
to __________________ 75%
1)
2)
max. working load = max. user weight + 35 kg accessories (mattress, bed linen etc.)
the mattress is not included in the delivery / all dimensions rounded off and in cm
66
Issued: 25.07.2007
Casa Med Classic FS
NURSING BEDS
Nameplates
16.2 Specifications: Drive system
Power supply _ 230 VAC 50 Hz
Safety class _____________ II
Ingress protection ______ IP44
Noise level ______ < 65 dB(A)
Maximum continuous
operation _________ 2 minutes
Minimum pause
after operation ____ 18 minutes
Lift - lying area motor
Head section ________ 85 mm
Foot section _________ 85 mm
Operating conditions:
room temperature _____ +10°C
up to _______________ +40°C
relative humidity _______ 30%
up to ________________ 75%
Storage humidity: _____ 30%
to __________________ 75%
16.3 Nursing bed labelling
16.3.1 Nameplate
The nameplate is located on the bed end of
the nursing bed and contains the following
information:
= Safety class II (double insulated)
= CE-certification
in accordance with 93/42/EWG
= application part type B
IP 44 = Ingress Protection (splashproofed)
= Reference to the operating manual
AB 2 min/ 18 min = 2 minutes maximum
continuous operation
of actuator motors
= 18 minutes minimum
pause after 2 minutes
operation
= Note for disposal
Casa Med Classic FS
67
Issued: 25.07.2007
NURSING BEDS
Accessories
16.3.2 Patient pole component sign
The component sign is located on the lower
part of the patient pole and contains the
following information:
• warning information about maximum
loading allowable.
• item description
• reference to the operating manual
16.4 Accessories
Please contact your Days Healthcare dealer
to order any articles required.
Description
Order-No.
Urine bottle with holder
03-20-000-000-00
Bed rail protectors, 190 x 39 cm, 1 piece
B4-01-001-050
Transport and storage system
Q1-07-001-001
Triangle with length-adjustable belt
K2-03-001-002
Bed rail, collapsible, beige, right
B3-05-01R
Bed rail, collapsible, beige, left
B3-05-01L
16.5 Spare parts
Spare parts can be obtained from your Days Healthcare specialist
dealer. Only original Days Healthcare spare parts may be used
(See dealer stamp on reverse of the envelope).
68
Issued: 25.07.2007
Casa Med Classic FS
NURSING BEDS
Warrenty
17.0 Warranty
Days Healthcare gives a guarantee of 24 months perfect functioning
within its General Terms and Conditions for the nursing bed.
• During warranty period any parts that have become defective due
to faulty workmanship or materials will be repaired or replaced without
charge by Days Healthcare supplier/dealer.
• The warranty excludes items that become worn due to normal wear
and tear such as castors etc.
• The warranty excludes all items that have been subjected to
undue wear and tear and misuse.
• Unauthorised changes or modifications will forfeit your
warranty.
• If a defect or fault is discovered, the Days Healthcare
supplier/dealer from who the product was purchased should be notified
immediately.
Limitation of Liability
The warranty does not extend to the consequential costs resulting from
fault clearance, in particular freight and travel costs, loss of earnings,
expenses, etc. The manufacturer will not accept responsibility for any
damage or injury caused by misuse or non-observances of the
instructions set out in the user manual.
Casa Med Classic FS
69
Issued: 25.07.2007
NURSING BEDS
70
Issued: 25.07.2007
Casa Med Classic FS
Dealers Stamp
Days healthcare
North Road
Bridgend Ind Est
Bridgend
UK
CF31 3TP
Tel 01656 664700
Fax 01656 664750
E-Mail [email protected]
Www.dayshealthcare.com