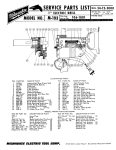
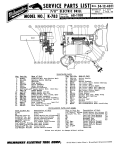
1
Distributed Diagnostics and Machine Control (Cat. No. 6401-DDMC,-SDSC, 6402-DDMC, 6403-DDMC) Application Notes Important User Information Because of the variety of uses for this product and because of the differences between solid state products and electromechanical products, those responsible for applying and using this product must satisfy themselves as to the acceptability of each application and use of this product. For more information, refer to publication SGI–1.1 (Safety Guidelines For The Application, Installation and Maintenance of Solid-State Control). The illustrations, charts, and layout examples shown in this manual are intended solely to illustrate the text of this manual. Because of the many variables and requirements associated with any particular installation, Allen-Bradley Company cannot assume responsibility or liability for actual use based upon the illustrative uses and applications. No patent liability is assumed by Allen-Bradley Company with respect to use of information, circuits, equipment or software described in this text. Reproduction of the contents of this manual, in whole or in part, without written permission of the Allen-Bradley Company is prohibited. Throughout this manual we make notes to alert you to possible injury to people or damage to equipment under specific circumstances. ATTENTION: Tells readers where people may be hurt if procedures are not followed properly. ATTENTION: Tells readers where machinery may be damaged or economic loss can occur if procedures are not followed properly. Warnings and Cautions: - Identify a possible trouble spot. - Tell what causes the trouble. - Give the result of improper action. - Tell the reader how to avoid trouble. Important: We recommend you frequently backup your application programs on appropriate storage medium to avoid possible data loss. 1991 Allen-Bradley Company, Inc. PLC is a registered trademark of Allen-Bradley Company, Inc. Summary of Changes Summary of Changes New Information in this Publication This release of the publication contains the following new information: In this release, a new 14 step detented value SDS instruction replaces the SDS shown in the previous version of this manual (see page 6-6 of “Applying the SDS Instruction to a Machine Clamp“). The new SDS instruction includes changes that have been made to eliminate processor scan dependencies. These changes include: swapping the request and memory I/O addresses in the input table other step transition changes throughout the SDS New or changed information is noted with a revision bar, as shown in the margin. 1-1 Table of Contents Summary of Changes . . . . . . . . . . . . . . . . . . . . . . . . . . . . 11 New Information in this Publication . . . . . . . . . . . . . . . . . . . . . . . . 11 Using this Manual . . . . . . . . . . . . . . . . . . . . . . . . . . . . . . . P1 Manual Objectives . . . . . . . . . . . . . . . . . . . . . . . . . . . . . . . . . . . Audience . . . . . . . . . . . . . . . . . . . . . . . . . . . . . . . . . . . . . . . . . . Specific Sections of the Manual . . . . . . . . . . . . . . . . . . . . . . . . . . ATTENTION and Important Notes . . . . . . . . . . . . . . . . . . . . . . . . Terms and Conventions . . . . . . . . . . . . . . . . . . . . . . . . . . . . . . . Related Publications . . . . . . . . . . . . . . . . . . . . . . . . . . . . . . . . . . P1 P1 P2 P3 P3 P4 Understanding DDMC Instructions and their Purpose . . . . 11 Chapter Objectives . . . . . . . . . . . . . . . . . . . . . . . . . . . . . . . . . . . Understanding the SDS Instruction . . . . . . . . . . . . . . . . . . . . . . . Understanding the DFA Instruction . . . . . . . . . . . . . . . . . . . . . . . Summary . . . . . . . . . . . . . . . . . . . . . . . . . . . . . . . . . . . . . . . . . 11 11 16 16 Implementing DDMC to a Specific Level . . . . . . . . . . . . . . . 21 Chapter Objectives . . . . . . . . . . . . . . . . . . . . . . . . . . . . . . . . . . . Implementing DDMC for Messaging Only Level 1 . . . . . . . . . . . Implementing DDMC for Messaging and Diagnostics Level 2 . . . Implementing DDMC for Messaging, Diagnostics and Control Level 3 . . . . . . . . . . . . . . . . . . . . . . . . . . . . . . Implementing DDMC for Operator Guidance Messaging . . . . . . . . Preparing to Apply DDMC Instructions . . . . . . . . . . . . . . . . . . . . . Summary . . . . . . . . . . . . . . . . . . . . . . . . . . . . . . . . . . . . . . . . . 21 22 23 24 25 27 27 Getting Started with State Transition/Conditional Logic Programming . . . . . . . . . . . . . . . . . . . . . . . . . . 31 Chapter Objectives . . . . . . . . . . . . . . . . . . . . . . . . . . . . . . . . . . . Decomposing Your Machine . . . . . . . . . . . . . . . . . . . . . . . . . . . . A Drill Motor Example . . . . . . . . . . . . . . . . . . . . . . . . . . . . . . . . . Summary . . . . . . . . . . . . . . . . . . . . . . . . . . . . . . . . . . . . . . . . . 31 31 38 313 Organizing a Drill Machine Application . . . . . . . . . . . . . . . 41 Chapter Objectives . . . . . . . . . . . . . . . . . . . . . . . . . . . . . . . . . . . Becoming Familiar with the Drill Machine . . . . . . . . . . . . . . . . . . . Decomposing the Drill Machine . . . . . . . . . . . . . . . . . . . . . . . . . . Defining States for a Drill Machine Segment . . . . . . . . . . . . . . . . . Defining Inputs and Outputs . . . . . . . . . . . . . . . . . . . . . . . . . . . . 41 41 44 46 48 ii Table of Contents Analyzing the Sequence of Operation . . . . . . . . . . . . . . . . . . . . . Setting up a State Diagram . . . . . . . . . . . . . . . . . . . . . . . . . . . . . Setting up a State Table . . . . . . . . . . . . . . . . . . . . . . . . . . . . . . . Assigning I/O . . . . . . . . . . . . . . . . . . . . . . . . . . . . . . . . . . . . . Combining the SDS Instruction with Ladder Logic . . . . . . . . . . . Using the SDS Instruction . . . . . . . . . . . . . . . . . . . . . . . . . . . . Integrating the SDS Instruction with Ladder Logic . . . . . . . . . . . Summary . . . . . . . . . . . . . . . . . . . . . . . . . . . . . . . . . . . . . . . 48 410 411 413 416 417 419 422 Organizing a Transfer Line Application . . . . . . . . . . . . . . . 51 Chapter Objectives . . . . . . . . . . . . . . . . . . . . . . . . . . . . . . . . . . . Decomposing the Transfer Line . . . . . . . . . . . . . . . . . . . . . . . . . . Detailing the I/O . . . . . . . . . . . . . . . . . . . . . . . . . . . . . . . . . . . . . Organizing the Logic . . . . . . . . . . . . . . . . . . . . . . . . . . . . . . . . . Associating Motions with SDS Instructions . . . . . . . . . . . . . . . . . . Developing State Diagrams and State Tables . . . . . . . . . . . . . . . . Summary . . . . . . . . . . . . . . . . . . . . . . . . . . . . . . . . . . . . . . . . . 51 51 57 58 58 514 526 Applying DDMC Instructions to Common Mechanisms . . . 61 Chapter Objectives . . . . . . . . . . . . . . . . . . . . . . . . . . . . . . . . . . . Applying the SDS Instruction to a Hydraulic Slide . . . . . . . . . . . . . Applying the SDS Instruction to a Machine Clamp (Detented Valve) Applying the SDS Instruction to a Part Stamp (SpringReturn Valve) Applying the DFA Instruction to a Spindle . . . . . . . . . . . . . . . . . . . Applying the SDS Instruction to a Mechanical Slide . . . . . . . . . . . . Summary . . . . . . . . . . . . . . . . . . . . . . . . . . . . . . . . . . . . . . . . . 61 61 65 610 613 615 620 Applying DDMC Instructions for Operator Guidance . . . . . 71 Chapter Objectives . . . . . . . . . . . . . . . . . . . . . . . . . . . . . . . . . . . Getting Started with Providing Operator Guidance . . . . . . . . . . . . . Understanding Interlock Terminology . . . . . . . . . . . . . . . . . . . . . . Summary . . . . . . . . . . . . . . . . . . . . . . . . . . . . . . . . . . . . . . . . . 71 71 74 75 Logging IMC Faults Sent as Messages by the PLC5 Processor . . . . . . . . . . . . . . . . . . . . . . . 81 Chapter Objectives . . . . . . . . . . . . . . . . . . . . . . . . . . . . . . . . . . . Configuring the IMC Fault Message Type . . . . . . . . . . . . . . . . . . . Sample Motion Program Which Reports Errors . . . . . . . . . . . . . . . 81 81 85 Table of Contents iii Other Application Examples . . . . . . . . . . . . . . . . . . . . . . . 91 Chapter Objectives . . . . . . . . . . . . . . . . . . . . . . . . . . . . . . . . . . . Accounting for Scan Dependencies . . . . . . . . . . . . . . . . . . . . . . . Prioritizing SDS Messages . . . . . . . . . . . . . . . . . . . . . . . . . . . . . Adding Power Loss Detection and Management Logic . . . . . . . . . . Providing Flashing Push Buttons for Operator Guidance . . . . . . . . 91 91 92 94 97 SDS Instruction Worksheets . . . . . . . . . . . . . . . . . . . . . . . A1 Appendix Overview . . . . . . . . . . . . . . . . . . . . . . . . . . . . . . . . . . A1 Preface Using this Manual Manual Objectives This manual describes how to apply Distributed Diagnostics and Machine Control (DDMC), specifically the SDS instruction, to your application. In this manual we provide: a tutorial for implementing state transition/conditional logic programming: - decomposing your machine or line into manageable segments defining states, inputs and outputs, transitions and conditions developing state diagrams and state tables developing a program that uses ladder logic and DDMC instructions application examples for common mechanisms application examples for providing operator guidance a sample program for logging IMC faults sent as messages from the PLC-5 processor other sample programs Audience We assume that if you are using this manual, you have read the DDMC User’s Manual (publication 6401–6.5.1). This means you are familiar with the following: the SDS instruction configuration utility the DFA instruction configuration utility PLC-5 hardware and programming software 1771 I/O Allen-Bradley operator interface and programming terminals the line or machine for which you are developing the program P-1 Preface Using this Manual Specific Sections of the Manual This manual is divided into two sections. The first focuses on learning to build an application with the SDS and DFA instructions. This is demonstrated with a conceptual example of a drill machine and a real-world example of a transfer line. The second section of the manual provides several programming examples and techniques that you can use when building your own custom DDMC application. Table P.A Sections of the Manual If you want to read about: Section 1 Application Concepts Section 2 Programming Techniques SDS and DFA instruction basics 1 Understanding DDMC Instructions and Their Purpose Levels of DDMC implementation; using the DDMC instruction for operator guidance messages 2 Implementing DDMC to a Specific Level Decomposing your machine into manageable segments; understanding the basics of truth tables, state diagrams, and state tables 3 Getting Started with State Transition/Conditional Logic Programming Applying state transition/conditional logic to a drill machine example 4 Organizing a Drill Machine Application Applying state transition/conditional logic to a transfer line example 5 Organizing a Transfer Line Application Applying DDMC instructions to a hydraulic slide, machine clamp, part stamp, spindle, and a mechanical slide 6 Applying DDMC Instructions to Common Mechanisms Using DDMC Instructions to provide operators with guidance messages 7 Applying DDMC Instructions for Operator Guidance Applying a technique that uses the PLC5 message instruction to simulate fault messages like those created with the SDS instruction. 8 Logging IMC Faults Sent as Messages by the PLC processor Using DDMC instructions for various applications such as scan dependencies, prioritizing messages, adding power loss detection and management logic, providing flashing push button guidance for operators 9 Other Application Examples Appendix A SDS Instruction Worksheets Worksheets for building state tables to configure SDS instructions P-2 Refer to chapter: Preface Using this Manual ATTENTION and Important Notes Information that is especially important to note is identified with an ATTENTION or Important note: ATTENTION: identifies informaton about practices or circumstances that can lead to personal injury or death, property damage or economic loss. Important: provides you with information that is important for the successful application of DDMC. Terms and Conventions In this manual, we use the following terms: This: Is: Combinatorial Equation A chain of events or steady state conditions; a Boolean equation in the SDS instruction this is limited to ANDed conditions. This type of equation doesn't care about the order or sequence in which inputs occur, it only cares that they all did occur. DDMC (Distributed Diagnostics and Machine Control) An industrial automation system containing hardware and software components that help you configure a control and diagnostics system for your equipment. DFA (Diagnostic Fault Annunciator) An instruction that resides in ladder logic, providing messaging capabilities when a fault occurs. SDS (Smart Directed Sequencer). An instruction that resides in ladder logic, providing state machine control and uptodate diagnostics for your machine. State/Step The conditions of the outputs of a machine at a point in time. State Transition An input change from ON to OFF or OFF to ON associated with a single input. Watchdog Timer A diagnostic technique that incorporates a timer to monitor a sequencer event. Interlock A real or storage output used to coordinate sequences. P-3 Preface Using this Manual Related Publications For more information about DDMC components, see the following publications: Publication Title Publication Number DDMC User Manual 6401-6.5.1 PLC5 Processors 1785 PLC5 Family Programmable Controllers Installation Manual 17856.6.1 1785 PLC5 Programmable Controller Design Manual 17856.2.1 Pyramid Integrator Design Manual 50006.2.1 PLC5 Programming Software Documentation Set 6200N8.001 PLC5 Programming Software Installation and Configuration 62006.4.6 PLC5 Programming Software Programming User's Manual 62006.4.7 PLC5 Programming Software Instruction Set Reference 62006.4.11 PLC5 Programming Software: I/O Configuration Software PLC5/250 Programming Software Documentation Set PLC5/250 Programming Software Installation and Configuration 62006.4.12 6200N8.002 50006.4.7 PLC5/250 Programming Software Programming Manual 50006.4.8 PLC5/250 Programming Software Testing and Maintenance 50006.4.11 PLC5/250 Programming Software Instruction Set Reference 50006.4.12 PLC5/250 Programming Software I/O Configuration Software User Manual 50006.4.15 Operator Interface Terminal T35 Plant Floor Terminal User's Manual 17846.5.6 T60 Industrial Workstation User's Manual 61606.5.1 RealRAM Enhanced Memory Card (cat. no. 6174DMB10) User's Manual 61716.5.15 RealRAM Enhanced Memory Card (cat. no. 6190MB14) User's Manual 61906.5.15 Communications Data Highway/Data Highway Plus Protocol and Command Set User's Manual 17706.5.16 Peer Communication Link Interface Module (cat. no. 1784KT) Product Data 17842.3 ControlView P-4 ControlView Core User's Manual 61906.5.1 ControlView AB Drivers User's Manual 61906.5.5 ControlView Mouse GRAFIX Editor User's Manual 61906.5.3 Chapter 1 Understanding DDMC Instructions and their Purpose Chapter Objectives Read this chapter to get an overview of DDMC instructions that you will use as part of your ladder program to build an application. In this chapter we describe the: SDS instruction (Smart Directed Sequencer) DFA instruction (Diagnostic Fault Annunciator) Understanding the SDS Instruction limit switches pressure switches proximity switches SDS SMART DIRECTED SEQUENCER Control File Step Desc. File Length No. of Steps Position/Step: No. of I/O Prog file number You can use the Smart Directed Sequencer (SDS) instruction in many ways, such as providing fault diagnostic information about sensing devices like: (EN) N10:0 N11:0 144 12 0 8 3 The SDS instruction allows two basic types of logic equations: (ST) (ER) (ES) Transitional (Logical OR) Combinatorial (Logical AND) Transition equations provide traditional state-based control. In other words, a transition equation defines the destination step for the transition (either ON––>OFF or OFF––>ON) of a desired input. Combinatorial equations define the destination step based on the steady state values and the relationship between a collection of inputs. Currently, the only valid relationship is the logical AND function. This allows you to accommodate complex combinations in the instruction while keeping the number of steps within a configuration to a minimum. You can define up to 4 logical AND combinations in an 8 input SDS instruction. You can define up to 8 ANDed conditions in a 16 or 32 input SDS instruction. Using the combinatorial feature of the SDS instruction, you can: replace complex ladder logic required for permissives in a state transition SDS instruction obtain diagnostic information on logical conditions (use for operator guidance) develop “shadow mode” diagnostics — the instruction follows what the machine is doing without controlling any outputs. 1-1 Chapter 1 Understanding DDMC Instructions and their Purpose Figure 1.1 shows an example of the SDS instruction’s step table (Edit Step screen) using the combinatorial feature. Figure 1.2 shows a step table with transitional structure (each input transition sends the instruction to a unique state for those conditions. For more information about the SDS configuration utility and steps for configuring the instruction, refer to the DDMC User’s Manual (publication 6401–6.5.1). Figure 1.1 SDS Instruction showing combinatorial function (Edit Step Screen) STEP 1 No 0 1 2 3 4 5 6 7 8 –– untitled –– Input ID PART IN POSITION CLAMP LS1 CLAMP LS2 CLAMP LS3 CLAMP LS4 HAND AUTO JOG PB PERMISSIVE TIMER=5.00s Equation ON––>OFF EQ1 EQ1 EQ1 EQ1 EQ2 Destination ERSTEP 10 STEP 9 STEP 9 STEP 9 STEP 9 STEP 5 EQ2 ON––>OFF STEP No 1 2 3 4 5 6 11 Output ID VALVE 4 CLAMPS OPEN CLAMPS CLOSED SOLENOID LIGHT MOTOR 2 MSG:ON State OFF ON OFF LAST LAST ON STEP 5 STEP 2 Press a function key. Enter destination step number or ’INIT’ > Prog edit mode Equatn Display Step Step Edit Step List Symbol Name Type Step Timer F1 F2 F3 F4 F5 F6 Msg Off F7 5/25 Addr 5 SDSTEST Equatn Output Marked Editor State Exit F8 F9 F10 Figure 1.2 SDS Instructions showing state transitional function (Edit Step Screen) STEP 1 No 0 1 2 3 4 READY Input ID RET’D LS ADV’D LS FULL DEPTH LS ADVANCE COMMAND RETURN COMMAND TIMER=0.0s – DISABLED Equation OFF––>ON OFF––>ON OFF––>ON OFF––>ON Destination STEP 4 STEP 10 STEP 4 **STEP 2 No Output ID 0 FORWARD MOTOR 1 1 REVERSE MOTOR 1 2 DRILL MOTOR MSG:OFF State OFF OFF OFF Press a function key. Program edit mode Equatn Display Step Step List Symbol Name Type F1 F2 F3 F4 1-2 Edit Step F5 Step Timer F6 Msg On F7 PLC–5/25 Addr 1 Input Output Marked Transit State Exit F8 F9 F10 Chapter 1 Understanding DDMC Instructions and their Purpose To What Mechanisms Can You Apply the SDS Instruction? As a rule, you may want to limit the use of an SDS instruction to a single sequence or motion like a rotary or linear axis. Refer to the following examples. Suppose that you have an actuator, such as a solenoid, that actuates several mechanically independent cylinders (Figure 1.3). These cylinders move at different speeds. Figure 1.3 Independent cylinders actuated by one solenoid Solenoid Cylinder 1 LS1 Cylinder 2 Cylinder 3 LS2 LS3 To provide accurate diagnostics for the above mechanism, you would want to assign one SDS instruction to each cylinder to diagnose the reaction of the position sensor switches associated with that cylinder. If you included all of the cylinders in the above example in one SDS instruction, the diagnostics would be lost because the cylinders operate at different speeds (not sequential). In addition, any messages generated by a single SDS instruction would not be precise and indicate which cylinder had faulted. On the other hand, say that you have two cylinders of equal length connected together to produce a three-position shuttle. The shuttle has three switches to indicate each of its three positions (Figure 1.4). In this case, the shuttle’s movement is sequential — each movement depends on the movement that just occurred. In this situation, a single SDS instruction would work well to diagnose faults accurately and provide precise messages. 1-3 Chapter 1 Understanding DDMC Instructions and their Purpose Figure 1.4 Threeposition shuttle with two cylinders and three switches Cylinder 2 Cylinder 1 LS1 LS2 LS3 For more information on applying the SDS instruction to a particular mechanism, refer to chapter 6, “Applying DDMC Instructions to Common Mechanisms.” What Information Should the SDS Instruction Include? The SDS instruction works with ladder logic to provide control and diagnostics for your application. You can use the instruction to varying degrees to achieve your desired level of diagnostics and control. Some instructions can become quite complex if you try to include too much information. We provide the following recommendations for keeping your SDS instructions as simple as possible. Limit inputs to: motion requests from sequencing logic position indicators a fault reset request, if applicable interlocks Limit outputs to: motion-actuator devices position indicating lights bits 1-4 Chapter 1 Understanding DDMC Instructions and their Purpose Keep in mind that you want to use the SDS for a particular motion or mechanism. Any other information related to that motion— but not part of that motion — can be handled more easily with conventional ladder logic like full depth information (or in a separate SDS instruction if you want messages generated). This information could include: Information: Description: Operating Mode Including operating mode in your SDS only increases the number of steps required in the instruction, thus increasing the difficulty of the instruction. It is not necessary that the SDS instruction know why the axis it controls is being requested to move, only that it must behave a certain way when it is requested to do so. Full Depth When you configure an SDS instruction for a motion it is likely that you include the inputs and outputs required to generate a full depth condition. Even so, we recommend keeping full depth logic out of the SDS because canceling the full depth signal requires including additional inputs, complicating the configuration. Internal storage points or logical conditions are more easily suited for ladder logic. For example, a full depth condition usually includes latches and unlatches both easily handled by ladder logic. Motor Starter Overloads When you program an SDS instruction to go to a fault step upon seeing an overload trip, the instruction stops all motion and reports a fault message. This is how the SDS instruction is supposed to react; however, while the SDS is in the fault step, it cannot detect other faults. If an input card or switch faults while the overload is tripped, the SDS cannot detect the fault and flag it. Rather than use the SDS in this case, we recommend that you use the Diagnostic Fault Annunciator (DFA) instruction. The DFA is described below. Manual Inputs Manual inputs include anything that does not control machine motion (such as pushbuttons, on/off switches, and dials). 1-5 Chapter 1 Understanding DDMC Instructions and their Purpose Understanding the DFA Instruction The Diagnostic Fault Annunciator (DFA) instruction is a monitoring only instruction; that is, it cannot control outputs. You must define the inputs in the instruction that you want monitored. Valid inputs can be: DFA DIAGNOSTIC FAULT ANNUNCIATOR Control File Length No. of I/O Prog file number N10:0 124 16 3 (EN) (ER) storage points such as binary bits counter/timer done bits outputs (real or logical) any valid bit address lube or level indicators alarms fault bits (set by another device — such as an IMC motion controller or ladder logic) If you currently have diagnostics programmed in ladder logic, you can use the DFA instruction to generate messages when a fault occurs. In addition, you can create other types of operational and diagnostic messages with the DFA instruction, such as tool change messages and operating instructions. Figure 1.5 shows an example of the DFA configuration template. For more information about the DFA configuration utility and steps for configuring the instruction, refer to the DDMC User’s Manual (publication 6401–6.5.1). Figure 1.5 DFA Instruction - Message Screen No 0 1 2 3 4 5 6 7 Input ID C4:01/ON I:000/02 I:000/01 I:000/06 I:B3/03 I:000/04 O:000/05 T5:1/ON DFA for DFA 1 AT N9:0 Input Message TOOL CHANGE REQUIRED LUBE FAULT LUBE LEVEL LOW NO PARTS PRESENT LOAD PARTS IN STA.5 PLACE MACHINE IN AUTO MODE TIME TO CALL MAINTENANCE MACHINE OVER CYCLE Press a function key or enter input number. > Rem Prog Change Display Exit Input Mode Symbol Monitor F1 F2 F3 F5 Summary 1-6 Edit Message F7 State 5/25 Addr 5 Input State F8 DB_TEST Accept Edits F10 This chapter gave you an overview of DDMC instructions and what they are used for. Read chapter 2 to learn methods for implementing these instructions into your program. Chapter 2 Implementing DDMC to a Specific Level Chapter Objectives You can implement DDMC instructions at different operational levels, depending on the amount of diagnostics and control that you need for your application. Each level provides incremental increases in terms of diagnostic coupling with the control. Figure 2.1 shows levels of implementation. Table 2.A describes the levels. Figure 2.1 Levels of DDMC Implementation Level 3 • SDS Instruction for Control and Diagnostics • DFA Instruction for Messages Level 2 • Ladder Logic for Control • SDS Instruction for Messages and Diagnostics Level 1 • DFA Instruction for Messages • Ladder Logic for Control and Diagnostics Important: A Level 3 Implementation does not limit you to only using the SDS instruction for control and diagnostics. You may also include Level 1 and Level 2 Implementations for diagnostics outside of the Level 3 SDS instruction, for example, lube faults or overloads. • DFA Instructions for Messages Table 2.A Description of DDMC Levels This level: Uses this DDMC instruction: Control is handled Diagnostics are by: handled by: Message Generation is handled by: 1 DFA ladder logic ladder logic DFA 2 SDS and DFA ladder logic SDS SDS and DFA 3 SDS and DFA SDS SDS SDS and DFA In addition to operational levels, you can implement DDMC to be used for operator guidance messages. Read this chapter to learn more about the level of implementation that best suits your application. 2-1 Chapter 2 Implementing DDMC to a Specific Level Implementing DDMC for Messaging Only Level 1 The Level 1 implementation of the DDMC uses the DFA instruction as a fault message generator. The PLC ladder logic is required to control the machine and to detect faults. You configure the instruction to monitor these fault bits for a transition to the faulted state. Upon that transition, the DFA instruction generates a fault message. Machine control logic, fault detection logic, and fault annunciation logic are not integrated. Using Level 1 the following is true: ladder logic controls the machine diagnostics are not updated with control logic changes diagnostic detection relies on ladder logic Figure 2.2 shows an example of Level 1 implementation: Figure 2.2 DDMC Implementation Level 1 Level 1 Traditional Control Logic Conventional ladder logic is used for both control and fault detection. The DFA monitors the ladder logic fault bits and generates messages Advance Solenoid Returned Solenoid Advance Light Returned Light Fault Detection Logic Station Fault Coolant Fault DFA Station Fault Coolant Fault 2-2 Chapter 2 Implementing DDMC to a Specific Level Implementing DDMC for Messaging and Diagnostics Level 2 Level 2 implementation of the DDMC uses the SDS instruction to decompose a mechanism into individual states based on the inputs or conditions that relate to the given mechanism. Refer to chapter 6 for examples of applying DDMC instructions to common mechanisms. The SDS instruction monitors the mechanism as it cycles from state to state. Upon an invalid transition of an input, or when the SDS instruction exceeds a predefined time period for a given step, the instruction generates a fault message that details the mechanism’s state and the input that had the invalid transition. The ladder logic is used to control the outputs of the machine. Both fault detection and fault message annunciation are performed by the SDS instruction. Using Level 2, the following is true: ladder logic controls the machine SDS instruction performs diagnostics PLC processor control and fault diagnostics are not integrated you should use the DFA instruction for discrete fault annunciation Figure 2.3 DDMC Implementation Level 2 Level 2 Conventional ladder logic is used to control outputs. The SDS instruction monitors inputs and conditions to detect faults and generate messages. Advance Solenoid Returned Solenoid Advance Light Returned Light Advance Solenoid SDS Return Solenoid 2-3 Chapter 2 Implementing DDMC to a Specific Level Implementing DDMC for Messaging, Diagnostics and Control Level 3 The Level 3 implementation of the SDS instruction requires the instruction to perform the machine output control, fault detection and fault message annunciation. The control logic and the machine diagnostics are integrated. Similar to the Level 2 implementation, you must decompose the given mechanism into individual states. The SDS instruction monitors the mechanism’s input for transition and uses the SDS instruction to control the mechanism’s outputs while it is in a given step. Upon an invalid transition of a mechanism’s input, the instruction generates a fault message. Changes that affect the control of a mechanism also update that mechanism’s diagnostics. Using Level 3, the following is true: the SDS instruction is used to control the machine’s outputs diagnostics and control are integrated you should use the DFA instruction for discrete fault annunciation Figure 2.4 DDMC Implementation Level 3 Level 3 The SDS controls outputs and monitors inputs for disagnostic detection and automatic message generation. Advance Request Return Request SDS 2-4 Advance Request Advance Solenoid Return Request Return Solenoid Advanced LS Advanced Light Returned LS Returned Light Chapter 2 Implementing DDMC to a Specific Level Implementing DDMC for Operator Guidance Messaging In addition to implementing DDMC at various levels, you can implement the instructions to provide operators with messages that guide them to perform sequential steps. For example, when a machine faults in automatic mode, the operator may need to perform steps to get the machine back to home position so that it can be placed back in automatic mode. You can use the messages generated by the DDMC instructions to tell the operator what to do. As stated on page 1-1, you can use the SDS instruction in two different ways: state-transitional mode (inputs are ORed) where individual input state transitions and changes are analyzed combinatorial mode (inputs or steady states are ANDed) to analyze logical conditions To achieve operator guidance, you still would want to keep those actions related to the motion of the mechanism in a separate SDS instruction. Information for analyzing expected conditions that are being monitored by the SDS instruction and allow the operator’s request to be acted upon should be kept in another SDS instruction. Important: You do this to reduce the complexity in the instruction and to display messages different than those used to indicate control faults. (You use the configuration utility differently to configure operator guidance messages than to configure warning messages.) To configure operator guidance messages, you first analyze existing or standard request logic, relocate the permissive and interlocks from the ladder logic, and put them in their own SDS instruction as shown in Figure 2.5. The permissives in the request logic must not allow for parallel paths. For sample programs that show DDMC implementations for operator guidance, refer to chapter 6, “Applying DDMC Instructions to Common Mechanisms”. 2-5 Chapter 2 Implementing DDMC to a Specific Level Figure 2.5 DDMC Implementation Operator Guidance Old Logic PB HAND COND 1 COND 2 COND 3 COMMAND REQUEST AUTO Conditions 1, 2, and 3 (permissives such as All Stations Returned" or All Stations Clamped" are placed as inputs within an SDS instruction. An interlock called OK is controlled within the SDS instruction. New Logic PB HAND CYCLE AUTO CYC PB1 COMMAND REQUEST OK OK TRIGGER CYCLE CYC PB2 HAND SDS Trigger OK (Control SDS Instruction) SDS Condition 1 Condition 2 Condition 3 2-6 (Conditionmonitoring SDS Instruction) Chapter 2 Implementing DDMC to a Specific Level Preparing to Apply DDMC Instructions Now that you have an understanding of the DDMC philosophy and the extent to which you can implement the DDMC instructions to provide diagnostics and messaging, you can begin building your application. If you are building: a messaging only application (Level 1), you can use the DFA instruction with your traditional ladder program. an application that contains diagnostics, control, or operator guidance, you will need to analyze your application a bit further. Figure 2.6 shows the basic mode of thinking you must go through to prepare a DDMC application of Level 2 or greater. (Much of this requires a good understanding of your machine or line and the motions it goes through to complete an operation.) Figure 2.6 Requirements for applying DDMC Decompose Your Machine Define States Define Inputs and Outputs Define Transitions and/or Conditions Develop State Diagrams and Tables Develop Your Program (Ladder and DDMC Instructions) Configure DDMC Instructions (& System, if required) Summary This chapter explained the various levels of DDMC implementation. Read chapters 3 – 5 for examples on performing the steps shown in Figure 2.6. 2-7 Chapter 3 Getting Started with State Transition/Conditional Logic Programming Chapter Objectives State transitional programming has several advantages. This approach lets you: represent machine functions in a step-by-step manner, parallel to the way the control system operates combine the machine control program and the diagnostic program Read this chapter to learn techniques used to develop a state transition/conditional logic application. Some of the topics you must understand to develop your application include: decomposing your machine developing a truth table developing a state diagram developing a state table Decomposing Your Machine Decomposition is the act of breaking a line or machine into manageable segments so that you can define states, or steps, and transitions/conditions that determine which state or step the machine should be in. A large machine or transfer line consists of many states — far too many to be considered manageable in one state instruction. When setting up a state application for a machine you need to first decompose the machine so that segments are manageable; In addition, decomposition with individual SDS instruction for each part of the machine provides more accurate and precise messages. Levels of Decomposition Decomposition is a logical process performed in levels. These levels vary for each machine, depending on its size and complexity. To determine levels for decomposition, it is imperative that you know how your machine operates. In the decomposition process, your first level is the overall system, machine, or line. Subsequent levels are actions parallel to one another — all smaller portions of the system until you achieve segments that are manageable. 3-1 Chapter 3 Geting Started with State Transition/Conditional Logic Programming Logical decomposition levels could be: second level - decompose along physical lines of your system, for example: - stations of a transfer line - major operations of a machine or process third level - decompose along functional lines of your second level, for example: - operations of a station on a transfer line - suboperations of a machine or process fourth level - decompose according to the physical movements of third level components, for example: - movement of a component or a subassembly Once you reach the level at which your segments become manageable, you can determine states for each segment. Figure 3.1 shows the decomposition process. The top block or level represents the overall system. Other blocks in the pyramid show successive levels of decomposition. Figure 3.1 Decomposition Process Overall System Levels of Decomposition 3-2 Chapter 3 Geting Started with State Transition/Conditional Logic Programming Methods of Decomposition To decompose a machine accurately, you must understand how the machine operates. You can use several methods to gain a better understanding of the relationships between the machine components at each level of decomposition. For example: sketch a block or physical diagram of the line, machine, or components refer to blueprints of the machine, if available describe the sequence of operation detail each operation refer to or develop a timing diagram for each operation Apply these methods as needed to obtain the information you need to complete the decomposition process. Defining States A state corresponds to the physical status of a machine and its components, such as motor off or motor on. States can be normal or in error. A state is normal when it follows the expected operation. A state is in error when it occurs outside normal operation. In the following example we have a motor that is controlled by one input — an on/off switch. Figure 3.2 shows the relay logic diagram of the motor example. Figure 3.2 Relay Logic Diagram of a Motor Switch Motor We have two normal states in our motor example: motor on motor off Figure 3.3 shows a schematic of our two normal states. 3-3 Chapter 3 Geting Started with State Transition/Conditional Logic Programming Figure 3.3 Normal States for Motor Motor Off Motor On Defining Transitions In this case, a single transition is the condition that provides direction to move from one state to another. Normally, we think of these conditions as inputs that change state or state transition. Transitions may be caused by actuators, sensors, or elapsed times. Conditions may be represented by an equation. In our motor example we have two states, motor on and motor off. We also have two state transitions: Switch ON → OFF Switch OFF → ON Figure 3.4 shows a schematic of input transitions between our two normal output states. Figure 3.4 Transitions for Motor Switch Switch 3-4 ON OFF Motor Motor Chapter 3 Geting Started with State Transition/Conditional Logic Programming Setting up a Truth Table A truth table shows all possible states of a machine. The number of possible conditions in a truth table depends on the number of inputs. When setting up a pure state transition application, you must be able to determine the state transitions you need to include when programming. You can determine the number of possible states using the following formula: P=2I where: P = possible number of input state transitions I = number of inputs For example, if you have two inputs, you have four possible state transitions, because 22 = 4. The number of possible states refers to physical or logical actions that could theoretically occur. The number of possible states does not always equal the number of states you use in a state application. Some will be impractical and can be ignored due to the nature of the machine. You can determine the number of practical states by setting up a truth table and analyzing the information. To set up a truth table, list: all inputs and outputs in a row possible states of each input (use 1’s and 0’s to represent ON and OFF states) or equations that represent a set of conditions that must be met logical outputs based on the machine configuration Table 3.A shows the truth table for our motor example: 3-5 Chapter 3 Geting Started with State Transition/Conditional Logic Programming Table 3.A Truth Table for Motor Inputs Outputs On/Off Switch Motor 1 1 0 0 In this example the number of possible states equals the number of practical states. Setting up a State Transition Diagram A state diagram graphically represents the control or operation of a machine in a state transition format. A state diagram consists of states and transitions. States are often represented as bubbles. Transitions are often represented as arcs with arrows pointing in the appropriate direction between bubbles. When defining states in a state diagram: label the state with the state number on the edge of the bubble put the name of the state inside the bubble Important: When naming states, choose the name that most accurately describes what is happening at that particular state. When you begin using state names to diagnose machine faults it is imperative that the state name clearly identifies the state at which the fault is occurring. When defining transitions in a state diagram label the: input causing the transition at the edge of the arc transition below or beside the input Figure 3.5 shows a state diagram for the motor example. 3-6 Chapter 3 Geting Started with State Transition/Conditional Logic Programming Figure 3.5 State Diagram of Motor Switch On 1 Motor Off 2 Motor On Switch Off Setting up a State Table A state table combines information from the truth table with information from the state diagram. A state table contains: output states input conditions input transitions actions to be taken The state table is a helpful tool when you are ready to enter data into the SDS instruction. You can also take information directly from the state table and plug it into the fill-in-the-blank configuration templates at the programming terminal. Table 3.B shows a state table for our simple motor. Table 3.B State Table for Motor State Input Description Input Transition or Conditions Next State Output Description Output Status 1 On/Off switch OFF>ON State 2 Motor OFF 2 On/Off switch ON>OFF State 1 Motor ON 3-7 Chapter 3 Geting Started with State Transition/Conditional Logic Programming A Drill Motor Example The first motor example was helpful in showing how to use the tools in developing a state application. In the following example, we have a drill motor with one device — a motor starter — and four inputs. We use the same tools to develop a state transition application for the drill motor. The following sequence of operation explains how the motor starter reacts to the different inputs: 1. When the START PB is pressed, the motor starter turns on 2. When the motor starter turns on, the MOTOR STARTER AUXILIARY CONTACT closes (turns on), sealing the circuit 3. If the motor starter has a current overload, the MOTOR STARTER OVERLOAD CONTACT opens (turns off). When the motor starter contact resets itself, then you can restart the motor by pressing the START PB. 4. When the STOP PB is pressed, the motor starter turns off Figure 3.6 illustrates the above operation in a relay logic diagram. Figure 3.7 shows the PLC ladder logic for the same operation. Figure 3.6 Relay Logic Diagram of Drill Motor Starter Operation Start PB MS Overload Stop PB Motor Starter MS Auxiliary Contact Figure 3.7 PLC Ladder Logic of Drill Motor Starter Operation Start PB MS Overload Stop PB Motor Starter MS Auxiliary Contact Decomposing the Drill Motor Because the drill motor is a fairly simple operation with 4 inputs and 1 output, and one basic motion, we need not decompose it further. 3-8 Chapter 3 Geting Started with State Transition/Conditional Logic Programming Setting up a Truth Table Using the formula 2I we can determine that we have 16 possible states since we have four inputs. Table 3.C shows the truth table which confirms this. Table 3.C Truth Table of Possible States for Drill Motor Inputs Outputs Start PB Auxiliary Contact Stop PB Motor Overload Motor Starter 0 0 0 0 0 0 0 0 1 0 0 0 1 0 0 0 0 1 1 0 0 1 0 0 0 0 1 0 1 0 0 1 1 0 0 0 1 1 1 1 1 0 0 0 0 1 0 0 1 0 1 0 1 0 0 1 0 1 1 1 1 1 0 0 0 1 1 0 1 0 1 1 1 0 0 1 1 1 1 1 The truth table shows all of the possible states for the drill motor. Several of these states, though probable, are not practical for this application. For example, it is unlikely that you will press the START PB and STOP PB at the same time or that all four inputs will be false at the same time. Likewise it makes little sense to worry about the START PB or the START AUXILIARY CONTACT when the motor overload is tripped, since it overrides both. Once you have developed a truth table for possible states, you must evaluate each state for your application and narrow the truth table down to practical states. As you do this, think of the sequence of operation and try to put the states in order so you can develop your state diagram. 3-9 Chapter 3 Geting Started with State Transition/Conditional Logic Programming Table 3.D shows the truth table of practical states for the drill motor application. Table 3.D Truth Table of Practical States for Drill Motor Inputs Outputs Start PB Auxiliary Contact Stop PB Motor Overload Motor Starter 0 0 1 1 0 1 0 1 1 1 1 1 1 1 1 0 1 1 1 1 0 1 0 1 0 0 1 1 0 0 1 0 1 0 0 Setting up a State a Diagram Figure 3.8 shows the state diagram for the drill motor example. Note that the diagram consists of only five states. (Our truth table of practical states contained seven.) In this case rows (or states) 3 and 4 and rows 6 and 7 in the table could be combined since the state of the START PB varied and did not change the operation. Figure 3.8 State Diagram of Drill Motor (State Transition Logic) 1 Start PB On Ready Initial Stop PB On Start PB Off MS Overload On 5 4 Error Stop MS Overload Off 2 Start Normal Stop MS Overload Off Stop PB Off 3 Seal 3-10 MS Auxiliary Contact On Chapter 3 Geting Started with State Transition/Conditional Logic Programming Setting up a State Table Table 3.E shows the state table for the drill motor. Blanks in the input transition column and next state column mean the state is ignored. Table 3.E State Table for Drill Motor State Input Description Input Transition Next State Output Description Output Status 1 Start PB Auxiliary Contact Stop PB Motor Overload OFF>ON State 2 Motor Starter OFF 2 Start PB Auxiliary Contact Stop PB Motor Overload ON>OFF OFF>ON State 1 State 3 Motor Starter ON ON>OFF State 5 Motor Starter ON Motor Starter OFF Motor Starter OFF 3 4 5 Start PB Auxiliary Contact Stop PB Motor Overload Start PB Auxiliary Contact Stop PB Motor Overload Start PB Auxiliary Contact Stop PB Motor Overload ON>OFF ON>OFF OFF>ON OFF>ON State 4 State 5 State 1 State 1 A Combinatorial Logic Approach Another more practical approach to the drill motor example would be to utilize the combinatorial functionality available in the SDS to reduce complexity based on individual transitions. Figure 3.9 shows the state diagram for the drill motor. Instead of five states using the state transition method, using the combinatorial approach we have only three states to be concerned with. 3-11 Chapter 3 Geting Started with State Transition/Conditional Logic Programming Figure 3.9 State Diagram of Drill Motor (Combinatorial Logic) 2 Start PB ON & Motor Overload OK & Stop PB ON Motor On 1 Motor Off Motor Over load ON > OFF Stop PB ON > OFF Stop PB ON > OFF Auxiliary Con tact OFF > ON 3 Seal On In Figure 3.9, we don’t care about the order in which the Start PB, Motor Overload, and Stop PB transition to ON. We only care that they are all on at the same time for us to go to the Motor ON step. Table 3.F shows the conditional logic for the drill motor in a table form. The 1’s and 0’s represent the states that are applicable to the operation of the drill motor. The dashes represent “don’t care” states. Compare this table to the truth table on page 3-9. Table 3.F Conditional Logic Table for Drill Motor Inputs Outputs Start PB Auxiliary Contact Stop PB Motor Overload Motor Starter 1 and 1 and 1 1 1 1 0 0 0 0 Using the conditional approach, the sequence of input transitions is not considered or checked. The diagnostic accuracy desired may be a factor in when to use or when not use this approach. For the above example, the diagnostics should retain a high degree of accuracy since the probability of all three conditions failing at the same time is low. With the combinatorial SDS instruction functionality, you can configure messages to annunciate all missing conditions. 3-12 Chapter 3 Geting Started with State Transition/Conditional Logic Programming Summary This chapter described the concepts of state transitional programming by developing a small state application for a motor and a drill motor. We also showed you tools to help you identify states and transitions for your application, such as setting up a: truth table state diagram state table Chapter 4 builds upon the concepts presented in this chapter by developing a state application for a larger example. 3-13 Chapter 4 Organizing a Drill Machine Application Chapter Objectives Read this chapter to get a better understanding of developing a Level 3 state transition application. The machine we describe in this chapter — a drill machine — is not technically a “real world” application; however, the procedure will help you better understand the concepts for implementing a Level 3 state transition application. In this chapter we: describe the two-station drill machine decompose the two-station drill machine into manageable segments prepare a state diagram and state tables for one of the two-station drill machine segments Becoming Familiar with the Drill Machine Figure 4.1 shows a diagram of a two-station drill machine and all of its devices. We first decompose the drill machine into manageable segments; then, we set up a state application for one of the segments created by decomposition. Figure 4.2 shows the operation of our drill machine in a relay logic diagram. 4-1 Chapter 4 Organizing a Drill Machine Application Figure 4.1 Diagram of Twostation Drill Machine O FF Cycle AUTO MANUAL FW D Conveyor Motor Not Used Station #1 Advance Assembly LS 9 Drill Motor NO Clamp #1 LS 1 NC LS 3 LS 4 NO NO LS 5 H eld O pen FW D Station #2 Advance Assembly NC LS 6 Drill Motor NO Clamp #2 LS 2 LS 7 NO NO H eld O pen Not Used LS 8 LS 10 17635 4-2 Chapter 4 Organizing a Drill Machine Application Figure 4.2 Relay Logic Diagram of Twostation Drill Machine 1 2 3 Start Stop CRM CRM CRM Off 2 Auto 1 3 Manual CRM CL2 6 18 CMF 4 5 CMF 8 5 CL1 CMM DR1D 5 LS1 6 15 DR1D LS5 CL1 3, 8, 13 SA1F 10, 11 7 15 14 8 9 10 4 15 CL1 DR1D 6 Cycle 15 20 SA1F 8 19 SA1F 11 SA1M 8 SA1R 12 CL1 14 13 DM1 7 DR1D LS3 14 15 6 LS5 15 LS4 LS1 6 TR1 SA1R 12 DR1D 6, 7, 8, 14, 16 16 DR1D 16 26 LS2 18 LS6 DR2D 15 17 CL2 DR2D 18 26 DR2D 25 26 9 19 20 9 TR1 14 CL2 19, 24, 3 SA2F Cycle 21, 22 26 SA2F 21 SA2F 19 SA2M 22 19 SA2R 23 CL2 25 24 DM2 17 DR2D LS6 25 26 18 LS8 26 LS7 LS2 18 TR2 SA2R 23 DR2D 17, 18, 19, 25, 27 27 DR2D 27 26 TR2 25 17636 4-3 Chapter 4 Organizing a Drill Machine Application Decomposing the Drill Machine To decompose our drill machine, we use some of the methods previously described for decomposition. Our first level of decomposition is the two-station drill machine (see Figure 4.1 and Figure 4.2). Decomposing to the Second Level Using the diagram of the drill machine at Figure 4.1, we can see three basic operations — a conveyor operation and two drilling operations. Therefore, we decompose the drill machine into three second-level segments: drill station #1 drill station #2 indexing conveyor Decomposing to the Third Level To decompose to the next level we need to look at what happens at each operation. By referring back to Figure 4.1 and analyzing the sequence of operation for the drill machine, we can decompose each operation into suboperations. Table 4.A gives us an overview of the drill machine operations. Table 4.A Overview of Drill Machine Operations Type of Operation System Initialization and Shutdown Sequence of Operation Step Description 1 Turn the SELECTOR SWITCH to Auto (position 1) or Manual (position 2). 2 Press the START BUTTON to start the conveyor. 3 Press the ESTOP BUTTON to shut the entire machine down. 1 A part is placed on the start end of the indexing conveyor. 2 The part actuates the partinplace limit switch (LS1), indicating the part is at the drill station #1. 3 Drill station #1 clamp solenoid (CL1) is energized and the conveyor motor is deenergized. 4 AUTO Drill station assembly #1 moves forward. MANUAL Press cycle button, moving drill station assembly #1 forward. 4-4 Chapter 4 Organizing a Drill Machine Application Type of Operation Step Description 5 Drill station assembly #1 actuates the advanced limit switch (LS4), energizing drill motor #1. 6 Drill station assembly #1 actuates the full depth limit switch (LS5), stopping drill station assembly #1, and initiating a threesecond dwell. 7 After the threesecond dwell delay, drill station assembly #1 begins to retract. 8 Drill station assembly #1 retracts past LS4 (LS4 opens), deenergizing drill motor #1. 9 Drill station assembly #1 actuates the returned limit switch (LS3), stopping the assemble, deenergizing CL1, and starting the indexing conveyor to move the part to drill station #2. Steps 4 through 9 are repeated for drill station #2. Now that we understand the working relationship of operations, we can decompose each operation into the following suboperations: indexing conveyor - conveyor index - clamp assembly drill station #1 - drill motor assembly - slide assembly drill station #2 - drill motor assembly - slide assembly Based on the sequence of operation and sketch of the drill machine, we can establish that our suboperations for each operation are fairly simple. Therefore, we can determine states from the second level of decomposition without decomposing further. Figure 4.3 graphically shows the decomposition process for the two-station drill machine. 4-5 Chapter 4 Organizing a Drill Machine Application Figure 4.3 Decomposition Process for Drill Machine Twostation Drill Machine Drill Station #1 Drill motor Slide Drill Station #2 Drill motor Slide Conveyor Index Clamp In the event that you decompose to a level and find that your number of states for each segment becomes unmanageable, we recommend that you decompose the segment to the next level. Defining States for a Drill Machine Segment After decomposing the drill machine into manageable segments, we can define states and transitions for each segment as described in chapter 3. We use the segment of drill station #1 as an example. Figure 4.4 and Figure 4.5 shows drill station #1 and the relay logic diagram for its operation. Refer to Figure 4.1 to see how these segments fit into the overall machine process. 4-6 Chapter 4 Organizing a Drill Machine Application Figure 4.4 Drill Station #1 OFF Cycle AUTO MANUAL FWD Conveyor Motor Not Used Station #1 Advance Assembly Drill Motor LS9 NO Clamp #1 LS1 NC LS3 NO LS5 LS4 NO Held Open Figure 4.5 Relay Logic Diagram of Station #1 CL1 DR1D 14 8 9 10 6 Cycle 15 19 SA1F 11 20 SA1F 8 SA1F 10, 11 SA1M 8 SA1R 12 CL1 14 13 DM1 7 DR1D LS3 14 15 6 LS5 15 LS4 LS1 6 TR1 SA1R 12 DR1D 6, 7, 8, 14, 16 16 DR1D 16 15 TR1 14 17 4-7 Chapter 4 Organizing a Drill Machine Application Defining Inputs and Outputs To define the possible states in station #1, we need to know the inputs and outputs. Inputs for station #1: Physical: returned limit switch (LS3) advanced limit switch (LS4) full depth limit switch (LS5) Logical: advance command return command Outputs for station #1: Physical: station #1 on/off (SAIM) station #1 forward motor (SAIF) station #1 reverse motor (SAIR) drill motor (DM1) Using the formula 2I, we can determine that we have 32 possible states for drill station #1 since we have five inputs (25 = 32). As with the drill motor example in chapter 3, several of the possible states are not practical for this application. Analyzing the Sequence of Operation 4-8 By referring to steps 4 - 9 in the sequence of operation at Table 4.A ,we can logically define states for drill station #1. Table 4.B shows the analysis you must go through to turn steps of the sequence of operation into states. State names appear in all capital letters. Some steps may contain more than one state if more than one input transition changes within that step. Chapter 4 Organizing a Drill Machine Application Table 4.B Analysis of Steps in Sequence of Operation Step (from Figure 4.4) 4 Corresponding States When all motors are off and station #1 is looking for a command, the station is RETURNED AND READY. When station #1 receives the advance command, the station is READY TO ADVANCE. As station #1 moves forward, it deactivates LS3, meaning the station is ADVANCING. 5 Once station #1 actuates LS4, the station is ADVANCED. At this point the drill motor comes on. 6 Station #1 is still moving forward. When station #1 actuates LS5, it stops moving forward, meaning the station is AT FULL DEPTH. The drill motor is still turning. When station #1 receives a return command or has met full depth conditions, it remains in position for three seconds, that is, at FULL DEPTH DWELL, letting the drill clean out any chips remaining in the part. 7 When the timer for the threesecond dwell goes off, station #1 is at FULL DEPTH AND RETURNING. When station #1 retracts past and deactivates LS5, the station is ADVANCED AND RETURNING. 8 When station #1 retracts past and deactivates LS4, the station is RETURNING. 9 Once station #1 actuates LS3, it is back to its original position at RETURNED AND READY. After you have determined all of the normal states from the sequence of operation, you need to determine the error states. For example, once the returned limit switch (LS3) goes on, it should remain on until station #1 returns to its original position after cycling. If LS3 goes off when the advance limit switch (LS4) goes on, then we have an error state. Your state diagrams and state tables should account for all error states that could occur. 4-9 Chapter 4 Organizing a Drill Machine Application Setting up a State Diagram Figure 4.6 shows the state diagram for drill station #1. Figure 4.6 State Diagram for Drill Station #1 1 Returned LS Off Returned & Ready 9 Advance Command On 2 Returning Ready to Advance Advance Command Off Returned LS On Advanced LS Off 8 Adv'd & Returning Return Command On Advance Command Off 11 3 Advancing Stopped Full Depth LS Off 7 FD & turning Timer Off Return Command Off Advance Command On Re 4 Advanced 6 Return Command Off 5 Full Depth Dwell At Full Depth Return Command On 10 Error 4-10 Advanced LS On Full Depth LS On Chapter 4 Organizing a Drill Machine Application Important: In the state diagram, the error step has no transitions leading to or from it. This is because all states except state 11 lead to the error state. The error state in turn leads back to an INITIALIZATION state. The INITIALIZATION state is discussed in the DDMC User’s Manual (publication 6401–6.5.1). We chose to eliminate the transition arcs to the error state to keep the state diagram readable. You may want to do this in similar cases also. Setting up a State Table Table 4.C shows the state table for drill station #1. Table 4.C State Table for Drill Station #1 State Input Description Input Transition Next State Output Description Output Status 1 Returned LS Advanced LS Full Depth LS Advance Command Return Command OFF>ON OFF>ON OFF>ON OFF>ON State 10 State 10 State 10 State 2 Forward Motor Reverse Motor Drill Motor OFF OFF OFF 2 Returned LS Advanced LS Full Depth LS Advance Command Return Command OFF>ON OFF>ON OFF>ON ON>OFF State 3 State 10 State 10 State 1 Forward Motor Reverse Motor Drill Motor ON OFF OFF 3 Returned LS Advanced LS Full Depth LS Advance Command Return Command ON>OFF OFF>ON OFF>ON ON>OFF State 10 State 4 State 10 State 11 Forward Motor Reverse Motor Drill Motor ON OFF OFF 4 Returned LS Advanced LS Full Depth LS Advance Command Return Command ON>OFF ON>OFF OFF>ON ON>OFF State 10 State 10 State 5 State 10 Forward Motor Reverse Motor Drill Motor ON OFF ON 5 Returned LS Advanced LS Full Depth LS Advance Command Return Command ON>OFF ON>OFF ON>OFF State 10 State 10 State 10 Forward Motor Reverse Motor Drill Motor OFF OFF ON OFF>ON State 6 4-11 Chapter 4 Organizing a Drill Machine Application Table 4.C State Table for Drill Station #1 (cont.) State 6 Input Description Input Transition Next State Returned LS Advanced LS Full Depth LS Advance Command Return Command Timer ON>OFF ON>OFF ON>OFF State 10 State 10 State 10 ON>OFF OFF>ON State 5 State 7 Returned LS Advanced LS Full Depth LS Advance Command Return Command ON>OFF ON>OFF ON>OFF State 10 State 10 State 8 ON>OFF State 11 Returned LS Advanced LS Full Depth LS Advance Command Return Command ON>OFF ON>OFF OFF>ON State 10 State 9 State 10 ON>OFF State 11 9 Returned LS Advanced LS Full Depth LS Advance Command Return Command ON>OFF OFF>ON OFF>ON State 1 State 10 State 10 10 Returned LS Advanced LS Full Depth LS Advance Command Return Command 11 Returned LS Advanced LS Full Depth LS Advance Command Return Command 7 8 State 3 State 8 OFF>ON OFF>ON Output Description Output Status Forward Motor Reverse Motor Drill Motor OFF OFF ON Forward Motor Reverse Motor Drill Motor OFF ON ON Forward Motor Reverse Motor Drill Motor OFF ON OFF Forward Motor Reverse Motor Drill Motor OFF ON OFF Forward Motor Reverse Motor Drill Motor OFF OFF OFF Forward Motor Reverse Motor Drill Motor OFF OFF OFF Once you have defined states and transitions for one segment of your state application, you can do the same for each of the other segments you want to program with state logic. 4-12 Chapter 4 Organizing a Drill Machine Application Assigning I/O Before you can develop your program, you must assign addresses to your inputs and outputs. I/O module assignments are the same regardless of the control method used. Addresses are entered onto rungs on the ladder program and into the I/O definition screen in the SDS instruction. Addressing The PLC-5 processor can address its I/O in 2-slot, 1-slot, and 1/2-slot groups. Refer to PLC-5 Family Programmable Controllers Installation Manual (publication 1785-6.6.1) for information on how to address your hardware. Refer to PLC-5 Programming Software Documentation Set (publication 6200-N8.001) or PLC-5/250 Programming Software Documentation Set (publication 6200-N8.002) for information on formatting I/O addresses. As you program, you will want to have addresses, descriptions, and symbolic names of I/O accessible. (Symbolic names can be up to 10 characters long in 6200 series software.) Figure 4.7 and Figure 4.8 shows Worksheet 1 and Worksheet 2 — I/O Data Worksheets for the two-station drill machine. Outputs are listed on the first worksheet; inputs are on the second worksheet. 4-13 Chapter 4 Organizing a Drill Machine Application Figure 4.7 I/O Data Worksheet for Twostation Drill Machine Outputs RACK ADDRESS GROUPING PROJECT NAME Twostation drill machine 4-14 MODULE GROUP 0 0 PAGE 1 OF 2 DATE DESIGNER Address Symbolic Name Description 00 CLAMP 2 CLAMP #2 (CL2) 01 SAIR CYC STATION # ONE REVERSE (SAIR) 02 DRILLMTR1 DRILL MOTOR # ONE (DM1) 03 SAIM CYC STATION # ONE ON (SAIM) 04 SAIF CYC STATION # ONE FORWARD (SAIF) 05 CLAMP 1 CLAMP # ONE (CL1) 06 C FORWARD CONVEYOR MOTOR FORWARD (CMF) 07 CONV MTR CONVEYOR MOTOR ON (CMM) 10 SA2F CYC STATION # TWO FORWARD (SA2F) 11 ADVCOMD2 STATION # TWO ON (SA2M) 12 DRILLMTR2 DRILL MOTOR # TWO (DM2) 13 REVMTR2 STATION # TWO REVERSE (SA2R) Chapter 4 Organizing a Drill Machine Application Figure 4.8 I/O Data Worksheet for Twostation Drill Machine RACK ADDRESS GROUPING PROJECT NAME Twostation drill machine Address MODULE GROUP 1 0 PAGE 2 OF 2 DATE DESIGNER Symbolic Name Description LS2 LIMIT SWITCH # 2 N/O (LS2) 03 RET LS6 LIMIT SWITCH # 6 N/C (LS6) 04 LS1 LIMIT SWITCH # 1 N/O 05 CYCLE PUSH BUTTON 06 AUTO POSITION # 1 07 MANUAL POSITION # 3 10 ADV LS7 LIMIT SWITCH # 7 N/O (LS7) 11 FD2 LS8 LIMIT SWITCH # 8 N/O (LS6) 14 FD LS5 LIMIT SWITCH # 5 N/O (LS5) 15 ADV LS4 LIMIT SWITCH # 4 N/O (LS4) 16 RET LS3 LIMIT SWITCH # 3 N/C (LS3) 00 01 02 12 13 4-15 Chapter 4 Organizing a Drill Machine Application Combining the SDS Instruction with Ladder Logic By combining the SDS instruction with ladder logic, you can develop an effective application program in less time while increasing your machine’s diagnostic capabilities. For example, suppose you have a machine that operates in two modes — automatic and manual. You would need two SDS instructions to account for the operation in each mode. By keeping the auto/manual permissive in the ladder program, you need only one SDS instruction. You can optimize your programming, if you use the SDS instruction for: outputs to be controlled inputs or signals you want to diagnose devices that provide feedback “what” information and use ladder logic for: serial permissives combinatorial logic “why” and “when” information For example, in our drill machine example, we will not develop state logic for the clamp because we do not receive feedback from the clamp to determine if it closed properly. (In most “real-world” examples there would be an input to make this determination.) 4-16 Chapter 4 Organizing a Drill Machine Application Using the SDS Instruction In DDMC, state logic resides in ladder logic in the form of an SDS instruction. Within this one instruction is all of the logic from the state diagram and state tables described earlier. The SDS instruction is very powerful; in the PLC-5/250 processor it can contain up to 255 states (or steps). In the PLC-5 processor, the instruction can contain 76 steps with 8 inputs, 45 steps with 16 inputs, or 23 steps with 32 inputs. You determine the number of states per SDS instruction through the decomposition process. (In our two-station drill machine example, we defined 11 states.) Each diagnostic segment derived from the decomposition process has its own SDS instruction on a rung of ladder logic. Each SDS instruction contains screens for entering the I/O, states, and transitions from the state diagram and state table. Refer to the DDMC User’s Manual (publication 6401–6.5.1) for more information on the instruction’s configuration screens. Figure 4.9 shows the state configuration for station #1 of the two-station drill machine in a step description worksheet. The SDS instruction uses the term “step” to refer to states. For example, in our drill machine example we have 11 steps. We have provided blank worksheets in appendix B if you would like to use them when configuring your instructions. 4-17 Chapter 4 Organizing a Drill Machine Application Figure 4.9 Step DescriptionWorksheet for Station #1 of the Drill Machine STEP Returned & Ready No Input ID Equation sec. STEP Destination MESSAGES: ON / OFF No Output ID State 1 Returned LS OFF>ON STEP 10 1 Forward Motor OFF 2 Advanced LS OFF>ON STEP 10 2 Reverse Motor OFF 3 Full Depth LS OFF>ON STEP 10 3 Drill Motor OFF 4 Advance Command OFF>ON STEP 4 5 Return Command 2 STEP 5 6 STEP 6 7 STEP 7 8 STEP 8 9 STEP 9 10 STEP 10 11 STEP 11 12 STEP 12 STEP Ready to Advance No 4-18 TIMER 0.00 Input ID TIMER 20.00 Equation sec. STEP Destination 10 No MESSAGES: ON / OFF Output ID State 1 Returned LS OFF>ON STEP 3 1 Forward Motor ON 2 Advanced LS OFF>ON STEP 10 2 Reverse Motor OFF 3 Full Depth LS OFF>ON STEP 10 3 Drill Motor OFF 4 Advance Command ON>OFF STEP 4 5 Return Command 1 STEP 5 6 STEP 6 7 STEP 7 8 STEP 8 9 STEP 9 10 STEP 10 11 STEP 11 12 STEP 12 Chapter 4 Organizing a Drill Machine Application Integrating the SDS Instruction with Ladder Logic Figure 4.10 shows a ladder program for the two-station drill machine. We have incorporated the state logic we developed for drill station #1 in the SDS instruction at rung 2.7. As previously mentioned, the clamps have been kept in ladder logic only because they do not contain feedback sensors to say we are clamped, preventing us from diagnosing a fault. As a contrast, we kept the entire control for drill station #2 in ladder logic, even though it and drill station #1 are identical. We did this so that you could see the manipulations made in the ladder program to accommodate the SDS instruction. Figure 4.10 Ladder Program for Twostation Drill Machine 4-19 Chapter 4 Organizing a Drill Machine Application Figure 4.10 Ladder Program for Twostation Drill Machine (continued) 4-20 Chapter 4 Organizing a Drill Machine Application Figure 4.10 Ladder Program for Twostation Drill Machine (continued) 4-21 Chapter 4 Organizing a Drill Machine Application Summary 4-22 In this chapter we showed you how to decompose a machine into manageable segments so that you could set up a state application. We also took one segment created by decomposition and defined states and transitions with a state diagram and state table. Read chapter 5 to see how to apply DDMC, specifically the SDS instruction, to a larger application that uses state transition logic. Chapter 5 Organizing a Transfer Line Application Chapter Objectives Read this chapter to see how state transitional logic is applied to a transfer line. In this chapter, we: decompose the transfer line into manageable segments implement state control with ladder logic show methods of determining the number of SDS instructions develop a state diagram and state table for each SDS instruction Decomposing the Transfer Line A transfer line is composed of several smaller assemblies. Seting up a state application for such a large system requires the decomposition process. When decomposing the transfer line, you want to break the line down into manageable segments. By using the methods previously described, you can decompose level by level until you achieve segments that are manageable. Figure 5.1 shows a block diagram of the transfer line where each block represents a station. We use this block diagram to visualize the complexity of the transfer line so we can decompose it. 5-1 Chapter 5 Organizing a Transfer Line Application Figure 5.1 Transfer Line Block Diagram R.H. LOADING STATION 1 2 3 L.H. PRESS STATION 4 L.H. PRESS STATION 5 R.H. PRESS STATION 6 R.H. PRESS STATION 7 8 9 L.H. PROBE GAUGE R.H. BORE & REAM 10 L.H. SLIDE R.H PROBE/GAUGE 11 R.H. EJECT STATION 12 13 R.H. CNC STATION 14 L.H. CNC STATION 15 16 R.H MILLING STATION L.H. EJECT STATION 17 18 19 20 L.H. MILLING STATION 21 22 R.H. STAMPING STATION 23 24 R.H. UNLOADING 25 Decomposing to the Second Level (Stations) In a transfer line application, decomposing to the second level requires dividing the system along physical lines. By looking at the block diagram (Figure 5.1), we see transfer and clamping mechanisms and a series of stations. Therefore, we can decompose the line into 27 separate stations — the 25 stations on the line, the transfer mechanism, and the clamping mechanism. 5-2 Chapter 5 Organizing a Transfer Line Application Decomposing to the Third Level (Operations) Once you have determined the second level of decomposition (stations), you must decompose each of the stations to the next level (in this case, operations). We have selected station 10 (R.H. line bore and ream/L.H. slide station) to decompose to operations. At this point we want to look at the subassemblies that make up station 10. If the subassemblies require further breakdown, we will continue the decomposition process. Several operations are performed at station 10. The subassemblies performing these operations are: clamp/lower/lock line bore feed reamer feed slide index table slide feed Because each subassembly contains several components, we want to continue decomposing to determine manageable segments. Decomposing to the Fourth Level (Motions) From station 10, we have selected the slide to decompose into motions. To decompose the slide, we must look very closely at the motions the slide components make through their sequence of operation. Figure 5.2 shows the physical arrangement of the slide’s devices. 5-3 Chapter 5 Organizing a Transfer Line Application Figure 5.2 Slide Representation Drill Planetary Gear Assy. With Rapid Adv. (A)/Ret(R) & Feed (B) Motors Drill Motor Slide (K) with Ballnut (J) Torqued Limit Switch (Q) Ball Screw (I) Advanced Feed Advance L.S. (N) Returned Limit Switch (S) Limit Switch (P) 17639 The slide’s devices are fairly simple with the exception of the sun/planetary gearbox. Figure 5.3 shows mechanical drawings detailing slide’s devices and their movement. Figure 5.3 Slide Mechanical Drawings Energize DC Coils Gear on the surface of the Gear Cage driven by Feed Motor Worm Gear (L) CP SP PP Planetary Gear (D) Planetary Gear Cage (M) Platen for Drive Motor (ref. only) Output Sun Gear (H) Slide (K) Ball Screw (I) Planetary Gear (G) Spring Return Input Sun Gear (C) Vbelt Ball Nut (J) End View of Feed Motor Worm Gear (Feed Motor (B), Sheaves, Vbelts, and Brake (O) not shown in this view.) Rapid Advance (A) and Rapid Return (R) Motor Sheave 5-4 17638 Chapter 5 Organizing a Transfer Line Application Figure 5.4 Slide Mechanical Drawings (continued) Sheave Feed Advance Motor DG Planetary Gear Cage Assembly (end view) Vbelt Sheave Feed Advance Worm Gear 17637 To detail the slide further, we need to get an overview of its operation (Table 5.A). Reference letters from components in Figure 5.2 and Figure 5.3 are shown in parentheses. Table 5.A Overview of Slide Operations Type of Operation Step System Initialization 1 Turn on the rapid advance motor (A). 2 Turn on the feed motor (B). 1 When the rapid advance motor (A) is turned on, the input sun gear (C) turns the planetary gears (DG). 2 The planetary gears (DG) turn the output sun gear (H). 3 The output sun gear (H) turns the ball screw (I). 4 The ball screw (I) moves the ball nut (J) forward. 5 The slide (K) is then carried forward by the ball nut (J). 6 When the feed motor (B) is turned on, the feed motor (B) drives the worm gear (L). 7 The worm gear (L) then drives the surfaces of the gearbox cage (M). This affects the slide (K) speed. Sequence of Operation Description 5-5 Chapter 5 Organizing a Transfer Line Application Table 5.A Overview of Slide Operations (continued) Type of Operation Step Description 8 In about 8 seconds, the feed limit switch (N) is activated, deenergizing the rapid motor (A) and engaging the brake (O). 9 When the brake (O) is engaged, the input sun gear (C) locks up. 10 The slide (K) speed is reduced to the feed rate as the feed motor (B) is still spinning the gearbox cage (M). 11 This actuates the advanced limit switch (P) in about 8 seconds. 12 When the slide (K) advances to a mechanical stop, a torque spring actuates a piston operated limit switch (Q) in about 1 second. 13 When the feed motor (B) is turned off, there is a short dwell time of about one second to ensure that the drilling is complete. 14 When the rapid return motor (R) is turned on, the effect of driving the gearbox cage (M) backward against the worm gear (L) locks up the cage. 15 The rapid return then occurs at the rapid rate, actuating the returned limit switch (S), about 2 seconds later. 16 This turns the rapid return motor (R) off. Based on the methodology presented in chapter 3 and recalling examples, we can: associate states with different movements from the sequence of operation. decompose the slide into the following movements: - brake engage brake disengage rapid advance slide rapid return slide feed advance slide We stop our decomposition at this point and set up our state application from this level. 5-6 Chapter 5 Organizing a Transfer Line Application Detailing the I/O To determine states for our example, we need to know the physical and logical inputs and outputs controlling the operation of the slide. (Refer to Figure 5.3 for locations of devices.) The physical inputs or sensors needed by the state logic (to sense the motion, position, states, or conditions of the devices) are: brake contactor energized feed motor started energized rapid advance motor started energized rapid return motor started energized returned position limit switch advanced position limit switch feed position limit switch torqued limit switch rapid advance/return motor overloads feed motor overloads The logical input requests (internal ladder logic or other SDS instructions) to the state logic are: brake release request feed request rapid return request rapid advance request reset overloads request The physical outputs used by the state logic to control the output devices are: brake release command feed advance command rapid advance command rapid return command The logical output indications (internal ladder logic) needed by the state logic to synchronize with other state and ladder logic are: brake release indication advanced indication returned indication in feed area indication overloads okay indication 5-7 Chapter 5 Organizing a Transfer Line Application Organizing the Logic To reduce complexity and programming time, evaluate which logic is handled best in ladder programming and which works best in state programming before setting up your SDS instructions. Associating Motions with SDS Instructions With larger applications that require decomposing to the motion level, you may want to associate the physical movements with SDS instructions. This lets you determine how many instructions you need to achieve a manageable number of states per instruction. You can do this by: 5-8 1. sketching a sample SDS block of the operation 2. breaking the block into multiple SDS instructions 3. picking one view to develop into SDS instruction Chapter 5 Organizing a Transfer Line Application Sketching a Sample SDS Block Table 5.B shows the sample single SDS block with all physical and logical inputs and outputs. Using the large block as one SDS instruction, we have 215 = 32,786 possible states. Because this is too complex to handle as one SDS instruction, we want to decompose the large block into smaller blocks with fewer possible states. Table 5.B Sample SDS Block of the Operation 15 Inputs and 9 Outputs Inputs Outputs 1. brake contactor energized 1. brake release indication 2. brake release request 2. brake release command 3. feed motor starter energized 3. feed advance command 4. rapid return motor starter energized 4. rapid return command 5. returned position limit switch 5. returned indication 6. advanced position limit switch 6. advanced indication 7. torqued limit switch 8. feed request 9. rapid return request 10 rapid advance motor starter energized 7. rapid advance command 11. feed position limit switch 8. in feed area indication 12. rapid advance request 13. rapid advance/return motor overloads 9. overload okay indication 14. feed motor overload 15. reset overload request 5-9 Chapter 5 Organizing a Transfer Line Application Table 5.C shows the SDS block decomposed into two motions: brake engage advance/return By decreasing the number of inputs in each section of the block, we have simplified our SDS instructions. Table 5.C View # 1 of SDS Block Brake Engage, Advance/Return Inputs Outputs 1. brake contactor energized 1. brake release indication 2. brake release request 2. brake release command 3. feed motor starter energized 3. feed advance command 4. rapid return motor starter energized 4. rapid return command 5. returned position limit switch 5. returned indication 6. advanced position limit switch 6. advanced indication 7. torqued limit switch 8. feed request 9. rapid return request 10 rapid advance motor starter energized 7. rapid advance command 11. feed position limit switch 8. in feed area indication 12. rapid advance request 13. rapid advance/return motor overloads 14. feed motor overload 15. reset overload request 5-10 9. overload okay indication Chapter 5 Organizing a Transfer Line Application Table 5.D shows the SDS block decomposed into three motions: brake engage feed rapid advance/rapid return By further reducing the inputs in each segment, we continue to simplify the SDS instructions. Table 5.D View # 2 of SDS Block Brake Engage, Feed, Rapid Advance/Rapid Return Inputs Outputs 1. brake contactor energized 1. brake release indication 2. brake release request 2. brake release command 3. feed motor starter energized 3. feed advance command 5. returned position limit switch 5. returned indication 6. advanced position limit switch 6. advanced indication 7. torqued limit switch 8. feed request 14. feed motor overload 15. reset overload request 9. overload okay indication 4. rapid return motor starter energized 4. rapid return command 5. returned position limit switch 5. returned indication 9. rapid return request 10 rapid advance motor starter energized 7. rapid advance command 11. feed position limit switch 8. in feed area indication 12. rapid advance request 13. rapid advance/return motor overloads 5-11 Chapter 5 Organizing a Transfer Line Application Table 5.E shows the SDS block decomposed to three motions, different from those shown in view #2: brake engage feed advance/rapid return rapid advance View #3 looks beyond the physical device at the optimum motion pair. (The order of inputs and outputs has been changed from view #2.) Table 5.E View # 3 of SDS Block Brake Engage, Feed Advance/Rapid Return, Rapid Advance Inputs Outputs 1. brake contactor energized 1. brake release indication 2. brake release request 2. brake release command 3. feed motor starter energized 3. feed advance command 4. rapid return motor starter energized 4. rapid return command 5. returned position limit switch 5. returned indication 6. advanced position limit switch 6. advanced indication 7. torqued limit switch 8. feed request 13. rapid advance/return motor overloads 9. rapid return request 10 rapid advance motor starter energized 7. rapid advance command 11. feed position limit switch 8. in feed area indication 12. rapid advance request 13. rapid advance/return motor overloads 14. feed motor overload 15. reset overload request 5-12 9. overload okay indication Chapter 5 Organizing a Transfer Line Application Table 5.F decomposes the SDS block into four motions based on view #3: brake engage feed advance/rapid return rapid advance motor overload This approach reduces the complexity of the SDS instruction in view #3. Table 5.F iVew # 4 of SDS Block Brake Engage, Feed Advance/Rapid Return, Rapid Advance, and Motor Overloads Inputs Outputs 1. brake contactor energized 1. brake release indication 2. brake release request 2. brake release command 3. feed motor starter energized 3. feed advance command 4. rapid return motor starter energized 4. rapid return command 5. returned position limit switch 5. returned indication 6. advanced position limit switch 6. advanced indication 7. torqued limit switch 8. feed request 9. rapid return request 10 rapid advance motor starter energized 7. rapid advance command 11. feed position limit switch 8. in feed area indication 12. rapid advance request 13. rapid advance/return motor overloads 9. overload okay indication 14. feed motor overload 15. reset overload request Important: When using the approach at #4, be certain that the desired coupling between the control and the diagnostics is not lost. Table 5.G shows the estimated number of normal states for the views shown in Table 5.B through Table 5.F. Table 5.H contrasts Table 5.G with the number of possible states for each view. 5-13 Chapter 5 Organizing a Transfer Line Application Table 5.G Number of Normal States for Each View View SDS #1 SDS#2 SDS#3 SDS#4 Big block 50 View #1 4 48 View #2 4 20 25 View #3 4 25 33 View #4 4 25 8 1 SDS#3 SDS#4 Table 5.H Number of Possible States for Each View View SDS #1 SDS#2 Big block 32,768 View #1 4 8192 View #2 4 128 128 View #3 4 128 128 View #4 4 128 8 2 After evaluating the complexity of each view, we pick the most feasible view, that is, the one with the fewest inputs per SDS, and develop state diagrams and state tables. From Table 5.G, view #4 looks like the best choice since it has 38 total states (compared to 50, 52, 49, and 62 from the other views). From Table 5.H, view #4 is the clear choice when considering the total number of states that we must investigate when setting up a state application. (View #4 has 142 possible states while the others have 32,768, 8196, 260, and 260.) Developing State Diagrams and State Tables View #4 provided us with the most manageable segments for setting up a state application. In this section, we set up a state diagram and state tables for each of the four segments that become our SDS instructions. The four segments are: brake feed advance/rapid return rapid advance motor overload 5-14 Chapter 5 Organizing a Transfer Line Application SDS #1 (Brake) The brake has two inputs and two outputs. They are: Inputs: - brake contactor energized - brake release request Outputs: - brake release indication - brake release command Figure 5.5 shows the state diagram for the brake. Table 5.I shows the state table for the brake. Figure 5.5 State diagram for SDS #1 (Brake) Release Req. & Brake Contactor Energized Off 1 0 Initialization Step Release Req. On Release Req. Off Brake Holding & Collapsed Brake Contactor Energized On 5 Brake Contactor Energized Off Timer On Brake Error 4 Brake Collapsing Timer Off Timer On 2 Brake Releasing Brake Contactor Energized Off Brake Contactor Energized On Release Req. Off 3 Release Req. On Brake Released 5-15 Chapter 5 Organizing a Transfer Line Application Table 5.I State Table for SDS #1 (Brake) State Input Description Input Transition Next State Output Description Output Status 1 Release Request Brake Con. Energized OFF>ON OFF>ON State 2 State 5 Release Command Released Indication OFF OFF 2 Release Request Brake Con. Energized Timer (2 seconds) ON>OFF OFF>ON ON>OFF State 1 State 3 State 5 Release Command Released Indication ON OFF 3 Release Request Brake Con. Energized ON>OFF ON>OFF State 4 State 5 Release Command Released Indication ON ON 4 Release Request Brake Con. Energized Timer (2 seconds) OFF>ON ON>OF OFF>ON State 3 State 1 State 5 Release Command Released Indication OFF ON 5 Release Request Brake Con. Energized Timer (2 seconds) Release Command Released Indication OFF OFF OFF>ON State 0 SDS #2 (Feed Advance/Rapid Return) The feed advance/rapid return has seven inputs and four outputs. They are: Inputs: - feed motor starter confirmation rapid return motor starter confirmation returned position limit switch advanced position limit switch torqued limit switch feed request rapid return request Outputs: - advanced indication returned indication feed advance command rapid return command Figure 5.6 shows the state diagram for the feed advance/rapid return. Table 5.J shows the state table for the feed advance/rapid return. 5-16 Chapter 5 Organizing a Transfer Line Application Figure 5.6 State Diagram for SDS #2 (Feed Advance/Rapid Return) Returning Off 1 12 Feed Req. On Slide Returned Slide Returning Interlock Removed 2 Returned LS On Returned LS On 11 13 Slide Coast Returning Between Returned & Advanced LS Return Req. Off Slide Returning Between Returned & Advanced LS Feeding Off 18 Return Req. On Slide Returned and Feeding Feed Req. Off 19 Slide Stopped Between Returned & Advanced LS Returning Off 21 Slide Rapid Return Motor Restarted at Advanced LS Advanced LS Off Feeding Off 10 Slide Rapid Return Motor Restarted Between Return & Advanced LS Advanced LS Off Torqued LS Off Feed Req. On Slide Returning Interlocked Return Req. On Return Req. On 20 16 Slide Coast Returning at Torqued LS Return Req. Off 4 Slide Stopped at Advanced LS Slide Feeding Between Returned & Advanced LS Advanced LS On 15 Slide Coast Feeding at Advanced LS Return Req. Off Returning Off 9 Returned LS Off Feeding On Feed Req. Off In Feeding On Advanced LS On Slide Feed Motor Restarted at Advanced LS Return Req. On 24 Return Req. Off 14 Slide Coast Feeding Between Returned & Advanced LS 22 Slide Coast Returning at Advanced LS Slide Returning at Advanced LS Slide Feed terlocked Return Req. Off Returning On 17 Return Req. On 3 Feed Req. On Slide Feed Motor Restarted between Returned & Advanced LS 23 Returning On Feed Req. Off Feed Req. On Feed Req. Off Advanced LS Off Feeding On Slide Coast Feeding at Returned LS Feed Req. Off 5 Feeding Off Feed Req. On Slide Feeding at Advanced LS Torqued LS On Torqued LS On Returning On 8 Return Req. Off Slide Returning at Torqued LS From All States 25 ERROR Slide Advanced at Torqued LS 7 Slide Feed Interlock Removal Return Req. On Slide Error 6 Returning Off Feeding Off 0 Initialization To All States 5-17 Chapter 5 Organizing a Transfer Line Application Table 5.J State Table for SDS #2 (Feed Advance/Rapid Return) State 1 5-18 Input Description Input Transition Next State Feed Request Return Request Returned LS Advanced LS Torqued LS Feed Motor Starter Return Motor Starter OFF>ON State 2 ON>OFF OFF>ON OFF>ON OFF>ON OFF>ON State 5 State 25 State 25 State 25 State 25 2 Feed Request Return Request Returned LS Advanced LS Torqued LS Feed Motor Starter Return Motor Starter ON>OFF OFF>ON ON>OFF OFF>ON OFF>ON OFF>ON OFF>ON 3 Feed Request Return Request Returned LS Advanced LS Torqued LS Feed Motor Starter Return Motor Starter 4 Output Description Output Status Feed Adv. Command Rap. Ret. Command Advanced Indication Returned Indication OFF OFF OFF ON State 1 State 25 State 25 State 25 State 25 State 3 State 25 Feed Adv. Command Rap. Ret. Command Advanced Indication Returned Indication ON OFF OFF ON ON>OFF OFF>ON ON>OFF OFF>ON OFF>ON ON>OFF OFF>ON State 13 State 25 State 4 State 25 State 25 State 25 State 25 Feed Adv. Command Rap. Ret. Command Advanced Indication Returned Indication ON OFF OFF ON Feed Request Return Request Returned LS Advanced LS Torqued LS Feed Motor Starter Return Motor Starter ON>OFF OFF>ON OFF>ON OFF>ON OFF>ON ON>OFF State 14 State 25 State 25 State 5 State 25 State 25 Feed Adv. Command Rap. Ret. Command Advanced Indication Returned Indication ON OFF OFF OFF 5 Feed Request Return Request Returned LS Advanced LS Torqued LS Feed Motor Starter Return Motor Starter ON>OFF OFF>ON OFF>ON ON>OFF OFF>ON ON>OFF OFF>ON State 15 State 25 State 25 State 25 State 6 State 25 State 25 Feed Adv. Command Rap. Ret. Command Advanced Indication Returned Indication ON OFF OFF OFF 6 Feed Request Return Request Returned LS Advanced LS Torqued LS Feed Motor Starter Return Motor Starter OFF>ON OFF>ON ON>OFF ON>OFF ON>OFF OFF>ON State 1 State 25 State 25 State 25 State 7 State 25 Feed Adv. Command Rap. Ret. Command Advanced Indication Returned Indication OFF OFF ON OFF Chapter 5 Organizing a Transfer Line Application Table 5.J State Table for SDS #2 (Feed Advance/Rapid Return) (cont.) State Input Description Input Transition Next State Output Description Output Status 7 Feed Request Return Request Returned LS Advanced LS Torqued LS Feed Motor Starter Return Motor Starter OFF>ON OFF>ON OFF>ON ON>OFF ON>OFF OFF>ON OFF>ON State 25 State 8 State 25 State 25 State 25 State 25 State 25 Feed Adv. Command Rap. Ret. Command Advanced Indication Returned Indication OFF OFF ON OFF 8 Feed Request Return Request Returned LS Advanced LS Torqued LS Feed Motor Starter Return Motor Starter OFF>ON ON>OFF OFF>ON ON>OFF ON>OFF OFF>ON OFF>ON State 25 State 7 State 25 State 25 State 25 State 25 State 9 Feed Adv. Command Rap. Ret. Command Advanced Indication Returned Indication OFF ON ON OFF 9 Feed Request Return Request Returned LS Advanced LS Torqued LS Feed Motor Starter Return Motor Starter OFF>ON ON>OFF OFF>ON ON>OFF ON>OFF OFF>ON ON>OFF State 25 State 18 State 25 State 25 State 10 State 25 State 25 Feed Adv. Command Rap. Ret. Command Advanced Indication Returned Indication OFF ON ON OFF 10 Feed Request Return Request Returned LS Advanced LS Torqued LS Feed Motor Starter Return Motor Starter OFF>ON ON>OFF OFF>ON ON>OFF OFF>ON OFF>ON ON>OFF State 25 State 17 State 25 State 11 State 25 State 25 State 25 Feed Adv. Command Rap. Ret. Command Advanced Indication Returned Indication OFF ON ON OFF 11 Feed Request Return Request Returned LS Advanced LS Torqued LS Feed Motor Starter Return Motor Starter OFF>ON ON>OFF OFF>ON OFF>ON OFF>ON OFF>ON ON>OFF State 25 State 18 State 12 State 25 State 25 State 25 State 25 Feed Adv. Command Rap. Ret. Command Advanced Indication Returned Indication OFF ON OFF OFF 12 Feed Request Return Request Returned LS Advanced LS Torqued LS Feed Motor Starter Return Motor Starter OFF>ON State 25 ON>OFF OFF>ON OFF>ON OFF>ON ON>OFF State 25 State 25 State 25 State 25 State 1 Feed Adv. Command Rap. Ret. Command Advanced Indication Returned Indication OFF OFF OFF ON 5-19 Chapter 5 Organizing a Transfer Line Application Table 5.J State Table for SDS #2 (Feed Advance/Rapid Return) (cont.) State 5-20 Input Description Input Transition Next State Output Description Output Status 13 Feed Request Return Request Returned LS Advanced LS Torqued LS Feed Motor Starter Return Motor Starter OFF>ON OFF>ON ON>OFF OFF>ON OFF>ON ON>OFF OFF>ON State 3 State 25 State 14 State 25 State 25 State 1 State 25 Feed Adv. Command Rap. Ret. Command Advanced Indication Returned Indication OFF OFF OFF ON 14 Feed Request Return Request Returned LS Advanced LS Torqued LS Feed Motor Starter Return Motor Starter OFF>ON OFF>ON OFF>ON OFF>ON OFF>ON ON>OFF OFF>ON State 4 State 25 State 25 State 15 State 25 State 19 State 25 Feed Adv. Command Rap. Ret. Command Advanced Indication Returned Indication OFF OFF OFF OFF 15 Feed Request Return Request Returned LS Advanced LS Torqued LS Feed Motor Starter Return Motor Starter OFF>ON OFF>ON OFF>ON ON>OFF OFF>ON ON>OFF OFF>ON State 5 State 25 State 25 State 25 State 6 State 20 State 25 Feed Adv. Command Rap. Ret. Command Advanced Indication Returned Indication OFF OFF OFF ON 16 Feed Request Return Request Returned LS Advanced LS Torqued LS Feed Motor Starter Return Motor Starter OFF>ON OFF>ON OFF>ON OFF>ON ON>OFF State 25 State 9 State 25 State 25 State 17 Feed Adv. Command Rap. Ret. Command Advanced Indication Returned Indication OFF OFF ON OFF ON>OFF State 6 17 Feed Request Return Request Returned LS Advanced LS Torqued LS Feed Motor Starter Return Motor Starter OFF>ON OFF>ON OFF>ON ON>OFF OFF>ON OFF>ON ON>OFF State 25 State 10 State 25 State 18 State 25 State 25 State 20 Feed Adv. Command Rap. Ret. Command Advanced Indication Returned Indication OFF OFF OFF OFF 18 Feed Request Return Request Returned LS Advanced LS Torqued LS Feed Motor Starter Return Motor Starter OFF>ON OFF>ON OFF>ON OFF>ON OFF>ON OFF>ON ON>OFF State 25 State 11 State 12 State 25 State 25 State 25 State 19 Feed Adv. Command Rap. Ret. Command Advanced Indication Returned Indication OFF OFF OFF OFF Chapter 5 Organizing a Transfer Line Application Table 5.J State Table for SDS #2 (Feed Advance/Rapid Return) (cont.) State Input Description Input Transition Next State Output Description Output Status 19 Feed Request Return Request Returned LS Advanced LS Torqued LS Feed Motor Starter Return Motor Starter OFF>ON OFF>ON OFF>ON OFF>ON OFF>ON OFF>ON OFF>ON State 21 State 24 State 25 State 25 State 25 State 25 State 25 State 25 Feed Adv. Command Rap. Ret. Command Advanced Indication Returned Indication OFF OFF OFF OFF 20 Feed Request Return Request Returned LS Advanced LS Torqued LS Feed Motor Starter Return Motor Starter OFF>ON OFF>ON OFF>ON ON>OFF OFF>ON OFF>ON OFF>ON State 22 State 23 State 25 State 25 State 25 State 25 State 25 Feed Adv. Command Rap. Ret. Command Advanced Indication Returned Indication OFF OFF OFF OFF 21 Feed Request Return Request Returned LS Advanced LS Torqued LS Feed Motor Starter Return Motor Starter ON>OFF OFF>ON OFF>ON OFF>ON OFF>ON OFF>ON OFF>ON State 19 State 25 State 25 State 25 State 25 State 4 State 25 Feed Adv. Command Rap. Ret. Command Advanced Indication Returned Indication ON OFF OFF OFF 22 Feed Request Return Request Returned LS Advanced LS Torqued LS Feed Motor Starter Return Motor Starter ON>OFF OFF>ON OFF>ON ON>OFF OFF>ON OFF>ON OFF>ON State 20 State 25 State 25 State 25 State 25 State 5 State 25 Feed Adv. Command Rap. Ret. Command Advanced Indication Returned Indication ON OFF OFF OFF 23 Feed Request Return Request Returned LS Advanced LS Torqued LS Feed Motor Starter Return Motor Starter OFF>ON ON>OFF OFF>ON ON>OFF OFF>ON OFF>ON OFF>ON State 25 State 20 State 25 State 25 State 25 State 25 State 10 Feed Adv. Command Rap. Ret. Command Advanced Indication Returned Indication OFF ON OFF OFF 24 Feed Request Return Request Returned LS Advanced LS Torqued LS Feed Motor Starter Return Motor Starter OFF>ON ON>OFF OFF>ON OFF>ON OFF>ON OFF>ON OFF>ON State 25 State 19 State 25 State 25 State 25 State 25 State 11 Feed Adv. Command Rap. Ret. Command Advanced Indication Returned Indication OFF ON OFF OFF 5-21 Chapter 5 Organizing a Transfer Line Application Table 5.J State Table for SDS #2 (Feed Advance/Rapid Return) (cont.) State 25 Input Description Feed Request Return Request Returned LS Advanced LS Torqued LS Feed Motor Starter Return Motor Starter Input Transition Next State Output Description Feed Adv. Command Rap. Ret. Command Advanced Indication Returned Indication OFF>ON Output Status OFF OFF OFF OFF State 0 SDS #3 (Rapid Advance) The rapid advance has four inputs and two outputs. They are: Inputs: - rapid advance motor starter confirmation feed position limit switch rapid return request rapid advance request Outputs: - in feed area indication - rapid advance command Figure 5.7 shows the state diagram for the rapid advance. Table 5.K shows the state table for the rapid advance. 5-22 Chapter 5 Organizing a Transfer Line Application Figure 5.7 State Diagram for SDS #3 (Rapid Advance) 0 Initialization Step 1 2 Advance Req. Off Advance Req. On Advance MS On Advance MS Off R/A Advancing & Not in Feed Area Timer On R/A Off Between Feed & Return Advance MS On 3 Return Req. On R/A Motor Confirmed Advance MS Off Rapid Advance Error Advance Req. On Feed LS Off Feed LS On 8 Return Req. On R/A Off Between Feed & Return Advance Req. Off Advance MS On Feed LS On Advance Req. On 7 Return Req. On Feed LS On Advance MS On Advance Req. On 6 4 Feed LS Off R/A Off & OK for Feed Off R/A Motor Not Confirmed at Feed Return Req. Off Return Req. On 5 R/A Off at Feed LS Advance MS Off 5-23 Chapter 5 Organizing a Transfer Line Application Table 5.K State Table for SDS #3 (Rapid Advance) State 5-24 Input Description Input Transition Next State Output Description Output Status 1 Advance Request Return Request Feed LS Advance Motor Starter OFF>ON OFF>ON OFF>ON OFF>ON State 2 State 8 State 8 State Advance Command In Feed Area Ind. OFF OFF 2 Advance Request Return Request Feed LS Advance Motor Starter ON>OFF OFF>ON OFF>ON OFF>ON State 1 State 8 State 8 State 3 Advance Command In Feed Area Ind. ON OFF 3 Advance Request Return Request Feed LS Advance Motor Starter ON>OFF OFF>ON OFF>ON ON>OFF Advance Command In Feed Area Ind. ON OFF 4 Advance Request Return Request Feed LS Advance Motor Starter Advance Command In Feed Area Ind. OFF ON OFF>ON State 8 ON>OFF State 5 5 Advance Request Return Request Feed LS Advance Motor Starter OFF>ON OFF>ON ON>OFF OFF>ON State 8 State 6 State 8 State 8 Advance Command In Feed Area Ind. OFF ON 6 Advance Request Return Request Feed LS Advance Motor Starter OFF>ON ON>OFF ON>OFF OFF>ON State 8 State 5 State 7 State 8 Advance Command In Feed Area Ind. OFF ON 7 Advance Request Return Request Feed LS Advance Motor Starter OFF>ON OFF>ON OFF>ON ON>OFF State 3 State 8 State 4 State 1 Advance Command In Feed Area Ind. OFF OFF 8 Advance Request Return Request Feed LS Advance Motor Starter Advance Command In Feed Area Ind. OFF OFF OFF>ON State 0 Chapter 5 Organizing a Transfer Line Application SDS #4 (Motor Overload Monitor) The inputs and outputs for the motor overload monitor are: Inputs: - rapid advance/return motor overloads - feed motor overload - reset overload request Outputs: - overload okay indication Figure 5.8 shows the state diagram of motor overload monitor. Table 5.L shows the state table of motor overload monitor. Figure 5.8 State Diagram for SDS #4 (Motor Overload Monitor) 1 Rapid Advance/Return Motor Overloads On 2 Slide Overload Error Slide Overload OK Feed Motor Overload On Motor Overload Off 5-25 Chapter 5 Organizing a Transfer Line Application Table 5.L State Table for SDS #4 (Motor Overload Monitor) State Input Description 1 Rapid Advance/Return Motor Overloads Feed Motor Overload Reset Overload Fault 2 Rapid Advance/Return Motor Overloads Feed Motor Overload Reset Overload Fault Input Transition OFF>ON OFF>ON Next State State 2 State 2 Output Description Overload OK Ind. Overload OK Ind. OFF>ON Output Status ON OFF State 0 After you develop state diagrams and state tables for your SDS instructions, double-check your tables to see if there are any redundant states. If you find redundant states, eliminate them from your state table and diagram. Summary Chapters 3 and 4 showed you how to organize an application that uses the DDMC philosophy. From our transfer line example, you can see how complex a simple slide movement can be from a state programming point of view. You can use the methods detailed in this chapter to setting up state transition applications for other machines or lines. Read chapter 6 to see how to apply the SDS and DFA instructions to common mechanisms on your line or machine. 5-26 Chapter 6 Applying DDMC Instructions to Common Mechanisms Chapter Objectives This chapters shows how the SDS and DFA instructions can be used with common mechanisms on your line or machine to perform control and diagnostic functions. We show examples for the following mechanisms: hydraulic slide (3-position valve with 2 limit switches) machine clamp (detented valve) part stamp (spring-return valve) spindle mechanical slide For each example above, we show: ladder logic the SDS or DFA step directory for the mechanism (number and names of steps) the inputs and outputs defined for the instructions step tables for each step Applying the SDS Instruction to a Hydraulic Slide The following three lines of logic are for a hydraulic slide. From a request logic standpoint there is no apparent difference between this logic and the request logic for other types of slides. The difference is in the SDS configuration. The configuration for the hydraulic slide is set up for a 3-position valve. Detented, spring return, or other types of valves would have a different configuration. | STA 7 | |STA 7 | ADVANCE |STA 7 |CLAMP |STA 7 RET |SLIDE STA 7 ADV | SLIDE PB |AUTO SS |ADVANCED |SLIDE REQ |FAULT SLIDE REQ | I:066 I:066 B3 B3 N28:0 B3 +–+–––] [––––––––]/[––––+–––] [––––––––]/[––––––––]/[––––––––––––––––––( )––––– | | 10 07 | 54 41 12 40 | |STA 7 |STA 7 | | |CYCLE |FULL | | |STATION |DEPTH | | | B3 O:066 | | +–––] [––––––––]/[––––+ | 48 07 6-1 Chapter 6 Applying DDMC Instructions to Common Mechanisms The SDS instruction in this line of logic is used to control the hydraulic slide for station 7. | POWER ON |POWER ON HYDRAULIC | DWELL |CRM SLIDE | T4:1 I:001 +SDS–––––––––––––––––––––––––+ +––––] [––––––––] [––––––––––––––––––––––––+SMART DIRECTED SEQUENCER +–(EN)– | DN 00 |Control File N28:0| | |Step Desc. File N29:0+–(ST) | |Length 143| | |No. of Steps 11+–(ER) | |Position/Step: 0| | |No. of I/O 8+–(ES) | |Prog file number 3| | +––––––––––––––––––––––––––––+ This rung of logic is used to request Station 7 slide to return. | STA 7 | |STA 7 |STA 7 |STA 7 | RETURN |STA 7 |OVRLOADS |SLIDE |SLIDE |STA 7 ADV STA 7 RET | SLIDE PB |AUTO SS |OK |RETURNED |FAULT |SLIDE REQ SLIDE REQ | I:066 I:066 B3 B3 N28:0 B3 B3 +–+–––] [––––––––]/[––––+–––] [––––––––]/[––––––––]/[––––––––]/[–––––––( )––––– | | 10 07 | 49 44 12 40 41 | |STA 7 |STA 7 | | |CYCLE |FULL | | |STATION |DEPTH | | | B3 O:066 | | +–––] [––––––––] [––––+ | 48 07 Step Directory Control File: N28:0 Step # 0 1 2 3 4 5 6-2 Step Name INITIALIZATION RETURNED RETD & ADVANCING ADVANCING ADVD & ADVANCING ADVANCED Step Description File: N29:0 Step # 6 7 8 9 10 11 Step Name ADVD & RETURNING RETURNING RETD & RETURNING STOP’D BTW ADV & RET COASTING FAULT Chapter 6 Applying DDMC Instructions to Common Mechanisms Inputs and Outputs Input 0 1 2 3 7 Logical Address B3/40 B3/41 I:066/01 I:066/00 B3/42 I/O CROSS–REFERENCE Address Symbol B3/40 B3/41 I:066/01 I:066/00 B3/42 Address Comment STA 7 ADV SLIDE REQ STA 7 RET SLIDE REQ ADVANCED LS RETURNED LS RESET SLIDE FAULT Output 0 1 2 3 Logical Address O:066/00 O:066/01 B3/43 B3/44 Address Symbol O:066/00 O:066/01 B3/43 B3/44 Address Comment ADVANCE SLIDE SOL RETURN SLIDE SOL SLIDE ADVANCED SLIDE RETURNED Step Tables STEP No 0 1 2 3 7 Input ID STA 7 ADV SLIDE REQ STA 7 RET SLIDE REQ ADVANCED LS RETURNED LS RESET SLIDE FAULT STEP No 0 1 2 3 7 No 0 1 2 3 7 Transition Destination OFF––>ON **STEP 2 OFF––>ON STEP 8 OFF––>ON ERSTEP 11 ON––>OFF ERSTEP 11 No 0 1 2 3 Transition Destination ON––>OFF STEP 10 OFF––>ON INITIALIZE OFF––>ON **STEP 4 OFF––>ON ERSTEP 11 No 0 1 2 3 sec WARNING No 0 1 2 3 State OFF OFF OFF ON MESSAGE:OFF Output ID ADVANCE SLIDE SOL RETURN SLIDE SOL SLIDE ADVANCED SLIDE RETURNED State ON OFF OFF ON MESSAGE:OFF Output ID ADVANCE SLIDE SOL RETURN SLIDE SOL SLIDE ADVANCED SLIDE RETURNED TIMER = 0.00 sec – DISABLED Transition Destination ON––>OFF INITIALIZE OFF––>ON INITIALIZE ON––>OFF ERSTEP 11 OFF––>ON ERSTEP 11 MESSAGE:OFF Output ID ADVANCE SLIDE SOL RETURN SLIDE SOL SLIDE ADVANCED SLIDE RETURNED sec WARNING TIMER = 5.00 4 ADVD & ADVANCING Input ID STA 7 ADV SLIDE REQ STA 7 RET SLIDE REQ ADVANCED LS RETURNED LS RESET SLIDE FAULT No 0 1 2 3 TIMER = 1.00 Transition Destination ON––>OFF STEP 1 OFF––>ON INITIALIZE OFF––>ON ERSTEP 11 ON––>OFF **STEP 3 3 ADVANCING Input ID STA 7 ADV SLIDE REQ STA 7 RET SLIDE REQ ADVANCED LS RETURNED LS RESET SLIDE FAULT STEP TIMER = 0.00 sec – DISABLED 2 RETD & ADVANCING Input ID STA 7 ADV SLIDE REQ STA 7 RET SLIDE REQ ADVANCED LS RETURNED LS RESET SLIDE FAULT STEP No 0 1 2 3 7 1 RETURNED State ON OFF OFF OFF MESSAGE:OFF Output ID ADVANCE SLIDE SOL RETURN SLIDE SOL SLIDE ADVANCED SLIDE RETURNED State ON OFF ON OFF 6-3 Chapter 6 Applying DDMC Instructions to Common Mechanisms STEP No 0 1 2 3 7 Input ID STA 7 ADV SLIDE REQ STA 7 RET SLIDE REQ ADVANCED LS RETURNED LS RESET SLIDE FAULT STEP No 0 1 2 3 7 No 0 1 2 3 7 No 0 1 2 3 7 No 0 1 2 3 7 STEP No 0 1 2 3 7 ERSTEP 6-4 Transition Destination OFF––>ON INITIALIZE ON––>OFF STEP 10 OFF––>ON ERSTEP 11 OFF––>ON **STEP 8 Input ID STA 7 ADV SLIDE REQ STA 7 RET SLIDE REQ ADVANCED LS RETURNED LS RESET SLIDE FAULT No 0 1 2 3 TIMER = 0.50 Transition Destination No 0 1 2 3 No 0 1 2 3 Transition Destination OFF––>ON STEP 0 No 0 1 2 3 State OFF ON OFF ON MESSAGE:OFF Output ID ADVANCE SLIDE SOL RETURN SLIDE SOL SLIDE ADVANCED SLIDE RETURNED State OFF OFF OFF OFF MESSAGE:OFF Output ID ADVANCE SLIDE SOL RETURN SLIDE SOL SLIDE ADVANCED SLIDE RETURNED TIMER = 0.00 sec – DISABLED State OFF ON OFF OFF MESSAGE:OFF Output ID ADVANCE SLIDE SOL RETURN SLIDE SOL SLIDE ADVANCED SLIDE RETURNED sec INITIALIZE State OFF ON ON OFF MESSAGE:OFF Output ID ADVANCE SLIDE SOL RETURN SLIDE SOL SLIDE ADVANCED SLIDE RETURNED TIMER = 0.00 sec – DISABLED Transition Destination OFF––>ON **STEP 3 OFF––>ON STEP 7 OFF––>ON ERSTEP 11 OFF––>ON ERSTEP 11 11 FAULT No 0 1 2 3 sec WARNING State OFF OFF ON OFF MESSAGE:OFF Output ID ADVANCE SLIDE SOL RETURN SLIDE SOL SLIDE ADVANCED SLIDE RETURNED TIMER = 0.00 sec – DISABLED Transition Destination OFF––>ON INITIALIZE ON––>OFF INITIALIZE OFF––>ON ERSTEP 11 ON––>OFF ERSTEP 11 10 COASTING Input ID STA 7 ADV SLIDE REQ STA 7 RET SLIDE REQ ADVANCED LS RETURNED LS RESET SLIDE FAULT No 0 1 2 3 MESSAGE:OFF Output ID ADVANCE SLIDE SOL RETURN SLIDE SOL SLIDE ADVANCED SLIDE RETURNED sec WARNING TIMER = 5.00 9 STOP’D BTW ADV & RET Input ID STA 7 ADV SLIDE REQ STA 7 RET SLIDE REQ ADVANCED LS RETURNED LS RESET SLIDE FAULT No 0 1 2 3 TIMER = 1.00 Transition Destination OFF––>ON INITIALIZE ON––>OFF STEP 5 ON––>OFF **STEP 7 OFF––>ON ERSTEP 11 8 RETD & RETURNING Input ID STA 7 ADV SLIDE REQ STA 7 RET SLIDE REQ ADVANCED LS RETURNED LS RESET SLIDE FAULT STEP Transition Destination OFF––>ON STEP 4 OFF––>ON **STEP 6 ON––>OFF ERSTEP 11 OFF––>ON ERSTEP 11 7 RETURNING Input ID STA 7 ADV SLIDE REQ STA 7 RET SLIDE REQ ADVANCED LS RETURNED LS RESET SLIDE FAULT STEP TIMER = 0.00 sec – DISABLED 6 ADVD & RETURNING Input ID STA 7 ADV SLIDE REQ STA 7 RET SLIDE REQ ADVANCED LS RETURNED LS RESET SLIDE FAULT STEP No 0 1 2 3 7 5 ADVANCED State OFF OFF LAST LAST MESSAGE:ON Output ID ADVANCE SLIDE SOL RETURN SLIDE SOL SLIDE ADVANCED SLIDE RETURNED State OFF OFF OFF OFF Chapter 6 Applying DDMC Instructions to Common Mechanisms These three lines of ladder logic show an example of an SDS for a detented Applying the SDS valve. This line is used to request the clamp to advance. Instruction to a Machine Clamp | ADVANCE |MACHINE |TRANSFER |RETURN |CLAMP ADVANCE (Detented Valve) | CLAMP PB |HAND PL |LOWERED |CLAMP REQ |FAULT CLAMP REQ | I:012 O:001 B3 B3 N32:0 B3 +–+–––] [––––––––] [––––+–––] [––––––––]/[––––––––]/[––––––––––––––––––( )––––– | | 10 07 | 15 51 12 50 | | | | |AUTO | | |CYCLE ON | | | B3 | | +–––] [–––––––––––––––+ | 05 The SDS instruction in this line of logic is used to control the machine clamp. | POWER ON |POWER ON MACHINE | DWELL |CRM CLAMP | T4:1 I:001 +SDS–––––––––––––––––––––––––+ +––––] [––––––––] [––––––––––––––––––––––––+SMART DIRECTED SEQUENCER +–(EN)– | DN 00 |Control File N32:0| | |Step Desc. File N33:0+–(ST) | |Length 286| | |No. of Steps 14+–(ER) | |Position/Step: 0| | |No. of I/O 8+–(ES) | |Prog file number 3| | +––––––––––––––––––––––––––––+ This rung of logic is used to request the clamp to return. | RETURN |MACHINE |TRANSFER |ADVANCE |CLAMP RETURN | CLAMP PB |HAND PL |RETURNED |CLAMP REQ |FAULT CLAMP REQ | I:012 O:001 B3 B3 N32:0 B3 +–+–––] [––––––––] [––––+–––] [––––––––]/[––––––––]/[––––––––––––––––––( )––––– | | 11 07 | 14 50 12 51 | | | | |AUTO | | |CYCLE ON | | | B3 | | +–––] [–––––––––––––––+ | 05 6-5 Chapter 6 Applying DDMC Instructions to Common Mechanisms Step Directory Control File: N116:0 Step # 0 1 2 3 4 5 6 7 Step Name Step Description File: N117:0 Step # INITIALIZATION RETURNED ADVANCING SHIFTED ADVANCE ADVD & ADVANCING ADVANCED RETURNING SHIFTED RETURN 8 9 10 11 12 13 14 Step Name RETD & RETD & ADVD & BTWN & REV TO REV TO FAULT RETURNING WTG FOR REQ WTF FOR REQ WTG FOR REQ RETURN ADVANCE Inputs and Outputs 6-6 Input 0 1 2 3 4 5 7 Logical Address B3/1 B3/0 I:000/03 I:000/02 B3/10 B3/11 I:000/07 I/O CROSS-REFERENCE Address Symbol B3/1 B3/0 I:000/03 I:000/02 B3/10 B3/11 I:000/07 Address Comment RETURN REQUEST ADVANCE REQUEST RETURNED LS ADVANCED LS RETURN MEMORY ADVANCE MEMORY RESET SDS FAULT Output 0 1 2 3 4 5 Logical Address O:000/04 O:000/05 O:000/06 O:000/07 B3/10 B3/11 Address Symbol O:000/04 O:000/05 O:000/06 O:000/07 B3/10 B3/11 Address Comment RETURN SOL ADVANCE SOL RETURNED PL ADVANCE PL RETURN MEMORY ADVANCE MEMORY Chapter 6 Applying DDMC Instructions to Common Mechanisms Step Tables STEP No 0 1 2 3 4 5 7 1 RETURNED Input ID RETURN REQUEST ADVANCE REQUEST RETURNED LS ADVANCED LS RETURN MEMORY ADVANCE MEMORY RESET SDS FAULT STEP TIMER = 0.00 sec – DISABLED Equation OFF––>ON OFF––>ON ON––>OFF OFF––>ON ON––>OFF OFF––>ON 2 ADVANCING No 0 1 2 3 4 5 TIMER = 3.00 sec No Input ID Equation 0 RETURN REQUEST OFF––>ON 1 ADVANCE REQUEST ON––>OFF 2 RETURNED LS EQ4 3 ADVANCED LS EQ4 4 RETURN MEMORY OFF––>ON 5 ADVANCE MEMORY 7 RESET SDS FAULT EQ4 NED LS=0 AND ADVANCED LS=1 STEP Destination STEP 8 **STEP 13 ERSTEP 14 ERSTEP 14 ERSTEP 14 ERSTEP 14 3 SHIFTED ADVANCE Destination INITIALIZE INITIALIZE **STEP 4 **STEP 4 ERSTEP 14 TIMER = 3.00 No 0 1 2 3 4 5 Output ID RETURN SOL ADVANCE SOL RETURNED PL ADVANCED PL RETURN MEMORY ADVANCE MEMORY WARNING No Input ID Equation 0 RETURN REQUEST OFF––>ON 1 ADVANCE REQUEST OFF––>ON 2 RETURNED LS EQ5 3 ADVANCED LS EQ5 4 RETURN MEMORY OFF––>ON 5 ADVANCE MEMORY ON––>OFF 7 RESET SDS FAULT EQ5 NED LS=0 AND ADVANCED LS=1 Destination STEP 12 INITIALIZE **STEP 5 **STEP 5 ERSTEP 14 ERSTEP 14 STEP TIMER = 0.00 sec – DISABLED No 0 1 2 3 4 5 7 4 ADVD & ADVANCING Input ID RETURN REQUEST ADVANCE REQUEST RETURNED LS ADVANCED LS RETURN MEMORY ADVANCE MEMORY RESET SDS FAULT STEP Equation OFF––>ON ON––>OFF OFF––>ON ON––>OFF OFF––>ON 5 ADVANCED No Input ID 0 RETURN REQUEST 1 ADVANCE REQUEST 2 RETURNED LS 3 ADVANCED LS 4 RETURN MEMORY 5 ADVANCE MEMORY 7 RESET SDS FAULT Destination INITIALIZE **STEP 5 ERSTEP 14 ERSTEP 14 ERSTEP 14 No 0 1 2 3 4 5 Equation OFF––>ON OFF––>ON OFF––>ON ON––>OFF OFF––>ON ON––>OFF Destination **STEP 12 STEP 4 ERSTEP 14 ERSTEP 14 ERSTEP 14 ERSTEP 14 No 0 1 2 3 4 5 State OFF ON OFF OFF OFF ON MESSAGE:OFF Output ID RETURN SOL ADVANCE SOL RETURNED PL ADVANCED PL RETURN MEMORY ADVANCE MEMORY State OFF OFF OFF OFF OFF ON MESSAGE:OFF Output ID RETURN SOL ADVANCE SOL RETURNED PL ADVANCED PL RETURN MEMORY ADVANCE MEMORY TIMER = 0.00 sec – DISABLED State OFF OFF ON OFF ON OFF MESSAGE:OFF Output ID RETURN SOL ADVANCE SOL RETURNED PL ADVANCED PL RETURN MEMORY ADVANCE MEMORY sec WARNING No 0 1 2 3 4 5 MESSAGE:OFF State OFF ON OFF ON OFF ON MESSAGE:OFF Output ID RETURN SOL ADVANCE SOL RETURNED PL ADVANCED PL RETURN MEMORY ADVANCE MEMORY State OFF OFF OFF ON OFF ON 6-7 Chapter 6 Applying DDMC Instructions to Common Mechanisms STEP 6 RETURNING TIMER = 3.00 No Input ID Equation 0 RETURN REQUEST ON––>OFF 1 ADVANCE REQUEST OFF––>ON 2 RETURNED LS EQ4 3 ADVANCED LS EQ4 4 RETURN MEMORY 5 ADVANCE MEMORY OFF––>ON 7 RESET SDS FAULT EQ4 NED LS=1 AND ADVANCED LS=0 STEP 7 SHIFTED RETURN ERSTEP 14 TIMER = 3.00 No 0 1 2 3 4 5 sec WARNING Destination INITIALIZE STEP 13 **STEP 1 **STEP 1 ERSTEP 14 ERSTEP 14 STEP TIMER = 0.00 sec – DISABLED 8 RETD & RETURNING STEP No 0 1 2 3 4 5 7 No 0 1 2 3 4 5 7 Destination INITIALIZE **STEP 13 ERSTEP 14 ERSTEP 14 OFF––>ON ERSTEP 14 9 RETD & WTG FOR REQ Input ID RETURN REQUEST ADVANCE REQUEST RETURNED LS ADVANCED LS RETURN MEMORY ADVANCE MEMORY RESET SDS FAULT STEP Equation ON––>OFF OFF––>ON ON––>OFF OFF––>ON Equation OFF––>ON OFF––>ON ON––>OFF OFF––>ON OFF––>ON OFF––>ON 10 ADVD & WTG FOR REQ Input ID RETURN REQUEST ADVANCE REQUEST RETURNED LS ADVANCED LS RETURN MEMORY ADVANCE MEMORY RESET SDS FAULT Equation OFF––>ON OFF––>ON OFF––>ON ON––>OFF OFF––>ON OFF––>ON No 0 1 2 3 4 5 No 0 1 2 3 4 5 No 0 1 2 3 4 5 Destination **STEP 12 STEP 13 ERSTEP 14 STEP 11 ERSTEP 14 ERSTEP 14 No 0 1 2 3 4 5 State OFF OFF OFF OFF ON OFF MESSAGE:OFF Output ID RETURN SOL ADVANCE SOL RETURNED PL ADVANCED PL RETURN MEMORY ADVANCE MEMORY State ON OFF ON OFF ON OFF MESSAGE:OFF Output ID RETURN SOL ADVANCE SOL RETURNED PL ADVANCED PL RETURN MEMORY ADVANCE MEMORY TIMER = 0.00 sec – DISABLED State ON OFF OFF OFF ON OFF MESSAGE:OFF Output ID RETURN SOL ADVANCE SOL RETURNED PL ADVANCED PL RETURN MEMORY ADVANCE MEMORY TIMER = 0.00 sec – DISABLED Destination **STEP 12 STEP 13 STEP 11 ERSTEP 14 ERSTEP 14 ERSTEP 14 MESSAGE:OFF Output ID RETURN SOL ADVANCE SOL RETURNED PL ADVANCED PL RETURN MEMORY ADVANCE MEMORY No Input ID Equation 0 RETURN REQUEST OFF––>ON 1 ADVANCE REQUEST OFF––>ON 2 RETURNED LS EQ5 3 ADVANCED LS EQ5 4 RETURN MEMORY ON––>OFF 5 ADVANCE MEMORY OFF––>ON 7 RESET SDS FAULT EQ5 NED LS=1 AND ADVANCED LS=0 No Input ID 0 RETURN REQUEST 1 ADVANCE REQUEST 2 RETURNED LS 3 ADVANCED LS 4 RETURN MEMORY 5 ADVANCE MEMORY 7 RESET SDS FAULT 6-8 Destination INITIALIZE INITIALIZE **STEP 8 **STEP 8 sec WARNING State OFF OFF ON OFF OFF OFF MESSAGE:OFF Output ID RETURN SOL ADVANCE SOL RETURNED PL ADVANCED PL RETURN MEMORY ADVANCE MEMORY State OFF OFF OFF ON OFF OFF Chapter 6 Applying DDMC Instructions to Common Mechanisms STEP No 0 1 2 3 4 5 7 Input ID RETURN REQUEST ADVANCE REQUEST RETURNED LS ADVANCED LS RETURN MEMORY ADVANCE MEMORY RESET SDS FAULT STEP No 0 1 2 3 4 5 7 No 0 1 2 3 4 5 7 Equation ON––>OFF OFF––>ON Destination **STEP 12 STEP 13 STEP 9 STEP 10 ERSTEP 14 ERSTEP 14 Destination INITIALIZE INITIALIZE TIMER = 0.10 Equation OFF––>ON ON––>OFF 14 FAULT Input ID RETURN REQUEST ADVANCE REQUEST RETURNED LS ADVANCED LS RETURN MEMORY ADVANCE MEMORY RESET SDS FAULT TIMER = 0.00 sec – DISABLED TIMER = 0.10 13 REV TO ADVANCE Input ID RETURN REQUEST ADVANCE REQUEST RETURNED LS ADVANCED LS RETURN MEMORY ADVANCE MEMORY RESET SDS FAULT ERSTEP Equation OFF––>ON OFF––>ON OFF––>ON OFF––>ON OFF––>ON OFF––>ON 12 REV TO RETURN Input ID RETURN REQUEST ADVANCE REQUEST RETURNED LS ADVANCED LS RETURN MEMORY ADVANCE MEMORY RESET SDS FAULT STEP No 0 1 2 3 4 5 7 11 BTWN & WTG FOR REQ Destination INITIALIZE INITIALIZE No 0 1 2 3 4 5 Output ID RETURN SOL ADVANCE SOL RETURNED PL ADVANCED PL RETURN MEMORY ADVANCE MEMORY sec INITIALIZE No 0 1 2 3 4 5 Equation Destination OFF––>ON INITIALIZE No 0 1 2 3 4 5 State ON OFF OFF OFF ON OFF MESSAGE:OFF Output ID RETURN SOL ADVANCE SOL RETURNED PL ADVANCED PL RETURN MEMORY ADVANCE MEMORY TIMER = 0.00 sec – DISABLED State OFF OFF OFF OFF OFF OFF MESSAGE:OFF Output ID RETURN SOL ADVANCE SOL RETURNED PL ADVANCED PL RETURN MEMORY ADVANCE MEMORY sec INITIALIZE No 0 1 2 3 4 5 MESSAGE:OFF State OFF ON OFF OFF OFF ON MESSAGE:ON Output ID RETURN SOL ADVANCE SOL RETURNED PL ADVANCED PL RETURN MEMORY ADVANCE MEMORY State OFF OFF OFF OFF OFF OFF 6-9 Chapter 6 Applying DDMC Instructions to Common Mechanisms Applying the SDS Instruction to a Part Stamp (SpringReturn Valve) These two lines of ladder logic show an example of an SDS for a spring return valve. This line is used to request the part stamp to advance. | STA 9 | |STA 9 |STA 9 | ADVANCE |STA 9 |CLAMP |PART |PART STAMP STA 9 ADV | SLIDE PB |AUTO SS |ADVANCED |PRESENT |FAULT STAMP REQ | I:066 I:066 B3 B3 N34:0 B3 +–+–––] [––––––––]/[––––+–––] [––––––––] [––––––––]/[––––––––––––––––––( )––––– | | 10 07 | 54 71 12 60 | |STA 9 |STA 9 | | |CYCLE |FULL | | |STATION |DEPTH | | | B3 O:076 | | +–––] [––––––––]/[––––+ | 68 07 The SDS instruction in this line of logic is used to control the part stamp. | POWER ON |POWER ON PART | DWELL |CRM STAMP | T4:1 I:001 +SDS–––––––––––––––––––––––––+ +––––] [––––––––] [––––––––––––––––––––––––+SMART DIRECTED SEQUENCER +–(EN)– | DN 00 |Control File N34:0| | |Step Desc. File N35:0+–(ST) | |Length 104| | |No. of Steps 8+–(ER) | |Position/Step: 0| | |No. of I/O 8+–(ES) | |Prog file number 3| | +––––––––––––––––––––––––––––+ 6-10 Chapter 6 Applying DDMC Instructions to Common Mechanisms Step Directory Control File: N34:0 Step # 0 1 2 3 4 Step Description File: N35:0 Step Name INITIALIZATION RETD & ADVANCING ADVANCING ADVANCED & ADVANCING ADVANCED & RETURNING Step # 5 6 7 8 Step Name RETURNING RETURNED FAULT COASTING Inputs and Outputs Input 0 1 2 7 Logical Address B3/60 I:067/01 I:067/00 B3/69 I/O CROSS–REFERENCE Address Symbol B3/60 I:067/01 I:067/00 B3/69 Address Comment ADVANCE REQUEST RETURNED LS ADVANCED LS RESET FAULT Output 0 1 2 3 Logical Address O:067/00 B3/62 B3/63 B3/64 Address Symbol O:067/00 B3/62 B3/63 B3/64 Address Comment ADVANCE SOL RETURNED BETWEEN ADVD & RETD ADVANCED Step Tables STEP No 0 1 2 7 Input ID ADVANCE REQUEST RETURNED LS ADVANCED LS RESET FAULT STEP No 0 1 2 7 No 0 1 2 3 TIMER = 2.00 Transition Destination ON––>OFF **STEP 8 OFF––>ON ERSTEP 7 OFF––>ON STEP 3 3 ADVANCED & ADVANCING Input ID ADVANCE REQUEST RETURNED LS ADVANCED LS RESET FAULT TIMER = 0.00 sec – DISABLED Transition Destination ON––>OFF **STEP 8 ON––>OFF STEP 2 OFF––>ON ERSTEP 7 2 ADVANCING Input ID ADVANCE REQUEST RETURNED LS ADVANCED LS RESET FAULT STEP No 0 1 2 7 1 RETD & ADVANCING No 0 1 2 3 Output ID ADVANCE SOL RETURNED BETWEEN ADVD & RETD ADVANCED sec WARNING No 0 1 2 3 State ON ON OFF OFF MESSAGE:OFF Output ID ADVANCE SOL RETURNED BETWEEN ADVD & RETD ADVANCED TIMER = 0.00 sec – DISABLED Transition Destination ON––>OFF **STEP 4 OFF––>ON ERSTEP 7 ON––>OFF ERSTEP 7 MESSAGE:OFF State ON OFF ON OFF MESSAGE:OFF Output ID ADVANCE SOL RETURNED BETWEEN ADVD & RETD ADVANCED State ON OFF OFF ON 6-11 Chapter 6 Applying DDMC Instructions to Common Mechanisms STEP No 0 1 2 7 Input ID ADVANCE REQUEST RETURNED LS ADVANCED LS RESET FAULT STEP No 0 1 2 7 ERSTEP No 0 1 2 7 STEP No 0 1 2 7 6-12 Transition Destination OFF––>ON **STEP 2 OFF––>ON STEP 6 OFF––>ON ERSTEP 7 Transition Destination OFF––>ON **STEP 1 ON––>OFF ERSTEP 7 OFF––>ON ERSTEP 7 8 COASTING Input ID ADVANCE REQUEST RETURNED LS ADVANCED LS RESET FAULT sec WARNING No 0 1 2 3 No 0 1 2 3 OFF––>ON STEP 0 TIMER = 0.50 Transition Destination No 0 1 2 3 No 0 1 2 3 State OFF OFF ON OFF MESSAGE:OFF Output ID ADVANCE SOL RETURNED BETWEEN ADVD & RETD ADVANCED State OFF ON OFF OFF MESSAGE:ON Output ID ADVANCE SOL RETURNED BETWEEN ADVD & RETD ADVANCED sec INITIALIZE State OFF OFF OFF ON MESSAGE:OFF Output ID ADVANCE SOL RETURNED BETWEEN ADVD & RETD ADVANCED TIMER = 0.00 sec – DISABLED Transition Destination MESSAGE:OFF Output ID ADVANCE SOL RETURNED BETWEEN ADVD & RETD ADVANCED TIMER = 0.00 sec – DISABLED 7 FAULT Input ID ADVANCE REQUEST RETURNED LS ADVANCED LS RESET FAULT No 0 1 2 3 TIMER = 2.00 6 RETURNED Input ID ADVANCE REQUEST RETURNED LS ADVANCED LS RESET FAULT TIMER = 0.00 sec – DISABLED Transition Destination OFF––>ON **STEP 3 OFF––>ON ERSTEP 7 ON––>OFF STEP 5 5 RETURNING Input ID ADVANCE REQUEST RETURNED LS ADVANCED LS RESET FAULT STEP No 0 1 2 7 4 ADVANCED & RETURNING State OFF OFF OFF OFF MESSAGE:OFF Output ID ADVANCE SOL RETURNED BETWEEN ADVD & RETD ADVANCED State OFF LAST LAST LAST Chapter 6 Applying DDMC Instructions to Common Mechanisms Applying the DFA Instruction to a Spindle The next five lines of logic show how to implement diagnostics on a spindle. By using timers to check the reaction time on the starter contactor and the flow switch, we can verify that they are in the proper state. The timer done bit is then monitored in the DFA instruction to display a fault message whenever neccessary. The DFA would also be used to monitor any other static faults pertaining to the station (ex OVERLOADS OK). | STA 6 | | START |STA 6 |HEAD LUBE |OVERLOADS |STOP |SPINDLE | SPINDLE PB|AUTO SS |FLOW OK |OK |SPINDLE |CHECK OK |SPINDLE | I:065 I:065 I:065 B3 B3 B3 O:065 +–++–––] [––––––––]/[––––+–––]/[––––+–––] [––––––––] [––––––––] [––––––––( )–––– | || 13 07 | 06 | 35 29 28 05 | ||START |STA 6 | | | ||SPINDLES |AUTO SS | | | || B3 I:065 | | | |+–––] [––––––––] [––––+ | | | 6 07 | | | |SPINDLE | | |SPINDLE |ON | | | O:065 I:065 | | +–––] [––––––––] [––––––––––––––––+ | 05 05 | SPINDLE | |SPINDLE CONTACTOR | SPINDLE |ON CHECK | O:065 I:065 +TON–––––––––––––––+ +–+–––] [––––––––]/[––––+––––––––––––––––––––––––––––+TIMER ON DELAY +–(EN)– | | 05 05 | |Timer T4:2| | | |SPINDLE | |Time base 0.01+–(DN) | |SPINDLE |ON | |Preset 5| | | O:065 I:065 | |Accum 0| | +–––]/[––––––––] [––––+ +––––––––––––––––––+ | 05 05 | SPINDLE | |HEAD LUBE LUBE FLOW | SPINDLE |FLOW OK CHECK | O:065 I:065 +TON–––––––––––––––+ +–+–––] [––––––––]/[––––+––––––––––––––––––––––––––––+TIMER ON DELAY +–(EN)– | | 05 06 | |Timer T4:3| | | |HEAD LUBE | |Time base 0.01+–(DN) | |SPINDLE |FLOW OK | |Preset 30| | | O:065 I:065 | |Accum 0| | +–––]/[––––––––] [––––+ +––––––––––––––––––+ | 05 06 6-13 Chapter 6 Applying DDMC Instructions to Common Mechanisms | SPINDLE |SPINDLE | CONTACTOR |LUBE FLOW SPINDLE | FAULT |FAULT CHECK OK | T4:2 T4:3 B3 +––––]/[––––––––]/[––––––––––––––––––––––––––––––––––––––––––––––––––––( )––––– | DN DN 28 | POWER ON | DWELL STA #6 | T4:1 +DFA–––––––––––––––––––––––––+ +––––] [–––––––––––––––––––––––––––––––––––+DIAGNOSTIC FAULT ANNUNCIATOR+–(EN) | DN |Control File N30:0|(ST) | |No. of I/O 8+–(ER) | |Prog file number 4|(ES) | +––––––––––––––––––––––––––––+ The following are examples of messages you could configure as part of the DFA instruction. STA #6 SPINDLE CONTACTOR FAULT STA #6 HEAD LUBE FLOW FAULT STA #6 SPINDLE OVERLOAD TRIPPED Inputs Input 0 1 2 INPUT CROSS–REFERENCE Address Symbol B3/28 I:065/06 B3/35 Logical Address B3/28 I:065/06 B3/35 Address Comment SPINDLE CHECK OK HEAD LUBE FLOW OK OVERLOADS OK DFA Messages No Input ID 0 SPINDLE CHECK OK 1 HEAD LUBE FLOW OK 2 OVERLOADS OK 6-14 Message SPINDLE FAULT HEAD LUBE FAULT MOTOR OVERLOAD FAULT State ON OFF OFF Chapter 6 Applying DDMC Instructions to Common Mechanisms Applying the SDS Instruction to a Mechanical Slide The next four lines of logic show the request logic and the SDS instruction for a mechanical slide station. Note that all motions are initiated with a line of request logic. It is in this request logic that any sequence interlocks are handled. It should also be noted that whenever possible, the permissives used in the request line should be internal bits that are controlled from some other SDS instruction or ladder logic, (e.g., CLAMP ADVANCED). | STA 6 | |STA 6 | ADVANCE |STA 6 |SPINDLE |CLAMP |STA 6 RET |SLIDE |STA 6 ADV | SLIDE PB |AUTO SS |ON |ADVANCED |REQUEST |FAULT |REQUEST | I:065 I:065 I:065 B3 B3 N26:0 B3 +–+–––] [––––––––]/[––––+–––] [––––––––] [––––––––]/[––––––––]/[––––––––( )–––– | | 10 07 | 05 54 31 12 30 | |STA 6 | | | |CYCLE |STA 6 | | |STATION |FULL DEPTH| | | B3 O:065 | | +–––] [––––––––]/[––––+ | 38 07 | POWER ON |POWER ON MECHANICAL | DWELL |CRM SLIDE | T4:1 I:001 +SDS–––––––––––––––––––––––––+ +––––] [––––––––] [––––––––––––––––––––––––+SMART DIRECTED SEQUENCER +–(EN)– | DN 00 |Control File N26:0| | |Step Desc. File N27:0+–(ST) | |Length 234| | |No. of Steps 18+–(ER) | |Position/Step: 0| | |No. of I/O 8+–(ES) | |Prog file number 3| | +––––––––––––––––––––––––––––+ | STA 6 | |STA 6 | |STA 6 | RETURN |STA 6 |OVERLOADS |RETURNED |STA 6 ADV |SLIDE |STA 6 RET | SLIDE PB |AUTO SS |OK |LT |REQUEST |FAULT |REQUEST | I:065 I:065 B3 B3 B3 N26:0 B3 +–+–––] [––––––––]/[––––+–––] [––––––––]/[––––––––]/[––––––––]/[––––––––( )–––– | | 11 07 | 35 36 30 12 31 | |STA 6 | | | |CYCLE |STA 6 | | |STATION |FULL DEPTH| | | B3 O:065 | | +–––] [––––––––] [––––+ | 38 07 | STA 6 | | RETURN TO | |STA 6 | TOOL CHG |STA 6 |STA 6 TOOL|SLIDE STA 6 RET | POSN PB |AUTO SS | CHG POSN |FAULT TO TL CHG | I:065 I:065 B3 N26:0 B3 +––––] [––––––––]/[––––––––]/[––––––––]/[––––––––––––––––––––––––––––––( )––––– | 12 07 37 12 32 6-15 Chapter 6 Applying DDMC Instructions to Common Mechanisms Step Directory Control File: N26:0 Step # 0 1 2 3 4 5 6 7 8 9 Step Description File: N27:0 Step Name INITIALIZATION RETURNED RETD & ADVANCING RAPID ADVANCING ADVG IN FEED AREA ADVD & ADVANCING ADVANCED ADVD & RETURNING RETG IN FEED AREA RETURNING Step # 10 11 12 13 14 15 16 17 18 Step Name RETD & RETURNING STPD BTW FEED & RETD STOPPED IN FEED AREA RETG TO TOOL CHG RETD TL CHG & RETG RETD TO TOOL CHANGE RETD TL CHG & ADVG COASTING FAULT Inputs and Outputs Input 0 1 2 3 4 5 6 7 Logical Address B3/30 B3/31 B3/32 I:065/01 I:065/02 I:065/00 I:065/03 B3/39 I/O CROSS–REFERENCE Address Symbol B3/30 B3/31 B3/32 I:065/01 I:065/02 I:065/00 I:065/03 B3/39 Address Comment STA 6 ADV REQUEST STA 6 RET REQUEST STA 6 RET TO TL CHG FEED POSITION LS ADVANCED LS RETURNED LS TOOL CHG POSN LS RESET STA 6 FLT Output 0 1 2 3 4 5 6 Logical Address O:065/00 O:065/01 O:065/02 B3/33 B3/34 B3/36 B3/37 Address Symbol O:065/00 O:065/01 O:065/02 B3/33 B3/34 B3/36 B3/37 Address Comment STA 6 ADV SLIDE MOTO STA 6 RET SLIDE MOTO STA 6 FEED MOTOR STA 6 FEED AREA STA 6 SLIDE ADVD STA 6 RETURNED LT STA 6 TOOL CHG POSN Step Tables STEP No 0 1 2 3 4 5 6 7 6-16 1 RETURNED Input ID STA 6 ADV REQUEST STA 6 RET REQUEST STA 6 RET TO TL CHG FEED POSITION LS ADVANCED LS RETURNED LS TOOL CHG POSN LS RESET STA 6 FLT TIMER = 0.00 sec – DISABLED Transition Destination OFF––>ON **STEP 2 OFF––>ON ERSTEP 18 OFF––>ON STEP 13 OFF––>ON ERSTEP 18 OFF––>ON ERSTEP 18 ON––>OFF ERSTEP 18 OFF––>ON ERSTEP 18 No 0 1 2 3 4 5 6 STA STA STA STA STA STA STA 6 6 6 6 6 6 6 MESSAGE:OFF Output ID ADV SLIDE MOTO RET SLIDE MOTO FEED MOTOR FEED AREA SLIDE ADVD RETURNED LT TOOL CHG POSN State OFF OFF OFF OFF OFF ON OFF Chapter 6 Applying DDMC Instructions to Common Mechanisms STEP No 0 1 2 3 4 5 6 7 Input ID STA 6 ADV REQUEST STA 6 RET REQUEST STA 6 RET TO TL CHG FEED POSITION LS ADVANCED LS RETURNED LS TOOL CHG POSN LS RESET STA 6 FLT STEP No 0 1 2 3 4 5 6 7 STEP No 0 1 2 3 4 5 6 7 STEP No 0 1 2 3 4 5 6 7 STEP sec WARNING No 0 1 2 3 4 5 6 STA STA STA STA STA STA STA 6 6 6 6 6 6 6 sec ERSTEP No 0 1 2 3 4 5 6 STA STA STA STA STA STA STA 18 STA STA STA STA STA STA STA 6 6 6 6 6 6 6 No 0 1 2 3 4 5 6 STA STA STA STA STA STA STA 6 6 6 6 6 6 6 Transition Destination OFF––>ON ERSTEP 18 OFF––>ON **STEP 7 OFF––>ON STEP 13 ON––>OFF ERSTEP 18 ON––>OFF ERSTEP 18 OFF––>ON ERSTEP 18 OFF––>ON ERSTEP 18 7 ADVD & RETURNING No 0 1 2 3 4 5 6 STA STA STA STA STA STA STA 6 6 6 6 6 6 6 State OFF OFF ON ON OFF OFF OFF MESSAGE:OFF Output ID ADV SLIDE MOTO RET SLIDE MOTO FEED MOTOR FEED AREA SLIDE ADVD RETURNED LT TOOL CHG POSN State OFF OFF OFF ON ON OFF OFF MESSAGE:OFF Output ID ADV SLIDE MOTO RET SLIDE MOTO FEED MOTOR FEED AREA SLIDE ADVD RETURNED LT TOOL CHG POSN TIMER = 0.00 sec – DISABLED State ON OFF ON OFF OFF OFF OFF MESSAGE:OFF Output ID ADV SLIDE MOTO RET SLIDE MOTO FEED MOTOR FEED AREA SLIDE ADVD RETURNED LT TOOL CHG POSN TIMER = 0.00 sec – DISABLED State ON OFF ON OFF OFF ON OFF MESSAGE:OFF Output ID 6 ADV SLIDE MOTO 6 RET SLIDE MOTO 6 FEED MOTOR 6 FEED AREA 6 SLIDE ADVD 6 RETURNED LT 6 TOOL CHG POSN sec WARNING No 0 1 2 3 4 5 6 MESSAGE:OFF Output ID ADV SLIDE MOTO RET SLIDE MOTO FEED MOTOR FEED AREA SLIDE ADVD RETURNED LT TOOL CHG POSN TIMER = 0.00 sec – DISABLED Transition Destination ON––>OFF INITIALIZE OFF––>ON INITIALIZE OFF––>ON ERSTEP 18 ON––>OFF ERSTEP 18 ON––>OFF ERSTEP 18 OFF––>ON ERSTEP 18 OFF––>ON ERSTEP 18 6 ADVANCED Input ID STA 6 ADV REQUEST STA 6 RET REQUEST STA 6 RET TO TL CHG FEED POSITION LS ADVANCED LS RETURNED LS TOOL CHG POSN LS RESET STA 6 FLT TIMER = 2.50 Transition Destination ON––>OFF STEP 17 OFF––>ON INITIALIZE OFF––>ON ERSTEP 18 ON––>OFF ERSTEP 18 OFF––>ON **STEP 5 OFF––>ON ERSTEP 18 OFF––>ON ERSTEP 18 5 ADVD & ADVANCING Input ID STA 6 ADV REQUEST STA 6 RET REQUEST STA 6 RET TO TL CHG FEED POSITION LS ADVANCED LS RETURNED LS TOOL CHG POSN LS RESET STA 6 FLT TIMER = 5.00 Transition Destination ON––>OFF STEP 17 OFF––>ON INITIALIZE OFF––>ON ERSTEP 18 OFF––>ON **STEP 4 OFF––>ON ERSTEP 18 OFF––>ON STEP 2 OFF––>ON ERSTEP 18 4 ADVG IN FEED AREA Input ID STA 6 ADV REQUEST STA 6 RET REQUEST STA 6 RET TO TL CHG FEED POSITION LS ADVANCED LS RETURNED LS TOOL CHG POSN LS RESET STA 6 FLT TIMER = 1.00 Transition Destination ON––>OFF STEP 1 OFF––>ON INITIALIZE OFF––>ON ERSTEP 18 OFF––>ON ERSTEP 18 OFF––>ON ERSTEP 18 ON––>OFF **STEP 3 OFF––>ON ERSTEP 18 3 RAPID ADVANCING Input ID STA 6 ADV REQUEST STA 6 RET REQUEST STA 6 RET TO TL CHG FEED POSITION LS ADVANCED LS RETURNED LS TOOL CHG POSN LS RESET STA 6 FLT STEP No 0 1 2 3 4 5 6 7 2 RETD & ADVANCING State OFF OFF OFF ON ON OFF OFF MESSAGE:OFF 6-17 Chapter 6 Applying DDMC Instructions to Common Mechanisms No 0 1 2 3 4 5 6 7 Input ID STA 6 ADV REQUEST STA 6 RET REQUEST STA 6 RET TO TL CHG FEED POSITION LS ADVANCED LS RETURNED LS TOOL CHG POSN LS RESET STA 6 FLT STEP No 0 1 2 3 4 5 6 7 No 0 1 2 3 4 5 6 7 STEP No 0 1 2 3 4 5 6 7 6-18 Transition Destination OFF––>ON INITIALIZE ON––>OFF STEP 17 OFF––>ON ERSTEP 18 OFF––>ON ERSTEP 18 OFF––>ON ERSTEP 18 OFF––>ON **STEP 10 OFF––>ON ERSTEP 18 6 6 6 6 6 6 6 Output ID ADV SLIDE MOTO RET SLIDE MOTO FEED MOTOR FEED AREA SLIDE ADVD RETURNED LT TOOL CHG POSN No 0 1 2 3 4 5 6 STA STA STA STA STA STA STA 6 6 6 6 6 6 6 No 0 1 2 3 4 5 6 STA STA STA STA STA STA STA 6 6 6 6 6 6 6 No 0 1 2 3 4 5 6 STA STA STA STA STA STA STA 6 6 6 6 6 6 6 Transition Destination OFF––>ON **STEP 3 OFF––>ON STEP 9 OFF––>ON STEP 13 OFF––>ON ERSTEP 18 OFF––>ON ERSTEP 18 OFF––>ON ERSTEP 18 OFF––>ON ERSTEP 18 No 0 1 2 3 4 5 6 STA STA STA STA STA STA STA 6 6 6 6 6 6 6 State OFF ON OFF ON OFF OFF OFF MESSAGE:OFF Output ID ADV SLIDE MOTO RET SLIDE MOTO FEED MOTOR FEED AREA SLIDE ADVD RETURNED LT TOOL CHG POSN State OFF ON OFF OFF OFF OFF OFF MESSAGE:OFF Output ID ADV SLIDE MOTO RET SLIDE MOTO FEED MOTOR FEED AREA SLIDE ADVD RETURNED LT TOOL CHG POSN TIMER = 0.00 sec – DISABLED State OFF ON OFF ON ON OFF OFF MESSAGE:OFF Output ID ADV SLIDE MOTO RET SLIDE MOTO FEED MOTOR FEED AREA SLIDE ADVD RETURNED LT TOOL CHG POSN TIMER = 0.00 sec – DISABLED Transition Destination OFF––>ON INITIALIZE ON––>OFF INITIALIZE OFF––>ON ERSTEP 18 OFF––>ON ERSTEP 18 OFF––>ON ERSTEP 18 ON––>OFF ERSTEP 18 OFF––>ON ERSTEP 18 11 STPD BTW FEED & RETD Input ID STA 6 ADV REQUEST STA 6 RET REQUEST STA 6 RET TO TL CHG FEED POSITION LS ADVANCED LS RETURNED LS TOOL CHG POSN LS RESET STA 6 FLT STA STA STA STA STA STA STA TIMER = 0.00 sec – DISABLED 10 RETD & RETURNING Input ID STA 6 ADV REQUEST STA 6 RET REQUEST STA 6 RET TO TL CHG FEED POSITION LS ADVANCED LS RETURNED LS TOOL CHG POSN LS RESET STA 6 FLT No 0 1 2 3 4 5 6 TIMER = 0.00 sec – DISABLED Transition Destination OFF––>ON INITIALIZE ON––>OFF STEP 17 OFF––>ON ERSTEP 18 ON––>OFF **STEP 9 OFF––>ON ERSTEP 18 OFF––>ON ERSTEP 18 OFF––>ON ERSTEP 18 9 RETURNING Input ID STA 6 ADV REQUEST STA 6 RET REQUEST STA 6 RET TO TL CHG FEED POSITION LS ADVANCED LS RETURNED LS TOOL CHG POSN LS RESET STA 6 FLT STEP No 0 1 2 3 4 5 6 7 8 RETG IN FEED AREA Input ID STA 6 ADV REQUEST STA 6 RET REQUEST STA 6 RET TO TL CHG FEED POSITION LS ADVANCED LS RETURNED LS TOOL CHG POSN LS RESET STA 6 FLT STEP Transition Destination OFF––>ON ERSTEP 18 ON––>OFF STEP 17 OFF––>ON ERSTEP 18 ON––>OFF ERSTEP 18 ON––>OFF **STEP 8 OFF––>ON ERSTEP 18 OFF––>ON ERSTEP 18 State OFF ON OFF OFF OFF ON OFF MESSAGE:OFF Output ID ADV SLIDE MOTO RET SLIDE MOTO FEED MOTOR FEED AREA SLIDE ADVD RETURNED LT TOOL CHG POSN State OFF OFF OFF OFF OFF OFF OFF Chapter 6 Applying DDMC Instructions to Common Mechanisms STEP No 0 1 2 3 4 5 6 7 Input ID STA 6 ADV REQUEST STA 6 RET REQUEST STA 6 RET TO TL CHG FEED POSITION LS ADVANCED LS RETURNED LS TOOL CHG POSN LS RESET STA 6 FLT STEP No 0 1 2 3 4 5 6 7 STEP No 0 1 2 3 4 5 6 7 No 0 1 2 3 4 5 6 7 STA STA STA STA STA STA STA 6 6 6 6 6 6 6 No 0 1 2 3 4 5 6 STA STA STA STA STA STA STA 6 6 6 6 6 6 6 No 0 1 2 3 4 5 6 STA STA STA STA STA STA STA 6 6 6 6 6 6 6 STA STA STA STA STA STA STA 6 6 6 6 6 6 6 Transition Destination ON––>OFF STEP 17 OFF––>ON ERSTEP 18 OFF––>ON ERSTEP 18 OFF––>ON ERSTEP 18 OFF––>ON ERSTEP 18 OFF––>ON ERSTEP 18 ON––>OFF **STEP 3 No 0 1 2 3 4 5 6 STA STA STA STA STA STA STA 6 6 6 6 6 6 6 State OFF ON OFF OFF OFF OFF OFF MESSAGE:OFF Output ID ADV SLIDE MOTO RET SLIDE MOTO FEED MOTOR FEED AREA SLIDE ADVD RETURNED LT TOOL CHG POSN State OFF ON OFF OFF OFF OFF ON MESSAGE:OFF Output ID ADV SLIDE MOTO RET SLIDE MOTO FEED MOTOR FEED AREA SLIDE ADVD RETURNED LT TOOL CHG POSN TIMER = 0.00 sec – DISABLED State OFF OFF OFF ON OFF OFF OFF MESSAGE:OFF Output ID ADV SLIDE MOTO RET SLIDE MOTO FEED MOTOR FEED AREA SLIDE ADVD RETURNED LT TOOL CHG POSN TIMER = 0.00 sec – DISABLED No 0 1 2 3 4 5 6 MESSAGE:OFF Output ID ADV SLIDE MOTO RET SLIDE MOTO FEED MOTOR FEED AREA SLIDE ADVD RETURNED LT TOOL CHG POSN TIMER = 0.00 sec – DISABLED Transition Destination OFF––>ON **STEP 16 OFF––>ON ERSTEP 18 OFF––>ON ERSTEP 18 OFF––>ON ERSTEP 18 OFF––>ON ERSTEP 18 OFF––>ON ERSTEP 18 ON––>OFF ERSTEP 18 16 RETD TL CHG & ADVG Input ID STA 6 ADV REQUEST STA 6 RET REQUEST STA 6 RET TO TL CHG FEED POSITION LS ADVANCED LS RETURNED LS TOOL CHG POSN LS RESET STA 6 FLT STEP 14 Transition Destination OFF––>ON ERSTEP 18 OFF––>ON ERSTEP 18 ON––>OFF **STEP 17 OFF––>ON ERSTEP 18 OFF––>ON ERSTEP 18 OFF––>ON ERSTEP 18 ON––>OFF ERSTEP 18 15 RETD TO TOOL CHANGE Input ID STA 6 ADV REQUEST STA 6 RET REQUEST STA 6 RET TO TL CHG FEED POSITION LS ADVANCED LS RETURNED LS TOOL CHG POSN LS RESET STA 6 FLT STEP OFF––>ON No 0 1 2 3 4 5 6 TIMER = 0.00 sec – DISABLED Transition Destination OFF––>ON ERSTEP 18 OFF––>ON ERSTEP 18 ON––>OFF **STEP 17 14 RETD TL CHG & RETG Input ID STA 6 ADV REQUEST STA 6 RET REQUEST STA 6 RET TO TL CHG FEED POSITION LS ADVANCED LS RETURNED LS TOOL CHG POSN LS RESET STA 6 FLT TIMER = 0.00 sec – DISABLED Transition Destination OFF––>ON **STEP 4 OFF––>ON STEP 8 OFF––>ON STEP 13 ON––>OFF ERSTEP 18 OFF––>ON ERSTEP 18 OFF––>ON ERSTEP 18 OFF––>ON ERSTEP 18 13 RETG TO TOOL CHG Input ID STA 6 ADV REQUEST STA 6 RET REQUEST STA 6 RET TO TL CHG FEED POSITION LS ADVANCED LS RETURNED LS TOOL CHG POSN LS RESET STA 6 FLT STEP No 0 1 2 3 4 5 6 7 12 STOPPED IN FEED AREA State OFF OFF OFF OFF OFF OFF ON MESSAGE:OFF Output ID ADV SLIDE MOTO RET SLIDE MOTO FEED MOTOR FEED AREA SLIDE ADVD RETURNED LT TOOL CHG POSN State ON OFF ON OFF OFF OFF ON 6-19 Chapter 6 Applying DDMC Instructions to Common Mechanisms STEP No 0 1 2 3 4 5 6 7 Input ID STA 6 ADV REQUEST STA 6 RET REQUEST STA 6 RET TO TL CHG FEED POSITION LS ADVANCED LS RETURNED LS TOOL CHG POSN LS RESET STA 6 FLT ERSTEP No 0 1 2 3 4 5 6 7 Summary 6-20 17 COASTING TIMER = 0.00 sec – DISABLED Transition Destination 18 FAULT Input ID STA 6 ADV REQUEST STA 6 RET REQUEST STA 6 RET TO TL CHG FEED POSITION LS ADVANCED LS RETURNED LS TOOL CHG POSN LS RESET STA 6 FLT No 0 1 2 3 4 5 6 STA STA STA STA STA STA STA 6 6 6 6 6 6 6 Output ID ADV SLIDE MOTO RET SLIDE MOTO FEED MOTOR FEED AREA SLIDE ADVD RETURNED LT TOOL CHG POSN TIMER = 0.00 sec – DISABLED Transition Destination OFF––>ON No 0 1 2 3 4 5 6 STA STA STA STA STA STA STA 6 6 6 6 6 6 6 MESSAGE:OFF State OFF OFF OFF OFF OFF OFF OFF MESSAGE:ON Output ID ADV SLIDE MOTO RET SLIDE MOTO FEED MOTOR FEED AREA SLIDE ADVD RETURNED LT TOOL CHG POSN State OFF OFF OFF OFF OFF OFF OFF STEP 0 This chapters showed you examples of logic that apply the DDMC instruction to common mechanisms. You can refer to these examples when you set up similar applications. Chapter 7 shows examples of using DDMC instruction in a DDMC implementation for operator guidance. Chapter 7 Applying DDMC Instructions for Operator Guidance Chapter Objectives In addition to implementing DDMC at various levels, you can implement the instructions to provide operators with messages that guide them to perform sequential steps. For example, when a machine faults in automatic mode, the operator may need to perform steps to get the machine back to home position so that it can be placed back in automatic mode. You can use the messages generated by the DDMC instructions to tell the operator what to do. Read this chapter to gain a basic understanding of providing operators with guidance messages and to better understand the terminology used in DDMC instructions for operator guidance. Getting Started with Providing Operator Guidance As stated on page 1-1, you can use the SDS instruction in two different ways: state-transitional mode (inputs are ORed) where individual input state transitions and changes are analyzed combinatorial mode (inputs or steady states are ANDed) to analyze logical conditions To achieve operator guidance, we recommend that you keep those actions related to the motion of the mechanism in a separate SDS instruction. Information for analyzing expected conditions that are being monitored by the SDS instruction and allow the operator’s request to be acted upon should be kept in another SDS instruction. You do this to reduce the complexity in the instruction and to display messages different than those used to indicate control faults. (You use the configuration utility differently to configure operator guidance messages than to configure warning messages.) To configure operator guidance messages, you first analyze existing or standard request logic and relocate the permissive and interlocks from the ladder logic and put them in their own SDS instruction as shown in Figure 7.1. The permissives in the request logic must not allow for parallel paths. Figure 7.2 shows the state diagram for the SDS instruction that monitors the conditions. The state (or step) tables follow the state diagram. 7-1 Chapter 7 Applying DDMC Instructions for Operator Guidance Figure 7.1 DDMC Implementation Operator Guidance Old Logic PB HAND COND 1 COND 2 COND 3 COMMAND REQUEST AUTO Conditions 1, 2, and 3 (permissives such as All Stations Returned" or All Stations Clamped" are placed as inputs within an SDS instruction. An interlock called OK is controlled within the SDS instruction. New Logic PB HAND CYCLE AUTO CYC PB1 COMMAND REQUEST OK TRIGGER OK CYCLE CYC PB2 HAND SDS (Control SDS Instruction) Trigger OK (Conditionmonitoring SDS SDS Instruction) Condition 1 Condition 2 Condition 3 7-2 Chapter 7 Applying DDMC Instructions for Operator Guidance Figure 7.2 State Diagram for Conditionmonitoring SDS Instruction Trigger OFF>ON 1 Output = OFF Timer = Warning Waiting for Trigger 2 Waiting for Conditions Trigger ON>OFF Cond 1 or Cond 2 or Cond 3 Trigger ON>OFF Output = OFF Cond 1 + Cond 2 + Cond 3 3 Conditions OK Output = ON Table 1.A Step Tables for Conditionmonitoring SDS Instruction STEP No 0 1 2 3 Input ID TRIGGER COND 1 COND 2 COND 3 STEP No 0 1 2 3 No 0 OK Output ID TIMER = WARNING Transition Destination ON––>OFF STEP 1 OFF––>ON INPUT 2 OFF––>ON INPUT 3 OFF––>ON STEP 3 1 WAITING FOR TRIGGER Input ID TRIGGER COND 1 COND 2 COND 3 TIMER = 0.00 sec – DISABLED Transition Destination OFF––>ON STEP 2 1 WAITING FOR CONDITIONS Input ID TRIGGER COND 1 COND 2 COND 3 STEP No 0 1 2 3 1 WAITING FOR TRIGGER No 0 OK No 0 OK State OFF MESSAGE:OFF Output ID TIMER = 0.00 sec – DISABLED Transition Destination ON––>OFF STEP 1 ON––>OFF STEP 2 ON––>OFF STEP 2 ON––>OFF STEP 2 MESSAGE:OFF Output ID State OFF MESSAGE:OFF State ON 7-3 Chapter 7 Applying DDMC Instructions for Operator Guidance Understanding Interlock Terminology In Figure 7.1, three conditions from the old logic were transferred to the SDS instruction. To make the transfer valid, an interlock called OK was included in the new ladder logic. An interlock refers to a condition that affects another motion. Interlocks are based on logical or mechanical safety considerations, usually related to multiple sequences. Below we define the terms relating to interlocks and describe their use. Control Permissives A control permissive is a command to allow or condition the next motion within a sequence. In manual control, a control permissive may be the operation of a push-button; however, in automatic mode, it may be dependent on a number of states, for example, “left and right hand clamps open and pin retracted.” Another example of a control permissive is “part in place” permissive. Where multiple machine states are required to provide a control permissive, we recommend placing control permissives in ladder logic. Although the permissives can be placed in a separate SDS instruction, you gain little by doing this since the individual permissives have their own diagnostics associated with their SDS instruction and as part of their own logic program. Critical Interlocks Critical interlocks are conditions that are required regardless of the machine’s mode of operation. These interlocks are provided to protect the machine from damage whether the machine is in automatic or manual mode. For example, a critical interlock might be a spindle or lube OK condition required before a tool can advance into a piece of work. In most cases, these conditions must be satisfied regardless of the mode of operation; that is, don’t close the door until all fingers are out of the way, or don’t move the transfer mechanism until all heads are returned and all stations are unclamped. You can include critical interlocks in the same SDS instruction used for controlling a mechanism, but the instruction could contain a large number of steps. We recommend including critical interlocks in a second SDS instruction to provide a permissive to the SDS that controls the mechanism. 7-4 Chapter 7 Applying DDMC Instructions for Operator Guidance ConstantlyMonitored Interlocks Constantly-monitored interlocks are commands that are required regardless of a machine’s mode of operation or its position within a sequence. These interlocks are provided to protect the operator in case of machine failure. Examples of constantly-monitored interlocks include: air pressure OK emergency stop guards closed You can place these interlocks in ladder logic and monitor them with the DFA instruction to provide the operator with startup/manual operation and diagnostics information if the machine fails. Process Interlocks Process interlocks are commands or conditions required for a number of operations within a sequence. You can include process interlocks in an SDS instruction, similar to the way you handle critical interlocks. However, if a process interlock fails, all of the instructions that were tied to it would each generate the same error messages for a single failure. We instead recommend implementing process interlocks like constantly-monitored interlocks — actually performing the interlocking in ladder logic and generate diagnostics information with the DFA instruction. Summary In this chapter you read about using the SDS instruction to provide guidance to your operators. In addition, we described some of the terminology common to using DDMC instructions for operator guidance. Chapter 8 contains application information for logging IMC faults sent as messages by the PLC-5 processor. 7-5 Chapter 8 Logging IMC Faults Sent as Messages by the PLC5 Processor Chapter Objectives A special message type has been defined for an IMC fault within the DDMC system. By using the message instruction (MSG) in PLC-5 software, you can log IMC faults and send them to an operator interface terminal. This procedure simulates the diagnostic messages sent by the SDS instruction. In addition, you can use this same IMC message format as means of integrating other devices such as drives into the DDMC fault display and logging utilities. Read this chapter to learn the techniques for logging this fault. Important: This procedure assumes you are familiar with programming 6200 Series software, the message instruction function and structure, and IMC MML programming. Configuring the IMC Fault Message Type To configure the IMC message type, you must perform the following tasks: configure the message instruction edit the data table provide PLC logic Configuring the Message Instruction To configure the message instruction, do the following: 1. Create a message instruction in your program. 2. Configure the message instruction (within the Message Instruction Data Entry screen) as shown in Figure 8.1. 8-1 Chapter 8 Logging IMC Faults Sent as Messages by the PLC5 Processor Figure 8.1 Message Instruction Data Entry screen MESSAGE INSTRUCTION DATA ENTRY FOR CONTROL BLOCK N12:20 Communication Command: PLC–5 Data Table Address: Size in Elements: Local/Remote: Remote Station: Link ID: Remote Link Type: Local Node Address: Destination Data Table Address: PLC–5 TYPED WRITE N12:0 13 LOCAL N/A N/A N/A 77 ”IMC” BLOCK SIZE = 9 WORDS Press a key to change a parameter or <ENTER> to accept parameters. > Program Forces:None Edits:None 5/15 Addr 0 DDMCIMC Command PLC–5 Size in Local/ Remote Link Remote Local Destin Type Address Elemnts Remote Station ID Link Node Address F1 F2 F3 F4 F5 F6 F7 F8 F9 Editing the Data Table You must edit the first 13 words of the local data table to contain the information which will be sent in your message. You may want to change the radix to ASCII to make editing simpler. To edit the data table, do the following: 1. Access the data table at the data file address for the message instruction. 2. Enter information into words 0 – 12 as shown below. Note that you configure words 0 – 6 by editing the data table directly; words 7 – 12 need to be supplied by the ladder programming when an error is detected. WORD 0 15 14 13 12 CLASS (Message class = C) 8-2 11 10 09 TYPE (fault = 0 clear =4) 08 07 06 05 PLCTYPE (PLC5 = 1 PLC5/250 =2) 04 03 02 01 UNUSED 00 Chapter 8 Logging IMC Faults Sent as Messages by the PLC5 Processor WORDS 1-4 PROCESSOR NAME entered in ASCII WORD 5 15 14 13 12 11 10 09 08 07 06 RACK (Rack number of IMC device) 05 04 03 02 01 00 GROUP (Group number of IMC device) WORD 6 15 14 13 12 11 10 09 08 07 06 SLOT (Slot number of IMC device) 05 04 03 02 01 00 IMC TYPE (IMC 120 = 1 IMC 121 = 2 IMC 123 = 3) WORD 7 IMC Error Code from IMC program WORDS 8-12 IMC to PLC Block Zero information words 2-6 Figure 8.2 shows the data table at the message instruction control file address configured with information. 8-3 Chapter 8 Logging IMC Faults Sent as Messages by the PLC5 Processor Figure 8.2 Configured Data Table at Message Instruction Control File Address (Radix shown in ASCII) Address N12:0 N12:10 0 1 2 3 \C4\10 D D M C T S \00\00 \00\00 \00\00 \00\00 Press a function key or enter a value. N12:1 = Program Forces:None Data:ASCII Change Specify Radix Address F1 F5 4 5 6 7 8 9 T \00 \00\03 \00\03 \00\00 \00\00 \00\00 Addr:Decimal 5/15 Addr 0 Next Prev File File F7 F8 DDMCIMC Providing PLC Programming Logic The PLC-5 ladder program must do the following: determine when an error is occurring load the proper data in words 7 through 12 of the message instruction send the message Determining an Error Condition Your PLC-5 ladder program must determine when an error condition has occurred. You can structure your program to do this by: monitoring the IMC data in block 0 (block 0 is the status block) word 5 and word 6. Any non-zero data in these words indicates an error or status condition. monitoring the fault bit (bit 4) in the IMC to PLC single status word. monitoring the detailed error code returned from the MML program through block 6. You can also combine these methods to achieve the desired results. 8-4 Chapter 8 Logging IMC Faults Sent as Messages by the PLC5 Processor Loading the Data in Words 7-12 Whenever a fault condition is detected, your PLC-5 ladder program must load the IMC fault log message into words 7 through 12 of the data table. The error code found in word 7 must be passed back from the IMC program. (There is the variable $ERROR in the IMC program. Refer to next section for a sample MML program that passes this detailed error code number back to the PLC-5 processor.) If this code is not available, your program must place a zero (0) in word 7. Your program should copy IMC to PLC block 0 words 2 through 6 into words 8 through 12 when a fault is detected. You can use copy or move instruction to do this. When the error code is not available in word 7, error information in block 0 is used to identify the error. Sending the Error Message After the error condition has been detected and the data loaded, your program should activate the message instruction to send the message. Sample Motion Program Which Reports Errors The following is an example of an IMC 123 program that demonstrates the techniques for passing error information. The information is passed back through the short integers which can then be passed to the PLC processor through block 6. Important: In the following sample program, programmers comments will be indicated by the sections marked by dashed lines on the left hand side. PROGRAM report CONST max_splcos = 20 VAR abort_flag, ret_val : boolean i, err : integer OUTPUT_ERRS [This subroutine passes the errors back to the PLC program.] ROUTINE output_errs VAR ir : integer 8-5 Chapter 8 Logging IMC Faults Sent as Messages by the PLC5 Processor BEGIN FOR ir = 1 TO max_splocs DO $sploc[ir] = 0 ENDFOR ir = 1 WHILE ((dequeue(err) = true) and (ir <= max_splocs)) DO $sploc[ir] = err ir = ir + 1 ENDWHILE put_plc(6) abort_flag = false enable condition [2] END output_errs START_OF_PROGRAM BEGIN ouput_errs IF UNINIT (ABORT_FLAG) THEN ABORT_FLAG = FALSE ENDIF IF ABORT_FLAG THEN OUTPUT_ERRS ENDIF 8-6 Chapter 8 Logging IMC Faults Sent as Messages by the PLC5 Processor CONDITIONS CONDITION [1] : WHEN ERROR [*] DO RET_VAL = ENQUEUE ($ERROR) SIGNAL EVENT [1] ENABLE CONDITION [1] ENDCONDITION CONDITION [2] : WHEN EVENT [1] DO OUTPUT_ERRS ENDCONDITION CONDITION [3] : WHEN ABORT DO ABORT_FLAG = TRUE ENDCONDITION ENABLE CONDITION [1] ENABLE CONDITION [2] ENABLE CONDITION [3] [The actual motion program is placed here. (This simple program moves a single axis back and forth while toggling a single output value to indicate direction.)] AXIS2.$SPEED = 200; AXIS2.$TERMTYPE = NOSETTLE WHILE ON DO FOUT[1] = ON MOVE AXIS2 BY 10 FOUT[1] = OFF MOVE AXIS2 BY –10 ENDWHILE END report 8-7 Chapter 9 Other Application Examples Chapter Objectives This chapter provides guidelines to help you implement the Smart Directed Sequencer (SDS) instruction in various applications. In this chapter, we define guidelines for: accounting for scan dependencies prioritizing SDS messages adding power-loss detection and management logic providing flashing push buttons for operator guidance Accounting for Scan Dependencies Like the PLC-5 program, each SDS instruction is scanned and executed sequentially. You must account for this when interlocking SDS instructions or when monitoring or using interlocks or other signals from external logic. If real I/O controlled from another SDS or external logic is being monitored within an SDS, you may need to use immediate input or output commands prior to the SDS to ensure it has the most accurate I/O image table data. If situations exist where the transition of two inputs within an SDS “race” each other (for example, activating the ADVANCE COMMAND and the RETURN COMMAND at the same time), you should make sure they are exclusive and unique states by adding to or modifying the driving ladder logic. 9-1 Chapter 9 Other Application Examples Prioritizing SDS Messages You can prioritize SDS messages generated by the SDS four ways. The first three methods are built into the DDMC system; the fourth method shows how you can add conditional logic for prioritizing messages. These methods are described below. Method 1 The first or highest class of prioritization is provided by the MMS portion of the DDMC software. (Refer to the DDMC User’s Manual (publication 6401–6.5.1) for details on the MMS software capabilities.) The software contains a utility that lets you assign on of 10 levels of message priority based on the following: PLC processor message type SDS/DFA control file A message generated with a Level 1 priority will replace a message with a priority of Level 2 on the operator interface display. Method 2 The second method of prioritizing messages is based on the position of an SDS instruction within a program scan. If two faults of the same priority (as configured in the MMS software) were to occur on the same program scan, then the first SDS to be scanned would provide the message displayed on the annunciator panel. The second message would remain in the fault queue until the first fault is cleared, thereby allowing the second message to be sent to the first panel. Method 3 The third method of prioritization is based on the order of the inputs in the SDS instruction. For example, if 2 inputs monitored by the same SDS instruction changed state on the same program scan, the first input to appear in the SDS I/O configuration would be the one included in the fault message. Method 4 Because SDS instructions are part of ladder logic, you can prioritize instruction by using conditional logic external to the instruction. You can also use sequential function charts to schedule when SDS instructions are activated. 9-2 Chapter 9 Other Application Examples Figure 9.1 shows an example of prioritizing SDS instructions by providing conditional logic. Figure 9.1 Conditional Logic for Prioritizing SDS Instructions COND 1 COND 2 Userdefined Logic Highest Priority SDS SMART DIRECTED SEQUENCER Control File N10:0 Step Desc. File N10:102 Length 144 No. of Steps 12 Position/Step: 0 No. of I/O 8 Prog file number 3 UNCONDITIONAL SDS SMART DIRECTED SEQUENCER Control File N20:0 Step Desc. File N20:102 Length 144 No. of Steps 14 Position/Step: 0 No. of I/O 8 Prog file number 3 COND 1 COND 1 COND 2 Lowest Priority SDS SMART DIRECTED SEQUENCER Control File N30.0 Step Desc. File N30:102 Length 144 No. of Steps 8 Position/Step: 0 No. of I/O 8 Prog file number 3 EN ST ER ES EN ST ER ES EN ST ER ES 9-3 Chapter 9 Other Application Examples Adding Power Loss Detection and Management Logic The SDS instruction cannot differentiate between the loss of field power to an input and the transition of that same input from on to off. This loss of field power can create or trigger false error messages. Loss of field power can be caused by the following: hardwired normally-closed E-stops being activated power brown-outs remote rack or adapter faults breakers to remote control cabinets To prevent false generation of messages, we recommend the following or similar approach to manage the loss of field power. Hardwiring Figure 9.2 shows an example of suggested hardwired ac power. An explanation follows. Figure 9.2 Hardwired ac power MASTER CONTROL RELAY (MCR) ESTOP MCR AC INPUT MODULE Local Rack I:000/01 Power OK 9-4 Chapter 9 Other Application Examples 1. Reserve an input in the local rack to detect if power is available. A local rack is required since loss of power to a remote rack could result in the loss of power to the adapter and I/O modules and might otherwise go undetected. If power is lost to the local rack, the processor goes through an orderly shut down and automatically disables the SDS instructions. The instructions then reset to their “initialization” state at power-up. If power is lost to a remote rack, the SDS remains active (is not reset). 2. Bring into the local rack a contact from the master control relay that is: hardwired and external to the PLC has been designed to accommodate safety and other critical aspects of machine control, such as the E-stop circuit Ladder Logic Figure 9.3 shows an example of suggested ladder logic. Table 9.A, following the figure, explains each rung of the logic. 9-5 Chapter 9 Other Application Examples Figure 9.3 Ladder Logic for Power Loss Detection and Management Power OK 1/2 second delay POWER ON 1. I:000 01 TON TIMER ON DELAY Timer Time base Preset Accum POWER OK 2. T4:80 DN POWER OK T4:80 3. DN UNCONDITIONAL 4. 9-6 T4:80 .01 050 0 EN DN Machine Control SDS SMART DIRECTED SEQUENCER Control File N11:0 Step Desc. File N11:102 Length 144 No. of Steps 12 Position/Step: 0 No. of I/O 8 Prog file number 3 EN ST ER ES Subsequent SDSs SDS SMART DIRECTED SEQUENCER Control File N20:0 Step Desc. File N20:102 Length 144 No. of Steps 12 Position/Step: 0 No. of I/O 8 Prog file number 3 EN ST ER ES Monitoronly SDS SDS SMART DIRECTED SEQUENCER Control File N21:0 Step Desc. File N21:102 Length 24 No. of Steps 2 Position/Step: 0 No. of I/O 16 Prog file number 3 EN ST ER ES Chapter 9 Other Application Examples Table 9.A Ladder Rung Explanations Rung(s): 1 2 and 3 4 Providing Flashing Push Buttons for Operator Guidance Explanation: The timer conditions the power available signal, allows for system settling at powerup, and allows for a halfsecond delay. The poweron done bit of the timer (Power OK) conditions the SDS instructions used for control and monitoring. Conditioning these instructions gives you the ability to disable them, preventing the instructions from detecting false errors. The unconditional SDS monitors the Power OK signal and generates a message should power be lost. On many machines, it is desirable to provide operators with guidance as to which operation he/she should perform next. This is especially important on machines which have a hand or manual mode of operation with multiple choices. In many cases, the operator needs to know exactly which manual command to initiate to satisfy logic/control requirements. You can provide this guidance with lighted push buttons that flash to prompt the operator to perform a specific action. For example, if the machine is stopped in mid-cycle, should the operator press the advance or return manual push button? A flashing push button could eliminate this decision, meaning operators could perform their jobs with less training on the machine. Figure 9.4 shows an example of a circuit for providing flashing push buttons. Table 9.B, following the figure, explains each rung of the logic. 9-7 Chapter 9 Other Application Examples Figure 9.4 Ladder Logic for Flashing Lighted Push Buttons 1. HAND PUSH BUTTON ORIGINAL REQUEST OTHER AUTO INDICATOR LIGHT REQUEST LS 2. ORIGINAL REQUEST HAND ORIGINAL REQUEST FLASH NEW REQUEST PUSH BUTTON 3. AUTO LES LESS THAN Source A 4. Source B T4:80 5. DN 9-8 FLASH T4:80 ACC 0 N11:0 2 TON TIMER ON DELAY Timer Time base Preset Accum T4:80 1.0 4 0 EN DN Chapter 9 Other Application Examples Table 9.B Ladder Rung Explanations Rung(s): Explanation: 1 The original motion request is used as an input to the SDS instructions. Typical examples of this request are the advance and return command. The ladder circuit contains the elements that permit the motion. 2 (top portion) This portion of the rung depicts the logic that is used to turn on an indicator light when a motion or command is complete. This indicator is usually driven by an input device such as a limit switch that trips when the motion or command is complete. 2 (bottom portion) This portion of the rung shows how rung 2 can be modified to flash on and off when a motion is required in the hand mode, but is not yet complete. The limit switch that provides the feedback to turn on the indicator when a requested motion has been completed can be ORed" with the request (e.g., hand and a flashing/pulsing contact to flash the indicator). 3 This rung is necessary to recondition the original requested signal to create a new one using a storage bit. This bit is then used to replace the original request as an input to the SDS instruction. 4 and 5 The circuit shown by these rungs is used to create a pulsing output called flash" that toggles on and off. This output is used to drive all flashing instructions. A 4second timer is used to turn the light off every 2 seconds. (You may choose other alternatives, such as flip flops, to achieve this flashing condition. The logic in rungs 1 through 3 must be repeated for each request signal and indicator light pair. 9-9 Appendix A SDS Instruction Worksheets Appendix Overview This appendix provides the following worksheets: I/O Data Worksheet Step Description Worksheets (two versions) Use the I/O Data Worksheet to help you address your I/O. Use the Step Description Worksheets to help you program steps into the SDS instruction. A-1 Appendix A SDS Instruction Worksheets I/O Data Worksheet RACK ADDRESS GROUPING PAGE OF DATE PROJECT NAME Address A-2 MODULE GROUP Symbolic Name DESIGNER Description Appendix A SDS Instruction Worksheets Step Description Worksheet 1 STEP No 1 2 3 4 5 6 7 8 TIMER Input ID STEP No 1 2 3 4 5 6 7 8 TIMER Input ID STEP No 1 2 3 4 5 6 7 8 Equation Equation TIMER Input ID Equation sec. STEP Destination STEP STEP STEP STEP STEP STEP STEP STEP MESSAGES: ON / OFF No 1 2 3 4 5 6 7 8 sec. STEP Destination STEP STEP STEP STEP STEP STEP STEP STEP State MESSAGES: ON / OFF No 1 2 3 4 5 6 7 8 sec. STEP Destination STEP STEP STEP STEP STEP STEP STEP STEP Output ID Output ID State MESSAGES: ON / OFF No 1 2 3 4 5 6 7 8 Output ID State A-3 Appendix A SDS Instruction Worksheets Step Description Worksheet 2 STEP TIMER → STEP STEP STEP STEP STEP STEP STEP STEP STEP STEP INPUTS/OUTPUTS ↓ → → → → → → → → 1. 2. 3. 4. 5. 6. 7. 8. STEP STEP STEP STEP STEP STEP STEP STEP → → → → → → → → STEP STEP STEP STEP STEP STEP STEP STEP → → → → → → → → STEP STEP STEP STEP STEP STEP STEP STEP → → → → → → → → STEP STEP STEP STEP STEP STEP STEP STEP → → → → → → → → STEP STEP STEP STEP STEP STEP STEP STEP 9. 10. 11. 12. 13. 14. 15. 16. STEP TIMER → STEP STEP STEP STEP STEP STEP STEP STEP STEP STEP INPUTS/OUTPUTS ↓ 1. 2. 3. 4. 5. 6. 7. 8. 9. 10. 11. 12. 13. 14. 15. 16. A-4 → → → → → → → → STEP STEP STEP STEP STEP STEP STEP STEP → → → → → → → → STEP STEP STEP STEP STEP STEP STEP STEP → → → → → → → → STEP STEP STEP STEP STEP STEP STEP STEP → → → → → → → → STEP STEP STEP STEP STEP STEP STEP STEP → → → → → → → → STEP STEP STEP STEP STEP STEP STEP STEP Index Symbols **Empty**, 72 Numbers 6200 Series Software, using message instruction for IMC faults, 81 A addressing, 413 assigning I/O, 413 audience for manual, P1 C combinatorial logic, drill motor example, 311 constantly monitored interlocks, 75 control permissives, 74 critical interlocks, 74 D data table, editing for logging IMC faults, 82 decomposition drill machine example, 41 levels of, 31 methods of, 33 process, 31 detented valve example, 65 DFA instruction in spindle example, 614 overview, 16 sample messages, 614 F flashing push buttons for op. guidance, 97 full depth in SDS instructions, 15 G glossary, P3 H hydraulic slide example, 61 I I/O addressing, 413 assigning, 413 I/O data worksheet, 414, A2 IMC faults, 81 interlock terminology, 74 interlocks constantly-monitored, 75 critical, 74 process, 75 L ladder program, example with SDS instructions, 419421 levels of SDS instruction implementation, 21 logging IMC faults, 81 M machine clamp example, 65 manual's objectives, P1 mechanical slide example, 615 message instruction, 81 messages configured for DFA instruction, 614 MML program, sample for logging IMC faults, 85 motor starter overloads in SDS instruction, 15 O operating mode in SDS instructions, 15 operator guidance, 71 I–2 Index P part stamp example, 610 permissive terminology, 74 PLC logic, providing logic for logging IMC faults, 84 possible number of states formula, 35 power loss detection and management logic, 94 prioritizing SDS messages, 92 process interlocks, 75 R related publications, P4 S scan dependencies, 91 SDS instruction applying to mechanisms, 13 associating motions to, 59 combinatorial logic, 12 in hydraulic slide example, 62 in machine clamp example, 65 in mechanical slide example, 615 in part stamp example, 610 information to include, 14 overview, 11 transitional logic, 12 SDS message prioritization, 92 sections in the manual, P2 sketching sample SDS blocks, 59 spindle example, 613 spring return valve example, 610 state, definition of, 33 state diagram description, 36 for a drill machine, 410 for a drill motor, 310 for transfer line brake, 515 feed advance/rapid returm, 517 motor overload monitor, 525 rapid advance, 523 state programming advantages, 31 drill machine example, 41 drill motor example, 38 transfer line example, 51 state table description, 37 for a drill machine, 411 for a drill motor, 311 for transfer line brake, 516 feed advance/rapid return, 518 motor overload monitor, 526 rapid advance, 524 step description worksheet, 418, A3, A4 T terms and conventions, P3 transition, 34 truth table, 35 W WARNINGS and CAUTIONS, P3 worksheets I/O data, 414 step description, 418 With offices in major cities worldwide WORLD HEADQUARTERS Allen-Bradley 1201 South Second Street Milwaukee, WI 53204 USA Tel: (1) 414 382-2000 Telex: 43 11 016 FAX: (1) 414 382-4444 EUROPE/MIDDLE EAST/AFRICA HEADQUARTERS Allen-Bradley Europe B.V. Amsterdamseweg 15 1422 AC Uithoorn The Netherlands Tel: (31) 2975/43500 Telex: (844) 18042 FAX: (31) 2975/60222 Publication 6401-6.4.1 – November 1992 Supersedes 6401-6.4.1 – October 1991 As a subsidiary of Rockwell International, one of the world’s largest technology companies — Allen-Bradley meets today’s challenges of industrial automation with over 85 years of practical plant-floor experience. More than 11,000 employees throughout the world design, manufacture and apply a wide range of control and automation products and supporting services to help our customers continuously improve quality, productivity and time to market. These products and services not only control individual machines but integrate the manufacturing process, while providing access to vital plant floor data that can be used to support decision-making throughout the enterprise. ASIA/PACIFIC HEADQUARTERS Allen-Bradley (Hong Kong) Limited Room 1006, Block B, Sea View Estate 28 Watson Road Hong Kong Tel: (852) 887-4788 Telex: (780) 64347 FAX: (852) 510-9436 CANADA HEADQUARTERS Allen-Bradley Canada Limited 135 Dundas Street Cambridge, Ontario N1R 5X1 Canada Tel: (1) 519 623-1810 FAX: (1) 519 623-8930 LATIN AMERICA HEADQUARTERS Allen-Bradley 1201 South Second Street Milwaukee, WI 53204 USA Tel: (1) 414 382-2000 Telex: 43 11 016 FAX: (1) 414 382-2400 PN 95578101 Copyright 1991 Allen-Bradley Company, Inc. Printed in USA