1
Mitsubishi Electric Air-conditioner Network System
Central Controller
Model: G-50A
Instruction Book
Contents
ON/OFF
CENTRAL CONTROLLER
G-50A
Safety ……………………………………………
Product feature …………………………………
Function …………………………………………
3-1 Specification ……………………………
3-2 Display screen …………………………
User operation …………………………………
4-1 Operation condition monitor ……………
4-2 Operation setting ………………………
4-2-1 Group operation setting …………
4-2-2 Collective operation setting ………
4-3 Timer operation …………………………
4-4 Malfunction ………………………………
4-5 Current time setting ……………………
1
2
4
4
8
4.
10
11
12
12
16
19
23
24
5. Initial setting …………………………………… 25
5-1 Shifting to initial setting menu ………… 25
5-2 M-NET address setting ………………… 25
5-3 Function setting ………………………… 26
5-4 Group configuration setting …………… 27
5-5 Interlocked operation setting ………… 29
5-6 Group name setting …………………… 31
5-7 User setting …………………………… 34
5-8 IP address setting ……………………… 35
5-9 Initial setting tools connection function ………… 35
6. Maintenance …………………………………… 36
6-1 Refrigerant system monitor …………… 36
6-2 Malfunction log monitor ……………… 37
7. External input / output ………………………… 38
7-1 External input function ………………… 38
7-2 External output function ………………… 39
Appendix 1 : Initial setting(adridged) ………………… 40
Appendix 2 : User operation(adridged) ………………… 42
1.
2.
3.
Before using the controller, please read this Instruction Book carefully to ensure
correct operation. Store this Instruction Book in a location that is easy to find.
1 . SAFETY
Please take a moment to review these safety precautions. They are provided for your protection and to prevent
damage to the controller.
This safety information applies to all operators and service personnal.
After you have read this manual, always observe the procedures described in the explanations and store it with
the installation manual in a location that is easy to find. If the controller is going to be operated by another person, make sure that this manual is given to them.
Symbols and Terms
WARNING Statements identify condition or practices that could result in personal injury or loss of life.
CAUTION Statements identify condition or practices that could result in damage to the controller or other property.
Specific Precautions
WARNING
• Ask your dealer or technical representative to install.
• Do not move and re-install the controller by yourself.
If installation is incorrect, it may cause an electric shock,
fire,etc. Ask your dealer or technical representative.
If incorrect inatallation is done by a customer, it may cause
an electric shock, fire, etc.
• Securely install in a place which can withstand the
weight of the controller.
• Contact your dealer if the controller will not be used any
more or will be scrapped.
If it is not enough, the controller may fall and cause an
injury.
• Do not remodel or repair by yourself.
If the controller is redesigned or repair is not correct, it may
cause an electric shock, fire, etc.
Consult your dealer if repair is necessary.
• Make sure that the controller is connected to a rated
power supply.
If the controller is not connected to a rated power supply, it
may cause a fire or damage to the controller.
• Stop the operation immediately and notify the your dealer if an error code is displayed or malfunction occurs.
Fire or damage may be caused if the controller is operated
in this condition .
• Never remove the cover during operation.
Touching the charged parts of the controller may cause
severe burns or other personal injury.
• Stop the operation if any malfunction occurs.
If malfunction occurs (burning smell, etc.) stop the operation
and turn off the power supply. Contact your dealer or technical representative immediately. If the controller continues to
operate after a malfunction occurs, this may cause damage,
electric shock or fire.
CAUTION
• Do not install the controller in a place where inflammable gas could leak.
• Do not use the controller in special environments.
The performance may be reduce or parts may be damaged
if the controller is used in locations subject to large quantities of oil (including machine oil), steam, sulfide gas.
If gas leaks and collects around the controller, it may cause
a fire or explosion.
• Do not wash the controller with water.
• Do not touch the switches with sharp objects.
It may cause an electric shock or malfunction.
It may cause an electric shock or malfunction.
• Do not touch the switch with wet hands.
It may cause an electric shock.
• Operate the controller within the specified temperature
range.
Observe the specified temperature range when operating
the controller. If the controller is used outside the specified
temperature range, it may cause serious damage. Be sure to
check the operation temperature range in the operation
manual.
• Do not use the controller for special applications.
This product is designed for use with the MITSUBISHI
ELECTRIC BUILDING AIR CONDITIONING CONTROL
SYSTEM. Do not use the system for other air condition management operation or applications. It may cause malfunctions.
• Do not apply insecticide or flammable sprays to the
controller.
Do not place flammable spray near the controller and make
sure it does not blow directly on the controller as this may
cause in fire.
-1-
2 . Product Features
The central controller is capable of controlling up to 50 air conditioner units. It supports the following operating
function.
[ 1 ] User operating function
(1) Operation
1. Virtually almost functions operated by local remote controller are supported.
The central controller can be used to control the indoor units in specific group ON or OFF, select the operating
mode (COOL, DRY, FAN, AUTO and HEAT) for the indoor unit or HEAT RECOVERY, BY-PASS, AUTO for the
ventilation unit), select the fan speed, select the air direction (4 direction and swing operation), select the ventilation mode (OFF, LOW speed, or HIGH speed), select TIMER MODE and select the temperature setting.
In addition, room temperature can be displayed at the unit of each group upon request.
(See 5-5 "User setting")
2. Local remote control operation can be prohibited for specific functions.
Access to specific control functions, such as ON/OFF operation, mode selection ,temperature setting and filter
sign reset operation can be prohibited for the local remote controls collectively or per group.
3. Collectively setting
Operation setting can be performs collectively or per group.
(2) Weekly Schedule
1. The weekly schedule enables four different schedule patterns to be set weekly per group. (P1-P4)
Of these, three patterns are to set ON/OFF schedule and remaining one pattern is to set the pattern to prohibit operation of the local remote controller.
Four patterns (daily patterns) mentioned above enable the setting of individual schedule times for every group.
2. The respective daily patterns enable the setting of three different ON times (three prohibition times) and three
different OFF times (three permission times).
In addition, it is possible to set ON time only (prohibition time only) and OFF time only (permission time only).
3. Easy setting
Daily operation patterns and weekly schedules for one group can easily be copied to the other groups.
4. Timer automatic recovery operation when recovering from a power down is supported.
(3) Operating status monitor
1. ON/OFF/MALFUNCTION status can be monitored by group or by unit.
2. The groups managed by the central controller may be displayed all together by group number or group name
(first three characters). Collective display of all unit address is also supported.
3. When displaying all groups at once, individual groups can be turned ON or OFF by designating them by the
indicator .
(4) Malfunction monitor
1. The unit address where the malfunction occurred, the error code and address of the unit that detected
the malfunction are displayed on the malfunction monitor screen.
2. Pressing the reset key stops all the units connected to the same group, refrigerant system or linked group to the
unit where the malfunction occurred, all of these are reset.
-2-
[ 2 ] System configuration setup and maintenance function
(1) Setup for system configuration
1. Registration can be made for the indoor units, local remote controllers and slave system controllers in the same
group.
And also registration can be made for the ventilation such as OA processing unit.
2. Group name may be specified. ( Names may include alphanumeric characters.)
3. Group name may be copied.
4. Setting of group configuration and specifying the group name may be performed as long as power is being supplied
to the central controller. This mean that setting can be performed before the central controller is installed at
the site, before installation of individual units is completed or while the power supply to some units is cut off.
5. System configuration data setting in the central controller can be deleted at once if necessary when replacing circuits wired board, etc.
(2) Refrigerant system monitor
All unit address (indoor, outdoor, etc.) can be displayed for individual refrigerant system on the refrigerant system
monitor screen. This information is useful for checking the installation, such as address setting, transmission line
connection and power supply connection.
(3) Interlocked group setting
Setting can be performed for indoor units interlocked with a ventilation unit.
If even one of the indoor units interlocked with ventilation have started to operate, the ventilation will be activated.
(4) Malfunction log monitor
1. A log of the last 64 malfunction massage, in the order in which they occurred, can be monitored.
2. The data and time the malfunction occurred, the address of unit where it occurred, the error code and the address of unit that detected the malfunction are displayed.
3. All malfunction logged in the memory of the central controller and indoor unit can be reset at once.
[ 3 ] Other
(1) Overall statues display lamp
Displays normal operation/all OFF/malfunction status for the entire system.
(Normal operation/all OFF/malfunction status is indicated by the lamp being lit, not lit or blinking respectively)
(2) Collective ON/OFF switch
This switch allows turning all of the unit in the system ON or OFF at once.
(3) Power supply wiring
The central controller is supplied power from the PAC-SC50KUA Power Supply Unit via the M-NET transmission line and
DC power line. The DC power between the PAC-SC50KUA Power Supply Unit and the central controller should be 10m
or less. The central controller allows to be connected to M-NET transmission line at any position. (M-NET transmission
line is the central control line which connects TB7 terminal of the outdoor unit)
(4) M-NET transmission line
The combined maximum distance between the outdoor units and the central controller, and between the outdoor units
and farthest indoor units connected to the same refrigerant system or their remote controller, may be extended up
500 meters.
Therefore, even if the total distance is made longer by installing the outdoor units all in row, there will be no problem
so long as the above maximum total distance limitation is not exceeded.
-3-
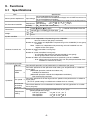
3 . Functions
3-1
Specifications
Item
Source power requirement
Environmental condition
Specification
DC24V,0.02A(Maximum loading)
Input voltage Power received from PAC-SC50KUA Power Supply Unit via M-NET transmission line.
DC12V,0.2A(Maximum loading)
Power is received from the PAC-SC50KUA Power Supply Unit via the DC power line.
0 ˚C +40 ˚C / 32 ˚F +104 ˚F
Operating
Temperature Non operating -20 ˚C +60 ˚C / – 4 ˚F +140 ˚F
30 90%RH (No condensation)
Humidity
mm 120(H) 300(W) 80[*19](D)
*[ ] : indicate the thickness from the
in
4-3/4(H) 11-13/16(W) 3-1/8[*3/4](D) wall.
Dimensions
Kg
lb
Weight
1.0
2-1/4
System condition
Number of control unit
Indoor unit or independent OA processing unit or LOSSNAY
: 50 units maximum (50 groups maximum)
Number of units (indoor or independent OA processing unit or LOSSNAY) in one group
: 1-16 units
*Note Indoor unit, independent OA processing unit and LOSSNAY can not
register to the same group.
Number of remote controllers in one group
*3
: 1-2
Number of system controllers in one group
: 0-4 (including the number of remote controller in one group)
: 0-3 for groups which have one remote controller.
Number of indoor units interlocked with one OA processing unit or LOSSNAY
: 0-16 (some types of OA processing unit can only be operated when interlocked to a maximum of 9 units)
User operating function
ON/OFF
Operation
The ON/OFF operation can be performed as a collective or per group.
The switch operation for the operation mode setting can be performed as a collective
or per group.
[ Selectable operation mode for the indoor unit ]
Operation
mode
Cool/Dry/Fan/Auto/Heat
*1
[ Selectable operation mode for the independent ventilation ]
Heat recovery/By-pass/Auto
The switch operation to set the High and Low speed can be performed as a collective
Fan speed *1 or per group.
( The 4 fan speed setting is available to the indoor that has 4 levels )
Air direction
The air flow direction can be switched to 4 directions and swing operation as a collecand swing
tive or per group
operation *1
Temperature setting can be performed collectively or per group.
[Setting temperature range]
Temperature
Cool (Dry) operation
: 19 30 ˚C / 67 87 ˚F
setting
Heat operation
: 17 28 ˚C / 63 83 ˚F
Auto operation
: 19 28 ˚C / 67 83 ˚F
-4-
Item
Prohibit local
remote
control
Operation
Timer operation
Specification
The specific functions of a local remote controller can be prohibited as a collective or
per group.
[Prohibit function]
ON/OFF operation, Operation mode setting, Temperature setting and Filter sign
reset operation.
The set schedule operations can be switched to ON/OFF (local remote controller
operation prohibition/permission) for each group.
The filter sign reset operation after the air filters are cleaned can be performed as a
collective or per group.
The ventilation operation of the interlocked OA processing unit or LOSSNAY can be collective or per group.
Ventilation
[Ventilation operation]
operation *1
Low speed/High speed/Ventilation OFF
*3
Filter sign
reset
Collective
operation
The overall status lamp displays conditions of the collective statues.
Each group
operation
Each group operation is displayed on the operation setting screen (group) or operation
monitor screen.
Operation
mode
Fan speed
Air direction
Temperature
setting
Timer
operation
Monitor
Filter sign
Local remote
control
prohibition
Displayed on the operation setting screen (group).
Ventilation
operation *3
Room
temperature
display
Central control
prohibition
External
input signal
condition
Malfunction
The unit address and error code are displayed on the malfunction monitor screen when
a malfunction occurs.
Current time
back-up
When the power is cut off, the current time is backed up for approximately one week.
(When the controller is fully charged. The controller is fully charged by twenty-four
hours after power feed.)
Operation pattern setting can be performed.
• Operation interval : Minimum 10 minutes
• The daily operation pattern and weekly schedule for each group can be set.
• A pattern of one day : P1/P2/P3/ P1 / P2 / P3 / P4 / * ON/OFF setting up to three times a day are possible for P1/P2/P3.
* P4 enables to set operation prohibition of 3 times per day for the remote controller.
* P1 / P2 / P3 implement the schedule which has combined P1/P2/P3 of ON/OFF
pattern and P4 of remote controller operation prohibition pattern together.
( P1 = P1 + P4 / P2 = P2 + P4 / P3 = P3 + P4 is displayed.)
* - is a day without timer operation.
• "The reference temperature and set-back value" or "Setting temperature" which are
linked with timer operation can be set.
Other
Timer setting
-5-
Item
Specification
Group name
designation
Group name can be specified and display on the operation setting screen.
* Group name setting is need at the initial setting.
Emergency stop/normal, ON/OFF, prohibit/permit for local remote operation can be
External
controlled for units being controlled with a non-voltage contact signal input from an
signal input
Other
external source.
interface
When one or more units being controlled are operating, the "ON" signal will be outExternal
signal output put, and if a malfunction occurs in one or more units, the "malfunction" signal will
be output.
interface
Initial setting (for installation and maintenance)
Connecting Group setting
*3
information
setting
Interlocked
setting
*3
Monitor
Malfunction
history
The interlocked setting for the ventilation equipment as the OA processing unit or
LOSSNAY , etc to indoor unit is performed on the interlocked setting screen.
A maximum of the 64 most recent malfunction are displayed on the malfunction log
monitor.
Refrigerant
The connected unit address are displayed on the refrigerant monitor screen.
system monitor
User setting
Other
The group setting operation for units (indoor units local remote controllers, independent OA processing unit, LOSSNAY and slave system controllers) are performed on
the group setting screen.
Some of the indication and function that appear on the each screen can be specified to
match the needs of the user.
Master system
controller/
Slave system Master/Slave setting of the system controller.
controller
* G-50A does not support slaves.
setting
*2
Prohibition
The setting of a system controller which the local remote control is prohibition enable or
setting enable
disable.
/disable
The prohibited
Selecting of the prohibited controller which is only local remote controller or both
controller
local remote controller and the other system controller.
range setting
K-control
type
The system composed of K-control type air conditioner equipment can be controlled
*3 using the K transmission converter (PAC-SC25KAA)
*1 Each operation is available in accordance with the function of unit.
*2 Master system controller and slave system controller.
* G-50A does not
support slaves.
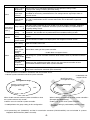
M-NET Gateway
management range
G-50A
management range
Another system controller
management range
Management range
of G-50A
Unit
Unit
Unit
Unit
When G-50A controls another system controller or when
the system contains only G-50A :
When G-50A is controlled by another system controller :
(Example: MJ-300Gateway)
G-50A is set as the master system controller.
G-50A is set as the slave system controller.
* G-50A performs the group setting in this configuration.
* The group setting is performed by Master system
controller.
*3 OA processing unit (LOSSNAY) and the K transmission converter (PAC-SC25KAA) are not included in systems
shipped to North America (USA & Canada).
-6-
NOTE :
The following group setting cannot be performed.
• Unit groups which are not under the management of the master controller and are managed by the slave
system controller.
Master system
controller
Group
Slave system
controller
Group
Group
• A common group is managed by more than two master controllers.
Master system
controller 1
Group
Master system
controller 2
Group
Group
• A slave system controller which exceeds the management range of the master system controller of two or
more.
Slave system
controller
Master system
controller 1
Group
Master system
controller 2
Group
Group
-7-
Group
Overall status lamp
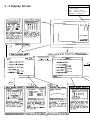
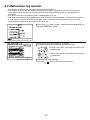
3 - 2 Display Screen
The lamp indicates the unit operation condition.
ON …… During operation
OFF …… All group are stopping
BLINKING …… Malfunction
Display
02
01
PROHI
BITED
G-50A
NOTE: The temperature setting includes
a function to switch the display
or
between
Celsius
(˚C)
Fahrenheit (˚F) (page 34).
2
1
Continuously press
and
(2 seconds or longer)
ENTER
NEXT
3
1
4
5
001
04-2002 MON
P4
-8-
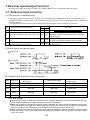
Collective operation switch
If this switch is pressed during
the operation, a whole group stop
is performed.
The collective operation switch can be performed in the user setting mode for any screen.
( Excluding menu screen )
LAN changeover switch
Refer to section "5. Initial setting ( page 25 ) " for
explanation of the operation of these switches.
LCD contrast adjustment knob
LAN status lamp
Orange LED indicates action and green LED indicates link.
Service LAN connector
Refer to section "5. Initial setting " for an explanation of this connector.
Rear side
Ethernet
M-NET
A
Operation
panel
B
POWER
S
M-NET Transmission
line terminal
LAN(Ethernet)connector
12VDC GND
1 CN1 5
RS232C
1
CN2
9
RS-232C connector
External input / output interface connecter
Refer to section "7. External input / output function ( page 38 )" for the detail
of operation of these connectors.
DC power supply terminator
M-NET address setting
IP address setting
Function select setting
6
ADDRESS SETTING
7
6 ADDRESS SETTING
M-NET ADDRESS: 000
FUNCTION SELECTS
IP ADDRESS SETTING
1 2 3 4 5 6 7 8
IP ADDRESS :
192.168.001.001
ON
OFF
8
MASK ADDRESS:
255.255.255.000
7 FUNCTION SETTING
8 IP ADDRESS SETTING
Displays, or sets, the controller
M-NET address.
Refer to section "5. Initial setting
(page 25)" for a detailed explanation of operation.
VER.
Sets the function of the controller.Refer to section "5. Initial setting(page 25)" for a detailed explanation of operation.
Sets the LAN IP address.
Refer to section "5. Initial setting(page 25)" for a detailed explanation of operation.
.
BACK
3
4
5
2
GROUP NO
2002
16-04-2002
014 6602
NONE
12 : 45
(DETECT 014)
2002
INDICATE
05-04-2002
012 6607
INDICATE
1-1-2001
7
09 : 12
(DETECT 012)
2002
NONE
TEMP. UNIT ˚C / ˚F
a
LOSSNAY
that
Maintenance
-9-
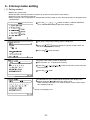
4 . User operation
Used the following two screens when user operation is performed.
Operation monitor screen ....... This screen displays ON/OFF and malfunction condition of unit.
G-50A normally displays this screen.
Operation setting screen ........ The unit operations can be performed by individual group or collective
operation. These operation include the ON/OFF, operation mode, fan speed,
temperature setting, air direction, ventilation setting, timer operation
ON/OFF, local remote controller prohibition and filter sign reset are
performed by group or collectively. In addition, this screen can also displays
the room temperature of each group.
• The collective operation can be performed on any screen (except for the menu screen) in the user operation
mode
<Shifting to the operation monitor screen and operation setting screen>
Press the
1
Press the
switch and
2
switch and
select "2. OPERATION SETTING"
select "1. OPERATION MONITOR"
Press the
Press the
Press the
ENTER
BACK
SCREEN
switch.
switch.
or
switch to set
"MON. (MONITOR)" on the blinking
display and press the
ENTER
The unit operation can be verified in
a single glance.
switch.
Press the
or
switch
to set "COL. (COLLECTIVE)" or
"GROUP" on the blinking display
and press the
ENTER
(Individual group
operation setting
screen)
switch.
Refer to section "4-1 Operation
condition monitor".
<Returning to the user operation menu screen>
Press the
BACK
SCREEN
(back screen) switch.
Each unit operation
setting is performed.
(Collective
operation
setting screen)
Refer to section "4-2 Operation setting".
-10-
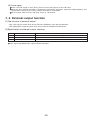
4 - 1 Operation condition monitor
• This function displays the ON/OFF/Malfunction status of specific units or group.
• ON/OFF/Malfunction status is shown by the indication corresponding to the unit or group appearing in inverse,
normal or blinking display.
• The user may select display items by unit address, group number or group name.
Refer to section "5-7 User setting (page 34)" for detail of user setting.
• During the user operation mode, this screen returns from any screen if there is no operation for approximately
10 minutes.
(1) Operation Method
• Note that operation is different for each of the following display methods.
GROUP
SELECT
1 Press the
switch to change the display group in desired opera-
tion and monitor.
2 When displaying the units in a given group, press the
all the units in that group ON or OFF.
1 Press the
number to be operated.
2 Press the
"
ON/OFF
1
switch turn
switch to move the " " select the group
ON/OFF
switch to set the displayed group unit is indicated by the
" symbol to the on/off mode.
1
switch to move the " " symbol. Select
1 Press the
the group name to be operated.
2 Press the
"
ON/OFF
1
switch to set the displayed group unit is indicated by the
" symbol to the on/off mode.
*Displays up to the first 3 characters of the set group name.
(2) Display contents
Reverse:ON
Normal:OFF
Blinking: Malfunction during
units is off
Blinking and Reverse:
Malfunction during
unit is on.
*When a malfunction occurs, refer to section "4-4 Malfunction (page 23) ".
-11-
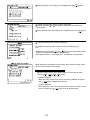
4 - 2 Operation setting
• There are two methods for the operation, performing the operation classified by groups or collective operation.
4 - 2 - 1 Group operation setting
Ventilation
No. Name of switches
Function
Display
Operation status display
1
ON/OFF switch
The ON/OFF condition of the displayed group is switched.
*When there is an interlocked OA processing unit
or LOSSNAY , turning this switch ON starts
operation in a [High] ventilated state.
Used to the type of the operation
mode selection.
2
3
4
Note:
Operation mode can be selected acOperation mode
cording to the function of unit.
switch
If the unit is only cooling type.
HEAT/AUTO mode may not appear
on the display.
Refer to the instruction manual of
the air conditioner for more detail.
Each time to push the switch, a mode is selected in
a sequence that goes from COOL, DRY, FUN,
AUTO, HEAT and beck to AUTO for air conditioner
group.
On the group composed of independent LOSSNAY ,
operation mode is selected in a sequence that goes
from HEAT RECOVERY,AUTO, BY-PASS and back
to HEAT RECOVERY.
Fan speed display
4 levels
Fan speed
switch
The fan speed can be switched to four
levels. Switching may be 3 levels or 2
levels, depending on the model.
Temperature
setting switch
The setting temperature display.
The setting range change according to the operation
mode.
19 30 ˚C / 67 87 ˚F
COOL/DRY
The setting temperature change is per17 28 ˚C / 63 83 ˚F
HEAT
formed.
19 28 ˚C / 67 83 ˚F
AUTO
NOTE: The temperature setting includes a function
to switch the display between Celsius (°C)
or Fahrenheit (°F) (page 34).
-12-
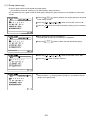
2 levels
3 levels
No. Name of switches
Function
Display
5
Current time
setting switch
These switches are used when the cur- Refer to section "4-5 Current time setting" .
rent time is set.
6
Air direction
setting switch
The Air flow direction can be selected.
The air flow direction can be selected
to four directions and swing operation
(auto vane).
7
Ventilation
setting switch
The operation mode of the interlocked
Ventilation volume setting display
ventilation can be performed.
*Where there is no interlocked ventilation,
the operation of this switch is invalid.
*"Ventilation" is OA processing unit or LOSSNAY
8
Remote
operation
prohibit switch
Used to prohibit for the local remote
control.
9
Timer more
switch
10
Reset switch
11
Group select
switch
The display group is changed.
Group number display
This switch displays 1 50 group numbers.
The switch can also display group names.
12
Back screen
switch
Use to back to the user menu screen.
The menu screen will be returned.
13
Cursor position
switch
The position of a cursor can be moved
when a cursor is appear.
The cursor position (blinking) moves.
The timer operation can be performed
according to a previously set operation
pattern.
The filter sign display reset is performed.The reset processing is completed by pressing this switch two
times.
Air flow direction
PROHIBIT : Local remote control specified on the
prohibit setting screen is not possible.
PERMIT : Local remote control is possible.
Timer operation display
ON
OFF
Filter display
Filter
No display
*1: Room temperature can be displayed by selecting the room temperature display function per "5-7User
Setting".( but limited to indoor unit group)
-13-
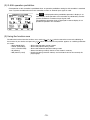
(1) Local remote control operation prohibition setting.
• G-50A can prohibit the operation of item such as connected local remote controller or slave system controller
for each group. The prohibit items are ON/OFF operation, operation mode, temperature setting and filter sign
reset operation.
GROUP
switch to display the group that the operation
1 Press the
SELECT
prohibition setting will be performed.
2 Press the
or
switch to set "PROH. (PROHIBIT)" on the
blinking display and press
switch.
ENTER
1 The prohibit setting screen is displayed.
2 Press the operation switch for the items to be prohibited.
ON/OFF
• When the ON/OFF operation is to be prohibited :
1
:
2
• When the setting temperature is to be prohibited :
4
MODE
• When the operation mode is to be prohibited
• When the filter sign reset is to be prohibited
:
or
7
RESET
DEL.
1 The items selected for prohibition are shown in reverse display.
2 After setting of prohibit item, press the
operation setting screen.
1 The operation setting screen is displayed.
2 Press the
REMOTE
PROHIBITION
0
switch to go back to the
Remote operation prohibition/permission display will
be change PERMIT to PROHIBIT and the prohibited item set on the prohibit setting screen are
shown in reverse display.
The prohibit setting is completed.
switch to set "PROHIBIT
ON " .
NOTE:
BACK
SCREEN
• The system controller that performed the local remote control operation prohibition setting can
operate the prohibited items.
• When the No.4 function select is set ON, the prohibit setting of the local remote control operating
cannot be made. For details, refer to "5-3 Function setting."
-14-
(2) G-50A operation prohibition
• The operation of this controller is prohibited when an operation prohibition setting for this controller is received
from a system controller other than this controller or when an external input signal is used.
PROHI-
The BITED is displayed and the prohibition operation is display in reverse display when operation of this controller is prohibited by another
system controller or an external input signal used.
The prohibition operation which is displayed in reverse display is not
possible to operate in this condition.
(3) Using the function area
To select the function from the function area, use the
or
switch to move the cursor to the blinking to
the function of your choice and press the
switch. The current cursor position appears as a blinking indication
on screen.
• MON. (MONITOR)
: Shift to the operation monitor screen
• PROH. (PROHIBIT)
: Shift to the prohibit setting screen
• COL. (COLLECTIVE)
: Shift to the collective operation setting screen
• M (memory)
: Stores the setting currently shown on the screen in memory.
• MR (memory read)
: Reads the setting stored in memory and activates them for the currently displayed group.
ENTER
-15-
4 - 2 - 2 Collective operation setting
• A collective operation setting and a collective prohibit setting can be performed for all the group managed by
this controller at one time.
(1) Collective operation setting
1 Press the
switch to set "COL. (COLLECTIVE)" in blinking
display and press the
screen.
ENTER
switch on the group operation setting
2 The collective operation setting initial screen is displayed.
3 Select the items for operation setting on the collective operation setting
initial screen.
The operation method is same as described in section "4-2-1 Group
operation setting" (Page 12).
NOTE: The items which were not set, remain set to the same
condition that were set before the collective operation was
performed.
4 The items selected for the operation blink on the collective operation
setting screen.
5 When all setting are completed, press the
switch to display
the "SET" in blinking display for the indicated function area.
6 Press the
ENTER
The collective setting is completed when the previous
items light. (After the setting are completed, start
from step 3 to perform operation again if change
operation are required.)
The collective setting is executed.
The collective setting takes approximately 20
seconds.
NOTE:
switch one time to complete this setting.
The display of setting contents is erased
when shift to another screen.
-16-
(2) Collective prohibit setting
1 Press the
switch to set "PROH. (PROHIBIT)" in blinking
display and press the
initial screen.
ENTER
switch on the collective operation setting
2 The collective prohibit setting initial screen is displayed.
3 Select the items to be prohibited or permitted on the collective prohibit
setting initial screen.
Each time to press the switch corresponding to the prohibition item,
the prohibition or permission is selected.
Prohibition setting : The prohibited item is displayed in reverse with
blinking.
Permission setting : The permitted item is displayed with blinking.
The selection method concerning to prohibit/ permit item is same as described in section "4-2-1 (1) Local remote control operation prohibit
setting". ( page 14 )
4 The items selected for the prohibition or permission are displayed with
blinking.
And the "SET" is displayed with blinking in the function area.
5 When all setting are completed, press the
plete this settings.
6 The collective prohibit setting is excused.
The collective prohibit setting takes approximately
20 seconds.
ENTER
switch one time to com-
7 The collective setting prohibition/permission item
setting is completed when the previous item light.
8 After setting of prohibit/permit items, press the
switch to back to the collective operation
setting initial screen.
BACK
SCREEN
-17-
9 The collective operation setting initial screen is displayed.
10 Press the
REMOTE
PROHIBITION
0
switch to set "REMOTE CONTROL PROHIBIT ".
11 Remote operation prohibition/permission display ("REMOTE CONTROL
PROHIBIT " ) is displayed with blinking.
12 Press the
or
switch to display the "SET" in blinking display
for the indicated function area.
Press the
switch one time to complete the collective prohibit setting.
ENTER
13 The collective prohibit setting is executed.
It takes approximately 20 seconds.
14 The collective prohibit setting is completed when the remote operation
prohibition/permission display is change to be light.
NOTE:
• The display of setting contents is erased when shift to another screen.
• The following restrictions in the collective operation settings.
1. Temperature setting
The range that can be set falls within 19˚C 28˚C /67˚F 83˚F regardless of the operation mode.
2. Operation mode selection, fan speed selection, air direction, etc.,can be collectively set regardless
of the functions of the unit. However, actual setting to a unit without functions cannot be performed.
To obtain the correct setting contents, refer to the respective group operation setting screens.
-18-
4-3 Timer operation
• A weekly schedule setting can be specified for each group.
• Possible to set on the timer the schedule to prohibit operation of the local remote controller in addition to ON/OFF
schedule.
• Always set to current time on the current time setting screen when the schedule setting is performed.
Refer to section "4-5 Current time setting".
NOTE: When browser monitoring, or schedule setting from central monitoring
PC, was performed, the timer screen of this function cannot be used.
"This function is set from a higher level." is displayed on this screen.
<Schedule setting function summary>
1 The ON and OFF (PROHIBITION and PERMISSION) times can set in 10-minute units.
2 The daily operation schedule can include up to three ON (PROHIBITION) time settings and three OFF (PERMISSION)
time settings.
3 Three types (P1-P3) of daily ON/OFF pattern and one type (P4) of prohibition/permission pattern are available
respectively, each of which can be set every to each group.
Week day which is not set in timer pattern is displayed with (-).
In addition, it is also possible to set the schedule which has combined P1 -P3 and P4 together .
( P1 / P2 / P3 ) In this case, both of ON/OFF pattern and prohibition/permission pattern are daily executed.
Any one of these options may be selected for each separate day of the week.
4 The schedule patterns can be copied easy to other group by the memory and memory read functions because the
schedule contents can be recorded in the memory.
5 The setting temperature or set-back value setting can also be supported during timer operation.
<Shifting to the schedule setting screen>
Press the 3
switch to select
"3 SCHEDULE SETTING".
BACK
SCREEN
Press the
switch to go back to
the user operation menu screen.
• The schedule contents of each
group can be monitor.
• Weekly schedule pattern setting
can be performed.
Press the
switch to move the cursor position
to P1 (or P2 or P3 or P4 ).
(The "P1" indication blinking.)
And press the
switch to the
P1 (Pattern 1) Schedule pattern
setting screen.
Press the
BACK
SCREEN
switch.
ENTER
• Schedule pattern (P1 P3 , P4 )
setting can be performed.
-19-
(1) Schedule pattern (P1
P3) setting
• Follow the procedures described below to set each daily schedule pattern for each group.
• The setting temperature or set-back values setting are also performed in the schedule setting operation. To enter
the setting temperature or set-back value setting select SET-BACK or SET TEMP. Accordance with section "5-7
user setting (page 34)" in advance.
• The setting temperature or set-back value selected in this way take effect only during timer operation.Also setback operation is cancelled if the setting temperature is changed using this central controller or a local remote
controller.
( The set-back operation resumes at the next timer-ON time )
<Schedule pattern setting( P1
P3, P4 ) >
1 Press the
setting.
GROUP
SELECT
switch to display the group in desired a timer
2 Press the
switch to move the cursor position to
the pattern ( P1 P3, P4 ) to be setting.
3 Press the
ENTER
switch one time.
4 The schedule pattern setting screen is displayed.
switch to move the cursor position to
5 Press the
the first ON (PROHIBITION) time.
6 Press the
CLOCK / PATTERN
switch to select the ON (PROHIBITION)
/ 8
time. (time is changed by 10 minutes unit.)
5
switch one time to set ON (PROHIBITION) schedule.
7 Press the
(The cursor moves to the next setting position.)
ENTER
8 Perform operation 6 to select OFF (PERMISSION) time.
9 Perform operation 7 to set the OFF (PERMISSION) time.
10 Repeat operation 6 to 9 to set the second and third ON/OFF (PROHIBITION/PERMISSION) schedules in the same manner.
When the second or third ON/OFF (PROHIBITION/PERMISSION) sch:
edule is not used, the characters "
" remain display and press
the
switch one time.
ENTER
11 To cancel the ON/OFF (PROHIBITION/PERMISSION) time that was set
previously, use the
switch to move the cursor
RESET
DEL.
to the time position to be cancelled and press the
switch.
12 When the P1 setting are completed,perform operation 2 to 11 as necessary to perform the setting for P2 or P3 or P4 .
Setting example in case of P4
-20-
(2) Set-back values and setting temperature setting
• Setting the set-back values and setting temperature can be performed only when selecting either "SET BACK"
or "SET TEMP" on the user setting screen in the initial setting mode.
• Set-back operation
Set-back operation is a method which reduces the air conditioner running cost by controlling the operation with
specified time band for lowered load. In other words the unit operates at a few degrees higher for cooling and
a few degrees lower for heating in the specified time band.
EXAMPLE When the reference temperature is 24˚C / 75˚F and the set-back value is set to 2˚C / 4˚F.
• Cooling operation : 24˚C+2˚C=26˚C / 75˚F+4˚F=79˚F
• Heating operation : 24˚C-2˚C=22˚C / 75˚F-4˚F=71˚F
• Setting temperature operation
This operation sets the temperature when timer ON is set to a predesignated temperature regardless of the operation mode.
1 Press the
switch to move the cursor position to the set-back reference
temperature or setting temperature.
NOTE: The temperature display
can be switched between
Celsius (°C) or Fahrenheit
(°F) (page 34).
2 Press the 5
/ 8
(CLOCK/PATTERN) switch to
select the following items.
• Set-back value;
The reference temperature and
set-back value for each ON time
period are selected.
• Setting temperature:
The setting temperature for
each ON time period is selected.
3 Press the
setting.
* The selecting range:
• The reference temperature for set-back operation
: 19˚C 28˚C (1˚C unit) / 67˚F 83˚F (2˚F unit)
: 0 9 degree (1 degree unit)
• The set-back value
/ 0 18 degree (2 degree unit)
• The setting temperature : 19˚C 28˚C (1˚C unit) / 67˚F 83˚F (2˚F unit)
ENTER
switch to make
4 Repeat operations 2 and 3 to
set the set-back value or setting
temperature for each ON/OFF
schedule.
5 Press the
hed.
BACK
SCREEN
switch, when finis-
(3) Weekly schedule setting
The schedule pattern P1 to P3, local remote control prohibition (P4), P1 to P3 of a composite pattern composed of
P1 to P3 and P4, and non-timer operation(-) are set for each day.
GROUP
1 Press the
SELECT
schedule setting.
2 Press the
switch to display the group in desired weekly
switch to move the cursor to the pat-
tern position to be set.
-21-
3 Press the 5
P4 or ( - ).
4 Press the
/
8
(CLOCK/PATTERN) switch to select P1 to
ENTER
switch one time to complete the setting.(The cursor
will move to the next setting position. )
5 Repeat operations 3 and 4 to assign the schedule pattern to each
day.
NOTE:
When the No.4 function setting is set ON, P4 cannot be set.
(4) Copying schedule content to other groups (memory,memory read)
• The schedule pattern P1 to P3, weekly schedule pattern, set-back value or setting temperature of one group
can be recorded and copied to memory or to another desired group.
• Correction and modification can be easily performed after the copy operation is completed.
1 Display the original group on the weekly schedule setting screen.
2 Press the
switch to move the cursor to "M" .
3 Press the
switch one time to record the setting date in memory.
*To erase date from the memory, return to the user operation menu
screen.
ENTER
4 "M" is displayed in reverse with blinking.
GROUP
5 Press the
SELECT
to be copied.
6 Press the
switch to select the group to which the data is
switch to move the cursor to "MR" .
7 Press the
switch to set the contents which will be the same as the
setting data in memory.
ENTER
The same contents are displayed.
The contents stored in memory can be copied to other groups any number
of times because these contents will not be erased even if the memory read
operation is used.
-22-
4 - 4 Malfunction
• The malfunction monitor function is used for conforming to the details of the malfunction condition when a
malfunction is displayed on the operation monitor screen.
• The malfunction monitor function can display data describing up to nine malfunctions in the address number sequence on one page. This data contains the unit address where the malfunction occured, the error code and the
unit address where the malfunction was detected.
• After checking the unit address where the malfunction occurred and the error code, please contact your dealer
or technical representative as soon as possible.
< Shifting to the malfunction monitor screen >
Press the 4
switch to
select "4 MALFUNCTION MONITOR".
BACK
SCREEN
Press the
switch to go back
to the user operation menu screen.
The unit address
where the malfunction occurred
The unit address
where the malfunction was detected
Error code
NOTE :
When there is no malfunction taking place, [ NO ERROR ] lights up instead of [ ERROR CODE ].
Page change operation
The page change operation is performed by the
switch.
Pressing the
or
switch shows the current display page +1.
Pressing the
or
switch shows the current display page -1.
Malfunction reset operation
Press the reset
RESET
DEL.
switch to reset all malfunctions.
The reset operation can be performed on any page.
NOTE :
When operation of the G-50A is prohibited, reset operation is invalid.
-23-
4 - 5 Current time setting
The current time, day, month and year are set on the current time setting screen.
< Sifting to the current time setting screen >
BACK
SCREEN
Press the
switch to back to
the user operation menu.
Press the 5
switch to select
"5 CURRENT TIME SETTING".
04-2002 MON
1 Press the
switch to move the cursor position to be set.
8
2 Press the 5
(CLOCK/PATTERN) switch to set the number or day that is displayed.
04-2002 MON
3 Repeat operations 1 and 2 to set the date day, month, year and
time.
4 Where all setting have been completed, press the
ENTER
switch.
5 The current time setting is executed and "done" is displayed with
blinking for two seconds to indicate the current time setting completed
and the clock count will start with the second reset to 0.
2002 SUN
-24-
5 . Initial setting
5 - 1 Shifting to initial setting menu
• Shift to the initial setting menu by continuously pressing
screen.(Refer to section "3-2".)
+
(2seconds or longer) on the user operation menu
Shift to the user operation menu by continuously pressing
+
(2seconds or longer) on the initial setting screen
(Refer to section "3-2".)
• When group information is not saved, the following initial setting screen is displayed when power is turned on at this
controller.
MENU
WED 15:29
1
2
3
4
ADDRESS SETTING
FUNCTION SELECT
IP ADDRESS SETTING
GROUP SETTING
PLEASE SET
INITIAL SETTING
5 - 2 M-NET address setting
(1) Select
"6.ADDRESS SETTING"(or
6
(2) Set the controller address by pressing the
(3) When the
MENU
BACK
SCREEN
1
"1.ADDRESS SETTING).
0
to
9
INS.
switches.(000,201
250).
switch is pressed after setting, the screen returns.
WED 15:29
6 ADDRESS SETTING
7 FUNCTION SETTING
8 IP ADDRESS SETTING
Press the 6
switch
to select"6ADDRESS M-NET ADDRESS
SETTING"
M-NET ADDRESS: 000
BACK
SCREEN
Press the
switch to back
to the initial
setting menu.
BACK
• When the controller is shipped from the factory, the address is set to "000".
(Always set the address to "000" When the K transmission converter is managed.)
NOTE :
Observe the following precautions when this controller manages the M-NET models and K control models by using the K transmission converter (PAC-SC25KAA).
Refer to the K transmission converter instruction manual for further details.
• Address of this controller
Always set the address of this controller to "000" .
• Function select setting of this controller
Always set the No.3 function setting to ON.
• Indoor unit address
Set all the M-NET models of indoor units from 001, next, set the address of the K control indoor unit.
Indoor unit address
001 M-NET indoor unit maximum address
mum address 050
K control indoor unit mini-
* The K transmission converter (PAC-SC25KAA) is not included in systems shipped to North America
(USA & Canada).
-25-
5 - 3 Function setting
• The functions of this controller are set according to the function settings.
• The functions selects are set to OFF when the controller is shipped from the factory.
(1) Select
"7.FUNCTION SETTING"(or
7
2
"2. FUNCTION SETTING").
(2) Switch the function by pressing the function No. you want to change, or the
of the same number.
1
to
8
switch
Each time the switch is pressed, the ON/OFF state of that No. is switched. (NO. 1 and NO. 2 cannot be changed.)
<Operation example>
1)When Input 3
switch was pressed.
3
3
ON
OFF
(3) When the
ON
OFF
BACK
SCREEN
: Active
switch is pressed at the end of function switching, the screen returns.
MENU
WED 15:29
6 ADDRESS SETTING
7 FUNCTION SETTING
8 IP ADDRESS SETTING
Press the 7
switch
to select"7FUNCTION FUNCTION SETTING
SELECT"
1 2 3 4 5 6 7 8
ON
OFF
BACK
SCREEN
Press the
switch to go back
to the initial
setting menu.
BACK
<Function selects>
No. 1
No. 2
No. 3
No. 4
No. 5
No. 6
No. 7
No. 8
Reserved for future use (Leave this switch set to OFF)
Reserved for future use (Leave this switch set to OFF)
ON : K transmission converter installed
OFF : No K transmission converter installed
OFF : Operation prohibit setting valid
ON : Operation prohibit setting invalid
OFF : Emergency stop broadcast enabled (Be sure to use)
ON : Emergency stop broadcast disabled
External input changeover (refer to section "7 External input/output function")
The range of a controller which the operation is prohibited
OFF : Both of the system controller and the local remote controller ON : Only the local remote controller
-26-
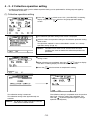
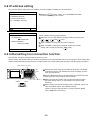
5 - 4 Group configuration setting
• Registration can be made for the indoor units, local remote controllers and slave system controllers in the same
group.
• Registration can be also performed for the group which is composed of only OA processing unit or LOSSNAY.
( Independent ventilation group )
< Example for the group configuration >
Outdoor unit
Indoor unit
M-NET local remote controller
OA processing unit or LOSSNAY
Air conditioner group
Independent ventilation group
M- NET
Transmission line
• Supply the power from the power supply unit (PAC-SC50KUA) through the M-NET transmission line and DC line.
• Perform the following procedures to set the group configuration because the interlocked operation setting will
not be performed if the group configuration settings have not been performed.
WED 15:29
1
2
3
4
ADDRESS SETTING
FUNCTION SETTING
IP ADDRESS SETTING
GROUP SETTING
1 When the power is supplied to the controller, the screen shown on the
left is displayed.
2 Press the
(or
1
4
) switch to select "1 GROUP SETTING" .
(or "4 GROUP SETTING")
PLEASE SET
INITIAL SETTING
The group configuration setting screen is displayed.
3 Press the
GROUP
SELECT
switch to display the group number to be set.
4 Press the
switch to move to move the cursor to the
address display position to be set.
5 Used the numeric keypad switch to set the address of the indoor
unit, local remote controller, slave system controller in the display
group number.
< Operation example >
When the indoor unit which address is 012.
1) Input "0"
0
2) Input "1"
01
3) Input "2"
012
4) Press the
switch 012
* It is also possible just enter "1" "2" .
< When the input is incorrect >
Before pressing
switch, continue to input the data. After pressing
switch, move the cursor to the addresses to be deleted and press
the
switch to delete these addresses.
DEL.
RESET
NOTE:
• Do not set interlocked ventilation unit such as OA processing unit or LOSSNAY.
• Even if the addresses are input any order, it is switched to a sequence starting with low-order address.
• The independent ventilation unit can not set to the indoor unit group and it can not be set to as an
interlocked ventilation unit.
-27-
Set all the units and controllers to be registered in the displayed group
number.
6 Repeat operation 3 to 5 to set all groups managed by this controller.
7 When all setting are completed, press the
BACK
SCREEN
switch.
NOTE: • When there are M-NET local remote controllers in the
system,always be sure to set the local remote controller
address. The local remote controller will not operate if
the address setting is not performed.
However, when the local remote controller is an MA remote
controller (PAR-20MAA) or K-control type remote controller,
setting is not performed.
• If there is a K transmission converter is a component
in the system, do not perform the group configurations
setting of this controller for the K transmission converter.
MENU
WED 15:29
8 The following initial setting screen is displayed.
When the interlocked operation settings are performed, refer to section
"5-5 Interlocked operation setting".
When the group name settings are performed, refer to section
"5-6 Group name setting".
When the user settings are performed, refer to section "5-7 User setting".
NEXT
Additions
Group configuration date collective deletion
• Display "G00" in the group configuration setting screen and press the
delete the all group configuration data and all interlocked operation data.
NOTE:
DEL.
switch two times continuously to
• When this unit is set to the slave system controller by the function select , group registration can not be
made. However confirmation of the contents of group registration is possible.
• Simultaneously press the
and
keys on the user operation menu screen for 2 seconds to perform group
configuration setting. The initial setting menu screen is displayed. Select "1. GROUP SETTING" on the setting
menu screen, wait for the group setting screen to appear, and change the setting.
9 When the necessary initial settings are complete, simultaneously press the
and
keys on the user operation menu screen for 2 seconds.
When returned to the user operation screen, register processing for the group
configuration information and initial set up processing for each unit and each
controller is executed.(This process takes approximately 5 7 minutes.)
-28-
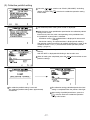
5 - 5 Interlocked operation setting
• Registration of interlocked operation of Ventilation unit (OA processing unit and LOSSNAY) with single or multiple
indoor unit is performed. All indoor units to be interlocked with ventilation unit for operation should be registered
for the interlocking with ventilation unit.
<Example for the interlocked group configuration>
Outdoor unit
Indoor unit
M-NET local remote controller
OA processing unit or LOSSNAY
M-NET
Transmission line
1 Simultaneously press the
screen for 2 seconds.
and
keys on the user operation menu
NOTE: Always perform the mode change operation from the user operation menu.
Mode change operation from other screens is ineffective even if
performed.
2 Initial setting menu screen is displayed.
3 Press the
switch to select "2 INTERLOCKED SETTING" .
2
NEXT
4 The interlocked setting screen is displayed.
Minimum address of the interlocked OA processing unit or LOSSNAY unit
which can be set to interlock with indoor unit is displayed on the "INTERLOCKED UNIT ADDRESS" display position. And the cursor is displayed in
the unit address display position.
GROUP
5 Press the
switch to display the address number of the inSELECT
terlocked OA processor unit or LOSSNAY that the setting will be perfomed on.
-29-
6 Used the numeric keypad switch to set the address of the indoor unit
that operates with displayed interlocked OA processing unit or LOSSNAY.
<Operation example>
When the indoor unit which address is 012.
1) Input "0"
0
2) Input "1"
3) Input "2"
01
012
4) Press the
switch 012
*It is also possible just enter "1" "2" .
<When the input is incorrect>
Before pressing
switch, continue to input the data. After pressing
switch, move the cursor to the address to be deleted and press
DEL.
the
switch to delete these addresses.
7 Set all the indoor units that operate with displayed interlocked OA
processing unit or LOSSNAY.
8 Repeat operation 5 to 7 to set the indoor units of all interlocked operation units managed by this controller.
9 When all settings are completed, press the
BACK
SCREEN
switch.
Initial setting screen is displayed.
This ends the interlocked operation setting.
When the interlocked operation settings are performed, refer to section
"5-5 Interlocked operation setting" .
When the group name settings are performed, refer to section "5-6 group
name setting" .
When the user setting are performed, refer to section "5-7 user setting" .
NEXT
Simultaneously press the
and
keys on the initial setting menu screen
for 2 seconds to complete user operation.After the initial setting processing
is completed (The initial setting screen will be displayed), refer to section
"4 User operation ( page 10 )" and perform user operation.
NOTE: When this unit is set to slave system controller by No.2 function select, interlocked operation settings cannot be adjusted. However monitoring of the contents of the interlocked operation settings is possible.
-30-
5 - 6 Group name setting
( 1 ) Setting method
• Specify new group name.
• Either alphabet, numeric characters, hyphens or spaces can be used for name setting.
• Maximum of ten characters can be set.
• When the group name is displayed on the operation monitor screen, the first three characters of the group name
are displayed.
(or 4
)switch to select"1. GROUP SETTING"
1 Press the 1
(or"4. GROUP SETTING") of the initial setting menu.
NEXT
2 The group configuration setting screen is displayed.
GROUP
3 Press the
switch to display the group number which will
SELECT
be set in the group name setting.
4 Press the
ENTER
switch one time.
The group name setting screen is displayed.
5 The character " " is displayed in reverse.
6 Press the
sired character.
7 Press the
ENTER
switch to move the cursor to the de-
switch.
The selected character is displayed in the group name display area.
8 Repeat operation 6 or 7 and set the group name.
When incorrect character is set, refer to section "Group name correction method (page 32)" .
Group name display area
-31-
9 When the group name setting is completed, press the
BACK
SCREEN
switch.
The group configuration setting screen is displayed.
10 Repeat operation 3 to 9 and perform the group name setting for
each group.
11 When all the group name settings are complete, press the
BACK
SCREEN
switch.
12 The initial setting menu screen is displayed.
To perform the setting, refer to section "5-6 User setting (page
34)".
Simultaneously press the
and
keys on the initial setting menu
screen for 2 seconds to complete user operation.
Next refer to section " 4 User operation " and perform user operation.
NEXT
When performing corrections to the group name, move the group name
cursor to the character to be correct.
Group name cursor movement method
Move the cursor to one of the group name cursor movement mark
using the
switch.
Group name cursor
Group name cursor movement mark
• Deletion methods
Move the group name cursor to the character to deleted and press
DEL.
the
switch to delete the character.
• Insertion methods
Move the group name cursor to the location where character is to be
insert and press the 9 INS. switch to enter desired space.
-32-
( 2 ) Group name copy
• A certain group name can be copied to another group.
( This method use the "M" (memory) and "MR" (memory read) functions.)
• It is convenient to use a group name for other groups because a group name that was copied can also be corrected.
GROUP
1 Press the
switch to display the original group on the group
SELECT
name setting screen.
2 Press the
3 Press the
switch to move the cursor to "M" .
ENTER
switch one time to record the setting name in memory.
4 "M" is displayed in reverse with blinking.
Recording the setting name to memory is completed.
5 Press the
GROUP
SELECT
6 Press the
7 Press the
switch to select the copy destination group.
switch to move the cursor "MR" .
ENTER
switch to read in memory.
8 Preformed the memory read for the group name.
Refer to section " (1) setting method (page 31)" and perform the correction of the group name.
-33-
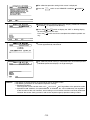
5-7 User setting
• To match the needs for the user this menu is to specify some of the indications and functions that appear on
the user operating screen.
1 Press the 5
switch to select "5 USER SETTING" on the initial
setting menu screen.
NEXT
The user setting screen is displayed.
2 Press the
switch to select the items to be set.
3 When all the selection are completed,press the
to the initial setting menu screen.
7
BACK
SCREEN
switch to return
TEMP. UNIT ˚C / ˚F
Setup condition before delivery from the shop
Item 1. Operation monitor screen display settings
"GROUP NO."
: Groups are indicated by group number on the operation monitor screen.
"NAME"
: Groups are indicated by their first three characters of the group name on the
operation monitor screen.
"UNIT ADDRESS" : Individual units are indicated by their unit address on the operation monitor
screen.
Item 2. Setting the set-back value and the setting temperature used in conjunction with schedule operation.
• The set-back value or the setting temperature setting are possible when operation is linked with the
schedule operation.
"SET-BACK"
: Allows setting set-back value used in conjunction with ON/OFF patterns during
schedule operation.
: Allows setting of the setting temperature used in conjunction with ON/OFF pat"SET TEMP"
terns during schedule operation.
: The schedule operation is only performs normal ON/OFF patterns.
"NONE"
Item 3. Setting filter sign indication
"INDICATE"
: Allows the indication of filter sign.
"NONE"
: Filter sign is not indicated.
Item 4. Group number display
"INDICATE"
: Enable display of group number on the operation setting screen and the schedule
setting screen.
"NONE"
: Group number is not indicated.
Item 5. Change to the sequence of current time
"2001-1-1"
: Current time indicate in a sequence of year,month and date on the current time
setting screen.
"1-1-2001"
: Current time indicate in a sequence of date,month and year on the current time
setting screen.
Item 6. Room temperature indication
"INDICATE"
: Indicated every each group
"NONE"
: Not indicated every each group
Item 7. Temperature unit
"˚C"
"˚F"
: Setting Centigrade
: Setting Fahrenheit
-34-
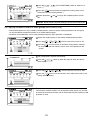
5-8 IP address setting
• This function allows setting of the IP address and mask address needed at LAN connection.
MENU
WED 15:29
1 Select the 6
switch select "8. IP ADDRESS SETTING"
on the initial setting menu screen.
6 ADDRESS SETTING
7 FUNCTION SETTING
8 IP ADDRESS SETTING
BACK
IP ADDRESS SETTING
The IP address setting screen appears.
2 Move the cursor to the address setting position by pressing the
IP ADDRESS :
192.168.001.001
,
MASK ADDRESS :
255.255.255.000
,
and
keys.
3 Set the address with the 0 to 9 numeric switches.
4 When all address setting are complete, return to the initial
setting menu screen by pressing
BACK
SCREEN
switch.
5-9 Initial setting tool connection function
• This function connects the initial setting tool PC by LAN.
• Group setting, interlocked setting, and other information can be downloaded to this unit by using the initial setting tool
Refer to the initial setting tool manual for an explanation of the initial setting tool functions and operating procedures.
LAN changeover switch
ACT
LINK
1 Remove the cover from the controller by inserting a flat blade
screwdriver into the gap between the cover and body and twisting the screwdriver.
2 Use the dedicated cable (sold separately) to connect the initial
setting tool PC to the service LAN connector.
Service LAN connector
FRONT
REAR
3 When changed to FRONT with the LAN changeover switch,
the initial setting tool PC is connected to the service LAN
connector.
4 When setting with the initial setting tool is complete, return the
LAN changeover switch to the REAR position.
*When a service LAN connector is used, the option Model
PAC-YG00FA-E is necessary.
-35-
6. Maintenance
6-1 Refrigerant system monitor
• This function allows monitoring of the address of the outdoor units, and BC controller connected to the refrigerant system. It is useful for checking address settings, transmission line connection during installation.
switch to select "3 REFRIGERANT MONITOR" on
1 Press the 3
the initial setting menu screen.
NEXT
The process for monitoring of the refrigerant system is executed.
Please wait.
The refrigerant system monitor screen of the lowest outdoor unit address
is displayed.
Press the
GROUP
SELECT
switch to change the displayed refrigerant system.
When the monitoring is end, press the
setting menu screen.
-36-
BACK
SCREEN
switch to back to the initial
6-2 Malfunction log monitor
• This function allows monitoring of a log of the last 64 malfunctions.
• The contents of malfunction and time the malfunction occurred is displayed. The contents of malfunction
is the address of the unit where it occurred, the error code and the address of the unit that detected the
malfunction.
• This data are remains in the memory even if supplied power is cut off.
• The malfunction log data can be deleted using the malfunction log reset operation. If the malfunction log data
is reset after the system is serviced, the log will provide a convenient record of the malfunction that have
occurred after that time when the system is next serviced.
1 Press the 4
switch to select "4 MALFUNCTION MONITOR" on
the initial setting menu screen.
NEXT
The malfunction log monitor screen is displayed.
2 Changing pages on the malfunction log monitor screen.
2002
16-04-2002
2002
GROUP
SELECT
(
05-04-2002
2002
,
)
GROUP
SELECT
(
,
)
Each time this switch is pressed, the current page
+1 is displayed.
Each time this switch is pressed, the current page
-1 is displayed.
3 Malfunction log reset operation
Press the
RESET
DEL.
-37-
switch to clear the malfunction log.
7.External input/output function
* External signal input requires the external I/O adapter (Model : PAC-YG10HA-E) sold separately.
7-1 External input function
(1) The function of external input
• Emergency stop/normal operation, ON/OFF, local remote control prohibit/permit can be controlled for all air
conditioners being controlled with a non-voltage contact signal input from an external input source. (Select with
the dip switches)
• The condition of external input signal is displayed on the operation setting screen for each group.
No. Function of external input signal
Function
No.6 No.7
OFF
Remarks
OFF
1
External input signal not used
2
Perform emergency stop with level signal OFF
ON
During emergency stop, only ON/OFF of the central
controller and local remote controller's operation
will be prohibit.
Perform ON/OFF operation with level signal
Perform ON/OFF operation,prohibit/permit operation with pulse signal
ON
OFF
Only the ON/OFF operation of the central controller
and the local remote controller will be prohibit.
ON
ON
Set the pulse width while the contact is ON to 0.5
to 1.0 second.
3
4
(2) Level signal and pulse signal
1 Level signal
2 Pulse signal
(3) Specification of external input interface
ON/OFF level signal
ON/OFF , prohibit/premit
pulse signal
ON/OFF input
Not used
ON input
OFF input
CN2
Lead wire
No.5
No.6
Orange
Yellow
Emergency stop/normal
level signal
Emergency stop/normal input
Not used
No.7
Blue
Not used
Not used
Local remote controller
prohibit input
No.8
Gray
Not used
Not used
Local remote controller
permit input
No.9
Red
Common(DC12V or DC24V)
(A) Level signal
1 When the level signal is selected, the operation (only ON/OFF operation) for the central controller and the
local remote controller are prohibited (except during normal operation).
2 When the emergency stop/normal operation signal is selected, the status will be changed from normal operation to emergency stop when the external input signal contact turns OFF to ON, and will be changed from
emergency stop to normal operation when external input signal contact turns ON to OFF.
3 When ON/OFF input signal is selected, the status will be changed from OFF to ON when the external input
signal contact turns OFF to ON, and will be changed from ON to OFF when the external input signal contact
turns ON to OFF.
-38-
(B) Pulse signal
1 Even if the ON signal is input during ON, the status will remain at the ON status.
2 When the local remote controller is prohibited, the ON/OFF operation, operation mode selection and
temperature setting from the local remote controller is prohibited.
3 Set the pulse width (contact ON time) to 0.5 to 1.0 second.
7 - 2 External output function
(1)The function of external output
•The "ON" signal is output when one or more air conditioner are in the ON operation.
•The "Malfunction" signal is output when one or more air conditioner malfunctions.
(2)Specification of external output interface
CN2
No.1
No.2
No.3
Lead wire
Green
Black
Brown
Description of each terminal
Common (0V)
ON/OFF
Malfunction/Normal
1 "ON" signal and "Malfunction" signal will both be output.
-39-
Appendix 1 : Initial setting (abridged)
Initial setting list
Power on
Displaying for a maximum of 7 minutes.
* User operation
WED 15:29
MENU
1 OPERATION MONITOR
There is group
information.
2 OPERATION SETTING
3 SCHEDULE SETTING
INITIAL SETTING
PLEASE WAIT
Group information
modification and
settings modification
There is no group
information.
MENU
1
2
3
4
4 MALFUNCTION
MONITOR
5 CURRENT TIME
SETTING
Continously press
and
(2 seconds or longer)
WED 15:29
MENU
1 GROUP SETTING
ADDRESS SETTING
FUNCTION SELECT
IP ADDRESS SETTING
GROUP SETTING
Setting end
PLEASE SET
INITIAL SETTING
2 INTERLOCKED
SETTING
3 REFRIGIERANT
MONITOR
4 MALFUNCTUON
MONITOR
5 USER SETTING
ENTER
MENU
6 ADDRESS SETTING
7 FUNCTION SETTING
8 IP ADDRESS SETTING
BACK
SCREEN
8
1
WED 15:29
VER.
.
BACK
Setting items
Menu items screen
Group configuration setting
… This performs the same group setting.
GROUP SETTING
G01
GROUP
SELECT
•
ADDRESS
UNIT
•
: Move the cursor to address display position.
• Numeric keypayed
REMOTE CONTROLLER
: Select the group number.
SYSTEM CONTROLLER
: Set the address.
indoor unit, local remote controller
slave system controller
GROUP NAME SET
GROUP NAME SET
BACK
SCREEN
ENTER
GROUP NAME
G01
•
: Move the cursor to the desired character.
M
•
•
1 2 3 4 5 6 7 8 9 0 -
: Select the charactor.
ENTER
: Delete the charactor.
DEL.
A B CD E F GH I J K L M
N OP Q R S T U V W X Y Z
Group name display area
M
MR
-40-
Interlocked setting
… Registration of interlocked operation of ventilation unit with single or
multiple indoor unit is performed.
INTERLOCKED SETTING
INTERLOCKED
UNIT ADDRESS
005
•
UNIT ADDRESS
: Select the address number of the interlocked
OA processor unit or LOSSNAY.
GROUP
SELECT
•
: Move the cursor to address display position.
• Numeric keypayed
: Set the address of the indoor unit.
User setting
… Select the display method and timer settings.
USER SETTING
1
2
3
4
5
6
7
OPERATION MONITOR
GROUP NO. /NAME
/UNIT ADDRESS
SCHEDULE DATA
SET- BACK/SET TEMP
/ NONE
FILTER SIGN
NONE/INDICATE
GROUP NO. DISPLAY
NONE/INDICATE
2001-1-1/1-1-2001
ROOM TEMPERATURE
NONE/INDICATE
TEMP. UNIT ˚C / ˚F
•
: Select the items.
Refrigerant monitor
… The unit address are displayed for each refrigerant system.
R E F R I G E R A N T M O N I TO R
OUTDOOR ADDRESS
ADDRESS
BC/OS
UNIT
01
02
08
09
15
16
ADDRESS
03
04
05
10
11
12
51
52
06
13
•
GROUP
SELECT
: Change the displayed refrigerant system.
07
14
Malfunction log
… The function allows monitoring of a log of the last 64 malfunction.
MALFUNCTION LOG
PAGE 01/01
18-04-2002
19:01
001-6607 (DETECT 000)
12:45
16-04-2002
014-6602 (DETECT 014)
03:23
12-04-2002
003-6607 (DETECT 000)
09:12
15-04-2002
112-6607 (DETECT 012)
23:56
01-04-2002
001-6607 (DETECT 000)
•
GROUP
SELECT
: Changing pages.
•
DEL.
: Clear the malfunction log.
M-NET address setting
M-NET ADDRESS
M-NET ADDRESS: 000
… Displays, or sets, the controller M-NET address.
• Numeric keypayed : Set the controller address.
(000,201 250)
*Initial value is 000.
Function setting
FUNCTION SETTING
… Sets the function of the controller.
• Numeric keypayed : Set ON/OFF
1 2 3 4 5 6 7 8
ON
OFF
•
: Move the cursor.
: Active
When No.3 is set to ON, the KA address input field is displayed.
Numeric keypayed : Set the address of the K transmission conveter.
IP address setting
IP ADDRESS SETTING
IP ADDRESS :
192.168.001.001
MASK ADDRESS :
255.255.255.000
… Sets the LAN IP address.
*Setting is unnecessary when a LAN is used.
•
: Move the cursor to the address setting position.
• Numeric keypayed
: Set the address (0
-41-
255)
Appendix 2 : User operation (abridged)
Shows the operation panel, screen, etc. for user operation.
Overall status lamp
ON
…During operation
OFF
…All group are stopping
BLINKING…Malfunction
Collective operation switch
ON/OFF
TEST RUN
ON/OFF MODE
1
2
FAN SPEED
3
4
5
AIR
DIRECTION
6
TEMP.
CLOCK/
PATTERN
8
VENTILATION
9 INS.
REMOTE
PROHIBITION
TIMER
MODE
RESET
7
CENTRAL CONTROLLER
G-50A
0
DEL.
GROUP
SELECT
BACK
SCREEN
ENTER
3
User operation menu screen
WED 15:29
MENU
1 OPERATION MONITOR
Initial setting
menu
* To initial setting
2 OPERATION SETTING
Continously press
and
( 2 seconds or longer )
3 SCHEDULE SETTING
4 MALFUNCTION
MONITOR
5 CURRENT TIME
SETTING
2
BACK
SCREEN
Operation setting screen
*The following settings are possible using the
Operation Panel switches
• Start/Stop, mode, set temperature, etc.
• Local remote control operation prohibition setting
Function area
MON. : MONITOR
PROH. : PROHIBIT
COL. : COLLECTIVE
M.
: MEMORY
MR.
: MEMORY READ
Reverse : ON
Normal : OFF
Blinking : Malfunction during unit off
Blinking and Reverse : Malfunction during unit is on
GROUP
SELECT
•
•
ON/OFF
1
BACK
SCREEN
Blinking "MON."
+
BACK
SCREEN
<Unit address display>
Operation monitor screen
: Change the display group
: Turn all the units in that group ON or OFF
<Group number display, Group name display>
•
•
: Move the "
ON/OFF
1
BACK
SCREEN
" symbol.
: Set the displayed group unit in indicated by the "
to the ON/OFF mode.
" symbol
<Group number display>
-42-
1
Weekly schedule setting screen
GROUP
SELECT
•
: Change the display group.
•
•
•
: Move the cursor to the pattern position.
CLOCK / PATTERN
/
5
: Select P1 to P4 or ( - )
8
: Complete the setting.
The cursor will move to the next setting position.
* Repeat assign the schedule pattern to each day (and each group)
ENTER
NOTE : When the No.4 function select is set ON, P4 connot be set.
BACK
SCREEN
* P1 to P3 of a composite pattern composed of P1 to P3 and P4.
P1
+
P4
BACK
SCREEN
ENTER
•
•
•
: Move the cursor position.
CLOCK / PATTERN
/
5
: Select the ON(PROHIBITION) time or OFF
(PERMISSION) time.
(Time is changed by 10 minutes unit.)
8
: Complete the setting. The cursor moves to the next setting p
ENTER
* Repeat set schedules.
* Three types (P1-P3) of daily ON/OFF pattern and one type (P4) of prohibition/
permission pattern are available respectively, each of which can be set for each
group.
Schedule parttern setting screen
Malfunction monitor screen
4
•
BACK
SCREEN
•
The unit address
where the malfunction occurred
: Change the pages
RESET
DEL.
or
= page + 1
or
= page - 1
: Reset all malfunctions
The unit address
where the malfunction was detected
Error code
NOTE : When there is no malfunction taking place,[NO ERROR] lights up instead of [ERROR CODE].
5
When operation of the G-50A is prohibited,reset operation is invalid.
BACK
SCREEN
Current time setting screen
•
•
: Move the cursor position
5
8
: Set the number or day
* Set the date day, month, year and time.
22-09-2002 SUN 00:00
•
ENTER
: Press this switch, where all setting have been completed.
* The clock count will start with the second reset to 0.
-43-
This product is designed and intended for use in the residential,
commercial and light -industrial environment.
The product at hand is
based on the following
EU regulations:
• Low Voltage Directive 73/23/EEC
• Electromagnetic Compatibility Directive 89/
336/EEC
NOTE:
This equipment has been tested and found to comply with the limits for a Class B digital device, pursuant to
Part 15 of the FCC Rules. These limits are designed to provide resonable protection against harmful
interference in a residential installation. This equipment generates, uses and can radiate radio frequency
energy and, if not installed and used in accordance with the instructions, may cause harmful interference to
radio communications.
However, there is no quarantee that interference will not occur in a particular installation.
If this equipment does cause harmful interference to radio or television reception, which can be determined
by turning the equipment off and on, the user is encouraged to try to correct the interference by one or more
of the following measures:
- Reorient or relocate the receiving antenna.
- Increase the separation between the equipment and receiver.
- Connect the equipment into an outlet on a circuit different from that to which the receiver is connected.
- Consult the dealer or an experienced radio / TV technician for help.
MITSUBISHI ELECTRIC CORPORATION
HEAD OFFICE: MITSUBISHI DENKI BLDG. , 2-2-3, MARUNOUCHI, CHIYODA-KU, TOKYO 100-8310, JAPAN
WT03945X01
Printed in Japan
Recycled Paper