1
GR SLIT LAMP USER MANUAL
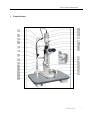
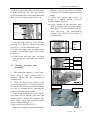
1. Work Table
2. Joystick
Incline joystick to move the instrument slightly on the horizontal surface and rotate it to
adjust the elevation of the microscope.
3. Brightness Control Switch
The brightness can be adjusted continuously. Avoid working continuously at high setting, as
the service life of the bulb will be shortened.
4. Microscope Arm Locking Knob
Lock the rotational movement of the microscopes arm.
5. Illumination Arm Locking Knob
Lock the rotational movement of the illumination arm.
6. The indicate of relative angle between the microscope and illumination unit
Mark on the angle mark ring of the illumination arm, which relates to the long mark of the
microscope arm, represent the two arms’ angle when the”0” on the ring relates to the short
mark at one side of the operator the right eyepiece may be blocked, and the side of the patient
the left eyepiece.
7. The mark of microscope arm
Together with (6) to indicate the angle between the microscope and illumination unit
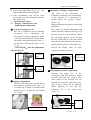
8. 12.5X Eyepieces
9. Prism Box
Separate the prism box to adjust the inter papillary distance until it fit for checking
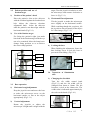
10. The Control Plat of Slit
11. Slit Height Control Knob
12. Aperture Slit Height and Display Window
It will display the diameter of the slit and the aperture.
13. The Fixation Knob of Lamp Cap
After fixing the knob, the lamp cap will not move.
14. Lamp Cap
With the function of protecting and insulating, its normal working temperature is around
51℃.
15. The plug of Lamp cap
It is connected with the power of the light unit.
16. Fixation target
Make the patient stare at it, it is convenient for checking
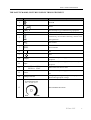
Rotate this knob to adjust the spot and the slit height. Swing the knob horizontally to revolve
the slit.
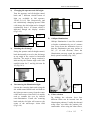
17. Filter Selection Lever and display mark
The lever can choose different filters.
18. Forehead Belt
To fix the patient’s head on an appropriate position
Gilras LLC
8