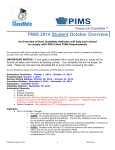
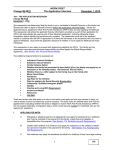
1
Section Two Client Intake - New New household records are created in this section. From there, a household (HH) can be enrolled in agency programs, services and household transactions. Client Search 34 Advanced Client Search 35 Client Search New 38 Client New 39 Client View 42 Household Mail and Phone Update 44 Non-Cash Benefits Update 47 Income & Employer 50 Residence Search 53 Residence New 54 Verifying Data on Views 55 Add Clients to Household 56 Active Client and Physical Residence 61 Client Vendor New 61 Household Summary 64 Household New Payment, Confirms Qualification 65 Payment Links 71 Denying A Payment 71 Household View 74 Energy Education See Section 4 Kits Components See Section 4 All SSNs throughout this manual have be covered for confidentiality purposes even though the test database was used. 33 ENERGY ASSISTANCE OPUS User Manual, Section 2 – Client Intake-New Data Classification: 2 Client Search There are two types of client search screens, ‘Client Search’ and ‘Client Search New’. When to use each specific Search Screen Client Search: Use the ‘Client Search’ screen to find current records in the OPUS database. Client Search New: Use the ‘Client Search New’ screen during a client intake session. Setup: Log in and start from ‘Message of the Day’ Screen. 1. Click the ‘Client Search’ link on the left nav bar or pass your cursor over ‘Client’ on the main menu and select ‘Search’ from the dropdown list. The ‘Client Search’ screen will appear next. (reference figure 2-1). 2. An individual search needs to be conducted for each new client and/or each client in the household. Search for clients by name or SSN/System ID (SID or SYSID) without dashes. 3. Click the ‘Search’ button. Figure 2-1: Client Search Screen When a search is unsuccessful, a message ‘No Results Found’ will display under the ‘Search Results’ section (reference figure 2-2). Repeat the search for each “new client” or “client in the household” (HH) before adding a client to a household. When a search is successful, a client's information will display in the Search Results (reference figure 3-2). If a person does not exist in the OPUS system, a client search will indicate ‘No Results Found’. The client can then be entered as a ‘New Client’. 34 ENERGY ASSISTANCE OPUS User Manual, Section 2 – Client Intake-New Data Classification: 2 Figure 2-2: Client Search Screen - No Results Found A search can be completed by any of the fields provided: SSN, first name, last name, physical address, system ID, city or zip. When a client has a system identification (SYSID#) different from their social security number, it might be beneficial to remove the SYSID# from the search box, and search only by the first and last name. Advanced Search Additionally you can access Advanced Search features by clicking on the ‘Advanced Search’ link (reference figure 2-3A). An advanced search can be completed utilizing system Identification (SYSID#), First Name, Last Name and/or Telephone Number (Ref. (reference figure 2-3B and 2-3C). 35 ENERGY ASSISTANCE OPUS User Manual, Section 2 – Client Intake-New Data Classification: 2 Figure 2-3A: Client Search Screen Figure 2-3B: Advanced Client Search Screen 36 ENERGY ASSISTANCE OPUS User Manual, Section 2 – Client Intake-New Data Classification: 2 Figure 2-3C: Advanced Client Search Screen – Search Results Note: ‘Search Results’ are displayed for the first 100 records randomly matching the criteria you enter in a given ‘search’. A list resulting of up to 100 individual result records are generated randomly. If specific search criteria entered will result in a more than 100 matches, utilize a redefined search result and narrow down the list generated. Fields marked * are required. 37 ENERGY ASSISTANCE OPUS User Manual, Section 2 – Client Intake-New Data Classification: 2 Client Search New: The ‘Client Search New’ screen finds possible matches using the required search fields. (reference figure 2-4). Setup: On the ‘Client Search New’ screen. 1. Enter required fields (without wild cards) with legal first name, last name, SSN/SID, and date of birth (DOB) (reference figure 2-4). The “Create ID” button will automatically create an SID to search for a client who may be assigned a system ID versus a SSN. System ID is created by OPUS (or can be manually done): SYSID sequence is as follows: "S" + first 5 letters of the client’s first name + month, day, year (MMDDYY) of client's birth date. 2. Click the “Search” button. The search button becomes activated when information is typed into any of the boxes. If “No Results found” is displayed, the client can be added as a new client to the OPUS database (reference figure 2-4A). Figure 2-4: Client Search New Note: OPUS utilizes several different ways to find potential duplicate clients. Please review the list first prior to entering new clients into the database. 38 ENERGY ASSISTANCE OPUS User Manual, Section 2 – Client Intake-New Data Classification: 2 Client New This step is only used after determining the client is not in the system and all search attempts have been exhausted. Setup: On the ‘Client Search New’ screen. 1. Click the ‘Add New Member’ button (reference figure 2-4A). The ‘Client New’ screen appears (reference figure 2-5). Figure 2-4A: Client Search New – No Results Found 2. Client name, birth date, SYSID/SSN is already filled in from being entered on the ‘Client Search New’ screen. Complete the rest of the new client information. Fields marked with * require responses to be selected. There are several buttons with dropdown arrows for different choices. Title; salutation if necessary. Legal first name, middle name, last name, suffix. * Review social security number or system identification number for accuracy. SSN Verification. * This is to describe if the SSN is full or ‘don’t know/don’t have’ or ‘refuse’ for system identification. Client ‘Comments’ Box One phone number, extension, and type. Mailing Address: * The first client created for a household, type their mailing address in provided boxes. For subsequent clients, the select from drop-down menu will display previous mailing addresses. Street number, Street direction: S, N, NE, NW, etc. Street name. 39 ENERGY ASSISTANCE OPUS User Manual, Section 2 – Client Intake-New Data Classification: 2 Street type: Ave, Lane, etc. Unit type: Apt, Unit, PO Box, etc. Enter an apt number or PO Box number. City or Zip Code Gender * Disabled * Ethnicity * Veteran * Language. Education. Homebound Transportation (if Homebound set to ‘YES’) Race.* Oregon Tribe Option (if Native American has been selected) Non-Cash benefits client receives * Does this client have any income * (None, Yes, None-Zero Income Statement, Don’t Know, Refused). If ‘None-Zero Income Statement’ is selected a required ‘Zero Income Comment’ block appears; otherwise it is hidden. Click the ‘Save’ button. Items marked with * required responses to be selected. Other items are optional and can be left blank. 40 ENERGY ASSISTANCE OPUS User Manual, Section 2 – Client Intake-New Data Classification: 2 Figure 2-5: Client New Screen. 41 ENERGY ASSISTANCE OPUS User Manual, Section 2 – Client Intake-New Data Classification: 2 Client View The ‘Client View’ screen will appear after a new client record is created or edited (reference figure 2-6). Use this screen to review the accuracy of information entered from the ‘New’ or ‘Edit’ screens. Note: When you change the ‘Does this Client have any income?’ response to YES and save, the New income button appears and the ‘Zero Income Comment’ box disappears. Viewing the HH View screen to verify information will be covered several times throughout this manual. Figure 2-6: Client View with Income/Employer info Screen 42 ENERGY ASSISTANCE OPUS User Manual, Section 2 – Client Intake-New Data Classification: 2 Figure 2-7: Client View with Zero Income Comments Box Screen If ‘None –Zero Income Statement’ is selected the ‘Zero Income Comment” box will appear (reference figure 2-7) and requires and entry. 43 ENERGY ASSISTANCE OPUS User Manual, Section 2 – Client Intake-New Data Classification: 2 Household Mail and Phone Update To update the mailing address from the household click on the ‘Mail/Ph Update’ link located on the Left Nav Bar (reference figure 2-8A). Figure 2-8A: Client View Screen The ‘Household Mail and Phone Update’ Screen will now appear (reference figure 2-8B). You can select a new mailing address from the drop down or enter and new mailing address. 44 ENERGY ASSISTANCE OPUS User Manual, Section 2 – Client Intake-New Data Classification: 2 Figure 2-8B: Household Mail and Phone Update Screen – Update HH Mailing Address You can add or delete additional telephone numbers to/from individuals or the entire household by entering the telephone number and selecting the corresponding button (reference figure 2-8C) 45 ENERGY ASSISTANCE OPUS User Manual, Section 2 – Client Intake-New Data Classification: 2 Figure 2-8C: Household Mail and Phone Update Screen – Modify HH Phone Numbers. 46 ENERGY ASSISTANCE OPUS User Manual, Section 2 – Client Intake-New Data Classification: 2 Client Non-Cash Benefits Update To update the non-cash benefits from the ‘Client View’ screen click the ‘Edit’ link located on the Left Nav Bar under Client or the ‘Edit Client’ button located in the Client Characteristics section of the Client View screen (reference figure 2-9A). Figure 2-9A: Client View Screen - Edit Client Button and Left Nav Bar Link 47 ENERGY ASSISTANCE OPUS User Manual, Section 2 – Client Intake-New Data Classification: 2 The Client Edit screen (reference figure 2-9B) should now appear. Go to the bottom of the screen were you will find the Non-Cash Benefits section. Select and/or deselect the appropriate check boxes and select ‘Save Changes’ button (reference figure 2-9B). Figure 2-9B: Client Edit Screen – Non-Cash Benefits 48 ENERGY ASSISTANCE OPUS User Manual, Section 2 – Client Intake-New Data Classification: 2 Figure 2-9C: Client View Screen – Reflecting Non-Cash Benefits changes 49 ENERGY ASSISTANCE OPUS User Manual, Section 2 – Client Intake-New Data Classification: 2 Income & Employer Setup: Using the ‘Household View’, click on the individual household member ‘SSN/SYSID’ to open ‘Client View’ screen. 1. Click the button “New Income/Employer” (reference figure 2-10). The ‘Income & Employer New’ screen will appear next. Figure 2-10: Client View – New Income Button 50 ENERGY ASSISTANCE OPUS User Manual, Section 2 – Client Intake-New Data Classification: 2 2. On the Income and Employer Screen, (reference figure 2-11). Type or Select: Source (such as employer's name) * Verified Date * * * * * Type of the income: i.e. SSI Income received in past 30 days Amount Don’t Use This Record Creating Payments Frequency Enter Comments as needed Verified How Employer Information & address Verified By who (follow steps as required) Click the ‘Save’ button, the ‘Client View’ screen will re-appear with the income displayed. If the client has an employer, you can enter this information by following the same steps done for income (reference figure 2-11). Figure 2-11: Income & Employer New Screen Click the ‘Save’ button (reference figure 2-11) and the ‘Client View’ screen will appear next with the income added and displayed in the Income section (reference figure 2-12). 51 ENERGY ASSISTANCE OPUS User Manual, Section 2 – Client Intake-New Data Classification: 2 Figure 2-12: Client View Screen – Updated Income 52 ENERGY ASSISTANCE OPUS User Manual, Section 2 – Client Intake-New Data Classification: 2 Residence Search A residence may exist in the database but may be linked to an old household record. If a client is located at an old address or linked to another household, go to Section 3 - Move Client(s) to Unknown and follow the steps. This process moves clients from an old residence record in order for you to use it for processing a new intake. Note: If a client is “Active” in another program enrollment, possibly in another OPUS module for services, the client cannot be moved from the HH without being exited from the ‘other’ open enrollment. The OPUS user can search other modules he/she has access to or contact their agency’s OPUS Administrator for assistance. If the agency does not have access to another module and receives an error message “The client cannot be moved due to another open enrollment”, contact OPUS Helpdesk [email protected]. Residence New Setup: While in the ‘Client Search’ screen. 1. In the address box, type a street number and street name (with spaces between as needed). If a street number isn’t available, use a "%" in front of the street name, such as % Stevens St. 2. If there is an apartment or unit number, use one of these formats: Apt #, Unit #, or Spc #. 3. Type a city and zip code to narrow the results to this region of the state (reference Figure 2-13). Note: At any time, searching for a client by address, the percent symbol (%) is considered a ‘wild card’. Enter the percent sign followed by the street name then click ‘Search’, the system will search for any addresses close to matching what you entered. 4. When a residence is found in the database, the address, city and zip code will be displayed in the ‘Search Results’. 5. If the residence is not in the result list, you’ll see ‘No Results Found’. A new residence can be created (reference figure 2-13A). When household members have not been found in the database, click the ‘New’ link under ‘Client’ on the ‘Left Nav Bar’. The goal is to find any records from the client’s application first, and find out which household members already exist in the database before creating new records (reference figure 2-13B). 53 ENERGY ASSISTANCE OPUS User Manual, Section 2 – Client Intake-New Data Classification: 2 Figure 2-13: Client Search, Residence New Search – No Results Found. Figure 2-13A: Residence New Screen 4. When a residence is found in the database, the address, city and zip code will be displayed in the ‘Search Results’. 5. If the residence is not in the result list, you’ll see ‘No Results Found’. A new residence can be created (reference figure 2-13A). When household members have not been found in the database, click the ‘New’ link under ‘Client’ on the ‘Left Nav Bar’. The goal is to find any records from the client’s application first, and find out which household members already exist in the database before creating new records (reference figure 2-13B). 54 ENERGY ASSISTANCE OPUS User Manual, Section 2 – Client Intake-New Data Classification: 2 Figure 2-13B: Client Search New - Residence New Screen Verifying Data on Views In general, for all view screens, you should review to verify data entered. If information needs to be edited, the ‘Edit’ links or buttons are available to update or correct information. Most "View Screens" are for viewing purposes, the two exceptions are the ‘Household View’ and ‘Client View’ screens. 55 ENERGY ASSISTANCE OPUS User Manual, Section 2 – Client Intake-New Data Classification: 2 Add Clients to Household Adding clients to an existing household is easiest when at least one client and the residence have been created initially (reference figure 2-14). Figure 2-14: Household View Screen - Adding New Client to HH Setup: On the ‘Household View’ screen: 1. On the Left Nav Bar, under ‘Client’, click the ‘New’ link. The ‘Client New’ screen will appear. If the client’s HH member is not listed, click ‘Add New Member’ (reference figure 2-15A). 56 ENERGY ASSISTANCE OPUS User Manual, Section 2 – Client Intake-New Data Classification: 2 Add Clients to Household (continued) Some household information will be previously entered due to the first client enrolled such as: address, home phone number. Drop-down menus are available to select from for subsequent household member(s) entered or you can manually enter new mailing addresses or phone numbers for each individual. Figure 2-15A: Client Search New - Add new HH member search 57 ENERGY ASSISTANCE OPUS User Manual, Section 2 – Client Intake-New Data Classification: 2 Add Clients to Household (continued) Figure 2-15B: Client New Screen - HH member new 58 ENERGY ASSISTANCE OPUS User Manual, Section 2 – Client Intake-New Data Classification: 2 2. Client name, birth date, SYSID/SSN is already filled in from being entered on the ‘Client Search New’ screen. Complete the rest of the new client information. Fields marked with * require responses to be selected. There are several buttons with dropdown arrows for different choices. Title; salutation if necessary. Legal first name, middle name, last name. * Review social security number or system identification number for accuracy. SSN Verification. * This is to describe if the SSN is full or ‘don’t know/don’t have’ or ‘refuse’ for system identification. Client ‘Comments’ Box One phone number, extension, and type. Mailing Address: * The first client created for a household, type their mailing address in provided boxes. For subsequent clients, the select from drop-down menu will display previous mailing addresses. Street number, Street direction: S, N, NE, NW, etc. Street name. Street type: Ave, Lane, etc. Unit type: Apt, Unit, PO Box, etc. Enter an apt number or PO Box number. City or Zip Code Gender * Disabled * Veteran * Ethnicity * Language. Education. Homebound Transportation (if Homebound set to ‘YES’) Race.* Oregon Tribe Option (if Native American has been selected) Non-Cash benefits client receives * Does this client have any income * (None, Yes, None-Zero Income Statement, Don’t Know, Refused). If ‘None-Zero Income Statement’ is selected a required ‘Zero Income Comment’ block appears; otherwise it is hidden. Click the ‘Save’ button. 59 ENERGY ASSISTANCE OPUS User Manual, Section 2 – Client Intake-New Data Classification: 2 Figure 2-16: Client View - HH member added view The ‘Client View’ screen will appear (reference figure 2-16). If changes need to be made, click the ‘Client Edit’ link in the left Nav Bar, or the ‘Edit Client’ button. Make the necessary changes, and click ‘Save Changes’ button. More clients can be added to the household as necessary by repeating the same steps. If all the clients have been added to the household, proceed to the ‘Household View’ screen to finish the client intake process, see next section for this process. 60 ENERGY ASSISTANCE OPUS User Manual, Section 2 – Client Intake-New Data Classification: 2 Where did the RED ICONS go???? (Active Client and Physical Residence) The RED Icons have been replaced with the ‘Client’ display and the ‘Residence’ display at the top of the screen. The client shown indicates the last active client record added/accessed and the residence shows the active physical residence created for household. (reference figure 2-17). Figure 2-17: Household View Screen - Red Icons Client Vendor New Setup: On the ‘Household View’ screen, click the ‘New Vendor’ button in the Client-Vendor section (reference figure 2-18). The ‘Client Vendor New’ screen will appear (reference figure 2-19). Type or Select (fields marked * are required): Select the Applicant's name. Enter the Name on the Account (this may/may not be the Applicant). Client's Account number. Vendor Name. Verify by Intake Worker initials. Verification Date. Verification Type. Comments for Vendor, if needed. Click the Save button to save. 61 ENERGY ASSISTANCE OPUS User Manual, Section 2 – Client Intake-New Data Classification: 2 Figure 2-18: Household View Screen – New Vendor Button 62 ENERGY ASSISTANCE OPUS User Manual, Section 2 – Client Intake-New Data Classification: 2 Figure 2-19: Client Vendor New The ‘Household View’ screen will re-appear with the vendor information entered in the Client Vendor section (reference figure 2-20). To add another vendor, click the ‘New Vendor’ button and repeat the setup steps listed above. If all the vendor information is complete, proceed to the next section ‘Household Summary’. 63 ENERGY ASSISTANCE OPUS User Manual, Section 2 – Client Intake-New Data Classification: 2 Household Summary This section provides steps to complete the household summary section on the ‘Household View’ screen. Setup: There is one area on the ‘Household View’ screen (reference figure 2-20; the ‘Household Summary’ section has to be completed. Household Type - drop-down list. This describes the composition of the household. HH Comments’ should be used for any documentation related to household. Figure 2-20: New Vendor section on the Household View Screen. 64 ENERGY ASSISTANCE OPUS User Manual, Section 2 – Client Intake-New Data Classification: 2 ‘Note: Household Comments are shown in all Program Modules, regardless where entered. It is strongly suggested to enter the ‘Date’ followed by comments and completed by intake worker initials. This will allow future agency OPUS users to follow the record(s) when staff turn-over takes place. Click the ‘Save’ button. The Household View screen will "blink" while the database is saving the information, then the screen will remain steady. Household - New Payment, Confirms Qualification Ensure that you have an active Client and Residence prior to proceeding (reference figure 2-17 red circled icons) otherwise you will get a general OPUS error and you will not be able to reach the screen (reference figure 2-21). Figure 2-21: New Payment - Residence Error Message. ** NOTE: Check current year LIHEAP and OEAP Operations Manual for program requirements. This process is to initiate a new payment. This step is only completed once ALL household, residence, income and vendor information has been verified and/or updated. The OPUS database calculates the income sources compared with formulas under the ‘Payment New’ screen and confirms that a household qualifies for program assistance. While in the ‘Household View’, using the top ‘Main Menu’; scroll the mouse over ‘Program’ and down to ‘New Payment’ (reference figure 2-22). The ‘Payment New’ screen will appear. Select an APC for your agency = Agency/Program/County. APC Example: ACCESS-LP08-JAC-LIEAP 2008 Click the ‘Load’ button (reference figure 2-23). OPUS will load the agency’s APC information with a program formula to calculate and match all household data with the program requirements. If a household qualifies or does not qualify for program requirements, an ‘Accepted’ or ‘Denied’ message will be displayed next to the ‘Payment Eligibility Status’ area (reference figure 2-24). 65 ENERGY ASSISTANCE OPUS User Manual, Section 2 – Client Intake-New Data Classification: 2 Figure 2-22: Main menu - drop down options. Figure 2-23: Payment New - APC Select and Load. Once the household is accepted and can receive services (payment), complete a ‘Payment New’ by selecting or entering the following fields: (fields marked * are required): Applicant Intake Date (defaults to today’s date but can be overridden if different) Your initials will be displayed in the Intake Worker’s box can be overridden if actual intake worker is different from person inputting the data. Weatherization check box: check the box “if the household is recommended” Non-Energy Services Energy Related Advocacy Payment Type (Refer to program requirements) Energy Type Authorization numbers can be taken from the application, or if desired, OPUS will generate the authorization number automatically when the ‘Save’ button is activated (reference figure 2-24). The authorization number will be generated and it will be displayed on the ‘Payment View’ screen. 66 ENERGY ASSISTANCE OPUS User Manual, Section 2 – Client Intake-New Data Classification: 2 67 Select Account Status for each vendor. Enter Dollar amount of assistance for each vendor (refer to program requirements for details on limitations). Override Child Blocking. (Selected only if child has been used during current in another Household). Click the ‘Save’ button to save payment information. ENERGY ASSISTANCE OPUS User Manual, Section 2 – Client Intake-New Data Classification: 2 IMPORTANT: On the ‘Payment New’ or ‘Payment Edit’ screen, if changes are made to the APC, Override Child Blocking or Energy Type have been selected to create a new payment, be sure to re-click the “Load” button in order to re-qualify. Work through the New/Edit screen and save (reference figure 2-24). If all or part of payment is made to “Direct Pay” you are required to enter comments or you will not be able to save the payment. Figure 2-24: Payment New Screen – Load Button and Eligibility Status 68 ENERGY ASSISTANCE OPUS User Manual, Section 2 – Client Intake-New Data Classification: 2 Figure 2-25: Payment New – Any adjustments made, one section will disable. Note: On the ‘Payment New’ screen, if there is an adjustment in the ‘Applicant Information or in ‘Payment Information’ without loading a New APC or issuing a new payment, one of the two sections will disable (reference figure 2-25). The ‘Payment View’ screen will appear next. Verify all information entered is correct. This step is considered to be a final review step for intake workers. The ‘Payment View’ screen displays the OPUS generated authorization number or the authorization number from the application. 69 ENERGY ASSISTANCE OPUS User Manual, Section 2 – Client Intake-New Data Classification: 2 Figure 2-26: Payment View The payment is now to be in "Pending Status", until management performs the payment authorization function. If edits need to be done on a payment, this can be done only when the payment is in "Pending Status". To edit, click the ‘Edit Payment’ button on the ‘Payment View’ screen. The payment detail section (at the bottom of screen) displays the batch number, check number and payment authorization number (reference figure 2-25). You can access the Payment View screen from the Household View Screen or Main Menu [Program > Search > Payment] as often as needed to track the payment status dates from ‘pending’, ‘authorized’, ‘batched’, to the final ‘agency paid’ status. 70 ENERGY ASSISTANCE OPUS User Manual, Section 2 – Client Intake-New Data Classification: 2 Payment Links The ‘Household View’ screen displays under the ‘Payments’ which the household receives assistance. A household may receive assistance from several programs or different time periods. For each program there is an associated payment link that displays a ‘Payment View’ screen. This concludes issuing a payment" to a qualified household who is eligible for program assistance in the LIEAP/OEA program (reference figure 2-27). The next section describes how to “Deny a Payment.” Figure 2-27: Household View Payments Denying a Payment There may be times when an agency needs to "manually" deny a payment to a household, and process a denied payment. Note: All ‘denied’ payments need to have comments recorded in the comments section of the screen. The details as to “why the payment was denied should be recorded”, (reference figure 2-28). It is strongly suggested to enter the ‘Date’ followed by comments and completed by intake worker initials. This will allow future agency OPUS users to follow the record(s) when staff-turn over takes place. 71 ENERGY ASSISTANCE OPUS User Manual, Section 2 – Client Intake-New Data Classification: 2 Figure 2-28: Payment New Screen - Deny a Payment with comments. Setup: 1. Start on ‘Payment New’ screen and complete the steps in the topic “Household - New Payment, Confirms Qualification”. 2. Enter an authorization number, or allow OPUS to generate one by leaving it blank. 3. Enter comments about why a household is denied a payment. 4. At the end of the screen (Payment New), notice the "Deny" button next to the Save button Note: On the Payment Edit screen, the ‘Deny’ button is located at the bottom-right side of the screen next to the ‘Hold’ button. Click the ‘Deny’ button. Once the Deny button is clicked, the Payment View screen will appear, (reference figure 2-29). If needed, a payment in "Deny" status can be edited on the ‘Payment Edit’ screen and the household re-qualified for program assistance. 72 ENERGY ASSISTANCE OPUS User Manual, Section 2 – Client Intake-New Data Classification: 2 Figure 2-29: Payment View with Status as ‘Deny’. 73 ENERGY ASSISTANCE OPUS User Manual, Section 2 – Client Intake-New Data Classification: 2 Household View Household view provides an overview of the household view screen and instructions for completing the final steps for a household to receive program assistance. Setup: On the ‘Client View’ screen: Use the ‘Left Nav’ bar, click the ‘Household View’ Link, the ‘Household View’ screen will appear or scroll over ‘Client’ in the top navigational bar and HH view will appear (reference figure 2-30). This screen is organized as follows: HH Members information - top section Payments- below client section Vendors – left side under payments section Income Summary - right-side under payments section Household Summary - right-side under income summary section Addresses - left side under vendor section Phone numbers - left side under address section HH Comments – right-side under household summary section In the ‘Payment’ section, under ‘HH Members’, energy assistance records the payments current and previous households have received listed by date. This screen is mainly a "view only" screen, except for the section in the middle of the screen: ‘Household Summary’ section. This section needs to be completed to qualify household for assistance. 74 ENERGY ASSISTANCE OPUS User Manual, Section 2 – Client Intake-New Data Classification: 2 Figure 2-30: HH View, Payments, Client Vendor Screen. 75 ENERGY ASSISTANCE OPUS User Manual, Section 2 – Client Intake-New Data Classification: 2 THIS PAGE LEFT BLANK 76 ENERGY ASSISTANCE OPUS User Manual, Section 2 – Client Intake-New Data Classification: 2