1
PicSight-GigE user manual
Documentation for Leutron Vision GigE Vision
cameras
Leutron Vision
PicSight-GigE user manual: Documentation for Leutron Vision GigE Vision
cameras
Leutron Vision
Revision: 1.0-21557. Leutron Vision documentation set.
Publication date 27 October 2013
Copyright © 1995-2011 Leutron Vision
All Information in this document is subject to change without notice and does not represent a commitment on the part of Leutron Vision.
The software products described in this document are furnished under a license agreement or nondisclosure agreement. The software
may be used or copied only in accordance with the terms of agreement.
It is against the law to copy the software on any medium except as specifically allowed in the license or nondisclosure agreement. The licensee
may make one copy of the software for backup purposes. No part of this manual may be reproduced or transmitted in any form or by
any means, electronic or mechanical, including photocopying, recording, or information storage and retrieval systems, for any purpose
other than the licensee’s personal use, without the express written permission of Leutron Vision.
Product names mentioned in this manual may be trademarks or registered trademarks of their respective companies and are hereby acknowledged.
PicSight-GigE user manual
Table of Contents
Table of Contents
General information ............................................................................................................ 9
Scope of the manual ................................................................................................... 9
Related documents ..................................................................................................... 9
Where do I find…? ............................................................................................................ 10
Important information ...................................................................................................... 11
Precautions ............................................................................................................... 11
Covered camera models ............................................................................................ 11
Licensing information ................................................................................................ 11
1. Quick start .................................................................................................................... 13
1.1. Simplon installation — quick guide for Windows .................................................. 13
1.2. Prepare the camera(s) ......................................................................................... 14
1.3. Testing the camera(s) ......................................................................................... 17
1.4. Basic camera features ......................................................................................... 19
2. Basic information .......................................................................................................... 23
2.1. Product package ................................................................................................ 23
2.2. PicSight model naming convention ..................................................................... 23
2.3. Ordering option summary .................................................................................. 24
2.4. Accessories ........................................................................................................ 24
2.5. GigE Vision compatible and legacy boot modes ................................................... 25
2.6. Standard conformity .......................................................................................... 26
2.6.1. GigE Vision & GenICam ........................................................................... 26
2.6.2. CE & FCC ............................................................................................... 26
2.6.2.1. Declaration of conformity ............................................................. 27
2.6.2.2. Regulatory notices ........................................................................ 27
2.6.3. RoHS ...................................................................................................... 27
2.7. Environmental requirements ............................................................................... 27
2.8. Technical specifications overview ......................................................................... 28
3. Hardware interface and installation ................................................................................ 29
3.1. Appearance overview ......................................................................................... 29
3.1.1. Camera case revision R1 .......................................................................... 30
3.2. Dimensions ........................................................................................................ 31
3.2.1. Standard camera case .............................................................................. 31
3.2.2. Right-angle camera case .......................................................................... 33
3.2.3. Older camera case versions (R1) ............................................................... 34
3.3. Mounting points ................................................................................................ 36
3.3.1. Mounting points on case revision R1 ........................................................ 36
3.4. Lens mount, optical head ................................................................................... 36
3.4.1. Flange back distance correction ................................................................ 36
3.5. Sensor ............................................................................................................... 37
3.5.1. Sensor types ........................................................................................... 37
3.5.1.1. Progressive scanning ..................................................................... 37
3.5.1.2. CMOS vs. CCD ............................................................................. 37
3.5.1.3. CMOS: global vs. rolling shutter .................................................... 37
3.5.1.4. CCD readout types ....................................................................... 38
3.6. IR-cut (or other) filter .......................................................................................... 38
3.6.1. Changing or removing the filter ............................................................... 39
3.7. Input and output signals ..................................................................................... 39
3.7.1. DC power input ...................................................................................... 40
3.7.1.1. Power over Ethernet (PoE) ............................................................. 40
3.7.2. Ethernet connection ................................................................................ 40
3.7.3. Video output ........................................................................................... 40
3.7.4. Trigger input ........................................................................................... 40
3.7.5. Optocoupler interface .............................................................................. 41
3.7.5.1. Optocoupler basics ....................................................................... 41
3.7.5.2. Optocoupler inputs ...................................................................... 41
Copyright © Leutron Vision
3
Leutron
Vision
PicSight-GigE user manual
Table of Contents
3.7.5.3. Optocoupler outputs ....................................................................
3.7.6. TTL I/O's .................................................................................................
3.7.7. Lens control interface (External ADC's & Power switches) ..........................
3.7.8. Serial port interface .................................................................................
3.8. Connector and cable description .........................................................................
3.8.1. Ethernet connector ..................................................................................
3.8.2. Power input & digital I/O connector .........................................................
3.8.3. External device control connector .............................................................
3.8.3.1. SDR-26 connector adapter cable ...................................................
3.8.4. Legacy power input & RS-232 connector ..................................................
3.9. Status LED .........................................................................................................
3.10. PicSight-Smart architecture ...............................................................................
4. Software installation ......................................................................................................
4.1. Simplon .............................................................................................................
4.1.1. Installation in Windows ............................................................................
4.1.1.1. System requirements ....................................................................
4.1.1.2. Installation media .........................................................................
4.1.1.3. Installation procedure ...................................................................
4.1.1.4. Installation layout .........................................................................
4.1.1.5. Installing network filter driver under Windows ................................
4.1.2. Installation in Linux .................................................................................
4.1.2.1. Installation package types .............................................................
4.1.2.2. System requirements ....................................................................
4.1.2.3. Standard installation layout ...........................................................
4.1.2.4. Notes for the most common distributions ......................................
5. Initial configuration and preparation ..............................................................................
5.1. Network configuration .......................................................................................
5.1.1. Network equipment ................................................................................
5.1.2. Possible impact of a firewall .....................................................................
5.1.2.1. Configuration of Windows XP Firewall ...........................................
5.1.2.2. Configuration of other firewalls .....................................................
5.1.2.3. Firewall configuration under Linux .................................................
5.1.3. Checking the connection .........................................................................
5.1.3.1. Network card's IP configuration .....................................................
5.2. Network performance ........................................................................................
5.2.1. Conditions affecting the performance .......................................................
5.2.2. Packet size, jumbo frames ........................................................................
5.2.3. Flow control, inter-packet delay ...............................................................
5.2.4. Network card configuration .....................................................................
5.2.4.1. Linux ...........................................................................................
5.2.5. Network filter driver ................................................................................
5.2.5.1. Enabling and disabling the filter driver use .....................................
5.3. HTTP-based configuration ...................................................................................
5.3.1. Basic camera information .........................................................................
5.3.2. Camera administration ............................................................................
5.4. Firmware update ................................................................................................
5.4.1. Upgrading from the legacy firmware line (1.x) ..........................................
5.5. Firmware recovery ..............................................................................................
5.6. Simplon GigE Vision Configuration Tool ...............................................................
5.6.1. Discovering the cameras with wrong subnet settings under Linux ..............
5.7. Simplon configuration ........................................................................................
5.7.1. Simplon Settings utility and the configuration file ......................................
5.7.2. Selected configuration options .................................................................
5.8. Acquisition and runtime configuration .................................................................
6. Camera features and their control ..................................................................................
6.1. Common principles ............................................................................................
6.2. Camera classes ...................................................................................................
6.2.1. Basic PicSight-GigE models ......................................................................
Copyright © Leutron Vision
4
42
43
44
44
44
44
45
46
47
47
48
48
50
50
50
50
50
51
55
56
59
59
60
60
63
65
65
65
65
66
69
69
70
71
72
72
72
73
75
79
80
81
82
82
83
85
88
89
90
92
93
93
94
95
96
96
97
97
Leutron
Vision
PicSight-GigE user manual
Table of Contents
6.2.2. RTF cameras ............................................................................................ 97
6.2.3. Smart cameras ........................................................................................ 97
6.2.4. OEM features .......................................................................................... 98
6.3. Information about the camera ............................................................................ 98
6.3.1. Device identity and version ...................................................................... 98
6.3.2. Runtime information .............................................................................. 100
6.3.3. Resetting the camera ............................................................................. 100
6.3.4. Pixel clock (sensor digitization clock) ...................................................... 101
6.3.5. Register streaming support .................................................................... 101
6.4. Transport layer control ...................................................................................... 102
6.4.1. Acquired image data size ....................................................................... 102
6.4.2. Selected GigE Vision related features ....................................................... 103
6.5. Image format ................................................................................................... 107
6.5.1. Pixel format .......................................................................................... 108
6.5.2. Binning and decimation ......................................................................... 109
6.5.2.1. Binning/decimation on color cameras .......................................... 111
6.5.3. Image size, area of interest (AOI) ............................................................ 111
6.5.3.1. AOI limits ................................................................................... 113
6.5.3.2. AOI and binning/decimation ....................................................... 113
6.5.3.3. AOI on color cameras ................................................................. 114
6.5.4. Advanced AOI settings ........................................................................... 114
6.5.4.1. Two-step AOI implementation ..................................................... 114
6.5.4.2. AOI modes ................................................................................. 115
6.5.4.3. AOI parameter dependencies ...................................................... 121
6.5.5. Fixed vs. variable payload size ................................................................ 122
6.6. Acquisition and trigger control .......................................................................... 124
6.6.1. Basic acquisition control ......................................................................... 124
6.6.2. Exposure time ....................................................................................... 127
6.6.2.1. Automatic exposure .................................................................... 128
6.6.2.2. Exposure mode .......................................................................... 129
6.6.3. Trigger modes ....................................................................................... 129
6.6.3.1. Free running mode ..................................................................... 129
6.6.3.2. Triggered mode (accurate exposure) ............................................ 130
6.6.3.3. Triggered mode (long range exposure) ........................................ 130
6.6.3.4. Trigger modes of the CMOS rolling shutter cameras ..................... 131
6.6.4. Trigger configuration ............................................................................. 132
6.6.5. Frame rate ............................................................................................ 135
6.7. Digital I/O, counters and timers ........................................................................ 136
6.7.1. Camera I/O lines ................................................................................... 136
6.7.1.1. Physical and logical lines ............................................................. 137
6.7.2. Observing I/O lines' status ...................................................................... 138
6.7.3. Using input lines for triggering ............................................................... 138
6.7.4. Basic output (strobe) configuration ......................................................... 139
6.7.5. User output configuration ...................................................................... 140
6.7.6. Advanced output configuration .............................................................. 142
6.7.7. Disconnected outputs ............................................................................ 146
6.7.8. Use for inter-camera synchronization ...................................................... 146
6.7.9. Special topics ........................................................................................ 146
6.8. Action commands control ................................................................................. 147
6.8.1. Using action commands for triggering .................................................... 149
6.8.2. Generating the action commands .......................................................... 149
6.9. Analog controls ................................................................................................ 149
6.9.1. Gain ..................................................................................................... 149
6.9.1.1. Default gain and exposure time settings ....................................... 152
6.9.2. Black level ............................................................................................. 152
6.9.2.1. Black level and gain .................................................................... 154
6.9.2.2. Black level and pixel format ......................................................... 154
6.9.3. Automatic gain and black level ............................................................... 154
Copyright © Leutron Vision
5
Leutron
Vision
PicSight-GigE user manual
Table of Contents
6.10. Luminance and color handling ........................................................................ 156
6.10.1. Look-up table (LUT) ............................................................................. 156
6.10.1.1. LUT single access reading/writing .............................................. 162
6.10.1.2. Direct and indirect LUT control (LUT modes) .............................. 164
6.10.1.3. White balance .......................................................................... 164
6.10.2. Color transformation ........................................................................... 166
6.10.3. Gamma correction, brightness and contrast .......................................... 167
6.10.4. White balance ..................................................................................... 167
6.11. Chunk data .................................................................................................... 168
6.11.1. Enabling chunk data ............................................................................ 169
6.11.2. Chunk data features naming convention ............................................... 171
6.11.3. Chunk types ........................................................................................ 171
6.12. Asynchronous events ...................................................................................... 173
6.12.1. Enabling events ................................................................................... 174
6.12.2. Event features naming convention ........................................................ 176
6.12.3. Event types ......................................................................................... 177
6.13. User sets (saving/loading camera configuration) ............................................... 179
6.13.1. Features defining camera configuration ................................................. 179
6.13.2. Camera's user configuration sets ........................................................... 180
6.13.3. Software control of configuration sets ................................................... 181
6.13.4. Comparison of the two methods .......................................................... 182
6.14. External device control ................................................................................... 182
6.14.1. External ADC's (analog inputs) ............................................................. 183
6.14.2. Power switches .................................................................................... 184
6.14.2.1. Operating modes ..................................................................... 184
6.14.2.2. Power switch's operation serialization ......................................... 185
6.14.2.3. Manual control mode ............................................................... 186
6.14.3. Lens control ........................................................................................ 187
6.14.3.1. Generic lens control .................................................................. 187
6.14.3.2. High level lens control ............................................................... 193
6.14.4. Serial Port Control ............................................................................... 193
6.15. Special features .............................................................................................. 196
6.15.1. Special purpose triggers ....................................................................... 196
6.15.1.1. Image stamps reset ................................................................... 197
6.15.2. Boot switch ......................................................................................... 198
6.15.3. Watchdog timer control ....................................................................... 199
6.16. Smart application control ................................................................................ 200
6.16.1. Basic application information and control ............................................. 201
6.16.2. Generic integer registers ...................................................................... 202
6.16.3. ASCII commands ................................................................................. 203
6.17. Feature summary ............................................................................................ 203
7. Simplon GenTL Producer features ................................................................................ 248
7.1. GenTL system module ...................................................................................... 248
7.1.1. Information about the system ................................................................ 249
7.1.2. Interface enumeration ........................................................................... 250
7.2. GenTL interface module ................................................................................... 252
7.2.1. Information about the interface .............................................................. 252
7.2.2. Device enumeration .............................................................................. 254
7.3. GenTL device module ....................................................................................... 256
7.3.1. Information about the device ................................................................. 256
7.3.2. Stream enumeration .............................................................................. 257
7.3.3. GigE Vision streaming control ................................................................. 258
7.3.4. GigE Vision communication control ........................................................ 259
7.3.5. Determining the GigE Vision streaming packet size .................................. 259
7.4. GenTL data stream module ............................................................................... 260
7.4.1. Information about the stream ................................................................. 260
7.5. Simplon GenTL Producer feature summary ........................................................ 262
8. Connecting with 3rd party software packages ............................................................... 269
Copyright © Leutron Vision
6
Leutron
Vision
PicSight-GigE user manual
Table of Contents
8.1. Halcon (MVTec Software GmbH) .......................................................................
8.1.1. GigE Vision interface (PicSight-GigE, PicSight-Smart) ...............................
8.1.2. GenTL interface (CheckSight/CheckSight-II, optionally PicSight-GigE/PicSight-Smart) ...................................................................................................
8.1.3. Common notes .....................................................................................
8.1.4. Halcon Image Acquisition Assistant .........................................................
8.2. Common Vision Blox (Stemmer Imaging) ..........................................................
8.2.1. GigE Vision interface (PicSight-GigE, PicSight-Smart) ...............................
8.2.2. GenTL interface (CheckSight/CheckSight-II, optionally PicSight-GigE/PicSight-Smart) ...................................................................................................
8.2.3. Getting started quickly ...........................................................................
8.3. VisionPro, CVL (Cognex) ...................................................................................
8.3.1. Installation ............................................................................................
8.3.2. Functionality .........................................................................................
8.3.2.1. Interfaces ...................................................................................
8.3.2.2. Options .....................................................................................
8.3.2.3. Device .......................................................................................
8.3.3. Settings saved from Simplon Explorer .....................................................
8.3.4. Features ................................................................................................
8.4. OpenCV ..........................................................................................................
9. Troubleshooting & Support .........................................................................................
9.1. Getting support for Leutron Vision products .......................................................
9.1.1. Before you contact the support team ......................................................
9.1.2. Contact options ....................................................................................
9.1.3. Gathering information about the problem ..............................................
9.1.4. Reporting the problem ..........................................................................
9.1.5. Return Material Authorization (RMA) ......................................................
9.1.6. Customer registration ............................................................................
9.2. Troubleshooting Leutron Vision products ...........................................................
9.2.1. Troubleshooting common issues .............................................................
9.2.2. Known problems and limitations ............................................................
9.2.2.1. Simplon software package ..........................................................
9.2.2.2. PicSight-GigE/PicSight-Smart cameras .........................................
9.2.3. Simplon logging ....................................................................................
9.2.4. Debugging with GigE Vision cameras .....................................................
9.2.5. Debugging symbols ..............................................................................
A. Technical specifications for individual models ................................................................
A.1. PicSight G32B-GigE-AS .....................................................................................
A.2. PicSight G32M-GigE-AS ....................................................................................
A.3. PicSight G43AB-GigE-AS ...................................................................................
A.4. PicSight G43AM-GigE-AS ..................................................................................
A.5. PicSight P133B-GigE-AS ....................................................................................
A.6. PicSight P141B-GigE-AS ....................................................................................
A.7. PicSight P141M-GigE-AS ...................................................................................
A.8. PicSight P142AB-GigE-AS ..................................................................................
A.9. PicSight P142AM-GigE-AS .................................................................................
A.10. PicSight P202B-GigE-AS ..................................................................................
A.11. PicSight P202M-GigE-AS .................................................................................
A.12. PicSight P203B-GigE-AS ..................................................................................
A.13. PicSight P32B-GigE-AS ....................................................................................
A.14. PicSight P32M-GigE-AS ...................................................................................
A.15. PicSight P33B-GigE-AS ....................................................................................
A.16. PicSight P33M-GigE-AS ...................................................................................
A.17. PicSight P34B-GigE-AS ....................................................................................
A.18. PicSight P34M-GigE-AS ...................................................................................
A.19. PicSight P52B-GigE-AS ....................................................................................
A.20. PicSight P52M-GigE-AS ...................................................................................
A.21. PicSight P83B-GigE-AS ....................................................................................
Copyright © Leutron Vision
7
269
269
270
271
272
276
276
277
277
282
283
283
284
284
284
285
285
286
288
288
288
288
288
289
290
290
290
290
291
291
291
291
291
292
293
293
294
295
297
298
300
301
303
304
306
307
309
310
312
313
315
316
318
319
321
322
Leutron
Vision
PicSight-GigE user manual
Table of Contents
A.22. PicSight P83M-GigE-AS ...................................................................................
A.23. PicSight R132M-GigE-AS .................................................................................
A.24. PicSight R312AB-GigE-AS ................................................................................
A.25. PicSight R502B-GigE-AS ..................................................................................
A.26. PicSight R502M-GigE-AS .................................................................................
B. Technical specifications for the “smart” models .............................................................
B.1. PicSight G32B-Smart502 ..................................................................................
B.2. PicSight G32M-Smart502 .................................................................................
B.3. PicSight G43AB-Smart502 ................................................................................
B.4. PicSight G43AM-Smart502 ...............................................................................
B.5. PicSight P133B-Smart502 .................................................................................
B.6. PicSight P141B-Smart502 .................................................................................
B.7. PicSight P141M-Smart502 ................................................................................
B.8. PicSight P142AB-Smart502 ...............................................................................
B.9. PicSight P142AM-Smart502 ..............................................................................
B.10. PicSight P202B-Smart502 ...............................................................................
B.11. PicSight P202M-Smart502 ..............................................................................
B.12. PicSight P203B-Smart502 ...............................................................................
B.13. PicSight P32B-Smart502 .................................................................................
B.14. PicSight P32M-Smart502 ................................................................................
B.15. PicSight P33B-Smart502 .................................................................................
B.16. PicSight P33M-Smart502 ................................................................................
B.17. PicSight P34B-Smart502 .................................................................................
B.18. PicSight P34M-Smart502 ................................................................................
B.19. PicSight P52B-Smart502 .................................................................................
B.20. PicSight P52M-Smart502 ................................................................................
B.21. PicSight P83B-Smart502 .................................................................................
B.22. PicSight P83M-Smart502 ................................................................................
B.23. PicSight R132M-Smart502 ..............................................................................
B.24. PicSight R312AB-Smart502 .............................................................................
B.25. PicSight R502B-Smart502 ...............................................................................
B.26. PicSight R502M-Smart502 ..............................................................................
Contacting Leutron Vision ...............................................................................................
Headquarters (Switzerland) ......................................................................................
Germany ................................................................................................................
Other countries .......................................................................................................
Useful links .............................................................................................................
Copyright © Leutron Vision
8
324
325
327
328
330
332
332
333
334
336
337
339
340
342
343
344
346
347
349
350
352
353
354
356
357
359
360
362
363
365
366
368
370
370
370
370
370
Leutron
Vision
PicSight-GigE user manual
General information
General information
Scope of the manual
This manual introduces the PicSight-GigE camera family and covers all common aspects of work
with these cameras. Technical specifications and other model-specific data are listed in an appendix
(Appendix A, Technical specifications for individual models [p. 293]).
Related documents
• Simplon getting started — Simplon package overview, installation instructions and quick start
guide.
• Product datasheets — list of Leutron Vision camera models with links to their respective datasheets.
• PicSight-Smart Library API programmer's guide — overview and tutorial of the PicSight-Smart
Library API library.
• CheckSight-II user manual — user manual for our CheckSight-II smart camera series.
• CheckSight user manual — user manual for our CheckSight smart camera series.
• Simplon tools — overview and documentation of various tools delivered with the Simplon
package.
Copyright © Leutron Vision
9
Leutron
Vision
PicSight-GigE user manual
Where do I find…?
Where do I find…?
The following points could help you to search for some important piece of information within this
manual:
• Install and test the camera quickly: Chapter 1, Quick start [p. 13]
• Technical specifications: Appendix A, Technical specifications for individual models [p. 293]
• Connector pinout description: Section 3.8, “Connector and cable description” [p. 44]
• Simplon package installation instructions: Section 4.1, “Simplon” [p. 50]
• Camera setup and configuration (incl. firmware update): Chapter 5, Initial configuration and
preparation [p. 65]
• Detailed documentation of camera features: Chapter 6, Camera features and their control [p. 96]
• Operating modes (GigE Vision vs. legacy mode): Section 2.5, “GigE Vision compatible and legacy
boot modes” [p. 25]
• GenICam GigE Vision and other industrial standards: Standards' introduction in Simplon getting
started
• Release notes (revision history): PicSight-GigE & PicSight-Smart revision history
• Looking for something else? Try Table of contents.
Copyright © Leutron Vision
10
Leutron
Vision
PicSight-GigE user manual
Important information
Important information
Precautions
Not respecting these precautions can lead to injury, camera damage, incorrect
camera performance and loss of warranty.
• Read the documentation.
Read the camera documentation before using the camera.
• Camera power. Incorrect input power can damage the camera. Follow guidelines in Section 3.7.1, “DC power input” [p. 40]. Do not reverse power polarity. Do not connect or disconnect other cables when the camera power is on.
• Opening the camera. Do not open the camera. Do not let liquid, dust, flammable or
metallic material to get inside the camera.
• Environment. Always use the camera in conditions meeting the requirements specified in
Section 2.7, “Environmental requirements” [p. 27]
• Cleaning the sensor window. Avoid cleaning the sensor window if possible. Keep lens
cap closed as long as no lens is attached, avoid touching the sensor. If necessary, clean the
sensor window using compressed air. If further cleaning is required, use lint-free, ESD-safe cloth
wiper. Avoid cloth that could generate static charge or that could scratch the window. The
camera should be cleaned in an ESD-safe area, the person performing cleaning should be
earthed.
• Electromagnetic fields. Keep the camera away from strong electromagnetic fields. Avoid
static charging, handle the camera in ESD protected area.
• Connectors. Take care when handling the camera so that no damage can be done to the
connectors. Prevent foreign objects in the connectors.
• Transporting the camera.
Always transport the camera in its original packaging.
Covered camera models
This manual covers the current “AS” series of PicSight-GigE and PicSight-Smart cameras (PicSightGigE-AS/PicSight-Smart-S) as well as the legacy “AR” series (PicSight-GigE-AR/PicSight-Smart-R).
Older camera series (prior to the “AR” line) are not covered, do not use this manual for those
cameras.
The described feature interface corresponds with cameras' firmware version 2.x, providing pure
GigE Vision interface. Cameras featuring firmware version of the 1.x line might differ in some
features, many features wouldn't be available at all.
Licensing information
The Simplon package and/or the software included in the cameras is using following 3rd party
software components:
• GenICam GenApi reference implementation — distributed under the GenICam license by the
GenICam committee. The copyright is held by the GenICam committee and its contributing
members working group (which includes Leutron Vision). The package as well as the license is
Copyright © Leutron Vision
11
Leutron
Vision
PicSight-GigE user manual
Important information
1
available from www.genicam.org . The GenICam GenApi reference implementation in turn uses
2
Apache Xalan-C++ and Xerces-C++ libraries (Apache license, www.apache.org ) and the modified
3
MathParser librariy (LGPL license, kirya.narod.ru/mathparser.html ).
4
• zlib compression library: available from www.zlib.net under zlib license.
5
• lwIP (lightweight TCP/IP stack): available from savannah.nongnu.org/projects/lwip under
modified BSD license. The copyright © is held by Swedish Institute of Computer Science.
6
• The Independent JPEG Group's JPEG software (libjpeg): available from www.ijg.org (Independent
JPEG Group).
7
• OpenCV: available from opencv.willowgarage.com under BSD license.
1
http://www.genicam.org
http://www.apache.org/
3
http://kirya.narod.ru/mathparser.html
4
http://www.zlib.net/
5
http://savannah.nongnu.org/projects/lwip/
6
http://www.ijg.org/
7
http://opencv.willowgarage.com/
2
Copyright © Leutron Vision
12
Leutron
Vision
PicSight-GigE user manual
Quick start
1. Quick start
This chapter is intended to help users wanting to start quickly with basic usage of the cameras,
without studying the entire documentation. The information in this chapter duplicates information
in the following parts of the manual. Whenever in doubt, please refer to the corresponding chapters
of the manual, providing detailed description of given problems.
1.1. Simplon installation — quick guide for Windows
Following points guide you quickly through Simplon installation under Windows. If in doubts, if
you need detailed instructions or if installing in another operating system, refer to full Simplon
installation description.
Now let's walk through the installation procedure:
1.
Prepare the installation media. The software should be installed by a user with administrator
rights.
• If you have the installation CD, insert it in the CD-ROM drive and wait until installation
starts.
1
• If you have downloaded the installer from our website , execute it.
1
2.
Depending on security adjustments of your system and whether you are running the installer
from a local disk or a network share, you might get following security warning. Simply proceed
clicking Run.
3.
The installer welcomes you with following screen, click Next.
4.
Next screen is the license agreement. Please read carefully the license text and if you agree,
click the I Agree button to proceed with installation.
5.
Next the installer asks you about the location where to install Simplon. The default location
will do well in most cases. Keep it or select another preferred location and click Next.
6.
If running Windows Vista or newer Windows version, the default software installation directory
(C:\Program Files) is read only. The installer will ask you where to put the application
data requiring write access (the dialog will not appear on Windows XP). Select a desired location and click Next.
http://www.leutron.com/support-downloads/download-area/
Copyright © Leutron Vision
13
Leutron
Vision
PicSight-GigE user manual
Quick start
7.
In the next step you can select the Simplon components to install. Note that for testing the
cameras, the “runtime” components suffice. However, for programming with Simplon you
need to make sure the Developer's tools are installed as well. When finished with the selection,
click Install.
8.
After starting the installation, the selected components will be installed to your computer.
The installer will inform you about the progress.
9.
When completed, the installer displays the final dialog. Keep the default option (Reboot now)
and click Finish. After rebooting, Simplon is ready to use.
1.2. Prepare the camera(s)
1. Connect the camera to proper 10—26V power supply.
Copyright © Leutron Vision
14
Leutron
Vision
PicSight-GigE user manual
Quick start
2. Connect the camera to the network, or directly to the PC using a suitable Ethernet cable. We
recommend to use shielded (S/STP) category 6 cable or better.
3. In optimal case, the network card interfacing the camera will be dedicated to the image acquisition only and thus will have no access to internet. In such case the firewall can be fully disabled
for this network interface. In Windows Firewall (configured in Control Panel) this can be selected
in the Advanced configuration
4. If your network configuration, however, requires to share internet and other network access
with the image acquisition over the same media (which is not recommended practice), you
will need to configure your firewall so that an it does not block the communication with the
camera. In Windows Firewall this can be done by creating an exception for each application
that will be accessing the camera — especially for the Simplon Explorer that we will use for the
first tests (possibly limiting the exception's scope to the local subnet only). Note that the applications to be unblocked (including Simplon Explorer) are not usually present yet in the system
at the time of installation, therefore this step might have to be repeated after the installation
itself and again for each new application. Therefore we again recommend to have a network
connection dedicated solely for camera connection — and disabling firewall fully for this connection.
Copyright © Leutron Vision
15
Leutron
Vision
PicSight-GigE user manual
Quick start
5. Verify, if the IP configuration of the connected cameras is matches your network settings. Start
the Simplon GigE Vision Configuration Tool: Start → Programs → Leutron Vision Simplon →
Simplon GigE Vision Configuration Tool (under Linux, start /opt/simplon/bin/lv.ipconf).
The tool will scan for the GigE Vision cameras connected to the system. If the camera(s) is directly
accessible from your PC, they will be displayed with a green “OK” icon
camera(s) is ready for acquisition, no further actions are necessary.
Copyright © Leutron Vision
16
. In such case the
Leutron
Vision
PicSight-GigE user manual
Quick start
If the camera is displayed using a yellow icon
, it is “visible” from your PC, but cannot be
directly accessed, because it is configured with different subnet than your network card. In such
case, select the camera in the list, adjust its IP configuration so that it matches settings of your
network card, select the Fix IP checkbox and click the Set persistent Conf button. When finished,
the camera's IP configuration should match the network card. It will display with the green icon
in the list and will be now directly accessible from the PC. It is ready for test.
If desired, the camera's “nickname” (user name) can be adjusted as well, together with the IP
configuration. The nickname can be used to identify individual cameras connected to the network.
1.3. Testing the camera(s)
The Simplon package contains the Simplon Explorer tool, which allows to enumerate, connect
and configure camera(s), acquire images or generate sample source code for Simplon API. It is a
useful tool for testing both the Simplon and camera functionality.
1.
Start the tool from system menu: Start → Programs → Leutron Vision Simplon → Simplon
Explorer (under Linux, start /opt/simplon/bin/lv.explorer).
2.
Connect the camera to be tested — select it in the list of found cameras and press the Connect
camera button. Of course, the camera must be connected and powered.
Copyright © Leutron Vision
17
Leutron
Vision
PicSight-GigE user manual
Quick start
3.
Configure the camera features as desired. Pay attention especially to features in Image
Format Control and Acquisition Control categories.
4.
When prepared, click the Start acquisition button — the camera should start acquiring. If not,
verify again, if the camera is properly connected and running, if the system was properly
configured (remember the notes above about firewall, network configuration, etc.) or if the
camera was not set to triggered mode, while no trigger was attached.
5.
While the acquisition is active, you can still adjust the runtime parameters, such as exposure
time or gain. Basic acquisition parameters, such as pixel format or trigger mode become
locked when the acquisition starts.
Copyright © Leutron Vision
18
Leutron
Vision
PicSight-GigE user manual
6.
Quick start
When finished, click the Stop acquisition button and exit.
1.4. Basic camera features
In this section we'll briefly discuss the most essential camera features important for the basic tests.
Full description of all camera features is provided in Chapter 6, Camera features and their control [p. 96].
The Simplon Explorer displays by default only the “basic” camera features intended to handle the
most common tasks. To display also the more advanced features, you need to switch to the “expert”
feature level. Note that the third available level, “guru”, is intended just for debugging and should
not be used for normal operation.
• Image format. The basic properties of the acquired image can be configured through features
in the Image Format category:
Pixel format
Copyright © Leutron Vision
The Pixel Format feature is an enumeration allowing to specify the type of
image data delivered to the application buffer. The available pixel formats
differ among camera models. In general, they can be
• Monochrome, with various number of bits per pixel, eg. Mono 8 or Mono
12.
• Bayer encoded, with sensor-dependent Bayer formats, eg. Bayer GR 8 or
Bayer BG 8. In this case the application needs to decode the Bayer encoded
image buffer to get a proper color image — Simplon API provides functions
for this.
19
Leutron
Vision
PicSight-GigE user manual
Quick start
• RGB color format, providing true RGB output, in this case the Bayer decoding is performed directly by the camera.
Image size
The camera will acquire full size image by default. The acquired image size
can be reduced using the Width and Height features, which set the acquired
image size in pixels. The field of view will be automatically centered within
the full sensor image.
• Acquisition parameters. The luminance of the acquired image can be controlled either
explicitly through exposure time and gain functions, or automatically through corresponding
auto-functions.
Exposure time
The Exposure Time feature in Acquisition Control category configures the
length of the exposure in microseconds.
Analog gain
Analog gain to be applied on the sensor during acquired image digitization
can be configured through corresponding features in Analog Control category. Verify that the Gain Selector feature is set to Analog (some cameras
models support also digital gain). Now the Gain feature controls the desired
analog gain value in decibell.
Auto-functions
Selected camera models support automatic gain and/or automatic exposure
functions, when the camera keeps adjusting given parameter automatically,
to maintain constant image luminance. The features will be displayed in
the feature tree only if the camera supports them. To switch the autofunction on, navigate to corresponding control feature, Automatic Exposure
in Acquisition Control category or Automatic Gain in Analog Control category
and switch them from Off to Continuous.
• Triggered acquisition. The camera starts by default in “free running” mode — acquiring
continuous stream of image frames. On the other hand in the triggered mode, the acquisition
of individual frames can be explicitly controlled by hardware or software triggers. The trigger
related features are located in the Acquisition Control category.
Triggered mode
Copyright © Leutron Vision
To switch the camera to triggered mode, open the Trigger Selector
subtree and set Trigger Mode to On. After starting the acquisition
again, the camera will acquire images only when explicit trigger
signal arrives.
20
Leutron
Vision
PicSight-GigE user manual
Quick start
Trigger source
The Trigger Source enumeration allows to select where should the
camera “listen for triggers. You can select either Software or one of
the camera's I/O lines. The assignment of the I/O lines to the connector pins is described in Section 3.8, “Connector and cable description” [p. 44].”
Software triggering
The software triggers can be issued during active acquisition in
triggered mode, regardless whether the trigger source is set to
Software or a physical I/O line. To apply the software trigger, select
the Generate Software Trigger feature and click the button which
pops up.
Strobe
The strobe can be configured using features in the Digital I/O Control
category, after switching the feature visibility level to “expert”. Select
the desired output line, where the strobe pulses should be applied
through Line Selector (the I/O line mapping to interface connector
pins is described in Section 3.8, “Connector and cable description” [p. 44]). Switch the strobe on for the selected line by setting
Line Source to Exposure Active. The camera will issue a strobe pulse
aligned with the exposure for every acquired frame. The strobe
output is available only in triggered mode.
• Information about the camera. It is frequently necessary to query the basic information
about the camera. The information is available through features in the Device Control category.
Device identity
The most important features identifying the camera are Vendor Name
and Model Name. The camera's serial number is stored as string in feature
Device ID (available only in “expert” feature level). Finally, the “nickname” used to identify the device is accessible (read/write) in Device
User ID.
Firmware version
The version of the firmware loaded on the camera is accessible as string
in feature Device Firmware Version.
IP configuration
The information related to device's IP configuration, such as Current IP
Address, Current Subnet Mask, MAC Address and other related features
are located in the Transport Layer Control category.
Copyright © Leutron Vision
21
Leutron
Vision
PicSight-GigE user manual
Copyright © Leutron Vision
Quick start
22
Leutron
Vision
PicSight-GigE user manual
Basic information
2. Basic information
2.1. Product package
The standard product package contains just the camera itself.
Any required camera accessories (Section 2.4, “Accessories” [p. 24] should be ordered separately.
Camera control software (Simplon), device drivers and other updates can be downloaded from
1
our download area free of charge.
2.2. PicSight model naming convention
To better understand PicSight model names, we outline below the basic rules used for naming
PicSight cameras. This reference should help you understand the camera names and the available
camera options. Note that this explanation is just a hint, the naming convention can be changed
any time in future.
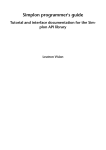
Every PicSight name has following form: Annnm(Rs)C(F)-I-(Ri)L-(O). Meaning of individual
name components is explained below:
A
Sensor type. Possible values are:
• P — CCD sensor, progressive scan, interline transfer
• G — CMOS sensor with global shutter
• R — CMOS sensor with rolling shutter
• T — CCD sensor, progressive scan, frame transfer
• F — CCD sensor, progressive scan, frame readout
• I — CCD sensor, interlaced (2 or multiple fields)
nnn Total number of pixels divided by 100000 and rounded. Leading zeros are not displayed
(which results in 1–3 digit number).
1
m
Imager size. Possible values are:
• 0 — 1" or bigger
• 1 — 2/3" or bigger
• 2 — 1/2", 1/1.8" or bigger
• 3 — 1/3", 1/2.7" or bigger
• 4 — 1/4" or bigger
• 5 — 1/5" or bigger
• 6 — 1/6" or bigger
Rs
Optional. Sensor revision. Allows to distinguish a new revision of the same sensor of other
manufacturer or another, very similar sensor with same basic properties. The original model
has the revision flag omitted. Additional revisions are flagged with A, B, etc.
C
Color coding. Possible values are:
• M — monochrome
• I — monochrome, IR sensitive
• B — Bayer encoded color
F
Optional. Optical filter. If omitted, specifies a camera with the default IR-blocking filter.
Other options are:
• F — float glass filter
• D — daylight blocking filter
• N — no filter
http://www.leutron.com/support-downloads/download-area/
Copyright © Leutron Vision
23
Leutron
Vision
PicSight-GigE user manual
Basic information
I
Interface. Possible values are:
• GigE — GigE Vision (gigabit Ethernet)
• GigE-PoE — GigE Vision with Power over Ethernet
• Smart502 — smart camera (gigabit Ethernet version with on-camera processing)
• Smart502-PoE — smart camera with Power over Ethernet
• Other values, such as Smart, Smart702 or others were used on older PicSight-GigE
models not covered by this manual.
Ri
Optional. Interface revision. Allows to distinguish a new revision (generation) of the same
camera interface module. The original interface generation has the revision flag omitted.
Additional revisions are flagged with A, B, etc.
L
Connector layout. Possible values are:
• S — the camera interface contains the 26-pin SDR and 12-pin Hirose connectors.
• R — the camera interface contains the 12-pin Hirose and 6-pin Hirose connectors.
O
Optional. Defines additional features available for a given model. For basic model version
(no additional features) it is omitted. Multiple options can be specified. The possible values
might be for example:
• RTF — real time functions (like Bayer decoder, shadow correction, etc.), available for
PicSight-GigE only
• H — horizontal, 90° lens mount
resolution
sensor type
interface
option
imager size
PicSight G43AB-GigE-AS-H
sensor revision
interface revision
color coding
connector layout
Figure 2.1. PicSight-GigE naming convention illustrated
2.3. Ordering option summary
Every PicSight-GigE basic model (see Appendix A, Technical specifications for individual models [p. 293])
can be further customized through additional options. Note that the following list does not contain
“options” which are represented by separate article numbers in our product list (such as the right
angle camera case or Power over Ethernet versions).
Following ordering options are available for high quantity OEM's:
IR-cut filter
By default, the cameras are delivered with an IR-cut filer mounted on top of
the sensor. Optionally, every model can also be delivered without this filter.
See more details in Section 3.6, “IR-cut (or other) filter” [p. 38]. Query us
about possibility to deliver the camera with other (e.g. daylight blocking or
float glass) filter.
Lens mount
The cameras can be delivered with CS-mount optical head instead of the
standard C-mount version.
Other options might be available for high quantity OEM's, please contact Leutron Vision for more
information.
2.4. Accessories
The list of PicSight-GigE accessories might grow in future, please contact Leutron Vision to learn
all the options and to get the ordering/pricing information.
Copyright © Leutron Vision
24
Leutron
Vision
PicSight-GigE user manual
Basic information
Cables
• Cable with SDR-26-pin female connector to connect the
external device control signals of PicSight-GigE to customized
hardware, other side of the cable has mounted D-sub 25-pin
female connector, 3m. Ordering number: 32032.
Connectors
• Hirose 12-pin female connector to match the male version
mounted on the camera — can be ordered from www.di2
gikey.com , article number HR10A-10P-12S.
• Hirose 6-pin female connector to match the male version
mounted on the camera — can be ordered from www.di3
gikey.com , article number HR10A-7P-6S.
• 26-pin SDR male plug with hood/solder version for PicSightGigE external device control connector. Ordering number:
24199.
Power supply
• Power Supply for PicSight-GigE, 100-240 VAC input,
12VDC/1A output, Hirose 12-pin connector. Ordering
number: 73513.
• Power Supply for PicSight-GigE with switch connected to
trigger input and LED to flash output, Hirose 6-pin connector
(for PicSight-GigE-AR models only). Ordering number: 73512.
Mounting
• Mounting plate to fix all PicSight-GigE-AR and PicSight-Smart
cameras on standard tripods, including screws. Not applicable to legacy cabinet version R1 (see Section 3.2, “Dimensions” [p. 31]). Ordering number: 999011.
• Mounting plate to fix all PicSight-GigE-H and PicSight-SmartH and (90° lens mount) cameras on standard tripods, including screws. Not applicable to legacy cabinet version R1 (see
Section 3.2, “Dimensions” [p. 31]). Ordering number:
999021.
Simplon software package
CD with Simplon software suite for Windows-XP/7 and Linux,
including Simplon Explorer to control PicSight and CheckSight
cameras, comprehensive programming library with automatic
source code generator, compatible to GenICam, GenTL and
GigE Vision standards, Simplon GigE Vision Configuration Tool,
firmware maintenance tool, software drivers for CheckSight
and all related hardware and software documentation. Ordering
number: 16060.
PicSight-Smart development suite CD with C/C++ library, PSOS-operating system kernel and
Cross-development environment under Windows to generate
programs which run on all PicSight-Smart cameras. Ordering
number: 16050.
2.5. GigE Vision compatible and legacy boot modes
Since the PicSight-GigE camera family was “born” even before the GigE Vision standard was ratified,
the cameras were originally using a proprietary communication protocol. Our legacy software
package, LV-SDS, controlled the cameras through this protocol.
After ratification of the GigE Vision and GenICam, PicSight-GigE adopted these standards, operating
in a dual mode — when being accessed by a GigE Vision application, they communicated in GigE
Vision protocol, when being accessed by an LV-SDS application, they communicated over the
proprietary protocol.
2
3
http://www.digikey.com/
http://www.digikey.com/
Copyright © Leutron Vision
25
Leutron
Vision
PicSight-GigE user manual
Basic information
After introducing the new Simplon software package, which is fully GigE Vision and GenICam
compatible, there is no more need for the proprietary protocol and all the newly delivered PicSightGigE cameras are purely GigE Vision compatible only.
For compatibility with the legacy LV-SDS applications, it is, however, still possible to boot the
camera in the legacy dual mode, supporting the old protocol. The configuration options for
switching the working mode are discussed in Section 5.3, “HTTP-based configuration” [p. 82],
Section 6.15, “Special features” [p. 196] and Section 5.5, “Firmware recovery” [p. 89].
2.6. Standard conformity
2.6.1. GigE Vision & GenICam
• The cameras implement the GigE Vision standard and were properly registered as GigE Vision
compliant devices with AIA.
• The cameras (and supporting libraries) fully implement the GenICam standard, including SFNC
(Standard Features Naming Convention) and GenTL.
Detailed information about these industrial standards and their use in our products is provided in
Chapter 8, Vision Standards
2.6.2. CE & FCC
• The cameras fulfill EMC standards 55022:1998/A1:2000/A2:2003 (emissions) and
55024:1998/A1:2001/A2:2003 (immunity).
• The equipment complies with the requirements of a FCC part 15 Class A Digital Device, the
FCC Mark is not applicable for Class A products
Copyright © Leutron Vision
26
Leutron
Vision
PicSight-GigE user manual
Basic information
2.6.2.1. Declaration of conformity
2.6.2.2. Regulatory notices
The cameras should be used with properly shielded cables (and other equipment) recommended
in this manual.
Please contact us if you need further information regarding the necessary equipment.
2.6.3. RoHS
All units delivered after June 30, 2006 are RoHS compliant.
2.7. Environmental requirements
• Operating temperature: 0 °C–50 °C
Copyright © Leutron Vision
27
Leutron
Vision
PicSight-GigE user manual
Basic information
• Operating relative humidity: 20 %–95 %, non-condensing
• Allow sufficient air circulation around the camera to prevent heat-up
If exposed to environment conditions outside the specified limits, camera performance can be significantly degraded or the camera can be damaged.
2.8. Technical specifications overview
Since the PicSight-GigE/PicSight-Smart families contain variety of camera models, featuring different
image sensors and differing in other options, lot of the technical specifications are strongly model
specific. The following table provides just a brief overview of the important common properties.
The model specific information is provided in Appendix A, Technical specifications for individual
models [p. 293] and Appendix B, Technical specifications for the “smart” models [p. 332]. Details about
individual camera components and their properties are given in corresponding chapters of the
manual, in particular in Chapter 3, Hardware interface and installation [p. 29].
Specification
PicSight-GigE/PicSight-Smart camera family
Interface
Ethernet 1000/100/10 Mb/s
Sensors
CCD and CMOS, VGA to 5 MPx, monochrome and Bayer encoded color
Video format
Up to 12-bit progressive scan
Trigger modes
Normal (free running), triggered, long range exposure
Mount
C-mount (CS-mount on request)
Dimension
• 44.8×31.4×91.7 mm (W×H×L, without connectors) — standard
version
• 44.8×37.56×96.0 mm (W×H×L, without connectors) — right
angle version
Weight
145 g
Power input
10-26V/5W
Standards
GigE Vision, GenICam, GenTL, CE, FCC, RoHS
Software
• Full featured SDK (Simplon API)
• Compatible with GigE Vision based software packages
• Compatible with GenICam GenTL based software packages
Firmware
Field upgradeable
Configuration
• GenICam/GigE Vision interface
• Simplon GigE Vision Configuration Tool
• HTTP interface
Table 2.1. PicSight-GigE/PicSight-Smart family, common technical
specifications
Copyright © Leutron Vision
28
Leutron
Vision
PicSight-GigE user manual
Hardware interface and installation
3. Hardware interface and installation
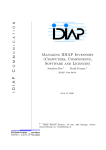
3.1. Appearance overview
Figure 3.1. PicSight-GigE camera, front-left view
Figure 3.2. PicSight-GigE camera, back-view view, PicSight-GigE-AR and
PicSight-GigE-AS models
Copyright © Leutron Vision
29
Leutron
Vision
PicSight-GigE user manual
Hardware interface and installation
Figure 3.3. PicSight-GigE camera, standard and “right angle” case
Figure 3.4. PicSight-GigE camera with attached zoom lens
3.1.1. Camera case revision R1
Following figure illustrates the older camera case revision R1. The differences are detailed in Section 3.2, “Dimensions” [p. 31].
Copyright © Leutron Vision
30
Leutron
Vision
PicSight-GigE user manual
Hardware interface and installation
Figure 3.5. PicSight-GigE camera, case revision R1
3.2. Dimensions
The following figures show mechanical dimensions of the PicSight-GigE cameras, location of the
connectors, location and size of the mounting screws. The cameras are available in the “standard”
and “right-angle” case.
Furthermore, the cameras exist in the PicSight-GigE-AS (newly delivered cameras) and PicSightGigE-AR (legacy variant) modifications. The two mechanically differ only in the back panel, so the
other views are not repeated for both variants again.
The camera case version documented on following drawings might be referred to as “case revision
3 (R3)” in other documents. All newly delivered cameras are packaged in this case. Older deliveries
included case revision R1, described below.
3.2.1. Standard camera case
Figure 3.6. PicSight-GigE-AS dimensions, bottom view
Copyright © Leutron Vision
31
Leutron
Vision
PicSight-GigE user manual
Hardware interface and installation
Figure 3.7. PicSight-GigE-AS dimensions, side view
Figure 3.8. PicSight-GigE-AS dimensions, front view
Figure 3.9. PicSight-GigE-AS dimensions, back view
Copyright © Leutron Vision
32
Leutron
Vision
PicSight-GigE user manual
Hardware interface and installation
Figure 3.10. PicSight-GigE-AR (the legacy variant) dimensions, back view
3.2.2. Right-angle camera case
Figure 3.11. PicSight-GigE-AS-H dimensions, bottom view
Figure 3.12. PicSight-GigE-AS-H dimensions, side view
Figure 3.13. PicSight-GigE-AS-H dimensions, top view
Copyright © Leutron Vision
33
Leutron
Vision
PicSight-GigE user manual
Hardware interface and installation
Figure 3.14. PicSight-GigE-AS-H dimensions, front view
Figure 3.15. PicSight-GigE-AS-H dimensions, back view
Figure 3.16. PicSight-GigE-AR-H (the legacy variant) dimensions, back
view
3.2.3. Older camera case versions (R1)
The camera case revision R1 was the original case version used for PicSight-GigE. All newly delivered
cameras are using the new case revision R3 described above.
The two revisions differ slightly in camera length, the other two dimensions are equal. The R1 revision is using thinner backplate and offers less mounting points. It also does not allow adjusting
the flange back distance.
Copyright © Leutron Vision
34
Leutron
Vision
PicSight-GigE user manual
Hardware interface and installation
Figure 3.17. PicSight-GigE dimensions, case revision R1, standard
Figure 3.18. PicSight-GigE dimensions, case revision R1, 90º lens mount
Copyright © Leutron Vision
35
Leutron
Vision
PicSight-GigE user manual
Hardware interface and installation
3.3. Mounting points
The camera provides 8 standard mounting points on the camera head sides, two on each side
(top, bottom, left, right), see Section 3.2, “Dimensions” [p. 31]. Use M3 screws going no deeper
than 4 mm to the camera body for fixing the camera.
Additional 4 mounting points are available in camera's back plate, two in bottom side, one on
each side, see Section 3.2, “Dimensions” [p. 31]. The holes are M3/4mm, same as the mounting
points in camera head.
The number and position of the mounting points differs on the right-angle version
of camera case. See photos and drawings in Section 3.2, “Dimensions” [p. 31] and
Section 3.1, “Appearance overview” [p. 29].
3.3.1. Mounting points on case revision R1
The case revision R1 (see Section 3.2, “Dimensions” [p. 31]) provided lower number of mounting
points.
The camera provides 8 standard mounting points on the camera head sides, two on each side
(top, bottom, left, right). Use M3 screws going no deeper than 4 mm to the camera body for
fixing the camera.
If these mounting points are not enough, you can additionally dismount the two M2 screws (use
TORX screwdriver number 6) on the bottom part of camera's case and replace them with your
own screws for fixing the camera. The screws should not go deeper than 4 mm into the camera
body. If the screws go deeper than 4 mm into the camera body, you can destroy the camera.
3.4. Lens mount, optical head
All the models are equipped with a C-mount optical head (1–inch thread diameter, 32 threads
per inch, 17.526 mm flange back). CS-mount version (identical, only with 12.5 mm flange back)
is available on request for high volume OEM customers.
Few different camera head versions are used for the individual cameras to compensate for different
shape (thickness) of individual sensor modules. This guarantees proper flange back 17.526 mm
(distance between lens flange and the focal plane, i.e. sensor surface) as specified for C-mount.
This has to be taken in account by OEMs (re)assembling the cameras. The different camera head
versions are marked using little holes on side to prevent confusion. Contact Leutron Vision for
more details.
3.4.1. Flange back distance correction
The flange back distance of the lens mount is precisely adjusted in factory for the C or CS-mount
standard. There are, however, lens types which do not exactly follow the standard and require
slightly different flange back distance. The PicSight-GigE cameras (since case revision R3) allow to
adjust the lens mount to match such lens types.
The lens mount thread can be released using two 1mm hex-socket screws accessible from the
mount point holes in one of the sides of the camera's head. When viewing the camera from the
front side, the screws are in the mounting points at the right side. After loosening them, the lens
mount thread is released and the flange back distance can be adjusted. When finished, fasten the
screws again.
Copyright © Leutron Vision
36
Leutron
Vision
PicSight-GigE user manual
Hardware interface and installation
Figure 3.19. Screws (red) fixing/releasing the lens mount thread
Once the flange back distance is user-modified, the factory precision is lost.
Therefore this procedure is strongly discouraged, unless required due to a nonstandard lens type use.
The flange back distance adjustment is not possible on PicSight-GigE cameras
delivered with the older case revision R1 (see Section 3.2, “Dimensions” [p. 31]).
3.5. Sensor
3.5.1. Sensor types
3.5.1.1. Progressive scanning
All Leutron Vision cameras provide progressive scan video output. The camera outputs full frame
data in sequential order (no field interlacing).
3.5.1.2. CMOS vs. CCD
Leutron Vision series offers models with both CMOS and CCD sensors worlds, providing advantages
of both technologies.
While CCD chips have reputation of great image quality and high sensitivity, CMOS imagers
usually offer higher resolution and dynamic range. But the decision should always be made camera
by camera, application by application. The camera series provides wide choice of CCD and CMOS
sensors to cover wide range of applications.
3.5.1.3. CMOS: global vs. rolling shutter
Some of the cameras with large CMOS sensors are equipped with a rolling shutter. In contrary to
the global shutter, where all camera pixels are exposed at exactly the same time, with rolling
shutter the exposure of every single line is slightly time-shifted relative to the previous line. This
requires some special considerations, especially when capturing moving objects. Flash illumination
is desirable.
Copyright © Leutron Vision
37
Leutron
Vision
PicSight-GigE user manual
Hardware interface and installation
Effective exposure time
Readout
Line 1
Line 2
Figure 3.20. Rolling shutter
3.5.1.4. CCD readout types
Most of the CCD sensors are designed with interline transfer readout. These sensors have photosensitive pixels organized in columns with light-shielded registers in between them. Upon exposure
end the charge from the photosensitive cells is quickly transferred to these storage registers. It is
then read out from these registers sequentially, line by line, pixel by pixel and sent to the camera
output.
One of the cameras is an exception from this rule, possessing a sensor with frame transfer readout.
Such chip is divided into two distinct regions, one photosensitive, the other light-shielded. Upon
the exposure end the charge is quickly transferred from the photosensitive area to the storage
part of the sensor. Then the image is sent sequentially to the output as usual.
3.6. IR-cut (or other) filter
All the cameras have by default an IR-cut filter mounted on top of the sensor. User has however
an option to choose from different configurations:
• IR-cut filter mounted on top of the sensor (default). CCD based cameras come with a 720nm
filter, CMOS based ones with 640nm filter.
• Clear glass filter (of the same size as the original IR-cut filter) mounted on top of the sensor.
Check, whether you don't need special lens designed for specifically for use without IR-cut filter
(common lens might not focus properly in the infrared band or show other problems).
• Daylight blocking filter.
• Without any sensor cover mounted. This has impact on optical properties of the camera — the
C-mount flange distance from the sensor is accurately adjusted for the use of the IR-cut filter
and removing the filter decreases the length of the optical path. With some lenses and working
area setups it can become impossible to focus properly.
User should understand what impact such options can have on the image quality
and lens choice and choose option best suiting given application.
Copyright © Leutron Vision
38
Leutron
Vision
PicSight-GigE user manual
Hardware interface and installation
Clear float glass filter
780nm daylight-cut filter
640nm IR-cut filter filter
830nm daylight-cut filter
720nm IR-cut filter
100
Transmission (%)
80
60
40
20
0
200
300
400
500
600
700
800
900
1000
1100
1200
Wawelength (nm)
Figure 3.21. Spectral characteristics of individual filter types
3.6.1. Changing or removing the filter
The filter is accessible from outside the camera and user can change it without loose of warranty.
It is very important to do this operation with maximum care so that the image sensor cannot be
damaged.
Figure 3.22. IR-cut filter fixing screws
If exchanging the filter for another type, it is highly recommended to choose a filter of the same
size, not to change the optical properties of the system. Removing the filter completely will change
the length of the optical path which can lead to focusing problems in some scenarios.
To mount/dismount the filter, you will need a TORX screwdriver number 6 (note that some of the
first units used hexagonal screws instead). The fixing screws are M2×3.
It's important to keep in mind that when changing or removing the filter, not
only can be the sensor damaged, but also dust or other dirt can get inside the
camera and especially on top of the sensor itself. It is necessary to perform such
operation in appropriately clean environment and using suitable tools preventing
any sensor dust pollution.
3.7. Input and output signals
This section describes all types of input and output signals available on PicSight-GigE cameras,
including their characteristics and when necessary including connection examples. Location and
Copyright © Leutron Vision
39
Leutron
Vision
PicSight-GigE user manual
Hardware interface and installation
pinouts of the connectors carrying the signals is documented in Section 3.2, “Dimensions” [p. 31]
and Section 3.8, “Connector and cable description” [p. 44].
3.7.1. DC power input
The cameras accept 10–26 V DC power input.
The power consumption varies among individual models.
The power input can be connected to one of the camera's interface connectors (see Section 3.8,
“Connector and cable description” [p. 44]). The power input pins available on the individual
connectors are internally connected in the camera.
3.7.1.1. Power over Ethernet (PoE)
The PicSight-GigE/PicSight-Smart cameras can be delivered with the Power over Ethernet option.
The “PoE” cameras are compatible with the Power over Ethernet standard, version IEEE 802.3af.
They should be used with PoE switches (“endspans”) or power injectors (“midspans”) complying
with the IEEE 802.3af specification.
Both PoE modes (A and B) are supported by the camera. Beware of using the PoE cameras with
100Mbit Ethernet only cables, where the “spare” wire pairs might be omitted. With such cable,
the power wouldn't be delivered when using Mode B compatible power sourcing equipment.
The PicSight-GigE PoE camera models are classified in the power level class 0. The power consumption of a PoE model is slightly higher than consumption of the same “regular” model. When
connecting multiple PoE cameras to a single PoE switch, verify, how much total power the switch
can provide and how it handles cases when the limit is exceeded.
The PoE cameras are powered solely over the Ethernet cable, the power input pins on other
camera interface connectors (see Section 3.8, “Connector and cable description” [p. 44]) are
disconnected.
3.7.2. Ethernet connection
The camera uses Gigabit Ethernet interface. It is fully compatible with the 1000BASE-T standard
(also known as IEEE 802.3ab) — Gigabit Ethernet over copper. It can be used in Fast Ethernet
networks (100BASE-TX) if the performance of the 100Mbit network fulfills the application requirements, considering especially the limited possible frame rate.
The camera is compatible with all standard Gigabit Ethernet equipment. Recommendations regarding choice of the network cards, switches or other equipment, might be listed in Section 5.2,
“Network performance” [p. 72] and Section 5.1, “Network configuration” [p. 65].
3.7.3. Video output
PicSight-GigE cameras output pixel data by means of standard Gigabit Ethernet interface, using
a protocol compatible with the GigE Vision standard.
3.7.4. Trigger input
Any of the available optocoupler inputs or TTL inputs can be used for triggering. The input line
mapping on the camera connectors is described in Section 3.8, “Connector and cable description” [p. 44].
The characteristics and default behavior of these interfaces are described below in Section 3.7.5,
“Optocoupler interface” [p. 41] and Section 3.7.6, “TTL I/O's” [p. 43]. Those sections also provide
examples how to connect the inputs.
Copyright © Leutron Vision
40
Leutron
Vision
PicSight-GigE user manual
Hardware interface and installation
3.7.5. Optocoupler interface
Optically isolated inputs and outputs.
3.7.5.1. Optocoupler basics
An optocoupler is a device using optical path to transfer an electronic signal between two circuits.
It basically consists of a photodiode converting the input signal to light and a phototransistor
converting the light again to electronic signal.
Figure 3.23. Diagram of basic optocoupler function
The optocoupler is useful in situations where one part of the circuit needs to be galvanically isolated
from the other part to prevent damage or unwanted interference. It is used to prevent ground
loops or to block voltage spikes.
For effective use of the optocoupler it is important to control it using an independent power
supply. When the external circuit is galvanically connected to the camera (eg. when reusing the
camera's power to control the optocoupler), the optocoupler's protective function is eliminated.
3.7.5.2. Optocoupler inputs
The PicSight-GigE camera is equipped with two optically isolated input lines, connected with one
common pole (Section 3.8.2, “Power input & digital I/O connector” [p. 45]) due to limited
number of pins on the I/O connector. The input optocouplers are polarity independent, they can
be connected with any polarity. When using both optocoupler inputs, the common pole has to
be connected with the same polarity for both inputs.
The optocoupler input's logical state is understood as logical 0 if no current is flowing through
the optocoupler diode, logical 1 if current is flowing through the diode.
The optocoupler is guaranteed to be switched on (logical 1 status) when the voltage applied to
the input is within range of 5—24 V (tolerance 10%). It is guaranteed to be switched off (logical
0) when the applied voltage is under 1.5 V. The input status is undefined between 1.5 and 4.5 V,
the input voltage must not exceed the 24 V limit.
The switching speed depends on the actual setup (eg. operating voltage, input current, temperature). The delays listed in the table are setup dependent mean values, while the jitters are maximal deviations (± ) from those mean values.
Parameter
Value
Operating voltage
5—24 V
Input current
3mA @ 5V, 8mA @ 12V, 20mA @ 24V
External resistor requirement
No
ON voltage level
> 4.5 V
OFF voltage level
< 1.5 V
Input (OFF-ON) to sensor trigger delay
20—23 µs (jitter +13/-2 µs)
Input (ON-OFF) to sensor trigger delay
49—69 µs (jitter +14/-3 µs)
Table 3.1. Optocoupler input parameters summary
Copyright © Leutron Vision
41
Leutron
Vision
PicSight-GigE user manual
Hardware interface and installation
PicSight
Opto input (any polarity)
1k5
±5-24 V
Opto inputs common pole
Figure 3.24. Example of using the optocoupler inputs
I/O connector
Pin 9: I/O line 1,
opto input (any polarity)
Opto input
(I/O line 1)
Pin 8: I/O line 2,
opto input (any polarity)
Opto input
(I/O line 2)
Pin 10: I/O lines 1-2,
opto inputs common pole
Figure 3.25. Diagram of the internal optocoupler inputs connections
3.7.5.3. Optocoupler outputs
The PicSight-GigE camera is equipped with three optically isolated output lines. The optocoupler
outputs are connected with a common emitter (Section 3.8.2, “Power input & digital I/O connector” [p. 45]) due to limited number of pins on the I/O connector.
After power up, the optocoupler outputs are in high impedance state and they remain in that
state until reconfigured from the software interface. Whenever the optocoupler output is disconnected in the SW interface, it gets in high impedance status.
The optocoupler output's logical state is understood as logical 0 when its output transistor is in
high impedance, logical 1 if it is in low impedance mode.
The optocoupler output work with operating voltage range of 5—24 V. To take full profit of this
signal isolation, you have to connect the optocoupler (tap) to an external power supply.
The maximal switched output current is 10 mA, higher current could damage the optocoupler
output circuit.
The switching speed depends on the actual setup (eg. operating voltage, temperature). The delays
listed in the table are setup dependent mean values, while the jitters are maximal deviations (± )
from those mean values.
Parameter
Value
Operating voltage
5—24 V
Output current
10 mA (sink only, current flowing into the collector)
Output low level at 10 mA
0.6 V
External resistor requirement
No
Opto-in (OFF-ON) to opto-out (OFF-ON) delay 65—83 µs (jitter +11/-3 µs)
Opto-in (OFF-ON) to opto-out (ON-OFF) delay 46—49 µs (jitter +10/-2 µs)
Opto-in (ON-OFF) to opto-out (ON-OFF) delay 75—95 µs (jitter +11/-3 µs)
Copyright © Leutron Vision
42
Leutron
Vision
PicSight-GigE user manual
Hardware interface and installation
Parameter
Value
Opto-in (ON-OFF) to opto-out (OFF-ON) delay 94—129 µs (jitter +12/-4 µs)
OFF to ON fall time (10 to 90 %)
1.10—3.50 µs
ON to OFF rise time (10 to 90 %)
40—70 µs
Table 3.2. Optocoupler output parameters summary
PicSight
Opto outputs common tap
+5-24 V
Pull-up resistor (4k7)
output
Opto output collector
Opto outputs common emitter
Figure 3.26. Example of using the optocoupler outputs
I/O connector
Pin 1: I/O lines 9-11,
opto outputs common tap
Pull-up resistor
(4k7)
Opto output
(I/O line 9)
Pin 3: I/O line 9,
opto output collector
Opto output
(I/O line 10)
Pin 4: I/O line 10,
opto output collector
Opto output
(I/O line 11)
Pin 5: I/O line 11,
opto output collector
Pin 2: I/O lines 9-11,
opto outputs common emitter
Figure 3.27. Diagram of the internal optocoupler outputs connections
internal camera
output signal
90 %
output voltage
on the connector
90 %
OFF to ON fall time
OFF to ON delay
ON to OFF rise time
ON to OFF delay
Figure 3.28. PicSight-GigE output optocoupler timing diagram
3.7.6. TTL I/O's
Standard 5V TTL (transistor-transistor logic) interface.
After power up, the TTL outputs are driven high — and they remain driven high until reconfigured
from the software interface. Whenever the TTL output is disconnected in the SW interface, it gets
in driven high status. TTL inputs are pulled up to 5V inside the camera to guarantee a stable input
Copyright © Leutron Vision
43
Leutron
Vision
PicSight-GigE user manual
Hardware interface and installation
in case nothing is connected. To generate a steep edge the TTL input driver should be capable of
driving and sinking 10mA.
The TTL input's and output's logical state is understood as logical 1 when it's driven high (5V) and
logical 0 when it's not driven (0V).
The delays listed in the table are setup dependent mean values, while the jitters are maximal deviations (± ) from those mean values.
Parameter
Value
Operating voltage
5V±10% (absolute maximum 6.5V)
ON voltage level
> 3.5 V
OFF voltage level
< 1.5 V
High level output current
-32mA max / high level at 3.8V min
Low level output current
32mA max / low level at 0.55V max
Input to sensor trigger delay
19 µs (jitter +13/-2 µs)
TTL-in to TTL-out delay
32 µs (jitter +10/-2 µs)
Table 3.3. TTL input/output parameters summary
3.7.7. Lens control interface (External ADC's & Power switches)
The lens control interface consists of three power switches able to drive most motorized zoom
lens types available on the market. Three “external ADC” inputs are used as feedback — monitoring
the current position of given lens function.
3.7.8. Serial port interface
Standard RS-232 communication interface, accessible directly from the camera's feature tree.
Configurable communication parameters are: baud rate, parity, data bits, stop bits.
3.8. Connector and cable description
All the grounds from individual connectors are connected inside the camera.
3.8.1. Ethernet connector
A standard Ethernet connector, 8P8C modular plug, often also referred to as RJ-45. Refer to the
corresponding Ethernet specifications for more details.
The connector is equipped with two standard status LED's.
Figure 3.29. Ethernet connector
Copyright © Leutron Vision
44
Leutron
Vision
PicSight-GigE user manual
Hardware interface and installation
Pin
Wire color code
Signal (1000BASE-T)
Signal (10BASE-T,
100BASE_TX)
1
white/green
BI_DA+
TX+
2
green
BI_DA-
TX-
3
white/orange
BI_DB+
RX+
4
blue
BI_DC+
NC
5
white/blue
BI_DC-
NC
6
orange
BI_DB-
RX-
7
white/brown
BI_DD+
NC
8
brown
BI_DD-
NC
Table 3.4. Ethernet connector, pinout
The color scheme and pinout shown in the table above applies for the straightthrough cables (cable wiring standard EIA-568-A). For cross over cable, wire
pairs 1–3, 2–6, 4–7 and 5–8 had to be crossed. Refer to official Ethernet connector
and cabling specifications in case of any doubts.
3.8.2. Power input & digital I/O connector
Hirose 12–pin male connector (HR10A-10R-12PB-71) for power input and digital I/O (TTL/optocoupler interface).
Figure 3.30. Power input & digital I/O connector
Pin
Signal
1
I/O lines 9—11: optocoupler outputs common tap
2
I/O lines 9—11: optocoupler outputs common emitter
3
I/O line 9: optocoupler output collector
4
I/O line 10: optocoupler output collector
5
I/O line 11: optocoupler output collector
6
I/O line 25: TTL output
7
10—26 VDC power input (disconnected on Power over Ethernet models)
8
I/O line 2: optocoupler input (any polarity)
9
I/O line 1: optocoupler input (any polarity)
10
I/O lines 1—2: optocoupler inputs common pole (any polarity)
11
I/O line 17: TTL input
12
Ground
Table 3.5. Power input & digital I/O connector, pinout
Copyright © Leutron Vision
45
Leutron
Vision
PicSight-GigE user manual
Hardware interface and installation
3.8.3. External device control connector
A 26pin SDR female connector with lens control interface, serial port (RS-232) interface, power
input and analog video output.
Some of the interfaces might not be available on all camera models. In such case
the corresponding pins should be left disconnected.
The connector is not mounted on the legacy camera versions, PicSight-GigEAR/PicSight-Smart-R and older.
An adapter cable with D-sub 25-pin female connector is available. The table lists also pin numbers
on the D-sub connector. The cable construction is described below.
Figure 3.31. External device control connector, pinout
Pin
Signal
D-sub 25
1
Feedback voltage / External ADC ground
12
2
Feedback voltage input of motor 3 (Iris) / External ADC 3 (max 3.3V) 1
3
Feedback voltage input of motor 2 (Focus) / External ADC 2 (max
3.3V)
2
4
Feedback voltage input of motor 1 (Zoom) / External ADC 1 (max
3.3V)
3
5
Positive reference voltage for lens feedback / External ADC resistors 4
(3.3V, output only)
6
Ground
5
7
Lens motor 3 - (Iris) / Power switch 3 -
6
8
Lens motor 3 + (Iris) / Power switch 3 +
7
9
Lens motor 2 - (Focus) / Power switch 2 -
8
10
Lens motor 2 + (Focus) / Power switch 2 +
9
11
Lens motor 1 - (Zoom) / Power switch 1 -
10
12
Lens motor 1 + (Zoom) / Power switch 1 +
11
13
Reserved for future use, DO NOT CONNECT!
n.c.
14
Video out CVBS
13
15
Reserved for future use, DO NOT CONNECT!
14
16
Reserved for future use, DO NOT CONNECT!
15
17
Video ground
16
18
Reserved for future use, DO NOT CONNECT!
17
19
Reserved for future use, DO NOT CONNECT!
18
20
Reserved for future use, DO NOT CONNECT!
19
21
10—26 VDC power input (disconnected on Power over Ethernet
models)
20
Copyright © Leutron Vision
46
Leutron
Vision
PicSight-GigE user manual
Hardware interface and installation
Pin
Signal
D-sub 25
22
Reserved for future use, DO NOT CONNECT!
21
23
Reserved for future use, DO NOT CONNECT!
22
24
Reserved for future use, DO NOT CONNECT!
23
25
RS-232 RxD (serial data input)
24
26
RS-232 TxD (serial data output)
25
Table 3.6. External device control connector, pinout (including pin numbers
on the SDR-26 to D-sub-25 adapter)
3.8.3.1. SDR-26 connector adapter cable
An adapter cable to interface the camera's 26-pin SDR connector is available. The other side of
the cable holds a D-sub 25-pin female connector. The D-sub connector can either be used directly
or the cable can be opened and used to interface another custom connector type. The construction
of the cable is described in the following figure.
SDR 26-pin
connector
D-sub 25-pin
connector
2
3
4
5
6
7
8
9
10
11
12
13
1
14
15
16
17
18
19
20
21
22
23
24
25
26
1
2
3
4
5
6
7
8
9
10
11
nc
12
13
14
15
16
17
18
19
20
21
22
23
24
25
twisted pair (black/white) #1
twisted pair (red/white) #2
twisted pair (green/white) #3
twisted pair (yellow/white) #4
twisted pair (blue/white) #5
twisted pair (purple/white) #6
twisted pair (gray/white) #7
twisted pair (brown/white) #8
twisted pair (red/black) #9
twisted pair (green/black) #10
twisted pair (yellow/black) #11
single line (orange) #12
single line (pink) #13
twisted pair (blue/black) #14
Figure 3.32. 26-pin SDR to 25-pin D-sub adapter cable
3.8.4. Legacy power input & RS-232 connector
Hirose 6–pin male connector (HR10A-7R-6PB-73) for power input and RS-232 interface.
This connector was mounted only on legacy camera models PicSight-GigEAR/PicSight-Smart-R. On current camera series the connector does not exist,
corresponding signals are available on other connectors.
Copyright © Leutron Vision
47
Leutron
Vision
PicSight-GigE user manual
Hardware interface and installation
Figure 3.33. Legacy power input & RS-232 connector
Pin
Signal
1
RS-232 TxD (serial data output)
2
RS-232 RxD (serial data input)
3
Ground
4
Reserved
5
Ground
6
10—26 VDC power input (disconnected on Power over Ethernet models)
Table 3.7. Legacy power input & RS-232 connector, pinout
3.9. Status LED
A status LED is placed on the back side of the camera (see Section 3.2, “Dimensions” [p. 31]).
During camera boot (after powering the camera) this LED is blinking irregularly. As soon as the
camera booted successfully and is ready for operation, the LED should start blinking regularly with
period of approx. 2 seconds If the status LED remains blinking irregularly en error occurred during
boot up. If the problem repeats in successive boots, the camera might need a firmware update
or other service operation.
As soon as the camera finishes booting, the LED's on the Ethernet connector should also start
shining (provided that the Ethernet cable is connected). The LED on the right side of the connector
indicates a connection to a host and its color indicates the connection speed: green for 100 Mb/s,
red for 1 Gb/s. The yellow LED on the left side indicates the traffic. If any of these two LED's is not
shining, you should recheck the Ethernet cable connection.
3.10. PicSight-Smart architecture
Every PicSight-GigE camera also exists in the “smart” version (PicSight-Smart). The basic functionality and Ethernet interface of the PicSight-Smart cameras is identical to PicSight-GigE cameras,
but PicSight-Smart models furthermore provide additional resources and functionality:
•
•
•
•
32-bit RISC processor
additional RAM memory (64 MB or more), flash memory
real-time operating system
SDK including C/C++ compiler and libraries for image acquisition, camera control, communication facilities and more
This allows to perform conditioning of the acquired image or full image processing on the camera.
Results of the processing can be signalled to the outside world through the i/o lines, over the
serial RS-232 line or over the Ethernet interface.
The GenICam feature interface of the PicSight-Smart provides set of generic features that might
be dynamically served by the smart applications and used to control it or report results. This
functionality is described in Section 6.16, “Smart application control” [p. 200].
Copyright © Leutron Vision
48
Leutron
Vision
PicSight-GigE user manual
Hardware interface and installation
Technical details about individual PicSight-Smart cameras are listed in Appendix B, Technical specifications for the “smart” models [p. 332].
Complete description of the PicSight-Smart cameras and especially their programming and configuration is described in dedicated documents — contact Leutron Vision to get a copy.
Copyright © Leutron Vision
49
Leutron
Vision
PicSight-GigE user manual
Software installation
4. Software installation
4.1. Simplon
Following sections provide installation instructions for Simplon on the Windows and Linux operating
systems. More details regarding the installation options (other operating systems, custom installation, etc.), Simplon configuration and other related topics can be found in Simplon getting
started.
Note that the installation of Simplon is not mandatory — if you are going to use
the camera from a software package compatible with the GigE Vision standard,
it will connect to the camera directly. The Simplon can be, however, still useful
for camera configuration, evaluation or troubleshooting.
4.1.1. Installation in Windows
4.1.1.1. System requirements
The Simplon for Windows does not have any particular system requirements, the installer will install
all the necessary dependencies, including the .NET Framework runtime. Simplon is compatible
with all “recent” Windows versions, including Windows 7, Windows Vista or Windows XP. Note
that Windows versions older than Windows 2000 are not supported.
The Simplon package installation should be performed by a user with administrator rights.
4.1.1.2. Installation media
The Simplon package can be installed from two types of installation media:
• If you obtained the installation CD-ROM, insert it to the CD-ROM drive. The installation will
start automatically.
• If you don't have the installation CD-ROM or if you wish to install a newer Simplon version, you
1
can download the installer from the download area on our website. The installer file name
follows pattern Simplonxyyzzz.exe, where xyyzzz stands for Simplon version.
Execute the installer. Depending on security adjustments of your system and whether you are
running the installer from a local disk or a network share, you might get following security
warning. Simply proceed clicking Run.
1
http://www.leutron.com/support-downloads/download-area/
Copyright © Leutron Vision
50
Leutron
Vision
PicSight-GigE user manual
Software installation
Figure 4.1. Simplon installation: Windows security warning
4.1.1.3. Installation procedure
The paragraphs below discuss all the dialogs of Simplon's Windows installer and corresponding
options. Note that some details might slightly differ between individual Simplon versions, but the
principles will always be the same.
The installer first displays a welcome screen with basic information about the software you are
going to install. Click Next to proceed.
Figure 4.2. Simplon installation: welcome screen
Next screen is the license agreement. Please read carefully the license text and if you agree, click
the I Agree button to proceed with installation. Once confirmed, your full agreement with the license text is assumed.
Copyright © Leutron Vision
51
Leutron
Vision
PicSight-GigE user manual
Software installation
Figure 4.3. Simplon installation: license agreement
Next the installer asks you about the location where to install Simplon. The default location
C:\Program Files\Leutron Vision\Simplon should do well in most cases. If you prefer
to install Simplon in another directory, select it now. When finished, click the Next button.
Figure 4.4. Simplon installation: destination directory
If running Windows Vista or newer Windows version, the default software installation directory
(C:\Program Files) is read only for regular applications. Simplon, however, requires write access
for certain files during operation (Section 4.1.1.4, “Installation layout” [p. 55]). Therefore the installer will ask you where to put the application data requiring write access.
Note that in Windows versions older than Windows Vista (in particular in Windows XP) the C:\Program Files area is not protected and therefore all data
can go to a single directory. Also, when installing to a non-standard location
(outside C:\Program Files), the installer assumes the user chooses a writable
Copyright © Leutron Vision
52
Leutron
Vision
PicSight-GigE user manual
Software installation
area and installs everything to that directory. The dialog will be omitted in these
cases.
You can choose from three options:
• C:\Users\Public\LeutronVision\Simplon — recommended, when Simplon will be
used by multiple users.
• C:\Users\YourUserName\AppDAta\Local\LeutronVision\Simplon — recommended,
when Simplon will be used by a single user (you).
• User configured directory — if none of the options above fit your requirements, you can specify
another directory. Be sure the directory has write access for all applications and is not protected
by UAC.
Select the preferred option and click Next.
Figure 4.5. Simplon installation: application data directory
In the next step you can select the Simplon components to install. The set of actual options can
slightly differ among individual Simplon versions. The basic options are:
• Runtime files — files necessary to run every Simplon application, these are always installed.
• Development files — essential files for compiling against Simplon API as well as additional
helper files. Files in this category are typically installed only on a development system, but not
deployed with final runtime systems.
• Include and library files — required for building Simplon API applications.
• Sample code
• Documentation — full documentation set for Simplon package and all Leutron Vision camera
families.
Note that for testing the cameras, the “runtime” components suffice. However, for programming
with Simplon you need to make sure the Developer's tools are installed as well. When finished
with the selection, click Install.
Copyright © Leutron Vision
53
Leutron
Vision
PicSight-GigE user manual
Software installation
Figure 4.6. Simplon installation: selecting components
After starting the installation, the selected components will be installed to your computer. The
installer will inform you about the progress. Note that the installation includes also Microsoft
Visual Studio runtime redistributable, device driver for CheckSight cameras and network filter
driver for GigE Vision based cameras (PicSight-GigE/PicSight-Smart).
Figure 4.7. Simplon installation: installation progress
When completed, the installer displays the final dialog. We recommend to keep the default option
(Reboot now) and click Finish. After rebooting, Simplon is ready to use.
Copyright © Leutron Vision
54
Leutron
Vision
PicSight-GigE user manual
Software installation
Figure 4.8. Simplon installation: finising installation
4.1.1.4. Installation layout
As mentioned above, the Simplon files are installed to two destinations, the main directory and
the application data directory. For the older Windows versions (Windows XP), these two are
merged and the application data directory is actually equivalent to the bin subdirectory of the
main installation destination.
Main installation directory
The main installation directory contains the following subdirectories:
• backup — backup of user modified files (such as the configuration files) that might be overwritten when upgrading to newer Simplon version
• bin — all executable (*.exe) and library (*.dll files belonging to Simplon
• data — tool-specific data, eg. templates used by the Simplon Source Code Generator
• doc — documentation files
• drivers — drivers (CheckSight device driver, network filter driver)
• include — header files for Simplon API development
• lib — library (*.lib) files for Simplon API development
• samples — additional sample code (most of the samples can be, however, generated interactively using the Simplon Source Code Generator)
Application data directory
The application data directory contains following main components:
• lv.simplon.ini — Simplon configuration file.
• lv.simplon.log — Simplon log file.
• XML — contains static XML files copied during installation. None of the files in this directory
should be removed unless being explicitly adviced by our support team.
• XMLCache — contains GenICam XML files downloaded from cameras.
• Cache — preprocessed versions of the GenICam XML files for performance improvement. These
can be safely removed, Simplon will re-generate them upon next use.
• Debug — the .pdb files with debugging information for the Simplon libraries. These might be
useful for troubleshooting when contacting our support team.
Copyright © Leutron Vision
55
Leutron
Vision
PicSight-GigE user manual
Software installation
4.1.1.5. Installing network filter driver under Windows
The Simplon setup program can install the network filter driver automatically, if desired. The decision
can be made on the setup program's dialog window, where installation components are selected.
If not installed automatically, it is still possible to install the filter driver manually later, as described
below.
Before installing it, you might want to learn more information about the filter driver [p. 80].
In older Simplon versions the setup did not install the filter driver automatically
and the user was required to install it manually.
Manual filter driver installation
The instructions below describe, how to install the network filter driver manually, if you did not
enable it during installation of the Simplon itself. Note that the instructions below assume that
Simplon is already successfully installed in the system.
Open the Network Connections applet in the Control Panel.
Windows 7 — menu Start → Control Panel → Network and sharing center → Manage Network
Connection
Windows Vista — menu Start → Control Panel → Network and internet → Network and sharing
center → Manage Network Connection
Windows XP — menu Start → Settings → Control Panel → Network Connections
Figure 4.9. Windows 7, Installing the network filter driver, step 1
Click with the right mouse button on the network connection, which is used to connect the PicSight-GigE cameras, select Properties from the context menu.
Copyright © Leutron Vision
56
Leutron
Vision
PicSight-GigE user manual
Software installation
Figure 4.10. Windows 7, Installing the network filter driver, step 2
In the Properties dialog box, General tab select Install... button to start the installation.
Figure 4.11. Windows 7, Installing the network filter driver, step 3
The Select Network Component Type dialog box appear. Select Service as the new network
component type and click the Add... button.
Figure 4.12. Windows 7, Installing the network filter driver, step 4
Copyright © Leutron Vision
57
Leutron
Vision
PicSight-GigE user manual
Software installation
In the Select Network Service dialog box ignore the options possibly offered by the system and
click the Have Disk... button to specify the driver location.
Figure 4.13. Windows 7, Installing network filter driver, step 5
In the next dialog browse to the location where the filter driver files are stored. The directory is
SIMPLONHOME\drivers\Windows32, where SIMPLONHOME is Simplon installation directory,
C:\Program Files\Leutron Vision\Simplon by default. When located,click Next.
For 64-bit Windows the driver files are located in
SIMPLONHOME\drivers\Windows64.
The driver consists of 4 files that should in any case be available to the system
in the same directory (that you need to locate in the dialog as described above).
The files are: LvGevDrv.sys (the driver executable itself), the LvGevDrv.inf
(the file used to install/uninstall the driver), the LvGevDrv_m.inf (auxiliary) and
the LvDrv.cat with a digital signature.
Windows should successfully find the proper driver and offer it for installation as “Leutron Vision
Simplon Filter Driver”. Select that option and click the OK button. Depending on Simplon and
Windows versions used one or more dialogs might appear to inform you that the driver is not
tested for Windows compatibility. In such case, just click through them, allowing to finish the installation successfully.
When finished the filter driver will be successfully installed and ready to use. You should see it listed
in the Local Area Connection properties dialog box.
Copyright © Leutron Vision
58
Leutron
Vision
PicSight-GigE user manual
Software installation
Figure 4.14. Windows 7, Installing network filter driver, step 6
4.1.2. Installation in Linux
This section discusses Simplon package installation under Linux with notes specific for the most
popular distributions and overview of system requirements.
4.1.2.1. Installation package types
Linux world does not have a single standard way for software installation. The Simplon Linux
package is therefore distributed in multiple forms to suit all systems.
RPM format
• Used on most commercial distributions and their community variants, including Fedora/Red
Hat, OpenSUSE/SUSE or Mandriva.
• The package file name is simplon-x.yy.zzz.rpm, where x.yy.zzz stands for Simplon
version.
• To install, execute rpm -i simplon-x.yy.zzz.rpm with superuser privileges.
• To uninstall, execute rpm -e simplon with superuser privileges.
DEB format
• Used on Debian based distributions, including Debian, Ubuntu (and variants) or Mint.
Copyright © Leutron Vision
59
Leutron
Vision
PicSight-GigE user manual
Software installation
• The package file name is simplon-x.yy.zzz.deb, where x.yy.zzz stands for Simplon
version.
• To install, execute dpkg -i simplon-x.yy.zzz.deb with superuser privileges.
• To uninstall, execute dpkg -r simplon with superuser privileges.
Compressed archive (TARGZ)
• The .tar.gz archive is intended for systems, where the rpm/deb formats cannot be used or
when a customized installation is required for serious reasons. Details are provided in a separate
section.
4.1.2.2. System requirements
Following list enumerates the most important requirements for installing and using Simplon. Note
that the list might not be complete and is subject to change between Simplon versions.
• Kernel version: kernels of the 2.6 line. The oldest tested version to date is 2.6.18, Simplon is
kept aligned with all the newest kernel version.
• Compiler: g++/gcc 4.1 and newer, libstdc++ v. 6 (GLIBCXX 3.4.5), pthreads implementation
NPTL.
• When installing on CheckSight, the kernel driver needs to get compiled and configured, therefore
the basic infrastructure for kernel development needs to be available, in particular the basic
compiling tools (gcc and make) and kernel headers. The name of the package containing the
kernel headers might differ among individual distributions (eg. linux-headers, kernel-devel
or similar).
Additional system requirements might apply for CheckSight systems, if in doubt, contact us to
get full list of distributions supported by the CheckSight cameras.
• LSB compatibility and xdg-utils are advantage, but they come by default on most of the usual
distributions.
• To compile samples genrated by the Simplon Source Code Generator, one needs basic development tools (make, g++) plus packages for Xlib/Xt development.
4.1.2.3. Standard installation layout
The Simplon installation follows the Filesystem Hierarchy Standard. Its files are distributed in several directories.
Main installation direcotry
The main isntallation directory is /opt/simplon.
Copyright © Leutron Vision
60
Leutron
Vision
PicSight-GigE user manual
Software installation
Figure 4.15. Linux installation layout, main directory
The main installation directory contains all the runtime binaries and development files. It is organized
in following subdirectories:
• bin — tools and test/demo programs, in particular Simplon Explorer (lv.explorer) and
Simplon Settings (lv.settings)
• lib — all Simplon API libraries, ie. a directory where the linker should be pointed at; on 64-bit
systems the lib directory contains the 32-bit versions, while the 64-bit ones reside in lib64
• cti — contains the Simplon GenTL Producer library; on 64-bit systems the cti directory contains
the 32-bit versions, while the 64-bit ones reside in cti64
• include — Simplon API header files
• share — static data files used by Simplon
• share/xml — static XML files copied during installation
• req — foreing requisite components used by Simplon, in particular the GenICam runtime
• drivers — scripts and sources necessary to build and install Simplon device drivers (used only
on CheckSight systems)
Configuration files
The configuration files are stored in /etc/opt/simplon.
Figure 4.16. Linux installation layout, configuration files
Copyright © Leutron Vision
61
Leutron
Vision
PicSight-GigE user manual
Software installation
The directory contains in particular the main Simplon configuration file, lv.simplon.ini. The
file should be edited with superuser privileges. See Section 5.7.1, “Simplon Settings utility and
the configuration file” [p. 93] for details.
Application data
The various application data, such as logs and cache go to /var/opt/simplon.
Figure 4.17. Linux installation layout, application data
The data are stored in several subdirectories, in particular:
• log — default destination for Simplon log files, in particular the lv.simplon.log, that are
useful for any troubleshooting (refer to Chapter 9, Troubleshooting & Support [p. 288]).
• XMLCache — contains GenICam XML files downloaded from cameras.
• GCCache — preprocessed versions of the GenICam XML files for performance improvement.
These can be safely removed, Simplon will re-generate them upon next use.
User specific files
Possible user specific files (such as demos'/tools' configuration) are stored in ~/.simplon.
Figure 4.18. Linux installation layout, user specific data
This directory is used solely to store user specific settings or preferences for Simplon tools, such
as Simplon Explorer or Simplon Settings. It will not be needed for usual operation on a runtime
system.
Copyright © Leutron Vision
62
Leutron
Vision
PicSight-GigE user manual
Software installation
Other actions performed by the installer
Besides copying the files and adjusting user rights, the installer performs some additional actions,
including:
• When installing on a CheckSight system (detected automatically), the necessary device driver
is built and installed.
• For convenience, the directory /opt/simplon/bin is added to PATH environment variable,
so that the tools are directly accessible from the shell. This is performed by adding an entry to
/etc/profile.d — on systems using other mechanism, the system administrator might need
to adjust the path manually.
• Directory /opt/simplon/cti is added to the GENICAM_GENTL32_PATH environment variable
(and analogically the 64-bit variant), so that the Simplon GenTL Producer can be located by
3rd party GenTL consumers. This is performed by adding an entry to /etc/profile.d — on
systems using other mechanism, the system administrator might need to adjust the path
manually.
• For convenience, the directory /opt/simplon/lib (and it's 64-bit variant) is added to the
search path of the dynamic linker. This is performed by adding an entry to ld.so.conf.d —
on systems using other mechanism, the system administrator might need to adjust the path
manually.
Custom installations
Installation to other than default locations is possible, however we recommend to do that only
for well-legitimate reasons. Corresponding guidelines are provided in a separate section.
4.1.2.4. Notes for the most common distributions
The Simplon package is tested with the most popular distributions. Brief notes for those distributions
are listed below. Note that this list by no means suggests that other distributions are not supported,
Simplon should work on any system fulfilling the basic requirements (Section 4.1.2.2, “System
requirements” [p. 60]). Also the versions listed for each distribution are just a hint, showing which
was the original version used for tests. Each newer version of given distribution should work well
and older versions would work if fulfilling the mentioned system requirments.
For each distribution, the tests were done with the most basic “default” setup including X, but
without any special additions.
The notes below are related only to Simplon itself, assuming the Linux operating
system was properly installed and configured. Special requirements related to
operating system installation might apply on CheckSight systems —. To install
Simplon on CheckSight, kernel development infrastructure (gcc, make, kernel
headers) must be installed to succesfully build and configure the device driver.
Ubuntu
• Originally tested version: 9.10 (Karmic Koala)
• Packaging type: deb format
• Works out of the box
Debian
• Originally tested version: 5.0 (Lenny)
• Packaging type: deb format
• Works out of the box
OpenSUSE (community version of SUSE Linux Enterprise)
• Originally tested version: 11.2
• Packaging type: rpm format
Copyright © Leutron Vision
63
Leutron
Vision
PicSight-GigE user manual
Software installation
• Default installation switches on a paranoid firewall, which has to be configured (or switched
off) if working with GigE Vision cameras (PicSight-GigE/PicSight-Smart)
Fedora (community version of Red Hat Enterprise Linux)
• Originally tested version: 12 (Constantine)
• Packaging type: rpm format
• Default installation switches on a paranoid firewall, which has to be configured (or switched
off) if working with GigE Vision cameras (PicSight-GigE/PicSight-Smart)
Mandriva
• Originally tested version: 2010.0
• Packaging type: rpm format
• Default installation switches on a paranoid firewall, which has to be configured (or switched
off) if working with GigE Vision cameras (PicSight-GigE/PicSight-Smart)
Slackware
• Originally tested version: 13
• Packaging type: special (tgz based), but slackware has a tool rpm2tgz which can be used to
convert the rpm package (rpm2tgz simlpon-x.yy.zzz.rpm) and then install it (installpkg
simplon-x.yy.zzz.tgz)
• Works out of the box
Gentoo
• Originally tested version: 10.1
• Packaging type: special, no reasonable way to use the rpm/deb packages, need to use the tar.gz
package
Mint
• Originally tested version: 8 (Helena)
• Packaging type: deb format
• Works out of the box
Copyright © Leutron Vision
64
Leutron
Vision
PicSight-GigE user manual
Initial configuration and preparation
5. Initial configuration and preparation
5.1. Network configuration
5.1.1. Network equipment
The PicSight-GigE is fully compatible with the industry-standard Ethernet LAN equipment.
It can be connected directly to the host PC (point-to-point connection). In such case a cross over
cable must be used and the cable length can be up to 100 meters. Note that in case of multiple
Ethernet adapters in the host PC, each one must be configured with a different subnet.
Or it can be connected to a network with one or more switches between the PicSight-GigE and
the host PC. As the PicSight-GigE complies with the IP protocol standard, it should work with all
standard Ethernet switches. However, the functions and performance grade of the switch can
significantly influence the performance of the image transfer and thus care must be taken in order
to select an appropriate switch.
For optimal performance the network with the Gigabit Ethernet (1000BASE-T) components should
be used. In the host PC it is recommended to use a network adapter (NIC) with the Intel PRO/1000
chipset, including its native device driver.
Using shielded (S/STP) cables rated as category 6 or better is highly recommended to achieve
good performance over long distance cables.
The switch should be non-blocking, it should support “Jumbo Frames” and have memory buffers
of sufficient size. The particular requirements for switch specification strongly depend on the way
how the PicSight-GigE cameras will be used in the system — how many cameras will be connected,
if they will transfer images simultaneously and in which speed, etc. Refer also to Section 5.2,
“Network performance” [p. 72].
To achieve sufficient and especially predictable performance, it is recommended to dedicate a
network segment solely for the image acquisition, avoiding additional network traffic (such as internet or office) that would interfere with the image acquisition.
5.1.2. Possible impact of a firewall
If the host PC has a firewall software running and you experience troubles with the connection or
data transfer, the firewall should be the first thing to check.
The firewall is a software which filters packets coming from the network and thus it can block
some of the communication channels used by PicSight-GigE. So it can happen, for example, that
although the ping command succeeds, the PicSight-GigE is not accessible via the HTTP protocol
(the firewall has disabled access to machines on local network for web browsers). Similarly, it can
happen that you can access PicSight-GigE through HTTP, you can even discover, connect and
configure the camera but when starting acquisition, the images are not transferred to the application — this can happen when the firewall blocks the data sent from the camera through the UDP
protocol.
Note also that the usage of the firewall software adds some CPU overhead which might degrade
the throughput of the LAN.
The easiest attitude is to switch the firewall fully off. However, this can be recommended only for
debugging or in situations, when the PC is not vulnerable to network attacks (for example, if you
use the PC's network interface only to connect the camera). If the PC is connected to a network
and especially to the internet, switching the firewall off is not a good idea; you should rather
configure the firewall so that it remains active, but enables the communication with PicSight-GigE.
Copyright © Leutron Vision
65
Leutron
Vision
PicSight-GigE user manual
Initial configuration and preparation
Preferrably one or more network cards will be dedicated solely for camera connection — then
firewall can be disabled for these connections and stay active only for network connections
handling the non-camera network traffic, such as internet.
5.1.2.1. Configuration of Windows XP Firewall
The example shown in this chapter describes the configuration of the Windows Firewall that is by
default installed on Windows XP SP2. The situation is similar with firewalls delivered with other
flavors of Windows.
If you need to keep the firewall switched on, you have to configure it in a way that it does not
block the communication with PicSight-GigE camera. In Windows Firewall this is done using “exceptions”(any incoming connections are prohibited, except those defined by the exceptions). To
configure it, start the Windows Firewall applet in the menu Start → Settings → Control Panel.
Figure 5.1. Windows Firewall, general settings
If the network connections used for connecting the cameras are not shared with other network
traffic (which is recommended practice), than you can switch off the firewall for those connections,
and keep it on only for the connections handling the “regular” network traffic. This can be done
in the Advanced tab of the firewall configuration window.
Copyright © Leutron Vision
66
Leutron
Vision
PicSight-GigE user manual
Initial configuration and preparation
Figure 5.2. Windows Firewall, advanced settings — firewall disabled for
selected network connecitons
If the connection must be shared with other traffic and the firewall needs to stay on, you will have
to add exceptions to the firewall configuration, allowing the image acquisition traffic. Make sure
the Don't allow exceptions checkbox is not checked…
Figure 5.3. Windows Firewall, exceptions allowed
Copyright © Leutron Vision
67
Leutron
Vision
PicSight-GigE user manual
Initial configuration and preparation
… and switch to the Exceptions tab of the firewall configuration window. Click Add Program...
button and locate the Simplon Explorer program. Then click OK to add the Simplon Explorer in
the exceptions' list. Since now incoming communication will not be blocked for Simplon Explorer.
Repeat the same procedure for any other executables (including programs you compile yourself)
you want to use for acquisition from the PicSight-GigE camera.
Figure 5.4. Windows Firewall, adding an exception
Figure 5.5. Windows Firewall, exception for Simplon Explorer
If you like to be more secure, you can restrict this exception to the subnet only or even to a specific list of IP addresses (corresponding with IP addresses of your PicSight-GigE cameras). Proper
dialog for this configuration will appear after clicking the Change scope... button.
Copyright © Leutron Vision
68
Leutron
Vision
PicSight-GigE user manual
Initial configuration and preparation
Figure 5.6. Windows Firewall, changing scope for an exception
5.1.2.2. Configuration of other firewalls
If your system uses any other firewall, its configuration should be very similar to the XP one, depending on its design philosophy.
If you have a firewall that allows more detailed configuration, for example configuring also outgoing
connections, make sure that no restrictions are made for outgoing HTTP connections (so that you
are able to configure the PicSight-GigE camera using your web browser), for ping, and in case
you will need to access PicSight-GigE over FTP, than make sure also that no restrictions apply for
outgoing FTP.
5.1.2.3. Firewall configuration under Linux
On many Linux distributions, the firewall is switched off by default, since no ports are anyway
opened after a basic installation. In such case no special actions are needed. Other distributions
switch the firewall on — and then you will have to configure it properly to allow the image acquisition traffic. The basic principles how to achieve that will be same as described above for the
Windows systems. The individual distributions frequently provide own front-ends allowing to
configure the firewall — refer to the documentation of your Linux distribution.
Alternatively to the distribution specific frontends, the firewall can be configured directly through
the low-level iptables interface. The iptables configuration allows wide range of complex and
flexible rules defining the firewall behavior and requires corresponding level of expertise to be
done properly. Its documentation is beyond scope of this manual, if needed, please refer to the
iptables documentation, preferably with notes specific to your particular distribution.
To perform a basic check if any firewall is active on your system, you can query the current iptables
settings, executing the iptables -L command with superuser privileges. If no firewall is active
(all communication accepted), the output of the command would look similar as
Chain INPUT (policy ACCEPT)
target
prot opt source
destination
Chain FORWARD (policy ACCEPT)
target
prot opt source
destination
Chain OUTPUT (policy ACCEPT)
target
prot opt source
destination
Copyright © Leutron Vision
69
Leutron
Vision
PicSight-GigE user manual
Initial configuration and preparation
5.1.3. Checking the connection
As required by the GigE Vision standard, the default off-factory configuration of the PicSight-GigE
cameras starts in the DHCP/LLA mode. If a DHCP server is running in the network, the camera
will obtain the IP address through the DHCP protocol. If the DHCP procedure fails, the camera
falls back to the LLA (link-local address) scheme.
The cameras using the firmware version 1.x (the “legacy mode”, Section 2.5,
“GigE Vision compatible and legacy boot modes” [p. 25]) do not start with DHCP
configuration, but rather with a fixed IP address 192.168.1.55, subnet mask
255.255.0.0.
This configuration can be adjusted (eg. switching to a fixed IP address for the camera) either
through the Simplon GigE Vision Configuration Tool (Section 5.6, “Simplon GigE Vision Configuration Tool” [p. 90]) or directly through the feature tree in Simplon Explorer (Section 6.4.2, “Selected
GigE Vision related features” [p. 103]).
The fastest way to verify connection is using the Simplon GigE Vision Configuration Tool. When
starting, the tool will search for the GigE Vision cameras connected to the system and displays
them in a list. All the cameras directly accessible to the system will be displayed with a green icon.
Figure 5.7. Simplon GigE Vision Configuration Tool
Red icon would mean that the camera is being used by another application (possibly even from
another PC) and is thus locked. Yellow icon means the camera is visible, but not directly accessible,
typically because its IP configuration does not match with the network card through which it is
connected — the two are configured for different subnets. In such case the temporary or even
persistent IP address of the camera can be immediately adjusted from the Simplon GigE Vision
Configuration Tool. The full details of the Simplon GigE Vision Configuration Tool configuration
options are documented in Section 5.6, “Simplon GigE Vision Configuration Tool” [p. 90].
Copyright © Leutron Vision
70
Leutron
Vision
PicSight-GigE user manual
Initial configuration and preparation
Once the camera is directly accessible (green icon in Simplon GigE Vision Configuration Tool), it
is ready to be connected from Simplon Explorer or any other GigE Vision compatible application.
5.1.3.1. Network card's IP configuration
Sometimes it might necessary to modify IP configuration of the network card itself to match the
desired system configuration.
Windows
To modify the IP configuration under Windows, open Start → Settings → Control Panel → Network
Connections → Local Area Connection → Properties → Internet Protocol (TCP/IP) → Properties:
Figure 5.8. Setting network IP properties
Choose between automatic (DHCP) configuration and a fixed IP address. For a fixed settings,
specify the desired IP address itself and the subnet mask. Optionally set also the default gateway.
Linux
To adjust the IP configuration under Linux, you can use commands ifconfig and route, for
example:
ifconfig eth0 10.0.2.48 netmask 255.255.255.0
route add default gw 10.0.2.100
To make the settings permanent, including selection of the IP configuration scheme (DHCP versus
persistent address), individual Linux distributions provide different front-end tools for network
configuration. Also the underlying configuration files are distributions specific, eg:
• /etc/network/interfaces file on Debian/Ubuntu based systems
• /etc/sysconfig/network-scripts directory on Fedora and related systems
• /etc/sysconfig/network directory on OpenSuse and related systems
Please refer to the documentation of your system for details.
Copyright © Leutron Vision
71
Leutron
Vision
PicSight-GigE user manual
Initial configuration and preparation
5.2. Network performance
When using GigE Vision cameras in demanding applications, involving high stress of the entire
system, one needs to consider and possibly tune system parameters, such as CPU load associated
with acquisition from the Ethernet based cameras, about the system latency (and especially its
predictability) and reliability. With basic understanding of the networking technology and with
elementary care for the important factors, the mentioned parameters can be successfully controlled.
This chapter will discuss the most important aspect of the problem. A very detailed paper describing
all aspects of network performance connected with using GigE Vision cameras, such as PicSight1
GigE is available from Leutron Vision. The paper can be downloaded from our website .
5.2.1. Conditions affecting the performance
The image data are streamed from the camera to the PC using the UDP protocol. In case some
of the packets is not delivered in time, it is lost, unless the application asks the camera explicitly
to resend them. Depending on the data rate produced by the camera and number of connected
cameras, the network as well as the receiving PC are exposed to corresponding processing load.
There are several points on the data path which might incur performance problems.
• When connecting multiple cameras over a switch, it is important to consider the amount of
data the cameras can produce simultaneously if acquiring in parallel. If the data volume exceeds
the bandwidth of the link between the switch and the PC or if the data exceed the switch's
forwarding capability, packets might be lost.
• When the data reach the host PC, they are processed by the network card driver and the operating system's network stack. Depending on the overall load of the PC (number of interrupts
generated, PCI bus load, processor load), the packet processing might not be fast enough to
cope with the incoming data and some packets might get dropped again.
• If the network connection is shared for image acquisition and other traffic (such as internet
connection), the other traffic might affect the image acquisition performance — and especially
the performance might become unpredictable.
• When a “slower” link (100Mbit) appears on the data path between the camera and PC, but the
camera itself is connected to the switch using a Gigabit Ethernet link, the camera will not know
about the bottleneck, relaying the data in full speed. The data would get dropped on the slow
link.
The following sections will provide advice how to cope with the mentioned problems.
5.2.2. Packet size, jumbo frames
The size of the packets carrying the image data is adjustable. It has direct impact on the processing
load induced by the packet stream processing on the receiving PC.
When using low packet size, more packets are required to transfer the image. Higher number of
packets means more network card interrupts, more packet processing in the network stack as well
as by the application itself. Higher number of packets means also higher overhead, since every
packet is carrying some header data. Increasing the packet size can eliminate all this unnecessary
overhead.
It is, however, important to remember that the standard maximal Ethernet packet size is 1500
bytes. To use packets of higher than standard packet size (so called “jumbo frames”), it is necessary
that the network card and all components (switches) on the data path support and are configured
1
http://www.leutron.com/products/products-for-machine-vision-and-image-acquisition-digital-c/picsight-gigabit-ethernet-camera/networkperformance/
Copyright © Leutron Vision
72
Leutron
Vision
PicSight-GigE user manual
Initial configuration and preparation
to recognize given packet size. If the network card or switch is not compatible with the jumbo
frames, a standard packet size under 1500 bytes has to be used.
The packet size feature can be found in the feature tree in category Transport Layer Control (Section 6.4, “Transport layer control” [p. 102]), under the Stream Channel Selector. The feature is accessible in the “expert” feature visibility level. The GenICam name of the feature is
GevSCPSPacketSize. The default value is chosen to be compatible with all the standard Ethernet
equipment, ie. within the 1500-byte-per-packet standard limit.
Figure 5.9. Packet size in the feature tree
The two figures below demonstrate, how increasing packet size lowers processing load of the receiving PC.
Figure 5.10. High processing load with small packet size
Figure 5.11. Lowered processing load with jumbo frames
5.2.3. Flow control, inter-packet delay
The inter-packet delay is a basic flow control mechanism allowing to limit the packet rate generated
by the camera. It is a minimal delay the camera guarantees to insert between each two consecutive
packets of the image data stream. Its particular size should be chosen according to the network
configuration, number of connected cameras, used frame rate and other parameters. Contact us
if you have problems determining the proper settings for your application, our team will provide
advice or tools helping to evaluate your setup.
The inter-packet delay can help for example in following situations:
Copyright © Leutron Vision
73
Leutron
Vision
PicSight-GigE user manual
Initial configuration and preparation
• Multiple cameras connected to a switch are sharing a single network segment up to the receiving
PC. If they are relaying simultaneously, the total data rate might exceed the link bandwidth.
• The receiving PC might be heavily loaded, eg. by a critical real-time image processing. In such
case the resources reserved for the image processing might be temporarily limited, which could
lead to packet losses if the incoming data rate is too high.
• The camera is connected to a gigabit Ethernet network segment, but there's a slower (100Mbit)
segment on the data path. The camera would have no way to know about that bottleneck and
the packets would get dropped when reaching that segment if the camera transmits with full
gigabit speed.
The inter-packet delay feature can be found in the feature tree in category Transport Layer Control
(Section 6.4, “Transport layer control” [p. 102]), under the Stream Channel Selector. The feature is
accessible in the “expert” feature visibility level. The GenICam name of the feature is GevSCPD.
The default value is 0.
Figure 5.12. Inter-packet delay in the feature tree
The two figures below demonstrate, how packet delay should be used if multiple cameras might
be transmitting the image data simultaneously, competing for the link to the PC.
Figure 5.13. Switch dropping packets from multiple cameras due to
bottleneck in the uplink
Figure 5.14. Bottleneck resolved using inter-packet delay
Another two figures demonstrate how packet delay helps with packet processing in case of a
heavily loaded host PC.
Copyright © Leutron Vision
74
Leutron
Vision
PicSight-GigE user manual
Initial configuration and preparation
Figure 5.15. Overloaded PC dropping packets in a packet burst
Figure 5.16. Packet rate lowered through inter-packet delay
5.2.4. Network card configuration
For optimal performance a network adapter (NIC) based on the Intel PRO/1000 chipset should
be used. This section provides information about the possible performance related settings of
network cards based on this chipset. Remember to use original and up-to-date device drivers for
the network card.
See following screenshots showing the recommended performance-specific configuration options.
Note that the screenshots contain also good explanation of every single option, so you should be
able to apply similar settings also on another network card, if you cannot use the recommended
model for any reason. The screenshots document the configuration options under Windows
—corresponding Linux configuration options are described below.
First open the network card properties dialog in the “Device manager”. Select the Advanced tab,
option Jumbo Frames. Enable the jumbo frame support. You can select the highest possible
packet size value, even if the actual packet size used for the acquisition might be lower. Remember
that all the equipment on the data path must support the jumbo frames as well.
Copyright © Leutron Vision
75
Leutron
Vision
PicSight-GigE user manual
Initial configuration and preparation
Figure 5.17. Configuring Intel PRO/1000 GT, Jumbo frames
Select the Advanced tab, option Performance Options and click the Properties button.
Figure 5.18. Configuring Intel PRO/1000 GT, Advanced properties
Copyright © Leutron Vision
76
Leutron
Vision
PicSight-GigE user manual
Initial configuration and preparation
Another dialog will pop up, allowing to configure some performance specific options. The
screenshots below document how all the options should be set up, including corresponding explanations.
Figure 5.19. Configuring Intel PRO/1000 GT, Inter-Frame Spacing
Figure 5.20. Configuring Intel PRO/1000 GT, Flow Control
Copyright © Leutron Vision
77
Leutron
Vision
PicSight-GigE user manual
Initial configuration and preparation
Figure 5.21. Configuring Intel PRO/1000 GT, Interrupt Moderation Rate
Figure 5.22. Configuring Intel PRO/1000 GT, Receive Descriptors
Copyright © Leutron Vision
78
Leutron
Vision
PicSight-GigE user manual
Initial configuration and preparation
Figure 5.23. Configuring Intel PRO/1000 GT, Transmit Descriptors
5.2.4.1. Linux
The set of the configuration options is similar under Linux. The individual parameters might be
adjusted using the ifconfig and ethtool commands or as options passed at driver module
load time (modprobe). Let's walk through some examples briefly, assuming all the commands
are executed with superuser privileges.
Configure jumbo frame size up to 9000 bytes on interface eth0:
ifconfig eth0 mtu 9000
Configure number of receive descriptors to the maximum supported size (4096):
ethtool -G eth0 rx 4096
Query the device driver controlling the network card and its version (should be “e1000” or the
newer “e1000e”):
ethtool -i eth0
The interrupt moderation parameters could be adjusted through the ethtool -C command,
however this option is not recognized by all driver version. As an alternative, it's possible to require
descreasing of the interrupt throttling rate when loading the module (note that the actually suitable
value might depend on the use case). Note that the “extreme” interrupt moderation mode setting
on the Windows driver corresponds with the interrupt throttle rate value of 1000 for the Linux
dirver.
modprobe e1000 InterruptThrottleRate=1000 FlowControl=0
Disable automatic flow control:
ethtool -A eth0 autoneg off rx off tx off
To make the discussed settings permanent, edit corresponding network configuration files. The
network configuration options are, however, system specific, so please refer to the documentation
of your distribution for details. Below you can see a hint for the most popular distributions:
• /etc/network/interfaces file on Debian/Ubuntu based systems
• /etc/sysconfig/network-scripts directory on Fedora and related systems
Copyright © Leutron Vision
79
Leutron
Vision
PicSight-GigE user manual
Initial configuration and preparation
• /etc/sysconfig/network directory on OpenSuse and related systems
The module loading options might be made permanent through the /etc/modprobe.conf
configuration file, or a file in the /etc/modprobe.d directory, depending on the distribution
used.
5.2.5. Network filter driver
Streaming video data over a network might lead to quite high network load. When the data has
to be fully processed by the common network stack implemented by the operating system, high
CPU load on the PC side might be involved. This means that part of the resources needed for image
processing is consumed by the acquisition itself. Indirectly, the high system load may even lead
to packet dropping. To solve these issues, Leutron Vision delivers a dedicated network filter driver.
The filter driver, when installed, hooks in a low-level point within the network stack and observes
all the network communication going through the network card where it is installed. It filters out
all the packets related to PicSight-GigE streaming in an effective way and passes them directly to
Simplon buffers. All other communication (not related to PicSight-GigE) is passed up to higher
levers of the network stack, so that they can reach the expected target. The filter driver thus does
not affect any other communication routed through the same network interface.
Figure 5.24. Processing the image data stream using the network filter
driver
It does not replace the network card's driver, but rather allows to communicate with that driver
directly than going through the standard network stack. The network stack overhead is thus fully
eliminated for the PicSight-GigE streaming.
The filter driver is independent on the network card model an it can be used with any Gigabit
Ethernet equipment.
Using the filter driver might slightly decrease performance of other network
traffic (not related to PicSight-GigE cameras) routed over the network card on
which the filter driver is applied. This involves configurations where the same
network card is used for connecting the camera as well as for other network
traffic at the same time (when the camera is connected over a switch). The performance impact is, however, not too high, typically just few percent.
The filter driver is currently available only for Windows operating systems. See Section 4.1.1.5,
“Installing network filter driver under Windows” [p. 56], providing information about installation
of the filter driver (the driver is installed automatically by default, so the users don't usually need
to care about it).
Copyright © Leutron Vision
80
Leutron
Vision
PicSight-GigE user manual
Initial configuration and preparation
Note that the Simplon filter driver is not used when the camera is accessed from a 3rd party GigE
Vision compatible software, bypassing the Simplon GenTL Producer. In such case, please check if
the software package you are using provides own filter driver.
5.2.5.1. Enabling and disabling the filter driver use
Once installed, the filter driver can be disabled — either globally or per-device.
• After installing the filter driver (Section 4.1.1.5, “Installing network filter driver under Windows” [p. 56]), it can be temporarily disabled in the Properties of each respective network
connection — clearing the checkbox for the Leutron Vision Simplon Filter Driver serivce.
• When enabled, it is still possible to configure, whether to use the filter driver for each respective
acquisition. The default behavior is configured through the Simplon configuration file and
Simplon Settings utility (Section 5.7, “Simplon configuration” [p. 93]) — option GenTL Options
→ GenTL Device Options → GenTL GEV Device Options → Default use of filter driver.
• The default behavior can be changed on per-device basis through a corresponding feature in
the GenTL Device feature tree. The feature name is LvGevDeviceStreamCaptureMode (displayed as Device Stream Capture Mode in a GUI). It is an enumeration, allowing to select among
default behaviour (according to the configuration file described above), “socket acquisition”
(filter driver off, acquisition routed through standard network stack), or acquisition using filter
driver.
Copyright © Leutron Vision
81
Leutron
Vision
PicSight-GigE user manual
Initial configuration and preparation
5.3. HTTP-based configuration
The PicSight-GigE/PicSight-Smart cameras are running a simple HTTP (web) server allowing to
get various information about the camera and adjust its basic properties from any web browser.
Note that most of the configuration options can be adjusted also using Simplon GigE Vision
Configuration Tool or directly from the camera's feature tree. The advantage of the HTTP interface
is that it can be used even at systems, where the Simplon software package is not installed —
provided that you know the IP address of the camera.
5.3.1. Basic camera information
To connect to the camera's HTTP interface, start your favourite web browser, and type the IP address
of the camera. The browser will display a welcome screen showing basic information about the
camera, such as its type, serial number, IP/MAC address, nickname (user name) or firmware version.
Figure 5.25. PicSight-GigE HTTP interface: welcome screen
The left part of the screen offers links to other functions of the HTTP interface.
The “status” page provides information about current status of the camera, in particular the current
IP configuration and link speed, as well as the list of supported communication protocols.
Copyright © Leutron Vision
82
Leutron
Vision
PicSight-GigE user manual
Initial configuration and preparation
Figure 5.26. PicSight-GigE HTTP interface: current status
The “actual image” page displays the current image present in the camera's frame buffer. This
can be used to verify the most basic camera functionality during troubleshooting. Note that if the
camera is operating in triggered mode, it will be the image acquired upon the last trigger. If the
camera started in triggered mode and no trigger was applied yet, you will get just black image.
Figure 5.27. PicSight-GigE HTTP interface: acquired image
5.3.2. Camera administration
To access the configuration options of the camera's HTTP interface, click the Administration link.
You will be prompted for access credentials. The default user name is gige, password gige, the
password can be changed (on PicSight-Smart models the default user name is smart, password
smart). After logging in, the “administration” page will be displayed, offering several configuration
categories.
Copyright © Leutron Vision
83
Leutron
Vision
PicSight-GigE user manual
Initial configuration and preparation
Figure 5.28. PicSight-GigE HTTP interface: administration options
The category “Change nickname and IP address” allows to change the nickname (user name) of
the camera — a name which can be used to identify/open the camera among the cameras discovered in the network. When working with multiple cameras, it might be good idea to use a
unique nickname for each of them.
The same configuration page also allows to adjust camera's IP configuration: IP address, subnet
mask and default gateway. Note that when setting the IP address to 0.0.0.0 switches the camera
to DHCP/LLA mode.
Figure 5.29. PicSight-GigE HTTP interface: nickname and IP configuration
The “Change system operating mode” page offers to switch the camera between legacy and pure
GigE Vision operating modes. The legacy mode that the camera will start with legacy firmware
version (version 1.x), supporting the communication protocol used in our older LV-SDS software
package. Use the legacy mode only when the cameras need to work with a LV-SDS application.
Note that this firmware line is in maintenance mode, no new features are added.
The “Pure GEV” (pure GigE Vision) mode will load the new (version 2.x) firmware, which is fully
compatible with the GigE Vision standard.
Copyright © Leutron Vision
84
Leutron
Vision
PicSight-GigE user manual
Initial configuration and preparation
Figure 5.30. PicSight-GigE HTTP interface: operating mode
The remaining functions or configuration categories accessible from the camera's administration
page include:
Change other INI items
Allows to adjust some specific low level parameters. We recommend to not touch them unless being advised by our support
personnel.
Reset to factory defaults
Resets any previously adjusted options back to defaults.
Show NOVRAM content
Displays content's of cameras NOVRAM. This information is
intended only for troubleshooting and might be required by
our support personnel.
Change password
Allows to change the administration password of the camera's
HTTP interface.
Camera reset
Resets (reboots) the camera.
Logout
Logs out of the camera administration space. Note that the
authentication data might still be kept by the browser in the
current session. To avoid that, you should close the browser
window.
5.4. Firmware update
The PicSight-GigE/PicSight-Smart cameras are field upgradeable. The upgrade procedure is simple
and can be done using the Simplon GigE Vision Configuration Tool tool (which is more thoroughly
documented in Section 5.6, “Simplon GigE Vision Configuration Tool” [p. 90].
The following description assumes that you downloaded the package containing the new firmware
2
from our download area or that you obtained the package from our support staff. The package
file name comes in shape PicSightGige_UpdateMixed_ML_ll_lll-RG_gg_ggg.bin, where
G_gg_ggg and L_ll_lll stand for firmware version (major, minor and subminor, eg. 2_00_052)
of the two firmware components, the default GigE Vision compatible and the legacy component
(the legacy mode will be used only when explicitly configured or when recovering the camera).
2
http://www.leutron.com/support-downloads/download-area/
Copyright © Leutron Vision
85
Leutron
Vision
PicSight-GigE user manual
Initial configuration and preparation
It also assumes that the camera to be upgraded is already based on firmware of the 2.x line. When
upgrading from the 1.x firmware version, please read additional instructions in Section 5.4.1,
“Upgrading from the legacy firmware line (1.x)” [p. 88].
The firmware update procedure is vendor specific, the Simplon GigE Vision
Configuration Tool will update only the PicSight-GigE/PicSight-Smart cameras.
Do not try to use it to update firmware on a 3rd party GigE Vision camera.
Now the update procedure itself (note that the exact look of the Simplon GigE Vision Configuration
Tool might slightly vary among individual Simplon versions):
1.
Start Simplon GigE Vision Configuration Tool. It will display the list of discovered GigE Vision
cameras. Note that it might display also foreign GigE Vision cameras if they are present in the
network — but the firmware update can be naturally applied only to the PicSight-GigE cameras. Click the Firmware update button to switch to the update mode. Then select the camera(s) to be updated, multiple cameras can be selected while holding the Ctrl key.
2.
Click the Open package button and browse for the firmware package to be applied.
Copyright © Leutron Vision
86
Leutron
Vision
PicSight-GigE user manual
Initial configuration and preparation
3.
When ready, click the Update selected device(s) button to start the update. Note that you
might select multiple cameras in the list to upload them all in one step. The check boxes under
the button allow to indicate, whether the updated cameras should be immediately reset after
the update and if their settings should be switched to factory defaults.
4.
The Simplon GigE Vision Configuration Tool will indicate the progress. It will take a while. Do
not disconnect or power off the cameras during the update procedure!
Copyright © Leutron Vision
87
Leutron
Vision
PicSight-GigE user manual
5.
Initial configuration and preparation
When finished, click again the Firmware update button in the main toolbar of Simplon GigE
Vision Configuration Tool to switch back to its main window. If you did not enable the Reset
after update button, remember that the new firmware will not become active until the next
camera reboot.
5.4.1. Upgrading from the legacy firmware line (1.x)
When upgrading from firmware version 1.x, few more steps need to be done. The steps are described briefly below — whenever in doubts, contact us to obtain further information.
Note that the firmware lines of the 1.x and 2.x lines differ fundamentally. While the 1.x firmware
supports the “legacy” operating mode of the PicSight-GigE cameras, compatible with the LV-SDS
package, the 2.x firmware is purely GigE Vision compatible. If you need to run the camera in a
legacy LV-SDS application, do not upgrade to a 2.x firmware version.
To upgrade the firmware from version 1.x to 2.x:
1.
3
Follow the instructions above to upgrade the camera first to the latest 1.x firmware available
3
in our download area . The minimal required version is 1.02.149. This firmware will be used
for recovery purposes (see Section 5.5, “Firmware recovery” [p. 89]). Do not forget to reset
the camera.
http://www.leutron.com/support-downloads/download-area/
Copyright © Leutron Vision
88
Leutron
Vision
PicSight-GigE user manual
Initial configuration and preparation
2.
When the newest 1.x firmware is applied, let's start with uploading the 2.x firmware. If the
camera is not automatically discovered by the Simplon GigE Vision Configuration Tool after
rebooting, click the refresh button to discover it. If the camera is not directly accessible due
to its IP configuration after the update (eg. different subnet), adjust the IP configuration accordingly (more details in Section 5.6, “Simplon GigE Vision Configuration Tool” [p. 90]).
3.
Repeat the upgrade procedure with the latest available firmware from the 2.x line. Reboot
the camera and let the Simplon GigE Vision Configuration Tool tool discover it again. If needed,
adjust its IP settings.
4.
Click the HTTP settings button in the main toolbar to access the HTTP configuration (Section 5.3, “HTTP-based configuration” [p. 82]). Your web browser will be started, displaying
the camera's configuration page. Click the Administration link (username “gige”, password
“gige”), then follow the Change system operating mode link. Select the Pure GEV option and
click the Save button. Reset the camera again.
5.
After discovering the camera again, you can adjust the final desired IP configuration parameters.
Depending on your network configuration, you can define, whether the camera will use a
persistent IP configuration or if it will obtain it through DHCP/LLA. All details about the IP
configuration are discussed in Section 5.6, “Simplon GigE Vision Configuration Tool” [p. 90].
5.5. Firmware recovery
For the case the PicSight-GigE camera fails to load successfully due to an error, a recover copy of
the system is available in the PicSight-GigE flash memory:
• For cameras based on the firmware version 2.x, the recovery mode loads a legacy firmware of
the 1.x line, which is also stored in the camera's flash memory.
• For older cameras containing ony the firmware version 1.x, the recovery mode loads a limited
version of the firmware, allowing just to fix the system by re-loading a new firmware.
The recovery mode should be used when the camera repeatedly fails to start properly. Such situation
indicates that the camera's installed firmware is corrupted. Note that the camera's boot procedure
can be monitored through the status LED (Section 3.9, “Status LED” [p. 48]).
To boot the camera in the recovery mode, press the “Reset/Recovery” button placed on the back
plate of the PicSight-GigE camera during camera's boot, i.e. hold down the reset button within 5
seconds right after powering the camera.
Figure 5.31. Position of the “recovery reset” button on PicSight-GigE-AR
and PicSight-GigE-AS models
When the “Reset/Recovery” button is being pressed during the boot process (i.e. within 5 seconds
after power up), the recover system is loaded. The LED light blinks slower than when booting the
normal system. You can also check the system on the home page of PicSight-GigE (when accessing
Copyright © Leutron Vision
89
Leutron
Vision
PicSight-GigE user manual
Initial configuration and preparation
the camera over HTTP, see Section 5.3, “HTTP-based configuration” [p. 82]), which is colored
differently and displays additional “*** RECOVER MODE ***” label.
When the camera boots to a recovery mode, remember, that it can use different IP configuration
settings than it had originally configured. In particular, the firmware version 1.x starts by default
with fixed IP address 192.168.1.55. You will need to adjust the temporary IP address corresponding with your network settings through Simplon GigE Vision Configuration Tool, or eventually
temporarily configure a network card to match the 192.168.1.0 subnet.
When started the recovery mode, you should especially restore the camera's original firmware to
fix the broken system. To do this, upload the latest available firmware version to the camera, using
instructions from Section 5.4, “Firmware update” [p. 85]. Also the essential configuration can be
done through the camera's HTTP interface.
The changes in the configuration, made through the HTTP-based configuration when the recover
system is loaded, are made to the normal system, not to the recovery system.
5.6. Simplon GigE Vision Configuration Tool
The Simplon GigE Vision Configuration Tool allows to perform several important configuration
tasks, including especially the IP related configuration and firmware update. The IP configuration
options can be used to configure any GigE Vision compliant camera, the firmware update is, naturally, intended only for the PicSight-GigE/PicSight-Smart models.
When the tools starts, up, it searches the network for connected GigE Vision cameras and displays
them in a list.
Figure 5.32. Simplon GigE Vision Configuration Tool
Copyright © Leutron Vision
90
Leutron
Vision
PicSight-GigE user manual
Initial configuration and preparation
Each camera is described using its basic properties, such as model name, IP address, serial number
or user name. Depending on the camera status, one of the following icons is displayed next to
the camera's model name:
The camera is accessible and can be directly configured.
The camera is not currently accessible, although it is on a correct subnet — it is perhaps
being used by an other application on the same or other PC.
The camera cannot be directly configured, because it is on a different subnet. You will
first need to switch the camera, at least temporarily, to the subnet corresponding with
the network interface it is connected to. Note that in this case the application does not
have a knowledge, whether the camera is at the moment used by another application.
The tool allows to adjust IP configuration for the selected camera.
For the cameras not marked as inaccessible (i.e. for cameras with green or red icon), the current
IP configuration (IP address, subnet mask, default gateway) can be adjusted. Note that such new
configuration will be valid only in the current session, but will be lost upon next camera boot.
Typical use case is to bring the camera to the subnet compatible with the interface it is connected
to, so that it is directly accessible for further configuration. Select the camera, fill in the desired
new values and click the Force IP address button. Whenever the adjusted address/subnet will not
match the subnet of the network interface the camera is connected to, a warning will be displayed.
For cameras that are currently under control of different application (they appear with yellow
icon), the attempt to change the configuration will be silently discarded by the camera.
For directly accessible cameras (green icon), the more options can be configured. If the camera
is not directly accessible, it's necessary to first bring it to the subnet corresponding with the network
interface the camera is connected to, as described above. The configurable options include IP
configuration mode (persistent IP, DHCP, LLA), persistent IP configuration parameters (IP address,
subnet mask, default gateway) user ID (nickname) and boot switch mode (pure GigE Vision mode
or legacy mode). Select the camera and click the Connect and configure button. The tool will
gain exclusive access to the camera, read its configuration and allow changing the configuration.
Select which property groups should be configured, adjust their values and when finished, click
the Apply and disconnect button.
Copyright © Leutron Vision
91
Leutron
Vision
PicSight-GigE user manual
Initial configuration and preparation
Figure 5.33. Simplon GigE Vision Configuration Tool, configuration options
Finally, the tool itself can be configured through the main toolbar, which includes following buttons:
Exits the tool.
Refreshes the list of detected cameras.
Starts your default web browser, connecting to the HTTP interface of the selected
camera.
Switches to the firmware update mode and back. Refer to Section 5.4, “Firmware
update” [p. 85].
Reboots the selected camera.
Displays help.
5.6.1. Discovering the cameras with wrong subnet settings under Linux
Depending on the system configuration, the Simplon GigE Vision Configuration Tool and Simplon
in general might not be able to discover cameras that are configured for different subnet than the
network card they are connected to. The reason is that some Linux systems use by default so called
“reverse path packet filtering” — a mode in which the kernel drops any incoming packets that
Copyright © Leutron Vision
92
Leutron
Vision
PicSight-GigE user manual
Initial configuration and preparation
do not match the routing table (which is usually the case for discovery responses from cameras
on wrong subnets).
The reverse path filter can be disabled through the sysctl interface, disable if for each interface
used to connect the cameras (net.ipv4.conf.ethX.rp_filter) and also globally
(net.ipv4.conf.all.rp_filter). For example:
sudo sysctl net.ipv4.conf.all.rp_filter=0
sudo sysctl net.ipv4.conf.eth0.rp_filter=0
sudo sysctl net.ipv4.conf.eth1.rp_filter=0
To make the settings permanent, adjust them directly through
/etc/sysctl.conf//etc/sysctl.d:
# /etc/sysctl.conf
net.ipv4.conf.all.rp_filter=0
net.ipv4.conf.eth0.rp_filter=0
net.ipv4.conf.eth1.rp_filter=0
Please study the rp_filter documentation to understand its impact and decide
when you want to disable it. Perhaps it could be disabled just for the network
interfaces used to connect cameras, but keep enabled for the “public” ones. Note
also, that when using the ip_forward option, the reverse path filter might be
also active implicitly. Study documentation of your system, to know all details.
When disabling the reverse path filter does not help to discover the cameras with
wrong subnet configuration, please try to run the Simplon GigE Vision Configuration Tool with superuser privileges. In some situations, the Simplon has to rely
on special (root-only) socket options during the discovery process — and when
running the tool with insufficient rights, the cameras on wrong subnets might
not be visible.
5.7. Simplon configuration
Following section provides basic information about Simplon software package configuration. More
information about the Simplon configuration, troubleshooting and other related topics can be
found in Simplon getting started.
5.7.1. Simplon Settings utility and the configuration file
The Simplon configuration options are concentrated in a single file, lv.simplon.ini. On Windows systems the file is located in the “application data” part of the installation. On Linux systems
it's stored by default in /etc/opt/simplon.
The file can be edited directly — every single option is well documented directly in the file, including
it's possible values. Note that on Linux superuser privileges are required to edit the file.
Instead of editing the file directly, however, the recommended alternative is to edit the file through
a helper utility, Simplon Settings (Windows: menu Start → Programs → Leutron Vision Simplon
→ Tools → Simplon Settings; Linux: /opt/simplon/bin/lv.settings as superuser). The tool provides
a comfortable way to edit the lv.simplon.ini file.
Copyright © Leutron Vision
93
Leutron
Vision
PicSight-GigE user manual
Initial configuration and preparation
Figure 5.34. Simplon Settings utility
The tool's interface can be controlled threw a handful of menu options (or corresponding buttons).
You can show/hide the info pane with info about the selected configuration option. You can switch
between three configuration levels (beginner, expert, guru) — the higher level, the more detailed
options are shown. Finally, you can store the changes.
The set of options itself is ever evolving, so the Simplon Settings tool itself (or the lv.simplon.ini
file) is the most complete documentation. The options include detailed logging configuration (see
also Chapter 9, Troubleshooting & Support [p. 288]), system installation related info and configuration
of individual Simplon subsystems.
5.7.2. Selected configuration options
The documentation for all the Simplon configuration options is provided directly in the Simplon
Settings utility and the configuration file. Here we'll mention just few selected important options:
Logging options
The Simplon log is an important tool for any support and troubleshooting. For regular operation, the log might be kept at low level (default is
level Info (4)) or even switched off to optimize the performance.
However, during application development or when debugging a problem, we recommend to switch the Log level configuration option to
Trace (6). All log files sent to our support team should be created
with level Trace (6).
The logging infrastructure is optimized for high performance. For example, the logging to file is buffered to minimize the disk access overhead. This can have a drawback, however, that in case of an application
crash, the last part of the log might be missing in the file. When
troubleshooting application crashes, we recommend to switch on the
option Disable all buffering .
Heartbeat timeout
Heartbeat timeout is an important parameter, related to GigE Vision
cameras only (PicSight-GigE/PicSight-Smart).
This timeout, in milliseconds, defines how frequently has the camera
send the “heartbeat” messages to the camera, indicating that it's still
alive. When the camera does not receive the message within the specified
timeout period, it assumes the application has gone away and disconnects
itself. The default value used in Simplon is 3 s.
Copyright © Leutron Vision
94
Leutron
Vision
PicSight-GigE user manual
Initial configuration and preparation
At most times, the heartbeat handling is fully transparent to the user.
However, during debugging, when a developer stops the application at
a breakpoint for single stepping, the Simplon heartbeat handling thread
would also stop, fail to deliver the heartbeat messages and the camera
would disconnect. To prevent that, we recommend to increase the
heartbeat timeout parameter to a higher value. The exact value should
be a compromise between being able to debug comfortably, while understanding that when the application stops unexpectedly without disconnecting the camera properly, it will take a while before the camera
disconnects automatically and becomes available for another connection.
The parameter is configurable through camera features at runtime, while
its default value can be adjusted through the Simplon Settings utility.
5.8. Acquisition and runtime configuration
The camera runtime functionality is fully configurable through the GenICam interface. The individual features, their relationships and use is described in chapter Chapter 6, Camera features and
their control [p. 96].
Accessing the camera (feature control and image acquisition) using the Leutron Vision Simplon
API interface is documented in Simplon API documentation: Simplon programmer's guide.
Accessing the camera (feature control and image acquisition) using 3rd party software packages
compatible with GenICam GenTL and GigE Vision standards is documented in chapter Chapter 8,
Connecting with 3rd party software packages [p. 269].
Copyright © Leutron Vision
95
Leutron
Vision
PicSight-GigE user manual
Camera features and their control
6. Camera features and their control
6.1. Common principles
The camera features are controlled through GenICam based feature tree. For clarity, we will present
them below in sections corresponding to individual categories in the feature tree. For individual
features, we'll provide a sample code showing how to access given feature through the Simplon
API and “pseudo-code” demonstrating how to use the feature in a generic GenICam based application. Naming and grouping the features strictly follows the GenICam SFNC standard. The Simplon
API samples are provided in plain C, other variants can be easily generated by the Simplon Source
Code Generator (refer to Simplon programmer's guide).
The code examples are marked with corresponding icons:
Introduces sample code demonstrating usage of the discussed features
through the Simplon API interface. The code snippets are using directly
the “native” Simplon API functions and constants. They are presented
in the plain C variant, but users programming in other languages
should find all needed info in them easily. Whenever a “shortcut”
function exists for given functionality in Simplon API, it is presented.
Pseudocode demonstrating usage of the discussed features through
a generic GenICam interface. These code snippets are intended for
users accessing the cameras through other software interface than
Simplon API. It uses the actual GenICam names of the individual features, rather than Simplon API constants. The “pseudo function calls”
need to be replaced with actual function names used in the actually
used software package.
The sections below document all the features available within the camera family. Some of the
features, are, however, only available on certain camera models. Some features might also not be
available on older firmware versions. Simplon API provides means to check if a given feature is
supported by the connected camera.
Simplon API can add additional “capabilities” to the connected cameras. For example, it can
supplement image processing capabilities (such as LUTs or color transformation) by means of
software if given camera does not implement them. Simplon API also provides additional extras
on top of the processing primitives offered by a camera — examples are white balance coefficients
calculations, brightness/contrast adjustments through LUT etc. Details are discussed in Simplon
programmer's guide.
The camera feature tree control is based on principles introduced in the GenICam standard. It
might be useful to get familiar with these principles in corresponding section in Simplon getting
started maual.
The camera feature model follows the GenICam SFNC (Standard Features Naming Convention)
standard as closely as possible. Only for functionality that cannot be expressed by means of SFNC,
then custom feature names are introduced — these have always the “Lv” prefix.
Individual features might be referred through three types of identifiers in the manual (overview
of all the features is given in Section 6.17, “Feature summary” [p. 203]):
• GUI name (display name), eg. Exposure time — this is the human readable name of the feature,
used to display the feature in a graphical user interface, such as in Simplon Explorer. When referring to the features in a free text, we usually use the GUI name, unless using the GenICam
name is needed for clarity. The name is rendered in a cursive font.
• GenICam name, eg. ExposureTime — the actual name of the feature used to identify it in
GenICam infrastructure. This name is important for users connecting to the cameras from 3rd
Copyright © Leutron Vision
96
Leutron
Vision
PicSight-GigE user manual
Camera features and their control
party software packages, other than Simplon API. We use it in all GenICam pseudo-code examples. In free text they are rendered in a monospace font.
• Simplon API constant, eg. LvDevice_ExposureTime — the identifier used to refer to the
feature in Simplon API. Used in all Simplon API code examples. In free text they are rendered
in a monospace font.
6.2. Camera classes
The individual Leutron Vision camera families contain several “classes” of camera models, providing
different level of functionality. The individual classes are available for every supported sensor type.
6.2.1. Basic PicSight-GigE models
Most of the features and interfaces are available for all the camera classes. The “basic” PicSightGigE models are thus full featured industrial cameras without any limitations. The advanced
camera classes described below extend the camera functionality by specific additional options.
6.2.2. RTF cameras
The PicSight-GigE cameras can be delivered with the RTF (Real-Time Function) option, which adds
several advanced features to the camera functionality. The add-on features include:
•
•
•
•
High quality Bayer decoder on camera
RGB color transformation matrix, LUTs, white balance
Integrated lens controller
Analog video output
Contact our sales team to find out the full list of the RTF options supported by your preferred
camera model.
6.2.3. Smart cameras
Every PicSight-GigE camera also exists in the “smart” version, PicSight-Smart. The basic functionality and Ethernet interface of the PicSight-Smart cameras is identical to PicSight-GigE cameras,
but PicSight-Smart models furthermore provide additional resources and functionality:
•
•
•
•
32-bit RISC processor
additional RAM memory (64 MB or more), flash memory
real-time operating system
SDK including C/C++ compiler and libraries for image acquisition, camera control, communication facilities and more
This allows to perform conditioning of the acquired image or full image processing on the camera.
Results of the processing can be signalled to the outside world through the i/o lines, over the
serial RS-232 line or over the Ethernet interface.
The PicSight-Smart cameras also provide a set of generic features in the camera feature interface.
These features can be used for purposes defined by the “smart” application. Overview of these
features is given in Section 6.16, “Smart application control” [p. 200]. The PicSight-Smart cameras
also offer additional functionality, such as extended I/O interface, RS232 communication port,
and more. Contact our sales team to learn the full list.
Technical details about individual PicSight-Smart cameras are listed in Appendix B, Technical specifications for the “smart” models [p. 332].
Complete description of the PicSight-Smart cameras and especially their programming and configuration is described in dedicated documents: PicSight-Smart Library API programmer's guide,
PicSight-Smart Library API reference.
Copyright © Leutron Vision
97
Leutron
Vision
PicSight-GigE user manual
Camera features and their control
In case of the PicSight-Smart cameras, the features discussed throughout this
chapter can be also configured directly by the “smart” application itself. The
principles behind the features are the same, no matter if accessed from the host
or smart application. To see the code examples for the PicSight-Smart Library
API, check the corresponding chapter in PicSight-Smart Library API programmer's guide.
6.2.4. OEM features
Additional features and options are available for OEM customers, new features might be added
on request. Please contact us to discuss your particular needs.
6.3. Information about the camera
Most of the features in this category provide read-only information about the camera. Only few
of them can be writable as well.
Figure 6.1. Example GUI showing the device information features
6.3.1. Device identity and version
The basic information about the camera includes:
Vendor Name
Name of the camera's vendor (manufacturer). For all Leutron
Vision camera types, this feature reads Leutron Vision.
Model Name
Name of the camera model. The name includes information
about the camera family, sensor type, interface and possibly
other variations. Refer to Section 2.2, “PicSight model naming
convention” [p. 23].
Manufacturer Info
Manufacturer information about the camera. This field is usually
empty.
Device Firmware Version
Version of the camera firmware as a string. The version is encoded as M.mm.sss, where M stands for major, mm for minor
and sss for subminor version. For example 2.00.005.
Recovery Firmware Version
Firmware version into which the camera would be recovered.
Besides the actual firmware, the camera carries also an older
firmware version into which it can be recovered in case of serious problems, see Section 5.5, “Firmware recovery” [p. 89].
Device Hardware Version
String holding various information about the camera hardware
version. On some cameras it might be empty. The contents is
intended for our support team.
Copyright © Leutron Vision
98
Leutron
Vision
PicSight-GigE user manual
Device ID (serial number)
Camera features and their control
String representation of camera's unique serial number.
Beware, the Simplon API identifier for this feature is
LvDevice_DeviceSerialNumber to distinguish it from the
GenICam GenTL “device ID” used for device enumeration.
Device User ID (nickname)
Writable string, which can be used to assign a unique camera
“nickname” by the user. The nickname can be up to 15 characters long and it is one of the options how to find/identify a
camera in Simplon API.
Device Scan Type
Scanning type of a camera. This SFNC (Standard Features
Naming Convention) feature is intended for generic applications — it returns Area Scan for all Leutron Vision cameras.
Device Type
String representation of camera type/class. The type associates
the camera with a given level of functionality (independent on
the mounted sensor). Example values are GigE, GigE-RTF,
or Smart, see Section 6.2, “Camera classes” [p. 97].
LvHDevice hDev; // open the device to get the handle
// read basic information
char StringVal[1024];
LvGetString (hDev, LvDevice_DeviceVendorName, StringVal, 1024);
LvGetString (hDev, LvDevice_DeviceModelName, StringVal, 1024);
LvGetString (hDev, LvDevice_DeviceManufacturerInfo, StringVal, 1024);
LvGetString (hDev, LvDevice_DeviceFirmwareVersion, StringVal, 1024);
LvGetString (hDev, LvDevice_LvRecoveryFirmwareVersion, StringVal, 1024);
LvGetString (hDev, LvDevice_DeviceVersion, StringVal, 1024);
LvGetString (hDev, LvDevice_DeviceSerialNumber, StringVal, 1024);
LvGetString (hDev, LvDevice_DeviceUserID, StringVal, 1024);
LvGetString (hDev, LvDevice_LvDeviceType, StringVal, 1024);
// set new nickname (user ID)
LvSetString (hDev, LvDevice_DeviceUserID, "FoobarCamera");
// check the scanning type (always LvDeviceScanType_Areascan)
int32_t EnumVal;
LvGetEnum (hDev, LvDevice_DeviceScanType, &EnumVal);
// read basic information
read_string (DeviceVendorName)
read_string (DeviceModelName)
read_string (DeviceManufacturerInfo)
read_string (DeviceFirmwareVersion)
read_string (LvRecoveryFirmwareVersion)
read_string (DeviceVersion)
read_string (DeviceID)
read_string (DeviceUserID)
read_string (LvDeviceType)
// set new nickname (user ID)
write_string (DeviceUserID, "FoobarCamera")
// check the scanning type (always AreaScan)
read_enum (DeviceScanType)
Copyright © Leutron Vision
99
Leutron
Vision
PicSight-GigE user manual
Camera features and their control
6.3.2. Runtime information
Apart of the basic information, the camera also provides various “runtime” status information:
Temperature
The camera self-diagnostics includes temperature measurement at various locations. Currently reported measurements include temperature at the sensor board
and at the main board. Note that before reading the actual value, it is necessary
to first adjust the Temperature Selector to correct measurement point.
Up Time
Current up-time of the device (time period elapsed since camera boot), as integer
value in milliseconds.
LvHDevice hDev; // open the device to get the handle
// read sensor temperature
LvSetEnum (hDev, LvDevice_DeviceTemperatureSelector,
LvDeviceTemperatureSelector_Sensor);
double FloatVal;
LvGetFloat (hDev, LvDevice_DeviceTemperature, &FloatVal);
// read main board temperature
LvSetEnum (hDev, LvDevice_DeviceTemperatureSelector,
LvDeviceTemperatureSelector_Mainboard);
LvGetFloat (hDev, LvDevice_DeviceTemperature, &FloatVal);
// read device uptime
int32_t IntVal;
LvGetInt32 (hDev, LvDevice_LvDeviceUpTime, &IntVal);
// read sensor temperature
write_enum (DeviceTemperatureSelector, Sensor)
read_float (DeviceTemperature)
// read main board temperature
write_enum (DeviceTemperatureSelector, Mainboard)
read_float (DeviceTemperature)
// read device uptime
read_int (LvDeviceUpTime)
6.3.3. Resetting the camera
It is possible to reset (reboot) the camera using the Reset Device command. It is important to remember, that after issuing the command, the connection with the camera is lost immediately and
it needs to be re-opened after it is booted again. Any temporary camera settings will be lost, the
camera will start in the default settings (note that the default startup settings of the camera are
user-configurable, see Section 6.13, “User sets (saving/loading camera configuration)” [p. 179]).
The camera also performs complete initialization procedure, such as eg. IP configuration (when
using DHCP, it can boot with different IP address).
LvHDevice hDev; // open the device to get the handle
// reset the camera
LvCmdExecute (hDev, LvDevice_DeviceReset);
Copyright © Leutron Vision
100
Leutron
Vision
PicSight-GigE user manual
Camera features and their control
// reset the camera
exec_cmd (DeviceReset)
6.3.4. Pixel clock (sensor digitization clock)
Pixel clock feature is a bit special since while it's typically a read-only informative feature, on certain
camera models and firmware versions, it might be configurable (section Section 6.6, “Acquisition
and trigger control” [p. 124] discusses other options to configure acquisition frame rate). To access
the pixel clock frequency through the Clock Frequency floating point feature, it's first necessary to
set Clock Selector to Sensor Digitization to differentiate from other clocks a camera might be reporting.
LvHDevice hDev; // open the device to get the handle
//read camera sensor digitization clock in Hz
LvSetEnum (hDev, LvDevice_DeviceClockSelector,
LvDevicClockSelector_SensorDigitization);
LvGetFloat (hDev, LvDevice_DeviceClockFrequency, &FloatVal);
// set pixel clock if the camera supports it (float in Hz)
LvSetEnum (hDev, LvDevice_DeviceClockSelector,
LvDevicClockSelector_SensorDigitization);
LvSetFloat (hDev, LvDevice_DeviceClockFrequency, 28.6*1000000);
// read camera sensor digitization clock in Hz
write_enum (DeviceClockSelector, SensorDigitization)
read_float (DeviceClockFrequency)
// set pixel clock if the camera supports it (float in Hz)
write_enum (DeviceClockSelector, SensorDigitization)
write_float (DeviceClockFrequency, 28.6*1000000)
6.3.5. Register streaming support
The camera supports so called “register streaming”. This GenICam term refers to safe storing and
re-loading entire camera configuration. Safe means that it restores complete “state” of the camera,
without need to know about complex feature dependencies. The same settings can be applied to
multiple cameras of the same type and version. To work reliably, the operation must exactly follow
rules standardized by the GenICam standard.
When using the Simplon API, the camera settings might be stored and re-loaded using functions
LvCameraSaveSettings() and LvCameraLoadSettings(), so the user need's not care
about the internal meachanism.
Other GenICam based software packages will usually also provide convenience functions to handle
camera settings. The camera features controlling the standardized register streaming operation
are: DeviceRegistersStreamingStart, DeviceRegistersStreamingEnd,
DeviceRegistersCheck and DeviceRegistersValid.
Note that the camera itself is also able to remember its current state and restore it later upon user
request or during boot, see Section 6.13, “User sets (saving/loading camera configuration)” [p. 179].
Copyright © Leutron Vision
101
Leutron
Vision
PicSight-GigE user manual
Camera features and their control
6.4. Transport layer control
The most important feature in this category is Payload Size, which is used to determine the size
of the image data during buffer allocation. Besides that, the category contains lot of “transport
layer” (GigE Vision) related features, most of which are handled internally by Simplon API or other
imaging library, or can be configured comfortably through Simplon GigE Vision Configuration
Tool.
Figure 6.2. Example GUI showing the transport layer control features
6.4.1. Acquired image data size
When preparing for acquisition, the application needs to know the required size of the buffers to
be allocated for receiving the acquired data. The size depends on various options, such as image
size and pixel format (Section 6.5, “Image format” [p. 107]) or presence of chunk data in the image
(Section 6.11, “Chunk data” [p. 168]).
The camera reports the image data size corresponding with current configuration in the Payload
Size feature, which provides the data size in bytes.
The camera allows to switch to a mode when some of the parameters (eg. image size) affecting
the payload size can change freely during acquisition. In such mode the Payload Size feature always
reports the maximal possible size, so that this size can always be safely used for buffer allocation.
It is important, that the actual value of the Payload Size feature does not change during active
acquisition — otherwise the application is in danger that its buffers will not be large enough for
the received data. GenICam provides a standard way to “lock” the essential “transport layer”
features during acquisition through feature called TLParamsLocked. Note that this feature is set
transparently during acquisition by Simplon API — and in all reasonable GenICam based software
packages, so the user does not need to care about it.
Copyright © Leutron Vision
102
Leutron
Vision
PicSight-GigE user manual
Camera features and their control
Simplon API offers additional image processing functions that can also alter the
image data size — and thus the required size of the target buffer. This topic is,
however, behind the scope of this manual, it is discussed in Simplon programmer's
guide.
LvHDevice hDev; // open the device to get the handle
// read the "payload size"
// (buffer size required to hold acquired image data)
int32_t IntVal;
LvGetInt32 (hDev, LvDevice_PayloadSize, &IntVal);
// now allocate the buffers and use them for the acquisition
// read the "payload size"
// (buffer size required to hold acquired image data)
read_int (PayloadSize)
// now allocate the buffers and use them for the acquisition
6.4.2. Selected GigE Vision related features
All essential camera registers dictated by the GigE Vision standard (so called “bootstrap registers”)
are exposed to the user through the feature tree interface. However, most of these features will
be configured “under the hood” by Simplon (or other GigE Vision compatible software controlling
the camera) and the user should not even try to touch them without very good reason. These
features become visible only at the “guru” feature visibility level.
Some of these features, are, however, useful for regular use — and these are listed below:
MAC Address
The MAC Address feature is natively an unsigned 64-bit integer.
Simplon API, however, allows to read it also in form of string
with colon-separated hexadecimal representation of individual
bytes (such as 00:18:66:01:97:5A).
Current IP settings
Current IP settings include Current IP Address, Current Subnet
Mask and Current Default Gateway. The features are natively
unsigned 32-bit integers, but Simplon API also allows reading
them in the usual string representation, ie. dot separated,
decimal (such as 10.0.2.3).
The current IP settings of the camera can be forced to arbitrarily
chosen values using Simplon GigE Vision Configuration Tool
(see Section 5.6, “Simplon GigE Vision Configuration
Tool” [p. 90]).
Persistent IP settings
Copyright © Leutron Vision
Persistent IP settings specify the IP settings (features Persistent
IP Address, Persistent Subnet Mask and Persistent Default Gateway) that the camera will use upon booting, when its IP configuration is switched to “Persistent IP” (in contrast to DHCP
or LLA). The features are natively unsigned 32-bit integers, but
Simplon API also allows reading and writing them in the usual
string representation, ie. dot separated, decimal (such as
10.0.2.3). These settings are stored in camera's non-volatile
memory, so that the camera “remembers” them after poweroff cycle.
103
Leutron
Vision
PicSight-GigE user manual
Camera features and their control
The persistent IP settings of the camera can be also comfortably
configured using Simplon GigE Vision Configuration Tool (see
Section 5.6, “Simplon GigE Vision Configuration Tool” [p. 90]).
IP configuration scheme
The IP configuration scheme to be used by the camera during
boot-up can be adjusted by swtiching individual protocols on
an off (see code samples below). The available protocols are:
• Persistent IP. The camera uses the IP settings configured
through corresponding features (see above) or the Simplon
GigE Vision Configuration Tool. Controlled through boolean
flag Persistent IP Active.
DHCP. Camera attempts to obtain the IP settings from a
DHCP server, if available on the network, using the DHCP
protocol. Controlled through boolean flag DHCP Active.
LLA. The LLA (Link-Local Address) protocol can be used
for IP settings configuration if the camera is connected directly to the network card, not through a local network. Note
that just a single LLA configured camera might be connected
to the computer at a time. Controlled through boolean flag
LLA Active.
According to the GigE Vision standard, if multiple protocols
are enabled, the order of selecting them is as follows:
1. Persistent IP — if enabled
2. DHCP — if enabled
3. LLA
The cameras might be delivered with two different default
factory settings:
• DHCP/LLA mode — as required by GigE Vision standard
• Persistent IP mode, set to 192.168.55.1/255.255.255.0
— legacy mode
The IP configuration scheme of the camera can be also comfortably configured using Simplon GigE Vision Configuration
Tool (see Section 5.6, “Simplon GigE Vision Configuration
Tool” [p. 90]).
Packet Size
The Packet Size feature controls the size of UDP packets (in
bytes) carrying the image data. This value can have significant
impact on image acquisition performance (see Section 5.2,
“Network performance” [p. 72]). The bigger the packet size,
the less overhead is used to transmit and process the packets.
However, the standard network equipment can only process
packets up to 1500 bytes. To use larger packets, you must be
sure that all the network components in the path are capable
and configured to recognize larger packets.
The Simplon API can (through Simplon GenTL Producer) execute an autodetection procedure that determines the maximum packet size that can be safely used for the camera, given
the actual network configuration.
Inter-Packet Delay
Copyright © Leutron Vision
The Inter-Packet Delay is a delay the camera inserts between
every two consecutive packets in the image stream. It is an integer value representing the delay as number of the camera
104
Leutron
Vision
PicSight-GigE user manual
Camera features and their control
timestamp ticks, default value is 0. The camera timestamp frequency is 1MHz, ie. the ticks correspond with time unit of 1
µs. It can be used as a flow control mechanism, to control the
maximal data rate coming from the camera — eg. when data
coming from multiple cameras connected over a switch would
exceed the link bandwidth (see Section 5.2, “Network performance” [p. 72]).
Message channel retransmissions The camera can attempt to re-send the event messages which
got lost (the camera did not receive acknowledge for them).
The functionality is controlled by two features, one specifying
the retry count (Message Channel Retry Count, number of attempts to re-send the same message), the other specifying the
transmission timeout (Message Channel Transmission Timeout,
timeout between two re-send attempts), in milliseconds. The
default value for both is 0. The zero transmission timeout means
that the camera will not require any acknowledge for the
message packets at all — which means that whenever using a
non-zero retry count, the transmission timeout should also be
non-zero.
Heartbeat Timeout, Heartbeat Dis- As dictated by the GigE Vision standard, the Simplon API (same
able
as any other GigE Vision compatible library or application)
maintains connection with the camera by means of sending
regular heartbeat messages. If the camera does not receive the
heartbeat within the period specified in the Heartbeat Timeout
feature (in ms), it closes the connection with the application.
This has the advantage that if an application crashes, the
camera does not remain blocked, listening to non-existing application. It closes the connection and becomes ready to get
connected to another application.
In most cases, the user does not need to care about the timeout
at all, since it is handled transparently by Simplon API. Only in
situations, such as application debugging, when stopping the
application in the debugger would also stop the heartbeat
message delivery thread, it might be desirable to temporarily
increase the timeout to prevent loosing connection with the
camera.
On cameras with newer firmware versions supporting GigE
Vision 1.2 the heartbeat can be temporarily fully disabled using
the boolean feature Heartbeat Disable. In such case, the camera
stops monitoring the heartbeat messages and never closes the
connection automatically. Note however, that increasing or
disabling the heartbeat timeout can lead to problems when
crashing or faulty application fails to close connection with the
camera properly.
When changing the Heartbeat Timeout value on the camera,
the Simplon GenTL Producer intercepts such changes and adapts itself to adjust the frequency of the heartbeat messages
accordingly. When using other GigE Vision compatible software,
verify, if it handles the heartbeat transparently as well, or if it
needs to be notified somehow about the new settings.
Timestamp control
Copyright © Leutron Vision
The camera maintains a timestamp counter (64-bit unsigned
integer value), which can be read (latched) or reset at any time.
105
Leutron
Vision
PicSight-GigE user manual
Camera features and their control
The camera timestamp frequency is 1MHz, ie. the ticks correspond with time unit of 1 µs. The timestamp is used to label
various data provided by the camera, such as image buffers or
asynchronous events.
The features controlling the timestamp include Timestamp Tick
Frequency (in Hz, for our cameras always 1000.000 Hz),
Timestamp Value (number of ticks since last reset or wraparound, for our cameras the ticks correspond with microseconds), Timestamp Latch (command latching the timestamp
value, ie. updating the Timestamp Value with current status)
and Timestamp Reset (command resetting the timestamp).
Refer also to the sections about additional “chunk data in the
image”, including image timestamp (Section 6.11, “Chunk
data” [p. 168]), asynchronous events (Section 6.12, “Asynchronous events” [p. 173]) and about “special trigger” functionality
allowing to reset timestamp and other counters using an external signal (Section 6.15, “Special features” [p. 196]).
LvHDevice hDev; // open the device to get the handle
// read the camera MAC address as string or integer
char StringVal[1024];
LvGetString (hDev, LvDevice_GevMACAddress, StringVal, 1024);
int64_t Int64Val;
LvGetInt64 (hDev, LvDevice_GevMACAddress, &Int64Val);
// read current IP settings as strings or integers
LvGetString (hDeve, LvDevice_GevCurrentIPAddress, StringVal, 1024);
LvGetString (hDev, LvDevice_GevCurrentSubnetMask, StringVal, 1024);
LvGetString (hDev, LvDevice_GevCurrentDefaultGateway, StringVal, 1024);
int32_t IntVal;
LvGetInt32 (hDev, LvDevice_GevCurrentIPAddress, &IntVal);
LvGetInt32 (hDev, LvDevice_GevCurrentSubnetMask, &IntVal);
LvGetInt32 (hDev, LvDevice_GevCurrentDefaultGateway, &IntVal);
// configure persistent IP settings as strings or integers
LvSetInt32 (hDev, LvDevice_GevPersistentIPAddress, 0x0A000203);
LvSetInt32 (hDev, LvDevice_GevPersistentSubnetMask, 0xFFFFFF00);
LvSetInt32 (hDev, LvDevice_GevPersistentDefaultGateway, 0x0A000201);
LvSetString (hDev, LvDevice_GevPersistentIPAddress, "10.0.2.3");
LvSetString (hDev, LvDevice_GevPersistentSubnetMask, "255.255.255.0");
LvSetString (hDev, LvDevice_GevPersistentDefaultGateway, "10.0.2.1");
// adjust IP configuration
LvSetBool (hDev, LvDevice_GevCurrentIPConfigurationLLA, 0);
LvSetBool (hDev, LvDevice_GevCurrentIPConfigurationDHCP, 0);
LvSetBool (hDev, LvDevice_GevCurrentIPConfigurationPersistentIP, 1);
// set packet size
LvSetInt32 (hDev, LvDevice_GevSCPSPacketSize, 9000);
// set inter-packet delay (as number of timestamp ticks)
LvSetInt32 (hDev, LvDevice_GevSCPD, 100);
// adjust message channel retransmission parameters
LvSetInt32 (hDev, LvDevice_GevMCRC, 3);
LvSetInt32 (hDev, LvDevice_GevMCTT, 10); // ms
// configure or disable the heartbeat timeout
LvSetInt32 (hDev, LvDevice_GevHeartbeatTimeout, 10000); // ms
LvSetBool (hDev, LvDevice_GevGVCPHeartbeatDisable, 1);
Copyright © Leutron Vision
106
Leutron
Vision
PicSight-GigE user manual
Camera features and their control
// read current timestamp value
LvCmdExecute (hDev, GevTimestampControlLatch);
LvGetInt64 (hDev, GevTimestampValue, &Int64Val);
// reset the timestamp value
LvCmdExecute(hDev, LvDevice_GevTimestampControlReset);
// read the actual timestamp frequency in Hz
LvGetInt32 (hDev, LvDevice_GevTimestampTickFrequency, &IntVal);
// read the camera MAC address (64-bit integer)
read_int (GevMACAddress)
// read current IP settings (integer values)
read_int (GevCurrentIPAddress)
read_int (GevCurrentSubnetMask)
read_int (GevCurrentDefaultGateway)
// configure persistent IP (integer values)
write_int (GevPersistentIPAddress, 0x0A000203) // 10.0.2.3
write_int (GevPersistentIPAddress, 0xFFFFFF00) // 255.255.255.0
write_int (GevPersistentIPAddress, 0x0A000201) // 10.0.2.3
// adjust IP configuration
write_bool (GevCurrentIPConfigurationLLA, false) // disables LLA
write_bool (GevCurrentIPConfigurationDHCP, false) // disables DHCP
write_bool (GevCurrentIPConfigurationPersistentIP, true) // enables fixed IP
// set packet size
write_int (GevSCPSPacketSize, 9000)
// set inter-packet delay (as number of timestamp ticks)
write_int (GevSCPD, 100)
// adjust message channel retransmission parameters
write_int (GevMCRC, 3)
write_int (GevMCTT, 10) // ms
// configure or disable the heartbeat timeout
write_int (GevHeartbeatTimeout, 10000) // ms
write_bool (GevGVCPHeartbeatDisable, true)
// read (latch) current timestamp value (64-bit integer)
exec_cmd (GevTimestampControlLatch)
read_int (GevTimestampValue)
// reset the timestamp value
exec_cmd (GevTimestampControlReset)
// read the actual timestamp frequency in Hz
read_int (GevTimestampTickFrequency)
6.5. Image format
The image format features allows to configure image size and all related features, as well as the
pixel format.
Copyright © Leutron Vision
107
Leutron
Vision
PicSight-GigE user manual
Camera features and their control
Figure 6.3. Example GUI showing the image format features
6.5.1. Pixel format
The Pixel Format feature controls the nature and layout of pixel data in the image buffer. The set
of available pixel formats is strongly dependent on the camera model, in particular on the mounted
sensor and also on the image preprocessing functions implemented by given camera, such as
Bayer decoding. Generic applications not designed for a single particular camera type should take
this into account and query first the available pixel formats.
Simplon API recognizes all the pixel format types and offers functions to process, convert or display
them.
The pixel formats fall into following main groups:
• Monochrome. The camera provides true monochrome image (luminance only). Depending
on the pixel depth, ie. number of bits representing each pixel, the monochrome formats can
be Mono8, Mono10 or Mono12.
Bayer encoded color. The camera provides color image as raw Bayer mosaic encoded data.
Similarly as for monochrome formats, it the Bayer formats also exist in various bit depths. Furthermore, individual image sensors might layout the color components different way within
the image — depending on the two pixels in top-left image corner, the formats are named:
• RG — the top left pixel is red
• BG — the top left pixel is blue
• GR — the top left pixel is green, followed by a red one
• GB — the top left pixel is green, followed by a blue one
The most usual Bayer encoded formats are BayerRG8, BayerRG12 and BayerRG10. Simplon
API provides functions for converting Bayer encoded data to true RGB image.
True color. The camera provides “true” color image in 32-bit BGR format (blue component
first), 8-bits per color channel. Name of the format is BGRA8Packed.
LvHDevice hDev; // open the device to get the handle
// set pixel format "Mono8", if available
if (LvIsAvailableEnumEntry(hDev, LvDevice_PixelFormat,
LvPixelFormat_Mono))
{
LvSetEnum (hDev, LvDevice_PixelFormat, LvPixelFormat_Mono8);
}
Copyright © Leutron Vision
108
Leutron
Vision
PicSight-GigE user manual
Camera features and their control
// set pixel format "Mono8"
write_enum (PixelFormat, Mono8)
6.5.2. Binning and decimation
Binning and decimation are two different sub-sampling operations performed directly at the
camera sensor, before image readout. They reduce the horizontal and/or vertical resolution by
given factor, thus yielding higher frame rate while preserving the field of view. Compare that with
area of interest (AOI) settings, which reduce field of view.
Different factors might be used for horizontal and vertical sub-sampling (yielding a distorted image).
Note that the availability and range of possible sub-sampling factors varies among individual
camera models. Some color sensors are not capable of binning/decimation even if their monochrome counterparts are.
Let's have a look, how binning and decimation is implemented:
Binning
Every N neighbouring pixels (N being the binning factor) are merged together to
produce a single output pixel. Depending on the binning implementation on each
respective sensor, the pixels might be merged by summing or averaging pixel
values. Binning is applied on the analog pixel values, before digitization. It thus
improves low-light camera performance, in particular the signal to noise (S/N)
ratio. It is controlled through features Horizontal Binning and Vertical Binning.
Decimation
Simple pixel skipping, only every Nth (N being the decimation factor) pixel is
output from the sensor, the others are ignored. Decimation does not affect lightness
or S/N ratio. It is controlled through features Horizontal Decimation and Vertical
Decimation.
The following two figures illustrate the differences between binning and decimation, first using a
simple schematics, second on a “real life” image. Note that the actual binning result (in particular
the resulting image lightness) might differ depending on the binning implementation on different
camera sensors.
Result of decimation
Original
Overflown pixel
Result of binning
Figure 6.4. Binning and decimation explained (assumes binning by pixel
summing)
Copyright © Leutron Vision
109
Leutron
Vision
PicSight-GigE user manual
Camera features and their control
Figure 6.5. Binning and decimation example
LvHDevice hDev; // open the device to get the handle
// configure 2x2 binning
LvSetInt32 (hDev, LvDevice_BinningHorizontal, 2);
LvSetInt32 (hDev, LvDevice_BinningVertical, 2);
// configure 2x2 decimation
LvSetInt32 (hDev, LvDevice_DecimationHorizontal, 2);
LvSetInt32 (hDev, LvDevice_DecimationVertical, 2);
// configure 2x2 binning
write_int (BinningHorizontal, 2)
write_int (BinningVertical, 2)
// configure 2x2 decimation
write_int (DecimationHorizontal, 2)
write_int (DecimationVertical, 2)
Since the binning/decimation might increase the maximal acquisition frame rate,
they might have also an impact on the exposure time limits. In free running mode,
the maximal exposure time depends on the current frame rate — it cannot be
increased beyond a point, when longer exposures would slow down the acquisition.
In conclusion, adjusting binning/decimation might lead to lowering the exposure
time range and the exposure time would be automatically adjusted to fit in the
new range. In triggered mode, the exposure time limits are not affected.
Copyright © Leutron Vision
110
Leutron
Vision
PicSight-GigE user manual
Camera features and their control
6.5.2.1. Binning/decimation on color cameras
The color (Bayer encoded) cameras supporting binning and/or decimation implement it intelligently,
merging/skipping pixels of corresponding colors in the Bayer mosaic filter. The output is thus always
a correct Bayer pattern compatible with the natural pattern of the sensor. The color representation
is not destroyed.
6.5.3. Image size, area of interest (AOI)
Another option to reduce image resolution is area of interest (AOI) feature. Area of interest is a
configurable rectangular area within the image sensor, that is read out and transferred to the application buffer. Pixels outside this defined area are ignored. Contrary to binning/decimation, AOI
reduces the field of view. The effect on frame rate depends on the camera model, size and position
of the AOI rectangle within the sensor.
The AOI functionality is available on all camera models.
The area of interest is defined by four basic parameters, specifying the size and offset within the
“parent” area (which is, in the most simple case, full sensor size):
Width/Height
Dimensions of the area of interest, in pixels.
X Offset/Y Offset
Offset of the area of interest, relative to the top-left corner of the parent
area (sensor), in pixels.
WidthMax
OffsetY
HeightMax
OffsetX
Area of Interest
(AOI)
Height
Width
Figure 6.6. AOI parameters
Copyright © Leutron Vision
111
Leutron
Vision
PicSight-GigE user manual
Camera features and their control
Figure 6.7. AOI example
In the default mode, only the AOI size is configurable, the x/y offsets (position within the sensor
area) are selected automatically by the camera to optimize performance. This typically means that
the area of interest is centered within the sensor. On some cameras only Height is configurable.
LvHDevice hDev; // open the device to get the handle
// decrease AOI size to 300x200 pixels
LvSetInt32 (hDev, LvDevice_Width, 300);
LvSetInt32 (hDev, LvDevice_Height, 200);
// read current maximum AOI size
// (depends on binning/decimation, see below)
int32_t IntVal;
LvGetInt32 (hDev, LvDevice_WidthMax, &IntVal);
LvGetInt32 (hDev, LvDevice_HeightMax, &IntVal);
// check entire sensor size (in pixels)
LvGetInt32 (hDev, LvDevice_SensorWidth, &IntVal);
LvGetInt32 (hDev, LvDevice_SensorHeight, &IntVal);
// decrease AOI size to 300x200 pixels
write_int (Width, 300)
write_int (Height, 200)
// read current maximum AOI size
Copyright © Leutron Vision
112
Leutron
Vision
PicSight-GigE user manual
Camera features and their control
// (depends on binning/decimation, see below)
read_int (WidthMax)
read_int (HeightMax)
// check entire sensor size (in pixels)
read_int (SensorWidth)
read_int (SensorHeight)
More elaborate options to configure area of interest will be shortly discussed below.
Since the AOI settings might increase the maximal acquisition frame rate, they
might have also an impact on the exposure time limits. In free running mode, the
maximal exposure time depends on the current frame rate — it cannot be increased beyond a point, when longer exposures would slow down the acquisition.
In conclusion, adjusting AOI might lead to lowering the exposure time range and
the exposure time would be automatically adjusted to fit in the new range. In
triggered mode, the exposure time limits are not affected.
When decreasing the AOI to very small size, the acquisition frame rate can increase significantly, having unwanted impact on system performance due to increased overhead. The actual behavior is strongly dependent on the used sensor,
system configuration and other conditions and cannot be exactly quantified. The
developer should consider possible impact of using extremely small AOI size on
the system performance and reliability.
6.5.3.1. AOI limits
Two pairs of helper read-only features provide information related to maximal size of the area of
interest under given conditions:
Sensor Width/Sensor Height
Effective resolution of the image sensor, specifying the number
of useful pixels that can be read out of the sensor. These values
are fixed for a given camera model. In the default mode (no
binning, decimation, or area of interest), the image dimensions
equal to Sensor Width and Sensor Height.
Max Width/Max Height
These values specify the maximum possible size of the area of
interest in current configuration. This maximum size can be
affected by features such as binning, which reduce the effective
sensor size. When no binning/decimation is active, Max
Width×Max Height are equal to Sensor Width×Sensor Height.
6.5.3.2. AOI and binning/decimation
When binning or decimation is active, the area of interest is applied to the virtual sensor area resulting from the binning/decimation operation. In this case, the Max Width and Max Height features
report the size resulting from binning/decimation, ie. sensor size reduced by given factor(s). Take
this in account when using the two features together.
Copyright © Leutron Vision
113
Leutron
Vision
PicSight-GigE user manual
Camera features and their control
Binning/Decimation
SensorWidth
Full sensor size
Full
sensor
WidthMax (ReadoutWidthMax)
Logical sensor size
after applying binning
or decimation...
Logical sensor
view after binning
... is subject to
application of AOI
in any of the AOI modes
Width
User
buffer
Figure 6.8. AOI and binning
6.5.3.3. AOI on color cameras
On the color (Bayer encoded) cameras, the AOI settings, size an offset, can only be adjusted with
increment of 2 to keep the same Bayer mosaic format in the buffer, regardless the actual AOI
configuration.
6.5.4. Advanced AOI settings
While the default “automatic” mode described above is sufficient in most cases, some applications
might require greater control over the AOI settings.
6.5.4.1. Two-step AOI implementation
In general, there are two points, where area of interest can be applied:
Sensor
The camera might configure the sensor to read out only the specified
area of interest. This attitude has the advantage, that the AOI has
direct impact on the frame rate (the smaller AOI, the faster readout
and frame rate).
On the other hand, this implementation is strongly sensor specific.
Some sensors do not allow to reduce AOI in both directions, others
Copyright © Leutron Vision
114
Leutron
Vision
PicSight-GigE user manual
Camera features and their control
impose additional constraints, such as that the AOI has to be centered
within the sensor. The functionality would thus be quite limited on
some camera models. It is not allowed to reconfigure sensor-side AOI
during active acquisition.
Camera frame buffer
The camera could alternatively read out the entire image from the
sensor into its frame buffer and apply the area of interest (clip the
image) before transferring it out to the host memory (application
buffer). In this case, the AOI settings have no impact on the sensor
readout time and frame rate. Only the required bandwidth for image
transfer decreases — that means lower network load for PicSight-GigE,
lower PCI/DMA load for CheckSight.
The advantage of this attitude is that the AOI can be configured freely,
without any constraints. The AOI parameters can even be, if desired,
changed on-the-fly, during active acquisition. The programmer just
needs to understand all the consequences of variable image size during
acquisition — this topic is discussed in Section 6.5.5, “Fixed vs. variable
payload size” [p. 122].
Leutron Vision cameras allow to combine both attitudes flexibly through various “AOI modes”.
6.5.4.2. AOI modes
The AOI modes are configured through the enumerated feature AOI Mode. Depending on the
selected AOI modes, the camera decides, how to interpret the AOI parameters, or even enables
additional parameters.
The available modes are:
• Automatic
• Clip on Transfer
• Manual
Automatic AOI mode
This is the default mode and was described above (Section 6.5.3, “Image size, area of interest
(AOI)” [p. 111]).
• Only the AOI size (Width/Height) is configurable. Its position (X Offset/Y Offset) is chosen by the
camera — usually centered within the sensor, unless the sensor disallows that.
• The camera automatically “distributes” the AOI implementation among the two options, sensorside and in-memory-clip. It tries to apply as much as possible directly on the sensor to increase
the frame rate as much as possible. If sensor AOI capabilities are limited, it additionally clips the
image in-memory before the transfer, to reach the desired AOI settings.
• The AOI parameters cannot be changed during active acquisition.
Copyright © Leutron Vision
115
Leutron
Vision
PicSight-GigE user manual
Camera features and their control
Automatic AOI Mode
WidthMax
Full sensor size,
eventually size
after applying binning
Sensor
Camera applies defined AOI size
as far as possible on the sensor
to increase frame rate
Offset settings not configurable
(this step is applied transparently,
not visible in feature settings)
Camera
memory
Width
If the AOI size could not
be fully applied on sensor,
the rest is clipped in memory
AOI size locked during acquisition,
offset not available
User does not care about
sensor specific AOI constraints
User
buffer
Figure 6.9. Automatic AOI mode
LvHDevice hDev; // open the device to get the handle
// select automatic AOI mode
LvSetEnum (hDev, LvDevice_LvAOIMode, LvAOIMode_Automatic);
// adjust AOI size to 300x200 pixels
LvSetInt32 (hDev, LvDevice_Width, 300);
LvSetInt32 (hDev, LvDevice_Height, 200);
// select automatic AOI mode
write_enum (LvAOIMode, Automatic)
// adjust AOI size to 300x200 pixels
write_int (Width, 300)
write_int (Height, 200)
Copyright © Leutron Vision
116
Leutron
Vision
PicSight-GigE user manual
Camera features and their control
Clip-on-transfer AOI mode
This mode allows free control over AOI parameters, optionally even at runtime. It might not be
implemented on all camera models since the same functionality can be achieved using the
“manual” mode.
• The AOI is fully applied in camera memory — the image is “clipped” before transferring out of
the camera.
• Since sensor settings are not involved, the AOI has no positive impact on the frame rate.
• All four AOI parameters, Width/Height and X Offset/Y Offset, are freely configurable. No sensor
specific constraints apply.
• Offsets are configurable during active acquisition.
• Size can be configurable during acquisition, see Section 6.5.5, “Fixed vs. variable payload
size” [p. 122].
ClipOnTransfer AOI Mode
WidthMax
Full sensor size,
eventually size
after applying binning
Sensor
Entire sensor is acquired
to camera memory
No frame rate increase
WidthMax
Camera
memory
Width
AOI is applied in memory
before the transfer
to the user buffer
Size and offset
can be programmable
even during acquisition
User
buffer
Figure 6.10. Clip-on-transfer AOI mode
LvHDevice hDev; // open the device to get the handle
// select clip-on-transfer AOI mode
LvSetEnum (hDev, LvDevice_LvAOIMode, LvAOIMode_ClipOnTransfer);
Copyright © Leutron Vision
117
Leutron
Vision
PicSight-GigE user manual
Camera features and their control
// adjust AOI size to 300x200 pixels
// with offset 100 pixels from top and left image sides
// (note that the order of setting the size and offset values
// might matter as described later)
LvSetInt32 (hDev, LvDevice_Width, 300);
LvSetInt32 (hDev, LvDevice_Height, 200);
LvSetInt32 (hDev, LvDevice_OffsetX, 100);
LvSetInt32 (hDev, LvDevice_OffsetY, 100);
// select clip-on-transfer AOI mode
write_enum (LvAOIMode, ClipOnTransfer)
// adjust AOI size to 300x200 pixels
// with offset 100 pixels from top and left image sides
// (note that the order of setting the size and offset values
// might matter as described later)
write_int (Width, 300)
write_int (Height, 200)
write_int (OffsetX, 100)
write_int (OffsetY, 100)
Manual AOI mode
The most flexible mode, allowing elaborate options for AOI configuration.
• The AOI can be configured in two separate steps: sensor-readout and in-memory-clip AOI. The
first one defines the region to be read out from a sensor into the camera memory. The second
AOI is applied to this region directly in camera memory (clipped before the transfer).
• The sensor-readout AOI is tightly coupled with capabilities of each respective sensor. All sensor
specific constraints apply — examples: only height is configurable, the AOI has to be centered,
etc.
• Four additional parameters are introduced in the manual AOI mode to define the sensor-readout
AOI part: Readout Width, Readout Height, Readout XOffset and Readout Y Offset. If no binning
and decimation is applied, the size limits are equal to the sensor size (Sensor Width/Sensor Height).
When using binning or decimation, the size limits are defined by the result of the binning/decimation operation (sensor size divided by the binning/decimation factor).
• The readout AOI parameters are not configurable during active acquisition.
• The second step is performed in the camera's frame buffer memory, after readout, and is equivalent to the “clip-on-transfer” AOI mode. It has all properties of that mode — in particular: the
parameters are freely configurable without constraints, offsets are configurable during acquisition,
size might be configurable during acquisition (Section 6.5.5, “Fixed vs. variable payload
size” [p. 122]).
• The “in-memory-clip” AOI step is configured through the “regular” AOI parameters, ie.
Width/Height and Y Offset/Y Offset. The AOI size limits are reported through Max Width and Max
Height, which are defined by the readout AOI size.
Copyright © Leutron Vision
118
Leutron
Vision
PicSight-GigE user manual
Camera features and their control
Manual AOI Mode
ReadoutWidthMax
Full sensor size,
eventually size
after applying binning
Sensor
WidthMax = ReadoutWidth
The Readout AOI applied on sensor
Availability and range
of individual parameters
is strictly sensor specific
Readout AOI parameters
locked during acquisition
Camera
memory
Width
The image acquired from the sensor
can be further clipped
in camera memory before transfer
Defined by "regular" AOI features
Size and offset can be programmable
during acquisition
User
buffer
Figure 6.11. Manual AOI mode
LvHDevice hDev; // open the device to get the handle
// select manual AOI mode
LvSetEnum (hDev, LvDevice_LvAOIMode, LvAOIMode_Manual);
// adjust the sensor readout AOI parameters
// (note that on most sensors only a subset of the parameters
// would be configurable)
LvSetInt32 (hDev, LvDevice_LvReadoutWidth, 600);
LvSetInt32 (hDev, LvDevice_LvReadoutHeight, 400);
LvSetInt32 (hDev, LvDevice_LvReadoutOffsetX, 200);
LvSetInt32 (hDev, LvDevice_LvReadoutOffsetY, 200);
// now adjust the in-memory-clip AOI parameters
// (note again that the order of setting the size and offset values
// might matter as described later)
LvSetInt32 (hDev, LvDevice_Width, 300);
LvSetInt32 (hDev, LvDevice_Height, 200);
LvSetInt32 (hDev, LvDevice_OffsetX, 100);
LvSetInt32 (hDev, LvDevice_OffsetY, 100);
Copyright © Leutron Vision
119
Leutron
Vision
PicSight-GigE user manual
Camera features and their control
// select manual AOI mode
write_enum (LvAOIMode, Manual)
// adjust the sensor readout AOI parameters
// (note that on most sensors only a subset of the parameters
// would be configurable)
write_int (LvReadoutWidth, 600)
write_int (LvReadoutHeight, 400)
write_int (LvReadoutOffsetX, 200)
write_int (LvReadoutOffsetY, 200)
// now adjust the in-memory-clip AOI parameters
// (note again that the order of setting the size and offset values
// might matter as described later)
write_int (Width, 300)
write_int (Height, 200)
write_int (OffsetX, 100)
write_int (OffsetY, 100)
Order of image format settings
When combining multiple image format settings, it is important to adjust them in correct order,
since each step defines the limits for the following step, and a virtual intermediate image to which
the consecutive step is applied. The correct procedure is:
1.
AOI mode. The AOI mode defines, which parameters will be configurable and what will
be their limits.
2.
Binning/decimation. The intermediate image resulting from the binning/decimation
operation is a basis for the AOI settings.
3.
Readout AOI. If in manual AOI mode, adjust the readout AOI parameters first. The result
of the readout AOI operation defines a basis for the transfer AOI step (in-memory clipping).
4.
Transfer AOI. This are the “regular” AOI parameters, available in all AOI modes. They
define the final image size that will be transferred to the host application buffers.
5.
Other parameters. The other image format related parameters, such as pixel format are
independent from the image size-related settings and can be applied at any point.
Copyright © Leutron Vision
120
Leutron
Vision
PicSight-GigE user manual
Camera features and their control
Complex AOI Settings
Set AOI mode
Adjust binning
Affects AOI constraints
Manual AOI mode?
Yes
Adjust readout AOI
No
Affects transfer AOI constraints
Adjust transfer AOI
Done
Figure 6.12. Flow chart: image format configuration options
6.5.4.3. AOI parameter dependencies
When working with AOI, it's important to understand the dependencies between the size and
offset parameters. The configured area of interest must naturally fall fully into the sensor area.
Thus the sum of an offset with its corresponding size parameter must not exceed the current
maximum size (which in turn might depend on other features such as binning):
OffsetX+Width<=WidthMax, OffsetY+Height<=HeightMax.
The current Width implies the maximum possible X Offset and vice versa (similar for vertical settings).
For example when AOI width is equal to the sensor size, the horizontal offset must naturally remain
0 — to be able to increase offset, one has to decrease the width first. The limits for the AOI parameters can be expressed in simple equations:
•
•
•
•
OffsetXmax = WidthMax - Width
Widthmax = WidthMax - OffsetX
OffsetYmax = HeightMax - Height
Heightmax = HeightMax - OffsetY
Copyright © Leutron Vision
121
Leutron
Vision
PicSight-GigE user manual
Camera features and their control
Set horizontal AOI
new Width
+ new OffsetX
<= WidthMax?
No
Invalid configuration
Yes
new Width
+ current OffsetX
<= WidthMax?
No
Yes
Write OffsetX
Write Width
(Width now
fits in limits)
(OffsetX now
fits in limits)
Write Width
Write OffsetX
Continue with vertical AOI
Figure 6.13. Flow chart: AOI parameter dependencies
6.5.5. Fixed vs. variable payload size
The image format features are (together with the chunk data configuration, Section 6.11, “Chunk
data” [p. 168]) affecting the size of the data the camera transfers to the host. The application has
to allocate buffers large enough to hold the entire data, otherwise the acquisition fails.
The size of the image data (“payload”) the camera is going to transfer is reported in the Payload
Size feature — the application is expected to use query this reported size when allocating the acquisition buffers.
By default, the payload size is fixed during acquisition, the camera transfers the same amount of
data for each acquired image.
If the application desires, however, to change image size during acquisition, special care has to
be taken, since the actual amount of data could differ from image to image. Such mode has to
be enabled explicitly by setting the Variable Payload Size flag. This has two effects:
• The Width/Height AOI parameters become configurable during acquisition (in manual and clipon-transfer AOI modes). The image size can change from image to image.
• The Payload Size feature does not report the data size corresponding with the current image
size, but with maximal image size. This assures that the reported size is large enough to hold
the entire image data, however the image size can change during the acquisition. The buffers
allocated using the Payload Size will be safe to hold the entire image data during entire acquisition.
The application needs to keep track of the actual image size for every single image, so that it interprets the buffer correctly. It can do so using three mechanisms:
Copyright © Leutron Vision
122
Leutron
Vision
PicSight-GigE user manual
Camera features and their control
• The camera can report the image size in the chunk data (Section 6.11, “Chunk data” [p. 168]).
When connecting the cameras through other software than Simplon API, check if your library
supports chunk data decoding.
• The parameters of the image acquired in each respective buffer can be retrieved through the
GenTL interface. Simplon API provides direct access to these info fields.
• The GigE Vision compatible cameras (PicSight-GigE and PicSight-Smart) report the image size
also in GigE Vision control packets. When connecting the cameras through other software than
Simplon API, check if your library provides the information from the control packets and how.
LvFixedPayloadSize = true
AOI Width/Height locked
during acquisition,
size is fixed
WidthMax
Width
The reported payload size
corresponds with actual AOI size
(considering chunk data)
allocated buffer
(fits acquired data)
LvFixedPayloadSize = false
Width/Height configurable
during acquisition,
size is variable
The reported payload size
corresponds with max AOI size
(considering chunk data)
allocated buffer
(can be bigger than acquired data)
WidthMax
Width
Figure 6.14. Variable payload size
LvHDevice hDev; // open the device to get the handle
// use variable payload size
// (the PayloadSize feature reports max possible size)
LvSetBool (hDev, LvDevice_LvVariablePayloadSize, 1);
// use fixed payload size
// (the PayloadSize feature reports actual size)
LvSetBool (hDev, LvDevice_LvVariablePayloadSize, 0);
// ...after finishing the configuration, read payload size feature
// and use it for the buffer allcoation
int32_t IntVal;
LvGetInt32 (hDev, LvDevice_PayloadSize, &IntVal);
Copyright © Leutron Vision
123
Leutron
Vision
PicSight-GigE user manual
Camera features and their control
// use variable payload size
// (the PayloadSize feature reports max possible size)
write_bool (LvVariablePayloadSize, true)
// use fixed payload size
// (the PayloadSize feature reports actual size)
write_bool (LvVariablePayloadSize, false)
// ...after finishing the configuration, read payload size feature
// and use it for the buffer allcoation
read_int (PayloadSize)
6.6. Acquisition and trigger control
This section discusses all features related to image acquisition, from essential acquisition control,
exposure time, frame rate to trigger modes.
Figure 6.15. Example GUI showing the acquisition and trigger features
6.6.1. Basic acquisition control
The camera delivered off factory always starts in “free running” mode — as soon as the acquisition
is started, it acquires images in highest possible frame rate, without need for any triggering.
The basic acquisition control is, in all working modes, done using few basic camera features:
Acquisition Mode
This enumeration is a mandatory feature for GigE Vision cameras —
hence it is implemented on all our camera families, even if they currently
support only a single acquisition mode, Continuous. Setting this feature
is thus optional.
Acquisition Start
Command that actually starts the acquisition. In free running mode, the
camera starts immediatelly grabbing and streaming images. In triggered
mode the images will be acquired upon valid triggers. Simplon API encapsulates this command in LvDeviceAcquisitionStart(), together
with additional startup actions.
Acquisition Stop
Command stopping the acquisition. In free running mode the acquisition
stops after finishing the current frame. In triggered mode no more triggers will be accepted. Simplon API encapsulates this command in
LvDeviceAcquisitionStop(), together with additional stopping
actions.
Acquisition Arm
Optional command that puts the camera to a status ready for acquisition.
It performs some initialization and verification routines otherwise handled
during acquisition start. It is optional, though, if omitted, if will be ex-
Copyright © Leutron Vision
124
Leutron
Vision
PicSight-GigE user manual
Camera features and their control
ecuted implicitly during acquisition start. The command is not needed
with Simplon API.
TLParamsLocked
This feature belong to the “transport layer features” category, Section 6.4,
“Transport layer control” [p. 102]. Its purpose is to “lock” the features
essential for the transport layer (software component transporting the
image data to the application buffers). Once set, the crucial acquisition
parameters will become locked — most importantly the Payload Size,
value indicating the required size of the acquisition buffers. Having this
feature locked guarantees that the user cannot cause accidental buffer
overflows by changing camera configuration.
The GenICam standard dictates that this feature is set throughout the
entire acquisition.
Simplon API handles TLParamsLocked transparently while starting/stopping the acquisition. When using the camera with another software
package, it is important that the feature is set properly before starting
the acquisition, otherwise any attempt to start the acquisition will fail
(the acquisition start command will not be executable).
In Simplon API, none of these features (with exception of the acquisition mode) are accessed directly, Simplon API does that automatically within the LvDeviceAcquisitionStart() and
LvDeviceAcquisitionStop() functions. The steps needed to initialize a Simplon API application
and prepare it for acquisition should be studied in Simplon programmer's guide.
LvHDevice hDev; // open the device to get the handle
// how to control acquisition:
// optional: set explicitly the acquisition mode
LvSetEnum (hDev, LvDevice_AcquisitionMode, LvAcquisitionMode_Continuous);
// configure essential features such as trigger mode and image format
// perform other basic Simplon initialization, as indicated in its manual
// when finished, read required buffer size and allocate buffers
int32_t IntVal;
LvGetInt32 (hDev, LvDevice_PayloadSize, &IntVal);
// start and stop the acquisition, as desired, Simplon API
// controls the underlying features automatically under the hood
while (NewAcquisitionsDesired)
{
LvDeviceAcquisitionStart (hDev);
// ... acquire images as long as desired
LvDeviceAcquisitionStop (hDev);
}
// if desired, reconfigure the camera and start again
In 3rd party GenICam based software package, similar attitude might be expected — ie. the acquisition related features might be hidden and wrapped into dedicated functions. The following
pseudocode anyway demonstrates the required procedure to start and stop the acquisition, but
remember that a typical GenICam aware library does this completely for you under the hood:
// how to control acquisition:
// optional: set explicitly the acquisition mode
write_enum (AcquisitionMode, Continuous)
// configure essential features such as trigger mode and image format
// optional: 'arm' the camera (prepare it for acquisition)
Copyright © Leutron Vision
125
Leutron
Vision
PicSight-GigE user manual
Camera features and their control
exec_cmd (AcquisitionArm)
// lock the transport layer parameters, as required by GenICam standard
write_int (TLParamsLocked, 1)
// now it is possible to read the required buffer size, and allocate buffers
// the size will not change as long as TLParamsLocked is set
read_int (PayloadSize)
// start and stop the acquisition, as desired
while (NewAcquisitionsDesired)
{
exec_cmd (AcquisitionStart)
// ... acquire images as long as desired
exec_cmd (AcquisitionStop)
}
// unlock the transport layer parameters
write_int (TLParamsLocked, 0)
// if desired, reconfigure the camera and start again
Copyright © Leutron Vision
126
Leutron
Vision
PicSight-GigE user manual
Camera features and their control
Simplon API
GenICam
Configure camera
Configure camera
LvSetEnum(LvDevice_PixelFormat)
LvSetEnum(LvDevice_TriggerMode)
etc.
PixelFormat=...
TriggerMode=...
etc.
Transport layer locked
TLParamsLocked=1
Start acquisition
Start acquisition
LvDeviceAcquisitionStart()
AcquisitionStart.exec()
Acquire images
Acquire images
Stop acquisition
Stop acquisition
LvDeviceAcquisitionStop()
AcquisitionStop.exec()
Transport layer unlocked
TLParamsLocked=0
Done
Done
Figure 6.16. Flow chart: acquisition control in Simplon API and in generic
GenICam application
6.6.2. Exposure time
The direct setting of exposure time is trivial, through the Exposure Time feature, which is a floating
point value in µs.
LvHDevice hDev; // open the device to get the handle
// configure exposure time in microseconds
LvSetFloat (hDev, LvDevice_ExposureTime, 1000.0);
Copyright © Leutron Vision
127
Leutron
Vision
PicSight-GigE user manual
Camera features and their control
// configure exposure time in microseconds
write_float (ExposureTime, 1000.0)
The actual range of possible exposure times depends on other settings, in particular:
• Working mode — free running or triggered, long range exposure mode (see
below)
• Area of interest (AOI) settings
• Binning/decimation settings
• Frame rate settings
Note that the camera might be able to adjust the exposure time only in small but discrete steps.
It will align the requested value to the closest “step” — to know the exact used value, the application might want to re-read the exposure time after setting it.
On certain camera models (in particular those based on the G43A sensor), the
exposure time is applied with a delay of one frame. The one frame delay also applies for sensor R312AB, but only in triggered mode.
Related topic of controlling gain and black level is discussed in separate section, Section 6.9,
“Analog controls” [p. 149].
6.6.2.1. Automatic exposure
The automatic exposure function is available only on those camera models, whose sensor supports
that function natively. It is useful for applications capturing scenes exposed to significantly varying
illumination, when it's necessary to protect the acquired images against under- or over-exposition.
The automatic exposure algorithm observes the luminance of acquired images and attempts to
keep it at constant level, by compensating for any changes by adjusting the exposure time for
subsequent frames. To prevent flickering, the adjustments are low-pass fltered — it may take several frames until the target luminance is restored again.
To switch the camera to automatic exposure (if supported by the camera), you switch the Automatic Exposure enumeration from Off to Continuous. The exposure time itself will become readonly since that feature is now under control of the camera firmware
LvHDevice hDev; // open the device to get the handle
// switch to automatic exposure mode
if (LvIsAvailableEnumEntry(hDev, LvDevice_ExposureAuto,
LvExposureAuto_Continuous))
{
LvSetEnum (hDev, LvDevice_ExposureAuto, LvExposureAuto_Continuous);
}
// switch back to the direct control of exposure time
LvSetEnum (hDev, LvDevice_ExposureAuto, LvExposureAuto_Off);
// switch to automatic exposure mode
write_enum (ExposureAuto, Continuous)
// switch back to the direct control of exposure time
write_enum (ExposureAuto, Off)
Copyright © Leutron Vision
128
Leutron
Vision
PicSight-GigE user manual
Camera features and their control
When used together with the automatic gain feature (Section 6.9, “Analog controls” [p. 149]), the auto exposure takes precedence. Automatic gain is inactive
as long as the automatic exposure functinality does not reach its limits — only
then the automatic gain becomes active as well.
The automatic exposure functionality might work against the manual gain settings. When increasing the gain, the automatic exposure function will decrease
the exposure to reach again the target luminance level.
The low pass filter applied in the automatic exposure algorithm can cause, that
the automatic exposure value never fully reaches the limits (min/max) of the
manual exposure time.
6.6.2.2. Exposure mode
To make the discussion complete, we should also mention the Exposure Mode feature. It is an
enumeration, which is currently present mainly as information for generic applications relying on
the GenICam SFNC (Standard Features Naming Convention) standard — since all Leutron Vision
cameras currently use just a single exposure mode in all working mode.
The supported exposure mode is Timed, which means that the exposure time is fully controlled
by features Exposure Time and Automatic Exposure, both discussed above. In particular, in the
triggered mode, the trigger width has no impact on the exposure time.
LvHDevice hDev; // open the device to get the handle
// optionally set the exposure mode
// ('Timed' is anyway currently the only, thus default, option)
LvSetEnum (hDev, LvDevice_ExposureMode, LvExposureMode_Timed);
// optionally set the exposure mode
// ('Timed' is anyway currently the only, thus default, option)
write_enum (ExposureMode, Timed)
On an older series of PicSight-GigE cameras, “Trigger Width” exposure mode
was used when triggering over the TTL input. In this mode, the exposure time
was controlled by the width of the trigger signal. These legacy cameras are,
however, obsolete, and the “Trigger Width” more is no more available on current
camera series.
6.6.3. Trigger modes
The following sections give an overview of the trigger modes supported by the cameras. Detailed
timing specifications are model specific.
6.6.3.1. Free running mode
In the free running mode no external triggers are considered by the camera. A continuous video
stream with constant frame rate (see Appendix A, Technical specifications for individual models [p. 293])
is output by the camera. Exposure time is programmable.
Copyright © Leutron Vision
129
Leutron
Vision
PicSight-GigE user manual
Camera features and their control
(frame rate)
Internal trigger
Exposure
CCD charge storage
VD
(see video output timing)
Readout
Figure 6.17. Free running mode timing
6.6.3.2. Triggered mode (accurate exposure)
In the triggered mode only the leading edge of the trigger pulse is significant. When encountered
an exposure starts, eventually after a programmable delay. The length of the exposure is programmable.
The trigger should be delivered through one of the input lines (see Section 3.7.4, “Trigger input” [p. 40], Section 3.8, “Connector and cable description” [p. 44]). The trigger pulse duration
should be at least 2 H. Trigger overlapping is not supported, therefore the maximum frame rate
in triggered mode is always lower than the frame rate in free running mode.
The programmable exposure time range is limited, but the exposure timing is accurate (no jitter)
across the entire range.
Exposure
(programmable)
CCD charge storage
VD
(see video output timing)
Readout
Next trigger possible
Ext. trigger
Picture pending
Figure 6.18. Triggered mode timing
6.6.3.3. Triggered mode (long range exposure)
Long range exposure mode is an alternative to the accurate exposure mode. The two modes are
functionally equivalent, the long range exposure mode differs only in two aspects:
Copyright © Leutron Vision
130
Leutron
Vision
PicSight-GigE user manual
Camera features and their control
• The exposure time range is extended towards long time exposures.
• The short exposure times might be affected by a jitter.
6.6.3.4. Trigger modes of the CMOS rolling shutter cameras
The way how the pixel integration and readout is handled by rolling shutter cameras (see Section 3.5.1.3, “CMOS: global vs. rolling shutter” [p. 37]) is significantly different from cameras
featuring global shutter. Thus also the trigger modes implemented by rolling shutter cameras are
different.
Snapshot mode
Default trigger mode for the rolling shutter cameras.
In the snapshot mode only the leading edge of the trigger pulse is significant. When encountered,
first row of the sensor is reset and its exposure starts. With a small offset, the second row and
gradually all other rows are reset and their exposure starts. When the last row is reset, a period
when all row are exposing starts. The possible (recommended) strobe illumination should fall into
this period. When the common exposure time (strobe period) ends, first line is read out, then the
second line and all other lines until entire sensor is read out.
Exposure time (meaning the “strobe” period when all rows are integrating) can be programmed
in a sensor specific rang.
Ext. trigger
Next trigger possible
Reset row 1
Reset row 2
Reset row N
Strobe (all rows integrating)
(see video output timing)
Readout (row by row)
Picture pending
Figure 6.19. Snapshot mode timing
Global reset mode
Some rolling shutter sensors support additionally the global reset mode, which is very similar to
the snapshot mode. The main difference is that all sensor rows are “globally” reset at the same
time and the common integration time (strobe period) begins. After that, row-by-row sensor
readout starts.
Because in global reset mode all the image rows are reset at the same time, but
the readout is performed gradually, row-by-row, as usual for rolling shutter
sensors, the exposure time is actually different for every image row (shortest for
the first, longest for the last row). Thus it is highly recommended to use this mode
only with a strobe illumination falling into the common exposure time period.
Copyright © Leutron Vision
131
Leutron
Vision
PicSight-GigE user manual
Camera features and their control
The main advantage over the snapshot mode is that the global reset mode is
significantly faster (with the snapshot mode you loose one frame time between
the actual trigger and start of the strobe period).
Reset all rows
Strobe (all rows integrating)
(see video output timing)
Readout (row by row)
Picture pending
Next trigger possible
Ext. trigger
Figure 6.20. Global reset mode timing
6.6.4. Trigger configuration
When configuring the acquisition trigger, it's first necessary to select the trigger type to be configured. The camera currently supports just a single type (Frame Start trigger), but more trigger
types will likely be added in future firmware versions. After switching the trigger on, the additional
trigger options will become available. Note that the trigger configuration cannot be changed
during acquisition.
Following steps document the procedure to configure the acquisition trigger:
1.
Select trigger type. Use the Trigger Selector feature to select the trigger type to be configured. In current firmware version, only the Frame Start trigger is available. Each occurrence
of this trigger starts acquisition of a new image frame.
2.
Switch the trigger on/off. Set the Trigger Mode feature On/Off. When switched off, the
camera operates in free running mode, no additional trigger parameters are available. When
switched on, the camera operates in triggered mode and other trigger parameters can be
configured.
3.
Specific trigger modes. If a specific trigger mode should be used, switch on corresponding
flag (Long Range Exposure Mode or Global Reset Mode).
4.
Trigger source (input line). Configure the source of the trigger signals (Trigger Source
feature). It can be a physical input line, such as Line 1 (see Section 6.7, “Digital I/O, counters
and timers” [p. 136], Section 3.7, “Input and output signals” [p. 39], Section 3.8, “Connector
and cable description” [p. 44]). Alternatively, the trigger source can be set to Software Trigger
— then the triggers are generated by the application, executing the command feature Generate Software Trigger. Note that while using a physical line as trigger source, the trigger can
still be forced through the Generate Software Trigger command.
Finally, the trigger source can be connected to one of the action commands, such as Action
1, if supported by the camera (see Section 6.8, “Action commands control” [p. 147]).
5.
Trigger activation (polarity). The Trigger Activation feature controls which edge of the
trigger input signal will be active, ie. which edge will actually ignite the trigger action. Possible
values are Rising Edge and Falling Edge, rising edge being the transition of signal level from
logical 0 to logical 1. The interpretation of signal levels for different input types (TTL/opto-
Copyright © Leutron Vision
132
Leutron
Vision
PicSight-GigE user manual
Camera features and their control
coupler) is discussed in Section 3.7, “Input and output signals” [p. 39]. Not applicable for
software triggering.
6.
Other options.
Eventually other fine-tuning options can be adjusted. Thes include:
• Trigger Delay — delay in µs between the trigger and actual exposure start
• Trigger Divider — allows to filter the trigger signals by a given ratio, only every Nth trigger
is used
• Trigger Caching — decides what to do, if a trigger arrives too early, before it can be accepted
by the camera. Possible values are Drop (the trigger is ignored) and Cache (the trigger is
applied as soon as the camera is ready).
7.
Triggering. The triggers, being generated from external device using a trigger input line
or from the application through the Generate Software Trigger command, can be issued as
soon as the acquisition is started. Eventual physical triggers delivered when no acquisition is
active will be ignored, the Generate Software Trigger command will not be executable.
LvHDevice hDev; // open the device to get the handle
// configure triggered mode
LvSetEnum (hDev, LvDevice_TriggerSelector, LvTriggerSelector_FrameStart);
LvSetEnum (hDev, LvDevice_TriggerMode, LvTriggerMode_On);
// optionally use a specific trigger mode, if supported
if (LvIsAvailable (hDev, LvDevice_LvLongRangeExposureMode))
{
LvSetBool (hDev, LvDevice_LvLongRangeExposureMode, 1);
}
if (LvIsAvailable (hDev, LvDevice_LvGlobalResetMode))
{
LvSetBool (hDev, LvDevice_LvGlobalResetMode, 1);
}
// configure hardware trigger input
LvSetEnum (hDev, LvDevice_TriggerSource,
LvTriggerSource_Line1); // opto input
LvSetEnum (hDev, LvDevice_TriggerActivation,
LvTriggerActivation_RisingEdge);
// configure software trigger input
LvSetEnum (hDev, LvDevice_TriggerSource, LvTriggerSource_Software);
// configure trigger over an action command
LvSetEnum (hDev, LvDevice_TriggerSource, LvTriggerSource_Action1);
// other options
LvSetFloat (hDev, LvDevice_TriggerDelay, 100.0); // 100 µs
LvSetEnum (hDev, LvDevice_LvTriggerCaching,
LvTriggerCaching_Cache); // or 'LvTriggerCaching_Drop'
// issue software trigger command after starting the acquisition
// - to generate regular trigger in software trigger mode
// - to force the trigger in hardware trigger mode
LvCmdExecute (hDev, LvDevice_TriggerSoftware);
// switch back to free-running mode
LvSetEnum (hDev, LvDevice_TriggerSelector, LvTriggerSelector_FrameStart);
LvSetEnum (hDev, LvDevice_TriggerMode, LvTriggerMode_Off);
Copyright © Leutron Vision
133
Leutron
Vision
PicSight-GigE user manual
Camera features and their control
// configure triggered mode
write_enum (TriggerSelector, FrameStart)
write_enum (TriggerMode, On)
// optionally use a specific trigger mode, if supported
write_enum (LvLongRangeExposureMode, true)
write_enum (LvGlobalResetMode, true)
// configure hardware trigger input
write_enum (TriggerSource, Line1) // opto input
write_enum (TriggerActivation, RisingEdge)
// configure software trigger input
write_enum (TriggerSource, Software)
// configure trigger over an action command
write_enum (TriggerSource, Action1)
// other options
write_float (TriggerDelay, 100.0) // 100 µs
write_enum (LvTriggerCaching, Cache) // or 'Drop'
// issue software trigger command after starting the acquisition
// - to generate regular trigger in software trigger mode
// - to force the trigger in hardware trigger mode
exec_cmd (TriggerSoftware)
// switch back to free-running mode
write_enum (TriggerSelector, FrameStart)
write_enum (TriggerMode, Off)
Trigger Configuration
Select configured trigger
TriggerSelector=FrameStart
Switch the trigger on
TriggerMode=On
Optionally use specific trigger modes
(LvLongRangeExposureMode=true)
(LvGlobalResetMode=true)
Select source line
TriggerSource=Line1/LineX
Set line activation (polarity)
TriggerActivation=RisingEdge/FallingEdge
Configure other options
TriggerDelay=100
TriggerDivider=5
LvTriggerCaching=Cache
Start acquisition
Hardware triggering
Software triggering
(external signal)
TriggerSoftware command
Stop acquisition
Done
Figure 6.21. Flow chart: trigger mode configuration
Copyright © Leutron Vision
134
Leutron
Vision
PicSight-GigE user manual
Camera features and their control
Figure 6.22. Example trigger configuration: triggering over Line1
(optocoupler input), activation on rising edge, trigger delay 100 µs
6.6.5. Frame rate
The frame rate (frequency of acquired image frames) of course varies among camera models, but
it also depends on current settings, in particular:
• Pixel clock (sensor digitization clock)
• Area of interest (AOI, also known as “partial scan”)
• Binning/decimation
In triggered mode, the actual frame rate obviously depends on the frequency of incoming triggers,
but it still cannot exceed the maximum defined by the current settings. The maximum achievable
frame rate in triggered mode is lower than in the free running mode, because in free running
mode the exposure of a new frame overlaps with readout of the previous one, while in the triggered
mode the two operations are sequential (new trigger is not accepted while readout of the previous
frame is still in progress).
When using the camera in the free-running mode (non-triggered), it is sometimes useful to decrease
the frame rate from it's maximal value to a desired lower one. The reasons might be to moderate
the processing load or network load when full frame rate is not needed.
To enable the frame rate settings, the Acquisition Frame Rate Control mode must be enabled first
(switched to On). When set to this mode, the camera internally switches to triggered mode and
generates periodic internal triggers with the desired frequency. The Acquisition Frame Rate feature
itself is a floating point value in Hz.
LvHDevice hDev; // open the device to get the handle
// configure frame rate in Hz
// (available only when operation in non-triggered mode)
if (LvIsAvailable (hDev, LvDevice_LvAcquisitionFrameRateControlMode))
{
LvSetEnum (hDev, LvDevice_LvAcquisitionFrameRateControlMode,
LvAcquisitionFrameRateControlMode_On);
LvSetFloat (hDev, LvDevice_AcquisitionFrameRate, 20.0);
}
// switch back to regular free-running mode (max frame rate)
LvSetEnum (hDev, LvDevice_LvAcquisitionFrameRateControlMode,
LvAcquisitionFrameRateControlMode_Off);
Copyright © Leutron Vision
135
Leutron
Vision
PicSight-GigE user manual
Camera features and their control
// configure frame rate in Hz
// (available only when operation in non-triggered mode)
write_enum (LvAcquisitionFrameRateControlMode, On)
write_float (AcquisitionFrameRate, 20.0)
// switch back to regular free-running mode (max frame rate)
write_enum (LvAcquisitionFrameRateControlMode, Off)
Since camera internally switches to triggered mode for frame rate control, the
maximum achievable frame rate is lower than the native free-running mode rate
(when frame rate control mode is off).
The frame rate feature can never increase the frequency beyond the maximum
defined by current working mode (see above), it can only decrease it. To reach a
higher frame rate, adjusting corresponding settings (such as AOI or pixel clock)
should be considered.
6.7. Digital I/O, counters and timers
This section discusses the digital I/O signal configuration.
Figure 6.23. Example GUI showing the digital I/O features
Figure 6.24. Example GUI showing the counters and timers features
6.7.1. Camera I/O lines
The number and type of I/O lines might differ among camera models. The overview of the lines
available and their assignment to actual physical pins on external connectors is given at Section 3.7,
“Input and output signals” [p. 39] and Section 3.8, “Connector and cable description” [p. 44].
To query the information about camera's I/O lines, one may loop through the Line Selector feature
and read the line mode (input/output) and format (optocoupler/TTL). In general, the interface
Copyright © Leutron Vision
136
Leutron
Vision
PicSight-GigE user manual
Camera features and their control
recognizes lines Line1 through Line32, but only a subset of them might be implemented by a
camera model.
The line mapping is fixed for all our camera families — all PicSight and CheckSight models (the
legacy firmware versions 1.x of PicSight-GigE used different mapping). It's briefly summarized in
the following table, details are listed in Section 3.7, “Input and output signals” [p. 39] and Section 3.8, “Connector and cable description” [p. 44].
I/O lines
Mapped signals
Line1—Line4
Optocoupler inputs
Line5—Line8
Reserved
Line9—Line12
Optocoupler outputs
Line13—Line16
Reserved
Line17—Line18
TTL inputs
Line19—Line24
Reserved
Line25—Line26
TTL outputs
Line27—Line32
Reserved
Table 6.1. Overview of digital I/O line mapping
LvHDevice hDev; // open the device to get the handle
// query info about line 4
if (LvIsAvailableEnumEntry(hDev, LvDevice_LineSelector,
LvLineSelector_Line4))
{
LvSetEnum (hDev, LvDevice_LineSelector, LvLineSelector_Line4);
int32_t EnumVal;
// line mode gives LvLineMode_Output or LvLineMode_Input
LvGetEnum (hDev, LvDevice_LineMode, &EnumVal);
// line format gives LvLineFormat_OptoCoupled or LvLineFormat_TTL
LvGetEnum (hDev, LvDevice_LineFormat, &EnumVal);
}
// query info about line 4
write_enum (LineSelector, Line4)
read_enum (LineMode) // Input or Output
read_enum (LineFormat) // OptoCoupled or TTL
6.7.1.1. Physical and logical lines
Except of the actual “physical” signals (representing the electrical status of the individual input/output lines, possibly inverted by the Line Inverter flag), few additional “logical” signals can also be
used for configuration. These are virtual signals representing internal status of the camera. The
available logical signals are:
• Exposure Active (ExposureActive) — the signal is asserted during an active exposure, both
start and duration of the signal is aligned with the exposure
• Frame Trigger (FrameTrigger) — asserted, when a frame trigger is issued, no matter if issued
by an external event, software command or other means. Only the starting edge of the signal
Copyright © Leutron Vision
137
Leutron
Vision
PicSight-GigE user manual
Camera features and their control
is significant, the duration is undefined. The signal is asserted immediately when the frame
trigger arrives, before applying the Trigger Delay.
• Timer X Active (TimerXActive) — aligned with active period of a timer. The signal starts as
soon as the Timer Delay expires and stays active during entire Timer Duration. Discussed below.
• Counter X End (CounterXEnc) — asserted when a counter expires (reaches Counter Duration).
Only the starting edge is significant, duration of this signal is undefined. Discussed below.
• User Output X (UserOutputX) — asserted as long as given user output is set. Only the starting
edge is significant, duration of this signal is undefined. Discussed below.
6.7.2. Observing I/O lines' status
There are two ways to query the current status of the camera's I/O lines:
• Status of the (single) line currently selected in the Line Selector is reported in the boolean feature
Line Status. Note that the status of the output lines can be inverted using Line Inverter flag, as
will be described shortly below. The way, how the signal levels of individual I/O types (TTL/optocoupler) are interpreted as logical 0 and 1 is described in Section 3.7, “Input and output signals” [p. 39].
• Status of all the I/O lines can be querying in a single access using Line Status All integer. This
feature is a 32-bit bitfield each bit representing status of a single line. The least significant bit
corresponds with Line 1, next bit with Line 2 etc.
LvHDevice hDev; // open the device to get the handle
// read current status of line 2
LvSetEnum (hDev, LvDevice_LineSelector, LvLineSelector_Line2);
int32_t IntVal;
LvGetBool (hDev, LvDevice_LineStatus, &IntVal);
// read status of all lines as a bitfield in single access
LvGetInt32 (hDev, LvDevice_LineStatusAll, &IntVal);
// read current status of line 2
write_enum (LineSelector, Line2)
read_bool (LineStatus)
// read status of all lines as a bitfield in single access
read_int (LineStatusAll)
The status of I/O lines associated with individual acquired images can also be monitored through
the chunk data, see Section 6.11, “Chunk data” [p. 168].
6.7.3. Using input lines for triggering
The signals issued on the input lines can be used for triggering the acquisition and other actions.
The trigger input lines are not configured, however, through features in the Digital I/O category,
but through features of the respective subsystem. Refer to
• Trigger Source feature in Section 6.6, “Acquisition and trigger control” [p. 124] to see how to
configure acquisition trigger input line.
• Special Purpose Trigger Source feature in Section 6.15, “Special features” [p. 196].
Copyright © Leutron Vision
138
Leutron
Vision
PicSight-GigE user manual
Camera features and their control
6.7.4. Basic output (strobe) configuration
The most typical use case for digital output is possibly driving a strobe light. The simple case of
strobe aligned with active exposure can be configured easily — select the desired line in Line Selector and set its Line Source to Exposure Active logical signal. If desired, the output signal polarity
can be inverted.
LvHDevice hDev; // open the device to get the handle
// configure strobe output aligned withe exposure on line 10
// (remeber to configure triggered mode first)
LvSetEnum (hDev, LvDevice_LineSelector, LvLineSelector_Line10);
LvSetEnum (hDev, LvDevice_LineSource, LvLineSource_ExposureActive);
// optionally invert the output signal polarity
LvSetBool (hDev, LvDevice_LineInverter, 1);
// configure strobe output aligned withe exposure on line 10
// (remeber to configure triggered mode first)
write_enum (LineSelector, Line10)
write_enum (LineSource, ExposureActive)
// optionally invert the output signal polarity
write_bool (LineInverter, true)
Figure 6.25. Simple strobe configuration (strobe aligned with exposure)
It is possible to drive multiple output lines by the same (eg. Exposure Active) signal at the same
time. To disconnect an output line again, you simply set its line source back to Off.
LvHDevice hDev; // open the device to get the handle
// disconnect the output signal on line 10
LvSetEnum (hDev, LvDevice_LineSelector, LvLineSelector_Line10);
LvSetEnum (hDev, LvDevice_LineSource, LvLineSource_Off);
// disconnect the output signal on line 10
write_enum (LineSelector, Line10)
write_enum (LineSource, Off)
Copyright © Leutron Vision
139
Leutron
Vision
PicSight-GigE user manual
Camera features and their control
Figure 6.26. Output line disconnected
6.7.5. User output configuration
As an alternative to the digital line output configuration synchronized with a cameras internal
signals (such as “exposure active” signal described above), the status of the individual output lines
can be directly controlled by user actions. This functionality is implemented by the “user output”
features in the Digital I/O Control category.
To directly control status of an output line, select the line and set its Line Source to one of the user
outputs, eg. User Output 1. Multiple lines can be driven by the same user output. Unlike with the
Exposure Active signal, the user outputs ara always available, even in the free running mode.
Once the configuration is finished, the output can be driven by toggling value of the corresponding
user output — select the connected output in User Output Selector, then set its value through the
User Output Value boolean feature.
The Line Inverter functionality still applies as usual for lines controlled through user outputs.
LvHDevice hDev; // open the device to get the handle
// configure line output on line 10 to be based on user output 1
LvSetEnum (hDev, LvDevice_LineSelector, LvLineSelector_Line10);
LvSetEnum (hDev, LvDevice_LineSource, LvLineSource_UserOutput1);
// now toggle the line status through the user output value as needed
LvSetEnum (hDev, LvDevice_UserOutputSelector,
LvUserOutputSelector_UserOutput1);
LvSetBool (hDev, LvDevice_UserOutputValue, 1);
LvSetBool (hDev, LvDevice_UserOutputValue, 0);
// configure line output on line 10 to be based on user output 1
write_enum (LineSelector, Line10)
write_enum (LineSource, UserOutput1)
// now toggle the line status through the user output value as needed
write_enum (UserOutputSelector, UserOutput1)
write_bool (UserOutputValue, true)
write_bool (UserOutputValue, false)
Copyright © Leutron Vision
140
Leutron
Vision
PicSight-GigE user manual
Camera features and their control
Figure 6.27. Line output (strobe) controlled through the user output settings
When working with multiple user outputs, it is possible to adjust them all in a single access. The
camera provides two integer features, User Output Value All and User Output Value All Mask, both
32-bit bitfields. The least significant bit of the bitfields corresponds with User Output 1, the next
bit with User Output 2 etc.
The User Output Value All Mask bitfield defines the set of the user outputs to be adjusted, User
Output Value All defines the logical values for them. When writing a new User Output Value All
value, the camera considers only those user outputs being enabled (having “their” bit set) in the
mask. The user outputs disabled in the mask (bit cleared) are preserved — their status is left intact,
regardless the User Output Value All value.
LvHDevice hDev; // open the device to get the handle
// (connect line sources to user outputs as desired...)
// set the 'value-all-mask' to enable user output 1 and 2
LvSetInt32 (hDev, LvDevice_UserOutputValueAllMask, 0x3);
// following call sets just the enabled outputs to logical 1
// the other ones are left intact, keeping their current status
LvSetInt32 (hDev, LvDevice_UserOutputValueAll, 0xFF);
// next call sets output 1 to logical 1, outut 2 to logical 0
// the other ones are left intact, keeping their current status
LvSetInt32 (hDev, LvDevice_UserOutputValueAll, 0x1);
// (connect line sources to user outputs as desired...)
// set the 'value-all-mask' to enable user output 1 and 2
write_int (UserOutputValueAllMask, 0x3)
// following call sets just the enabled outputs to logical 1
// the other ones are left intact, keeping their current status
write_int (UserOutputValueAll, 0xFF)
// next call sets output 1 to logical 1, outut 2 to logical 0
// the other ones are left intact, keeping their current status
write_int (UserOutputValueAll, 0x1)
Copyright © Leutron Vision
141
Leutron
Vision
PicSight-GigE user manual
Camera features and their control
Value All
bitfield
Value All Mask Effective result
bitfield
User Output values
1
0
0
0
1
1
1
0
1
0
1
0
= user output
unaltered
Figure 6.28. User Output Value All functionality illustrated
6.7.6. Advanced output configuration
Sometimes the digital output timing has to be different than the exposure timing. In such case,
the output can be driven by a timer, started by the Frame Trigger event. The timer has a configurable
Timer Delay and Timer Duration (both in µs). The delay defines, how long after receiving the frame
acquisition trigger the camera asserts the output. The duration defines, how long stays the output
active. The Line Source needs than be connected to such configured timer. To keep the description
simple, let's describe the desired settings in source code and screenshot of finished configuration
in Simplon Explorer.
LvHDevice hDev; // open the device to get the handle
// configure strobe output on line 10,
// starting 100 µs after frame trigger and staying active 1000 µs
// first configure the timer
LvSetEnum (hDev, LvDevice_TimerSelector, LvTimerSelector_Timer1);
LvSetEnum (hDev, LvDevice_TimerTriggerSource,
LvTimerTriggerSource_FrameTrigger);
LvSetFloat (hDev, LvDevice_TimerDelay, 100.0);
LvSetFloat (hDev, LvDevice_TimerDuration, 1000.0);
// now connect the line source to the configured timer
LvSetEnum (hDev, LvDevice_LineSelector, LvLineSelector_Line10);
LvSetEnum (hDev, LvDevice_LineSource, LvLineSource_Timer1Active);
// optionally invert the output signal polarity
LvSetBool (hDev, LvDevice_LineInverter, 1);
// configure strobe output on line 10,
// starting 100 µs after frame trigger and staying active 1000 µs
// first configure the timer
write_enum (TimerSelector, Timer1)
write_enum (TimerTriggerSource, FrameTrigger)
write_float (TimerDelay, 100.0)
write_float (TimerDuration, 1000.0)
// now connect the line source to the configured timer
write_enum (LineSelector, Line10)
Copyright © Leutron Vision
142
Leutron
Vision
PicSight-GigE user manual
Camera features and their control
write_enum (LineSource, Timer1Active)
// optionally invert the output signal polarity
write_bool (LineInverter, true)
Figure 6.29. Strobe configured to be delayed 100 µs behind trigger and last
1000 µs
Note that any of the timers (Timer 1 through Timer 4) could be used.
Using the described strobe timing configuration together with the Trigger Delay feature, the desired
timing of the strobe and exposure itself can be precisely configured. Setting Trigger Delay larger
than the strobe delay, the exposure starts later than the strobe signal itself.
Figure 6.30. Strobe configured to be start 100 µs before exposure start
Sometimes it's desirable to assert the output just once in a number of events (frame triggers). This
might be required in use cases such as inter-camera synchronization (see below) or similar. Such
scenario is configured in the same way as the previous case (delayed output), just the timer is not
connected directly to the frame trigger event, but through a counter. The timer (and any line
output connected) would then be asserted only when the counter expires — the counter thus
effectively behaves as signal divider. Let's have a look at the previous example modified to assert
the output only at every fourth frame trigger event.
Copyright © Leutron Vision
143
Leutron
Vision
PicSight-GigE user manual
Camera features and their control
LvHDevice hDev; // open the device to get the handle
// configure strobe output on line 10,
// starting 100 µs after every 4th frame trigger
// and staying active 1000 µs
// first configure the counter
LvSetEnum (hDev, LvDevice_CounterSelector, LvCounterSelector_Counter1);
LvSetEnum (hDev, LvDevice_CounterEventSource,
LvCounterEventSource_FrameTrigger);
LvSetInt32 (hDev, LvDevice_CounterDuration, 4);
LvSetEnum (hDev, LvDevice_LvCounterMode,
LvCounterMode_Autoreset); // restarts when expired
// connect the timer and configure it
LvSetEnum (hDev, LvDevice_TimerSelector, LvTimerSelector_Timer1);
LvSetEnum (hDev, LvDevice_TimerTriggerSource,
LvTimerTriggerSource_Counter1End);
LvSetFloat (hDev, LvDevice_TimerDelay, 100.0);
LvSetFloat (hDev, LvDevice_TimerDuration, 1000.0);
// now connect the line source to the configured timer
LvSetEnum (hDev, LvDevice_LineSelector, LvLineSelector_Line10);
LvSetEnum (hDev, LvDevice_LineSource, LvLineSource_Timer1Active);
// optionally invert the output signal polarity
LvSetBool (hDev, LvDevice_LineInverter, 1);
// configure strobe output on line 10,
// starting 100 µs after every 4th frame trigger
// and staying active 1000 µs
// first configure the counter
write_enum (CounterSelector, Counter1)
write_enum (CounterEventSource, FrameTrigger)
write_int (CounterDuration, 4)
write_enum (CounterMode, Autoreset) // restarts when expired
// connect the timer and configure it
write_enum (TimerSelector, Timer1)
write_enum (TimerTriggerSource, Counter1End)
write_float (TimerDelay, 100.0)
write_float (TimerDuration, 1000.0)
// now connect the line source to the configured timer
write_enum (LineSelector, Line10)
write_enum (LineSource, Timer1Active)
// optionally invert the output signal polarity
write_bool (LineInverter, true)
Copyright © Leutron Vision
144
Leutron
Vision
PicSight-GigE user manual
Camera features and their control
Figure 6.31. Output configured to be fired on every fourth trigger (an delayed
100 µs)
Complex Strobe Settings
Configure triggered mode
TriggerSelector=FrameStart
TriggerMode=On
etc.
Select output line
LineSelector=Line4
Apply delay or divider?
Yes
Configure timer
LineSource=Timer1Active
TimerSelector=Timer1
TimerDelay=...
TimerDuration=...
No
Apply divider?
No
Yes
Configure counter
LineSource=ExposureActive
TimerTriggerSource=FrameTrigger
TimerTriggerSource=Counter1End
CounterSelector=Counter1
CounterMode=Autoreset
CounterEventSource=FrameTrigger
CounterDuration=...
Configure line polarity
LineInverter=On/Off
Done
Figure 6.32. Flow chart: strobe configuration options
Copyright © Leutron Vision
145
Leutron
Vision
PicSight-GigE user manual
Camera features and their control
6.7.7. Disconnected outputs
When an output line is disconnected (its line source is set to Off), its status is always switched to
its default (high impedance for optocoupler, driven high for TTL), regardless the actual value of
the line inverter flag. Refer also to Section 3.7, “Input and output signals” [p. 39].
The line might be effectively disconnected even if the line source is not Off, for
example if the line source is set to Timer 1 Active, but the timer itself is disconnected (not driven by any signal).
6.7.8. Use for inter-camera synchronization
One of possible use cases for the output signal “divider” described above is to synchronize frame
ID's and timestamps across multiple cameras working together. If an application needs to pair
images coming from multiple cameras, it needs to get them synchronized regularly. A possible
solution to this problem is to output this synchronizing pulse once every “N” (eg. every 100) images
are acquired on the master camera and route this signal to the timestamp-reset input on all involved
cameras. The procedure to output a signal every Nth image was described above, the timestamp
resetting triggers are discussed in Section 6.15, “Special features” [p. 196].
EXT. TRIGGER
ACQ TRG
RST TRG
ACQ TRG
RST TRG
MASTER
CAMERA
TRG CPY
SLAVE
CAMERA
ACQ TRG: acquisition trigger input
TRG CPY: output copying every Nth trigger
RST TRG: timestamp reset trigger input
Figure 6.33. Using digital I/O to periodically synchronize timestamps among
multiple cameras
6.7.9. Special topics
Just to make the discussion complete, we have to mention last few special timer/counter related
features. First is the ability to software reset the counter at any time (using Counter Reset command,
so that it starts counting again from zero. Second is the option to adjust counter's current Counter
Value to any number lower than the counter duration.
Note that the counter value is only reset to zero when the counter expires or when calling the
Counter Reset command explicitly. Connecting/disconnecting the Counter Event Source or starting/stopping acquisition has no influence on the counter value, which is maintained across these
actions. The application should reset the counter value explicitly whenever needed.
Copyright © Leutron Vision
146
Leutron
Vision
PicSight-GigE user manual
Camera features and their control
LvHDevice hDev; // open the device to get the handle
// reset Counter1 (it will start counting from zero again)
LvSetEnum (hDev, LvDevice_CounterSelector, LvCounterSelector_Counter1);
LvCmdExecute (hDev, LvDevice_CounterReset);
// set counter value to duration-1
// first time it will expire at the very first event
// next time it will count the full 'duration' cycle
LvSetEnum (hDev, LvDevice_CounterSelector, LvCounterSelector_Counter1);
LvSetInt32 (hDev, LvDevice_CounterDuration, 100);
LvSetInt32 (hDev, LvDevice_CounterValue, 99);
// reset Counter1 (it will start counting from zero again)
write_enum (CounterSelector, Counter1)
exec_cmd (CounterReset)
// set counter value to duration-1
// first time it will expire at the very first event
// next time it will count the full 'duration' cycle
write_enum (CounterSelector, Counter1)
write_int (CounterDuration, 100)
write_int (CounterValue, 99)
6.8. Action commands control
This section discusses the features related to the control of action commands optionally delivered
to the camera(s).
Figure 6.34. Example GUI showing the action control features
Action commands are intended to allow triggering various “actions” (typically a new frame acquisition) on multiple devices in parallel, in approximately same time. The commands are software
generated “messages” delivered to the selected cameras through the Simplon GenTL Producer
— or, in case of PicSight-GigE/PicSight-Smart from another GigE Vision compatible application
with standard action command support. Note that because of their software nature (contrary to
a hardware signal delivered over an I/O line), the action commands are not fully synchronous and
may introduce certain jitter, dependent mainly on the actual system configuration.
The camera might recognize multiple different action commands. To find out the number of actions
supported by the camera, read out the range of the Action Selector integer feature — it's minimum
is always 1, while the maximum corresponds with the number of recognized actions. When
“connecting” to the individual actions, such as in Trigger Source, the actions are referred as Action
1, Action 2, etc.
Every action command generated by the application carries several parameters: “device key”,
“group key” and “group mask”. The camera configuration contains corresponding matching
features that are checked against the parameters carried by individual action commands delivered
to the camera — to decide which (if any) actual action should be generated. This kind of fine
grained matching is important, because the action commands are typically broadcast to all accessible devices. The camera's features controlling the action commands are:
Copyright © Leutron Vision
147
Leutron
Vision
PicSight-GigE user manual
Action Device Key
Camera features and their control
The action command will be only considered if the device is currently
open by a controlling application and if the device key parameter included in the command equals the Action Device Key value configured
in the device. If they do not match, the action command is immediately
dropped without any further checks.
Note that the Action Device Key is a write-only 32-bit unsigned integer
feature. It is write-only to ensure that the primary controlling application
has full, exclusive control of the key. If the primary application desires
to allow other applications (or even devices) to generate the action
commands, it needs to pass the device key parameter to them.
Action Selector
Selects one of the action commands supported by the camera, allowing
to configure the action-specific parameters, Action Group Key and Action
Group Mask. The selector is an integer, ranging from 1 to the maximum
number of action commands recognized by the camera. The value 1
corresponds the action being referred as Action 1, value 2 corresponds
with Action 2 etc.
Action Group Key
If an action command arrives and passes the device key check, it's group
key parameter is compared against the Action Group Key values (again
32-bit unsigned integers) configured for the individual actions. Those
actions for which their group keys equal with the key embedded in the
command are considered as candidates for generating the actual action
commands.
Action Group Mask
The Action Group Mask is the last step in the action command matching
chain. For the action(s) matching the group key parameter, the delivered
group mask parameter is compared against the actions configured Action
Group Mask value (yet another 32-bit unsigned integer. In this case, the
camera performs the bit-wise AND operation on the two values. If the
result is nonzero, the action is considered as a “match” and the corresponding internal action signal is generated. Any subsystems connected
to that action (for example the Trigger Source) would immediately receive
the signal.
Given this algorithm for action command delivery, it is solely choice of the application, how it
uses the described parameters to control a group of cameras through the action commands. Note
that many applications control these parameters “under the hood” and that they are all accessible
only in the “guru” feature visibility level.
LvHDevice hDev; // open the device to get the handle
// set the action device key parameter
// (using LvSetInt64() since the int32 range might not
// be sufficient for the unsigned 32-bit parameters)
LvSetInt64 (hDev, LvDevice_ActionDeviceKey, 0x07A312B2);
// configure the group key and mas for Action 1
LvSetInt32 (hDev, LvDevice_ActionSelector, 1);
LvSetInt64 (hDev, LvDevice_ActionGroupKey, 0x00000020);
LvSetInt64 (hDev, LvDevice_ActionGroupMask, 0x00000013);
// set the action device key parameter
write_int (ActionDeviceKey, 0x07A312B2)
// configure the group key and mas for Action 1
Copyright © Leutron Vision
148
Leutron
Vision
PicSight-GigE user manual
Camera features and their control
write_int (ActionSelector, 1)
write_int (ActionGroupKey, 0x00000020)
write_int (ActionGroupMask, 0x00000013)
6.8.1. Using action commands for triggering
The action commands issued from the application can be used for triggering the acquisition and
other actions. The respective actions used to trigger the desired operations are not configured,
however, through features in the Action Control category, but through features of the respective
subsystem. Refer to
• Trigger Source feature in Section 6.6, “Acquisition and trigger control” [p. 124] to see how to
configure acquisition trigger action command.
• Special Purpose Trigger Source feature in Section 6.15, “Special features” [p. 196].
6.8.2. Generating the action commands
The information how to generate and deliver the action commands to the desired cameras is
beyond the scope of this section. It is responsibility of the controlling application. If you are programming with Simplon, refer to its documentation (Chapter 7, Simplon GenTL Producer features [p. 248], Simplon programmer's guide). When programming with another GigE Vision compatible library, find the relevant information in its documentation.
6.9. Analog controls
This section discusses the “analog” features of the image, ie. the features that affect the analog
to digital conversion of the sensor output.
Figure 6.35. Example GUI showing the analog controls' features
6.9.1. Gain
Gain is a multiplicative factor applied to the pixel output values to increase the response — produce
higher pixel values (higher brightness). It is useful when under given conditions (environment and
maximal acceptable exposure time) the sensor does not reach the desired level of saturation. Note
however, that together with the useful signal itself, gain amplifies also the noise, so it does not
improve the real pixel dynamic range. It is therefore recommended when increasing the brightness,
first adjust the exposure time (Section 6.6, “Acquisition and trigger control” [p. 124]) and only go
for gain when exposure time can no more be increased. Another alternative to gain settings is, of
course, adjusting the lens aperture, which can be automated on cameras supporting the lens
control functionality (Section 6.14.3, “Lens control” [p. 187]).
There are two types of gain available (although not all camera modes support both of them):
Analog gain
Amplifies the actual analog signal output of the sensor, before actually digitizing
it.
Digital gain
Amplifies already digitized pixel values (multiplying by a given factor). Since
certain noise is also generated during the A/D conversion, digital gain also
amplifies this additional noise and is thus less accurate than the analog gain.
Copyright © Leutron Vision
149
Leutron
Vision
PicSight-GigE user manual
Camera features and their control
Figure 6.36. Comparison of analog and digital gain, the histogram shows
how digital gain amplifies the digitization noise
Gain values are expressed in logarithmic unit, decibel (dB). Increasing the gain by 6 dB approximately doubles the camera response. To find correct gain value in dB for a desired pixel value multiplication factor, use formula: Gain=20*log(MultiplicativeFactor).
The range of possible gain values is model specific, negative gain is also possible for certain models.
The available range might differ in free running and individual triggered modes. Note that the
camera might be able to adjust the gain only in small but discrete steps. It will align the requested
value to the closest “step” — to know the exact used value, the application might want to re-read
the gain after setting it.
All the camera models are adjusted, so that for gain set to 0 dB, the maximal sensor output (output
of fully saturated sensor) produces the “white” pixels (pixel value 255 for 8-bit pixel format).
6 dB
0 dB
Resulting pixel value (DN)
255
(8-bit pixel
format)
-6 dB
127
0
50
100
Sensor output voltage (%)
Figure 6.37. Output pixel values for various gains (assumes that no black
level is applied)
Copyright © Leutron Vision
150
Leutron
Vision
PicSight-GigE user manual
Camera features and their control
Figure 6.38. Gain effect example (±6 dB)
Before reading/writing the Gain value, it is necessary to first select the gain type to be accessed
in the Gain Selector enumeration. Possible values are Analog and Digital (although not all camera
models support both of them).
LvHDevice hDev; // open the device to get the handle
// adjust analog gain to 6 dB
// (assumes that it is not switched to automatic mode)
LvSetEnum (hDev, LvDevice_GainSelector, LvGainSelector_AnalogAll);
LvSetFloat (hDev, LvDevice_Gain, 6.0);
// if desired, re-read the value possibly adjusted by the camera
double FloatVal;
LvGetFloat (hDev, LvDev_Gain, &FloatVal);
// adjust digital gain (if available) to -6 dB
if (LvIsAvailableEnumEntry(hDev, LvDevice_GainSelector,
LvGainSelector_DigitalAll))
{
LvSetEnum (hDev, LvDevice_GainSelector, LvGainSelector_DigitalAll);
LvSetFloat (hDev, LvDevice_Gain, -6.0);
}
// adjust analog gain to 6 dB
// (assumes that it is not switched to automatic mode)
write_enum (GainSelector, AnalogAll)
write_float (Gain, 6.0)
// adjust digital gain (if available) to -6 dB
Copyright © Leutron Vision
151
Leutron
Vision
PicSight-GigE user manual
Camera features and their control
write_enum (GainSelector, DigitalAll)
write_float (Gain, -6.0)
The camera might also adjust the gain automatically, see Section 6.9.3, “Automatic gain and black
level” [p. 154].
On certain camera models (in particular those based on the G43A sensor), the
gain is applied with a delay of one frame.
6.9.1.1. Default gain and exposure time settings
The factory defaults for gain and exposure time are adjusted for good “first test” experience, ie.
to provide reasonable image brightness in regular office conditions in a typical illumination level,
assuming lens aperture size 2.8. We assume that the user will have to adjust the camera anyway
for the target working environment.
The order of adjusting the default values is as follows:
1.
First try to adjust the image brightness by altering the exposure time. Do not, however, increase
the exposure time beyond the value which would start affecting the camera's frame rate.
2.
If the image is still too dark at the maximal exposure time level, finish the adjustment by increasing also the analog gain.
3.
The digital gain, if available, is always kept at 0 dB.
6.9.2. Black level
The black level function (also known as “offset”) controls the output value of the black pixels, ie.
pixels not exposed to illumination. It controls it by applying offset (positive or negative) to the
individual pixel values. That offset is expressed as a floating point value in unit “digital number”,
DN. Black level value 5 DN means that values of all pixels will increase approximately by 5. The
offset is actually applied to the analog sensor output signal, before the analog to digital conversion.
The black level function can be used to keep the camera response constant in changing environment
conditions. For example, if the camera and the sensor heats up, the response of the sensor will
slightly increase thanks to the thermally generated pixel output. Decreasing the black level value
will compensate for that. It is usually desirable to keep the values of the “black” pixels slightly
above zero, so that a possible decrease of their value can also be recognized and appropriately
compensated.
The range of possible values is model specific. Positive and negative values are possible, as well as
decimal values. Note however, that the camera might be able to adjust the black level only in
small but discrete steps. It will align the requested value to the closest “step” — to know the exact
used value, the application might want to re-read the black level after setting it.
Copyright © Leutron Vision
152
Leutron
Vision
PicSight-GigE user manual
Camera features and their control
0 DN
255
(8-bit pixel
format) 245
Resulting pixel value (DN)
10 DN
-10 DN
10
0
100
-10
Sensor output voltage (%)
Figure 6.39. Output pixel values for various black levels (assumes that no
gain is applied)
Figure 6.40. Black level example (artificially increased effect)
The function is controlled through the Black Level floating point feature. Since the cameras support
just a single black level type, adjusting the Black Level Selector in the examples below is currently
more less formal and could be omitted.
Copyright © Leutron Vision
153
Leutron
Vision
PicSight-GigE user manual
Camera features and their control
LvHDevice hDev; // open the device to get the handle
// adjust black level to 10.0 DN
// (assumes that black level is not switched to automatic mode)
LvSetEnum (hDev, LvDevice_BlackLevelSelector, LvBlackLevelSelector_All);
LvSetFloat (hDev, LvDevice_BlackLevel, 10.0);
// adjust black level to 10.0 DN
// (assumes that black level is not switched to automatic mode)
write_enum (BlackLevelSelector, All)
write_float (BlackLevel, 10.0)
Black level might also be adjusted automatically, see Section 6.9.3, “Automatic gain and black
level” [p. 154].
6.9.2.1. Black level and gain
When using together with gain, the black level is applied first. The sensor analog output is first
adjusted according to the black level settings and the result is then subject to amplification by the
selected gain factor. The effect may be symbolically expressed using an equation (of course considering that gain has in fact logarithmic effect):
OutputValue = (InputValue+BlackLevel) * 10^(Gain/20), see also Section 6.9.1,
“Gain” [p. 149].
6.9.2.2. Black level and pixel format
Since the black level values are expressed in the “digital number” (DN) units, the same value can
have different meaning for different pixel format. To reach the same effect, higher black level value
is needed for pixel formats with more bits per pixel.
To give an example, a sensor pixel, which would give value 10 in 8-bit pixel format, would in 12bit pixel format yield value around 160. Therefore also the black level value 10 DN in 8-bit pixel
format has the same effect as 160 DN in 12-bit pixel format.
To keep the black level effect constant when changing the pixel format, the camera readjusts the
black level range and the value itself whenever a pixel format is changed.
6.9.3. Automatic gain and black level
Similarly as automatic exposure (Section 6.6.2.1, “Automatic exposure” [p. 128]), selected camera
models offer also automatic gain and automatic black level operation modes.
The automatic gain algorithm observes the luminance of acquired images and attempts to keep
it at constant level, by compensating for any changes by adjusting the gain for subsequent frames.
To prevent flickering, the adjustments are low-pass fltered — it may take several frames until the
target luminance is restored again.
The automatic black level algorithm monitors the “dark pixels”, ie. the pixels out of the effective
sensor area, which are not exposed to illumination. The value of the dark pixels is averaged over
multiple acquired frames, low-pass filtered (to avoid fast oscillations) and compared to predefined
thresholds. When the value falls outside those threshold, the black level is re-adjusted to restore
the desired black values (very slightly above zero).
The configuration is analogical for all automatic features — each of them is controlled through
an enumerated feature (Automatic Gain, Automatic Black Level, Automatic Exposure), which can
switch between two modes, Off and Continuous. The Off option means the automatic mode is not
active and given feature is controlled “manually” by adjusting the desired value. This is default
Copyright © Leutron Vision
154
Leutron
Vision
PicSight-GigE user manual
Camera features and their control
option for all the automatic features. The Continuous option means that the automatic adjustment
of the feature is continuously applied.
To configure automatic gain, it is first necessary to select through Gain Selector, which gain type
(analog or digital) is being configured.
LvHDevice hDev; // open the device to get the handle
// switch analog gain to automatic mode
// (full availability checking for generic applications)
if (LvIsAvailableEnumEntry(hDev, LvDevice_GainSelector,
LvGainSelector_AnalogAll))
{
LvSetEnum (hDev, LvDevice_GainSelector, LvGainSelector_AnalogAll);
if (LvIsAvailableEnumEntry(hDev, LvDevice_GainAuto,
LvGainAuto_Continuous))
{
LvSetEnum (hDev, LvDevice_GainAuto, LvGainAuto_Continuous);
}
}
// switch digital gain to automatic mode
// (since now the extended checks omitted)
LvSetEnum (hDev, LvDevice_GainSelector, LvGainSelector_DigitalAll);
LvSetEnum (hDev, LvDevice_GainAuto, LvGainAuto_Continuous);
// switch to automatic black level mode
LvSetEnum (hDev, LvDevice_BlackLevelSelector, LvBlackLevelSelector_All);
LvSetEnum (hDev, LvDevice_BlackLevelAuto, LvBlackLevelAuto_Continuous);
// switch the analog gain back to manual mode,
// reading the newly adjusted value
LvSetEnum (hDev, LvDevice_GainSelector, LvGainSelector_AnalogAll);
LvSetEnum (hDev, LvDevice_GainAuto, LvGainAuto_Off);
double FloatVal;
LvGetFloat (hDev, LvDevice_Gain, &FloatVal);
// switch analog gain to automatic mode
write_enum (GainSelector, AnalogAll)
write_enum (GainAuto, Continuous)
// switch digital gain to automatic mode
write_enum (GainSelector, DigitalAll)
write_enum (GainAuto, Continuous)
// switch to automatic black level mode
write_enum (BlackLevelSelector, All)
write_enum (BlackLevelAuto, Continuous)
// switch the analog gain back to manual mode,
// reading the newly adjusted value
write_enum (GainSelector, AnalogAll)
write_enum (GainAuto, Off)
read_float (Gain)
When using automatic gain together with the automatic exposure feature (Section 6.6.2.1, “Automatic exposure” [p. 128]), the auto exposure takes precedence.
Automatic gain is inactive as long as the automatic exposure functionality does
not reach its limits — only then the automatic gain becomes active as well.
Copyright © Leutron Vision
155
Leutron
Vision
PicSight-GigE user manual
Camera features and their control
The automatic gain functionality might work against the manual exposure time
settings. When increasing the exposure time, the automatic gain function will
decrease the gain to reach again the target luminance level.
The low pass filter applied in the automatic gain algorithm can cause, that the
automatic gain value never fully reaches the limits (min/max) of the manual gain
settings.
6.10. Luminance and color handling
The section discusses camera features controlling the luminance and color information in the digitized image. The features include in particular the look-up table (LUT) and color transformation
matrix, but the section discusses also several “higher level” functions that can be implemented
using those primitives — for example gamma correction, binarization or white balance.
6.10.1. Look-up table (LUT)
The LUT (look-up table) is a trivial preprocessing technique allowing to map each input pixel value
to a corresponding output pixel value. The look-up table operation is applied separately to every
image pixel. The PicSight and CheckSight cameras use two types of LUTs, depending on the currently used pixel format (Section 6.5, “Image format” [p. 107]):
RGB LUT
Used only with the RGB/BGR pixel formats. The LUT consists of three tables,
each controlling separately given color channel.
Luminance LUT
Used for all other pixel formats, ie. the monochrome and Bayer encoded ones.
A single look-up table controls the luminance (gray value) of individual pixels.
When controlling the LUT, you first need to select the table you want adjust (luminance, red,
green or blue) in the LUT Selector enumeration. The choice depends on the camera model and
current pixel format. Having the table selected, you can loop through the entire range of LUT Index
and adjust the LUT Value for each of them — we'll demonstrate that in a sample code below. Finally,
the LUT operation can be switched on or off using the LUT Enable flag — when switched off, the
data flow bypasses the LUT operation, but the LUT contents itself remains intact, so it is possible
to switch it on again later, without need to refill the table.
The luminance LUT can be used to perform various operations, such as
•
•
•
•
•
•
invert the image
binarize the image at given threshold
apply gamma correction
adapt brightness and contrast
simulate gain and black level operations
etc.
Copyright © Leutron Vision
156
Leutron
Vision
PicSight-GigE user manual
Camera features and their control
Binarization
No LUT
Output pixel value (DN)
4095
Gamma
correction
Inversion
0
4095
Input pixel value (DN)
Figure 6.41. Examples of functions implemented through luminance LUT
Copyright © Leutron Vision
157
Leutron
Vision
PicSight-GigE user manual
Camera features and their control
Figure 6.42. Luminiance LUT function effects illustrated
The camera internally always work with the image data read out from the sensor in 12-bit format,
regardless the target format transferred to the host application. The luminance LUT thus always
uses 12-bit depth at both input and output — meaning that the luminance LUT has always 4096
entries (index 0—4095) and each LUT value has also range of 0—4095, 0 corresponding with
black, 4095 with white pixel.
Copyright © Leutron Vision
158
Leutron
Vision
LUT values
Camera features and their control
LUT indexes
PicSight-GigE user manual
2046
0
2047
0
input value .. 2048
(grey pixel)
output value ..4095
(white pixel)
2048 4095
2049 4095
2050 4095
input image
output image
Figure 6.43. 12-bit luminance LUT used as a binarization function
LvHDevice hDev; // open the device to get the handle
// adjust the luminance LUT...
LvSetEnum (hDev, LvDevice_LUTSelector, LvLUTSelector_Luminance);
// ...to invert the image
for (int i = 0; i<4095; ++i)
{
LvSetInt32 (hDev, LvDevice_LUTIndex, i);
LvSetInt32 (hDev, LvDevice_LUTValue, 4095-i);
}
// ...or to binarize the image at threshold 2048 (50% gray)
for (int i = 0; i<4095; ++i)
{
LvSetInt32 (hDev, LvDevice_LUTIndex, i);
LvSetInt32 (hDev, LvDevice_LUTValue, (i<2048) ? 0 : 4095);
}
// don't forget to enable the LUT
LvSetBool (hDev, LvDevice_LUTEnable, 1);
// disable the LUT later if needed (LUT contents will be preserved)
LvSetBool (hDev, LvDevice_LUTEnable, 0);
// adjust the luminance LUT...
write_enum (LUTSelector, Luminance)
// ...to invert the image
for (i = 0 .. 4095)
{
write_int (LUTIndex, i)
write_int (LUTValue, 4095-i)
}
// ...or to binarize the image at threshold 2048 (50% gray)
for (i = 0 .. 4095)
{
write_int (LUTIndex, i)
Copyright © Leutron Vision
159
Leutron
Vision
PicSight-GigE user manual
Camera features and their control
write_int (LUTValue, (i<2048) ? 0 : 4095)
}
// don't forget to enable the LUT
write_bool (LUTEnable, true)
// disable the LUT later if needed (LUT contents will be preserved)
write_bool (LUTEnable, false)
The RGB LUT works in principle same as the luminance LUT, it only consists from three separate
tables, each controlling separately given color channel. It can accomplish the same operations as
the luminance LUT — modifying all three tables in the same way. It can adapt the color information
in the image — adjusting all the tables separately. A typical use case is the white balance adjustment,
when individual channel responses are increased or decreased to balance the colors. Both approaches may be of course combined, eg. to perform white balance and gamma correction at
the same time.
green channel
255
Output pixel value per channel (DN)
red channel
blue channel
0
255
Input pixel value per channel (DN)
Figure 6.44. Examples of an RGB LUT used for white balancing (increased
red, decreased blue channel values)
Copyright © Leutron Vision
160
Leutron
Vision
PicSight-GigE user manual
Camera features and their control
Figure 6.45. RGB LUT effect illustrated — blue channel reduced for simple
white balancing
The RGB LUT is used only with true color (RGB/BGR) pixel formats, after the Bayer decoding operation, when the camera converts the image to the 3×8-bit color format. The RGB LUT thus always
uses 8-bit depth at both input and output — meaning that each of the three (R-G-B) tables has
always 256 entries (index 0—255) and each LUT value has also range of 0—255, 255 corresponding
with fully saturated color channel of the pixel.
Note that enabling/disabling any of the three red/green/blue LUT tables actually enables/disables
the entire RGB LUT. It is not possible to enable them separately.
LvHDevice hDev; // open the device to get the handle
// adjust the RGB LUT for white balancing
// increase red, decrease blue, leave green channel intact
LvSetEnum (hDev, LvDevice_LUTSelector, LvLUTSelector_Red);
for (int i = 0; i<255; ++i)
{
LvSetInt32 (hDev, LvDevice_LUTIndex, i);
Copyright © Leutron Vision
161
Leutron
Vision
PicSight-GigE user manual
Camera features and their control
LvSetInt32 (hDev, LvDevice_LUTValue, 1.2*i);
}
LvSetEnum (hDev, LvDevice_LUTSelector, LvLUTSelector_Blue);
for (int i = 0; i<255; ++i)
{
LvSetInt32 (hDev, LvDevice_LUTIndex, i);
LvSetInt32 (hDev, LvDevice_LUTValue, 0.8*i);
}
LvSetEnum (hDev, LvDevice_LUTSelector, LvLUTSelector_Green);
for (int i = 0; i<255; ++i)
{
LvSetInt32 (hDev, LvDevice_LUTIndex, i);
LvSetInt32 (hDev, LvDevice_LUTValue, i);
}
// don't forget to enable the LUT
// (enabling any of the three tables enables entire LUT)
LvSetBool (hDev, LvDevice_LUTEnable, 1);
// disable the LUT later if needed (LUT contents will be preserved)
LvSetBool (hDev, LvDevice_LUTEnable, 0);
// adjust the RGB LUT for white balancing
// increase red, decrease blue, leave green channel intact
write_enum (LUTSelector, Red)
for (i = 0 .. 255)
{
write_int (LUTIndex, i)
write_int (LUTValue, 1.2*i)
}
write_enum (LUTSelector, Blue)
for (i = 0 .. 255)
{
write_int (LUTIndex, i)
write_int (LUTValue, 0.8*i)
}
write_enum (LUTSelector, Green)
for (i = 0 .. 255)
{
write_int (LUTIndex, i)
write_int (LUTValue, i)
}
// don't forget to enable the LUT
// (enabling any of the three tables enables entire LUT)
write_bool (LUTEnable, true)
// disable the LUT later if needed (LUT contents will be preserved)
write_bool (LUTEnable, false)
6.10.1.1. LUT single access reading/writing
The per-element LUT access provides a natural interface for reading/writing the LUT, the application
does not need to make any assumptions about the internal layout of the LUT. On the other hand,
reading/wriging the entire LUT this way can generate significant overhead due to excessive I/O
operations. In some situations, it might be desirable to eliminate this overhead, reading or writing
the entire LUT in a single access.
Copyright © Leutron Vision
162
Leutron
Vision
PicSight-GigE user manual
Camera features and their control
The single-step access is performed through feature LUT Value All, which is based on GenICam
type IRegister, behaving as a raw block of memory. All the rules about selecting the LUT to be
accessed (LUT Selector) or enabling the LUT (LUT Enable) apply same as in case of the per-element
access method, the feature LUT Value All just allows to replace the LUT Index and LUT Value calls
with a single input/output request.
Since the LUT Value All feature accesses the LUT in a single step as a block of memory, it is necessary
to know the internal layout of the LUT:
• Regardless of the LUT type, the size of the individual elements, as they are stored in the memory,
are always 4 bytes. Naturally, not all bits of the 4-byte slot are actually used, the luminance LUT
uses 12-bit, the RGB LUT's 8-bit elements. When writing the LUT as a memory block, the application is responsible to not overflow these limits.
• Beware, due to differences between the actual technologies, the endianess of the individual
elements vary among Leutron Vision camera families. PicSight-GigE cameras store the LUT elements in big endian, CheckSight cameras in little endian format. The application is responsible
to provide the memory block in correct format when writing. Note that these considerations
apply only to the “entire memory block” access, when accessing the LUT per-element the LUT
internals are shielded from the user.
• The number of elements in the LUT depends on the LUT type. As described above, the luminance
LUT has always 4096 elements, while the individual R/G/B LUT's have 256 elements each.
• The entire size of the LUT in bytes is naturally product of the single element size (4B) and
number of entries.
• The order of elements in the LUT is defined by their indexes. The element with index 0 is always
stored at the lowest address (aligned with the start of the LUT memory block). The element
with index 1 can be accessed at a 4-byte offset from the LUT beginning, etc.
LvHDevice hDev; // open the device to get the handle
// adjust the luminance LUT...
LvSetEnum (hDev, LvDevice_LUTSelector, LvLUTSelector_Luminance);
uint8_t LUTData[16384]; // 4096 * 4B
// prepare the memory block LUTData, using size and layout
// compatible with camera's internal representation of the LUT
LvSetBuffer(hDev, LvDevice_LUTValueAll, LUTData, 16384);
// don't forget to enable the LUT
LvSetBool (hDev, LvDevice_LUTEnable, 1);
// adjust the luminance LUT...
write_enum (LUTSelector, Luminance)
// prepare the memory block LUTData, using size and layout
// compatible with camera's internal representation of the LUT
write_raw_reg (LUTValueAll, LUTData, 16384)
// don't forget to enable the LUT
write_bool (LUTEnable, true)
Copyright © Leutron Vision
163
Leutron
Vision
PicSight-GigE user manual
Camera features and their control
6.10.1.2. Direct and indirect LUT control (LUT modes)
The LUT(s) can be configured either directly by adjusting the look-up table entries — or, if given
camera supports it, through higher level functions built on top of the LUT functionality. An example
of the higher level function is white balance, which is implemented on top of the RGB LUT.
The higher level function(s) fully control the LUT, in such case it's no more possible to modify the
LUT entries directly. Therefore the user has to select the desired mode of operation. If a given
camera supports various LUT operation modes, they are controlled through enumeration feature
LUT Mode.
The basic, always available, option is Direct. In this case the LUT entries are controlled directly by
the application. The higher level functions are not available.
Alternatively, it's possible to select a higher level function (e.g. White Balance). In that case, the
features controlling given higher level function become available and take over the LUT control.
LUT itself is still available, but in read-only mode. Individual higher level functions are discussed
in separate sections.
LvHDevice hDev; // open the device to get the handle
// select the direct LUT control mode...
LvSetEnum (hDev, LvDevice_LvLUTMode, LvLUTMode_Direct);
// ...access the LUT entries directly now
// select a higher level function, here white balance
LvSetEnum (hDev, LvDevice_LvLUTMode, LvLUTMode_BalanceWhite);
// ...now LUT itself is read-only, controlled indirectly
// select the direct LUT control mode...
write_enum (LvLUTMode, Direct)
// ...access the LUT entries directly now
// select a higher level function, here white balance
write_enum (LvLUTMode, BalanceWhite)
// ...now LUT itself is read-only, controlled indirectly
6.10.1.3. White balance
White balance function is adjustment of intensities of individual color (R-G-B) channels to compensate for the unwanted color shift, e.g. because of non-neutral ambient illumination of the
scene. The white balancing is controlled through amplification factors to be applied on the individual R-G-B color channels. Note that white balance makes only sense when using a true RGB
pixel format.
The camera implements the white balance functionality using the RGB LUT — the white balance
factors (“ratios”) are applied as linear functions in the individual R-G-B LUT's. To make the white
balance functinality avilable (if supported by the camera), first switch LUT Mode to White Balance.
To apply the desired white balance factors, select progressively the individual color channels (Red,
Green, Blue) in the Balance Ratio Selector enumeration and for each channel configure the desired
amplification factor through Balance Ratio. The Balance Ratio is a floating point factor allowing to
amplify the given color channel within certain limits.
Copyright © Leutron Vision
164
Leutron
Vision
PicSight-GigE user manual
Camera features and their control
LvHDevice hDev; // open the device to get the handle
// select the "white balance" LUT mode
LvSetEnum (hDev, LvDevice_LvLUTMode, LvLUTMode_BalanceWhite);
// adjust white balance:
// increase red, decrease blue, leave green channel intact
LvSetEnum (hDev, LvDevice_BalanceRatioSelector,
LvBalanceRatioSelector_Red);
LvSetFloat (hDev, LvDevice_BalanceRatio, 1.2);
LvSetEnum (hDev, LvDevice_BalanceRatioSelector,
LvBalanceRatioSelector_Green);
LvSetFloat (hDev, LvDevice_BalanceRatio, 1.0);
LvSetEnum (hDev, LvDevice_BalanceRatioSelector,
LvBalanceRatioSelector_Blue);
LvSetFloat (hDev, LvDevice_BalanceRatio, 0.8);
select the "white balance" LUT mode
write_enum (LvLUTMode, BalanceWhite)
write_enum (BalanceRatioSelector, Red)
write_float (BalanceRatio, 1.2)
write_enum (BalanceRatioSelector, Green)
write_float (BalanceRatio, 1.0)
write_enum (BalanceRatioSelector, Blue)
write_float (BalanceRatio, 0.8)
Besides the “manual” setting of the white balancing ratios, the camera might compute them
automatically based on an actually acquired image. To instruct the camera to compute the new
ratios, switch the Automatic White Balance feature to Once (the default value of this enumeration
is Off). As soon as switched to Once, the camera will automatically evaluate the acquired image
and compute new white balancing factor — considering, that the acquired image is color neutral,
i.e. suitable for white balance calibration. When computed, the Automatic White Balance will switch
back to Off and the newly computed values will be available through Balance Ratio Selector/Balance
Ratio. Of course, the new values will immediately become effective. When required, the process
should be repeated again.
LvHDevice hDev; // open the device to get the handle
// select the "white balance" LUT mode
LvSetEnum (hDev, LvDevice_LvLUTMode, LvLUTMode_BalanceWhite);
// trigger computation of new white balance factors
LvSetEnum (hDev, LvDevice_BalanceWhiteAuto,
LvBalanceWhiteAuto_Once);
// when finished, it switches back to LvBalanceWhiteAuto_Off
// and new balance ratios are immediately applied
select the "white balance" LUT mode
write_enum (LvLUTMode, BalanceWhite)
// trigger computation of new white balance factors
write_enum (BalanceWhiteAuto, Once)
// when finished, it switches back to LvBalanceWhiteAuto_Off
// and new balance ratios are immediately applied
Copyright © Leutron Vision
165
Leutron
Vision
PicSight-GigE user manual
Camera features and their control
Note, that computation of the white balancing factors based on the acquired image can be done
even if the output pixelf format is not true RGB, but a Bayer encoded format. In such case the
camera does not apply them directly (no RGB LUT with Bayer encoded pixel format), it just provides
the recommended values (read-only) as a hint for the application, which can apply them after
decoding the Bayer encoded image.
6.10.2. Color transformation
The color transformation functionality allows to adjust the color information through applying a
matrix operation on every single pixel. The operation is applicable only for true color RGB/BGR
output pixel formats (Section 6.5, “Image format” [p. 107]) since it takes the R-G-B channel values
of each pixel as input.
The color transformation functionality can be used to perform various operations, such as
•
•
•
•
•
•
•
image color improvement/correction, advanced white balancing, channel overlap elimination
color to grayscale conversion
format conversion (eg. RGB to YUV)
adjusting color saturation
adjusting brightness and contrast of color images
hue rotation
etc.
The color transformation functionality might be only available on specific camera models. Please
contact Leutron Vision to check availability of the feature and its detailed documentation for given
model.
Copyright © Leutron Vision
166
Leutron
Vision
PicSight-GigE user manual
Camera features and their control
Figure 6.46. Artificial example illustrating the color transformation (in this
case full color space rotation)
6.10.3. Gamma correction, brightness and contrast
Simplon API provides several utility functions helping to implement some common image conditioning operations using the camera's LUT functionality. It can, for example, configure the LUT to
apply desired gamma correction, optionally combined with brightness and contrast adjustment.
Simplon API would automatically find out the currently active LUT type (luminance or RGB LUT),
compute the LUT values based on the required inputs and adjust the LUT. The details are documented in Simplon programmer's guide.
6.10.4. White balance
The color interpretation in the acquired image might not always exactly correspond with the
reality, for example because of non-neutral ambient illumination in the scene — some color
components might be emphasized more than others. The goal of the white balancing operation
Copyright © Leutron Vision
167
Leutron
Vision
PicSight-GigE user manual
Camera features and their control
is to adjust the image colors so that color neutral objects (white or gray) are represented as such
in the acquired image data. This operation can be achieved through
• RGB LUT — linearly amplifying the color channels that are too weak in the image and vice versa
• Color transformation matrix — which can also simply amplify or curtail individual channels, but
can also “shift” the response of one channel to another one
Simplon API provides functions to help with white balancing. It would query the color handling
functions supported by the connected camera (RGB LUT or color transformation matrix), inspect
the target image buffer supplied by the application, calculate the necessary parameters needed
to white-balance that buffer and configure the camera with those parameters. White balancing
can be combined with the other LUT based operations, such as gamma correction, described
above. The details are documented in Simplon programmer's guide.
6.11. Chunk data
This section discusses the additional info fields (so called “chunk data”) optionally appended to
every acquired image.
Figure 6.47. Example GUI showing the chunk data features
The chunk data are additional data optionally appended to every acquired image. The data can
be retrieved through the feature tree, similarly as regular camera features. The individual chunks
contain information about the camera status and configuration of certain important features at
the time the image was acquired, thus providing additional information about the image. In
triggered mode, the chunk data are collected in the moment of applying the frame trigger (effective
exposure start). In free running mode, the chunk data are collected upon start of sensor readout.
The application can selectively choose, which chunks should be delivered. The chunk data are always
delivered in the same buffer with the actual image data. The status of chunk data configuration
thus affects the “payload size” (Section 6.4.1, “Acquired image data size” [p. 102]) and the application must consider that when allocating the acquisition buffers. The chunk data are always appended to the end of the buffer (in a standardized format), the image data are always in the beginning. Accessing the image data itself is thus not affected by the fact, whether the chunk data
are used or not.
Copyright © Leutron Vision
168
Leutron
Vision
PicSight-GigE user manual
Camera features and their control
Image without chunk data
Image with chunk data
IMAGE
IMAGE "CHUNK"
CHUNK1
Image chunk header
CHUNK2
Chunk1 header
Chunk2 header
Figure 6.48. Chunk data layout, the image data are always at the “start”
of the buffer, chunk data parsed from the end of the delivered buffer
Naturally, since the chunk data increase the image buffer size, the bandwidth required to deliver
the image stream to the application also increases. However, the chunk data size is usually very
small compared to the image data size, therefore its influence is marginal.
The GigE Vision compatible cameras (PicSight-GigE and PicSight-Smart) naturally deliver the chunk
data with images using the GigE Vision payload types intended for chunk data. Other camera
families, in particular CheckSight/CheckSight-II, deliver the image with chunk data through GenTL
image acquisition engine. Note that all camera families, including CheckSight/CheckSight-II, deliver the chunk data in GigE Vision compatible format. Therefore every library/application capable
of parsing the GigE Vision chunk data can use the same mechanism to parse also CheckSight/CheckSight-II chunk data.
Not all GigE Vision and GenICam based software packages are capable of working with the chunk
data. If accessing the cameras through other library than Simplon API, please check its documentation to see if it supports chunk data parsing and delivery. Note that for GigE Vision cameras
(PicSight-GigE and PicSight-Smart), part of the information available through the chunk data are
also delivered in GigE Vision control packets (data leader and trailer). If your library provides access
to those fields, they can be used alternatively instead of the chunk data.
In Simplon API, the library's acquisition engine delivers acquired image buffers. In chunk mode,
it is responsibility of the application to specify, when the chunk data of a given buffer should be
parsed and “attached” to the camera's feature tree. As soon as the library performs the chunk
data processing in the given buffer, the values of individual chunks are available through corresponding camera features. The values will be available until another buffer's chunk data are processed
— then the features are updated with new values. Note that it is important to process and read
the chunk data before returning the buffer to the acquisition engine (“queuing” the buffer) —
after that the buffers is owned by the acquisition engine and its contents is undefined. All needed
details are documented in Simplon programmer's guide
In a 3rd party library, the mechanism might be similar, but it is important to study its documentation carefully to be sure how to retrieve the chunk data reliably.
6.11.1. Enabling chunk data
By default, the chunk data delivery is switched off. The application should switch on each particular
chunk type it's interested in. It does so by selecting the desired chunk type in Chunk Selector feature
and set the Chunk Enable boolean flag. It should repeat this procedure for all chunk types it wishes
to monitor. Finally, the application must enable the chunk delivery mode through the Chunk Mode
Active boolean feature. This feature allows to globally switch the chunk mode on and off, independently on which chunk types are currently selected.
Copyright © Leutron Vision
169
Leutron
Vision
PicSight-GigE user manual
Camera features and their control
Figure 6.49. Chunk “Pixel Format” enabled, associated feature highlighted
LvHDevice hDev; // open the device to get the handle
// switch to the chunk mode
LvSetBool (hDev, LvDevice_ChunkModeActive, 1);
// and enable the "ExposureTime" chunk delivery
LvSetEnum (hDev, LvDevice_ChunkSelector, LvChunkSelector_ExposureTime);
LvSetBool (hDev, LvDevice_ChunkEnable, 1);
// now the camera appends the exposure time chunk
// to every acquired image
// the application can process the chunk data in each delivered buffer
// and read associated feature values
while (NewAcquiredBuffersComing)
{
LvHBuffer hBuf; // obtain handle of the acquired buffer
LvBufferParseChunkData (hBuffer, 0);
double FloatVal;
LvGetFloat (hDev, LvDevice_ChunkExposureTime, &FloatVal);
}
// switch off the chunk mode, if desired
LvSetBool (hDev, LvDevice_ChunkModeActive, 1);
// switch to the chunk mode
write_bool (ChunkModeActive, true)
// and enable the "ExposureTime" chunk delivery
write_enum (ChunkSelector, ExposureTime)
write_bool (ChunkEnable, true)
// now the camera appends the exposure time chunk
// to every acquired image
// the application can process the chunk data in each delivered buffer
// and read associated feature values
while (NewAcquiredBuffersComing)
{
// before reading the values, pass the buffer for chunk data parsing
// unless your library does that implicitly
read_float (ChunkExposureTime)
}
Copyright © Leutron Vision
170
Leutron
Vision
PicSight-GigE user manual
Camera features and their control
// switch off the chunk mode, if desired
write_bool (ChunkModeActive, false)
In Simplon API to read the chunk data values delivered in a buffer, the application has to pass the
acquired buffer's handle to the chunk data parsing function, LvBufferParseChunkData().
Details including sample code are listed in Simplon programmer's guide. In other software packages,
the procedure might be quite similar.
The Simplon Explorer application will read the chunk data automatically, when
enabled. It will parse the chunk data in every acquired buffer and update corresponding values in the feature tree. What it displays in the feature tree in a moment
is of course the value associated with the currently displayed image.
6.11.2. Chunk data features naming convention
As discussed above, each supported chunk is listed in the Chunk Selector enumeration and can be
selectively enabled or disabled. The value of each supported and enabled chunk can be read
through corresponding read only feature: for a chunk with name XXX, the chunk value feature is
named ChunkXXX. When referring to an “array” of values of the same type (such as analog and
digital Gain), the values are indexed using a selector feature, as usual (eg. ChunkGainSelector,
ChunkGain).
For chunks carrying values of a camera configuration feature (such as ExposureTime), the chunk
name is equivalent as the feature name itself. Of course, data types and value ranges are specific
to each chunk.
Figure 6.50. Chunk data feature naming illustrated
6.11.3. Chunk types
The Leutron Vision cameras currently support following chunk types:
Width (Width)
Width of the image in the buffer.
Height (Height)
Height of the image in the buffer.
X Offset (OffsetX)
Horizontal AOI offset used when acquiring the image in the
buffer.
Y Offset (OffsetY)
Vertical AOI offset used when acquiring the image in the buffer.
Pixel Format (PixelFormat)
Pixel format of the image in the buffer.
Line Pitch (LinePitch)
Line pitch (in bytes) of the image in the buffer.
Copyright © Leutron Vision
171
Leutron
Vision
PicSight-GigE user manual
Camera features and their control
Timestamp (Timestamp)
Value of the camera's timestamp counter at the moment the
image was acquired (64-bit integer). The camera timestamp
frequency is 1MHz, ie. the ticks correspond with time unit of
1 µs.
Frame ID (FrameID)
Value of the frame counter associated with the image in the
buffer (64-bit integer).
Exposure Time (ExposureTime)
Exposure time used to acquire the image in the buffer.
Gain (Gain)
Gain used to acquire the image in the buffer. Since some
camera models support two types of gain, analog and digital
(refer to Section 6.9, “Analog controls” [p. 149]), the
ChunkGain feature comes with a selector,
ChunkGainSelector. To read the analog gain chunk (if
supported by the camera), set the selector to AnalogAll, to
read the digital gain, set DigitalAll.
Black Level (BlackLevel)
Black level used to acquire the image in the buffer.
Line Status All (LineStatusAll) Bitfield reflecting status of all digital I/O lines (Section 6.7,
“Digital I/O, counters and timers” [p. 136]) at the time the image was acquired. The least significant bit corresponds with
Line1, next bit with Line2 etc.
External ADC Value
(LvExternalADCValue)
Status of the external ADC inputs (Section 6.14, “External
device control” [p. 182]) at the time the image was acquired.
Since the cameras are equipped with multiple external ADC's,
the ChunkLvExternalADCValue feature comes with a selector, ChunkLvExternalADCSelector. To read a particular
external ADC value chunk (if supported by the camera), select
it first in the selector.
Trigger Delayed
(LvTriggerDelayed)
Flag indicating, whether the frame trigger for the current image
was delayed, because it was issued too early (before the camera
could accept it).
Note that the way how early triggers are processed
(cache/drop) can be controlled through feature Trigger Caching
(Section 6.6, “Acquisition and trigger control” [p. 124]).
Dropped triggers are signalled through asynchronous events
(Section 6.12, “Asynchronous events” [p. 173]).
Strobe Dropped
(LvStrobeDropped)
Flag indicating (for cameras supporting the integrated strobe
ring only), whether the strobe pulse was dropped for the current image due to hardware constraints — in particular if the
timing did not match the device capabilities (the trigger arrived
before the device could accept it).
Note that the way how early strobe requests are processed
(cache/drop) can be controlled through feature Strobe Drop
Mode.
Smart Application String
(LvSmartAppString)
A string that might be appended to the image by the “smart
application” (running on PicSight-Smart). The contents and
length of the string is defined by the respective application.
Smart Application Signed Integer
(LvSmartAppInt)
One or more signed integer values that might be appended
to the image by the “smart application” (running on PicSightSmart). The contents and number of the values is defined by
Copyright © Leutron Vision
172
Leutron
Vision
PicSight-GigE user manual
Camera features and their control
the respective application. Since multiple values might be delivered, the ChunkLvSmartAppInt feature comes with a selector, ChunkLvSmartAppIntSelector, which is an integer
with range from 1 to the number of values in the chunk. To
read the desired value, set the selector to point to the value of
question.
Smart Application Unsigned Integer One or more unsigned integer values that might be appended
(LvSmartAppUint)
to the image by the “smart application” (running on PicSightSmart). The contents and number of the values is defined by
the respective application. Since multiple values might be delivered, the ChunkLvSmartAppUint feature comes with a
selector, ChunkLvSmartAppUintSelector, which is an integer with range from 1 to the number of values in the chunk.
To read the desired value, set the selector to point to the value
of question.
Smart Application Register
(LvSmartAppRegister)
A raw register (memory buffer) that might be appended to the
image by the “smart application” (running on PicSight-Smart).
The contents and length of the register is defined by the respective application.
6.12. Asynchronous events
This section discusses the asynchronous event (and associated data) delivery.
Figure 6.51. Example GUI showing the asynchronous event features
COMMAND
COMMAND
RESPONSE
RESPONSE
Control
camera discovery, connection,
configuration, control
IMAGE
IMAGE
CHUNK DATA
CHUNK DATA
IMAGE
Streaming
images
and chunk data
EVENT EVENT
EVENT EVENT
EVENT
Messaging
APPLICATION
CAMERA
Besides the acquired images, and possibly additional “chunk” data appended to images(Section 6.11, “Chunk data” [p. 168], the cameras can deliver additional “asynchronous” messages.
The events are delivered through a separate channel, independent on the streaming channel
(images) and control channel (camera configuration), therefore “asynchronous”.
asynchronous events
with associated data
Figure 6.52. Camera communication channels
Copyright © Leutron Vision
173
Leutron
Vision
PicSight-GigE user manual
Camera features and their control
The events can be just a simple messages (such as signalling occurrence of an incident, such as
error), but usually they carry additional data. The data can be retrieved through the feature tree,
similarly as regular camera features. All the events have associated timestamp, which is the value
of the camera's timestamp counter (refer to Section 6.3, “Information about the camera” [p. 98])
at the time the event was generated. The camera timestamp frequency is 1MHz, ie. the ticks correspond with time unit of 1 µs.
The GigE Vision compatible cameras (PicSight-GigE and PicSight-Smart) naturally deliver the events
through the GigE Vision message channel. Other camera families, in particular CheckSight/CheckSight-II, deliver the events through GenTL event signalling mechanism. Note that all camera
families, including CheckSight, deliver the event data in GigE Vision compatible format. Therefore
every library/application capable of parsing the GigE Vision event data can use the same mechanism
to parse also CheckSight/CheckSight-II event data.
Not all GigE Vision and GenICam based software packages are capable of working with the asynchronous events. If accessing the cameras through other library than Simplon API, please check
its documentation to see if it supports asynchronous event delivery and event data parsing.
In Simplon API, the library deliver callbacks to your application, whenever an asynchronous event
arrives (provided that you have registered for the callback delivery). The callbacks will signal all
the features corresponding with the data delivered with the event — announcing the application
that it can read the new event data. It is important to read the data directly withing the callback,
which is executed in the context of the Simplon API event delivery thread. After leaving the callback,
the event delivery thread continues and the event data feature values might eventually be overwritten by a following event. All needed details are documented in Simplon programmer's guide.
In a 3rd party library, the mechanism might be similar, but it is important to study its documentation carefully to be sure how to retrieve the event data reliably.
6.12.1. Enabling events
By default, the event delivery is switched off. The application should switch on each particular
event type it's interested in. It does so by selecting the desired event type in Event Selector feature
and adjust the Event Notification feature to On (note that due to the compatibility with the SFNC
standard, this feature is not a boolean, but an enumeration with two options, On and Off). It
should repeat this procedure for all event types it wishes to monitor.
Figure 6.53. Event type “Log” enabled, subcategory with features carrying
the associated data highlighted
LvHDevice
// enable
LvSetEnum
LvSetEnum
hDev; // open the device to get the handle
the "Log" events delivery
(hDev, LvDevice_EventSelector, LvEventSelector_LvLog);
(hDev, LvDevice_EventNotification, LvEventNotification_On);
Copyright © Leutron Vision
174
Leutron
Vision
PicSight-GigE user manual
Camera features and their control
// now the camera starts generating the log events whenever appropriate
// provided that a callback was registered for the log event (LvDevice_EventLvLog
// the application can monitor them and read associated event data
while (NewLogEventsComing)
{
char StringVal[1024];
LvGetString (hDev, LvDevice_EventLvLogMessage, StringVal, 1024);
int64_t Int64Val;
LvGetInt64 (hDev, LvDevice_EventLvLogTimestamp, &Int64Val);
}
// disable the "Log" events delivery
LvSetEnum (hDev, LvDevice_EventSelector, LvEventSelector_LvLog);
LvSetEnum (hDev, LvDevice_EventNotification, LvEventNotification_Off);
// enable the "Log" events delivery
write_enum (EventSelector, LvLog)
write_enum (EventNotification, On)
// now the camera starts generating the log events whenever appropriate
// provided that event delivery was registered for the log event (EventLvLog)
// the application can monitor them and read associated event data
while (NewLogEventsComing)
{
// before reading the values, pass the event buffer for data parsing
// unless your library does that implicitly
read_string (EventLvLogMessage)
read_int (EventLvLogTimestamp)
}
// disable the "Log" events delivery
write_enum (EventSelector, LvLog)
write_enum (EventNotification, Off)
In Simplon API there are two actions needed to receive the asynchronous event notifications. First,
the event receiving and dispatching thread must be started
(LvEventOpen(LvEventType_FeatureDevEvent), LvEventStartThread()). Second,
callbacks need to be registered on the features associated with the desired event
(LvRegisterFeatureCallback()) — the rules about event feature naming are discussed below
in Section 6.12.2, “Event features naming convention” [p. 176]. Details including sample code are
listed in Simplon programmer's guide. In other software packages, the procedure might be quite
similar.
The Simplon Explorer application will capture the events automatically, when
enabled. It will parse the event data and update corresponding values in the
feature tree. What it displays in the feature tree in a moment is of course the
value associated with the last delivered event. The event history is not recorded
in Simplon Explorer.
The only exception are the logging messages, which might be recorded and displayed in a separate panel. This functionality is, however, only intended for customer support. If the support case requires it, our support staff will provide instructions how to capture the relevant camera log. Complete user interface of
the Simplon Explorer is described in Simplon programmer's guide.
Copyright © Leutron Vision
175
Leutron
Vision
PicSight-GigE user manual
Camera features and their control
Figure 6.54. Camera log displayed in Simplon Explorer
6.12.2. Event features naming convention
The naming of event related features follows the recommendation of the GenICam SFNC standard.
As described earlier, each supported event is listed in the Event Selector enumeration and can be
selectively enabled or disabled. Each supported event comes with a set of additional features following fixed naming scheme.
Let's describe the naming scheme for a hypothetical event with name XXX:
EventXXXData
A subcategory of the EventControl category. This subcategory contains
all the features specific to the XXX event.
EventXXX
Read only integer feature. Its main purpose is that it can be used for registering the callback, when listening for given events. Each time the
event of this type is generated by the camera, the callback would be
called (note that other libraries than Simplon API might use other
mechanism than callbacks for signalling the event). Note that when
monitoring an event carrying some event data, registering the callback
on the data field would also work. The EventXXX feature is just available
for every single event type.
The value of the EventXXX integer is always the ID of the respective
event type. Note that every event type is internally identified by a unique
numeric ID. The ID is, however, not important for most applications,
and especially to Simplon API based ones, since it is not needed for event
monitoring.
EventXXXTimestamp Every single generated event carries a timestamp — value of the camera's
timestamp counter at the time the event was generated. It is a 64-bit
integer value.
EventXXXyyy
Copyright © Leutron Vision
Feature(s) carrying value(s) of the event data “yyy” associated with the
given event. For each event type there might be multiple event data
fields, single field or even none. The data type and value range of individual fields might also be different for each event type.
176
Leutron
Vision
PicSight-GigE user manual
Camera features and their control
The same features are used for all instances of given event, so at every
moment, they provide the value(s) carried by the last delivered event.
As soon as the next event instance is delivered, the values are overwritten
by the new data.
When using a software package that does not support
event delivery, no callbacks will be delivered and it will
not be possible to read any event data. The event related
features will not be even available for reading.
To demonstrate the rules on a real example — the “log” events of PicSight-GigE cameras are
identified by LvLog entry in the EventSelector. The name of the subcategory related to the
event data is EventLvLogData. The primary target for registering the callback for this event is
EventLvLog. The subcategory also contains the “timestamp” feature EventLvLogTimestamp
and a single data feature specific to this event type, in this case EventLvLogMessage. Note that
other event types might carry multiple event specific data fields as well as none of them.
Figure 6.55. Event naming convention illustrated
6.12.3. Event types
The Leutron Vision cameras currently support following event types:
Log (LvLog)
Camera logging messages. Intended for troubleshooting and
support purposes. If needed, our support staff will provide instructions, how to capture the entire log. Please note that the
log contents is intended to be interpreted solely by our support
staff, it does not provide any information useful for the camera
user. Therefore please do not try to interpret its contents or
report to us log contents that you potentially find “suspiciouis”.
Under normal circumstances the log events should be switched
off so that they do not occupy the camera link.
Event ID for this event type is 0xBB01.
Event specific data fields:
• EventLvLogMessage — log message as string of variable
length. If a log message is too long (longer than the maximal
possible event data size allowed by the GigE Vision standard),
the camera splits it among multiple events.
Trigger Dropped
(LvTriggerDropped)
Message signalling that a frame trigger was dropped, because
it was issued too early (before the camera could accept it).
Note that the way how early triggers are processed
(cache/drop) can be controlled through feature Trigger Caching
(Section 6.6, “Acquisition and trigger control” [p. 124]). Info
Copyright © Leutron Vision
177
Leutron
Vision
PicSight-GigE user manual
Camera features and their control
about delayed triggers are delivered through within chunk data
for the corresponding image (Section 6.11, “Chunk
data” [p. 168]).
Event ID for this event type is 0xBB07.
Event specific data fields: none, this event type serves as a pure
“signal” carrying just the timestamp.
Smart Application Log
(LvSmartAppLog)
The smart application log event is analogical to the regular log
event, but it's dedicated for use by smart applications (running
on PicSight-Smart cameras). The contents and purpose of the
log messages is thus strictly specific to the running smart application.
Event ID for this event type is 0xBB02.
Event specific data fields:
• EventLvSmartAppLogMessage — smart application “log”
message as string of variable length. If a message is too long
(longer than the maximal possible event data size allowed
by the GigE Vision standard), the camera splits it among
multiple events.
Smart Application String
(LvSmartAppString)
An asynchronous string message generated by the “smart application” (running on PicSight-Smart). The contents and length
of the string is defined by the application. Strings delivered
through this event type are not considered by the logging facilities.
Event ID for this event type is 0xBB03.
Event specific data fields:
• EventLvSmartAppStringValue — the string itself.
Smart Application Signed Integer
(LvSmartAppInt)
Asynchronous message carrying one or more signed integer
values, generated by the “smart application” (running on PicSight-Smart). The contents and number of the values is defined
by the application.
Event ID for this event type is 0xBB04.
Event specific data fields:
• EventLvSmartAppIntSelector — selects one of the
values delivered in the message. It is an integer with range
from 1 to the number of values in the message. To read the
desired value, set the selector to point to the value of question.
• EventLvSmartAppIntValue — reads the signed integer
value the selector points to.
Smart Application Unsigned Integer Asynchronous message carrying one or more unsigned integer
(LvSmartAppUint)
values, generated by the “smart application” (running on PicSight-Smart). The contents and number of the values is defined
by the application.
Event ID for this event type is 0xBB05.
Event specific data fields:
Copyright © Leutron Vision
178
Leutron
Vision
PicSight-GigE user manual
Camera features and their control
• EventLvSmartAppUintSelector — selects one of the
values delivered in the message. It is an integer with range
from 1 to the number of values in the message. To read the
desired value, set the selector to point to the value of question.
• EventLvSmartAppUintValue — reads the unsigned integer value the selector points to.
Smart Application Register
(LvSmartAppRegister)
A raw register (memory buffer) message generated by the
“smart application” (running on PicSight-Smart). The contents
and length of the register is defined by the application.
Event ID for this event type is 0xBB06.
Event specific data fields:
• EventLvSmartAppRegisterValue — the “register” feature carrying the raw memory data.
6.13. User sets (saving/loading camera configuration)
This section discusses options to store and reuse camera configuration sets.
Figure 6.56. Example GUI showing the user sets' features
6.13.1. Features defining camera configuration
The set of features that the user can control make up the camera configuration. The complete
current configuration can be at any point stored away and later re-loaded to bring the camera
back to the status when the configuration snapshot was saved. The configuration user set handling
can be performed directly by the camera or by the application itself — both approaches are discussed below.
It's important to understand, which features belong to the user set and will thus be “remembered”.
Let's list few rules:
• Refer to Section 6.17, “Feature summary” [p. 203] — features marked as “streamable” will be
stored in the user sets.
• In general, the user sets consist of all the read-writable features, ie. those that can be written
and retrieved back.
• Features depending on a “selector”, ie. array-like features are stored for all possible selector
values (the entire array is always stored and re-loaded). If a feature is available and read-writable
only for some selector values, than only those entries will be part of the user set.
• Naturally read-only features (such as serial number or model name) are not part of the user sets.
Remember, that being read-only does not necessarily mean the feature is constant. For example,
if in DHCP mode, the camera might have different IP address at each run, but still the “current
IP address” feature will not be part of the user set — ie. the IP address would not be restored.
• Commands are not part of the user set. No commands can be executed while re-loading the
configuration.
Copyright © Leutron Vision
179
Leutron
Vision
PicSight-GigE user manual
Camera features and their control
• There are few exceptions among the read-writable features, that do not belong to the user sets.
These are the low-level features used to set-up the basic connection with the camera. These
features are always under direct access of the camera controlling library and trying to restore
their values among sessions makes no sense.
• The same applies for features defining identify of the camera (such as its persistent IP address
or user name). These values are anyway persisted by the camera — and trying to apply them
to multiple cameras through software controlled configuration set functionality would lead to
unwanted results.
• The default user configuration set used during camera boot is also not stored.
• The smart application control features (Section 6.16, “Smart application control” [p. 200]) are
not included. The meaning and purpose of these registers is strictly specific to each smart application and cannot be known in advance which of them should define application status. They
should be therefore handled separately.
The user sets are designed to be expectable, storing a configuration away and reloading it back
brings the camera to the same status as when the configuration snapshot was made.
The user set storing/loading should be performed only when acquisition is not
active. Once the acquisition is started, some features are not writable any more
and the camera will not allow adjusting their values or load a user set.
6.13.2. Camera's user configuration sets
The camera can store up to five configuration sets, one with factory default settings (Default User
Set) and four user configurable sets (User Set 1 to User Set 4).
The set with factory defaults is fixed, cannot be written. The settings include free running working
mode and full resolution image. Also defaults for other settings are chosen to be expectable — if
needed, the default behavior for each feature is documented together with the feature itself.
The user sets can be used to save “snapshots” of particular camera configurations and reuse them
later. After adjusting the desired configuration, it can be stored to the camera's persistent memory
by selecting the desired set in User Configuration Set Selector feature and invoking the User Set Save
command. To load them later, one invokes the User Set Load command, having the desired set
selected.
Note that after loading a configuration set, virtually any feature might change its value. Therefore
the application might need to re-read the entire feature tree to know the new camera configuration.
Finally, it is possible to choose, which of the configuration sets will be applied during camera boot.
Usually the factory defaults are used, but it is possible to use one of the user sets instead. The bootup configuration set is selected through the Default Startup Set feature. The same default set will
be also applied after resetting the camera using the Reset Device command and even every time
when opening the camera connection from the application.
In some situations, it might be preferable that the camera configuration is not reset on every disconnect/connect loop. To keep the camera settings across multiple connections, the PicSightGigE/PicSight-Smart cameras allow to set the Default Startup Set to None.
On the PicSight-Smart cameras, when a “smart application” takes control over the camera, it is
not desirable at all that the configuration gets reset whenever a connection to the camera is opened
from a remote host. Therefore, whenever a “smart application” gains control over the camera,
opening the connection has no effect on the camera settings (the default startup set is not applied).
Copyright © Leutron Vision
180
Leutron
Vision
PicSight-GigE user manual
Camera features and their control
Note that when Default Startup Set is set to None, the camera will use the factory default settings
when booting or being reset. Note that this option is not available at all on the CheckSight/CheckSight-II cameras.
LvHDevice hDev; // open the device to get the handle
// store current configuration in user set #1
LvSetEnum (hDev, LvDevice_UserSetSelector, LvUserSetSelector_UserSet1);
LvCmdExecute (hDev, LvDevice_UserSetSave);
// load and apply settings stored in user set #4
LvSetEnum (hDev, LvDevice_UserSetSelector, LvUserSetSelector_UserSet4);
LvCmdExecute (hDev, LvDevice_UserSetLoad);
// load and apply factory default settings
LvSetEnum (hDev, LvDevice_UserSetSelector, LvUserSetSelector_Default);
LvCmdExecute (hDev, LvDevice_UserSetLoad);
// use settings stored in user set #2 after during camera boot
LvSetEnum (hDev, LvDevice_UserSetDefaultSelector,
LvUserSetDefaultSelector_UserSet2);
// store current configuration in user set #1
write_enum (UserSetSelector, UserSet1)
exec_cmd (UserSetSave)
// load and apply settings stored in user set #4
write_enum (UserSetSelector, UserSet4)
exec_cmd (UserSetLoad)
// load and apply factory default settings
write_enum (UserSetSelector, Default)
exec_cmd (UserSetLoad)
// use settings stored in user set #2 after during camera boot
write_enum (UserSetDefaultSelector, UserSet2)
6.13.3. Software control of configuration sets
Besides the camera controlled configuration handling, the application might want to store/reload
the configuration on its own. The configuration description stored by the application could be
modified or reused for multiple compatible cameras.
Because of dependencies among individual features, however, the application has no way to know
the correct order in which the features should be set to reach the desired goal reliably. The GenICam
standard provides a solution for that, called “register streaming”, which is a standardized way to
save/load full camera configuration. It was discussed before in Section 6.3.5, “Register streaming
support” [p. 101]. Our cameras provide full support for register streaming.
Simplon API implements this functionality in LvCameraSaveSettings() and
LvCameraLoadSettings() functions, see details in Simplon programmer's guide. Other GenICam
compatible software packages should also provide similar functionality.
Besides that, the Simplon Source Code Generator (component of the Simplon Explorer) allows to
record all feature settings, including executed commands. The recorded actions are provided by
the Simplon Source Code Generator in form of source code that can be easily included in the user
application.
Copyright © Leutron Vision
181
Leutron
Vision
PicSight-GigE user manual
Camera features and their control
6.13.4. Comparison of the two methods
Both methods of handling the user configuration sets, directly on the camera or by the application,
have their advantages and disadvantages:
• The on-camera user set “travels” with the camera, independently on the application with which
it is used. It is fully under camera control, so it is always correct — mistakes such as applying
the user set to incompatible camera type or version are not possible.
• The camera's default user set is applied directly at camera boot, before any application even
connects to it.
• The software controlled user sets can be stored once and applied to many cameras of the same
type.
• The software controlled user sets might be edited by qualified personnel, although it must be
done with maximum care.
• The action recorder/playback functionality can include command execution. On the other side,
it strongly depends on the initial camera status.
6.14. External device control
The section documents features for camera's external device (peripheral) control. The features include ADC's for monitoring analog inputs, power switches for driving external motors or other
devices or serial port communication. The combined power switch and ADC (feedback) components
can be used together for automatic lens control. Peripheral devices can be controlled over a serial
port interface.
Copyright © Leutron Vision
182
Leutron
Vision
PicSight-GigE user manual
Camera features and their control
Figure 6.57. Example GUI showing the external device control features
6.14.1. External ADC's (analog inputs)
The cameras might be equipped with up to 3 analog input, connected to A/D converters — the
application can monitor the inputs' digitized value. The components are called “external ADC's”
because they are digitizing external analog signals. They can be used as feedbacks for automatic
lens control (Section 6.14.3, “Lens control” [p. 187]), but also independently to read any external
analog signal within a given range.
The external ADC's have 8-bit resolution, digitizing voltage range of 0—3.3 V — input voltage of
0 V yields digitized value 0, 3.3 V yields 255 and the response is linear. There is no overvoltage
and polarity protection, the user is responsible for connecting correct signal. The maximal scanning
frequency is in range of 10 kHz. More technical details are available in Section 3.7.7, “Lens control
interface (External ADC's & Power switches)” [p. 44].
To read the digitized value of an external ADC, select the desired ADC in External ADC Selector
and then read the External ADC Value.
LvHDevice hDev; // open the device to get the handle
// read current value of external ADC #1
LvSetEnum (hDev, LvDevice_LvExternalADCSelector,
LvExternalADCSelector_ExternalADC1);
int32_t IntVal;
LvGetInt32 (hDev, LvDevice_LvExternalADCValue, &IntVal);
Copyright © Leutron Vision
183
Leutron
Vision
PicSight-GigE user manual
Camera features and their control
// read current value of external ADC #1
write_enum (LvExternalADCSelector, ExternalADC1)
read_int (LvExternalADCValue)
6.14.2. Power switches
The cameras might be equipped with up to three power switches — the application can switch
them between plus/minus polarity or switch them off. The power switch status can be either
controlled directly (manual mode) or through higher level features (automatic mode). They can
be used as motor drives for automatic lens control (Section 6.14.3, “Lens control” [p. 187], but
also independently to control any external device, such as motorized positioning stages, LED illuminators and others.
The default switched output voltage is 5 V, supplied directly off the camera, with maximal output
current 50 mA — suitable to drive most lens control motors. For other power options, please
contact Leutron Vision. Internally each of the power switches is realized as an H-bridge. The power
switches are protected against overvoltage and short circuit. More technical details are available
in Section 3.7.7, “Lens control interface (External ADC's & Power switches)” [p. 44].
6.14.2.1. Operating modes
As mentioned before, the power switches can be used in two basic operating modes:
Manual
The power switch is controlled directly and treated independently on any feedback.
It is possible to connect the switch with either polarity, disconnect it, or issue pulses
of desired length. To control a switch in the manual mode, no feedback must be
bound to it through Power Switch Bound ADC feature. Details about the manual
mode will be discussed shortly below.
Automatic
The power switch operates in a pair with it bound feedback (Power Switch Bound
ADC). This mode assumes that the external device controlled through the power
switch provides feedback about its actual status (e.g. position) through an external
ADC input. The power switch and external ADC pair must be first calibrated and
the higher level functions then allow to adjust the external device to a desired
“position” — while the camera controls the power switch internally, monitoring
the status of the controlled device using the feedback.
Typical application is automatic lens control, as names of the corresponding features
imply. The features will be discussed in a separate section, Section 6.14.3, “Lens
control” [p. 187].
Note that the two operating modes are mutually exclusive, i.e. when an external ADC is bound
to the power switch, only the automatic (lens control) features are available, when no external
ADC is bound, only the manual mode features are available.
LvHDevice hDev; // open the device to get the handle
// set the power switch 1 to the 'automatic' mode
// binding feedback from external ADC 1 to it...
LvSetEnum (hDev, LvDevice_LvPowerSwitchSelector,
LvPowerSwitchSelector_PowerSwitch1);
LvSetEnum (hDev, LvDevice_LvPowerSwitchBoundADC,
LvPowerSwitchBoundADC_ExternalADC1);
// ...now 'automatic' (lens control) features are available
// set the power switch 1 to the 'manual' mode...
Copyright © Leutron Vision
184
Leutron
Vision
PicSight-GigE user manual
Camera features and their control
LvSetEnum (hDev, LvDevice_LvPowerSwitchSelector,
LvPowerSwitchSelector_PowerSwitch1);
LvSetEnum (hDev, LvDevice_LvPowerSwitchBoundADC,
LvPowerSwitchBoundADC_None);
// ...now 'manual control' features are available
// set the power switch 1 to the 'automatic' mode
// binding feedback from external ADC 1 to it...
write_enum (LvPowerSwitchSelector, PowerSwitch1)
write_enum (LvPowerSwitchBoundADC, ExternalADC1)
// ...now 'automatic' (lens control) features are available
// set the power switch 1 to the 'manual' mode...
write_enum (LvPowerSwitchSelector, PowerSwitch1)
write_enum (LvPowerSwitchBoundADC, None)
// ...now 'manual control' features are available
6.14.2.2. Power switch's operation serialization
The power switch control subsystem is able to handle just a single operation at a time. To keep it
predictable, no request queuing is done by the camera, the application is responsible for serializing
the operations properly and not issue a new request while other operation on one of the power
switches is still in progress.
The camera reports when a given operation is finished properly through its GenICam interface —
for every “command” feature, the progress is reported through its “IsDone” property. In Simplon
API, this can be monitored using the LvCmdIsDone() function, other GenICam compliant libraries
should provide similar mechanism.
Alternatively, the currently active operation can be also retrieved through the Power Switch Current
Action feature. This read-only enumeration reports status of the entire power switch subsystem
(reports operation pending on any of the power switches, regardless of which is selected in the
Power Switch Selector). It can have following values:
Idle
All power switches are idle — the system is ready for a new request.
Drive
One of the power switches is currently driven with either polarity in the
manual mode.
Pulse
Manual mode's pulse operation is in progress on one of the power switches.
Calibrate
One or more power switches are just being calibrated in the automatic
mode.
Adjust Position
The automatic mode's adjust position operation is in progress on one of
the power switches.
LvHDevice hDev; // open the device to get the handle
// check which (if any) power switch operation is currently active
int32_t EnumVal;
LvGetEnum (hDev, LvDevice_LvPowerSwitchCurrentAction, &EnumVal);
Copyright © Leutron Vision
185
Leutron
Vision
PicSight-GigE user manual
Camera features and their control
// check which (if any) power switch operation is currently active
read_enum (LvPowerSwitchCurrentAction)
6.14.2.3. Manual control mode
In the manual mode the status of the power switches is controlled directly among three states:
Off
The switch is disconnected (both sides of the H-bridge floating), the output yields 0 V.
Plus
The switch is connected with plus polarity, yielding +5 V.
Minus
The switch is connected with minus polarity, yielding -5 V.
The desired switch should be selected through Power Switch Selector and its status controlled
through Power Switch Drive enumeration (values Off/Plus/Minus). Only the selected power switch
is driven, other power switches remain disconnected.
LvHDevice hDev; // open the device to get the handle
// switch the power switch 1 to 'manual' control mode, if needed
LvSetEnum (hDev, LvDevice_LvPowerSwitchSelector,
LvPowerSwitchSelector_PowerSwitch1);
LvSetEnum (hDev, LvDevice_LvPowerSwitchBoundADC,
LvPowerSwitchBoundADC_None);
// drive it with 'plus' polarity (+5V output)
LvSetEnum (hDev, LvDevice_LvPowerSwitchDrive,
LvPowerSwitchDrive_Plus);
// and switch it off again (0V output)
LvSetEnum (hDev, LvDevice_LvPowerSwitchDrive,
LvPowerSwitchDrive_Off);
// drive it with 'minus' polarity (+5V output)
LvSetEnum (hDev, LvDevice_LvPowerSwitchDrive,
LvPowerSwitchDrive_Minus);
// and switch it off again (0V output)
LvSetEnum (hDev, LvDevice_LvPowerSwitchDrive,
LvPowerSwitchDrive_Off);
// switch the power switch 1 to 'manual' control mode, if needed
write_enum (LvPowerSwitchSelector, PowerSwitch1)
write_enum (LvPowerSwitchBoundADC, None)
// drive the power switch 1 with 'plus' polarity (+5V output)
write_enum (LvPowerSwitchDrive, Plus)
// and switch it off again (0V output)
write_enum (LvPowerSwitchDrive, Off)
// drive the power switch 1 with 'minus' polarity (+5V output)
write_enum (LvPowerSwitchDrive, Minus)
// and switch it off again (0V output)
write_enum (LvPowerSwitchDrive, Off)
Besides directly connecting/disconnecting the power switch, a pulse of exactly defined length can
be issued. The length of the pulse is set through Power Switch Pulse Duration (in µs), the pulse itself,
with plus or minus polarity, is started using commands Power Switch Pulse Plus and Power Switch
Pulse Minus.
Copyright © Leutron Vision
186
Leutron
Vision
PicSight-GigE user manual
Camera features and their control
LvHDevice hDev; // open the device to get the handle
// switch the power switch 1 to 'manual' control mode, if needed
LvSetEnum (hDev, LvDevice_LvPowerSwitchSelector,
LvPowerSwitchSelector_PowerSwitch1);
LvSetEnum (hDev, LvDevice_LvPowerSwitchBoundADC,
LvPowerSwitchBoundADC_None);
// 'pulse' the power switch 1 with 'plus' polarity for 5000µs
LvSetFloat (hDev, LvDevice_LvPowerSwitchPulseDuration, 5000.0);
LvCmdExecute (hDev, LvDevice_LvPowerSwitchPulsePlus);
// now again with 'negative' polarity
LvCmdExecute (hDev, LvDevice_LvPowerSwitchPulseMinus);
// switch the power switch 1 to 'manual' control mode, if needed
write_enum (LvPowerSwitchSelector, PowerSwitch1)
write_enum (LvPowerSwitchBoundADC, None)
// 'pulse' the power switch 1 with 'plus' polarity for 5000µs
write_float (LvPowerSwitchPulseDuration, 5000.0)
exec_cmd (LvPowerSwitchPulsePlus)
// now again with 'negative' polarity
exec_cmd (LvPowerSwitchPulseMinus)
6.14.3. Lens control
The functionality of the power switches and external ADC's, described above, can be used together
for intelligent control of motorized lenses or similar devices. In this case, a pair power switch/external ADC are working together, the power switch driving the lens motor, the external ADC
serving as feedback indicating the current lens position.
The features are named after the most important use case, but can be in fact used to control
other devices based on the drive/feedback principle, provided that the external ADC and power
switch specifications (feedback voltage, switched power and current, etc.) meet the external device
requirements.
The lens control functionality can only work properly if the power switch and
external ADC are cooperating properly. If position feedback is not available for
given lens function or not connected properly to the external ADC, the lens
control commands will fail (the result would be undefined). In such case, the
function (lens motor) should only be controlled by direct power switch adjustments, as described above. The bound external ADC should be connected in a
way so that driving the power switch with minus polarity decreases the feedback
value, plus polarity increases the feedback value.
6.14.3.1. Generic lens control
The generic lens control functionality provides generic hardware oriented features allowing to
control a pair of motor drive (power switch) and feedback (external ADC). It cannot provide high
level access to the lens functions and therefore it should be avoided, whenever the high level
control is available for given lens type (described below). On the other side, the interface is fully
generic and can be used to control “unknown” lens types or other similar devices.
For certain set of selected lens types (see Section 3.7.7, “Lens control interface
(External ADC's & Power switches)” [p. 44]), lens control cables are available.
All these cables assume following mapping of lens functions to power switches
and external ADC's (see also Section 3.8, “Connector and cable description” [p. 44]):
Copyright © Leutron Vision
187
Leutron
Vision
PicSight-GigE user manual
Camera features and their control
• Zoom — If zoom function is supported, the zoom motor is wired to be controlled
by Power Switch 1. If the camera provides feedback about the zoom position,
it is wired to External ADC 1.
• Focus — If focus function is supported, the focus motor is wired to be controlled
by Power Switch 2. If the camera provides feedback about the focus position,
it is wired to External ADC 2.
• Iris — If iris function is supported, the iris motor is wired to be controlled by
Power Switch 3. If the camera provides feedback about the iris position, it is
wired to External ADC 3.
The lens control operation consists of three steps, binding feedbacks (external ADC's) to drives
(power switches), calibrating the individual pairs, and finally control of the individual lens functions.
Binding external ADC to a power switch
Before accessing any lens control related features on a given power switch, it is necessary to “bind”
the external ADC providing feedback about the current status (position) of given lens function.
The binding are configure for each power switch through the Power Switch Bound ADC enumeration.
When no external ADC is bound, the lens control functions won't be available at all.
LvHDevice hDev; // open the device to get the handle
// bind External ADC 1 to Power Switch 1 and ADC 2 to Switch 2
LvSetEnum (hDev, LvDevice_LvPowerSwitchSelector,
LvPowerSwitchSelector_PowerSwitch1);
LvSetEnum (hDev, LvDevice_LvPowerSwitchBoundADC,
LvPowerSwitchBoundADC_ExternalADC1);
LvSetEnum (hDev, LvDevice_LvPowerSwitchSelector,
LvPowerSwitchSelector_PowerSwitch2);
LvSetEnum (hDev, LvDevice_LvPowerSwitchBoundADC,
LvPowerSwitchBoundADC_ExternalADC2);
// do not bind any External ADC to Power Switch 3
LvSetEnum (hDev, LvDevice_LvPowerSwitchSelector,
LvPowerSwitchSelector_PowerSwitch3);
LvSetEnum (hDev, LvDevice_LvPowerSwitchBoundADC,
LvPowerSwitchBoundADC_None);
// bind External ADC 1 to Power Switch 1 and ADC 2 to Switch 2
write_enum (LvPowerSwitchSelector, PowerSwitch1)
write_enum (LvPowerSwitchBoundADC, ExternalADC1)
write_enum (LvPowerSwitchSelector, PowerSwitch2)
write_enum (LvPowerSwitchBoundADC, ExternalADC2)
// do not bind any External ADC to Power Switch 3
write_enum (LvPowerSwitchSelector, PowerSwitch3)
write_enum (LvPowerSwitchBoundADC, None)
Calibrating the power switch/external ADC pair
The lens control logic needs to know about the relationships between power switch and its bound
external ADC and about the expected behavior of the pair. The configuration is described by
several parameters — these can be initialized through an automatic calibration procedure performed
by the camera, or, once known, the application can set the parameters directly without performing
the calibration again (we'll come back to this later). Note that depending on the external device
being controlled, the system might need re-calibration when environment changes significantly.
Copyright © Leutron Vision
188
Leutron
Vision
PicSight-GigE user manual
Camera features and their control
The calibration is started on a selected power switch using the Lens Control Calibrate command.
Note that the calibration will typically take a couple of seconds. The application should wait until
the command is finished and then eventually start using the calibrated power switch/external
ADC pair. The camera reports, whether the calibration was successful through a read-only feature
Lens Control Calibration Status, which can read simply either Valid or Invalid. When not successful,
the lens control functionality cannot be used and the corresponding features will be disabled.
The calibration procedure first drives the power switch to plus and minus sides, observing the
min/max feedback values that can be achieved and the power switch polarity required to reach
them. After that it moves to the middle of the interval and empirically finds the slow motion
parameters leading to feedback change by 1 per power switch pulse (for optimal operation, the
lens control subsystem slows down the motor shortly before reaching the target position, to adjust
it precisely).
For convenience, all the power switches can be calibrated at once using the Lens Control Calibrate
All command, which operates on all switches that have an external ADC bound.
LvHDevice hDev; // open the device to get the handle
// (assuming that correct External ADC is bound)
// calibrate the Power Switch 1 with its bound External ADC
LvSetEnum (hDev, LvDevice_LvPowerSwitchSelector,
LvPowerSwitchSelector_PowerSwitch1);
LvCmdExecute (hDev, LvDevice_LvLensControlCalibrate);
// now wait until the operation end using LvCmdIsDone(),
// then possibly verifying if it was successful
int32_t EnumVal;
LvGetEnum (hDev, LvDevice_LvLensControlCalibrationStatus, &EnumVal);
// as a convenience, all bound power switches
// can be calibrated at once
LvCmdExecute (hDev, LvDevice_LvLensControlCalibrateAll);
// (assuming that correct External ADC is bound)
// calibrate the Power Switch 1 with its bound External ADC
write_enum (LvPowerSwitchSelector, PowerSwitch1)
exec_cmd (LvLensControlCalibrate)
// now wait until the operation end using command's IsDone property
wait_until_done (LvLensControlCalibrate)
// then possibly verifying if it was successful
read_enum (LvLensControlCalibrationStatus)
// as a convenience, all bound power switches
// can be calibrated at once
exec_cmd (LvLensControlCalibrateAll)
In the rest of this section, we'll cover some low level details related to the power switch calibration,
such as the individual calibration parameters. If you don't want to bother with those details, you
can safely move to the next topic. Note that these low-level details are in “guru” feature visibility
level.
Since the calibration is time consuming, it might not be desirable to execute it every time the
camera starts. The parameters resulting from the calibration process can be remembered after a
successful calibration and next time they can be directly set to the camera. The parameters describing the configuration are:
Copyright © Leutron Vision
189
Leutron
Vision
PicSight-GigE user manual
Camera features and their control
Lens Control Minus End
Minimal feedback (bound external ADC) value achievable by
driving the power switch with minus polarity (or plus polarity
in case of polarity inversion, see below).
Lens Control Plus End
Maximal feedback (bound external ADC) value achievable by
driving the power switch with plus polarity (or minus polarity
in case of polarity inversion, see below).
Lens Control Inverted Polarity
Boolean flag indicating if the lens control external circuit is
wired with inverted polarity, meaning that driving the power
switch to the plus side decreases the external ADC feedback.
Lens Control Pulse Period
Optimal determined length of power switch pulse (in µs) which
results in feedback value changed by 1. Closely related with
Lens Control Duty Cycle.
Lens Control Duty Cycle
Optimal determined duty cycle (in %) which results in feedback
value changed by 1. The Lens Control Pulse Period and Lens
Control Duty Cycle parameters define the behavior of the slow
motion lens operation used for precise adjustments. The slow
motion is achieved by pulsing the power switch, so that each
pulse changes feedback value by 1 (assuming the feedback is
linear). The pulse period defines the length of the entire pulse,
the duty cycle specifies how much of this entire length is the
power switch actually active (in %).
After starting the calibration, the application should wait until the command is finished and then
the newly calibrated values can be retrieved. The calibration result can be further affected specifying
a Lens Control Min Calibration Range (difference between feedback plus and minus ends) that is
needed to consider the calibration as successful (valid). When the calibrated feedback range does
not reach this minimal value, the Lens Control Calibration Status is reported as Invalid and the lens
control features are disabled for given power switch.
Knowing this additional information, the previous example can be extended as follows:
LvHDevice hDev; // open the device to get the handle
// (assuming that correct External ADC is bound)
// calibrate the Power Switch 1 with its bound External ADC
// requiring feedback range of at least 20
LvSetEnum (hDev, LvDevice_LvPowerSwitchSelector,
LvPowerSwitchSelector_PowerSwitch1);
LvSetInt32 (hDev, LvDevice_LvLensControlMinCalibrationRange, 20);
LvCmdExecute (hDev, LvDevice_LvLensControlCalibrate);
// now wait until the operation end using LvCmdIsDone(),
// then possibly reading and storing the calibrated values
// alternatively, when known, set the values directly,
// without performing the calibration, for example:
LvSetEnum (hDev, LvDevice_LvPowerSwitchSelector,
LvPowerSwitchSelector_PowerSwitch1);
LvSetInt32 (hDev, LvDevice_LvLensControlMinusEnd, 42);
LvSetInt32 (hDev, LvDevice_LvLensControlPlusEnd, 169);
LvSetBool (hDev, LvDevice_LvLensControlInvertedPolarity, 0);
LvSetFloat (hDev, LvDevice_LvLensControlPulsePeriod, 100000.0);
LvSetInt32 (hDev, LvDevice_LvLensControlDutyCycle, 9);
Copyright © Leutron Vision
190
Leutron
Vision
PicSight-GigE user manual
Camera features and their control
// (assuming that correct External ADC is bound)
// calibrate the Power Switch 1 with its bound External ADC
// requiring feedback range of at least 20
write_enum (LvPowerSwitchSelector, PowerSwitch1)
write_int (LvLensControlMinCalibrationRange, 20)
exec_cmd (LvLensControlCalibrate)
// now wait until the operation end using command's IsDone property
wait_until_done (LvLensControlCalibrate)
// then possibly reading and storing the calibrated values
// alternatively, when known, set the values directly,
// without performing the calibration, for example:
write_enum (LvPowerSwitchSelector, PowerSwitch1)
write_int (LvLensControlMinusEnd, 42)
write_int (LvLensControlPlusEnd, 169)
write_bool (LvLensControlInvertedPolarity, false)
write_float (LvLensControlPulsePeriod, 100000.0)
write_int (LvLensControlDutyCycle, 9)
Controlling the lens functions
Having initialized the calibration parameters, it is possible to precisely control the position of the
respective lens function. Since the interface is generic, the position is not specified in function
specific units, but rather as the desired value of the function feedback. The user/application is responsible for mapping the feedback values to the function specific units. The features affecting
the lens position control are:
Lens Control Target Position
Target position of the function controlled by the selected power
switch. The position is specified as the desired value of the
function feedback (bound external ADC). The limits for the
position are given by the calibrated Lens Control Minus End and
Lens Control Plus End values.
Lens Control Target Approach
Controls, how the target position is approached. On some lens
types, it might be desirable to reach the target position always
from the same time to ensure consistent results. Possible values
are:
Direct
Moves the lens always directly to the target position, regardless the current status.
FromPlus
Approaches the target position always from the
“plus” side. If the current position is already at
the plus side from the target position, it moves
directly. If it is in minus side, it first moves
slightly to the plus side, then returns back to the
target position.
Note: the “plus” here refers to the plus polarity
of the power switch — when the lens is wired
with inverted polarity, the plus side of the power
switch might correspond with lower feedback
values on the bound external ADC.
FromMinus
Copyright © Leutron Vision
191
Approaches the target position always from the
“minus” side. If the current position is already
at the minus side from the target position, it
moves directly. If it is in plus side, it first moves
slightly to the minus side, then returns back to
the target position.
Leutron
Vision
PicSight-GigE user manual
Camera features and their control
Note: the “minus” here refers to the minus polarity of the power switch — when the lens is
wired with inverted polarity, the minus side of
the power switch might correspond with higher
feedback values on the bound external ADC.
Lens Control Nr Slow Steps
Number of slow steps applied before reaching the target position for improved accuracy. The lens control logic first drives
the power switch constantly to almost reach the desired position. Only the final stage is performed by slow motion —
pulsing the power switch. The slow motion operation starts
when the difference between the current feedback and the
target position equals the configured number of slow steps.
The pulses are formed according to the calibrated Lens Control
Pulse Period and Lens Control Duty Cycle parameters. Note that
this feature is in the “guru” feature visibility level.
Lens Control Adjust Position
Drives the power switch to reach the desired target position,
using the parameters described above. It uses the feedback
coming over the bound external ADC during the operation.
This is the only power switch related command which does
not have the “parallel” alternative. Target position of every
function (zoom, focus, iris) needs to be adjusted separately.
LvHDevice hDev; // open the device to get the handle
// (assuming Power Switch Mode is set to Automatic,
// correct External ADC is bound and calibrated)
// adjust the position of the function controlled by Power Switch 1
// so that the bound Extenal ADC gives feedback value 75,
// approach the target always from plus,
// using five final slow motion steps
LvSetEnum (hDev, LvDevice_LvPowerSwitchSelector,
LvPowerSwitchSelector_PowerSwitch1);
LvSetEnum (hDev, LvDevice_LvLensControlTargetApproach,
LvLensControlTargetApproach_FromPlus);
LvSetInt32 (hDev, LvDevice_LvLensControlNrSlowSteps, 5);
LvSetInt32 (hDev, LvDevice_LvLensControlTargetPosition, 75);
LvCmdExecute (hDev, LvDevice_LvLensControlAdjustPosition);
// (assuming Power Switch Mode is set to Automatic,
// correct External ADC is bound and calibrated)
// adjust the position of the function controlled by Power Switch 1
// so that the bound Extenal ADC gives feedback value 75,
// approach the target always from plus,
// using five final slow motion steps
write_enum (LvPowerSwitchSelector, PowerSwitch1)
write_enum (LvLensControlTargetApproach, FromPlus)
write_int (LvLensControlNrSlowSteps, 5)
write_int (LvLensControlTargetPosition, 75)
exec_cmd (LvLensControlAdjustPosition)
Copyright © Leutron Vision
192
Leutron
Vision
PicSight-GigE user manual
Camera features and their control
6.14.3.2. High level lens control
For given “known” range of lens types, the cameras will support fully automatic high level control
of individual lens functions (zoom, iris, focus), based on the knowledge of the lens properties and
a fixed lens control cable wiring. Contact Leutron Vision for more information.
6.14.4. Serial Port Control
The CheckSight/CheckSight-II cameras and some models of PicSight-GigE and PicSight-Smart are
equipped with a serial port interface to control peripheral devices connected to the camera. The
interface supports regular synchronous (command/response) string based communication.
All usual serial communication parameters can be configured:
Serial Port Baud Rate
Enumeration adjusting the baud rate. The values range from 2400
(Baud2400) to 115200 (Baud115200). The default value is 9600
(Baud9600).
Serial Port Parity
Enumeration adjusting the parity error detection method. Possible
values are None (default value), Odd and Even.
Serial Port Data Bits
Enumeration adjusting data bits per character. Possible values are
8 (DataBits8, the default value) and 7 (DataBits7).
Serial Port Stop Bits
Enumeration adjusting stop bits per character. Possible values are
1 (StopBits1, the default value), 2 (StopBits2) and 1.5
(StopBits1dot5).
The interface always uses one start bit per character and no handshaking.
After sending the serial command, the camera has to wait for the response sent by the connected
peripheral. The response timing is strongly device specific and thus wait operation can be controlled
by following two parameters:
Serial Port Timeout
Maximal time the camera waits for incoming response characters before reporting the response to the application as floating
point value in milliseconds. If no EOT marker is used, the full
timeout is always spent before returning the response.
Serial Port EOT Marker
End of transmission marker — a string token (frequently just a
single character) unequivocally identifying end of the response.
Each device might use different characters to mark the end of
transmission. Maximal length of the token is 8 characters, but
the practically used markers are usually just 1—2 characters.
When specified, the camera observes the received characters
and when the marker is encountered in the received buffer,
the camera identifies the response as complete, stops waiting
and reports the response immediately without completing the
timeout.
If the camera receives a burst of characters containing the EOT
marker, which is followed by additional characters, it waits little
longer to see if another marker will arrive. It then reports the
response until the last marker received.
If the EOT marker is not encountered in the response at all, the
waiting stops as soon as the timeout expires.
Copyright © Leutron Vision
193
Leutron
Vision
PicSight-GigE user manual
Serial Port Max Response Length
Camera features and their control
Maximal expected response length. As soon as the camera receives the specified number of response characters, it immediately stops waiting and reports the response, regardless the
timeout or EOT marker settings.
Value of 0 means that the camera does not wait for any response at all.
The default value is 128, which is equal to the maximal supported length of the response string — meaning that the default
value of this features does not impose any constraints on the
expected response length.
The communication itself expects simple string based, synchronous messages (command followed
by a single response):
1.
Write the command message string to Serial Port Command String. Maximal supported command length is 128 characters.
2.
Instruct the camera to send the command message to the serial port, executing the Send
Command Over Serial Port command. The camera will send the characters and will start
listening for the response.
3.
Wait for completion of the command — wait until the “IsDone” GenICam property of the
command yields true (in Simplon API this is inspected through LvCmdIsDone()). The
camera signals the command as “done” when finished waiting for the response, according
to the timeout and EOT marker configuration. Important: do not try to read the response
before the command is completed, otherwise the communication may fail.
4.
Check the command/response operation success — optional but recommended step. The
status can be queried using the enumeration feature Serial Port Command Status. Possible
values are Success, Timeout (depending on configuration this might signal a problem or not),
Port Busy (e.g. when used by another application), Communication Error (generic), Frame Error,
Parity Error, Overflow. If the status reports a failure, reading the response string itself would
most probably yield irrelevant result.
5.
Read the command response string from Serial Port Command Response. Maximal supported
response length is 128 characters. Note that issuing a new command will discard any characters
in the camera's communication input buffer and the camera will start waiting for a new response.
Copyright © Leutron Vision
194
Leutron
Vision
PicSight-GigE user manual
Camera features and their control
Serial Port Communication
Configure interface parameters
LvSerialPortBaudRate=Baud9600
LvSerialPortParity=None
LvSerialPortDataBits=DataBits8
LvSerialPortStopBits=StopBits1
Configure timing parameters
LvSerialPortTimeout=100
LvSerialPortEOTMarker="\n"
LvSerialPortMaxResponseLength=16
Send serial command
LvSerialPortCommandString="abc=5\n"
execute LvSerialPortCommandSend
Wait for response arrival
query completion (IsDone)
of LvSerialPortCommandSend command
Pick up the response
(read LvSerialPortCommandStatus)
read LvSerialPortCommandResponse
Done
Figure 6.58. Flow chart: serial port communication
LvHDevice hDev; // open the device to get the handle
// configure the communication interface parameters
LvSetEnum (hDev, LvDevice_LvSerialPortBaudRate,
LvSerialPortBaudRate_Baud9600);
LvSetEnum (hDev, LvDevice_LvSerialPortParity,
LvSerialPortParity_None);
LvSetEnum (hDev, LvDevice_LvSerialPortDataBits,
LvSerialPortDataBits_DataBits8);
LvSetEnum (hDev, LvDevice_LvSerialPortStopBits,
LvSerialPortStopBits_StopBits1);
// configure the response timing parameters
LvSetFloat (hDev, LvDevice_LvSerialPortTimeout, 100.0); // in ms
LvSetString (hDev, LvDevice_LvSerialPortEOTMarker, "\n");
LvSetInt32 (hDev, LvDevice_LvSerialPortMaxResponseLength, 16);
// send simple command 'abc=5\n'
LvSetString (hDev, LvDevice_LvSerialPortCommandString, "abc=5\n");
LvCmdExecute (hDev, LvDevice_LvSerialPortCommandSend);
// wait for the response and pick it up, unless failure is reported
// (wait until the operation end using LvCmdIsDone(),
// or by specifying the timeout in LvCmdExecute() call above)
int32_t EnumVal;
LvGetEnum (hDev, LvDevice_LvSerialPortCommandStatus, &EnumVal);
char StringVal[1024];
LvGetString (hDev, LvDevice_LvSerialPortCommandResponse, StringVal, 1024);
Copyright © Leutron Vision
195
Leutron
Vision
PicSight-GigE user manual
Camera features and their control
// configure the communication interface parameters
write_enum (LvSerialPortBaudRate, Baud9600)
write_enum (LvSerialPortParity, None)
write_enum (LvSerialPortDataBits, DataBits8)
write_enum (LvSerialPortStopBits, StopBits1)
// configure the response timing parameters
write_float (LvSerialPortTimeout, 100.0) // in ms
write_string (LvSerialPortEOTMarker, "\n")
write_int (LvSerialPortMaxResponseLength, 16)
// send simple command 'abc=5\n'
write_string (LvSerialPortCommandString, "abc=5\n")
exec_cmd (LvSerialPortCommandSend)
// wait for the response and pick it up, unless failure is reported
wait_until_done (LvSerialPortCommandSend)
read_enum (LvSerialPortCommandStatus)
read_string (LvSerialPortCommandResponse)
6.15. Special features
This section discusses special purpose features that do not belong to any other category or that
span multiple categories.
Figure 6.59. Example GUI showing the “special” features
6.15.1. Special purpose triggers
Besides controlling the acquisition (Section 6.6, “Acquisition and trigger control” [p. 124]) and the
I/O's (Section 6.7, “Digital I/O, counters and timers” [p. 136]), the external signals can be used to
trigger also other specific actions. This can be configured through the “special purpose trigger”
features.
The special purpose trigger configuration is very similar to the acquisition trigger features (Section 6.6, “Acquisition and trigger control” [p. 124]):
1.
Select trigger type. Use the Special Purpose Trigger Selector feature to select the trigger
type to be configured. In current firmware version, only the Image Stamps Reset trigger is
available, but more types can be introduced in future.
2.
Trigger source (input line). Configure the source of the trigger signals (Special Purpose
Trigger Source feature). It can be a physical input line, such as Line 1 (see Section 6.7, “Digital
I/O, counters and timers” [p. 136], Section 3.7, “Input and output signals” [p. 39], Section 3.8,
“Connector and cable description” [p. 44]). Unlike with the acquisition triggers, there is no
“Software” option, issuing the trigger through executing the command feature Generate
Special Purpose Trigger is always possible, regardless the actual trigger source configuration.
Alternatively, the trigger source can be connected to one of the action commands, such as
Action 1, if supported by the camera (see Section 6.8, “Action commands control” [p. 147]).
3.
Trigger activation (polarity). The Special Purpose Trigger Activation feature controls
which edge of the trigger input signal will be active, ie. which edge will actually ignite the
trigger action. Possible values are Rising Edge and Falling Edge, rising edge being the transition
Copyright © Leutron Vision
196
Leutron
Vision
PicSight-GigE user manual
Camera features and their control
of signal level from logical 0 to logical 1. The interpretation of signal levels for different input
types (TTL/optocoupler) is discussed in Section 3.7, “Input and output signals” [p. 39]. Not
applicable for software triggering.
4.
Configure additional options specific to given trigger. If a given trigger action can
be further controlled through additional features, do it now. For the Image Stamps Reset
trigger it is possible to specify which stamps should be reset, see below.
5.
Triggering. The triggers, being generated from external device using a trigger input line
or from the application through the Generate Special Purpose Trigger command, can be issued
at any suitable time.
6.15.1.1. Image stamps reset
The image stamps reset trigger can reset the “stamps” used to label the image buffers and other
camera outputs (eg. the asynchronous events). After reset, given stamp starts counting again from
zero. Following stamps are available:
Timestamp
Value of the 64-bit timestamp counter maintained by the device. The timestamp
is used to label various data outputs provided by the camera, in particular the image
buffers (through chunk data, Section 6.11, “Chunk data” [p. 168]) and the asynchronous events (Section 6.12, “Asynchronous events” [p. 173]).
Note that for PicSight-GigE cameras, the timestamp can be controlled also directly
through the GigE Vision transport layer features (Section 6.4, “Transport layer
control” [p. 102]).
Frame ID
The frame ID stamp serves as an image frame counter (also a 64-bit integer). It is
optionally appended to every image buffer through the chunk data (Section 6.11,
“Chunk data” [p. 168]).
The frame ID counter starts counting from zero when the camera boots up and
keeps counting every acquired frame — until it is explicitly reset or until the value
overflows the 64-bit range (in such case it would start counting from zero again).
Note that the counter does not count the image frames transferred to the host PC
(the application), but rather all the frames internally acquired by the camera. If the
camera boots in free running mode (default behavior), it starts internally acquiring
and counting the frames (without transferring them to the application), even if the
acquisition was not yet explicitly started by the application. This behaviour is particularly important for the PicSight-Smart cameras, which might be used in a “selfcontained” mode, controlled by the smart application without intervention of a
host PC.
Note that the frame ID is in general independent from the “block
ID” low-level tags used by the GigE Vision protocol.
The image stamp reset trigger can be very useful to periodically synchronize the image stamps
among multiple cooperating cameras. The trigger can be issued from an independent signal source
or from one of the cameras, which works as a “master” in the group — such setup was demonstrated in Section 6.7.8, “Use for inter-camera synchronization” [p. 146].
To activate the image stamp reset trigger, it is first necessary to enable it for the individual stamps
— selecting every desired stamp type in Image Stamp Selector and then activating the reset trigger
functionality for it by setting the Image Stamp Reset Enable boolean feature. Each occurrence of
the stamp resetting trigger will reset only those stamps that were explicitly enabled, leaving the
others intact.
Copyright © Leutron Vision
197
Leutron
Vision
PicSight-GigE user manual
Camera features and their control
There's an alternative way that can be used to enable the stamps to be reset in one step — the
Image Stamps Reset Mask feature, which is a 32-bit bitfield. The least significant bit controls the
timestamp, the second bit controls the frame ID.
LvHDevice hDev; // open the device to get the handle
// configure timestamp reset trigger
LvSetEnum (hDev, LvDevice_LvSpecialPurposeTriggerSelector,
LvSpecialPurposeTriggerSelector_ImageStampsReset);
// configure hardware trigger input
LvSetEnum (hDev, LvDevice_LvSpecialPurposeTriggerSource,
LvSpecialPurposeTriggerSource_Line2); // Opto input
LvSetEnum (hDev, LvDevice_LvSpecialPurposeTriggerActivation,
LvSpecialPurposeTriggerActivation_RisingEdge);
// (or configure trigger over an action command)
LvSetEnum (hDev, LvDevice_LvSpecialPurposeTriggerSource,
LvSpecialPurposeTriggerSource_Action2);
// select the stamps to be reset
LvSetEnum (hDev, LvDevice_LvImageStampSelector,
LvImageStampSelector_Timestamp);
LvSetBool (hDev, LvDevice_LvImageStampResetEnable, 1);
LvSetEnum (hDev, LvDevice_LvImageStampSelector,
LvImageStampSelector_FrameID);
LvSetBool (hDev, LvDevice_LvImageStampResetEnable, 1);
// read back the stamps reset mask as a bitfield
int32_t IntVal;
LvGetInt32 (hDev, LvDevice_LvImageStampsResetMask, &IntVal);
// issue software trigger command to reset the timestamps
// (valid regardless the trigger source configuration)
LvCmdExecute (hDev, LvDevice_LvSpecialPurposeTriggerSoftware);
// configure triggered mode
// configure timestamp reset trigger
write_enum (LvSpecialPurposeTriggerSelector, ImageStampsReset)
// configure hardware trigger input
write_enum (LvSpecialPurposeTriggerSource, Line2) // Opto input
write_enum (LvSpecialPurposeTriggerActivation_RisingEdge, RisingEdge)
// (or configure trigger over an action command)
write_enum (LvSpecialPurposeTriggerSource, Action2)
// select the stamps to be reset
write_enum (LvImageStampSelector, Timestamp)
write_bool (LvImageStampResetEnable, true)
write_enum (LvImageStampSelector, FrameID)
write_bool (LvImageStampResetEnable, true)
// read back the stamps reset mask as a bitfield
read_int (LvImageStampsResetMask)
// issue software trigger command to reset the timestamps
// (valid regardless the trigger source configuration)
exec_cmd (LvSpecialPurposeTriggerSoftware)
6.15.2. Boot switch
The PicSight-GigE cameras are delivered in default configuration fully compatible with the GigE
Vision standard. For compatibility with applications based on our legacy software package, LV-
Copyright © Leutron Vision
198
Leutron
Vision
PicSight-GigE user manual
Camera features and their control
SDS, it is possible to switch them to operating mode supporting also the legacy (pre GigE Vision)
communication protocol (see Section 2.5, “GigE Vision compatible and legacy boot
modes” [p. 25]).
The operating mode is selected upon camera boot and cannot be changed at runtime. The decision
in which operating mode should the camera boot next time is done through enumerated feature
Boot Switch, which has two options:
Pure GigE Vision
Fully compatible with the GigE Vision standard. All new development and
feature improvements are done only for this operating mode. This is also
the default mode in which the newly manufactured cameras are delivered
off the factory.
Note that the legacy communication protocol is not supported in this
operating mode and the camera will not even recognized by the legacy
LV-SDS software.
Legacy
Dual mode supporting both the GigE Vision protocol and the legacy
protocol used by LV-SDS. Intended for existing LV-SDS based applications.
Development of this branch is frozen, no new features added, only bugfixes
applied. All new designs should be based on the Pure GigE Vision version
and the Simplon software interface.
LvHDevice hDev; // open the device to get the handle
// let the camera start in legacy mode upon next boot
LvSetEnum (hDev, LvDevice_LvBootSwitch, LvBootSwitch_Legacy);
// let the camera start in pure GigE Vision mode upon next boot
LvSetEnum (hDev, LvDevice_LvBootSwitch, LvBootSwitch_PureGEV);
// let the
write_enum
// let the
write_enum
camera start in legacy mode upon next boot
(LvBootSwitch, Legacy)
camera start in pure GigE Vision mode upon next boot
(LvBootSwitch, PureGEV)
The boot mode can also be configured in the HTTP configuration interface, refer
to Section 5.3, “HTTP-based configuration” [p. 82].
6.15.3. Watchdog timer control
Some Leutron Vision camera models provide features to control the device's watchdog timer behavior. The watchdog timer is a subsystem allowing to monitor device health. When enabled, the
application needs to periodically reset the watchdog timer — the resets serve as the application
“heartbeat”. As long as each new heartbeat is issued withing a specified timeout duration, the
watchdog stays silent. However, if the watchdog timer expires and the reset command is not issued,
the watchdog assumes the application (or entire system) is locked and reboots the camera. The
watchdog functionality is implemented in the FPGA, independently from the main camera control,
so it remains functional even if the operating systems itself gets locked.
After the camera boots, the watchdog is always inactive. If desired, the application has to enable
it explicitly (Watchdog Enable), specifying the desired Watchdog Timeout Duration. Once enabled,
the application is responsible issuing the Watchdog Reset signals in period lower than the configured
Copyright © Leutron Vision
199
Leutron
Vision
PicSight-GigE user manual
Camera features and their control
timeout to prevent the watchdog timeout expiration and device reboot. The watchdog can be
disabled again. Furthermore, the current Watchdog Timer Value (time remaining until expiration)
can be queried.
It is important that the application always disables the watchdog timer whenever it intends to
stop updating it regularly, such as when the application shuts down — otherwise the system would
be rebooted as soon as the timer expires. The watchdog timer is never disabled automatically.
Finally, the integer Watchdog Failure Count provides information about how many watchdog failure
reboots happened in the device lifetime.
Note that all the watchdog related features are in “guru” feature visibility level.
LvHDevice hDev; // open the device to get the handle
// possibly read number of watchdog failures in device's lifetime
LvGetInt32 (hDev, LvDevice_LvWatchdogFailureCount, &IntVal);
// configure and enable the watchdog timer...
LvSetFloat (hDev, LvDevice_LvWatchdogTimerDuration, 20.0); // in seconds
LvSetBool (hDev, LvDevice_LvWatchdogEnable, 1);
// ...and immediatelly start feeding it with regular reset signals
LvCmdExecute (hDev, LvDevice_LvWatchdogTimerReset);
// the actual value of the watchdog timer can be queried
double FloatVal;
LvGetFloat (hDev, LvDevice_LvWatchdogTimerValue, &FloatVal);
// when not needed any more, disable the watchdog timer
LvSetBool (hDev, LvDevice_LvWatchdogEnable, 0);
// possibly read number of watchdog failures in device's lifetime
read_int (LvWatchdogFailureCount)
// configure and enable the watchdog timer...
write_float (LvWatchdogTimerDuration, 20.0) // in seconds
write_bool (LvWatchdogEnable, true)
// ...and immediatelly start feeding it with regular reset signals
exec_cmd (LvWatchdogTimerReset)
// the actual value of the watchdog timer can be queried
read_float (LvWatchdogTimerValue)
// when not needed any more, disable the watchdog timer
write_bool (LvWatchdogEnable, false)
6.16. Smart application control
The Smart Application Features category contains features dedicated for control of the smart applications running at PicSight-Smart.
Copyright © Leutron Vision
200
Leutron
Vision
PicSight-GigE user manual
Camera features and their control
Figure 6.60. Example GUI showing the smart application features
The PicSight-Smart cameras (see Section 6.2, “Camera classes” [p. 97], Section 3.10, “PicSightSmart architecture” [p. 48]) provide means for programming embedded applications running
directly at the camera. The smart application programming is beyond the scope of this manual
(refer to PicSight-Smart Library API documentation). We will, however, briefly discuss the generic
features controlling the smart application behavior.
The feature tree of the PicSight-Smart cameras contains a category called “Smart Application
Features”, which contains some generic features that can be used to control the smart application
running at the camera. It is up to the smart application itself which of them will be enabled and
how they will be used (which smart application function they will control). Using these generic
features, the smart application can be directly interfaced from any GigE Vision and GenICam
compatible software, including the Simplon API.
Smart application programmers should refer to the PicSight-Smart Library API documentation to
learn how to enable individual smart application control features and how to interact with the
feature tree.
Users controlling the smart application running on a PicSight-Smart camera should refer to the
documentation of that respective smart application (usually designed by a 3rd party) to learn the
mapping of the individual generic features to the particular smart application functions.
The smart application can optionally “lock” access to camera configuration
through the regular features and allow control solely through the dedicated features in the Smart Application Features category. In such case the regular feature
tree is not accessible, being limited just to the few most essential features required
by the GigE Vision standard, even those just read-only.
6.16.1. Basic application information and control
The smart application execution can be controlled through several basic features:
Smart Application ID
String identifier of the smart application currently running at
the camera. If no smart application is running, this feature will
report string Streaming. The same string will be reported on
regular PicSight-GigE cameras.
Smart Application Path
Path to the application to be started through the Start Smart
Application command. The required path will be specified in
each corresponding smart application documentation.
Start Smart Application
Start the smart application specified in Smart Application Path.
Since the smart application takes control over the camera, the
entire feature tree becomes invalid and should be released and
reopened again.
Send Smart Application Exit Event
Sends exit event to the currently running smart application.
The application will finish execution at closest suitable point.
Since the smart application releases control over the camera,
Copyright © Leutron Vision
201
Leutron
Vision
PicSight-GigE user manual
Camera features and their control
the entire feature tree becomes invalid and should be released
and reopened again.
LvHDevice hDev; // open the device to get the handle
// read the application identifier
char StringVal[1024];
LvGetString (hDev, LvDevice_LvSmartAppID, StringVal, 1024);
// start the smart application specified by its path
// (the entire feature tree will be invalidated by this action)
LvSetString (hDev, LvDevice_LvSmartAppPath, "MySmartAppPath");
LvCmdExecute (hDev, LvDevice_LvSmartAppStart);
// send the exit event to the running smart application
// (the entire feature tree will be invalidated by this action)
LvCmdExecute (hDev, LvDevice_LvSmartAppExitEvent);
// read the application identifier
read_string (LvSmartAppID)
// start the smart application specified by its path
// (the entire feature tree will be invalidated by this action)
write_string (LvSmartAppPath, "MySmartAppPath")
exec_cmd (LvSmartAppStart)
// send the exit event to the running smart application
// (the entire feature tree will be invalidated by this action)
exec_cmd (LvSmartAppExitEvent)
6.16.2. Generic integer registers
The interface provides 32 signed integer features (Signed Integer 1 to Signed Integer 32) and 32
unsigned integer features (Unsigned Integer 1 to Unsigned Integer 32). The smart application decides
which of them will be enabled, what will be their range and access status (read-only or read-write).
LvHDevice hDev; // open the device to get the handle
// write 42 to unsigned integer #7
LvSetInt32 (hDev, LvDevice_LvSmartAppUint7, 42);
// read value of signed integer #4
int32_t IntVal;
LvGetInt32 (hDev, LvDevice_LvSmartAppInt4, &IntVal);
// write 42 to unsigned integer #7
write_int (LvSmartAppUint7, 42)
LvSetInt32 (hDev, LvDevice_LvSmartAppUint7, 42);
// read value of signed integer #4
read_int (LvSmartAppInt4)
Copyright © Leutron Vision
202
Leutron
Vision
PicSight-GigE user manual
Camera features and their control
6.16.3. ASCII commands
The smart application can be controlled through simple synchronous (command/response) ASCII
string commands. The user/application will specify the string command for the application and
start its execution explicitly. The smart application will provide feedback through a string response
and an integer return code. The communication procedure is simple:
1.
Write the command message string to ASCII Command String. Maximal supported command
length is 128 characters.
2.
Instruct the smart application to apply the command, executing the ASCII Command Execute
command feature. The smart application will start executing the operation bound to the
command and when finished, it will provide the feedback.
3.
Wait for completion of the command — wait until the “IsDone” GenICam property of the
command yields true (in Simplon API this is inspected through LvCmdIsDone()). The smart
application signals the command as “done” when the operation is finished. Important: do
not try to read the response and return code before the command is completed, otherwise
the communication may fail.
4.
Read the command response string from ASCII Command Response and the integer return
code from ASCII Command Return Code. Maximal supported response length is 128 characters..
LvHDevice hDev; // open the device to get the handle
// send simple command 'foobar'
LvSetString (hDev, LvDevice_LvSmartAppAsciiCmdString, "foobar");
LvCmdExecute (hDev, LvDevice_LvSmartAppAsciiCmdExecute);
// wait for the response + return code and pick it up
// (wait until the operation end using LvCmdIsDone(),
// or by specifying the timeout in LvCmdExecute() call above)
char StringVal[1024];
LvGetString (hDev, LvDevice_LvSmartAppAsciiCmdFeedback, StringVal, 1024);
int32_t IntVal;
LvGetInt32 (hDev, LvDevice_LvSmartAppAsciiCmdRetCode, &IntVal);
// send simple command 'foobar'
write_string (LvSmartAppAsciiCmdString, "foobar")
exec_cmd (LvSmartAppAsciiCmdExecute)
// wait for the response and pick it up
wait_until_done (LvSmartAppAsciiCmdExecute)
read_string (LvSmartAppAsciiCmdFeedback)
read_int (LvSmartAppAsciiCmdRetCode)
6.17. Feature summary
The following table provides condensed summary of all the features existing among all our camera
families. Some of the features are only supported by certain camera families, some of them even
just by certain few camera models. The range of allowed values might differ.
For detailed explanation of the purpose of each feature group and their dependencies, refer to
previous sections in this chapter. To learn availability of a feature on a particular camera model,
refer to the model datasheet or contact our sales department.
Copyright © Leutron Vision
203
Leutron
Vision
PicSight-GigE user manual
Camera features and their control
Name
Description
Feature category: Device Control , refer to Section 6.3, “Information about the camera” [p. 98]
DeviceVendorName
Name of the manufacturer of the device
GUI name: Vendor Name
Type: string
GUI visibility: beginner
Read-only feature
DeviceModelName
Model name of the device
GUI name: Model Name
Type: string
GUI visibility: beginner
Read-only feature
DeviceManufacturerInfo
Manufacturer information about the device
GUI name: Manufacturer Info
Type: string
GUI visibility: beginner
Read-only feature
DeviceVersion
Version of the device
GUI name: Device Hardware Version
Type: string
GUI visibility: beginner
Read-only feature
DeviceFirmwareVersion
Version of the device firmware
GUI name: Device Firmware Version
Type: string
GUI visibility: beginner
Read-only feature
Indicates the version of the firmware and software to which the device would recover
LvRecoveryFirmwareVersion
GUI name: Recovery Firmware Version
Type: string
GUI visibility: guru
Read-only feature
DeviceID
Device identifier (serial number)
GUI name: Device ID
Type: string
GUI visibility: expert
Read-only feature
DeviceUserID
User-programmable device identifier
GUI name: Device User ID
Type: string
GUI visibility: beginner
LvSensorID
Serial number of the sensor board
GUI name: Sensor ID
Type: string
GUI visibility: guru
Read-only feature
Copyright © Leutron Vision
204
Leutron
Vision
PicSight-GigE user manual
Camera features and their control
Name
Description
LvGrabberID
Serial number of the grabber board
GUI name: Grabber ID
Type: string
GUI visibility: guru
Read-only feature
DeviceScanType
Scan type of the sensor.
GUI name: Device Scan Type
Type: enumeration
Possible values: Areascan
GUI visibility: expert
Read-only feature
DeviceRegistersStreamingStart
Announces start of register streaming
GUI name: Device Registers Streaming Start
Type: command
GUI visibility: guru
DeviceRegistersStreamingEnd
Announces end of register streaming
GUI name: Device Registers Streaming End
Type: command
GUI visibility: guru
DeviceRegistersCheck
Requests validation of the register set
GUI name: Device Registers Check
Type: command
GUI visibility: expert
DeviceRegistersValid
Result of registers validity check
GUI name: Device Registers Valid
Type: bool
GUI visibility: expert
Read-only feature
DeviceReset
Resets the device
GUI name: Reset Device
Type: command
GUI visibility: guru
DeviceClockSelector
Selects a device clock frequency
GUI name: Clock Selector
Type: enumeration
Possible values: SensorDigitization
GUI visibility: expert
DeviceClockFrequency
Frequency of the selected clock
[DeviceClockSelector]
Type: float
GUI name: Clock Frequency
GUI visibility: expert
Streamable feature, stored with user configuration sets
Unit: Hz
DeviceTemperatureSelector
Selects a temperature measurement location
GUI name: Temperature Selector
Type: enumeration
Possible values: Sensor, Mainboard
GUI visibility: expert
Copyright © Leutron Vision
205
Leutron
Vision
PicSight-GigE user manual
Camera features and their control
Name
Description
DeviceTemperature
Current temperature at the selected location
[DeviceTemperatureSelector]
Type: float
GUI name: Temperature
GUI visibility: expert
Read-only feature
Unit: C
LvDeviceUpTime
Current up-time of the device
GUI name: Up Time
Type: integer
GUI visibility: expert
Unit: ms
LvDeviceType
Indicates the basic type of the device
GUI name: Device Type
Type: string
GUI visibility: expert
Read-only feature
Major version of SFNC standard used by the
device
DeviceSFNCVersionMajor
GUI name: Device SFNC Version Major
Type: integer
GUI visibility: beginner
Read-only feature
Minor version of SFNC standard used by the
device
DeviceSFNCVersionMinor
GUI name: Device SFNC Version Minor
Type: integer
GUI visibility: beginner
Read-only feature
DeviceSFNCVersionSubMinor
GUI name: Device SFNC Version Subminor
Sub-minor version of SFNC standard used by the
device
Type: integer
GUI visibility: beginner
Read-only feature
Feature category: Image Format Control , refer to Section 6.5, “Image format” [p. 107]
SensorWidth
Effective width of the sensor in pixels.
GUI name: Sensor Width
Type: integer
GUI visibility: expert
Read-only feature
Unit: px
SensorHeight
Effective height of the sensor in pixels.
GUI name: Sensor Height
Type: integer
GUI visibility: expert
Read-only feature
Unit: px
Copyright © Leutron Vision
206
Leutron
Vision
PicSight-GigE user manual
Camera features and their control
Name
Description
WidthMax
Maximum width of the image.
GUI name: Max Width
Type: integer
GUI visibility: expert
Read-only feature
Unit: px
HeightMax
Maximum height of the image.
GUI name: Max Height
Type: integer
GUI visibility: expert
Read-only feature
Unit: px
Width
Image width provided by the device
GUI name: Width
Type: integer
GUI visibility: beginner
Streamable feature, stored with user configuration sets
Unit: px
Height
Image height provided by the device
GUI name: Height
Type: integer
GUI visibility: beginner
Streamable feature, stored with user configuration sets
Unit: px
OffsetX
Horizontal offset from the origin of the AOI.
GUI name: X Offset
Type: integer
GUI visibility: beginner
Streamable feature, stored with user configuration sets
Unit: px
OffsetY
Vertical offset from the origin of the AOI.
GUI name: Y Offset
Type: integer
GUI visibility: beginner
Streamable feature, stored with user configuration sets
Unit: px
Copyright © Leutron Vision
207
Leutron
Vision
PicSight-GigE user manual
Camera features and their control
Name
Description
PixelFormat
Pixel format provided by the device
GUI name: Pixel Format
Type: enumeration
Possible values: Mono8, Mono8Signed,
Mono10, Mono10Packed, Mono12,
Mono12Packed, Mono16, BayerGR8,
BayerRG8, BayerGB8, BayerBG8,
BayerGR10, BayerRG10, BayerGB10,
BayerBG10, BayerGR12, BayerRG12,
BayerGB12, BayerBG12, RGB8Packed,
BGR8Packed, RGBA8Packed, BGRA8Packed
GUI visibility: beginner
Streamable feature, stored with user configuration sets
BinningHorizontal
Horizontal binning factor
GUI name: Horizontal Binning
Type: integer
GUI visibility: expert
Streamable feature, stored with user configuration sets
BinningVertical
Vertical binning factor
GUI name: Vertical Binning
Type: integer
GUI visibility: expert
Streamable feature, stored with user configuration sets
DecimationHorizontal
Horizontal decimation factor
GUI name: Horizontal Decimation
Type: integer
GUI visibility: expert
Streamable feature, stored with user configuration sets
DecimationVertical
Vertical decimation factor
GUI name: Vertical Decimation
Type: integer
GUI visibility: expert
Streamable feature, stored with user configuration sets
LvAOIMode
Mode of controlling the area of interest
GUI name: AOI Mode
Type: enumeration
Possible values: Automatic,
ClipOnTransfer, Manual
GUI visibility: expert
Streamable feature, stored with user configuration sets
Copyright © Leutron Vision
208
Leutron
Vision
PicSight-GigE user manual
Camera features and their control
Name
Description
LvReadoutWidth
Width of the sensor-side area of interest in pixels
GUI name: Readout Width
Type: integer
GUI visibility: expert
Streamable feature, stored with user configuration sets
Unit: px
LvReadoutHeight
Height of the sensor-side area of interest in pixels
GUI name: Readout Height
Type: integer
GUI visibility: expert
Streamable feature, stored with user configuration sets
Unit: px
X offset (left offset) of the sensor-side area of interest in pixels
LvReadoutOffsetX
GUI name: Readout X Offset
Type: integer
GUI visibility: expert
Streamable feature, stored with user configuration sets
Unit: px
Y offset (top offset) of the sensor-side area of interest in pixels
LvReadoutOffsetY
GUI name: Readout Y Offset
Type: integer
GUI visibility: expert
Streamable feature, stored with user configuration sets
Unit: px
LvVariablePayloadSize
Flag switching on the variable payload size mode
GUI name: Variable Payload Size
Type: bool
GUI visibility: expert
Streamable feature, stored with user configuration sets
Feature category: Acquisition Control , refer to Section 6.6, “Acquisition and trigger control” [p. 124]
AcquisitionMode
Acquisition mode of the device
GUI name: Acquisition Mode
Type: enumeration
Possible values: SingleFrame, MultiFrame,
Continuous
GUI visibility: beginner
Streamable feature, stored with user configuration sets
AcquisitionStart
Starts image acquisition
GUI name: Acquisition Start
Type: command
GUI visibility: beginner
Copyright © Leutron Vision
209
Leutron
Vision
PicSight-GigE user manual
Camera features and their control
Name
Description
AcquisitionStop
Stops image acquisition
GUI name: Acquisition Stop
Type: command
GUI visibility: beginner
AcquisitionArm
Arms the camera for acquisition start
GUI name: Acquisition Arm
Type: command
GUI visibility: expert
TriggerSelector
Selects the type of trigger to configure
GUI name: Trigger Selector
Type: enumeration
Possible values: FrameStart
GUI visibility: beginner
TriggerMode
Controls if the selected trigger is active
[TriggerSelector]
Type: enumeration
GUI name: Trigger Mode
Possible values: Off, On
GUI visibility: beginner
Streamable feature, stored with user configuration sets
TriggerSoftware
Generates a software trigger
[TriggerSelector]
Type: command
GUI name: Generate Software Trigger
GUI visibility: beginner
TriggerSource
Signal source for the selected trigger
[TriggerSelector]
Type: enumeration
GUI name: Trigger Source
Possible values: Line1, Line2, Line3,
Line4, Line5, Line6, Line7, Line8,
Line17, Line18, Line19, Line20,
Line21, Line22, Line23, Line24,
Action1, Action2, Action3, Action4,
Action5, Action6, Action7, Action8,
Software
GUI visibility: beginner
Streamable feature, stored with user configuration sets
TriggerActivation
Activation mode of the trigger.
[TriggerSelector]
Type: enumeration
GUI name: Trigger Activation
Possible values: RisingEdge, FallingEdge
GUI visibility: beginner
Streamable feature, stored with user configuration sets
TriggerDelay
Trigger delay in microseconds
[TriggerSelector]
Type: float
GUI name: TriggerDelay
GUI visibility: expert
Streamable feature, stored with user configuration sets
Unit: us
Copyright © Leutron Vision
210
Leutron
Vision
PicSight-GigE user manual
Camera features and their control
Name
Description
TriggerDivider
Trigger divider
[TriggerSelector]
Type: integer
GUI name: Trigger Divider
GUI visibility: expert
Streamable feature, stored with user configuration sets
LvTriggerCaching
Caching mode for the selected trigger
[TriggerSelector]
Type: enumeration
GUI name: Trigger Caching
Possible values: Cache, Drop
GUI visibility: expert
Streamable feature, stored with user configuration sets
ExposureMode
Exposure (shutter) mode
GUI name: Exposure Mode
Type: enumeration
Possible values: Timed
GUI visibility: beginner
Streamable feature, stored with user configuration sets
Switches to mode with wider range of exposure
times
LvLongRangeExposureMode
GUI name: Long Range Exposure Mode
Type: bool
GUI visibility: beginner
Streamable feature, stored with user configuration sets
Switches to mode with wider range of exposure
times
LvGlobalResetMode
GUI name: Global Reset Mode
Type: bool
GUI visibility: beginner
Streamable feature, stored with user configuration sets
ExposureTime
Exposure time in microseconds
GUI name: Exposure Time
Type: float
GUI visibility: beginner
Streamable feature, stored with user configuration sets
Unit: us
ExposureAuto
Selects the automatic exposure mode
GUI name: Automatic Exposure
Type: enumeration
Possible values: Off, Once, Continuous
GUI visibility: beginner
Streamable feature, stored with user configuration sets
Copyright © Leutron Vision
211
Leutron
Vision
PicSight-GigE user manual
Camera features and their control
Name
Description
LvAcquisitionFrameRateControlMode
Switches the acquisition frame rate control on
or off
GUI name: Acquisition Frame Rate Control
Type: enumeration
Possible values: Off, On
GUI visibility: beginner
Streamable feature, stored with user configuration sets
AcquisitionFrameRate
Acquisition frame rate in frames per second (Hz)
GUI name: Acquisition Frame Rate
Type: float
GUI visibility: beginner
Streamable feature, stored with user configuration sets
Unit: Hz
Feature category: Digital I/O Control , refer to Section 6.7, “Digital I/O, counters and
timers” [p. 136]
Selects the I/O line for querying and configuration
LineSelector
GUI name: Line Selector
Type: enumeration
Possible values: Line1, Line2, Line3,
Line4, Line5, Line6, Line7, Line8,
Line9, Line10, Line11, Line12,
Line13, Line14, Line15, Line16,
Line17, Line18, Line19, Line20,
Line21, Line22, Line23, Line24,
Line25, Line26, Line27, Line28,
Line29, Line30, Line31, Line32
GUI visibility: expert
LineMode
Line mode (input or output)
[LineSelector]
Type: enumeration
GUI name: Line Mode
Possible values: Input, Output
GUI visibility: expert
Read-only feature
Sets the electrical configuration of the selected
line
LineFormat
[LineSelector]
Type: enumeration
GUI name: Line Format
Possible values: NoConnect, TriState, TTL,
LVDS, RS422, OptoCoupled
GUI visibility: expert
Read-only feature
Copyright © Leutron Vision
212
Leutron
Vision
PicSight-GigE user manual
Camera features and their control
Name
Description
LineSource
Internal signal driving the line's ouptut
[LineSelector]
Type: enumeration
GUI name: Line Source
Possible values: Off, ExposureActive,
Timer1Active, Timer2Active,
Timer3Active, Timer4Active,
UserOutput1, UserOutput2,
UserOutput3, UserOutput4,
UserOutput5, UserOutput6,
UserOutput7, UserOutput8
GUI visibility: expert
Streamable feature, stored with user configuration sets
LineInverter
Inverts the signal
[LineSelector]
Type: bool
GUI name: Line Inverter
GUI visibility: expert
Streamable feature, stored with user configuration sets
LvLineDebounceDuration
Duration of line debounce period
[LineSelector]
Type: float
GUI name: Line Debounce Duration
GUI visibility: expert
Streamable feature, stored with user configuration sets
Unit: us
LineStatus
Status of the selected line
[LineSelector]
Type: bool
GUI name: Line Status
GUI visibility: expert
Read-only feature
LineStatusAll
Status of i/o lines
GUI name: Line Status All
Type: integer
GUI visibility: expert
Read-only feature
Selects the user output for querying and configuration
UserOutputSelector
GUI name: User Output Selector
Type: enumeration
Possible values:
UserOutput2,
UserOutput4,
UserOutput6,
UserOutput8
UserOutput1,
UserOutput3,
UserOutput5,
UserOutput7,
GUI visibility: expert
Copyright © Leutron Vision
213
Leutron
Vision
PicSight-GigE user manual
Camera features and their control
Name
Description
UserOutputValue
Status of the selected user output
[UserOutputSelector]
Type: bool
GUI name: User Output Value
GUI visibility: expert
Streamable feature, stored with user configuration sets
UserOutputValueAll
Status of user outputs
GUI name: User Output Value All
Type: integer
GUI visibility: expert
Streamable feature, stored with user configuration sets
UserOutputValueAllMask
Mask for the User Output Value All bitfield
GUI name: User Output Value All Mask
Type: integer
GUI visibility: expert
Streamable feature, stored with user configuration sets
Feature category: Counter and Timer Control , refer to Section 6.7, “Digital I/O, counters
and timers” [p. 136]
CounterSelector
Selects which counter to configure
GUI name: Counter Selector
Type: enumeration
Possible values: Counter1, Counter2,
Counter3, Counter4
GUI visibility: expert
LvCounterMode
Selects working mode of the selected counter.
[CounterSelector]
Type: enumeration
GUI name: Counter Mode
Possible values: Autoreset
GUI visibility: expert
Streamable feature, stored with user configuration sets
CounterEventSource
Signal incrementing the counter
[CounterSelector]
Type: enumeration
GUI name: Counter Event Source
Possible values: Off, FrameTrigger
GUI visibility: expert
Streamable feature, stored with user configuration sets
CounterReset
Resets the selected counter
[CounterSelector]
Type: command
GUI name: Counter Reset
GUI visibility: expert
CounterValue
Current value of the selected counter
[CounterSelector]
Type: integer
GUI name: Counter Value
GUI visibility: expert
Streamable feature, stored with user configuration sets
Copyright © Leutron Vision
214
Leutron
Vision
PicSight-GigE user manual
Camera features and their control
Name
Description
CounterDuration
Duration (number of events) for the selected
counter
[CounterSelector]
Type: integer
GUI name: Counter Duration
GUI visibility: expert
Streamable feature, stored with user configuration sets
TimerSelector
Selects which timer to configure
GUI name: Timer Selector
Type: enumeration
Possible values: Timer1, Timer2, Timer3,
Timer4
GUI visibility: expert
TimerDuration
Duration of the selected timer
[TimerSelector]
Type: float
GUI name: Timer Duration
GUI visibility: expert
Streamable feature, stored with user configuration sets
Unit: us
TimerDelay
Delay for the selected timer
[TimerSelector]
Type: float
GUI name: Timer Delay
GUI visibility: expert
Streamable feature, stored with user configuration sets
Unit: us
TimerTriggerSource
Signal activating the timer
[TimerSelector]
Type: enumeration
GUI name: Timer Trigger Source
Possible values:
Counter1End,
Counter3End,
UserOutput1,
UserOutput3,
UserOutput5,
UserOutput7,
Off, FrameTrigger,
Counter2End,
Counter4End,
UserOutput2,
UserOutput4,
UserOutput6,
UserOutput8
GUI visibility: expert
Streamable feature, stored with user configuration sets
Feature category: Action Control , refer to Section 6.8, “Action commands control” [p. 147]
Provides the device key that allows the device
to check the validity of action commands.
ActionDeviceKey
GUI name: Action Device Key
Type: integer
GUI visibility: guru
Selects to which action signal further action settings apply.
ActionSelector
GUI name: Action Selector
Type: integer
GUI visibility: guru
Copyright © Leutron Vision
215
Leutron
Vision
PicSight-GigE user manual
Camera features and their control
Name
Description
ActionGroupKey
Provides the key that the device will use to validate the action on reception of the action protocol
message.
[ActionSelector]
GUI name: Action Group Key
Type: integer
GUI visibility: guru
Provides the mask that the device will use to
validate the action on reception of the action
protocol message.
ActionGroupMask
[ActionSelector]
GUI name: Action Group Mask
Type: integer
GUI visibility: guru
Feature category: Special Features , refer to Section 6.15, “Special features” [p. 196]
LvSpecialPurposeTriggerSelector
GUI name: Special Purpose Trigger Selector
Selects the special purpose trigger type to configure
Type: enumeration
Possible values: ImageStampsReset
GUI visibility: expert
LvSpecialPurposeTriggerSource
Signal source for the selected trigger
[LvSpecialPurposeTriggerSelector]
Type: enumeration
GUI name: Special Purpose Trigger Source
Possible values: Off, Line1, Line2, Line3,
Line4, Line5, Line6, Line7, Line8,
Line17, Line18, Line19, Line20,
Line21, Line22, Line23, Line24,
Action1, Action2, Action3, Action4,
Action5, Action6, Action7, Action8
GUI visibility: expert
Streamable feature, stored with user configuration sets
LvSpecialPurposeTriggerActivation
Activation mode of the trigger.
[LvSpecialPurposeTriggerSelector]
Type: enumeration
GUI name: Special Purpose Trigger Activation
Possible values: RisingEdge, FallingEdge
GUI visibility: expert
Streamable feature, stored with user configuration sets
LvSpecialPurposeTriggerSoftware
Generates a software trigger
[LvSpecialPurposeTriggerSelector]
Type: command
GUI name: Generate Special Purpose Trigger
GUI visibility: expert
LvImageStampsResetMask
A single bitfield that selects which features will
be reset by the image stamp reset trigger
GUI name: Image Stamps Reset Mask
Type: integer
GUI visibility: guru
LvImageStampSelector
Selects an image stamp type for configuration
GUI name: Image Stamp Selector
Type: enumeration
Possible values: Timestamp, FrameID
GUI visibility: expert
Copyright © Leutron Vision
216
Leutron
Vision
PicSight-GigE user manual
Camera features and their control
Name
Description
LvImageStampResetEnable
Enables/disables the reset trigger functionality
for the selected image stamp type
[LvImageStampSelector]
Type: bool
GUI name: Image Stamp Reset Enable
GUI visibility: expert
Streamable feature, stored with user configuration sets
LvBootSwitch
Selects the firmware type to load on next boot
GUI name: Boot Switch
Type: enumeration
Possible values: PureGEV, Legacy
GUI visibility: guru
LvBayerDecoderAlgorithm
Selects the Bayer decoder algorithm
GUI name: Bayer Decoder Algorithm
Type: enumeration
Possible values: VariableGradient
GUI visibility: expert
Streamable feature, stored with user configuration sets
LvBayerDecoderThreshold
Sets the Bayer decoder threshold
GUI name: Bayer Decoder Threshold
Type: float
GUI visibility: guru
Streamable feature, stored with user configuration sets
LvWatchdogEnable
Enables the watchdog reset function
GUI name: Watchdog Enable
Type: bool
GUI visibility: guru
Streamable feature, stored with user configuration sets
When watchdog is enabled, the device reboots
when the timeout specified expires
LvWatchdogTimerDuration
GUI name: Watchdog Timer Duration
Type: float
GUI visibility: guru
Streamable feature, stored with user configuration sets
Unit: s
Current watchdog timer value - reports the current value, after which the timer expires
LvWatchdogTimerValue
GUI name: Watchdog Timer Value
Type: float
GUI visibility: guru
Read-only feature
Unit: s
Resets the watchdog timer, the watchdog starts
counting the specified timeout again
LvWatchdogTimerReset
GUI name: Watchdog Timer Reset
Type: command
GUI visibility: guru
Copyright © Leutron Vision
217
Leutron
Vision
PicSight-GigE user manual
Camera features and their control
Name
Description
LvWatchdogFailed
Signals that the last device reboot was initiated
by the watchdog function
GUI name: Watchdog Failed
Type: bool
GUI visibility: guru
Number of watchdog failures (reboots) in camera's lifetime
LvWatchdogFailureCount
GUI name: Watchdog Failure Count
Type: integer
GUI visibility: guru
Feature category: Analog Control , refer to Section 6.9, “Analog controls” [p. 149]
GainSelector
Selects which gain type to configure
GUI name: Gain Selector
Type: enumeration
Possible values: All, AnalogAll,
DigitalAll
GUI visibility: beginner
Gain
Gain value for the selected gain type
[GainSelector]
Type: float
GUI name: Gain
GUI visibility: beginner
Streamable feature, stored with user configuration sets
Unit: dB
GainAuto
Automatic gain mode
[GainSelector]
Type: enumeration
GUI name: Automatic Gain
Possible values: Off, Once, Continuous
GUI visibility: beginner
Streamable feature, stored with user configuration sets
BlackLevelSelector
Selects which black level type to configure
GUI name: Black Level Selector
Type: enumeration
Possible values: All
GUI visibility: expert
BlackLevel
Black level value
[BlackLevelSelector]
Type: float
GUI name: Black Level
GUI visibility: expert
Streamable feature, stored with user configuration sets
Unit: DN
BlackLevelAuto
Automatic black level mode
[BlackLevelSelector]
Type: enumeration
GUI name: Automatic Black Level
Possible values: Off, Once, Continuous
GUI visibility: expert
Streamable feature, stored with user configuration sets
Copyright © Leutron Vision
218
Leutron
Vision
PicSight-GigE user manual
Camera features and their control
Name
Description
Feature category: Color Transformation Control , refer to Section 6.10, “Luminance and
color handling” [p. 156]
Selects which color transformation module is
controlled by the color transformation features.
ColorTransformationSelector
GUI name: Color Transformation Selector
Type: enumeration
Possible values: RGBtoRGB
GUI visibility: expert
Activates the selected Color Transformation
module
ColorTransformationEnable
[ColorTransformationSelector]
Type: bool
GUI name: Color Transformation Enable
GUI visibility: expert
Streamable feature, stored with user configuration sets
ColorTransformationValueSelector
Selects the color transformation matrix entry
[ColorTransformationSelector]
Type: enumeration
GUI name: Color Transformation Value Selector
Possible values: Gain00, Gain01, Gain02,
Gain10, Gain11, Gain12, Gain20,
Gain21, Gain22
GUI visibility: expert
ColorTransformationValue
[ColorTransformationValueSelector]
GUI name: Color Transformation Entry Value
Value of the selected color transformation matrix
entry
Type: float
GUI visibility: expert
Streamable feature, stored with user configuration sets
Feature category: External Device Control , refer to Section 6.14, “External device control” [p. 182]
Selects the operation mode of external device
control.
LvExternalDeviceControlMode
GUI name: External Device Control Mode
Type: enumeration
Possible values: Custom
GUI visibility: expert
Streamable feature, stored with user configuration sets
LvExternalADCSelector
External ADC to configure.
GUI name: External ADC Selector
Type: enumeration
Possible values: ExternalADC1,
ExternalADC2, ExternalADC3,
ExternalADC4
GUI visibility: expert
Copyright © Leutron Vision
219
Leutron
Vision
PicSight-GigE user manual
Camera features and their control
Name
Description
LvExternalADCValue
Value of the selected external ADC
[LvExternalADCSelector]
Type: integer
GUI name: External ADC Value
GUI visibility: expert
Read-only feature
Unit: DN
LvPowerSwitchCurrentAction
Action currently performed by a power switch
GUI name: Power Switch Current Action
Type: enumeration
Possible values: Idle, Pulse, Calibrate,
AdjustPosition, Drive
GUI visibility: expert
Read-only feature
LvPowerSwitchSelector
Power switch to configure.
GUI name: Power Switch Selector
Type: enumeration
Possible values: PowerSwitch1,
PowerSwitch2, PowerSwitch3,
PowerSwitch4
GUI visibility: expert
LvPowerSwitchBoundADC
Binds an external ADC to the power switch
[LvPowerSwitchSelector]
Type: enumeration
GUI name: Power Switch Bound ADC
Possible values: None, ExternalADC1,
ExternalADC2, ExternalADC3,
ExternalADC4
GUI visibility: expert
Streamable feature, stored with user configuration sets
Drives the selected power switch with desired
polarity
LvPowerSwitchDrive
[LvPowerSwitchSelector]
Type: enumeration
GUI name: Power Switch Drive
Possible values: Off, Plus, Minus
GUI visibility: expert
LvPowerSwitchPulseDuration
Power switch pulse duration in microseconds
[LvPowerSwitchSelector]
Type: float
GUI name: Power Switch Pulse Duration
GUI visibility: expert
Streamable feature, stored with user configuration sets
Unit: us
Pulses the selected power switch with plus polarity
LvPowerSwitchPulsePlus
[LvPowerSwitchSelector]
Type: command
GUI name: Power Switch Pulse Plus
GUI visibility: expert
Copyright © Leutron Vision
220
Leutron
Vision
PicSight-GigE user manual
Camera features and their control
Name
Description
LvPowerSwitchPulseMinus
Pulses the selected power switch with minus
polarity
[LvPowerSwitchSelector]
Type: command
GUI name: Power Switch Pulse Minus
GUI visibility: expert
LvLensControlMinCalibrationRange
Minimum ADC range required for calibration
[LvPowerSwitchSelector]
Type: integer
GUI name: Lens Control Min Calibration Range
GUI visibility: guru
Streamable feature, stored with user configuration sets
LvLensControlCalibrate
Starts automatic calibration
[LvPowerSwitchSelector]
Type: command
GUI name: Lens Control Calibrate
GUI visibility: expert
LvLensControlCalibrationStatus
Reports current calibration status of the selected
power switch and its bound ADC
[LvPowerSwitchSelector]
GUI name: Lens Control Calibration Status
Type: enumeration
Possible values: Invalid, Valid
GUI visibility: expert
Read-only feature
Calibrated minimal ADC achievable by driving
the power switch's with minus polarity (plus if
the polarity is inverted)
LvLensControlMinusEnd
[LvPowerSwitchSelector]
GUI name: Lens Control Minus End
Type: integer
GUI visibility: guru
Streamable feature, stored with user configuration sets
Calibrated maximal ADC achievable by driving
the power switch's with plus polarity (minus if
the polarity is inverted)
LvLensControlPlusEnd
[LvPowerSwitchSelector]
GUI name: Lens Control Plus End
Type: integer
GUI visibility: guru
Streamable feature, stored with user configuration sets
LvLensControlInvertedPolarity
Indicates if the lens is wired with inverted polarity
[LvPowerSwitchSelector]
Type: bool
GUI name: Lens Control Inverted Polarity
GUI visibility: guru
Streamable feature, stored with user configuration sets
Calibrated slow motion pulse period for the selected power switch, in microsesonds
LvLensControlPulsePeriod
[LvPowerSwitchSelector]
Type: float
GUI name: Lens Control Pulse Period
GUI visibility: guru
Streamable feature, stored with user configuration sets
Unit: us
Copyright © Leutron Vision
221
Leutron
Vision
PicSight-GigE user manual
Camera features and their control
Name
Description
LvLensControlDutyCycle
Calibrated slow motion duty cycle on the power
switch
[LvPowerSwitchSelector]
Type: integer
GUI name: Lens Control Duty Cycle
GUI visibility: guru
Streamable feature, stored with user configuration sets
Unit: %
Selects how the target lens position should be
approached
LvLensControlTargetApproach
[LvPowerSwitchSelector]
Type: enumeration
GUI name: Lens Control Target Approach
Possible values: Direct, FromPlus,
FromMinus
GUI visibility: expert
Streamable feature, stored with user configuration sets
LvLensControlNrSlowSteps
Number of slow steps before the target position
[LvPowerSwitchSelector]
Type: integer
GUI name: Lens Control Nr Slow Steps
GUI visibility: guru
Streamable feature, stored with user configuration sets
LvLensControlTargetPosition
Target lens position
[LvPowerSwitchSelector]
Type: integer
GUI name: Lens Control Target Position
GUI visibility: expert
Streamable feature, stored with user configuration sets
LvLensControlAdjustPosition
Adjusts the target lens position
[LvPowerSwitchSelector]
Type: command
GUI name: Lens Control Adjust Position
GUI visibility: expert
LvLensControlCalibrateAll
Starts automatic calibration
GUI name: Lens Control Calibrate All
Type: command
GUI visibility: expert
LvSerialPortBaudRate
Baud rate used for the serial port communication
GUI name: Serial Port Baud Rate
Type: enumeration
Possible values: Baud2400, Baud4800,
Baud9600, Baud14400, Baud19200,
Baud38400, Baud57600, Baud115200
GUI visibility: expert
Streamable feature, stored with user configuration sets
Copyright © Leutron Vision
222
Leutron
Vision
PicSight-GigE user manual
Camera features and their control
Name
Description
LvSerialPortParity
Parity used for the serial port communication
GUI name: Serial Port Parity
Type: enumeration
Possible values: None, Odd, Even
GUI visibility: expert
Streamable feature, stored with user configuration sets
Data bits per character for the serial port communication
LvSerialPortDataBits
GUI name: Serial Port Data Bits
Type: enumeration
Possible values: DataBits7, DataBits8
GUI visibility: expert
Streamable feature, stored with user configuration sets
Stop bits per character for the serial port communication
LvSerialPortStopBits
GUI name: Serial Port Stop Bits
Type: enumeration
Possible values: StopBits1,
StopBits1dot5, StopBits2
GUI visibility: expert
Streamable feature, stored with user configuration sets
Timeout value used to finish waiting for command response
LvSerialPortTimeout
GUI name: Serial Port Timeout
Type: float
GUI visibility: expert
Streamable feature, stored with user configuration sets
Unit: ms
Short string (or single character) marking end
of transmission
LvSerialPortEOTMarker
GUI name: Serial Port EOT Marker
Type: string
GUI visibility: expert
Streamable feature, stored with user configuration sets
LvSerialPortMaxResponseLength
GUI name: Serial Port Max Response Length
Maximal expected length of the command response
Type: integer
GUI visibility: expert
Streamable feature, stored with user configuration sets
Unit: B
Copyright © Leutron Vision
223
Leutron
Vision
PicSight-GigE user manual
Camera features and their control
Name
Description
LvSerialPortCommandString
String of the ASCII command to be sent over the
serial port
GUI name: Serial Port Command String
Type: string
GUI visibility: expert
LvSerialPortCommandSend
Sends the ASCII command over the serial port
GUI name: Send Command Over Serial Port
Type: command
GUI visibility: expert
LvSerialPortCommandResponse
GUI name: Serial Port Command Response
Response to the ASCII command sent over the
serial port
Type: string
GUI visibility: expert
Read-only feature
Status code indicating success of the last command
LvSerialPortCommandStatus
GUI name: Serial Port Command Status
Type: enumeration
Possible values: Success, Timeout,
PortBusy, CommunicationError,
FrameError, ParityError, Overflow
GUI visibility: expert
Read-only feature
Feature category: LUT Control and Image Adjustment , refer to Section 6.10, “Luminance
and color handling” [p. 156]
LvLUTMode
Selects the LUT control mode
GUI name: LUT Mode
Type: enumeration
Possible values: Direct, BalanceWhite,
BrightnessContrast
GUI visibility: expert
Streamable feature, stored with user configuration sets
LUTSelector
Selects which LUT to configure
GUI name: LUT Selector
Type: enumeration
Possible values: Luminance, Red, Green,
Blue
GUI visibility: expert
LUTEnable
Activates the selected LUT
[LUTSelector]
Type: bool
GUI name: LUT Enable
GUI visibility: expert
Streamable feature, stored with user configuration sets
LUTIndex
LUT element index
[LUTSelector]
Type: integer
GUI name: LUT Index
GUI visibility: guru
Copyright © Leutron Vision
224
Leutron
Vision
PicSight-GigE user manual
Camera features and their control
Name
Description
LUTValue
LUT value for the selected index
[LUTIndex]
Type: integer
GUI name: LUT Value
GUI visibility: guru
Streamable feature, stored with user configuration sets
Accesses the entire content of the selected LUT
in one chunk access
LUTValueAll
[LUTSelector]
Type: raw register
GUI name: LUT Value All
GUI visibility: guru
LvLUTReset
Resets the LUT settings
[LUTSelector]
Type: command
GUI name: LUT Reset
GUI visibility: expert
BalanceRatioSelector
Selects which color channel to configure
GUI name: Balance Ratio Selector
Type: enumeration
Possible values: Red, Green, Blue
GUI visibility: expert
BalanceRatio
White balance ratio coefficient
[BalanceRatioSelector]
Type: float
GUI name: Balance Ratio
GUI visibility: expert
Streamable feature, stored with user configuration sets
Controls the mode for automatic white balancing
between the color channels.
BalanceWhiteAuto
GUI name: Automatic White Balance
Type: enumeration
Possible values: Off, Once, Continuous
GUI visibility: expert
Streamable feature, stored with user configuration sets
LvLUTBrightness
Brightness control
GUI name: Brightness
Type: integer
GUI visibility: expert
Streamable feature, stored with user configuration sets
Unit: %
LvLUTContrast
Contrast control
GUI name: Contrast
Type: integer
GUI visibility: expert
Streamable feature, stored with user configuration sets
Unit: %
Feature category: Transport Layer Control , refer to Section 6.4, “Transport layer control” [p. 102]
Copyright © Leutron Vision
225
Leutron
Vision
PicSight-GigE user manual
Camera features and their control
Name
Description
PayloadSize
Number of bytes provided for each image by
the device
GUI name: Payload Size
Type: integer
GUI visibility: expert
Read-only feature
Unit: B
GevVersionMajor
Major version of the GEV specification
GUI name: GigE Vision Version Major
Type: integer
GUI visibility: expert
Read-only feature
GevVersionMinor
Minor version of the GEV specification
GUI name: GigE Vision Version Minor
Type: integer
GUI visibility: expert
Read-only feature
GevDeviceModeIsBigEndian
Endianess of the device registers
GUI name: Device Mode Big Endian
Type: bool
GUI visibility: guru
Read-only feature
GevDeviceClass
Returns the class of the device.
GUI name: Device Class
Type: enumeration
Possible values: Transmitter
GUI visibility: guru
Read-only feature
Character set used by all the strings of the device
registers
GevDeviceModeCharacterSet
GUI name: Character Set
Type: enumeration
Possible values: UTF8
GUI visibility: guru
Read-only feature
Selects which physical network interface to control
GevInterfaceSelector
GUI name: Interface Selector
Type: integer
GUI visibility: beginner
GevMACAddress
MAC address of the network interface.
[GevInterfaceSelector]
Type: integer
GUI name: MAC Address
GUI visibility: beginner
Read-only feature
Copyright © Leutron Vision
226
Leutron
Vision
PicSight-GigE user manual
Camera features and their control
Name
Description
GevSupportedOptionSelector
Selects the GEV option to interrogate for existing
support.
GUI name: Supported Option Selector
Type: enumeration
Possible values:
IPConfigurationPersistentIP,
IPConfigurationDHCP,
IPConfigurationLLA,
CommandsConcatenation, WriteMem,
PacketResend, Event, EventData,
PendingAck, Action,
PrimaryApplicationSwitchover,
ExtendedStatusCodes,
DiscoveryAckDelayWritable,
DiscoveryAckDelay, TestData,
ManifestTable, CCPApplicationSocket,
LinkSpeed, HeartbeatDisable,
SerialNumber, UserDefinedName,
StreamChannelSourceSocket,
StreamChannel0ExtendedChunkData,
StreamChannel0UnconditionalStreaming,
StreamChannel0IPReassembly,
StreamChannel0BigAndLittleEndian,
MessageChannelSourceSocket
GUI visibility: expert
GevSupportedOption
Returns if the selected GEV option is supported.
[GevSupportedOptionSelector]
Type: bool
GUI name: Supported Option
GUI visibility: expert
Read-only feature
Indicates if Link Local Address IP configuration
scheme is activated on the given network interface.
GevCurrentIPConfigurationLLA
[GevInterfaceSelector]
GUI name: LLA Active
Type: bool
GUI visibility: beginner
Read-only feature
GevCurrentIPConfigurationDHCP
[GevInterfaceSelector]
Indicates if DHCP IP configuration scheme is activated on the given network interface.
Type: bool
GUI name: DHCP Active
GUI visibility: beginner
Streamable feature, stored with user configuration sets
GevCurrentIPConfigurationPersistentIP Indicates if persistent IP configuration scheme is
activated on the given network interface.
[GevInterfaceSelector]
Type: bool
GUI name: Persistent IP Active
GUI visibility: beginner
Streamable feature, stored with user configuration sets
Copyright © Leutron Vision
227
Leutron
Vision
PicSight-GigE user manual
Camera features and their control
Name
Description
GevCurrentIPAddress
Reports the IP address for the given network interface.
[GevInterfaceSelector]
Type: integer
GUI name: Current IP Address
GUI visibility: beginner
Read-only feature
GevCurrentSubnetMask
Provides the subnet mask of the given interface.
[GevInterfaceSelector]
Type: integer
GUI name: Current Subnet Mask
GUI visibility: beginner
Read-only feature
Indicates the default gateway IP address to be
used on the given network interface.
GevCurrentDefaultGateway
[GevInterfaceSelector]
Type: integer
GUI name: Current Default Gateway
GUI visibility: beginner
Read-only feature
GevIPConfigurationStatus
Reports the current IP configuration status.
[GevInterfaceSelector]
Type: enumeration
GUI name: IP Configuration Status
Possible values: None, PersistentIP, DHCP,
LLA, ForceIP
GUI visibility: beginner
Read-only feature
Indicates the persistent IP address for this network interface.
GevPersistentIPAddress
[GevInterfaceSelector]
Type: integer
GUI name: Persistent IP Address
GUI visibility: beginner
Indicates the persistent subnet mask associated
with the persistent IP address on this network
interface.
GevPersistentSubnetMask
[GevInterfaceSelector]
GUI name: Persistent Subnet Mask
Type: integer
GUI visibility: beginner
Indicates the persistent default gateway for this
network interface.
GevPersistentDefaultGateway
[GevInterfaceSelector]
Type: integer
GUI name: Persistent Default Gateway
GUI visibility: beginner
Indicates the speed of transmission negotiated
by the given network interface, in Mbs.
GevLinkSpeed
[GevInterfaceSelector]
Type: integer
GUI name: Link Speed
GUI visibility: expert
Unit: Mbps
Indicates the number of physical network interfaces supported by this device.
GevNumberOfInterfaces
GUI name: Number of Interfaces
Type: integer
GUI visibility: expert
Read-only feature
Copyright © Leutron Vision
228
Leutron
Vision
PicSight-GigE user manual
Camera features and their control
Name
Description
GevMessageChannelCount
Indicates the number of message channels supported by this device.
GUI name: Message Channel Count
Type: integer
GUI visibility: expert
Read-only feature
Indicates the number of stream channels supported by this device.
GevStreamChannelCount
GUI name: Stream Channel Count
Type: integer
GUI visibility: expert
Read-only feature
Indicates the current heartbeat timeout in milliseconds.
GevHeartbeatTimeout
GUI name: Heartbeat Timeout
Type: integer
GUI visibility: guru
Unit: ms
Indicates the number of timestamp ticks during
1 second (frequency in Hz).
GevTimestampTickFrequency
GUI name: Timestamp Tick Frequency
Type: integer
GUI visibility: expert
Read-only feature
Unit: Hz
Latches current timestamp counter into GevTimestampValue.
GevTimestampControlLatch
GUI name: Timestamp Latch
Type: command
GUI visibility: expert
GevTimestampControlReset
Resets the Timestamp counter to 0.
GUI name: Timestamp Reset
Type: command
GUI visibility: expert
GevTimestampControlLatchReset
Reset and latch in a single command
GUI name: Timestamp Latch/Reset
Type: command
GUI visibility: expert
Returns the latched 64-bit value of the
timestamp counter.
GevTimestampValue
GUI name: Timestamp Value
Type: integer
GUI visibility: expert
Read-only feature
Unit: us
Copyright © Leutron Vision
229
Leutron
Vision
PicSight-GigE user manual
Camera features and their control
Name
Description
GevDiscoveryAckDelay
Indicates the maximum randomized delay the
device will wait to acknowledge a discovery
command.
GUI name: Discovery Ack Delay
Type: integer
GUI visibility: expert
Unit: ms
GevGVCPExtendedStatusCodes
Enables the generation of extended status codes.
GUI name: Extended Status Codes
Type: bool
GUI visibility: guru
GevGVCPPendingAck
Enables the generation of PENDING_ACK.
GUI name: Pending Ack
Type: bool
GUI visibility: guru
GevGVCPHeartbeatDisable
Disables the GVCP heartbeat.
GUI name: Heartbeat Disable
Type: bool
GUI visibility: expert
Indicates the longest GVCP command execution
time before a device returns a PENDING_ACK.
GevGVCPPendingTimeout
GUI name: Pending Timeout
Type: integer
GUI visibility: guru
Read-only feature
Unit: ms
GevPrimaryApplicationSwitchoverKey Controls the key to use to authenticate primary
application switchover requests.
GUI name: Primary Application Switchover Key
Type: integer
GUI visibility: guru
Controls the device access privilege of an application.
GevCCP
GUI name: Control Channel Privilege
Type: enumeration
Possible values: OpenAccess,
ExclusiveAccess, ControlAccess,
ControlAccessSwitchoverActive
GUI visibility: guru
Returns the UDP source port of the primary application.
GevPrimaryApplicationSocket
GUI name: Primary Application Socket
Type: integer
GUI visibility: guru
Read-only feature
GevPrimaryApplicationIPAddress
Returns the address of the primary application.
GUI name: Primary Application IPAddress
Type: integer
GUI visibility: guru
Read-only feature
Copyright © Leutron Vision
230
Leutron
Vision
PicSight-GigE user manual
Camera features and their control
Name
Description
GevMCPHostPort
Controls the port to which the device must send
messages.
GUI name: Message Channel Host Port
Type: integer
GUI visibility: guru
GevMCDA
GUI name: Message Channel Destination Address
Controls the destination IP address for the message channel.
Type: integer
GUI visibility: guru
GevMCTT
GUI name: Message Channel Transmission Timeout
Provides the transmission timeout value in milliseconds.
Type: integer
GUI visibility: guru
Unit: ms
GevMCRC
GUI name: Message Channel Retry Count
Controls the number of retransmissions allowed
when a message channel message times out.
Type: integer
GUI visibility: guru
This feature indicates the source port for the
message channel.
GevMCSP
GUI name: Message Channel Source Port
Type: integer
GUI visibility: guru
Read-only feature
GevStreamChannelSelector
Selects the stream channel to control.
GUI name: Stream Channel Selector
Type: integer
GUI visibility: expert
GevSCCFGUnconditionalStreaming
[GevStreamChannelSelector]
GUI name: Unconditional Streaming
Enables the camera to continue to stream, for
this stream channel, if its control channel is
closed or regardless of the reception of any ICMP
messages (such as destination unreachable
messages).
Type: bool
GUI visibility: guru
Enables cameras to use the extended chunk data
payload type for this stream channel.
GevSCCFGExtendedChunkData
[GevStreamChannelSelector]
Type: bool
GUI name: Extended Chunk Data
GUI visibility: guru
GevSCPDirection
Reports the direction of the stream channel.
[GevStreamChannelSelector]
Type: enumeration
GUI name: Stream Direction
Possible values: Transmitter
GUI visibility: guru
Read-only feature
Copyright © Leutron Vision
231
Leutron
Vision
PicSight-GigE user manual
Camera features and their control
Name
Description
GevSCPInterfaceIndex
Index of network interface to use
[GevStreamChannelSelector]
Type: integer
GUI name: Interface Index
GUI visibility: guru
GevSCPHostPort
Indicates the port to which the device must send
data stream.
[GevStreamChannelSelector]
Type: integer
GUI name: Host Port
GUI visibility: guru
GevSCPSFireTestPacket
Sends a test packet.
[GevStreamChannelSelector]
Type: bool
GUI name: Fire Test Packet
GUI visibility: guru
GevSCPSDoNotFragment
The state of this feature is copied into the "do
not fragment" bit of IP header of each stream
packet.
[GevStreamChannelSelector]
GUI name: Do Not Fragment
Type: bool
GUI visibility: guru
Specifies the stream packet size in bytes to send
on this channel.
GevSCPSBigEndian
[GevStreamChannelSelector]
Type: bool
GUI name: Is Big Endian
GUI visibility: guru
Read-only feature
Specifies the stream packet size in bytes to send
on this channel.
GevSCPSPacketSize
[GevStreamChannelSelector]
Type: integer
GUI name: Packet Size
GUI visibility: expert
Streamable feature, stored with user configuration sets
Unit: B
Indicates the delay (in timestamp counter unit,
which is currently a microsecond) to insert
between each packet for this stream channel.
GevSCPD
[GevStreamChannelSelector]
GUI name: Inter-Packet Delay
Type: integer
GUI visibility: expert
Streamable feature, stored with user configuration sets
Unit: us
Indicates the destination IP address for this
stream channel.
GevSCDA
[GevStreamChannelSelector]
Type: integer
GUI name: Stream Channel Destination
GUI visibility: guru
GevSCSP
Indicates the source port of the stream channel.
[GevStreamChannelSelector]
Type: integer
GUI name: Stream Channel Source Port
GUI visibility: guru
Read-only feature
Copyright © Leutron Vision
232
Leutron
Vision
PicSight-GigE user manual
Camera features and their control
Name
Description
Feature category: User Sets , refer to Section 6.13, “User sets (saving/loading camera configuration)” [p. 179]
UserSetSelector
Selects configuration set to configure
GUI name: User Configuration Set Selector
Type: enumeration
Possible values: Default, UserSet1,
UserSet2, UserSet3, UserSet4
GUI visibility: beginner
UserSetLoad
Loads the selected user set
[UserSetSelector]
Type: command
GUI name: User Set Load
GUI visibility: beginner
UserSetSave
Saves current configuration into the selected
user set
[UserSetSelector]
Type: command
GUI name: User Set Save
GUI visibility: beginner
UserSetDefaultSelector
Selects the default feature configuraiton set
GUI name: Default Startup Set
Type: enumeration
Possible values: Default, UserSet1,
UserSet2, UserSet3, UserSet4, None
GUI visibility: beginner
Feature category: Chunk Data Control , refer to Section 6.11, “Chunk data” [p. 168]
ChunkModeActive
Enables the chunk mode
GUI name: Chunk Mode Active
Type: bool
GUI visibility: expert
Streamable feature, stored with user configuration sets
ChunkSelector
Selects the chunk to configure
GUI name: Chunk Selector
Type: enumeration
Possible values: OffsetX, OffsetY, Width,
Height, PixelFormat, LinePitch,
FrameID, Timestamp, ExposureTime,
Gain, LineStatusAll, BlackLevel,
LvExternalADCValue, LvSmartAppString,
LvSmartAppInt, LvSmartAppUint,
LvSmartAppRegister, LvTriggerDelayed,
LvStrobeDropped
GUI visibility: expert
ChunkEnable
Enables the selected chunk
[ChunkSelector]
Type: bool
GUI name: Chunk Enable
GUI visibility: expert
Streamable feature, stored with user configuration sets
Copyright © Leutron Vision
233
Leutron
Vision
PicSight-GigE user manual
Camera features and their control
Name
Description
ChunkOffsetX
X offset applied to image included in the payload
GUI name: X Offset
Type: integer
GUI visibility: expert
Read-only feature
Unit: px
ChunkOffsetY
Y offset applied to image included in the payload
GUI name: Y Offset
Type: integer
GUI visibility: expert
Read-only feature
Unit: px
ChunkWidth
Width of the image included in the payload
GUI name: Width
Type: integer
GUI visibility: expert
Read-only feature
Unit: px
ChunkHeight
Height of the image included in the payload
GUI name: Height
Type: integer
GUI visibility: expert
Read-only feature
Unit: px
ChunkPixelFormat
Pixel format of the image included in the payload
GUI name: Pixel Format
Type: enumeration
Possible values: Mono8, Mono8Signed,
Mono10, Mono10Packed, Mono12,
Mono12Packed, Mono16, BayerGR8,
BayerRG8, BayerGB8, BayerBG8,
BayerGR10, BayerRG10, BayerGB10,
BayerBG10, BayerGR12, BayerRG12,
BayerGB12, BayerBG12, RGB8Packed,
BGR8Packed, RGBA8Packed, BGRA8Packed
GUI visibility: expert
Read-only feature
ChunkLinePitch
Line pitch of the image included in the payload
GUI name: Line Pitch
Type: integer
GUI visibility: expert
Read-only feature
Unit: B
ChunkFrameID
Frame id of the image included in the payload
GUI name: Frame ID
Type: integer
GUI visibility: expert
Read-only feature
Copyright © Leutron Vision
234
Leutron
Vision
PicSight-GigE user manual
Camera features and their control
Name
Description
ChunkTimestamp
Timestamp associated with the image included
in the payload
GUI name: Timestamp
Type: integer
GUI visibility: expert
Read-only feature
Unit: us
Exposure time used to acquire the image included in the payload
ChunkExposureTime
GUI name: Exposure Time
Type: float
GUI visibility: expert
Read-only feature
Unit: us
ChunkGainSelector
Gain type to be reported in chunk data
GUI name: Gain Selector
Type: enumeration
Possible values: AnalogAll, DigitalAll
GUI visibility: expert
Gain used to acquire the image included in the
payload
ChunkGain
[ChunkGainSelector]
Type: float
GUI name: Gain
GUI visibility: expert
Read-only feature
Unit: dB
Black level used to acquire the image included
in the payload
ChunkBlackLevel
GUI name: Black Level
Type: float
GUI visibility: expert
Read-only feature
Unit: DN
Status of i/o lines at time of acquiring the image
in the payload
ChunkLineStatusAll
GUI name: Line Status All
Type: integer
GUI visibility: expert
Read-only feature
ChunkLvExternalADCSelector
>External ADC to be reported in chunk data
GUI name: External ADC Selector
Type: enumeration
Possible values: ExternalADC1,
ExternalADC2, ExternalADC3,
ExternalADC4
GUI visibility: expert
Copyright © Leutron Vision
235
Leutron
Vision
PicSight-GigE user manual
Camera features and their control
Name
Description
ChunkLvExternalADCValue
Value of the selected external ADC at time of
acquisition of the image included in the payload
[ChunkLvExternalADCSelector]
Type: integer
GUI name: External ADC Value
GUI visibility: expert
Read-only feature
Unit: DN
Flag indicating if the trigger was delayed when
acquiring the image included in the payload
ChunkLvTriggerDelayed
GUI name: Trigger Delayed
Type: bool
GUI visibility: expert
Read-only feature
Flag indicating if the configured strobe was
dropped when acquiring the image included in
the payload
ChunkLvStrobeDropped
GUI name: Strobe Dropped
Type: bool
GUI visibility: expert
Read-only feature
The smart application string related to the delivered payload
ChunkLvSmartAppString
GUI name: Smart Application String
Type: string
GUI visibility: expert
Read-only feature
Selects one of the signed integer values related
to the delivered payload
ChunkLvSmartAppIntSelector
GUI name: Smart Application Signed Integer SelectType: integer
or
GUI visibility: expert
The selected smart application signed integer
related to the delivered payload
ChunkLvSmartAppInt
[ChunkLvSmartAppIntSelector]
GUI name: Smart Application Signed Integer
Type: integer
GUI visibility: expert
ChunkLvSmartAppUintSelector
GUI name: Smart Application Unsigned Integer
Selector
Selects one of the unsigned integer values related
to the delivered payload
Type: integer
GUI visibility: expert
The selected smart application unsigned integer
related to the delivered payload
ChunkLvSmartAppUint
[ChunkLvSmartAppUintSelector]
GUI name: Smart Application Unsigned Integer
Type: integer
GUI visibility: expert
The smart application raw register related to the
delivered payload
ChunkLvSmartAppRegister
GUI name: Smart Application Register
Type: raw register
GUI visibility: expert
Feature category: Event Control , refer to Section 6.12, “Asynchronous events” [p. 173]
Copyright © Leutron Vision
236
Leutron
Vision
PicSight-GigE user manual
Camera features and their control
Name
Description
EventSelector
Selects which event to signal to the host application.
GUI name: Event Selector
Type: enumeration
Possible values: LvLog, LvSmartAppLog,
LvSmartAppString, LvSmartAppInt,
LvSmartAppUint, LvSmartAppRegister,
LvTriggerDropped
GUI visibility: expert
Activate or deactivate the notification to the host
application of the selected event occurrence.
EventNotification
[EventSelector]
Type: enumeration
GUI name: Event Notification
Possible values: Off, On
GUI visibility: expert
Streamable feature, stored with user configuration sets
Returns the unique identifier of the log type of
event.
EventLvLog
GUI name: Log Event
Type: integer
GUI visibility: expert
Read-only feature
EventLvLogTimestamp
Returns the timestamp of the log event.
GUI name: Log Event Timestamp
Type: integer
GUI visibility: expert
Read-only feature
Unit: us
EventLvLogMessage
The log message coming with the event
GUI name: Log Event Message
Type: string
GUI visibility: expert
Read-only feature
Returns the unique identifier of the dropped
trigger type of event.
EventLvTriggerDropped
GUI name: Trigger Dropped Event
Type: integer
GUI visibility: expert
Read-only feature
EventLvTriggerDroppedTimestamp
GUI name: Trigger Dropped Event Timestamp
Returns the timestamp of the dropped trigger
event.
Type: integer
GUI visibility: expert
Read-only feature
Unit: us
Copyright © Leutron Vision
237
Leutron
Vision
PicSight-GigE user manual
Camera features and their control
Name
Description
EventLvSmartAppLog
Returns the unique identifier of the smart application log type of event.
GUI name: Smart Application Log Event
Type: integer
GUI visibility: expert
Read-only feature
EventLvSmartAppLogTimestamp
GUI name: Smart Application Log Event Timestamp
Returns the timestamp of the smart application
Smart Application Log Event.
Type: integer
GUI visibility: expert
Read-only feature
Unit: us
EventLvSmartAppLogMessage
GUI name: Smart Application Log Event Message
The smart application log message comming
with the event
Type: string
GUI visibility: expert
Read-only feature
Returns the unique identifier of the smart application string type of event.
EventLvSmartAppString
GUI name: String Event
Type: integer
GUI visibility: expert
Read-only feature
EventLvSmartAppStringTimestamp
GUI name: String Event Timestamp
Returns the timestamp of the smart application
string event.
Type: integer
GUI visibility: expert
Read-only feature
Unit: us
The smart application string value coming with
the event
EventLvSmartAppStringValue
GUI name: String Event Value
Type: string
GUI visibility: expert
Read-only feature
Returns the unique identifier of the smart application signed integer type of event.
EventLvSmartAppInt
GUI name: Signed Integer Event
Type: integer
GUI visibility: expert
Read-only feature
Copyright © Leutron Vision
238
Leutron
Vision
PicSight-GigE user manual
Camera features and their control
Name
Description
EventLvSmartAppIntTimestamp
Returns the timestamp of the smart application
signed integer event.
GUI name: Signed Integer Event Timestamp
Type: integer
GUI visibility: expert
Read-only feature
Unit: us
Selects one of the signed integer values coming
with the event
EventLvSmartAppIntSelector
GUI name: Signed Integer Event Selector
Type: integer
GUI visibility: expert
Value of the selected signed integer coming with
the event
EventLvSmartAppIntValue
[EventLvSmartAppIntSelector]
Type: integer
GUI name: Signed Integer Event Value
GUI visibility: expert
Returns the unique identifier of the smart application unsigned integer type of event.
EventLvSmartAppUint
GUI name: Unsigned Integer Event
Type: integer
GUI visibility: expert
Read-only feature
EventLvSmartAppUintTimestamp
GUI name: Unsigned Integer Event Timestamp
Returns the timestamp of the smart application
unsigned integer event.
Type: integer
GUI visibility: expert
Read-only feature
Unit: us
EventLvSmartAppUintSelector
GUI name: Unsigned Integer Event Selector
Selects one of the unsigned integer values coming with the event
Type: integer
GUI visibility: expert
Value of the selected unsigned integer coming
with the event
EventLvSmartAppUintValue
[EventLvSmartAppUintSelector]
Type: integer
GUI name: Unsigned Integer Event Value
GUI visibility: expert
Returns the unique identifier of the smart application raw register type of event.
EventLvSmartAppRegister
GUI name: Register Event
Type: integer
GUI visibility: expert
Read-only feature
Copyright © Leutron Vision
239
Leutron
Vision
PicSight-GigE user manual
Camera features and their control
Name
Description
EventLvSmartAppRegisterTimestamp
Returns the timestamp of the smart application
raw register event.
GUI name: Register Event Timestamp
Type: integer
GUI visibility: expert
Read-only feature
Unit: us
The smart application raw register value coming
with the event
EventLvSmartAppRegisterValue
GUI name: Register Event Value
Type: raw register
GUI visibility: expert
Feature category: Smart Application Features , refer to Section 6.16, “Smart application
control” [p. 200]
LvSmartAppID
ID string the smart application
GUI name: Smart Application ID
Type: string
GUI visibility: expert
Read-only feature
Generic signed integer register controlling a
smart application.
LvSmartAppInt1
GUI name: Signed Integer 1
Type: integer
GUI visibility: expert
Generic signed integer register controlling a
smart application.
LvSmartAppInt2
GUI name: Signed Integer 2
Type: integer
GUI visibility: expert
Generic signed integer register controlling a
smart application.
LvSmartAppInt3
GUI name: Signed Integer 3
Type: integer
GUI visibility: expert
Generic signed integer register controlling a
smart application.
LvSmartAppInt4
GUI name: Signed Integer 4
Type: integer
GUI visibility: expert
Generic signed integer register controlling a
smart application.
LvSmartAppInt5
GUI name: Signed Integer 5
Type: integer
GUI visibility: expert
Generic signed integer register controlling a
smart application.
LvSmartAppInt6
GUI name: Signed Integer 6
Type: integer
GUI visibility: expert
Copyright © Leutron Vision
240
Leutron
Vision
PicSight-GigE user manual
Camera features and their control
Name
Description
LvSmartAppInt7
Generic signed integer register controlling a
smart application.
GUI name: Signed Integer 7
Type: integer
GUI visibility: expert
Generic signed integer register controlling a
smart application.
LvSmartAppInt8
GUI name: Signed Integer 8
Type: integer
GUI visibility: expert
Generic signed integer register controlling a
smart application.
LvSmartAppInt9
GUI name: Signed Integer 9
Type: integer
GUI visibility: expert
Generic signed integer register controlling a
smart application.
LvSmartAppInt10
GUI name: Signed Integer 10
Type: integer
GUI visibility: expert
Generic signed integer register controlling a
smart application.
LvSmartAppInt11
GUI name: Signed Integer 11
Type: integer
GUI visibility: expert
Generic signed integer register controlling a
smart application.
LvSmartAppInt12
GUI name: Signed Integer 12
Type: integer
GUI visibility: expert
Generic signed integer register controlling a
smart application.
LvSmartAppInt13
GUI name: Signed Integer 13
Type: integer
GUI visibility: expert
Generic signed integer register controlling a
smart application.
LvSmartAppInt14
GUI name: Signed Integer 14
Type: integer
GUI visibility: expert
Generic signed integer register controlling a
smart application.
LvSmartAppInt15
GUI name: Signed Integer 15
Type: integer
GUI visibility: expert
Generic signed integer register controlling a
smart application.
LvSmartAppInt16
GUI name: Signed Integer 16
Type: integer
GUI visibility: expert
Copyright © Leutron Vision
241
Leutron
Vision
PicSight-GigE user manual
Camera features and their control
Name
Description
LvSmartAppInt17
Generic signed integer register controlling a
smart application.
GUI name: Signed Integer 17
Type: integer
GUI visibility: expert
Generic signed integer register controlling a
smart application.
LvSmartAppInt18
GUI name: Signed Integer 18
Type: integer
GUI visibility: expert
Generic signed integer register controlling a
smart application.
LvSmartAppInt19
GUI name: Signed Integer 19
Type: integer
GUI visibility: expert
Generic signed integer register controlling a
smart application.
LvSmartAppInt20
GUI name: Signed Integer 20
Type: integer
GUI visibility: expert
Generic signed integer register controlling a
smart application.
LvSmartAppInt21
GUI name: Signed Integer 21
Type: integer
GUI visibility: expert
Generic signed integer register controlling a
smart application.
LvSmartAppInt22
GUI name: Signed Integer 22
Type: integer
GUI visibility: expert
Generic signed integer register controlling a
smart application.
LvSmartAppInt23
GUI name: Signed Integer 23
Type: integer
GUI visibility: expert
Generic signed integer register controlling a
smart application.
LvSmartAppInt24
GUI name: Signed Integer 24
Type: integer
GUI visibility: expert
Generic signed integer register controlling a
smart application.
LvSmartAppInt25
GUI name: Signed Integer 25
Type: integer
GUI visibility: expert
Generic signed integer register controlling a
smart application.
LvSmartAppInt26
GUI name: Signed Integer 26
Type: integer
GUI visibility: expert
Copyright © Leutron Vision
242
Leutron
Vision
PicSight-GigE user manual
Camera features and their control
Name
Description
LvSmartAppInt27
Generic signed integer register controlling a
smart application.
GUI name: Signed Integer 27
Type: integer
GUI visibility: expert
Generic signed integer register controlling a
smart application.
LvSmartAppInt28
GUI name: Signed Integer 28
Type: integer
GUI visibility: expert
Generic signed integer register controlling a
smart application.
LvSmartAppInt29
GUI name: Signed Integer 29
Type: integer
GUI visibility: expert
Generic signed integer register controlling a
smart application.
LvSmartAppInt30
GUI name: Signed Integer 30
Type: integer
GUI visibility: expert
Generic signed integer register controlling a
smart application.
LvSmartAppInt31
GUI name: Signed Integer 31
Type: integer
GUI visibility: expert
Generic signed integer register controlling a
smart application.
LvSmartAppInt32
GUI name: Signed Integer 32
Type: integer
GUI visibility: expert
Generic unsigned integer register controlling a
smart application.
LvSmartAppUint1
GUI name: Unsigned Integer 1
Type: integer
GUI visibility: expert
Generic unsigned integer register controlling a
smart application.
LvSmartAppUint2
GUI name: Unsigned Integer 2
Type: integer
GUI visibility: expert
Generic unsigned integer register controlling a
smart application.
LvSmartAppUint3
GUI name: Unsigned Integer 3
Type: integer
GUI visibility: expert
Generic unsigned integer register controlling a
smart application.
LvSmartAppUint4
GUI name: Unsigned Integer 4
Type: integer
GUI visibility: expert
Copyright © Leutron Vision
243
Leutron
Vision
PicSight-GigE user manual
Camera features and their control
Name
Description
LvSmartAppUint5
Generic unsigned integer register controlling a
smart application.
GUI name: Unsigned Integer 5
Type: integer
GUI visibility: expert
Generic unsigned integer register controlling a
smart application.
LvSmartAppUint6
GUI name: Unsigned Integer 6
Type: integer
GUI visibility: expert
Generic unsigned integer register controlling a
smart application.
LvSmartAppUint7
GUI name: Unsigned Integer 7
Type: integer
GUI visibility: expert
Generic unsigned integer register controlling a
smart application.
LvSmartAppUint8
GUI name: Unsigned Integer 8
Type: integer
GUI visibility: expert
Generic unsigned integer register controlling a
smart application.
LvSmartAppUint9
GUI name: Unsigned Integer 9
Type: integer
GUI visibility: expert
Generic unsigned integer register controlling a
smart application.
LvSmartAppUint10
GUI name: Unsigned Integer 10
Type: integer
GUI visibility: expert
Generic unsigned integer register controlling a
smart application.
LvSmartAppUint11
GUI name: Unsigned Integer 11
Type: integer
GUI visibility: expert
Generic unsigned integer register controlling a
smart application.
LvSmartAppUint12
GUI name: Unsigned Integer 12
Type: integer
GUI visibility: expert
Generic unsigned integer register controlling a
smart application.
LvSmartAppUint13
GUI name: Unsigned Integer 13
Type: integer
GUI visibility: expert
Generic unsigned integer register controlling a
smart application.
LvSmartAppUint14
GUI name: Unsigned Integer 14
Type: integer
GUI visibility: expert
Copyright © Leutron Vision
244
Leutron
Vision
PicSight-GigE user manual
Camera features and their control
Name
Description
LvSmartAppUint15
Generic unsigned integer register controlling a
smart application.
GUI name: Unsigned Integer 15
Type: integer
GUI visibility: expert
Generic unsigned integer register controlling a
smart application.
LvSmartAppUint16
GUI name: Unsigned Integer 16
Type: integer
GUI visibility: expert
Generic unsigned integer register controlling a
smart application.
LvSmartAppUint17
GUI name: Unsigned Integer 17
Type: integer
GUI visibility: expert
Generic unsigned integer register controlling a
smart application.
LvSmartAppUint18
GUI name: Unsigned Integer 18
Type: integer
GUI visibility: expert
Generic unsigned integer register controlling a
smart application.
LvSmartAppUint19
GUI name: Unsigned Integer 19
Type: integer
GUI visibility: expert
Generic unsigned integer register controlling a
smart application.
LvSmartAppUint20
GUI name: Unsigned Integer 20
Type: integer
GUI visibility: expert
Generic unsigned integer register controlling a
smart application.
LvSmartAppUint21
GUI name: Unsigned Integer 21
Type: integer
GUI visibility: expert
Generic unsigned integer register controlling a
smart application.
LvSmartAppUint22
GUI name: Unsigned Integer 22
Type: integer
GUI visibility: expert
Generic unsigned integer register controlling a
smart application.
LvSmartAppUint23
GUI name: Unsigned Integer 23
Type: integer
GUI visibility: expert
Generic unsigned integer register controlling a
smart application.
LvSmartAppUint24
GUI name: Unsigned Integer 24
Type: integer
GUI visibility: expert
Copyright © Leutron Vision
245
Leutron
Vision
PicSight-GigE user manual
Camera features and their control
Name
Description
LvSmartAppUint25
Generic unsigned integer register controlling a
smart application.
GUI name: Unsigned Integer 25
Type: integer
GUI visibility: expert
Generic unsigned integer register controlling a
smart application.
LvSmartAppUint26
GUI name: Unsigned Integer 26
Type: integer
GUI visibility: expert
Generic unsigned integer register controlling a
smart application.
LvSmartAppUint27
GUI name: Unsigned Integer 27
Type: integer
GUI visibility: expert
Generic unsigned integer register controlling a
smart application.
LvSmartAppUint28
GUI name: Unsigned Integer 28
Type: integer
GUI visibility: expert
Generic unsigned integer register controlling a
smart application.
LvSmartAppUint29
GUI name: Unsigned Integer 29
Type: integer
GUI visibility: expert
Generic unsigned integer register controlling a
smart application.
LvSmartAppUint30
GUI name: Unsigned Integer 30
Type: integer
GUI visibility: expert
Generic unsigned integer register controlling a
smart application.
LvSmartAppUint31
GUI name: Unsigned Integer 31
Type: integer
GUI visibility: expert
Generic unsigned integer register controlling a
smart application.
LvSmartAppUint32
GUI name: Unsigned Integer 32
Type: integer
GUI visibility: expert
String of the ASCII command for the smart application
LvSmartAppAsciiCmdString
GUI name: ASCII Command String
Type: string
GUI visibility: expert
Executes the ASCII command for the smart application
LvSmartAppAsciiCmdExecute
GUI name: ASCII Command Execute
Type: command
GUI visibility: expert
Copyright © Leutron Vision
246
Leutron
Vision
PicSight-GigE user manual
Camera features and their control
Name
Description
LvSmartAppAsciiCmdFeedback
Response to the ASCII command for the smart
application
GUI name: ASCII Command Response
Type: string
GUI visibility: expert
Read-only feature
Numeric return code of the ASCII command for
the smart application
LvSmartAppAsciiCmdRetCode
GUI name: ASCII Command Return Code
Type: integer
GUI visibility: expert
Read-only feature
LvSmartAppPath
Path of the smart application to be started
GUI name: Smart Application Path
Type: string
GUI visibility: expert
LvSmartAppStart
Starts the smart application defined by the path
GUI name: Start Smart Application
Type: command
GUI visibility: expert
LvSmartAppExitEvent
GUI name: Send Smart Application Exit Event
Sends an exit event to the running smart application
Type: command
GUI visibility: expert
Table 6.2. Summary of all camera features (some of them available only by
specific models)
Copyright © Leutron Vision
247
Leutron
Vision
PicSight-GigE user manual
Simplon GenTL Producer features
7. Simplon GenTL Producer features
The behaviour of the Simplon GenTL Producer can be controlled through feature trees, similarly
as the features of the camera itself (the camera features were documented in Chapter 6, Camera
features and their control [p. 96]). The basic principles of work with the Simplon GenTL Producer
features are same as with the camera features, refer to the introduction in Section 6.1, “Common
principles” [p. 96].
This chapter will discuss the Simplon GenTL Producer features, some of them dictated by the
GenTL standard, others specific to Simplon. The chapter will discuss the Simplon GenTL Producer
in general, considering all Leutron Vision camera families. Note that the chapter is irrelevant for
users connecting to our GigE Vision cameras (PicSight-GigE/PicSight-Smart) directly through the
GigE Vision interface of a 3rd party library — in such case the Simplon GenTL Producer is not involved.
A feature set is associated with every GenTL module instance. The module types are:
•
•
•
•
•
System — represents the entire GenTL producer.
Interface — an interface through which the cameras (devices) are connected to the system.
Device — GenTL producer's view of the camera (device).
Data stream — controls image acquisition from the camera.
Buffer — wraps a single acquisition buffer. Simplon GenTL Producer currently does not provide
any buffer related features.
The availability and use of the individual features is the same, regardless if you access the Simplon
GenTL Producer through Simplon API or through a 3rd party GenTL compatible library. Individual
libraries might slightly differ in details such as how the individual GenTL modules are enumerated
and opened, but the functionality will be the same in the end. For more information about the
GenTL producer access and configuration, refer to Simplon programmer's guide or to documentation of the 3rd party library you are using. You might also want to study Chapter 8, Connecting
with 3rd party software packages [p. 269].
Overview of all the supported features is in Section 7.5, “Simplon GenTL Producer feature summary” [p. 262].
The Simplon API extends the individual feature sets with even more features for each “GenTL
module”. These features are, however, discussed in the corresponding manual, Simplon programmer's guide.
7.1. GenTL system module
The system module represents the entire GenTL producer, there's always exactly one instance of
this module. It allows to obtain basic information about the GenTL producer, enumerate its
available device interfaces and obtain basic information about the interfaces even before actually
opening them.
Copyright © Leutron Vision
248
Leutron
Vision
PicSight-GigE user manual
Simplon GenTL Producer features
Figure 7.1. Example GUI showing the GenTL system module features
7.1.1. Information about the system
The system module provides basic set of features describing the GenTL producer implementation:
Transport Layer Vendor
Name of the vendor implementing given GenTL producer. For
Simplon GenTL Producer this naturally reads Leutron
Vision.
Transport Layer Model
Name of the GenTL producer itself, in our case Simplon
GenTL Producer.
Transport Layer ID
Unique ID of the transport layer producer. This feature is used
for communication between the GenTL producer and consumer, it should not be interpreted anyhow by the user.
Transport Layer Version
String representation of the GenTL producer's version number.
This feature provides the version number of the installed Simplon package.
Transport Layer Path
Path to the GenTL producer file (the .cti file). The exact location depends on how the Simplon package was installed.
Transport Layer Type
Another feature dictated by the GenTL specification. It informs
the consumer about the camera interface technologies it supports. For Simplon GenTL Producer it's always Mixed, because
the producer supports multiple camera interfaces (CheckSight/CheckSight-II cameras and GigE Vision compatible cameras).
GenTL Version Major/GenTL Version Minor
Major/minor version of the GenTL specification implemented
by the producer.
GigE Vision Version Major/GigE
Vision Version Minor
Major/minor version of the GigE Vision specification implemented by the GenTL producer's component handling GigE Vision
cameras.
LvHSystem hSys; // open the system to get the handle
// read basic information about the system
char StringVal[1024];
LvGetString (hSys, LvSystem_TLVendorName, StringVal, 1024);
LvGetString (hSys, LvSystem_TLModelName, StringVal, 1024);
Copyright © Leutron Vision
249
Leutron
Vision
PicSight-GigE user manual
Simplon GenTL Producer features
LvGetString (hSys, LvSystem_TLID, StringVal, 1024);
LvGetString (hSys, LvSystem_TLVersion, StringVal, 1024);
LvGetString (hSys, LvSystem_TLPath, StringVal, 1024);
int32_t EnumVal;
LvGetEnum(hSys, LvSystem_TLType, &EnumVal);
int32_t IntVal;
LvGetInt32 (hSys, LvSystem_GenTLVersionMajor, &IntVal);
LvGetInt32 (hSys, LvSystem_GenTLVersionMinor, &IntVal);
LvGetInt32 (hSys, LvSystem_GevVersionMajor, &IntVal);
LvGetInt32 (hSys, LvSystem_GevVersionMinor, &IntVal);
// read basic information about the system
read_string (TLVendorName)
read_string (TLModelName)
read_string (TLID)
read_string (TLVersion)
read_string (TLPath)
read_enum (TLType)
read_int (GenTLVersionMajor)
read_int (GenTLVersionMinor)
read_int (GevVersionMajor)
read_int (GevVersionMinor)
7.1.2. Interface enumeration
The system module also provides means for GenTL interface enumeration and querying basic information about the interfaces without need to open them. Note that some of the GigE Vision
specific features are only available on the GigE Vision interfaces — and even only if the producer
creates one interface module for every network card (see also Section 7.2, “GenTL interface
module” [p. 252]).
Update Interface List
Command asking the GenTL producer to rescan the currently
available camera interfaces and update its internal interface
list.
Note that Simplon API executes this command internally when
enumerating/discovering the interfaces, so there's no need to
access this feature directly when using Simplon API.
Interface Selector
Selects one of the discovered interfaces and allows to query
information about the interfaces through the depending features (see below).
The Interface Selector is an integer feature with zero-based indexing of the discovered interfaces. The index corresponds
with the same index in the GenTL C interface. The current
range of the selector (zero through its current maximum) corresponds with the number of discovered interfaces.
Note that in Simplon API the interfaces are accessed through
corresponding handles and the interface indexes/ID's are fully
wrapped into the handles — they can be usually ignored by
Simplon API users.
Copyright © Leutron Vision
250
Leutron
Vision
PicSight-GigE user manual
Simplon GenTL Producer features
Interface ID
Unique ID of the selected interface. This feature is used for
communication between the GenTL producer and consumer,
it should not be interpreted anyhow by the user.
Interface MAC Address
MAC address corresponding with the selected interface.
GigE Vision interfaces only.
Interface Default IP Address
Default IP address configured on the selected interface.
GigE Vision interfaces only.
Interface Default Subnet Mask
Default subnet mask configured on the selected interface.
GigE Vision interfaces only.
Interface Default Gateway
Default gateway configured on the selected interface.
GigE Vision interfaces only.
LvHSystem hSys; // open the system to get the handle
// rescan the list of available interfaces
// (waiting for operation completion)
LvCmdExecute (hSys, LvSystem_InterfaceUpdateList);
// (now wait until the operation end using LvCmdIsDone())
// read information about the first discovered interface
// (i.e. interface with index 0)
LvSetInt32 (hSys, LvSystem_InterfaceSelector, 0);
char StringVal[1024];
LvGetString (hSys, LvSystem_InterfaceID, StringVal, 1024);
if (LvIsAvailable (hSys, LvSystem_GevInterfaceMACAddress))
{
// MAC/IP addresses can be read as integers or formatted strings
int32_t IntVal;
int64_t Int64Val;
LvGetInt64 (hSys, LvSystem_GevInterfaceMACAddress, &Int64Val);
LvGetString (hSys, LvSystem_GevInterfaceMACAddress, StringVal, 1024);
LvGetInt32 (hSys, LvSystem_GevInterfaceDefaultIPAddress, &IntVal);
LvGetInt32 (hSys, LvSystem_GevInterfaceDefaultSubnetMask, &IntVal);
LvGetInt32 (hSys, LvSystem_GevInterfaceDefaultGateway, &IntVal);
}
// rescan the list of available interfaces
// (waiting for operation completion)
exec_cmd (InterfaceUpdateList)
wait_until_done (InterfaceUpdateList)
// read information about the first discovered interface
// (i.e. interface with index 0)
write_int (InterfaceSelector, 0)
read_string (InterfaceID)
read_int (GevInterfaceMACAddress)
read_int (GevInterfaceDefaultIPAddress)
Copyright © Leutron Vision
251
Leutron
Vision
PicSight-GigE user manual
Simplon GenTL Producer features
read_int (GevInterfaceDefaultSubnetMask)
read_int (GevInterfaceDefaultGateway)
7.2. GenTL interface module
The interface module symbolizes a physical interface through which the GenTL producer discovers
and connects to the cameras (“devices”). It allows to obtain basic information about the interface,
enumerate the devices currently accessible through the interface and obtain basic information
about the devices even before actually opening them.
• The CheckSight/CheckSight-II cameras are always connected through a “PCI Interface”. The
name indicates that the camera's acquisition module is connected to the system through PCIExpress.
• The GigE Vision cameras (PicSight-GigE, PicSight-Smart or any other GigE Vision compatible
cameras) connect through dedicated interface(s). Depending on Simplon version and/or configuration there might be either a single common logical interface called “GigE Interface” which
encapsulates all physical network interfaces (network cards) available in the system. Alternately,
there might be one GenTL interface per physical network card. In the latter case, the network
related information features (such as MAC address) are reported. When using the single logical
interface, representing all the network cards, the per-card features are hidden.
Figure 7.2. Example GUI showing the GenTL interface module features
7.2.1. Information about the interface
The interface module provides basic set of features describing its properties:
Interface ID
Unique ID of the interface. This feature is used for communication between the GenTL producer and consumer, it should
not be interpreted anyhow by the user.
Interface Type
A feature dictated by the GenTL specification. It informs the
consumer about the camera interface technology it supports.
For Simplon GenTL Producer it's always GigE Vision for the interface(s) handling the GigE Vision cameras (such as PicSightGigE) and Custom for the interface controlling CheckSight/CheckSight-II.
Copyright © Leutron Vision
252
Leutron
Vision
PicSight-GigE user manual
Interface MAC Address
Simplon GenTL Producer features
MAC address corresponding with the interface.
GigE Vision interfaces only.
Interface gateways' information
The Interface Gateway Selector feature (zero based integer index)
allows to loop through the gateways configured for given GigE
Vision interface. The Interface Gateway then reports the IP address of the selected gateway.
GigE Vision interfaces only.
Interface subnets' information
The Interface Subnet Selector feature (zero based integer index)
allows to loop through the subnets configured for given GigE
Vision interface. The Interface Subnet IP Address/Interface Subnet
Mask then report the IP address and subnet mask corresponding
with the selected subnet.
GigE Vision interfaces only.
LvHInterface hItf; // open the interface to get the handle
// read basic information about the interface
char StringVal[1024];
LvGetString (hItf, LvInterface_InterfaceID, StringVal, 1024);
int32_t EnumVal;
LvGetEnum(hItf, LvInterface_InterfaceType, &EnumVal);
if (LvIsAvailable (hItf, LvInterface_GevMACAddress))
{
// MAC/IP addresses can be read as integers or formatted strings
int32_t IntVal;
int64_t Int64Val;
LvGetInt64 (hItf, LvInterface_GevMACAddress, &Int64Val);
LvGetString (hItf, LvInterface_GevMACAddress, StringVal, 1024);
// first gateway
LvSetInt32 (hItf, LvInterface_GevInterfaceGatewaySelector, 0);
LvGetInt32 (hItf, LvInterface_GevInterfaceGateway, &IntVal);
// first subnet
LvSetInt32 (hItf, LvInterface_GevInterfaceSubnetSelector, 0);
LvGetInt32 (hItf, LvInterface_GevInterfaceSubnetIPAddress, &IntVal);
LvGetInt32 (hItf, LvInterface_GevInterfaceSubnetMask, &IntVal);
}
// read basic information about the interface
read_string (InterfaceID)
read_enum (InterfaceType)
read_int (GevMACAddress)
// first gateway
write_int (GevInterfaceGatewaySelector, 0)
read_int (GevInterfaceGateway)
// first subnet
write_int (GevInterfaceSubnetSelector, 0)
read_int (GevInterfaceSubnetIPAddress)
read_int (GevInterfaceSubnetMask)
Copyright © Leutron Vision
253
Leutron
Vision
PicSight-GigE user manual
Simplon GenTL Producer features
7.2.2. Device enumeration
The interface module also provides means for device (camera) enumeration and querying basic
information about the devices without need to open them. Note that some of the GigE Vision
specific features are only available for the GigE Vision devices Unlike with interface enumeration,
the device enumeration might be done repeatedly at runtime by some applications since devices
(in particular the GigE Vision cameras) might go away or get connected to the system any time,
so the device list is more dynamic by its nature.
Update Device List
Command asking the GenTL producer to rescan the list of devices
currently accessible through given interface.
Keep in mind that after the update, the contents of the list of the
devices “known” to the Simplon GenTL Producer might change,
including their order. Handles to the opened devices are guaranteed
to remain valid, however.
Note that Simplon API executes this command internally when
enumerating/discovering the devices, so there's no need to access
this feature directly when using Simplon API.
Device Selector
Selects one of the discovered devices and allows to query information
about the devices through the depending features (see below).
The Device Selector is an integer feature with zero-based indexing of
the discovered devices. The index corresponds with the same index
in the GenTL C interface. The current range of the selector (zero
through its current maximum) corresponds with the number of
discovered devices.
Note that in Simplon API the devices are accessed through corresponding handles and the device indexes/ID's are fully wrapped into
the handles — they can be usually ignored by Simplon API users.
Device ID
Globally unique ID of the selected device. This feature is used for
communication between the GenTL producer and consumer, it
should not be interpreted anyhow by the user.
Device Vendor Name
Name of the selected camera's vendor (manufacturer).
Device Model Name
Model name of the selected camera.
Device Access Status
Access status of the selected device at the time of the last device list
update. This enumeration feature can report following status options:
Read/Write (the device can be opened for reading and writing), Read
Only (the device can be opened in read-only mode), No Access (the
device cannot be currently opened — e.g. because it's opened by
another application already).
Device User ID
User ID (also known as nickname) of the selected device. The user
ID's can be assigned by the user to individual cameras — and used
as custom device identification scheme. In Simplon API the User ID
can be directly used as device (camera) identifier when opening it.
Device Serial Number
Serial number (as a string) of the selected device.
Device MAC Address
MAC address of the selected device.
GigE Vision devices only.
Copyright © Leutron Vision
254
Leutron
Vision
PicSight-GigE user manual
Device IP Address
Simplon GenTL Producer features
Current IP address of the selected device.
GigE Vision devices only.
Device Subnet Mask
Current subnet mask of the selected device.
GigE Vision devices only.
LvHInterface hItf; // open the interface to get the handle
// rescan the list of available devices
// (waiting for operation completion)
LvCmdExecute (hItf, LvInterface_DeviceUpdateList);
// (now wait until the operation end using LvCmdIsDone())
// read information about the first discovered device
// (i.e. device with index 0)
LvSetInt32 (hItf, LvInterface_DeviceSelector, 0);
char StringVal[1024];
LvGetString (hItf, LvInterface_DeviceID, StringVal, 1024);
LvGetString (hItf, LvInterface_DeviceVendorName, StringVal, 1024);
LvGetString (hItf, LvInterface_DeviceModelName, StringVal, 1024);
LvGetString (hItf, LvInterface_LvDeviceUserID, StringVal, 1024);
LvGetString (hItf, LvInterface_LvDeviceSerialNumber, StringVal, 1024);
int32_t EnumVal;
LvGetEnum(hItf, LvInterface_DeviceAccessStatus, &EnumVal);
// MAC/IP addresses can be read as integers or formatted strings
int32_t IntVal;
int64_t Int64Val;
LvGetInt64 (hItf, LvInterface_GevDeviceMACAddress, &Int64Val);
LvGetString (hItf, LvInterface_GevDeviceMACAddress, StringVal, 1024);
LvGetInt32 (hItf, LvInterface_GevDeviceIPAddress, &IntVal);
LvGetInt32 (hItf, LvInterface_GevDeviceSubnetMask, &IntVal);
// rescan the list of available devices
// (waiting for operation completion)
exec_cmd (DeviceUpdateList)
wait_until_done (DeviceUpdateList)
// read information about the first discovered device
// (i.e. device with index 0)
write_int (DeviceSelector, 0)
read_string (DeviceID)
read_string (DeviceVendorName)
read_string (DeviceModelName)
read_string (LvDeviceUserID)
read_string (LvDeviceSerialNumber)
read_enum (DeviceAccessStatus)
read_int (GevDeviceMACAddress)
read_int (GevDeviceIPAddress)
read_int (GevDeviceSubnetMask)
Copyright © Leutron Vision
255
Leutron
Vision
PicSight-GigE user manual
Simplon GenTL Producer features
7.3. GenTL device module
The device module provides a GenTL producer's local view of each opened camera (“device”) —
there's one instance for every device you open. Note that this does not refer to the features exported
by the camera itself (those were discussed in Chapter 6, Camera features and their control [p. 96]),
but rather to the features exported by the GenTL producer itself, controlling how it handles the
camera.
Figure 7.3. Example GUI showing the GenTL device module features
7.3.1. Information about the device
The device module provides basic set of features describing its properties:
Device ID
Globally unique ID of the device. This feature is used for communication
between the GenTL producer and consumer, it should not be interpreted anyhow by the user.
Device Type
A feature dictated by the GenTL specification. It informs the consumer
about the camera's interface technology it is based on. For Simplon
GenTL Producer it's always GigE Vision for the GigE Vision cameras (such
as PicSight-GigE) and Custom for the CheckSight/CheckSight-II cameras.
Device Vendor Name
Name of the camera's vendor (manufacturer).
Device Model Name
Model name of the camera.
Device MAC Address
MAC address of the device.
GigE Vision devices only.
Device IP Address
Current IP address of the device.
GigE Vision devices only.
Device Subnet Mask
Current subnet mask of the device.
GigE Vision devices only.
Device Gateway
Current default gateway of the device.
GigE Vision devices only.
Copyright © Leutron Vision
256
Leutron
Vision
PicSight-GigE user manual
Simplon GenTL Producer features
LvHDevice hDev; // open the device to get the handle
// read basic information about the device
char StringVal[1024];
LvGetString (hDev, LvDevice_DeviceID, StringVal, 1024);
int32_t EnumVal;
LvGetEnum(hDev, LvDevice_DeviceType, &EnumVal);
LvGetString (hDev, LvDevice_DeviceVendorName, StringVal, 1024);
LvGetString (hDev, LvDevice_DeviceModelName, StringVal, 1024);
// MAC/IP addresses can be read as integers or formatted strings
int32_t IntVal;
int64_t Int64Val;
LvGetInt64 (hDev, LvDevice_GevDeviceMACAddress, &Int64Val);
LvGetString (hDev, LvDevice_GevDeviceMACAddress, StringVal, 1024);
LvGetInt32 (hDev, LvDevice_GevDeviceIPAddress, &IntVal);
LvGetInt32 (hDev, LvDevice_GevDeviceSubnetMask, &IntVal);
LvGetInt32 (hDev, LvDevice_GevDeviceGateway, &IntVal);
// read basic information about the device
read_string (DeviceID)
read_enum (DeviceType)
read_string (DeviceVendorName)
read_string (DeviceModelName)
read_int (GevDeviceMACAddress)
read_int (GevDeviceIPAddress)
read_int (GevDeviceSubnetMask)
read_int (GevDeviceGateway)
7.3.2. Stream enumeration
The interface module also provides means for stream “enumeration”, according to the GenTL
specification. However, Simplon GenTL Producer currently always uses just a single stream per
device. For streams, there's no “update stream list” command like with other module types, the
stream (s) configuration is always known upon opening the device module and remains fixed.
Stream Selector
Selects one of the streams belonging to the device and allows to query information about the stream through the depending features (see below).
The Stream Selector is an integer feature with zero-based indexing of the
device streams. The index corresponds with the same index in the GenTL
C interface. The current range of the selector (zero through its current
maximum) corresponds with the number of streams of the device.
Note that in Simplon API the streams are accessed through corresponding
handles and the stream indexes/ID's are fully wrapped into the handles —
they can be usually ignored by Simplon API users.
Stream ID
Unique ID of the selected stream. This feature is used for communication
between the GenTL producer and consumer, it should not be interpreted
anyhow by the user.
LvHDevice hDev; // open the device to get the handle
// read information about the first stream of the device
// (i.e. stream with index 0)
Copyright © Leutron Vision
257
Leutron
Vision
PicSight-GigE user manual
Simplon GenTL Producer features
LvSetInt32 (hDev, LvDevice_StreamSelector, 0);
char StringVal[1024];
LvGetString (hDev, LvDevice_StreamID, StringVal, 1024);
// read information about the first stream of the device
// (i.e. stream with index 0)
write_int (StreamSelector, 0)
read_string (StreamID)
7.3.3. GigE Vision streaming control
This topic is specific to GigE Vision devices only. When acquiring images from a GigE Vision camera,
depending on the camera's data rate and configuration, the amount of data being sent over the
network in the image stream can be high enough to generate significant processor load and
consume other system resources — especially when being processed through the regular operating
system's network stack. The Simplon GenTL Producer provides a network filter driver to minimize
such processing overhead, see Section 5.2.5, “Network filter driver” [p. 80].
The feature Device Stream Capture Mode allows to select, which stream capture mode should be
used for given device. Possible options are:
• System Default (the default option) — the capture mode will be selected according to the default
option adjusted in the Simplon configuration file (Section 5.7, “Simplon configuration” [p. 93]).
Name of the corresponding configuration (boolean) option is Default use of filter
driver.
• Socket — the image data from this camera will be captured through the regular socket interface,
regardless of the global default configuration.
• Filter Driver — the image data from this camera will be captured through the filter driver interface,
regardless of the global default configuration.
LvHDevice hDev; // open the device to get the handle
// use system default GigE Vision stream capture mode
// (configurable through Simplon ini-file)
LvSetEnum (hDev, LvDevice_LvGevDeviceStreamCaptureMode,
LvGevDeviceStreamCaptureMode_SystemDefault);
// capture the GigE Vision image stream through standard socket
LvSetEnum (hDev, LvDevice_LvGevDeviceStreamCaptureMode,
LvGevDeviceStreamCaptureMode_Socket);
// capture the GigE Vision image stream through the filter driver
LvSetEnum (hDev, LvDevice_LvGevDeviceStreamCaptureMode,
LvGevDeviceStreamCaptureMode_FilterDriver);
// use system default GigE Vision stream capture mode
// (configurable through Simplon ini-file)
write_enum (LvGevDeviceStreamCaptureMode, SystemDefault)
// capture the GigE Vision image stream through standard socket
write_enum (LvGevDeviceStreamCaptureMode, Socket)
// capture the GigE Vision image stream through the filter driver
write_enum (LvGevDeviceStreamCaptureMode, FilterDriver)
Copyright © Leutron Vision
258
Leutron
Vision
PicSight-GigE user manual
Simplon GenTL Producer features
7.3.4. GigE Vision communication control
This topic is specific to GigE Vision devices only. When controlling a GigE Vision camera, the
Simplon GenTL Producer (and every GigE Vision compliant software) uses the GVCP protocol,
which basically consists of commands issued by the host software and acknowledges responded
by the device. If the acknowledge from the device does not arrive within the expected timeout,
Simplon GenTL Producer assumes that delivery of the command failed and eventually retries
sending it again. Both the timeout and number of eventual retries can be configured by the user
through features Control Channel Transmission Timeout (value in ms) and Control Channel Retry
Count.
If the device itself provides hints about the maximal expectable response timeout, Simplon GenTL
Producer uses this hint to adjust the initial value of Control Channel Transmission Timeout, otherwise
it defaults to 200 ms.
The default values used by Simplon GenTL Producer will work just fine in vast majority of cases
and the user should attempt to readjust them only if encountering a communication problem
(such as failing read/write operations) with a particular camera, usually with guidance of our
support staff. The features become visible only at the “guru” feature visibility level. Note that it is
important to configure these values before the problematic communication with the device can
ever happen, ie. typically before accessing the feature tree of the remote device.
LvHDevice hDev; // open the device to get the handle
// adjust control channel retransmission parameters
LvSetInt32 (hDev, LvDevice_LvGevCCRC, 3);
LvSetInt32 (hDev, LvDevice_LvGevCCTT, 500); // ms
// adjust message channel retransmission parameters
write_int (LvGevCCRC, 3)
write_int (LvGevCCTT, 500) // ms
7.3.5. Determining the GigE Vision streaming packet size
This topic is specific to GigE Vision devices only. When acquiring the image data from a GigE Vision
camera, it is usually desirable to stream the data using larger packets to improve the performance,
see Section 5.2, “Network performance” [p. 72]. The possible packet size value is, however, limited
by the capabilities of the networking hardware involved. When connecting to a camera, the Simplon
GenTL Producer determines the maximal packet size usable with the current network configuration
and adjusts it on the camera. For applications needing to further control the packet size while
working with the camera, Simplon GenTL Producer provides two additional features (available
only in the “guru” feature visibility level). Remember, that changing the streaming packet size on
the fly might be tricky and these features must never be used while any streaming is active.
When the application suspects that the conditions affecting the maximal possible packet size are
incorrect or if the packet size became otherwise invalid, the procedure to determine the maximal
possible packet size can be executed again using the Find Maximal Packet Size command. When
the operation finishes, the resulting maximal packet size usable with the device and current network
configuration can be retrieved from Packet Size Value. The application can then actually apply the
packet size on the camera itself (using the Packet Size™ feature in the remote device feature tree)
whenever suitable — but not during active streaming.
For applications requiring even finer approach to packet size control, the Simplon GenTL Producer
can be asked to verify if a given packet size is valid on the current network configuration. The
specified packet size would be verified, but not applied — this is left for the application. The
Copyright © Leutron Vision
259
Leutron
Vision
PicSight-GigE user manual
Simplon GenTL Producer features
packet size to be tested should be specified in Packet Size Value and the verification procedure
started using the Test Packet Size command. The success (usability of given packet size) is reported
in Packet Size Test Success.
LvHDevice hDev; // open the device to get the handle
// determine the maximal usable packet size...
LvCmdExecute (hDev, LvDevice_LvGevFindMaxPacketSize);
// ...now wait until the operation end using LvCmdIsDone()
// and read the result (will not be automatically applied,
// the application has to configure the camera explicitly)
int32_t IntVal;
LvGetInt32 (hDev, LvDevice_LvGevPacketSizeValue, &IntVal);
// test if packet size 9000 is usable with current configuration...
LvSetInt32 (hDev, LvDevice_LvGevPacketSizeValue, 9000);
LvCmdExecute (hDev, LvDevice_LvGevTestPacketSize);
// ...now wait until the operation end using LvCmdIsDone()
// and read the result
LvGetBool (hDev, LvDevice_LvGevPacketSizeTestSuccess, &IntVal);
// determine the maximal usable packet size...
exec_cmd (LvGevFindMaxPacketSize)
// ...now wait until the operation end using command's IsDone property
// (will not be automatically applied,
// the application has to configure the camera explicitly)
read_int (LvGevPacketSizeValue)
// test if packet size 9000 is usable with current configuration...
write_int (LvGevPacketSizeValue, 9000)
exec_cmd (LvGevTestPacketSize)
// ...now wait until the operation end using command's IsDone property
// and read the result
read_bool (LvGevPacketSizeTestSuccess)
7.4. GenTL data stream module
The stream module controls the image acquisition from the device. In the moment, the Simplon
GenTL Producer is always using just a single data stream per device.
Figure 7.4. Example GUI showing the GenTL data stream module features
7.4.1. Information about the stream
The data stream module provides basic set of features describing its properties:
Copyright © Leutron Vision
260
Leutron
Vision
PicSight-GigE user manual
Simplon GenTL Producer features
Stream ID
Unique ID of the stream. This feature is used for communication
between the GenTL producer and consumer, it should not be
interpreted anyhow by the user.
Stream Type
A feature dictated by the GenTL specification. It informs the
consumer about the camera interface technology of the camera
device the stream belongs to. For Simplon GenTL Producer it's
always GigE Vision for streams belonging to the GigE Vision
cameras (such as PicSight-GigE) and Custom for stream belonging to CheckSight/CheckSight-II.
Stream Announced Buffer Count
Number of buffers currently announced by the GenTL consumer
to the stream. This value is “volatile”, it can be changed at any
time by the consumer when adding/removing acquisition
buffers from the stream.
Stream Acquisition Mode Selector
Selects the acquisition mode to be used by the stream. Acquisition mode describes how the data stream handles the pool of
input acquisition buffers, which buffers it delivers first to the
consumer (application) and how buffer locking behaves.
Simplon GenTL Producer currently supports just a single acquisition mode — the default acquisition mode required by the
GenTL specification. In this mode the buffers are delivered to
the consumer (application) in FIFO order, the application must
explicitly queue (unlock) all the buffers after processing to make
them again available to the acquisition engine and the acquisition engine never overwrites any buffers in the output queue
— when overflown, new images are dropped.
Stream Announce Buffer Minimum Minimum number of acquisition buffers the stream requires
for operation. The value depends on the acquisition mode. For
the current version of Simplon GenTL Producer and the default
acquisition mode the minimum is 1.
LvHStream hStrm; // open the stream to get the handle
// read basic information about the stream
char StringVal[1024];
LvGetString (hStrm, LvStream_StreamID, StringVal, 1024);
int32_t EnumVal;
LvGetEnum(hStrm, LvStream_StreamType, &EnumVal);
int32_t IntVal;
LvGetInt32 (hStrm, LvStream_StreamAnnouncedBufferCount, &IntVal);
LvGetEnum(hStrm, LvStream_StreamAcquisitionModeSelector, &EnumVal);
LvGetInt32 (hStrm, LvStream_StreamAnnounceBufferMinimum, &IntVal);
// read basic information about the stream
read_string (StreamID)
read_enum (StreamType)
read_int (StreamAnnouncedBufferCount)
read_enum (StreamAcquisitionModeSelector)
read_int (StreamAnnounceBufferMinimum)
Copyright © Leutron Vision
261
Leutron
Vision
PicSight-GigE user manual
Simplon GenTL Producer features
7.5. Simplon GenTL Producer feature summary
The following table provides condensed summary of all the features provided by the Simplon
GenTL Producer for individual GenTL modules. Some of the features are only relevant for certain
camera families. The range of allowed values might differ depending on the actual system configuration.
For detailed explanation of the purpose of each feature group and their dependencies, refer to
previous sections in this chapter.
Name
Description
Feature category: GenTL System Module , refer to Section 7.1, “GenTL system module” [p. 248]
TLVendorName
GenTL producer vendor name
GUI name: Transport Layer Vendor
Type: string
GUI visibility: beginner
Read-only feature
TLModelName
GenTL producer model name
GUI name: Transport Layer Model
Type: string
GUI visibility: beginner
Read-only feature
TLID
GenTL producer ID
GUI name: Transport Layer ID
Type: string
GUI visibility: beginner
Read-only feature
TLVersion
GenTL producer version
GUI name: Transport Layer Version
Type: string
GUI visibility: beginner
Read-only feature
TLPath
GenTL producer path
GUI name: Transport Layer Path
Type: string
GUI visibility: beginner
Read-only feature
GenTL producer type (currently always reported
as 'Mixed')
TLType
GUI name: Transport Layer Type
Type: enumeration
Possible values: Mixed, Custom, GEV
GUI visibility: beginner
Read-only feature
Major version of the implemented GenTL specification
GenTLVersionMajor
GUI name: GenTL Version Major
Type: integer
GUI visibility: beginner
Read-only feature
Copyright © Leutron Vision
262
Leutron
Vision
PicSight-GigE user manual
Simplon GenTL Producer features
Name
Description
GenTLVersionMinor
Minor version of the implemented GenTL specification
GUI name: GenTL Version Minor
Type: integer
GUI visibility: beginner
Read-only feature
Major version of the implemented GigE Vision
specification
GevVersionMajor
GUI name: GigE Vision Version Major
Type: integer
GUI visibility: beginner
Read-only feature
Minor version of the implemented GigE Vision
specification
GevVersionMinor
GUI name: GigE Vision Version Minor
Type: integer
GUI visibility: beginner
Read-only feature
InterfaceUpdateList
Update internal list of interfaces
GUI name: Update Interface List
Type: command
GUI visibility: beginner
InterfaceSelector
Selects an interface module to be accessed
GUI name: Interface Selector
Type: integer
GUI visibility: beginner
InterfaceID
Interface ID
[InterfaceSelector]
Type: string
GUI name: Interface ID
GUI visibility: beginner
Read-only feature
GevInterfaceMACAddress
MAC address of the (GigE Vision) interface
[InterfaceSelector]
Type: integer
GUI name: Interface MAC Address
GUI visibility: beginner
Read-only feature
GevInterfaceDefaultIPAddress
Default IP address of the (GigE Vision) interface
[InterfaceSelector]
Type: integer
GUI name: Interface Default IP Address
GUI visibility: beginner
Read-only feature
GevInterfaceDefaultSubnetMask
[InterfaceSelector]
GUI name: Interface Default Subnet Mask
Default subnet mask of the (GigE Vision) interface
Type: integer
GUI visibility: beginner
Read-only feature
Copyright © Leutron Vision
263
Leutron
Vision
PicSight-GigE user manual
Simplon GenTL Producer features
Name
Description
GevInterfaceDefaultGateway
Default gateway of the (GigE Vision) interface
[InterfaceSelector]
Type: integer
GUI name: Interface Default Gateway
GUI visibility: beginner
Read-only feature
Feature category: GenTL Interface Module , refer to Section 7.2, “GenTL interface module” [p. 252]
InterfaceID
Interface ID
GUI name: Interface ID
Type: string
GUI visibility: beginner
Read-only feature
InterfaceType
Interface type
GUI name: Interface Type
Type: enumeration
Possible values: Custom, GEV
GUI visibility: beginner
Read-only feature
Selects gateway associated with a (GigE Vision)
interface
GevInterfaceGatewaySelector
GUI name: Interface Gateway Selector
Type: integer
GUI visibility: beginner
GevInterfaceGateway
Gateway of a (GigE Vision) interface
[GevInterfaceGatewaySelector]
Type: integer
GUI name: Interface Gateway
GUI visibility: beginner
Read-only feature
GevMACAddress
MAC address of a (GigE Vision) interface
GUI name: Interface MAC Address
Type: integer
GUI visibility: beginner
Read-only feature
Selects subnet associated with a (GigE Vision)
interface
GevInterfaceSubnetSelector
GUI name: Interface Subnet Selector
Type: integer
GUI visibility: beginner
GevInterfaceSubnetIPAddress
Subnet IP address of a (GigE Vision) interface
[GevInterfaceSubnetSelector]
Type: integer
GUI name: Interface Subnet IP Address
GUI visibility: beginner
Read-only feature
GevInterfaceSubnetMask
Subnet mask of a (GigE Vision) interface
[GevInterfaceSubnetSelector]
Type: integer
GUI name: Interface Subnet Mask
GUI visibility: beginner
Read-only feature
Copyright © Leutron Vision
264
Leutron
Vision
PicSight-GigE user manual
Simplon GenTL Producer features
Name
Description
DeviceUpdateList
Update internal list of devices
GUI name: Update Device List
Type: command
GUI visibility: beginner
DeviceSelector
Selects a device module to be accessed
GUI name: Device Selector
Type: integer
GUI visibility: beginner
DeviceID
Device ID
[DeviceSelector]
Type: string
GUI name: Device ID
GUI visibility: beginner
Read-only feature
DeviceVendorName
Device vendor name
[DeviceSelector]
Type: string
GUI name: Device Vendor Name
GUI visibility: beginner
Read-only feature
DeviceModelName
Device model name
[DeviceSelector]
Type: string
GUI name: Device Model Name
GUI visibility: beginner
Read-only feature
Access status of the device at time of last device
list update
DeviceAccessStatus
[DeviceSelector]
Type: enumeration
GUI name: Device Access Status
Possible values: ReadWrite, ReadOnly,
NoAccess
GUI visibility: beginner
Read-only feature
LvDeviceUserID
Device User ID
[DeviceSelector]
Type: string
GUI name: Device User ID
GUI visibility: beginner
Read-only feature
LvDeviceSerialNumber
Device identifier (serial number)
[DeviceSelector]
Type: string
GUI name: Device Serial Number
GUI visibility: beginner
Read-only feature
GevDeviceIPAddress
IP address of the (GigE Vision) device
[DeviceSelector]
Type: integer
GUI name: Device IP Address
GUI visibility: beginner
Read-only feature
GevDeviceSubnetMask
Subnet mask of the (GigE Vision) device
[DeviceSelector]
Type: integer
GUI name: Device Subnet Mask
GUI visibility: beginner
Read-only feature
Copyright © Leutron Vision
265
Leutron
Vision
PicSight-GigE user manual
Simplon GenTL Producer features
Name
Description
GevDeviceMACAddress
MAC address of the (GigE Vision) device
[DeviceSelector]
Type: integer
GUI name: Device MAC Address
GUI visibility: beginner
Read-only feature
Feature category: GenTL Device Module , refer to Section 7.3, “GenTL device module” [p. 256]
DeviceID
Device ID
GUI name: Device ID
Type: string
GUI visibility: beginner
Read-only feature
DeviceVendorName
Device vendor name
GUI name: Device Vendor Name
Type: string
GUI visibility: beginner
Read-only feature
DeviceModelName
Device model name
GUI name: Device Model Name
Type: string
GUI visibility: beginner
Read-only feature
DeviceType
Device type
GUI name: Device Type
Type: enumeration
Possible values: Custom, GEV
GUI visibility: beginner
Read-only feature
GevDeviceIPAddress
IP address of the (GigE Vision) device
GUI name: Device IP Address
Type: integer
GUI visibility: beginner
Read-only feature
GevDeviceSubnetMask
Subnet mask of the (GigE Vision) device
GUI name: Device Subnet Mask
Type: integer
GUI visibility: beginner
Read-only feature
GevDeviceMACAddress
MAC address of the (GigE Vision) device
GUI name: Device MAC Address
Type: integer
GUI visibility: beginner
Read-only feature
GevDeviceGateway
Gateway of the (GigE Vision) device
GUI name: Device Gateway
Type: integer
GUI visibility: beginner
Read-only feature
Copyright © Leutron Vision
266
Leutron
Vision
PicSight-GigE user manual
Simplon GenTL Producer features
Name
Description
DeviceEndianessMechanism
Identifies the endianess mode
GUI name: Device Endianess Mechanism
Type: enumeration
Possible values: Legacy, Standard
GUI visibility: guru
LvGevDeviceStreamCaptureMode
Device stream capture mode
GUI name: Device Stream Capture Mode
Type: enumeration
Possible values: SystemDefault, Socket,
FilterDriver
GUI visibility: expert
Streamable feature, stored with user configuration sets
Determine the maximal usable packet size for
streaming
LvGevFindMaxPacketSize
GUI name: Find Maximal Packet Size
Type: command
GUI visibility: guru
Streaming packet size to be verified using the
Test Packet Size command
LvGevPacketSizeValue
GUI name: Packet Size Value
Type: integer
GUI visibility: guru
Test if the selected packet size is suitable for
streaming in current network configuration
LvGevTestPacketSize
GUI name: Test Packet Size
Type: command
GUI visibility: guru
Reports success of the last packet size test command
LvGevPacketSizeTestSuccess
GUI name: Packet Size Test Success
Type: bool
GUI visibility: guru
Read-only feature
LvGevCCTT
GUI name: Control Channel Transmission Timeout
Controls the GigE Vision control channel transmission timeout value in milliseconds.
Type: integer
GUI visibility: guru
Unit: ms
Controls the number of GigE Vision control
channel command retransmissions allowed when
a control channel command times out.
LvGevCCRC
GUI name: Control Channel Retry Count
Type: integer
GUI visibility: guru
StreamSelector
Selects a stream module to be accessed
GUI name: Stream Selector
Type: integer
GUI visibility: beginner
Copyright © Leutron Vision
267
Leutron
Vision
PicSight-GigE user manual
Simplon GenTL Producer features
Name
Description
StreamID
Stream ID
[StreamSelector]
Type: string
GUI name: Stream ID
GUI visibility: beginner
Read-only feature
Feature category: GenTL Stream Module , refer to Section 7.4, “GenTL data stream module” [p. 260]
StreamID
Stream ID
GUI name: Stream ID
Type: string
GUI visibility: beginner
Read-only feature
StreamAnnouncedBufferCount
GUI name: Stream Announced Buffer Count
Number of buffers announced for the data
stream
Type: integer
GUI visibility: beginner
Read-only feature
StreamAcquisitionModeSelector
Selects desired acquisition mode
GUI name: Stream Acquisition Mode Selector
Type: enumeration
Possible values: Default
GUI visibility: beginner
StreamAnnounceBufferMinimum
[StreamAcquisitionModeSelector]
GUI name: Stream Announce Buffer Minimum
Minimum number of buffers to be announced
for selected acquisition mode
Type: integer
GUI visibility: beginner
Read-only feature
StreamType
Stream type
GUI name: Stream Type
Type: enumeration
Possible values: Custom, GEV
GUI visibility: beginner
Read-only feature
Feature category: GenTL Buffer Module
The GenTL producer currently does not provide any features for this module.
Table 7.1. Summary of all GenTL producer features (some of them available
only for specific camera technologies)
Copyright © Leutron Vision
268
Leutron
Vision
PicSight-GigE user manual
Connecting with 3rd party software packages
8. Connecting with 3rd party software packages
Since the basic principles of integrating individual camera models in the 3rd party
products are frequently same for all the camera families, this chapter discusses
all the product lines.
Our cameras connect to all GenTL compliant libraries, PicSight-GigE/PicSight-Smart cameras then
also to all GigE Vision compliant libraries. The libraries include
• Halcon and ActivVisionTools from MVTec Software GmbH (GenTL and GigE Vision compliant)
• OpenCV, open source library originally developed by Intel (Simplon Source Code Generator
provides samples to connect with OpenCV)
• LabView from National Instruments (GigE Vision compliant)
• VisionPro from Cognex (GigE Vision compliant)
• Common Vision Blox from Stemmer Imaging (GenTL and GigE Vision compliant)
• MIL (Matrox Imaging Library) from Matrox (GigE Vision compliant)
• MATLAB from MathWorks (GenTL and GigE Vision compliant)
• Adaptive Vision from Future Processing (Future Processing provides connectivity to PicSightSmart cameras)
• Any other GenTL or GigE Vision compliant software.
The following sections provide basic instructions and some useful hints about using Leutron Vision
cameras and Simplon GenTL Producer with some of the major 3rd party software packages. If you
don't find instructions for the software library of your choice, then simply follow the official documentation of that software package or contact our support team in case of experiencing a problem.
8.1. Halcon (MVTec Software GmbH)
This section provides hints for successful integration of our cameras in the Halcon library (and
ActivVisionTools). The details of the Halcon image acquisition interface is subject to change by
MVTec Software GmbH. In case of any discrepancies, the official MVTec Software GmbH documentation overrides the info in this manual. If in doubts, please contact MVTec Software GmbH
to get more accurate information.
Some of the points below might be targeted for use in the HDevelop environment. It should be
well usable, however, for all Halcon users.
8.1.1. GigE Vision interface (PicSight-GigE, PicSight-Smart)
When working with our GigE Vision cameras, the “GigEVision” image acquisition interface of
Halcon should be used. This interface accesses the GigE Vision cameras directly, no Leutron Vision
software needs to be installed. During the initial tests, it might still be good idea to install the
Simplon software package for easy camera configuration or possible troubleshooting.
If desired, however, the cameras might also be connected through the “GenICamTL” acquisition
interface, as described in the next section.
• Be sure to always use the latest version of the GigEVision acquisition interface released for your
Halcon version. It may contain important updates. Read its documentation carefully.
• To discover the GigE Vision cameras connected to the system, use the info_framegrabber
operator:
info_framegrabber ('GigEVision', 'info_boards', Information, ValueList)
That call will rescan the network and detect all currently available GigE Vision cameras, providing
various information about every detected camera. The most important part of the string is so
called “unique name”, which is built as MacAddress_VendorName_ModelName, where any
Copyright © Leutron Vision
269
Leutron
Vision
PicSight-GigE user manual
Connecting with 3rd party software packages
non-alphanumeric characters are eliminated from vendor and model names. Example unique
name can be 00186601975a_LeutronVision_PicSightP34MGigE. The unique name is
used when opening the camera in the open_framegrabber operator, passing the unique
name in the Device parameter. Alternatively, the entire output string from the
info_framegrabber can be used to open the camera as well.
The info_framegrabber operator has an alternative form:
info_framegrabber ('GigEVision', 'device', Information, ValueList)
In this case it returns just the unique names, without the additional information.
To make the discussion complete, the cameras can be also opened using the Device User ID
string (sometimes also known as camera “nickname”). Once you assign unique user ID's to all
used cameras, referring them using those ID's might be easier and more straightforward than
using the Halcon “unique names”. Of course, this mechanism can only work reliably, if the user
ID's for individual cameras are truly unique (no duplicities).
When you need to rescan the system to discover newly connected cameras, just call the
info_framegrabber operator again.
• The PicSight-GigE/PicSight-Smart cameras might not be properly discovered if their IP configuration does not match the network interface they are connected to, for example if they are
configured for different subnet. In such case, it's recommended to use the Simplon GigE Vision
Configuration Tool to configure all the cameras first, before using them in Halcon.
8.1.2. GenTL interface (CheckSight/CheckSight-II, optionally PicSightGigE/PicSight-Smart)
When working with our CheckSight/CheckSight-II cameras, the “GenICamTL” image acquisition
interface of Halcon should be used. This interface accesses the cameras through Simplon GenTL
Producer, according to the GenICam GenTL standard. Therefore the Simplon package has to be
installed in the system.
Halcon will find and use the Simplon GenTL Producer automatically. The GenTL
producers are (according to the standard) registered in the system through the
GENICAM_GENTL32_PATH/GENICAM_GENTL64_PATH environment variable. This is
done automatically by the Simplon installer. However, on some Linux systems
not supporting the /etc/profile.d mechanism, this might fail. In such case,
you will need to set the environment variable manually according to the conventions used in your Linux distribution. The variable should point to the directory
containing the Simplon GenTL Producer, liblv.gentl.cti. This directory is
by default /opt/simplon/cti on 32-bit, /opt/simplon/cti64 on 64-bit systems.
• Be sure to always use the latest version of the GenICamTL acquisition interface released for your
Halcon version. It may contain important updates. Read its documentation carefully.
• To discover the cameras connected to the system, use the info_framegrabber operator:
info_framegrabber ('GenICamTL', 'info_boards', Information, ValueList)
That call will rescan the system and detect all cameras currently visible through the “GenTL
producers” installed in the system, providing various information about every detected camera.
The three most important components of the information string are the GenTL “device ID” of
the camera, the ID of the “GenTL interface” the camera was discovered on and finally the corresponding GenTL producer itself (identified by its full path). These three components are
enough to open the camera using the open_framegrabber operator. The string passed to
the operator in the Device parameter should contain these three components, using similar
syntax as returned from info_framegrabber, eg. device:DeviceID
Copyright © Leutron Vision
270
Leutron
Vision
PicSight-GigE user manual
Connecting with 3rd party software packages
interface:InterfaceID producer:ProducerPath. Alternatively, the entire output string
from the info_framegrabber can be used to open the camera as well.
The info_framegrabber operator has an alternative form:
info_framegrabber ('GigEVision', 'device', Information, ValueList)
In this case it returns just the GenTL device ID's, without the additional information. The device
ID unequivocally identifies the camera, so it can be also used to open it. However, this mechanism
currently only works in Halcon when the camera is detected on the first interface of the first
GenTL producer, therefore it's not fully reliable and we recommend to use the full syntax
(device/interface/producer).
When you need to rescan the system to discover newly connected cameras, just call the
info_framegrabber operator again. Note that Halcon currently avoids rescanning the GenTL
interfaces where one ore more cameras are already open. This might improve in future.
• When opening the camera, you can adjust the number of acquisition buffers the Halcon acquisition interface will allocate for the camera. In most cases the default value (3) will be just fine,
but in some scenarios it might be useful to allocate more buffers to prevent acquisition overflows,
eg. when the system gets temporarily under a heavy load and cannot process the incoming
images as they are coming. Larger number of acquisition buffers can help to overcome short
peaks of the processing load.
The number of buffers might be changed through the Generic parameter of the
open_framegrabber operator. Set this parameter to num_buffers=N, where N is the desired
number of buffers.
• It is possible to control also the features of the individual GenTL modules corresponding with
the open camera: the Device module, its parent Interface module and the System module representing the GenTL producer itself. In such case, the module name in square brackets should
prefix the feature name: [Device]FeatureName, [Interface]FeatureName,
[System]FeatureName.
Adjusting the parameters of the Stream and Buffer GenTL modules is not supported by the
Halcon GenTL interface.
8.1.3. Common notes
• During the development phase, it might be good idea to switch on the low-level error reporting
mechanism of Halcon, it can help for troubleshooting.
set_system ('do_low_error', 'true')
Note however, that in some situations, such as when switching on the chunk data mode or
when using the variable payload size functionality, the “low-error” mechanism of Halcon might
trigger a warning that the payload size (ie. size of the image data) reported by the camera is
bigger than the size calculated by Halcon. Please ignore this warning, the payload size reported
by the camera is always correct — the size increase is legitimate in certain operating modes.
• All integer-based device features are internally handled as signed, with native size on the current
platform. This can bring certain limitations, in particular on 32-bit systems. Whenever working
with integers that might exceed the 32-bit range or that are by nature unsigned, keep this in
mind. The features include for example:
• Timestamps and related features.
• MAC and IP addresses.
• 32-bit masks and bitfields, such as Line Status All, User Output Value All or similar.
• Generic unsigned integer features used by PicSight-Smart applications.
Copyright © Leutron Vision
271
Leutron
Vision
PicSight-GigE user manual
Connecting with 3rd party software packages
To input an integer in hexadecimal form, use the 0x prefix:
Result := 0xFF
To get a value displayed in hexadecimal form, use the $'x' appendix with the variable:
HexValue := Value$'x'
• When trying to set an integer or float value which is out of the range supported by the camera,
the Halcon acquisition interface will not raise an error, but round the value to the closest supported one.
• Chunk data nor event data are currently supported by Halcon.
• Halcon image acquisition interfaces make significant efforts to allow changing any camera feature
value at any time, including the features that would be “locked” (read-only) by the camera
during the acquisition. When the application attempts to write to a feature that is currently
read-only, Halcon stops the acquisition to check whether the camera would unlock the feature
and eventually writes to it. Then it restarts the acquisition.
This attitude brings a good deal of flexibility, but it also comes for a price. Starting and stopping
the acquisition generates certain overhead on all cameras — in particular with the DMA based
devices such as CheckSight/CheckSight-II. In such case the acquisition buffers must be locked
into the physical memory when starting the acquisition, and that is potentially time consuming
operation, depending on the timing requirements of the application. Furthermore, after changing
certain parameters, the size of the data acquired for each image (“payload size”) can change
— then the Halcon interface will need to reallocate all the acquisition buffers, which yields additional overhead. All of these operations might of course also fail at any time, depending on
the actual status of the system resources — all this in the middle of acquisition.
For all these reasons we recommend to configure the features normally locked during the acquisition only at the beginning and don't touch them again during the acquisition — unless
really necessary or unless the timing requirements of the application are not too strict. When
not sure if a given feature is locked during the acquisition, the easiest way is to verify in the
Simplon Explorer — after opening the camera and starting the acquisition, part of the features
in the feature tree will become “greyed”, signalling that they were locked by the camera.
8.1.4. Halcon Image Acquisition Assistant
When starting with camera integration in Halcon, you can either start with one of the samples
delivered with Halcon or use the Image Acquisition Assistant (tool built in the Halcon HDevelop
development environment) to create the application skeleton. When finished with tuning the
HDevelop script, the program can be exported to programming languague of your choice.
In the few steps below, we'll briefly demonstrate how to use the Image Acquisition Assistant. Note
that this section does not substitute the Halcon documentation, it's just a brief introduction with
some useful hints.
1.
Start HDevelop and open a new Image Acquisition Assistant from the menu Assistants →
Open New Image Acquisition.
Copyright © Leutron Vision
272
Leutron
Vision
PicSight-GigE user manual
2.
Connecting with 3rd party software packages
Select the Halcon image acquisition interface you want to use to control the camera(s). Depending on the camera type(s), select either “GenICamTL” or “GigEVision” interface.
The assistant will query the list of cameras available through that interface and allow to connect
one of them at the Connection tab.
It's possible to rescan the list of connected cameras later by clicking the Detect button. Note
however, that current implementation of the Halcon GenICamTL interface does not attempt
to discover cameras connected to interface on which one ore more cameras are already open.
As a consequence, after opening a camera on a GenTL interface, you won't be able to start
a new Image Acquisition Assistant and open another camera on the same interface — the
assistant woudl not discover it. This behaviour might improve in a future version of Halcon
GenICamTL acquisition interface.
3.
Switch from the Source to the Connection tab of the acquisition assistant. By the top of the
window, you'll see the Device combobox listing the discovered cameras.
Select the one you wish to work with and click the Connect button. The assistant will open
the connection to the camera, retrieve it's feature tree and allow to control the features or
acquire images.
Copyright © Leutron Vision
273
Leutron
Vision
PicSight-GigE user manual
4.
Connecting with 3rd party software packages
Switch to the Parameters tab of the assistant. Here you can fully configure the camera, the
GenTL producer and even the acquisition related parameters of the Halcon itself. Some important hints:
• The features come in three visibility levels, beginner-expert-guru. You can control them
through the Visibility combobox. At the beginner level, only the basic features will be
available, at the guru level all the features (including the typically “don't touch” ones) will
appear. We recommend to work at the expert level in most cases.
• Using the Category combobox the feature list can be narrowed down to a single feature
category. This might make the orientation a lot easier.
• We recommend to clear the Update Image checkbox while configuring the camera. When
enabled, the assistant will attempt to acquire an image after every feature change (which
frequently is not required at all). This brings an overhead in repeated acquisition start/stop
loops. Indirectly, starting/stopping the acquisition might change access mode of some
features (certain features are locked during acquisition). Finally, in triggered mode the acquisition won't work anyway unless you supply the trigger.
• Halcon Image Acquisition Assistant does not handle the feature dependencies automatically.
For example if changing one feature enables/disables another feature, it will not automatically appear/hide in the feature tree. To update the feature list (after changing the configuration or whenever in doubts), click the Refresh button. The feature tree will be reloaded
with proper access modes.
Copyright © Leutron Vision
274
Leutron
Vision
PicSight-GigE user manual
5.
Connecting with 3rd party software packages
When finished with the camera configuration, you can test the image acquisition using the
Live or Snap buttons in the Connection tab of the assistant.
You can repeat changing the camera configuration until the desired final status is reached.
6.
When finished configuring the camera, you can let the assistant to generate the application
code for you. Proceed to the Code Generation tab and click the Insert Code button. The assistant will generate code that finds and opens the selected camera, adjusts all the camera
parameters you have changed in the assistant and then start a simple acquisition loop. By
default it will automatically disconnect from the camera so that you can immediately start
playing with the generated script. The script can serve as a very good starting point for the
actual application.
Copyright © Leutron Vision
275
Leutron
Vision
PicSight-GigE user manual
Connecting with 3rd party software packages
8.2. Common Vision Blox (Stemmer Imaging)
This section provides hints for successful integration of our cameras in the Common Vision Blox
library. The details of the Common Vision Blox image acquisition interface is subject to change
by Stemmer Imaging. In case of any discrepancies, the official Stemmer Imaging documentation
overrides the info in this manual. If in doubts, please contact Stemmer Imaging to get more accurate
information.
8.2.1. GigE Vision interface (PicSight-GigE, PicSight-Smart)
When working with our GigE Vision cameras, the Common Vision Blox image acquisition interface
can access the GigE Vision cameras directly, no Leutron Vision software needs to be installed.
During the initial tests, it might still be good idea to install the Simplon software package for easy
camera configuration or possible troubleshooting.
If desired, however, the cameras might also be connected through the Simplon GenTL Producer,
as described in the next section.
Common Vision Blox is internally using the GenTL to access the image acquisition interfaces, including its own ones (similarly as Simplon), so the functionality and user experience will be practically the same, regardless if connecting through Simplon GenTL Producer or the Common Vision
Blox internal GigE Vision interface.
• Be sure to always use the latest version of the Common Vision Blox, including any available
service packs (“hotfixes”). They may contain important updates. Read its documentation carefully.
• The PicSight-GigE/PicSight-Smart cameras might not be properly discovered if their IP configuration does not match the network interface they are connected to, for example if they are
configured for different subnet. In such case, it's recommended to use the Simplon GigE Vision
Configuration Tool (or a corresponding Common Vision Blox utility) to configure all the cameras
first, before using them in Common Vision Blox.
• Chunk data are not supported by Common Vision Blox.
• Event data are supported. However, the Common Vision Blox is using a custom event delivery
mechanism, not compatible with other GenTL producers. Therefore the event data delivery will
work reliably only over the Common Vision Blox internal GigE Vision interface.
Copyright © Leutron Vision
276
Leutron
Vision
PicSight-GigE user manual
Connecting with 3rd party software packages
Common Vision Blox is expected to align to the GenTL event delivery mechanism in the future,
you might wish to observe the new available updates.
8.2.2. GenTL interface (CheckSight/CheckSight-II, optionally PicSightGigE/PicSight-Smart)
When working with our CheckSight/CheckSight-II cameras, the Common Vision Blox has to access
the camera through the Simplon GenTL Producer according to the GenICam GenTL standard.
Therefore the Simplon package has to be installed in the system.
Common Vision Blox is available for Windows operating systems. The Linux
version is available only for the 64-bit platform, while the CheckSight/CheckSightII is 32-bit. Therefore Linux Common Vision Blox cannot be currently used on
CheckSight/CheckSight-II. If interested in the Linux operating system, please
contact Stemmer Imaging to get the up to date information about plans to support 32-bit Linux version.
Common Vision Blox will find and use the Simplon GenTL Producer automatically.
The GenTL producers are (according to the standard) registered in the system
through the GENICAM_GENTL32_PATH/GENICAM_GENTL64_PATH environment
variable. This is done automatically by the Simplon installer. However, on some
Linux systems not supporting the /etc/profile.d mechanism, this might fail.
In such case, you will need to set the environment variable manually according
to the conventions used in your Linux distribution. The variable should point to
the directory containing the Simplon GenTL Producer, liblv.gentl.cti. This
directory is by default /opt/simplon/cti on 32-bit, /opt/simplon/cti64 on
64-bit systems.
• Be sure to always use the latest version of the Common Vision Blox, including any available
service packs (“hotfixes”). They may contain important updates. Read its documentation carefully.
• Chunk data are not supported by Common Vision Blox.
• Event data are supported. However, the Common Vision Blox is using a custom event delivery
mechanism, not compatible with other GenTL producers. Therefore we strongly recommend
to not use any device event related functionality within Common Vision Blox, it might cause
serious problems.
Common Vision Blox is expected to align to the GenTL event delivery mechanism in the future,
you might wish to observe the new available updates.
8.2.3. Getting started quickly
The Common Vision Blox comes with documentation describing how to work with the cameras
connecting through the “GenICam Driver” — the Common Vision Blox component responsible
for communication over the GenTL interface. That driver will be used to control our cameras,
either through Simplon GenTL Producer or through Common Vision Blox own GigE Vision interface.
This section is not intended to replace the Common Vision Blox documentation, but rather provide
step-by-step introduction on how to test and integrate our cameras into the Common Vision Blox
environment. We still recommend to read the Common Vision Blox documentation carefully.
For the first test you can use the tool called GigE Vision Configuration Manager. Despite it's name,
the tool is not working just with GigE Vision cameras. The executable path is
%CVB%\Hardware\StemmerImaging\siFilterDriver\GEVConfigManager.exe, where
%CVB% stands for Common Vision Blox installation directory.
Copyright © Leutron Vision
277
Leutron
Vision
PicSight-GigE user manual
Connecting with 3rd party software packages
When loaded, the tool displays the list of cameras discovered in the system. It will show cameras
discovered through the Simplon GenTL Producer (both PicSight and CheckSight cameras) and
through the Common Vision Blox native GigE Vision interface. Note that the PicSight cameras will
be discovered multiple times, through both Simplon and Common Vision Blox interfaces.
When the Simplon package is not installed, only the cameras discovered through the Common
Vision Blox native acquisition interface will be recognized. Since it is GigE Vision compliant, it will
detect any PicSight-GigE and PicSight-Smart cameras. You can select whether to communicate
with the camera through the Common Vision Blox filter driver or through a simple socket interface.
The current camera status is expressed through the camera icons:
• Green icon — the camera is ready for connection.
• Blue icon — the camera is accessible, but not available in the moment, usually because it is
already opened in another application (possible even from another computer).
• Red icon — the camera is not accessible. For GigE Vision cameras this usually means that the
camera is currently configured for a different subnet than the computer itself, therefore they
cannot communicate directly.
Copyright © Leutron Vision
278
Leutron
Vision
PicSight-GigE user manual
Connecting with 3rd party software packages
To connect to the camera, simply select it in the list and click the Open Device button.
The tool will connect to the camera and display it's feature tree. Now you can configure the desired
camera parameters — and when finished, start acquisition by clicking the Grab checkbox. Clicking
it again will stop the acquisition.
Copyright © Leutron Vision
279
Leutron
Vision
PicSight-GigE user manual
Connecting with 3rd party software packages
Except of the feature tree of the camera itself, feature trees of the individual components of the
GenTL producer controlling the camera can be also accessed. The individual feature trees are selectable through the combobox by the top of the window.
Copyright © Leutron Vision
280
Leutron
Vision
PicSight-GigE user manual
Connecting with 3rd party software packages
When finished with testing the camera functionality in the GigE Vision Configuration Manager,
you can use the tool to configure the camera(s) for use through the Common Vision BloxGenICam
Driver. Note that the Common Vision Blox libraries and tools will access the cameras exactly
through this driver.
The Common Vision Blox acquisition drivers are stored in %CVB%\Drivers directory. The GenICam
Driver binary file name is GenICam.vin and its configuration file GenICam.ini. The configuration
file mainly lists the cameras to be used and their connection parameters. It can be created from
the GigE Vision Configuration Manager.
Select the camera(s) you want to store in the driver's configuration file and click the > to copy
them from the GenICam Device Tree panel to CVB CamPort Assignment.
Double-clicking the camera entry in the CVB CamPort Assignment panel pops a dialog allowing
to configure some parameters controlling how the driver will handle the camera.
Part of the parameters are GigE Vision specific (packet size, inter-packet delay, heartbeat timeout).
Other parameters are universal, such as the NumBuffers parameter. It specifies how many acquisition buffers should the driver allocate for the camera. Note that when your application generates
a variable processing load, it might get behind the acquisition rate in processing peaks. Increasing
the number of acquisition buffers can help to overcome these peaks and help to prevent loosing
images. Note also that when the driver will do color format conversion, that number of buffers
will be actually allocated twice, one set for the actually acquired data, the other for the processed
ones.
When the configuration is finished, it can be written to the driver's configuration file by clicking
the Save CVB INI button.
Copyright © Leutron Vision
281
Leutron
Vision
PicSight-GigE user manual
Connecting with 3rd party software packages
The configuration can be verified for example through one of the Common Vision Blox sample
programs. As an example, let's take the “C# GenICam Example”. Start it through system menu
Start → Programs → STEMMER IMAGING → Common Vision Blox → Hardware → GenICam →
C# GenICam Example.
When started, the sample will automatically open the camera configured in the driver's configuration file — provided that it is still available. It will allow to control all the camera features and
then start the camera acquisition — again through the Grab checkbox.
At this point, the system should be verified and configured for use in a real Common Vision Blox
application. The details how to access the cameras programmatically through the Common Vision
Blox acquisition interface are beyond scope of this manual. Please refer to the official Common
Vision Blox documentation.
8.3. VisionPro, CVL (Cognex)
The Simplon Imaging Device Adapter for Cognex Software allows to access the Leutron Vision hardware
from Cognex software (VisionPro 5.2 or later or CVL 6.6 or later), through the Simplon library.
This adapter is provided namely as a solution for running Cognex software on CheckSight; for
Copyright © Leutron Vision
282
Leutron
Vision
PicSight-GigE user manual
Connecting with 3rd party software packages
Leutron Vision GigE cameras can be used the GigE-Vision protocol, which is directly supported by
Cognex software and thus this adapter is not needed.
8.3.1. Installation
The adapter is installed by Simplon Setup from version 1.00.074. It consists of 2 files:
• lv.cognex.adapter.dll, which is installed to the Simplon\Bin folder of Simplon
• lv.cognex.adapter.ini, which is installed to the Simplon user folder (on Windows XP is
this folder the same as Simplon\Bin).
The Setup also modifies the Windows Registry to make the adapter visible to Cognex software.
This includes the following 4 values added to 32-bit registry:
[HKEY_LOCAL_MACHINE\SOFTWARE\Cognex\AIK\AdapterLeutronVision]
"UseExe"=dword:00000001
"ServerNameBase"="Cognex.AIKserver.AdapterLeutronVision."
"PoolSize"=dword:08000000
"LibName"="C:\\Prg\\Simplon\\Bin\\lv.cognex.adapter.dll"
Note that the PoolSize is officially recommended to have a value 0x4000000, however, when
working with large color images (1600x1200 and larger), this size may not be sufficient and you
can experience a crash (it is a known bug in Cognex software). Thus the Setup sets the value
0x8000000 instead.
Important note: When you install Cognex software on CheckSight, be sure you do not accidentally install the support for the FG8600 frame grabber. To be sure, please verify after the Cognex
software installation that there is no FG8600.sys driver file installed in Windows\System32\Drivers
directory. Also be sure you do not have installed the Leutron Vision LV-SDS. These drivers are in
conflict with Simplon and can cause system hang.
8.3.2. Functionality
The Adapter provides the functionality required by the Cognex Acquisition Integration Kit. As this
API is quite simple, some additional parameters, not covered by the API, can be specified in the
lv.cognex.adapter.ini file. The contents of the file is as follows:
[Interfaces]
ListGigEDevices=0
ListPciDevices=1
[Options]
NumberOfBuffers=10
SupportRoi=0
FeatureVisibility=0
DontStopInNonContinuous=1
DelayAfterStartAcq=50
[Device]
DeviceSettings=
DefaultExposure=10000
DefaultImageWidth=640
DefaultImageHeight=480
DefaultTriggerSource=Line1
[PCI-Interface-CheckSight-P32B]
Settings=C:\Prg\Simplon\Bin\PCI-Interface-CheckSight-P32B.cam
Copyright © Leutron Vision
283
Leutron
Vision
PicSight-GigE user manual
Connecting with 3rd party software packages
DefaultExposure=16019
DefaultImageWidth=656
DefaultImageHeight=492
8.3.2.1. Interfaces
In this section you can specify, which interfaces are to be scanned for devices. Typically, the Cognex
software installs support for GigE camera, so if you enable ListGigEDevices, then the GigE
camera would appear in the list twice – once through the GigE-Vision protocol, once through the
Simplon (GenTL) interface. As this adapter is primarily designed for CheckSight, which is a PCI
device, the ListPciDevices=1 assures its device(s) will be listed.
8.3.2.2. Options
NumberOfBuffers: Defines how many buffers should be used by Simplon for the acquisition.
The higher number of buffers may be needed in case your Cognex application may not pick in
time the acquired images; they are queued and the higher number of images means a longer
queue. The default value is 10, in case you use triggered or non-continuous acquisition and pick
images in time, the number of buffers can be reduced to 3.
SupportRoi: Enables the support of hardware ROI. This should be enabled only if the given sensor
supports the hardware ROI (AOI). You can check this in Simplon Explorer – in such case the
LvDevice_LvAOIMode feature can be set to LvAOIMode_Manual, and LvDevice_OffsetX,
LvDevice_OffsetY can be set to a non-zero value. On CheckSight the support of hardware
ROI is useful only in case the sensor provides faster acquisition with reduced ROI; on GigE cameras
the HW ROI can also save network traffic. If the ROI is not hardware supported, the Cognex libraries
make the ROI automatically by software.
FeatureVisibility: The device features, as you can see them in Simplon Explorer, are also available
as Features of the imaging device in the Cognex library. Enumeration of the features consumes
some time, so if you want to reduce the device connection time, you can limit the available features
by selecting the level. The levels correspond to the levels visible in Simplon Explorer. The lower
level, the faster is the connection of the device. Beginner = 0, Expert = 1, Guru = 2. See also the
Features chapter.
DontStopInNonContinuous: When in non-continuous mode, an application usually calls
StartAcquisition() function and after obtaining the image it calls the StopAcquisition()
function. Starting and stopping the acquisition is time consuming, so the adapter introduces a
mode, in which it postpones the StopAcquisition() call to the moment when it is really needed.
If the next StartAcquisition() comes just after StopAcquisition() without change of
any feature or other parameters, these 2 calls are skipped (only the acquisition of a new image is
triggered) and time is saved. This enhancement is available only in non-continuous and nontriggered mode. You can disable it by this option.
8.3.2.3. Device
DeviceSettings: Here you can specify the name of the settings file for the device. You can create
this file in Simplon Explorer by saving the settings in menu "Camera -> Save camera settings". This
enables you to load device settings, which you can comfortably set in Simplon Explorer. Common
things like white balance, gain etc., can be set in Simplon Explorer and saved to this file. Note
that the attempt to load these settings for a different device may cause an error. The file must be
specified with a full path.
DefaultExposure, DefaultImageWidth, DefaultImageHeight: The Cognex software requires
to obtain these values before the device is opened. Thus they are read from this file.
DefaultTriggerSource: As Leutron Vision devices usually have more trigger inputs, you can
specify here which one will be used when the HW trigger is configured in Cognex software. On
CheckSight the following inputs are available: Line1 - Opto In, Line2 - Opto In, Line3 - Opto In,
Copyright © Leutron Vision
284
Leutron
Vision
PicSight-GigE user manual
Connecting with 3rd party software packages
Line4 - Opto In, Line17 - TTL In, Line18 - TTL In. You can also set the trigger input by a feature,
see the next chapter.
8.3.3. Settings saved from Simplon Explorer
The part printed in italics shows an example of settings, which can be saved easily from Simplon
Explorer by the menu "Camera -> Save device settings for Cognex adapter". The section name is
composed from Interface ID and Device ID, so the contents of this section is used only in case the
same device is opened. If this section exists for the device, it has a precedence over the [Device]
section contents.
8.3.4. Features
The Device features visible in Simplon Explorer are also available through the Adapter. The feature
is identified by its Gen-i-cam name and in case of enumerations you can also see the available
values in Simplon Explorer. For example for setting the trigger source, the feature name is TriggerSource, and value is Line1, see the arrows in the screen shot. See also FeatureVisibility in the INI
file.
Copyright © Leutron Vision
285
Leutron
Vision
PicSight-GigE user manual
Connecting with 3rd party software packages
For example in VisionPro QuickBuild you put these strings in the feature access dialog:
8.4. OpenCV
The OpenCV library does not provide native support for GenTL or GigE Vision interfaces, however,
it is possible to integrate OpenCV with Simplon API easily. A simple example demonstrating, how
to deliver the images acquired through the Simplon API interface to the OpenCV functions, can
be created through the Simplon Source Code Generator — use the OpenCV sample in the Project
Generation Wizard:
Copyright © Leutron Vision
286
Leutron
Vision
PicSight-GigE user manual
Connecting with 3rd party software packages
Figure 8.1. Simplon Explorer — start the Project Generation Wizard
Figure 8.2. Simplon Explorer — select the OpenCV template in the wizard
The generated sample is trivial and should be easy to follow. It passes the acquired data to the
OpenCV library using its IplImage structure. This approach allows to keep the full flexibility of
the Simplon API interface while programming with OpenCV.
The OpenCV library can be used also on our PicSight-Smart architecture.
Copyright © Leutron Vision
287
Leutron
Vision
PicSight-GigE user manual
Troubleshooting & Support
9. Troubleshooting & Support
9.1. Getting support for Leutron Vision products
9.1.1. Before you contact the support team
To get the most effective support for your problems, please make sure that you
• Check if your issue does not belong to the list of the most common issues (providing solutions
to all of them).
• Send the problem report to proper e-mail address, depending on your location and the problem
nature, as explained in Section 9.1.2, “Contact options” [p. 288].
• Make sure the problem is well reproducible, preferably with the Simplon Explorer and that you
capture the lv.simplon.log file (Section 9.1.3, “Gathering information about the problem” [p. 288]).
• Attach the captured log file (one per each session if multiple test scenarios are described in the
report) as well as other important information, describe all details about the problem, see Section 9.1.4, “Reporting the problem” [p. 289].
Following these guidelines will guarantee that your problem can be solved effectively, in the
shortest possible time.
9.1.2. Contact options
Following list should help to identify the e-mail contact to be used for your problem report:
• If you purchased Leutron Vision products through a distributor, please contact that distributor
1
with every support case. The list of Leutron Vision distributors with their contact information
is provided in our website.
• If you reside in Germany or Austria, contact <[email protected]>.
• If you reside in US or Canada, contact <[email protected]>.
• If you reside in Czech republic or Slovakia, contact <[email protected]>.
• In all other cases contact
• <[email protected]> for issues related to PicSight-GigE/PicSight-Smart cameras
• <[email protected]> for any issues with Simplon for Linux
• and <[email protected]> for any other products, issues and questions
9.1.3. Gathering information about the problem
When collecting information about your problem, please follow the steps listed hereafter:
1.
1
Be sure you use the latest version of Simplon. It may be that you have an old version
of Simplon installed and you are experiencing a bug, which was already removed in the
meantime. The version of currently installed Simplon is visible in the Simplon Explorer tool
(menu Help → About). The latest Simplon version can be downloaded from the Simplon
http://www.leutron.com/sales-contact/
Copyright © Leutron Vision
288
Leutron
Vision
PicSight-GigE user manual
Troubleshooting & Support
2
download area . If you have not registered yet for Simplon download on our website, you
will have to do so first.
2.
Enable logging. Before attempting to reproduce the problem, be sure the logging is
enabled through the Simplon Settings tool (or directly the lv.simplon.ini file (refer to
Section 5.7.1, “Simplon Settings utility and the configuration file” [p. 93]). Enable logging
to file, preferably with highest log level. If the application crashes and the log is not complete,
switch on the Disable all buffering log configuration option.
3.
Test the hardware functionality with a supplied demo program, Simplon Explorer. As the first step use the “standard” demo program, Simplon Explorer, which covers
most of the possibilities of Leutron Vision hardware usage.
If you are able to reproduce the problem in Simplon Explorer, then the problem is probably
not in your code. However, it still need not be a bug, a problem can be also caused by an
improper configuration.
4.
Camera configuration. Check especially whether the camera is set in a proper working
mode. See camera documentation to learn how the camera should be adjusted.
5.
Check with another hardware. Sometimes the problem can be caused by the HW/SW
environment or by a defective piece of hardware. If it is in your possibilities, try if the same
problem happens on another PC. If you have another camera of the same type available, try
if the problem happens also after the camera replacement. For GigE Vision based cameras,
review the network configuration and try to connect the camera directly, without additional
network components in the path.
6.
Check with your application. If the problem could not be reproduced in the previous
steps, reproduce the problem in your application. If it is possible, extract and send us the
smallest part of your code that can demonstrate where the problem occurs. Even better is if
you can make the extracted code fragment compilable, so that the problem can be reproduced
with a small application that you can send to us. Make sure that your application does proper
error handling when accessing Simplon functions. Ignoring the error status of Simplon functions
can lead to unexpected behavior of your application.
7.
Screenshots. In case of disturbances in the acquired images, make and send us the
screenshots of them, either as bitmaps with lossless compression (.bmp, .png) or as .jpg
with a high quality (small compression).
8.
Send us the report. Send all the collected information (and especially the
lv.simplon.log file) to us, following guidelines from Section 9.1.4, “Reporting the problem” [p. 289].
9.1.4. Reporting the problem
Each problem report should contain following information:
• The e-mail subject should give a brief but specific description of the problem and your company
name (separated by a “@” character). The subject will be used to identify evolution of the support
case, so if you need to submit a different problem, create a new subject string, do not reuse the
old one.
• Example of a good subject: Changing exposure time has no effect @ My Company Inc.
• Example of a bad subject: Problem with camera
• With each new support case, please list your Simplon registration number in the e-mail.
2
http://www.leutron.com/support-downloads/download-area/
Copyright © Leutron Vision
289
Leutron
Vision
PicSight-GigE user manual
Troubleshooting & Support
• Describe your problem in detail, including all its symptoms, conditions under which it occurs
and all other information that can help resolving the problem. List all the information you
gathered while testing and reproducing the problem, as described in Section 9.1.3, “Gathering
information about the problem” [p. 288].
• Attach the required lv.simplon.log file (one per each reported session). The file absolutely
essential for our support team and failing to attach it will usually only lead to a response asking
you to collect and send it, which will in effect make the time needed for the resolution longer.
Be sure that you send the log file generated during the problematic session you are mentioning
in your report reporting.
• If the problem occurs only under some conditions or only with some particular piece of hardware
or software, describe the differences between the two cases and attach log files generated during
both the successful and problematic sessions. If only a specific sequence of steps leads to the
problem, describe this sequence.
9.1.5. Return Material Authorization (RMA)
If you need to return some (possibly defective) material to Leutron Vision, please use the RMA
3
application on our website. The application will query you for some important information about
your product(s) and their defect(s), deciding automatically, whether you should send the material
immediately back to Leutron Vision (or your distributor) or whether we will first contact you to
do more tests for problem verification.
9.1.6. Customer registration
4
Customers willing to get (different level of) access rights to Leutron Vision download area should
5
first register on our website. The registration area provides various registration possibilities from
6
access to freely downloadable data (anyone can get access to it) to access to Simplon download
(you need to purchase Simplon first).
9.2. Troubleshooting Leutron Vision products
9.2.1. Troubleshooting common issues
The lists below mention some most common issues that can be faced by customers, but have easy
solution. It is a good idea to check this list first when encountering a problem. It is also a good
idea to check Section 9.2.2, “Known problems and limitations” [p. 291] and Section 9.2.3, “Simplon
logging” [p. 291] whether some hints can be found there.
• If you are not getting any image, if you get different image data than expected or if you have
problems with acquisition timing, check again carefully that the camera is set in proper working
mode and that it is not in some error status (see camera manual for possible description of such
situations).
• If you have problems with acquisition from a PicSight-GigE/PicSight-Smart camera, check
whether your firewall settings do not interfere with the acquisition. PicSight-GigE user manual
provides more information about this topic.
3
http://www.leutron.com/rma/client_id.php
http://www.leutron.com/support-downloads/download-area/
5
http://www.leutron.com/support-downloads/registrations/
6
http://www.leutron.com/support-downloads/download-area/
4
Copyright © Leutron Vision
290
Leutron
Vision
PicSight-GigE user manual
Troubleshooting & Support
9.2.2. Known problems and limitations
9.2.2.1. Simplon software package
(none in current version)
9.2.2.2. PicSight-GigE/PicSight-Smart cameras
• For the R312AB models, changing the exposure time in triggered mode or in acquisition frame
rate control mode may crash the sensor and a reset of the camera is necessary. This can happen
if the trigger frequency is near the limitation of the frame time which depends on the exposure
time. For example, a trigger frequency of 10 Hz with changing exposure times below 10 ms
are not affected. Please ask support for more details and current status.
9.2.3. Simplon logging
All the Simplon components are using a common logging subsystem, which can be configured
through the lv.simplon.ini and Simplon Settings (Section 5.7.1, “Simplon Settings utility
and the configuration file” [p. 93]).
The log can be directed to various outputs, while the most important of them (especially for support) is the file output. The log file path can be adjusted, however the default name
(lv.simplon.log) as well as the default location (application data directory under Windows,
/var/opt/simplon/log under Linux) will be just right in most situations.
The logging level can also be adjusted. While the default level Info (4) provides most useful
information about the system and Simplon operation, for specific troubleshooting and support
requests, it is often useful to switch to the most verbose level Trace (6).
For the case of troubleshooting problems involving an application crash, when the log might not
be written completely (log buffers not flushed completely at the time of application crash), the
logging subsystem should be configured to avoid any buffering. In such case, please switch on
the Disable all buffering option.
The logging configuration offers few more options, the most important of them being the max
allowed size of the log file. The log can be also directed to other outputs, but those are mainly
intended for use during advanced debugging by qualified personnel.
Several logging mechanisms are used by various Simplon components. They are separated to
utilize log analysis, to separate domain-specific info from the general purpose logs and to improve
performance, logging only what needs to get logged in a given situation. Creation of these log
files can usually be controlled by the user.
Note however, that all the information in the logs is just informative and its main
purpose is to assist the Leutron Vision support team when trying to resolve
possible problems. It is not designed as a tool that should be necessarily well
understandable by users, it might be misleading and all the information is contextspecific. If a word “error” or “warning” appears in the log, it does not necessarily
mean a real error occurred, it might be valid situation in a given context. You
don't need to get alarmed because of that and contact support, especially if the
application is otherwise working well.
9.2.4. Debugging with GigE Vision cameras
When debugging an application using GigE Vision cameras (PicSight-GigE/PicSight-Smart), it's
necessary to pay attention to a low level GigE Vision communication parameter, the heartbeat
timeout.
Copyright © Leutron Vision
291
Leutron
Vision
PicSight-GigE user manual
Troubleshooting & Support
This timeout, in milliseconds, defines how frequently has the camera send the “heartbeat” messages
to the camera, indicating that it's still alive. When the camera does not receive the message
within the specified timeout period, it assumes the application has gone away and disconnects
itself. The default value used in Simplon is 3 s (other software packages might use another value).
At most times, the heartbeat handling is fully transparent to the user. However, during debugging,
when a developer stops the application at a breakpoint for single stepping, the Simplon heartbeat
handling thread would also stop, fail to deliver the heartbeat messages and the camera would
disconnect. To prevent that, we recommend to increase the heartbeat timeout parameter to a
higher value. The exact value should be a compromise between being able to debug comfortably,
while understanding that when the application stops unexpectedly without disconnecting the
camera properly, it will take a while before the camera disconnects automatically and becomes
available for another connection.
The parameter is configurable through camera features at runtime (the feature's GenICam name
is GevHeartbeatTimeout), while its default value can be adjusted through the Simplon Settings
utility, configuration option Heartbeat timeout.
Note that some software packages attempt to increase the timeout automatically, whenever they
find out that a debugger is attached to the process. We don't do that since we believe that the
correct heartbeat timeout value can only be determined by the application developer, for reasons
described above.
9.2.5. Debugging symbols
When debugging certain kinds of problems, such as application crash, it might be very useful if
you can provide the support team with extended diagnostic information, such as the stack trace
showing the crash point. The installer of Simplon for Windows allows to install “PDB files” — files
containing the debugging information (symbols) for the Simplon libraries. We recommend to install
these debug files on the development and testing systems, so that it is possible to generate the
stack trace info whenever encountering a problem. The files are located in the bin\Debug subdirectory of the Simplon installation.
Note that in Linux version of Simplon the symbols are directly included in the libraries and executables.
Copyright © Leutron Vision
292
Leutron
Vision
PicSight-GigE user manual
Technical specifications for individual models
Appendix A. Technical specifications for individual
models
A.1. PicSight G32B-GigE-AS
Specification
PicSight G32B-GigE-AS
Interface
Ethernet 1000/100/10 Mb/s
Sensor
1/2" CMOS, parallel readout, type Aptina MT9V403
Spectral sensitivity
Monochrome/color
bayer pattern
Output image resolution (H×V) 656 × 492 pixels
Frame rate
196 fps
Video format
10-bit, single tap
Scanning
progressive
Pixel size (H×V)
9.9 × 9.9 μm
Sensor size (H×V)
6.5241 × 4.8906 mm
Shutter
global, 20 μs –1300 ms (default 5 ms)
Operating (trigger) modes
• Free running
• Triggered mode
Gain & black level
• Analog gain: 0 .. 23.52 dB (default 0 dB)
• Digital gain: n/a
• Black level: -1.5 .. 1.5 DN (default 0 DN)
Auto functions
n/a
Signal/noise ratio
46 dB
Dynamic range
53 dB
Area of interest (AOI)
Horizontal and vertical AOI applicable directly at the sensor
Binning
n/a
Decimation
n/a
Mount
C-mount (CS-mount on request)
Dimension
• 44.8×31.4×91.7 mm (W×H×L, without connectors) — standard
version
• 44.8×37.56×96.0 mm (W×H×L, without connectors) — right
angle version
Weight
145 g
Copyright © Leutron Vision
293
Leutron
Vision
PicSight-GigE user manual
Technical specifications for individual models
Specification
PicSight G32B-GigE-AS
Power input
10-26V/5W
Ordering information
• 401202: PicSight G32B-GigE-AS (Hirose/SDR-26 connector)
• 401203: PicSight G32B-GigE-AS-H (Hirose/SDR-26 connector,
90º lens mount)
• 401227: PicSight G32B-GigE-PoE-S (PoE, Hirose/SDR-26 connector)
• 401228: PicSight G32B-GigE-PoE-S-H (PoE, Hirose/SDR-26
connector, 90º lens mount)
• 401302: PicSight G32B-GigE-AS-RTF (Realtime function, lens
controller, Hirose/SDR-26 connector)
• 401303: PicSight G32B-GigE-AS-RTF-H (Realtime function, lens
controller, Hirose/SDR-26 connector, 90º lens mount)
• 401327: PicSight G32B-GigE-PoE-S-RTF (PoE, Realtime function,
lens controller, Hirose/SDR-26 connector)
• 401328: PicSight G32B-GigE-PoE-S-RTF-H (PoE, Realtime
function, lens controller, Hirose/SDR-26 connector, 90º lens
mount)
Check latest price list or contact us to learn if more options are
available.
Table A.1. PicSight G32B-GigE-AS technical specifications
A.2. PicSight G32M-GigE-AS
Specification
PicSight G32M-GigE-AS
Interface
Ethernet 1000/100/10 Mb/s
Sensor
1/2" CMOS, parallel readout, type Aptina MT9V403
Spectral sensitivity
Monochrome/color
monochrome
Output image resolution (H×V) 656 × 492 pixels
Frame rate
196 fps
Video format
10-bit, single tap
Scanning
progressive
Pixel size (H×V)
9.9 × 9.9 μm
Sensor size (H×V)
6.5241 × 4.8906 mm
Shutter
global, 20 μs –1300 ms (default 5 ms)
Operating (trigger) modes
• Free running
• Triggered mode
Copyright © Leutron Vision
294
Leutron
Vision
PicSight-GigE user manual
Technical specifications for individual models
Specification
PicSight G32M-GigE-AS
Gain & black level
• Analog gain: 0 .. 23.52 dB (default 0 dB)
• Digital gain: n/a
• Black level: -1.5 .. 1.5 DN (default 0 DN)
Auto functions
n/a
Signal/noise ratio
46 dB
Dynamic range
53 dB
Area of interest (AOI)
Horizontal and vertical AOI applicable directly at the sensor
Binning
n/a
Decimation
n/a
Mount
C-mount (CS-mount on request)
Dimension
• 44.8×31.4×91.7 mm (W×H×L, without connectors) — standard
version
• 44.8×37.56×96.0 mm (W×H×L, without connectors) — right
angle version
Weight
145 g
Power input
10-26V/5W
Ordering information
• 400202: PicSight G32M-GigE-AS (Hirose/SDR-26 connector)
• 400203: PicSight G32M-GigE-AS-H (Hirose/SDR-26 connector,
90º lens mount)
• 400227: PicSight G32M-GigE-PoE-S (PoE, Hirose/SDR-26 connector)
• 400228: PicSight G32M-GigE-PoE-S-H (PoE, Hirose/SDR-26
connector, 90º lens mount)
• 400302: PicSight G32M-GigE-AS-RTF (Realtime function, lens
controller, Hirose/SDR-26 connector)
• 400303: PicSight G32M-GigE-AS-RTF-H (Realtime function,
lens controller, Hirose/SDR-26 connector, 90º lens mount)
• 400327: PicSight G32M-GigE-PoE-S-RTF (PoE, Realtime function, lens controller, Hirose/SDR-26 connector)
• 400328: PicSight G32M-GigE-PoE-S-RTF-H (PoE, Realtime
function, lens controller, Hirose/SDR-26 connector, 90º lens
mount)
Check latest price list or contact us to learn if more options are
available.
Table A.2. PicSight G32M-GigE-AS technical specifications
A.3. PicSight G43AB-GigE-AS
Specification
PicSight G43AB-GigE-AS
Interface
Ethernet 1000/100/10 Mb/s
Sensor
1/3" CMOS, parallel readout, type Aptina MT9V033
Copyright © Leutron Vision
295
Leutron
Vision
PicSight-GigE user manual
Specification
Technical specifications for individual models
PicSight G43AB-GigE-AS
Spectral sensitivity
Monochrome/color
bayer pattern
Output image resolution (H×V) 752 × 480 pixels
Frame rate
62 fps
Video format
10-bit, single tap
Scanning
progressive
Pixel size (H×V)
6 × 6 μm
Sensor size (H×V)
4.512 × 2.88 mm
Shutter
global, 10 μs –1000 ms (default 15 ms)
Operating (trigger) modes
• Free running
• Triggered mode
Gain & black level
• Analog gain: 0 .. 12.04 dB (default 12 dB)
• Digital gain: -12.04 .. 11.48 dB (default 0 dB)
• Black level: 0 .. 6.35 DN (default 0 DN)
Auto functions
• Auto exposure
• Automatic analog gain control
• Automatic black level
Signal/noise ratio
42 dB
Dynamic range
49 dB
Area of interest (AOI)
Horizontal and vertical AOI applicable directly at the sensor
Binning
n/a
Decimation
n/a
Mount
C-mount (CS-mount on request)
Dimension
• 44.8×31.4×91.7 mm (W×H×L, without connectors) — standard
version
• 44.8×37.56×96.0 mm (W×H×L, without connectors) — right
angle version
Weight
145 g
Power input
10-26V/5W
Copyright © Leutron Vision
296
Leutron
Vision
PicSight-GigE user manual
Technical specifications for individual models
Specification
PicSight G43AB-GigE-AS
Ordering information
• 413202: PicSight G43AB-GigE-AS (Hirose/SDR-26 connector)
• 413203: PicSight G43AB-GigE-AS-H (Hirose/SDR-26 connector,
90º lens mount)
• 413227: PicSight G43AB-GigE-PoE-S (PoE, Hirose/SDR-26
connector)
• 413228: PicSight G43AB-GigE-PoE-S-H (PoE, Hirose/SDR-26
connector, 90º lens mount)
• 413302: PicSight G43AB-GigE-AS-RTF (Realtime function, lens
controller, Hirose/SDR-26 connector)
• 413303: PicSight G43AB-GigE-AS-RTF-H (Realtime function,
lens controller, Hirose/SDR-26 connector, 90º lens mount)
• 413327: PicSight G43AB-GigE-PoE-S-RTF (PoE, Realtime function, lens controller, Hirose/SDR-26 connector)
• 413328: PicSight G43AB-GigE-PoE-S-RTF-H (PoE, Realtime
function, lens controller, Hirose/SDR-26 connector, 90º lens
mount)
Check latest price list or contact us to learn if more options are
available.
Table A.3. PicSight G43AB-GigE-AS technical specifications
A.4. PicSight G43AM-GigE-AS
Specification
PicSight G43AM-GigE-AS
Interface
Ethernet 1000/100/10 Mb/s
Sensor
1/3" CMOS, parallel readout, type Aptina MT9V033
Spectral sensitivity
Monochrome/color
monochrome
Output image resolution (H×V) 752 × 480 pixels
Frame rate
62 fps
Video format
10-bit, single tap
Scanning
progressive
Pixel size (H×V)
6 × 6 μm
Sensor size (H×V)
4.512 × 2.88 mm
Shutter
global, 10 μs –1000 ms (default 15 ms)
Operating (trigger) modes
• Free running
• Triggered mode
Copyright © Leutron Vision
297
Leutron
Vision
PicSight-GigE user manual
Technical specifications for individual models
Specification
PicSight G43AM-GigE-AS
Gain & black level
• Analog gain: 0 .. 12.04 dB (default 4 dB)
• Digital gain: -12.04 .. 11.48 dB (default 0 dB)
• Black level: 0 .. 6.35 DN (default 0 DN)
Auto functions
• Auto exposure
• Automatic analog gain control
• Automatic black level
Signal/noise ratio
42 dB
Dynamic range
49 dB
Area of interest (AOI)
Horizontal and vertical AOI applicable directly at the sensor
Binning
• Horizontal: 2× 4×
• Vertical: 2× 4×
Decimation
n/a
Mount
C-mount (CS-mount on request)
Dimension
• 44.8×31.4×91.7 mm (W×H×L, without connectors) — standard
version
• 44.8×37.56×96.0 mm (W×H×L, without connectors) — right
angle version
Weight
145 g
Power input
10-26V/5W
Ordering information
• 412202: PicSight G43AM-GigE-AS (Hirose/SDR-26 connector)
• 412203: PicSight G43AM-GigE-AS-H (Hirose/SDR-26 connector,
90º lens mount)
• 412227: PicSight G43AM-GigE-PoE-S (PoE, Hirose/SDR-26
connector)
• 412228: PicSight G43AM-GigE-PoE-S-H (PoE, Hirose/SDR-26
connector, 90º lens mount)
• 412302: PicSight G43AM-GigE-AS-RTF (Realtime function, lens
controller, Hirose/SDR-26 connector)
• 412303: PicSight G43AM-GigE-AS-RTF-H (Realtime function,
lens controller, Hirose/SDR-26 connector, 90º lens mount)
• 412327: PicSight G43AM-GigE-PoE-S-RTF (PoE, Realtime
function, lens controller, Hirose/SDR-26 connector)
• 412328: PicSight G43AM-GigE-PoE-S-RTF-H (PoE, Realtime
function, lens controller, Hirose/SDR-26 connector, 90º lens
mount)
Check latest price list or contact us to learn if more options are
available.
Table A.4. PicSight G43AM-GigE-AS technical specifications
A.5. PicSight P133B-GigE-AS
Specification
PicSight P133B-GigE-AS
Interface
Ethernet 1000/100/10 Mb/s
Sensor
1/1" CCD, interline transfer, type SONY ICX442AQ
Copyright © Leutron Vision
298
Leutron
Vision
PicSight-GigE user manual
Specification
Technical specifications for individual models
PicSight P133B-GigE-AS
Spectral sensitivity
Monochrome/color
bayer pattern
Output image resolution (H×V) 1304 × 976 pixels
Full sensor resolution (incl. black 1360 × 986 pixels
pixels)
Frame rate
8.3 fps
Video format
12-bit, single tap
Scanning
progressive
Pixel size (H×V)
0 × 0 μm
Sensor size (H×V)
6.23 × 5.09 mm
Shutter
global, 5 μs –60000 ms (default 100 ms)
Operating (trigger) modes
• Free running
• Triggered mode
• Long range exposure mode
Gain & black level
• Analog gain: -10 .. 26 dB (default 0 dB)
• Digital gain: n/a
• Black level: 0 .. 25.5 DN (default 0 DN)
Auto functions
n/a
Area of interest (AOI)
Vertical AOI applicable directly at the sensor
Binning
n/a
Decimation
n/a
Mount
C-mount (CS-mount on request)
Dimension
• 44.8×31.4×91.7 mm (W×H×L, without connectors) — standard
version
• 44.8×37.56×96.0 mm (W×H×L, without connectors) — right
angle version
Weight
145 g
Power input
10-26V/5W
Copyright © Leutron Vision
299
Leutron
Vision
PicSight-GigE user manual
Technical specifications for individual models
Specification
PicSight P133B-GigE-AS
Ordering information
• 151202: PicSight P133B-GigE-AS (Hirose/SDR-26 connector)
• 151203: PicSight P133B-GigE-AS-H (Hirose/SDR-26 connector,
90º lens mount)
• 151227: PicSight P133B-GigE-PoE-S (PoE, Hirose/SDR-26 connector)
• 151228: PicSight P133B-GigE-PoE-S-H (PoE, Hirose/SDR-26
connector, 90º lens mount)
• 151302: PicSight P133B-GigE-AS-RTF (Realtime function, lens
controller, Hirose/SDR-26 connector)
• 151303: PicSight P133B-GigE-AS-RTF-H (Realtime function,
lens controller, Hirose/SDR-26 connector, 90º lens mount)
• 151327: PicSight P133B-GigE-PoE-S-RTF (PoE, Realtime function, lens controller, Hirose/SDR-26 connector)
• 151328: PicSight P133B-GigE-PoE-S-RTF-H (PoE, Realtime
function, lens controller, Hirose/SDR-26 connector, 90º lens
mount)
Check latest price list or contact us to learn if more options are
available.
Table A.5. PicSight P133B-GigE-AS technical specifications
A.6. PicSight P141B-GigE-AS
Specification
PicSight P141B-GigE-AS
Interface
Ethernet 1000/100/10 Mb/s
Sensor
2/3" CCD, interline transfer, type SONY ICX285
Spectral sensitivity
Monochrome/color
bayer pattern
Output image resolution (H×V) 1392 × 1040 pixels
Full sensor resolution (incl. black 1438 × 1050 pixels
pixels)
Frame rate
20.2 fps
Video format
12-bit, single tap
Scanning
progressive
Pixel size (H×V)
6.45 × 6.45 μm
Sensor size (H×V)
10.2 × 8.3 mm
Shutter
global, 5 μs –60000 ms (default 48 ms)
Operating (trigger) modes
• Free running
• Triggered mode
• Long range exposure mode
Copyright © Leutron Vision
300
Leutron
Vision
PicSight-GigE user manual
Technical specifications for individual models
Specification
PicSight P141B-GigE-AS
Gain & black level
• Analog gain: -3 .. 33 dB (default 9 dB)
• Digital gain: n/a
• Black level: 0 .. 25.5 DN (default 0 DN)
Auto functions
n/a
Area of interest (AOI)
Vertical AOI applicable directly at the sensor
Binning
n/a
Decimation
n/a
Mount
C-mount (CS-mount on request)
Dimension
• 44.8×31.4×91.7 mm (W×H×L, without connectors) — standard
version
• 44.8×37.56×96.0 mm (W×H×L, without connectors) — right
angle version
Weight
145 g
Power input
10-26V/5W
Ordering information
• 181202: PicSight P141B-GigE-AS (Hirose/SDR-26 connector)
• 181203: PicSight P141B-GigE-AS-H (Hirose/SDR-26 connector,
90º lens mount)
• 181227: PicSight P141B-GigE-PoE-S (PoE, Hirose/SDR-26 connector)
• 181228: PicSight P141B-GigE-PoE-S-H (PoE, Hirose/SDR-26
connector, 90º lens mount)
• 181302: PicSight P141B-GigE-AS-RTF (Realtime function, lens
controller, Hirose/SDR-26 connector)
• 181303: PicSight P141B-GigE-AS-RTF-H (Realtime function,
lens controller, Hirose/SDR-26 connector, 90º lens mount)
• 181327: PicSight P141B-GigE-PoE-S-RTF (PoE, Realtime function, lens controller, Hirose/SDR-26 connector)
• 181328: PicSight P141B-GigE-PoE-S-RTF-H (PoE, Realtime
function, lens controller, Hirose/SDR-26 connector, 90º lens
mount)
Check latest price list or contact us to learn if more options are
available.
Table A.6. PicSight P141B-GigE-AS technical specifications
A.7. PicSight P141M-GigE-AS
Specification
PicSight P141M-GigE-AS
Interface
Ethernet 1000/100/10 Mb/s
Sensor
2/3" CCD, interline transfer, type SONY ICX285
Copyright © Leutron Vision
301
Leutron
Vision
PicSight-GigE user manual
Specification
Technical specifications for individual models
PicSight P141M-GigE-AS
Spectral sensitivity
Monochrome/color
monochrome
Output image resolution (H×V) 1392 × 1040 pixels
Full sensor resolution (incl. black 1438 × 1050 pixels
pixels)
Frame rate
20.2 fps
Video format
12-bit, single tap
Scanning
progressive
Pixel size (H×V)
6.45 × 6.45 μm
Sensor size (H×V)
10.2 × 8.3 mm
Shutter
global, 5 μs –60000 ms (default 48 ms)
Operating (trigger) modes
• Free running
• Triggered mode
• Long range exposure mode
Gain & black level
• Analog gain: -3 .. 33 dB (default 0 dB)
• Digital gain: n/a
• Black level: 0 .. 25.5 DN (default 0 DN)
Auto functions
n/a
Signal/noise ratio
43 dB
Dynamic range
77 dB
Area of interest (AOI)
Vertical AOI applicable directly at the sensor
Binning
• Vertical: 2×
Decimation
n/a
Mount
C-mount (CS-mount on request)
Dimension
• 44.8×31.4×91.7 mm (W×H×L, without connectors) — standard
version
• 44.8×37.56×96.0 mm (W×H×L, without connectors) — right
angle version
Weight
145 g
Power input
10-26V/5W
Copyright © Leutron Vision
302
Leutron
Vision
PicSight-GigE user manual
Technical specifications for individual models
Specification
PicSight P141M-GigE-AS
Ordering information
• 180202: PicSight P141M-GigE-AS (Hirose/SDR-26 connector)
• 180203: PicSight P141M-GigE-AS-H (Hirose/SDR-26 connector,
90º lens mount)
• 180227: PicSight P141M-GigE-PoE-S (PoE, Hirose/SDR-26
connector)
• 180228: PicSight P141M-GigE-PoE-S-H (PoE, Hirose/SDR-26
connector, 90º lens mount)
• 180302: PicSight P141M-GigE-AS-RTF (Realtime function, lens
controller, Hirose/SDR-26 connector)
• 180303: PicSight P141M-GigE-AS-RTF-H (Realtime function,
lens controller, Hirose/SDR-26 connector, 90º lens mount)
• 180327: PicSight P141M-GigE-PoE-S-RTF (PoE, Realtime function, lens controller, Hirose/SDR-26 connector)
• 180328: PicSight P141M-GigE-PoE-S-RTF-H (PoE, Realtime
function, lens controller, Hirose/SDR-26 connector, 90º lens
mount)
Check latest price list or contact us to learn if more options are
available.
Table A.7. PicSight P141M-GigE-AS technical specifications
A.8. PicSight P142AB-GigE-AS
Specification
PicSight P142AB-GigE-AS
Interface
Ethernet 1000/100/10 Mb/s
Sensor
1/2" CCD, interline transfer, type SONY ICX267
Spectral sensitivity
Monochrome/color
bayer pattern
Output image resolution (H×V) 1392 × 1040 pixels
Full sensor resolution (incl. black 1434 × 1050 pixels
pixels)
Frame rate
0.15 fps
Video format
12-bit, single tap
Scanning
progressive
Pixel size (H×V)
4.65 × 4.65 μm
Sensor size (H×V)
7.6 × 6.2 mm
Shutter
global, 5 μs –60000 ms (default 130 ms)
Operating (trigger) modes
• Free running
• Triggered mode
• Long range exposure mode
Copyright © Leutron Vision
303
Leutron
Vision
PicSight-GigE user manual
Technical specifications for individual models
Specification
PicSight P142AB-GigE-AS
Gain & black level
• Analog gain: -8 .. 28 dB (default 0 dB)
• Digital gain: n/a
• Black level: 0 .. 25.5 DN (default 0 DN)
Auto functions
n/a
Area of interest (AOI)
Vertical AOI applicable directly at the sensor
Binning
n/a
Decimation
n/a
Mount
C-mount (CS-mount on request)
Dimension
• 44.8×31.4×91.7 mm (W×H×L, without connectors) — standard
version
• 44.8×37.56×96.0 mm (W×H×L, without connectors) — right
angle version
Weight
145 g
Power input
10-26V/5W
Ordering information
• 171202: PicSight P142AB-GigE-AS (Hirose/SDR-26 connector)
• 171203: PicSight P142AB-GigE-AS-H (Hirose/SDR-26 connector,
90º lens mount)
• 171227: PicSight P142AB-GigE-PoE-S (PoE, Hirose/SDR-26
connector)
• 171228: PicSight P142AB-GigE-PoE-S-H (PoE, Hirose/SDR-26
connector, 90º lens mount)
• 171302: PicSight P142AB-GigE-AS-RTF (Realtime function, lens
controller, Hirose/SDR-26 connector)
• 171303: PicSight P142AB-GigE-AS-RTF-H (Realtime function,
lens controller, Hirose/SDR-26 connector, 90º lens mount)
• 171327: PicSight P142AB-GigE-PoE-S-RTF (PoE, Realtime
function, lens controller, Hirose/SDR-26 connector)
• 171328: PicSight P142AB-GigE-PoE-S-RTF-H (PoE, Realtime
function, lens controller, Hirose/SDR-26 connector, 90º lens
mount)
Check latest price list or contact us to learn if more options are
available.
Table A.8. PicSight P142AB-GigE-AS technical specifications
A.9. PicSight P142AM-GigE-AS
Specification
PicSight P142AM-GigE-AS
Interface
Ethernet 1000/100/10 Mb/s
Sensor
1/2" CCD, interline transfer, type SONY ICX267
Copyright © Leutron Vision
304
Leutron
Vision
PicSight-GigE user manual
Specification
Technical specifications for individual models
PicSight P142AM-GigE-AS
Spectral sensitivity
Monochrome/color
monochrome
Output image resolution (H×V) 1392 × 1040 pixels
Full sensor resolution (incl. black 1434 × 1050 pixels
pixels)
Frame rate
0.15 fps
Video format
12-bit, single tap
Scanning
progressive
Pixel size (H×V)
4.65 × 4.65 μm
Sensor size (H×V)
7.6 × 6.2 mm
Shutter
global, 5 μs –60000 ms (default 50 ms)
Operating (trigger) modes
• Free running
• Triggered mode
• Long range exposure mode
Gain & black level
• Analog gain: -8 .. 28 dB (default 0 dB)
• Digital gain: n/a
• Black level: 0 .. 25.5 DN (default 0 DN)
Auto functions
n/a
Signal/noise ratio
43 dB
Dynamic range
71 dB
Area of interest (AOI)
Vertical AOI applicable directly at the sensor
Binning
• Vertical: 2×
Decimation
n/a
Mount
C-mount (CS-mount on request)
Dimension
• 44.8×31.4×91.7 mm (W×H×L, without connectors) — standard
version
• 44.8×37.56×96.0 mm (W×H×L, without connectors) — right
angle version
Weight
145 g
Power input
10-26V/5W
Copyright © Leutron Vision
305
Leutron
Vision
PicSight-GigE user manual
Technical specifications for individual models
Specification
PicSight P142AM-GigE-AS
Ordering information
• 170202: PicSight P142AM-GigE-AS (Hirose/SDR-26 connector)
• 170203: PicSight P142AM-GigE-AS-H (Hirose/SDR-26 connector, 90º lens mount)
• 170227: PicSight P142AM-GigE-PoE-S (PoE, Hirose/SDR-26
connector)
• 170228: PicSight P142AM-GigE-PoE-S-H (PoE, Hirose/SDR-26
connector, 90º lens mount)
• 170302: PicSight P142AM-GigE-AS-RTF (Realtime function,
lens controller, Hirose/SDR-26 connector)
• 170303: PicSight P142AM-GigE-AS-RTF-H (Realtime function,
lens controller, Hirose/SDR-26 connector, 90º lens mount)
• 170327: PicSight P142AM-GigE-PoE-S-RTF (PoE, Realtime
function, lens controller, Hirose/SDR-26 connector)
• 170328: PicSight P142AM-GigE-PoE-S-RTF-H (PoE, Realtime
function, lens controller, Hirose/SDR-26 connector, 90º lens
mount)
Check latest price list or contact us to learn if more options are
available.
Table A.9. PicSight P142AM-GigE-AS technical specifications
A.10. PicSight P202B-GigE-AS
Specification
PicSight P202B-GigE-AS
Interface
Ethernet 1000/100/10 Mb/s
Sensor
1/1.8" CCD, interline transfer, type SONY ICX274
Spectral sensitivity
Monochrome/color
bayer pattern
Output image resolution (H×V) 1624 × 1236 pixels
Full sensor resolution (incl. black 1688 × 1248 pixels
pixels)
Frame rate
14.6 fps
Video format
12-bit, single tap
Scanning
progressive
Pixel size (H×V)
4.4 × 4.4 μm
Sensor size (H×V)
8.5 × 6.8 mm
Shutter
global, 5 μs –60000 ms (default 60 ms)
Operating (trigger) modes
• Free running
• Triggered mode
• Long range exposure mode
Copyright © Leutron Vision
306
Leutron
Vision
PicSight-GigE user manual
Technical specifications for individual models
Specification
PicSight P202B-GigE-AS
Gain & black level
• Analog gain: -10 .. 26 dB (default 4 dB)
• Digital gain: n/a
• Black level: 0 .. 25.5 DN (default 0 DN)
Auto functions
n/a
Area of interest (AOI)
Vertical AOI applicable directly at the sensor
Binning
n/a
Decimation
n/a
Mount
C-mount (CS-mount on request)
Dimension
• 44.8×31.4×91.7 mm (W×H×L, without connectors) — standard
version
• 44.8×37.56×96.0 mm (W×H×L, without connectors) — right
angle version
Weight
145 g
Power input
10-26V/5W
Ordering information
• 211202: PicSight P202B-GigE-AS (Hirose/SDR-26 connector)
• 211203: PicSight P202B-GigE-AS-H (Hirose/SDR-26 connector,
90º lens mount)
• 211227: PicSight P202B-GigE-PoE-S (PoE, Hirose/SDR-26 connector)
• 211228: PicSight P202B-GigE-PoE-S-H (PoE, Hirose/SDR-26
connector, 90º lens mount)
• 211302: PicSight P202B-GigE-AS-RTF (Realtime function, lens
controller, Hirose/SDR-26 connector)
• 211303: PicSight P202B-GigE-AS-RTF-H (Realtime function,
lens controller, Hirose/SDR-26 connector, 90º lens mount)
• 211327: PicSight P202B-GigE-PoE-S-RTF (PoE, Realtime function, lens controller, Hirose/SDR-26 connector)
• 211328: PicSight P202B-GigE-PoE-S-RTF-H (PoE, Realtime
function, lens controller, Hirose/SDR-26 connector, 90º lens
mount)
Check latest price list or contact us to learn if more options are
available.
Table A.10. PicSight P202B-GigE-AS technical specifications
A.11. PicSight P202M-GigE-AS
Specification
PicSight P202M-GigE-AS
Interface
Ethernet 1000/100/10 Mb/s
Sensor
1/1.8" CCD, interline transfer, type SONY ICX274
Copyright © Leutron Vision
307
Leutron
Vision
PicSight-GigE user manual
Specification
Technical specifications for individual models
PicSight P202M-GigE-AS
Spectral sensitivity
Monochrome/color
monochrome
Output image resolution (H×V) 1624 × 1236 pixels
Full sensor resolution (incl. black 1688 × 1248 pixels
pixels)
Frame rate
14.6 fps
Video format
12-bit, single tap
Scanning
progressive
Pixel size (H×V)
4.4 × 4.4 μm
Sensor size (H×V)
8.5 × 6.8 mm
Shutter
global, 5 μs –60000 ms (default 30 ms)
Operating (trigger) modes
• Free running
• Triggered mode
• Long range exposure mode
Gain & black level
• Analog gain: -10 .. 26 dB (default 0 dB)
• Digital gain: n/a
• Black level: 0 .. 25.5 DN (default 0 DN)
Auto functions
n/a
Signal/noise ratio
40 dB
Dynamic range
69 dB
Area of interest (AOI)
Vertical AOI applicable directly at the sensor
Binning
• Vertical: 2×
Decimation
n/a
Mount
C-mount (CS-mount on request)
Dimension
• 44.8×31.4×91.7 mm (W×H×L, without connectors) — standard
version
• 44.8×37.56×96.0 mm (W×H×L, without connectors) — right
angle version
Weight
145 g
Power input
10-26V/5W
Copyright © Leutron Vision
308
Leutron
Vision
PicSight-GigE user manual
Technical specifications for individual models
Specification
PicSight P202M-GigE-AS
Ordering information
• 210202: PicSight P202M-GigE-AS (Hirose/SDR-26 connector)
• 210203: PicSight P202M-GigE-AS-H (Hirose/SDR-26 connector,
90º lens mount)
• 210227: PicSight P202M-GigE-PoE-S (PoE, Hirose/SDR-26
connector)
• 210228: PicSight P202M-GigE-PoE-S-H (PoE, Hirose/SDR-26
connector, 90º lens mount)
• 210302: PicSight P202M-GigE-AS-RTF (Realtime function, lens
controller, Hirose/SDR-26 connector)
• 210303: PicSight P202M-GigE-AS-RTF-H (Realtime function,
lens controller, Hirose/SDR-26 connector, 90º lens mount)
• 210327: PicSight P202M-GigE-PoE-S-RTF (PoE, Realtime function, lens controller, Hirose/SDR-26 connector)
• 210328: PicSight P202M-GigE-PoE-S-RTF-H (PoE, Realtime
function, lens controller, Hirose/SDR-26 connector, 90º lens
mount)
Check latest price list or contact us to learn if more options are
available.
Table A.11. PicSight P202M-GigE-AS technical specifications
A.12. PicSight P203B-GigE-AS
Specification
PicSight P203B-GigE-AS
Interface
Ethernet 1000/100/10 Mb/s
Sensor
1/1" CCD, interline transfer, type SONY ICX454JQF-J
Spectral sensitivity
Monochrome/color
bayer pattern
Output image resolution (H×V) 1648 × 1240 pixels
Full sensor resolution (incl. black 1690 × 1250 pixels
pixels)
Frame rate
9.2 fps
Video format
12-bit, single tap
Scanning
progressive
Pixel size (H×V)
0 × 0 μm
Sensor size (H×V)
6.38 × 5.26 mm
Shutter
global, 5 μs –60000 ms (default 100 ms)
Copyright © Leutron Vision
309
Leutron
Vision
PicSight-GigE user manual
Technical specifications for individual models
Specification
PicSight P203B-GigE-AS
Operating (trigger) modes
• Free running
• Triggered mode
• Long range exposure mode
Gain & black level
• Analog gain: -6 .. 26 dB (default 6 dB)
• Digital gain: n/a
• Black level: 0 .. 25.5 DN (default 0 DN)
Auto functions
n/a
Area of interest (AOI)
Vertical AOI applicable directly at the sensor
Binning
n/a
Decimation
n/a
Mount
C-mount (CS-mount on request)
Dimension
• 44.8×31.4×91.7 mm (W×H×L, without connectors) — standard
version
• 44.8×37.56×96.0 mm (W×H×L, without connectors) — right
angle version
Weight
145 g
Power input
10-26V/5W
Ordering information
• 201202: PicSight P203B-GigE-AS (Hirose/SDR-26 connector)
• 201203: PicSight P203B-GigE-AS-H (Hirose/SDR-26 connector,
90º lens mount)
• 201227: PicSight P203B-GigE-PoE-S (PoE, Hirose/SDR-26 connector)
• 201228: PicSight P203B-GigE-PoE-S-H (PoE, Hirose/SDR-26
connector, 90º lens mount)
• 201302: PicSight P203B-GigE-AS-RTF (Realtime function, lens
controller, Hirose/SDR-26 connector)
• 201303: PicSight P203B-GigE-AS-RTF-H (Realtime function,
lens controller, Hirose/SDR-26 connector, 90º lens mount)
• 201327: PicSight P203B-GigE-PoE-S-RTF (PoE, Realtime function, lens controller, Hirose/SDR-26 connector)
• 201328: PicSight P203B-GigE-PoE-S-RTF-H (PoE, Realtime
function, lens controller, Hirose/SDR-26 connector, 90º lens
mount)
Check latest price list or contact us to learn if more options are
available.
Table A.12. PicSight P203B-GigE-AS technical specifications
A.13. PicSight P32B-GigE-AS
Specification
PicSight P32B-GigE-AS
Interface
Ethernet 1000/100/10 Mb/s
Sensor
1/2" CCD, interline transfer, type SONY ICX414
Copyright © Leutron Vision
310
Leutron
Vision
PicSight-GigE user manual
Specification
Technical specifications for individual models
PicSight P32B-GigE-AS
Spectral sensitivity
Monochrome/color
bayer pattern
Output image resolution (H×V) 656 × 492 pixels
Full sensor resolution (incl. black 692 × 504 pixels
pixels)
Frame rate
62.3 fps
Video format
12-bit, single tap
Scanning
progressive
Pixel size (H×V)
9.9 × 9.9 μm
Sensor size (H×V)
7.48 × 6.15 mm
Shutter
global, 5 μs –60000 ms (default 16 ms)
Operating (trigger) modes
• Free running
• Triggered mode
• Long range exposure mode
Gain & black level
• Analog gain: -6 .. 30 dB (default 10 dB)
• Digital gain: n/a
• Black level: 0 .. 25.5 DN (default 0 DN)
Auto functions
n/a
Area of interest (AOI)
Vertical AOI applicable directly at the sensor
Binning
n/a
Decimation
n/a
Mount
C-mount (CS-mount on request)
Dimension
• 44.8×31.4×91.7 mm (W×H×L, without connectors) — standard
version
• 44.8×37.56×96.0 mm (W×H×L, without connectors) — right
angle version
Weight
145 g
Power input
10-26V/5W
Copyright © Leutron Vision
311
Leutron
Vision
PicSight-GigE user manual
Technical specifications for individual models
Specification
PicSight P32B-GigE-AS
Ordering information
• 121202: PicSight P32B-GigE-AS (Hirose/SDR-26 connector)
• 121203: PicSight P32B-GigE-AS-H (Hirose/SDR-26 connector,
90º lens mount)
• 121227: PicSight P32B-GigE-PoE-S (PoE, Hirose/SDR-26 connector)
• 121228: PicSight P32B-GigE-PoE-S-H (PoE, Hirose/SDR-26
connector, 90º lens mount)
• 121302: PicSight P32B-GigE-AS-RTF (Realtime function, lens
controller, Hirose/SDR-26 connector)
• 121303: PicSight P32B-GigE-AS-RTF-H (Realtime function, lens
controller, Hirose/SDR-26 connector, 90º lens mount)
• 121327: PicSight P32B-GigE-PoE-S-RTF (PoE, Realtime function,
lens controller, Hirose/SDR-26 connector)
• 121328: PicSight P32B-GigE-PoE-S-RTF-H (PoE, Realtime function, lens controller, Hirose/SDR-26 connector, 90º lens mount)
Check latest price list or contact us to learn if more options are
available.
Table A.13. PicSight P32B-GigE-AS technical specifications
A.14. PicSight P32M-GigE-AS
Specification
PicSight P32M-GigE-AS
Interface
Ethernet 1000/100/10 Mb/s
Sensor
1/2" CCD, interline transfer, type SONY ICX414
Spectral sensitivity
Monochrome/color
monochrome
Output image resolution (H×V) 656 × 492 pixels
Full sensor resolution (incl. black 692 × 504 pixels
pixels)
Frame rate
62.3 fps
Video format
12-bit, single tap
Scanning
progressive
Pixel size (H×V)
9.9 × 9.9 μm
Sensor size (H×V)
7.48 × 6.15 mm
Shutter
global, 5 μs –60000 ms (default 16 ms)
Operating (trigger) modes
• Free running
• Triggered mode
• Long range exposure mode
Copyright © Leutron Vision
312
Leutron
Vision
PicSight-GigE user manual
Technical specifications for individual models
Specification
PicSight P32M-GigE-AS
Gain & black level
• Analog gain: -6 .. 30 dB (default 4 dB)
• Digital gain: n/a
• Black level: 0 .. 25.5 DN (default 0 DN)
Auto functions
n/a
Signal/noise ratio
45 dB
Dynamic range
73 dB
Area of interest (AOI)
Vertical AOI applicable directly at the sensor
Binning
• Vertical: 2×
Decimation
n/a
Mount
C-mount (CS-mount on request)
Dimension
• 44.8×31.4×91.7 mm (W×H×L, without connectors) — standard
version
• 44.8×37.56×96.0 mm (W×H×L, without connectors) — right
angle version
Weight
145 g
Power input
10-26V/5W
Ordering information
• 120202: PicSight P32M-GigE-AS (Hirose/SDR-26 connector)
• 120203: PicSight P32M-GigE-AS-H (Hirose/SDR-26 connector,
90º lens mount)
• 120227: PicSight P32M-GigE-PoE-S (PoE, Hirose/SDR-26 connector)
• 120228: PicSight P32M-GigE-PoE-S-H (PoE, Hirose/SDR-26
connector, 90º lens mount)
• 120302: PicSight P32M-GigE-AS-RTF (Realtime function, lens
controller, Hirose/SDR-26 connector)
• 120303: PicSight P32M-GigE-AS-RTF-H (Realtime function, lens
controller, Hirose/SDR-26 connector, 90º lens mount)
• 120327: PicSight P32M-GigE-PoE-S-RTF (PoE, Realtime function,
lens controller, Hirose/SDR-26 connector)
• 120328: PicSight P32M-GigE-PoE-S-RTF-H (PoE, Realtime
function, lens controller, Hirose/SDR-26 connector, 90º lens
mount)
Check latest price list or contact us to learn if more options are
available.
Table A.14. PicSight P32M-GigE-AS technical specifications
A.15. PicSight P33B-GigE-AS
Specification
PicSight P33B-GigE-AS
Interface
Ethernet 1000/100/10 Mb/s
Sensor
1/3" CCD, interline transfer, type SONY ICX424
Copyright © Leutron Vision
313
Leutron
Vision
PicSight-GigE user manual
Specification
Technical specifications for individual models
PicSight P33B-GigE-AS
Spectral sensitivity
Monochrome/color
bayer pattern
Output image resolution (H×V) 656 × 492 pixels
Full sensor resolution (incl. black 692 × 504 pixels
pixels)
Frame rate
62.3 fps
Video format
12-bit, single tap
Scanning
progressive
Pixel size (H×V)
7.4 × 7.4 μm
Sensor size (H×V)
5.79 × 4.89 mm
Shutter
global, 5 μs –60000 ms (default 16 ms)
Operating (trigger) modes
• Free running
• Triggered mode
• Long range exposure mode
Gain & black level
• Analog gain: -6 .. 30 dB (default 12 dB)
• Digital gain: n/a
• Black level: 0 .. 25.5 DN (default 0 DN)
Auto functions
n/a
Area of interest (AOI)
Vertical AOI applicable directly at the sensor
Binning
n/a
Decimation
n/a
Mount
C-mount (CS-mount on request)
Dimension
• 44.8×31.4×91.7 mm (W×H×L, without connectors) — standard
version
• 44.8×37.56×96.0 mm (W×H×L, without connectors) — right
angle version
Weight
145 g
Power input
10-26V/5W
Copyright © Leutron Vision
314
Leutron
Vision
PicSight-GigE user manual
Technical specifications for individual models
Specification
PicSight P33B-GigE-AS
Ordering information
• 111202: PicSight P33B-GigE-AS (Hirose/SDR-26 connector)
• 111203: PicSight P33B-GigE-AS-H (Hirose/SDR-26 connector,
90º lens mount)
• 111227: PicSight P33B-GigE-PoE-S (PoE, Hirose/SDR-26 connector)
• 111228: PicSight P33B-GigE-PoE-S-H (PoE, Hirose/SDR-26
connector, 90º lens mount)
• 111302: PicSight P33B-GigE-AS-RTF (Realtime function, lens
controller, Hirose/SDR-26 connector)
• 111303: PicSight P33B-GigE-AS-RTF-H (Realtime function, lens
controller, Hirose/SDR-26 connector, 90º lens mount)
• 111327: PicSight P33B-GigE-PoE-S-RTF (PoE, Realtime function,
lens controller, Hirose/SDR-26 connector)
• 111328: PicSight P33B-GigE-PoE-S-RTF-H (PoE, Realtime function, lens controller, Hirose/SDR-26 connector, 90º lens mount)
Check latest price list or contact us to learn if more options are
available.
Table A.15. PicSight P33B-GigE-AS technical specifications
A.16. PicSight P33M-GigE-AS
Specification
PicSight P33M-GigE-AS
Interface
Ethernet 1000/100/10 Mb/s
Sensor
1/3" CCD, interline transfer, type SONY ICX424
Spectral sensitivity
Monochrome/color
monochrome
Output image resolution (H×V) 656 × 492 pixels
Full sensor resolution (incl. black 692 × 504 pixels
pixels)
Frame rate
62.3 fps
Video format
12-bit, single tap
Scanning
progressive
Pixel size (H×V)
7.4 × 7.4 μm
Sensor size (H×V)
5.79 × 4.89 mm
Shutter
global, 5 μs –60000 ms (default 16 ms)
Operating (trigger) modes
• Free running
• Triggered mode
• Long range exposure mode
Copyright © Leutron Vision
315
Leutron
Vision
PicSight-GigE user manual
Technical specifications for individual models
Specification
PicSight P33M-GigE-AS
Gain & black level
• Analog gain: -6 .. 30 dB (default 4 dB)
• Digital gain: n/a
• Black level: 0 .. 25.5 DN (default 0 DN)
Auto functions
n/a
Signal/noise ratio
40 dB
Dynamic range
63 dB
Area of interest (AOI)
Vertical AOI applicable directly at the sensor
Binning
• Vertical: 2×
Decimation
n/a
Mount
C-mount (CS-mount on request)
Dimension
• 44.8×31.4×91.7 mm (W×H×L, without connectors) — standard
version
• 44.8×37.56×96.0 mm (W×H×L, without connectors) — right
angle version
Weight
145 g
Power input
10-26V/5W
Ordering information
• 110202: PicSight P33M-GigE-AS (Hirose/SDR-26 connector)
• 110203: PicSight P33M-GigE-AS-H (Hirose/SDR-26 connector,
90º lens mount)
• 110227: PicSight P33M-GigE-PoE-S (PoE, Hirose/SDR-26 connector)
• 110228: PicSight P33M-GigE-PoE-S-H (PoE, Hirose/SDR-26
connector, 90º lens mount)
• 110302: PicSight P33M-GigE-AS-RTF (Realtime function, lens
controller, Hirose/SDR-26 connector)
• 110303: PicSight P33M-GigE-AS-RTF-H (Realtime function, lens
controller, Hirose/SDR-26 connector, 90º lens mount)
• 110327: PicSight P33M-GigE-PoE-S-RTF (PoE, Realtime function,
lens controller, Hirose/SDR-26 connector)
• 110328: PicSight P33M-GigE-PoE-S-RTF-H (PoE, Realtime
function, lens controller, Hirose/SDR-26 connector, 90º lens
mount)
Check latest price list or contact us to learn if more options are
available.
Table A.16. PicSight P33M-GigE-AS technical specifications
A.17. PicSight P34B-GigE-AS
Specification
PicSight P34B-GigE-AS
Interface
Ethernet 1000/100/10 Mb/s
Sensor
1/4" CCD, interline transfer, type SONY ICX098
Copyright © Leutron Vision
316
Leutron
Vision
PicSight-GigE user manual
Specification
Technical specifications for individual models
PicSight P34B-GigE-AS
Spectral sensitivity
Monochrome/color
bayer pattern
Output image resolution (H×V) 656 × 492 pixels
Full sensor resolution (incl. black 692 × 504 pixels
pixels)
Frame rate
64.7 fps
Video format
12-bit, single tap
Scanning
progressive
Pixel size (H×V)
5.6 × 5.6 μm
Sensor size (H×V)
4.6 × 3.97 mm
Shutter
global, 5 μs –60000 ms (default 15 ms)
Operating (trigger) modes
• Free running
• Triggered mode
• Long range exposure mode
Gain & black level
• Analog gain: -6 .. 30 dB (default 16 dB)
• Digital gain: n/a
• Black level: 0 .. 25.5 DN (default 0 DN)
Auto functions
n/a
Area of interest (AOI)
Vertical AOI applicable directly at the sensor
Binning
n/a
Decimation
n/a
Mount
C-mount (CS-mount on request)
Dimension
• 44.8×31.4×91.7 mm (W×H×L, without connectors) — standard
version
• 44.8×37.56×96.0 mm (W×H×L, without connectors) — right
angle version
Weight
145 g
Power input
10-26V/5W
Copyright © Leutron Vision
317
Leutron
Vision
PicSight-GigE user manual
Technical specifications for individual models
Specification
PicSight P34B-GigE-AS
Ordering information
• 101202: PicSight P34B-GigE-AS (Hirose/SDR-26 connector)
• 101203: PicSight P34B-GigE-AS-H (Hirose/SDR-26 connector,
90º lens mount)
• 101227: PicSight P34B-GigE-PoE-S (PoE, Hirose/SDR-26 connector)
• 101228: PicSight P34B-GigE-PoE-S-H (PoE, Hirose/SDR-26
connector, 90º lens mount)
• 101302: PicSight P34B-GigE-AS-RTF (Realtime function, lens
controller, Hirose/SDR-26 connector)
• 101303: PicSight P34B-GigE-AS-RTF-H (Realtime function, lens
controller, Hirose/SDR-26 connector, 90º lens mount)
• 101327: PicSight P34B-GigE-PoE-S-RTF (PoE, Realtime function,
lens controller, Hirose/SDR-26 connector)
• 101328: PicSight P34B-GigE-PoE-S-RTF-H (PoE, Realtime function, lens controller, Hirose/SDR-26 connector, 90º lens mount)
Check latest price list or contact us to learn if more options are
available.
Table A.17. PicSight P34B-GigE-AS technical specifications
A.18. PicSight P34M-GigE-AS
Specification
PicSight P34M-GigE-AS
Interface
Ethernet 1000/100/10 Mb/s
Sensor
1/4" CCD, interline transfer, type SONY ICX098
Spectral sensitivity
Monochrome/color
monochrome
Output image resolution (H×V) 656 × 492 pixels
Full sensor resolution (incl. black 692 × 504 pixels
pixels)
Frame rate
64.7 fps
Video format
12-bit, single tap
Scanning
progressive
Pixel size (H×V)
5.6 × 5.6 μm
Sensor size (H×V)
4.6 × 3.97 mm
Shutter
global, 5 μs –60000 ms (default 15 ms)
Operating (trigger) modes
• Free running
• Triggered mode
• Long range exposure mode
Copyright © Leutron Vision
318
Leutron
Vision
PicSight-GigE user manual
Technical specifications for individual models
Specification
PicSight P34M-GigE-AS
Gain & black level
• Analog gain: -6 .. 30 dB (default 9 dB)
• Digital gain: n/a
• Black level: 0 .. 25.5 DN (default 0 DN)
Auto functions
n/a
Signal/noise ratio
44 dB
Dynamic range
69 dB
Area of interest (AOI)
Vertical AOI applicable directly at the sensor
Binning
• Vertical: 2×
Decimation
n/a
Mount
C-mount (CS-mount on request)
Dimension
• 44.8×31.4×91.7 mm (W×H×L, without connectors) — standard
version
• 44.8×37.56×96.0 mm (W×H×L, without connectors) — right
angle version
Weight
145 g
Power input
10-26V/5W
Ordering information
• 100202: PicSight P34M-GigE-AS (Hirose/SDR-26 connector)
• 100203: PicSight P34M-GigE-AS-H (Hirose/SDR-26 connector,
90º lens mount)
• 100227: PicSight P34M-GigE-PoE-S (PoE, Hirose/SDR-26 connector)
• 100228: PicSight P34M-GigE-PoE-S-H (PoE, Hirose/SDR-26
connector, 90º lens mount)
• 100302: PicSight P34M-GigE-AS-RTF (Realtime function, lens
controller, Hirose/SDR-26 connector)
• 100303: PicSight P34M-GigE-AS-RTF-H (Realtime function, lens
controller, Hirose/SDR-26 connector, 90º lens mount)
• 100327: PicSight P34M-GigE-PoE-S-RTF (PoE, Realtime function,
lens controller, Hirose/SDR-26 connector)
• 100328: PicSight P34M-GigE-PoE-S-RTF-H (PoE, Realtime
function, lens controller, Hirose/SDR-26 connector, 90º lens
mount)
Check latest price list or contact us to learn if more options are
available.
Table A.18. PicSight P34M-GigE-AS technical specifications
A.19. PicSight P52B-GigE-AS
Specification
PicSight P52B-GigE-AS
Interface
Ethernet 1000/100/10 Mb/s
Sensor
1/2" CCD, interline transfer, type SONY ICX415
Copyright © Leutron Vision
319
Leutron
Vision
PicSight-GigE user manual
Specification
Technical specifications for individual models
PicSight P52B-GigE-AS
Spectral sensitivity
Monochrome/color
bayer pattern
Output image resolution (H×V) 776 × 580 pixels
Full sensor resolution (incl. black 823 × 592 pixels
pixels)
Frame rate
62.3 fps
Video format
12-bit, single tap
Scanning
progressive
Pixel size (H×V)
8.3 × 8.3 μm
Sensor size (H×V)
7.48 × 6.15 mm
Shutter
global, 5 μs –60000 ms (default 15 ms)
Operating (trigger) modes
• Free running
• Triggered mode
• Long range exposure mode
Gain & black level
• Analog gain: -10 .. 26 dB (default 12 dB)
• Digital gain: n/a
• Black level: 0 .. 25.5 DN (default 0 DN)
Auto functions
n/a
Area of interest (AOI)
Vertical AOI applicable directly at the sensor
Binning
n/a
Decimation
n/a
Mount
C-mount (CS-mount on request)
Dimension
• 44.8×31.4×91.7 mm (W×H×L, without connectors) — standard
version
• 44.8×37.56×96.0 mm (W×H×L, without connectors) — right
angle version
Weight
145 g
Power input
10-26V/5W
Copyright © Leutron Vision
320
Leutron
Vision
PicSight-GigE user manual
Technical specifications for individual models
Specification
PicSight P52B-GigE-AS
Ordering information
• 131202: PicSight P52B-GigE-AS (Hirose/SDR-26 connector)
• 131203: PicSight P52B-GigE-AS-H (Hirose/SDR-26 connector,
90º lens mount)
• 131227: PicSight P52B-GigE-PoE-S (PoE, Hirose/SDR-26 connector)
• 131228: PicSight P52B-GigE-PoE-S-H (PoE, Hirose/SDR-26
connector, 90º lens mount)
• 131302: PicSight P52B-GigE-AS-RTF (Realtime function, lens
controller, Hirose/SDR-26 connector)
• 131303: PicSight P52B-GigE-AS-RTF-H (Realtime function, lens
controller, Hirose/SDR-26 connector, 90º lens mount)
• 131327: PicSight P52B-GigE-PoE-S-RTF (PoE, Realtime function,
lens controller, Hirose/SDR-26 connector)
• 131328: PicSight P52B-GigE-PoE-S-RTF-H (PoE, Realtime function, lens controller, Hirose/SDR-26 connector, 90º lens mount)
Check latest price list or contact us to learn if more options are
available.
Table A.19. PicSight P52B-GigE-AS technical specifications
A.20. PicSight P52M-GigE-AS
Specification
PicSight P52M-GigE-AS
Interface
Ethernet 1000/100/10 Mb/s
Sensor
1/2" CCD, interline transfer, type SONY ICX415
Spectral sensitivity
Monochrome/color
monochrome
Output image resolution (H×V) 776 × 580 pixels
Full sensor resolution (incl. black 823 × 592 pixels
pixels)
Frame rate
62.3 fps
Video format
12-bit, single tap
Scanning
progressive
Pixel size (H×V)
8.3 × 8.3 μm
Sensor size (H×V)
7.48 × 6.15 mm
Shutter
global, 5 μs –60000 ms (default 15 ms)
Operating (trigger) modes
• Free running
• Triggered mode
• Long range exposure mode
Copyright © Leutron Vision
321
Leutron
Vision
PicSight-GigE user manual
Technical specifications for individual models
Specification
PicSight P52M-GigE-AS
Gain & black level
• Analog gain: -10 .. 26 dB (default 4 dB)
• Digital gain: n/a
• Black level: 0 .. 25.5 DN (default 0 DN)
Auto functions
n/a
Signal/noise ratio
44 dB
Dynamic range
69 dB
Area of interest (AOI)
Vertical AOI applicable directly at the sensor
Binning
• Vertical: 2×
Decimation
n/a
Mount
C-mount (CS-mount on request)
Dimension
• 44.8×31.4×91.7 mm (W×H×L, without connectors) — standard
version
• 44.8×37.56×96.0 mm (W×H×L, without connectors) — right
angle version
Weight
145 g
Power input
10-26V/5W
Ordering information
• 130202: PicSight P52M-GigE-AS (Hirose/SDR-26 connector)
• 130203: PicSight P52M-GigE-AS-H (Hirose/SDR-26 connector,
90º lens mount)
• 130227: PicSight P52M-GigE-PoE-S (PoE, Hirose/SDR-26 connector)
• 130228: PicSight P52M-GigE-PoE-S-H (PoE, Hirose/SDR-26
connector, 90º lens mount)
• 130302: PicSight P52M-GigE-AS-RTF (Realtime function, lens
controller, Hirose/SDR-26 connector)
• 130303: PicSight P52M-GigE-AS-RTF-H (Realtime function, lens
controller, Hirose/SDR-26 connector, 90º lens mount)
• 130327: PicSight P52M-GigE-PoE-S-RTF (PoE, Realtime function,
lens controller, Hirose/SDR-26 connector)
• 130328: PicSight P52M-GigE-PoE-S-RTF-H (PoE, Realtime
function, lens controller, Hirose/SDR-26 connector, 90º lens
mount)
Check latest price list or contact us to learn if more options are
available.
Table A.20. PicSight P52M-GigE-AS technical specifications
A.21. PicSight P83B-GigE-AS
Specification
PicSight P83B-GigE-AS
Interface
Ethernet 1000/100/10 Mb/s
Sensor
1/3" CCD, interline transfer, type SONY ICX204
Copyright © Leutron Vision
322
Leutron
Vision
PicSight-GigE user manual
Specification
Technical specifications for individual models
PicSight P83B-GigE-AS
Spectral sensitivity
Monochrome/color
bayer pattern
Output image resolution (H×V) 1032 × 776 pixels
Full sensor resolution (incl. black 1077 × 788 pixels
pixels)
Frame rate
32.5 fps
Video format
12-bit, single tap
Scanning
progressive
Pixel size (H×V)
4.65 × 4.65 μm
Sensor size (H×V)
5.8 × 4.92 mm
Shutter
global, 5 μs –60000 ms (default 30 ms)
Operating (trigger) modes
• Free running
• Triggered mode
• Long range exposure mode
Gain & black level
• Analog gain: -8 .. 28 dB (default 16 dB)
• Digital gain: n/a
• Black level: 0 .. 25.5 DN (default 0 DN)
Auto functions
n/a
Area of interest (AOI)
Vertical AOI applicable directly at the sensor
Binning
n/a
Decimation
n/a
Mount
C-mount (CS-mount on request)
Dimension
• 44.8×31.4×91.7 mm (W×H×L, without connectors) — standard
version
• 44.8×37.56×96.0 mm (W×H×L, without connectors) — right
angle version
Weight
145 g
Power input
10-26V/5W
Copyright © Leutron Vision
323
Leutron
Vision
PicSight-GigE user manual
Technical specifications for individual models
Specification
PicSight P83B-GigE-AS
Ordering information
• 141202: PicSight P83B-GigE-AS (Hirose/SDR-26 connector)
• 141203: PicSight P83B-GigE-AS-H (Hirose/SDR-26 connector,
90º lens mount)
• 141227: PicSight P83B-GigE-PoE-S (PoE, Hirose/SDR-26 connector)
• 141228: PicSight P83B-GigE-PoE-S-H (PoE, Hirose/SDR-26
connector, 90º lens mount)
• 141302: PicSight P83B-GigE-AS-RTF (Realtime function, lens
controller, Hirose/SDR-26 connector)
• 141303: PicSight P83B-GigE-AS-RTF-H (Realtime function, lens
controller, Hirose/SDR-26 connector, 90º lens mount)
• 141327: PicSight P83B-GigE-PoE-S-RTF (PoE, Realtime function,
lens controller, Hirose/SDR-26 connector)
• 141328: PicSight P83B-GigE-PoE-S-RTF-H (PoE, Realtime function, lens controller, Hirose/SDR-26 connector, 90º lens mount)
Check latest price list or contact us to learn if more options are
available.
Table A.21. PicSight P83B-GigE-AS technical specifications
A.22. PicSight P83M-GigE-AS
Specification
PicSight P83M-GigE-AS
Interface
Ethernet 1000/100/10 Mb/s
Sensor
1/3" CCD, interline transfer, type SONY ICX204
Spectral sensitivity
Monochrome/color
monochrome
Output image resolution (H×V) 1032 × 776 pixels
Full sensor resolution (incl. black 1077 × 788 pixels
pixels)
Frame rate
32.5 fps
Video format
12-bit, single tap
Scanning
progressive
Pixel size (H×V)
4.65 × 4.65 μm
Sensor size (H×V)
5.8 × 4.92 mm
Shutter
global, 5 μs –60000 ms (default 30 ms)
Operating (trigger) modes
• Free running
• Triggered mode
• Long range exposure mode
Copyright © Leutron Vision
324
Leutron
Vision
PicSight-GigE user manual
Technical specifications for individual models
Specification
PicSight P83M-GigE-AS
Gain & black level
• Analog gain: -8 .. 28 dB (default 14 dB)
• Digital gain: n/a
• Black level: 0 .. 25.5 DN (default 0 DN)
Auto functions
n/a
Signal/noise ratio
42 dB
Dynamic range
73 dB
Area of interest (AOI)
Vertical AOI applicable directly at the sensor
Binning
• Vertical: 2×
Decimation
n/a
Mount
C-mount (CS-mount on request)
Dimension
• 44.8×31.4×91.7 mm (W×H×L, without connectors) — standard
version
• 44.8×37.56×96.0 mm (W×H×L, without connectors) — right
angle version
Weight
145 g
Power input
10-26V/5W
Ordering information
• 140202: PicSight P83M-GigE-AS (Hirose/SDR-26 connector)
• 140203: PicSight P83M-GigE-AS-H (Hirose/SDR-26 connector,
90º lens mount)
• 140227: PicSight P83M-GigE-PoE-S (PoE, Hirose/SDR-26 connector)
• 140228: PicSight P83M-GigE-PoE-S-H (PoE, Hirose/SDR-26
connector, 90º lens mount)
• 140302: PicSight P83M-GigE-AS-RTF (Realtime function, lens
controller, Hirose/SDR-26 connector)
• 140303: PicSight P83M-GigE-AS-RTF-H (Realtime function, lens
controller, Hirose/SDR-26 connector, 90º lens mount)
• 140327: PicSight P83M-GigE-PoE-S-RTF (PoE, Realtime function,
lens controller, Hirose/SDR-26 connector)
• 140328: PicSight P83M-GigE-PoE-S-RTF-H (PoE, Realtime
function, lens controller, Hirose/SDR-26 connector, 90º lens
mount)
Check latest price list or contact us to learn if more options are
available.
Table A.22. PicSight P83M-GigE-AS technical specifications
A.23. PicSight R132M-GigE-AS
Specification
PicSight R132M-GigE-AS
Interface
Ethernet 1000/100/10 Mb/s
Sensor
1/2" CMOS, sequential readout, type Aptina MT9M001
Copyright © Leutron Vision
325
Leutron
Vision
PicSight-GigE user manual
Specification
Technical specifications for individual models
PicSight R132M-GigE-AS
Spectral sensitivity
Monochrome/color
monochrom
Output image resolution (H×V) 1280 × 1024 pixels
Frame rate
30 fps
Video format
10-bit, single tap
Scanning
progressive
Pixel size (H×V)
5.2 × 5.2 μm
Sensor size (H×V)
6.66 × 5.32 mm
Shutter
rolling, 28 μs –520 ms (default 30 ms)
Operating (trigger) modes
• Free running
• Triggered mode
Gain & black level
• Analog gain: 0 .. 23.53 dB (default 14 dB)
• Digital gain: n/a
• Black level: -51.2 .. 51 DN (default 0 DN)
Auto functions
• Automatic black level
Signal/noise ratio
42 dB
Dynamic range
52 dB
Area of interest (AOI)
Horizontal and vertical AOI applicable directly at the sensor
Binning
n/a
Decimation
• Horizontal: 2× 4× 8×
• Vertical: 2× 4× 8×
Mount
C-mount (CS-mount on request)
Dimension
• 44.8×31.4×91.7 mm (W×H×L, without connectors) — standard
version
• 44.8×37.56×96.0 mm (W×H×L, without connectors) — right
angle version
Weight
145 g
Power input
10-26V/5W
Copyright © Leutron Vision
326
Leutron
Vision
PicSight-GigE user manual
Technical specifications for individual models
Specification
PicSight R132M-GigE-AS
Ordering information
• 420202: PicSight R132M-GigE-AS (Hirose/SDR-26 connector)
• 420203: PicSight R132M-GigE-AS-H (Hirose/SDR-26 connector,
90º lens mount)
• 420227: PicSight R132M-GigE-PoE-S (PoE, Hirose/SDR-26
connector)
• 420228: PicSight R132M-GigE-PoE-S-H (PoE, Hirose/SDR-26
connector, 90º lens mount)
• 420302: PicSight R132M-GigE-AS-RTF (Realtime function, lens
controller, Hirose/SDR-26 connector)
• 420303: PicSight R132M-GigE-AS-RTF-H (Realtime function,
lens controller, Hirose/SDR-26 connector, 90º lens mount)
• 420327: PicSight R132M-GigE-PoE-S-RTF (PoE, Realtime function, lens controller, Hirose/SDR-26 connector)
• 420328: PicSight R132M-GigE-PoE-S-RTF-H (PoE, Realtime
function, lens controller, Hirose/SDR-26 connector, 90º lens
mount)
Check latest price list or contact us to learn if more options are
available.
Table A.23. PicSight R132M-GigE-AS technical specifications
A.24. PicSight R312AB-GigE-AS
Specification
PicSight R312AB-GigE-AS
Interface
Ethernet 1000/100/10 Mb/s
Sensor
1/2" CMOS, sequential readout, type Aptina MT9T001
Spectral sensitivity
Monochrome/color
bayer pattern
Output image resolution (H×V) 2048 × 1536 pixels
Frame rate
12.77 fps
Video format
10-bit, single tap
Scanning
progressive
Pixel size (H×V)
3.2 × 3.2 μm
Sensor size (H×V)
6.5536 × 4.9152 mm
Shutter
rolling, 47 μs –520 ms (default 10 ms)
Operating (trigger) modes
• Free running
• Triggered mode
Copyright © Leutron Vision
327
Leutron
Vision
PicSight-GigE user manual
Technical specifications for individual models
Specification
PicSight R312AB-GigE-AS
Gain & black level
• Analog gain: 0 .. 18.07 dB (default 18 dB)
• Digital gain: 0 .. 24.08 dB (default 0 dB)
• Black level: -51.2 .. 51 DN (default 0 DN)
Auto functions
• Automatic black level
Signal/noise ratio
43 dB
Dynamic range
61 dB
Area of interest (AOI)
Horizontal and vertical AOI applicable directly at the sensor
Binning
• Horizontal: 2× 3×
• Vertical: 2× 3×
Decimation
• Horizontal: 2× 3× 4× 8×
• Vertical: 2× 3× 4× 8×
Mount
C-mount (CS-mount on request)
Dimension
• 44.8×31.4×91.7 mm (W×H×L, without connectors) — standard
version
• 44.8×37.56×96.0 mm (W×H×L, without connectors) — right
angle version
Weight
145 g
Power input
10-26V/5W
Ordering information
• 441202: PicSight R312AB-GigE-AS (Hirose/SDR-26 connector)
• 441203: PicSight R312AB-GigE-AS-H (Hirose/SDR-26 connector,
90º lens mount)
• 441227: PicSight R312AB-GigE-PoE-S (PoE, Hirose/SDR-26
connector)
• 441228: PicSight R312AB-GigE-PoE-S-H (PoE, Hirose/SDR-26
connector, 90º lens mount)
• 441302: PicSight R312AB-GigE-AS-RTF (Realtime function, lens
controller, Hirose/SDR-26 connector)
• 441303: PicSight R312AB-GigE-AS-RTF-H (Realtime function,
lens controller, Hirose/SDR-26 connector, 90º lens mount)
• 441327: PicSight R312AB-GigE-PoE-S-RTF (PoE, Realtime
function, lens controller, Hirose/SDR-26 connector)
• 441328: PicSight R312AB-GigE-PoE-S-RTF-H (PoE, Realtime
function, lens controller, Hirose/SDR-26 connector, 90º lens
mount)
Check latest price list or contact us to learn if more options are
available.
Table A.24. PicSight R312AB-GigE-AS technical specifications
A.25. PicSight R502B-GigE-AS
Specification
PicSight R502B-GigE-AS
Interface
Ethernet 1000/100/10 Mb/s
Sensor
1/2.5" CMOS, sequential readout, type Aptina MT9P031
Copyright © Leutron Vision
328
Leutron
Vision
PicSight-GigE user manual
Specification
Technical specifications for individual models
PicSight R502B-GigE-AS
Spectral sensitivity
Monochrome/color
bayer pattern
Output image resolution (H×V) 2592 × 1944 pixels
Frame rate
11.7 fps
Video format
12-bit, single tap
Scanning
progressive
Pixel size (H×V)
2.2 × 2.2 μm
Sensor size (H×V)
5.702 × 4.277 mm
Shutter
rolling, 39 μs –55000 ms (default 10 ms)
Operating (trigger) modes
• Free running
• Triggered mode
• Global reset mode
Gain & black level
• Analog gain: 0 .. 18.06 dB (default 0 dB)
• Digital gain: 0 .. 24.08 dB (default 0 dB)
• Black level: 0 .. 2.55 DN (default 0 DN)
Auto functions
• Automatic black level
Signal/noise ratio
38 dB
Dynamic range
70 dB
Area of interest (AOI)
Horizontal and vertical AOI applicable directly at the sensor
Binning
• Horizontal: 2× 4×
• Vertical: 2× 4×
Decimation
• Horizontal: 2× 3× 4× 5× 6× 7×
• Vertical: 2× 3× 4× 5× 6× 7× 8×
Mount
C-mount (CS-mount on request)
Dimension
• 44.8×31.4×91.7 mm (W×H×L, without connectors) — standard
version
• 44.8×37.56×96.0 mm (W×H×L, without connectors) — right
angle version
Weight
145 g
Power input
10-26V/5W
Copyright © Leutron Vision
329
Leutron
Vision
PicSight-GigE user manual
Technical specifications for individual models
Specification
PicSight R502B-GigE-AS
Ordering information
• 451202: PicSight R502B-GigE-AS (Hirose/SDR-26 connector)
• 451203: PicSight R502B-GigE-AS-H (Hirose/SDR-26 connector,
90º lens mount)
• 451227: PicSight R502B-GigE-PoE-S (PoE, Hirose/SDR-26 connector)
• 451228: PicSight R502B-GigE-PoE-S-H (PoE, Hirose/SDR-26
connector, 90º lens mount)
• 451302: PicSight R502B-GigE-AS-RTF (Realtime function, lens
controller, Hirose/SDR-26 connector)
• 451303: PicSight R502B-GigE-AS-RTF-H (Realtime function,
lens controller, Hirose/SDR-26 connector, 90º lens mount)
• 451327: PicSight R502B-GigE-PoE-S-RTF (PoE, Realtime function, lens controller, Hirose/SDR-26 connector)
• 451328: PicSight R502B-GigE-PoE-S-RTF-H (PoE, Realtime
function, lens controller, Hirose/SDR-26 connector, 90º lens
mount)
Check latest price list or contact us to learn if more options are
available.
Table A.25. PicSight R502B-GigE-AS technical specifications
A.26. PicSight R502M-GigE-AS
Specification
PicSight R502M-GigE-AS
Interface
Ethernet 1000/100/10 Mb/s
Sensor
1/2.5" CMOS, sequential readout, type Aptina MT9P031
Spectral sensitivity
Monochrome/color
monochrome
Output image resolution (H×V) 2592 × 1944 pixels
Frame rate
11.7 fps
Video format
12-bit, single tap
Scanning
progressive
Pixel size (H×V)
2.2 × 2.2 μm
Sensor size (H×V)
5.702 × 4.277 mm
Shutter
rolling, 39 μs –55000 ms (default 10 ms)
Operating (trigger) modes
• Free running
• Triggered mode
• Global reset mode
Gain & black level
• Analog gain: 0 .. 18.06 dB (default 0 dB)
• Digital gain: 0 .. 24.08 dB (default 0 dB)
• Black level: 0 .. 2.55 DN (default 0 DN)
Copyright © Leutron Vision
330
Leutron
Vision
PicSight-GigE user manual
Technical specifications for individual models
Specification
PicSight R502M-GigE-AS
Auto functions
• Automatic black level
Signal/noise ratio
38 dB
Dynamic range
70 dB
Area of interest (AOI)
Horizontal and vertical AOI applicable directly at the sensor
Binning
• Horizontal: 2× 4×
• Vertical: 2× 4×
Decimation
• Horizontal: 2× 3× 4× 5× 6× 7×
• Vertical: 2× 3× 4× 5× 6× 7× 8×
Mount
C-mount (CS-mount on request)
Dimension
• 44.8×31.4×91.7 mm (W×H×L, without connectors) — standard
version
• 44.8×37.56×96.0 mm (W×H×L, without connectors) — right
angle version
Weight
145 g
Power input
10-26V/5W
Ordering information
• 450202: PicSight R502M-GigE-AS (Hirose/SDR-26 connector)
• 450203: PicSight R502M-GigE-AS-H (Hirose/SDR-26 connector,
90º lens mount)
• 450227: PicSight R502M-GigE-PoE-S (PoE, Hirose/SDR-26
connector)
• 450228: PicSight R502M-GigE-PoE-S-H (PoE, Hirose/SDR-26
connector, 90º lens mount)
• 450302: PicSight R502M-GigE-AS-RTF (Realtime function, lens
controller, Hirose/SDR-26 connector)
• 450303: PicSight R502M-GigE-AS-RTF-H (Realtime function,
lens controller, Hirose/SDR-26 connector, 90º lens mount)
• 450327: PicSight R502M-GigE-PoE-S-RTF (PoE, Realtime function, lens controller, Hirose/SDR-26 connector)
• 450328: PicSight R502M-GigE-PoE-S-RTF-H (PoE, Realtime
function, lens controller, Hirose/SDR-26 connector, 90º lens
mount)
Check latest price list or contact us to learn if more options are
available.
Table A.26. PicSight R502M-GigE-AS technical specifications
Copyright © Leutron Vision
331
Leutron
Vision
PicSight-GigE user manual
Technical specifications for the “smart” models
Appendix B. Technical specifications for the
“smart” models
B.1. PicSight G32B-Smart502
Specification
PicSight G32B-Smart502
Interface
Ethernet 1000/100/10 Mb/s
Smart technology
32-bit RISC VLIW processor PNX1502/300MHz, 64MB DDR2
RAM (128MB on newer and all currently delivered systems), 32MB
flash memory for user applications, real-time operating system,
C/C++ compiler, various APIs
Sensor
1/2" CMOS, parallel readout, type Aptina MT9V403
Spectral sensitivity
Monochrome/color
bayer pattern
Output image resolution (H×V) 656 × 492 pixels
Frame rate
196 fps
Video format
10-bit, single tap
Scanning
progressive
Pixel size (H×V)
9.9 × 9.9 μm
Sensor size (H×V)
6.5241 × 4.8906 mm
Shutter
global, 20 μs –1300 ms (default 5 ms)
Operating (trigger) modes
• Free running
• Triggered mode
Gain & black level
• Analog gain: 0 .. 23.52 dB (default 0 dB)
• Digital gain: n/a
• Black level: -1.5 .. 1.5 DN (default 0 DN)
Auto functions
n/a
Signal/noise ratio
46 dB
Dynamic range
53 dB
Area of interest (AOI)
Horizontal and vertical AOI applicable directly at the sensor
Binning
n/a
Decimation
n/a
Mount
C-mount (CS-mount on request)
Copyright © Leutron Vision
332
Leutron
Vision
PicSight-GigE user manual
Technical specifications for the “smart” models
Specification
PicSight G32B-Smart502
Dimension
• 44.8×31.4×91.7 mm (W×H×L, without connectors) — standard
version
• 44.8×37.56×96.0 mm (W×H×L, without connectors) — right
angle version
Weight
145 g
Power input
10-26V/5W
Ordering information
• 401602: PicSight G32B-Smart502-AS (PNX1502, 300MHz,
64MB-DDR, lens controller, Hirose/SDR-26 connector)
• 401603: PicSight G32B-Smart502-AS-H (PNX1502, 300MHz,
64MB-DDR, lens controller, Hirose/SDR-26 connector, 90º lens
mount)
• 401627: PicSight G32B-Smart502-PoE-S (PoE, PNX1502,
300MHz, 64MB-DDR, lens controller, Hirose/SDR-26 connector)
• 401628: PicSight G32B-Smart502-PoE-S-H (PoE, PNX1502,
300MHz, 64MB-DDR, lens controller, Hirose/SDR-26 connector,
90º lens mount)
Check latest price list or contact us to learn if more options are
available.
Table B.1. PicSight G32B-Smart502 technical specifications
B.2. PicSight G32M-Smart502
Specification
PicSight G32M-Smart502
Interface
Ethernet 1000/100/10 Mb/s
Smart technology
32-bit RISC VLIW processor PNX1502/300MHz, 64MB DDR2
RAM (128MB on newer and all currently delivered systems), 32MB
flash memory for user applications, real-time operating system,
C/C++ compiler, various APIs
Sensor
1/2" CMOS, parallel readout, type Aptina MT9V403
Spectral sensitivity
Monochrome/color
monochrome
Output image resolution (H×V) 656 × 492 pixels
Frame rate
196 fps
Video format
10-bit, single tap
Scanning
progressive
Pixel size (H×V)
9.9 × 9.9 μm
Sensor size (H×V)
6.5241 × 4.8906 mm
Copyright © Leutron Vision
333
Leutron
Vision
PicSight-GigE user manual
Technical specifications for the “smart” models
Specification
PicSight G32M-Smart502
Shutter
global, 20 μs –1300 ms (default 5 ms)
Operating (trigger) modes
• Free running
• Triggered mode
Gain & black level
• Analog gain: 0 .. 23.52 dB (default 0 dB)
• Digital gain: n/a
• Black level: -1.5 .. 1.5 DN (default 0 DN)
Auto functions
n/a
Signal/noise ratio
46 dB
Dynamic range
53 dB
Area of interest (AOI)
Horizontal and vertical AOI applicable directly at the sensor
Binning
n/a
Decimation
n/a
Mount
C-mount (CS-mount on request)
Dimension
• 44.8×31.4×91.7 mm (W×H×L, without connectors) — standard
version
• 44.8×37.56×96.0 mm (W×H×L, without connectors) — right
angle version
Weight
145 g
Power input
10-26V/5W
Ordering information
• 400602: PicSight G32M-Smart502-AS (PNX1502, 300MHz,
64MB-DDR, lens controller, Hirose/SDR-26 connector)
• 400603: PicSight G32M-Smart502-AS-H (PNX1502, 300MHz,
64MB-DDR, lens controller, Hirose/SDR-26 connector, 90º lens
mount)
• 400627: PicSight G32M-Smart502-PoE-S (PoE, PNX1502,
300MHz, 64MB-DDR, lens controller, Hirose/SDR-26 connector)
• 400628: PicSight G32M-Smart502-PoE-S-H (PoE, PNX1502,
300MHz, 64MB-DDR, lens controller, Hirose/SDR-26 connector,
90º lens mount)
Check latest price list or contact us to learn if more options are
available.
Table B.2. PicSight G32M-Smart502 technical specifications
B.3. PicSight G43AB-Smart502
Specification
PicSight G43AB-Smart502
Interface
Ethernet 1000/100/10 Mb/s
Smart technology
32-bit RISC VLIW processor PNX1502/300MHz, 64MB DDR2
RAM (128MB on newer and all currently delivered systems), 32MB
flash memory for user applications, real-time operating system,
C/C++ compiler, various APIs
Sensor
1/3" CMOS, parallel readout, type Aptina MT9V033
Copyright © Leutron Vision
334
Leutron
Vision
PicSight-GigE user manual
Specification
Technical specifications for the “smart” models
PicSight G43AB-Smart502
Spectral sensitivity
Monochrome/color
bayer pattern
Output image resolution (H×V) 752 × 480 pixels
Frame rate
62 fps
Video format
10-bit, single tap
Scanning
progressive
Pixel size (H×V)
6 × 6 μm
Sensor size (H×V)
4.512 × 2.88 mm
Shutter
global, 10 μs –1000 ms (default 15 ms)
Operating (trigger) modes
• Free running
• Triggered mode
Gain & black level
• Analog gain: 0 .. 12.04 dB (default 12 dB)
• Digital gain: -12.04 .. 11.48 dB (default 0 dB)
• Black level: 0 .. 6.35 DN (default 0 DN)
Auto functions
• Auto exposure
• Automatic analog gain control
• Automatic black level
Signal/noise ratio
42 dB
Dynamic range
49 dB
Area of interest (AOI)
Horizontal and vertical AOI applicable directly at the sensor
Binning
n/a
Decimation
n/a
Mount
C-mount (CS-mount on request)
Dimension
• 44.8×31.4×91.7 mm (W×H×L, without connectors) — standard
version
• 44.8×37.56×96.0 mm (W×H×L, without connectors) — right
angle version
Weight
145 g
Power input
10-26V/5W
Copyright © Leutron Vision
335
Leutron
Vision
PicSight-GigE user manual
Technical specifications for the “smart” models
Specification
PicSight G43AB-Smart502
Ordering information
• 413602: PicSight G43AB-Smart502-AS (PNX1502, 300MHz,
64MB-DDR, lens controller, Hirose/SDR-26 connector)
• 413603: PicSight G43AB-Smart502-AS-H (PNX1502, 300MHz,
64MB-DDR, lens controller, Hirose/SDR-26 connector, 90º lens
mount)
• 413627: PicSight G43AB-Smart502-PoE-S (PoE, PNX1502,
300MHz, 64MB-DDR, lens controller, Hirose/SDR-26 connector)
• 413628: PicSight G43AB-Smart502-PoE-S-H (PoE, PNX1502,
300MHz, 64MB-DDR, lens controller, Hirose/SDR-26 connector,
90º lens mount)
Check latest price list or contact us to learn if more options are
available.
Table B.3. PicSight G43AB-Smart502 technical specifications
B.4. PicSight G43AM-Smart502
Specification
PicSight G43AM-Smart502
Interface
Ethernet 1000/100/10 Mb/s
Smart technology
32-bit RISC VLIW processor PNX1502/300MHz, 64MB DDR2
RAM (128MB on newer and all currently delivered systems), 32MB
flash memory for user applications, real-time operating system,
C/C++ compiler, various APIs
Sensor
1/3" CMOS, parallel readout, type Aptina MT9V033
Spectral sensitivity
Monochrome/color
monochrome
Output image resolution (H×V) 752 × 480 pixels
Frame rate
62 fps
Video format
10-bit, single tap
Scanning
progressive
Pixel size (H×V)
6 × 6 μm
Sensor size (H×V)
4.512 × 2.88 mm
Shutter
global, 10 μs –1000 ms (default 15 ms)
Operating (trigger) modes
• Free running
• Triggered mode
Copyright © Leutron Vision
336
Leutron
Vision
PicSight-GigE user manual
Technical specifications for the “smart” models
Specification
PicSight G43AM-Smart502
Gain & black level
• Analog gain: 0 .. 12.04 dB (default 4 dB)
• Digital gain: -12.04 .. 11.48 dB (default 0 dB)
• Black level: 0 .. 6.35 DN (default 0 DN)
Auto functions
• Auto exposure
• Automatic analog gain control
• Automatic black level
Signal/noise ratio
42 dB
Dynamic range
49 dB
Area of interest (AOI)
Horizontal and vertical AOI applicable directly at the sensor
Binning
• Horizontal: 2× 4×
• Vertical: 2× 4×
Decimation
n/a
Mount
C-mount (CS-mount on request)
Dimension
• 44.8×31.4×91.7 mm (W×H×L, without connectors) — standard
version
• 44.8×37.56×96.0 mm (W×H×L, without connectors) — right
angle version
Weight
145 g
Power input
10-26V/5W
Ordering information
• 412602: PicSight G43AM-Smart502-AS (PNX1502, 300MHz,
64MB-DDR, lens controller, Hirose/SDR-26 connector)
• 412603: PicSight G43AM-Smart502-AS-H (PNX1502, 300MHz,
64MB-DDR, lens controller, Hirose/SDR-26 connector, 90º lens
mount)
• 412627: PicSight G43AM-Smart502-PoE-S (PoE, PNX1502,
300MHz, 64MB-DDR, lens controller, Hirose/SDR-26 connector)
• 412628: PicSight G43AM-Smart502-PoE-S-H (PoE, PNX1502,
300MHz, 64MB-DDR, lens controller, Hirose/SDR-26 connector,
90º lens mount)
Check latest price list or contact us to learn if more options are
available.
Table B.4. PicSight G43AM-Smart502 technical specifications
B.5. PicSight P133B-Smart502
Specification
PicSight P133B-Smart502
Interface
Ethernet 1000/100/10 Mb/s
Smart technology
32-bit RISC VLIW processor PNX1502/300MHz, 64MB DDR2
RAM (128MB on newer and all currently delivered systems), 32MB
flash memory for user applications, real-time operating system,
C/C++ compiler, various APIs
Sensor
1/1" CCD, interline transfer, type SONY ICX442AQ
Copyright © Leutron Vision
337
Leutron
Vision
PicSight-GigE user manual
Specification
Technical specifications for the “smart” models
PicSight P133B-Smart502
Spectral sensitivity
Monochrome/color
bayer pattern
Output image resolution (H×V) 1304 × 976 pixels
Full sensor resolution (incl. black 1360 × 986 pixels
pixels)
Frame rate
8.3 fps
Video format
12-bit, single tap
Scanning
progressive
Pixel size (H×V)
0 × 0 μm
Sensor size (H×V)
6.23 × 5.09 mm
Shutter
global, 5 μs –60000 ms (default 100 ms)
Operating (trigger) modes
• Free running
• Triggered mode
• Long range exposure mode
Gain & black level
• Analog gain: -10 .. 26 dB (default 0 dB)
• Digital gain: n/a
• Black level: 0 .. 25.5 DN (default 0 DN)
Auto functions
n/a
Area of interest (AOI)
Vertical AOI applicable directly at the sensor
Binning
n/a
Decimation
n/a
Mount
C-mount (CS-mount on request)
Dimension
• 44.8×31.4×91.7 mm (W×H×L, without connectors) — standard
version
• 44.8×37.56×96.0 mm (W×H×L, without connectors) — right
angle version
Weight
145 g
Power input
10-26V/5W
Copyright © Leutron Vision
338
Leutron
Vision
PicSight-GigE user manual
Technical specifications for the “smart” models
Specification
PicSight P133B-Smart502
Ordering information
• 151602: PicSight P133B-Smart502-AS (PNX1502, 300MHz,
64MB-DDR, lens controller, Hirose/SDR-26 connector)
• 151603: PicSight P133B-Smart502-AS-H (PNX1502, 300MHz,
64MB-DDR, lens controller, Hirose/SDR-26 connector, 90º lens
mount)
• 151627: PicSight P133B-Smart502-PoE-S (PoE, PNX1502,
300MHz, 64MB-DDR, lens controller, Hirose/SDR-26 connector)
• 151628: PicSight P133B-Smart502-PoE-S-H (PoE, PNX1502,
300MHz, 64MB-DDR, lens controller, Hirose/SDR-26 connector,
90º lens mount)
Check latest price list or contact us to learn if more options are
available.
Table B.5. PicSight P133B-Smart502 technical specifications
B.6. PicSight P141B-Smart502
Specification
PicSight P141B-Smart502
Interface
Ethernet 1000/100/10 Mb/s
Smart technology
32-bit RISC VLIW processor PNX1502/300MHz, 64MB DDR2
RAM (128MB on newer and all currently delivered systems), 32MB
flash memory for user applications, real-time operating system,
C/C++ compiler, various APIs
Sensor
2/3" CCD, interline transfer, type SONY ICX285
Spectral sensitivity
Monochrome/color
bayer pattern
Output image resolution (H×V) 1392 × 1040 pixels
Full sensor resolution (incl. black 1438 × 1050 pixels
pixels)
Frame rate
20.2 fps
Video format
12-bit, single tap
Scanning
progressive
Pixel size (H×V)
6.45 × 6.45 μm
Sensor size (H×V)
10.2 × 8.3 mm
Shutter
global, 5 μs –60000 ms (default 48 ms)
Operating (trigger) modes
• Free running
• Triggered mode
• Long range exposure mode
Copyright © Leutron Vision
339
Leutron
Vision
PicSight-GigE user manual
Technical specifications for the “smart” models
Specification
PicSight P141B-Smart502
Gain & black level
• Analog gain: -3 .. 33 dB (default 9 dB)
• Digital gain: n/a
• Black level: 0 .. 25.5 DN (default 0 DN)
Auto functions
n/a
Area of interest (AOI)
Vertical AOI applicable directly at the sensor
Binning
n/a
Decimation
n/a
Mount
C-mount (CS-mount on request)
Dimension
• 44.8×31.4×91.7 mm (W×H×L, without connectors) — standard
version
• 44.8×37.56×96.0 mm (W×H×L, without connectors) — right
angle version
Weight
145 g
Power input
10-26V/5W
Ordering information
• 181602: PicSight P141B-Smart502-AS (PNX1502, 300MHz,
64MB-DDR, lens controller, Hirose/SDR-26 connector)
• 181603: PicSight P141B-Smart502-AS-H (PNX1502, 300MHz,
64MB-DDR, lens controller, Hirose/SDR-26 connector, 90º lens
mount)
• 181627: PicSight P141B-Smart502-PoE-S (PoE, PNX1502,
300MHz, 64MB-DDR, lens controller, Hirose/SDR-26 connector)
• 181628: PicSight P141B-Smart502-PoE-S-H (PoE, PNX1502,
300MHz, 64MB-DDR, lens controller, Hirose/SDR-26 connector,
90º lens mount)
Check latest price list or contact us to learn if more options are
available.
Table B.6. PicSight P141B-Smart502 technical specifications
B.7. PicSight P141M-Smart502
Specification
PicSight P141M-Smart502
Interface
Ethernet 1000/100/10 Mb/s
Smart technology
32-bit RISC VLIW processor PNX1502/300MHz, 64MB DDR2
RAM (128MB on newer and all currently delivered systems), 32MB
flash memory for user applications, real-time operating system,
C/C++ compiler, various APIs
Sensor
2/3" CCD, interline transfer, type SONY ICX285
Spectral sensitivity
Copyright © Leutron Vision
340
Leutron
Vision
PicSight-GigE user manual
Technical specifications for the “smart” models
Specification
PicSight P141M-Smart502
Monochrome/color
monochrome
Output image resolution (H×V) 1392 × 1040 pixels
Full sensor resolution (incl. black 1438 × 1050 pixels
pixels)
Frame rate
20.2 fps
Video format
12-bit, single tap
Scanning
progressive
Pixel size (H×V)
6.45 × 6.45 μm
Sensor size (H×V)
10.2 × 8.3 mm
Shutter
global, 5 μs –60000 ms (default 48 ms)
Operating (trigger) modes
• Free running
• Triggered mode
• Long range exposure mode
Gain & black level
• Analog gain: -3 .. 33 dB (default 0 dB)
• Digital gain: n/a
• Black level: 0 .. 25.5 DN (default 0 DN)
Auto functions
n/a
Signal/noise ratio
43 dB
Dynamic range
77 dB
Area of interest (AOI)
Vertical AOI applicable directly at the sensor
Binning
• Vertical: 2×
Decimation
n/a
Mount
C-mount (CS-mount on request)
Dimension
• 44.8×31.4×91.7 mm (W×H×L, without connectors) — standard
version
• 44.8×37.56×96.0 mm (W×H×L, without connectors) — right
angle version
Weight
145 g
Power input
10-26V/5W
Ordering information
• 180602: PicSight P141M-Smart502-AS (PNX1502, 300MHz,
64MB-DDR, lens controller, Hirose/SDR-26 connector)
• 180603: PicSight P141M-Smart502-AS-H (PNX1502, 300MHz,
64MB-DDR, lens controller, Hirose/SDR-26 connector, 90º lens
mount)
• 180627: PicSight P141M-Smart502-PoE-S (PoE, PNX1502,
300MHz, 64MB-DDR, lens controller, Hirose/SDR-26 connector)
• 180628: PicSight P141M-Smart502-PoE-S-H (PoE, PNX1502,
300MHz, 64MB-DDR, lens controller, Hirose/SDR-26 connector,
90º lens mount)
Check latest price list or contact us to learn if more options are
available.
Table B.7. PicSight P141M-Smart502 technical specifications
Copyright © Leutron Vision
341
Leutron
Vision
PicSight-GigE user manual
Technical specifications for the “smart” models
B.8. PicSight P142AB-Smart502
Specification
PicSight P142AB-Smart502
Interface
Ethernet 1000/100/10 Mb/s
Smart technology
32-bit RISC VLIW processor PNX1502/300MHz, 64MB DDR2
RAM (128MB on newer and all currently delivered systems), 32MB
flash memory for user applications, real-time operating system,
C/C++ compiler, various APIs
Sensor
1/2" CCD, interline transfer, type SONY ICX267
Spectral sensitivity
Monochrome/color
bayer pattern
Output image resolution (H×V) 1392 × 1040 pixels
Full sensor resolution (incl. black 1434 × 1050 pixels
pixels)
Frame rate
0.15 fps
Video format
12-bit, single tap
Scanning
progressive
Pixel size (H×V)
4.65 × 4.65 μm
Sensor size (H×V)
7.6 × 6.2 mm
Shutter
global, 5 μs –60000 ms (default 130 ms)
Operating (trigger) modes
• Free running
• Triggered mode
• Long range exposure mode
Gain & black level
• Analog gain: -8 .. 28 dB (default 0 dB)
• Digital gain: n/a
• Black level: 0 .. 25.5 DN (default 0 DN)
Auto functions
n/a
Area of interest (AOI)
Vertical AOI applicable directly at the sensor
Binning
n/a
Decimation
n/a
Mount
C-mount (CS-mount on request)
Dimension
• 44.8×31.4×91.7 mm (W×H×L, without connectors) — standard
version
• 44.8×37.56×96.0 mm (W×H×L, without connectors) — right
angle version
Weight
145 g
Power input
10-26V/5W
Copyright © Leutron Vision
342
Leutron
Vision
PicSight-GigE user manual
Technical specifications for the “smart” models
Specification
PicSight P142AB-Smart502
Ordering information
• 171602: PicSight P142AB-Smart502-AS (PNX1502, 300MHz,
64MB-DDR, lens controller, Hirose/SDR-26 connector)
• 171603: PicSight P142AB-Smart502-AS-H (PNX1502, 300MHz,
64MB-DDR, lens controller, Hirose/SDR-26 connector, 90º lens
mount)
• 171627: PicSight P142AB-Smart502-PoE-S (PoE, PNX1502,
300MHz, 64MB-DDR, lens controller, Hirose/SDR-26 connector)
• 171628: PicSight P142AB-Smart502-PoE-S-H (PoE, PNX1502,
300MHz, 64MB-DDR, lens controller, Hirose/SDR-26 connector,
90º lens mount)
Check latest price list or contact us to learn if more options are
available.
Table B.8. PicSight P142AB-Smart502 technical specifications
B.9. PicSight P142AM-Smart502
Specification
PicSight P142AM-Smart502
Interface
Ethernet 1000/100/10 Mb/s
Smart technology
32-bit RISC VLIW processor PNX1502/300MHz, 64MB DDR2
RAM (128MB on newer and all currently delivered systems), 32MB
flash memory for user applications, real-time operating system,
C/C++ compiler, various APIs
Sensor
1/2" CCD, interline transfer, type SONY ICX267
Spectral sensitivity
Monochrome/color
monochrome
Output image resolution (H×V) 1392 × 1040 pixels
Full sensor resolution (incl. black 1434 × 1050 pixels
pixels)
Frame rate
0.15 fps
Video format
12-bit, single tap
Scanning
progressive
Pixel size (H×V)
4.65 × 4.65 μm
Sensor size (H×V)
7.6 × 6.2 mm
Shutter
global, 5 μs –60000 ms (default 50 ms)
Operating (trigger) modes
• Free running
• Triggered mode
• Long range exposure mode
Copyright © Leutron Vision
343
Leutron
Vision
PicSight-GigE user manual
Technical specifications for the “smart” models
Specification
PicSight P142AM-Smart502
Gain & black level
• Analog gain: -8 .. 28 dB (default 0 dB)
• Digital gain: n/a
• Black level: 0 .. 25.5 DN (default 0 DN)
Auto functions
n/a
Signal/noise ratio
43 dB
Dynamic range
71 dB
Area of interest (AOI)
Vertical AOI applicable directly at the sensor
Binning
• Vertical: 2×
Decimation
n/a
Mount
C-mount (CS-mount on request)
Dimension
• 44.8×31.4×91.7 mm (W×H×L, without connectors) — standard
version
• 44.8×37.56×96.0 mm (W×H×L, without connectors) — right
angle version
Weight
145 g
Power input
10-26V/5W
Ordering information
• 170602: PicSight P142AM-Smart502-AS (PNX1502, 300MHz,
64MB-DDR, lens controller, Hirose/SDR-26 connector)
• 170603: PicSight P142AM-Smart502-AS-H (PNX1502, 300MHz,
64MB-DDR, lens controller, Hirose/SDR-26 connector, 90º lens
mount)
• 170627: PicSight P142AM-Smart502-PoE-S (PoE, PNX1502,
300MHz, 64MB-DDR, lens controller, Hirose/SDR-26 connector)
• 170628: PicSight P142AM-Smart502-PoE-S-H (PoE, PNX1502,
300MHz, 64MB-DDR, lens controller, Hirose/SDR-26 connector,
90º lens mount)
Check latest price list or contact us to learn if more options are
available.
Table B.9. PicSight P142AM-Smart502 technical specifications
B.10. PicSight P202B-Smart502
Specification
PicSight P202B-Smart502
Interface
Ethernet 1000/100/10 Mb/s
Smart technology
32-bit RISC VLIW processor PNX1502/300MHz, 64MB DDR2
RAM (128MB on newer and all currently delivered systems), 32MB
flash memory for user applications, real-time operating system,
C/C++ compiler, various APIs
Sensor
1/1.8" CCD, interline transfer, type SONY ICX274
Copyright © Leutron Vision
344
Leutron
Vision
PicSight-GigE user manual
Specification
Technical specifications for the “smart” models
PicSight P202B-Smart502
Spectral sensitivity
Monochrome/color
bayer pattern
Output image resolution (H×V) 1624 × 1236 pixels
Full sensor resolution (incl. black 1688 × 1248 pixels
pixels)
Frame rate
14.6 fps
Video format
12-bit, single tap
Scanning
progressive
Pixel size (H×V)
4.4 × 4.4 μm
Sensor size (H×V)
8.5 × 6.8 mm
Shutter
global, 5 μs –60000 ms (default 60 ms)
Operating (trigger) modes
• Free running
• Triggered mode
• Long range exposure mode
Gain & black level
• Analog gain: -10 .. 26 dB (default 4 dB)
• Digital gain: n/a
• Black level: 0 .. 25.5 DN (default 0 DN)
Auto functions
n/a
Area of interest (AOI)
Vertical AOI applicable directly at the sensor
Binning
n/a
Decimation
n/a
Mount
C-mount (CS-mount on request)
Dimension
• 44.8×31.4×91.7 mm (W×H×L, without connectors) — standard
version
• 44.8×37.56×96.0 mm (W×H×L, without connectors) — right
angle version
Weight
145 g
Power input
10-26V/5W
Copyright © Leutron Vision
345
Leutron
Vision
PicSight-GigE user manual
Technical specifications for the “smart” models
Specification
PicSight P202B-Smart502
Ordering information
• 211602: PicSight P202B-Smart502-AS (PNX1502, 300MHz,
64MB-DDR, lens controller, Hirose/SDR-26 connector)
• 211603: PicSight P202B-Smart502-AS-H (PNX1502, 300MHz,
64MB-DDR, lens controller, Hirose/SDR-26 connector, 90º lens
mount)
• 211627: PicSight P202B-Smart502-PoE-S (PoE, PNX1502,
300MHz, 64MB-DDR, lens controller, Hirose/SDR-26 connector)
• 211628: PicSight P202B-Smart502-PoE-S-H (PoE, PNX1502,
300MHz, 64MB-DDR, lens controller, Hirose/SDR-26 connector,
90º lens mount)
Check latest price list or contact us to learn if more options are
available.
Table B.10. PicSight P202B-Smart502 technical specifications
B.11. PicSight P202M-Smart502
Specification
PicSight P202M-Smart502
Interface
Ethernet 1000/100/10 Mb/s
Smart technology
32-bit RISC VLIW processor PNX1502/300MHz, 64MB DDR2
RAM (128MB on newer and all currently delivered systems), 32MB
flash memory for user applications, real-time operating system,
C/C++ compiler, various APIs
Sensor
1/1.8" CCD, interline transfer, type SONY ICX274
Spectral sensitivity
Monochrome/color
monochrome
Output image resolution (H×V) 1624 × 1236 pixels
Full sensor resolution (incl. black 1688 × 1248 pixels
pixels)
Frame rate
14.6 fps
Video format
12-bit, single tap
Scanning
progressive
Pixel size (H×V)
4.4 × 4.4 μm
Sensor size (H×V)
8.5 × 6.8 mm
Shutter
global, 5 μs –60000 ms (default 30 ms)
Operating (trigger) modes
• Free running
• Triggered mode
• Long range exposure mode
Copyright © Leutron Vision
346
Leutron
Vision
PicSight-GigE user manual
Technical specifications for the “smart” models
Specification
PicSight P202M-Smart502
Gain & black level
• Analog gain: -10 .. 26 dB (default 0 dB)
• Digital gain: n/a
• Black level: 0 .. 25.5 DN (default 0 DN)
Auto functions
n/a
Signal/noise ratio
40 dB
Dynamic range
69 dB
Area of interest (AOI)
Vertical AOI applicable directly at the sensor
Binning
• Vertical: 2×
Decimation
n/a
Mount
C-mount (CS-mount on request)
Dimension
• 44.8×31.4×91.7 mm (W×H×L, without connectors) — standard
version
• 44.8×37.56×96.0 mm (W×H×L, without connectors) — right
angle version
Weight
145 g
Power input
10-26V/5W
Ordering information
• 210602: PicSight P202M-Smart502-AS (PNX1502, 300MHz,
64MB-DDR, lens controller, Hirose/SDR-26 connector)
• 210603: PicSight P202M-Smart502-AS-H (PNX1502, 300MHz,
64MB-DDR, lens controller, Hirose/SDR-26 connector, 90º lens
mount)
• 210627: PicSight P202M-Smart502-PoE-S (PoE, PNX1502,
300MHz, 64MB-DDR, lens controller, Hirose/SDR-26 connector)
• 210628: PicSight P202M-Smart502-PoE-S-H (PoE, PNX1502,
300MHz, 64MB-DDR, lens controller, Hirose/SDR-26 connector,
90º lens mount)
Check latest price list or contact us to learn if more options are
available.
Table B.11. PicSight P202M-Smart502 technical specifications
B.12. PicSight P203B-Smart502
Specification
PicSight P203B-Smart502
Interface
Ethernet 1000/100/10 Mb/s
Smart technology
32-bit RISC VLIW processor PNX1502/300MHz, 64MB DDR2
RAM (128MB on newer and all currently delivered systems), 32MB
flash memory for user applications, real-time operating system,
C/C++ compiler, various APIs
Sensor
1/1" CCD, interline transfer, type SONY ICX454JQF-J
Copyright © Leutron Vision
347
Leutron
Vision
PicSight-GigE user manual
Specification
Technical specifications for the “smart” models
PicSight P203B-Smart502
Spectral sensitivity
Monochrome/color
bayer pattern
Output image resolution (H×V) 1648 × 1240 pixels
Full sensor resolution (incl. black 1690 × 1250 pixels
pixels)
Frame rate
9.2 fps
Video format
12-bit, single tap
Scanning
progressive
Pixel size (H×V)
0 × 0 μm
Sensor size (H×V)
6.38 × 5.26 mm
Shutter
global, 5 μs –60000 ms (default 100 ms)
Operating (trigger) modes
• Free running
• Triggered mode
• Long range exposure mode
Gain & black level
• Analog gain: -6 .. 26 dB (default 6 dB)
• Digital gain: n/a
• Black level: 0 .. 25.5 DN (default 0 DN)
Auto functions
n/a
Area of interest (AOI)
Vertical AOI applicable directly at the sensor
Binning
n/a
Decimation
n/a
Mount
C-mount (CS-mount on request)
Dimension
• 44.8×31.4×91.7 mm (W×H×L, without connectors) — standard
version
• 44.8×37.56×96.0 mm (W×H×L, without connectors) — right
angle version
Weight
145 g
Power input
10-26V/5W
Copyright © Leutron Vision
348
Leutron
Vision
PicSight-GigE user manual
Technical specifications for the “smart” models
Specification
PicSight P203B-Smart502
Ordering information
• 201602: PicSight P203B-Smart502-AS (PNX1502, 300MHz,
64MB-DDR, lens controller, Hirose/SDR-26 connector)
• 201603: PicSight P203B-Smart502-AS-H (PNX1502, 300MHz,
64MB-DDR, lens controller, Hirose/SDR-26 connector, 90º lens
mount)
• 201627: PicSight P203B-Smart502-PoE-S (PoE, PNX1502,
300MHz, 64MB-DDR, lens controller, Hirose/SDR-26 connector)
• 201628: PicSight P203B-Smart502-PoE-S-H (PoE, PNX1502,
300MHz, 64MB-DDR, lens controller, Hirose/SDR-26 connector,
90º lens mount)
Check latest price list or contact us to learn if more options are
available.
Table B.12. PicSight P203B-Smart502 technical specifications
B.13. PicSight P32B-Smart502
Specification
PicSight P32B-Smart502
Interface
Ethernet 1000/100/10 Mb/s
Smart technology
32-bit RISC VLIW processor PNX1502/300MHz, 64MB DDR2
RAM (128MB on newer and all currently delivered systems), 32MB
flash memory for user applications, real-time operating system,
C/C++ compiler, various APIs
Sensor
1/2" CCD, interline transfer, type SONY ICX414
Spectral sensitivity
Monochrome/color
bayer pattern
Output image resolution (H×V) 656 × 492 pixels
Full sensor resolution (incl. black 692 × 504 pixels
pixels)
Frame rate
62.3 fps
Video format
12-bit, single tap
Scanning
progressive
Pixel size (H×V)
9.9 × 9.9 μm
Sensor size (H×V)
7.48 × 6.15 mm
Shutter
global, 5 μs –60000 ms (default 16 ms)
Operating (trigger) modes
• Free running
• Triggered mode
• Long range exposure mode
Copyright © Leutron Vision
349
Leutron
Vision
PicSight-GigE user manual
Technical specifications for the “smart” models
Specification
PicSight P32B-Smart502
Gain & black level
• Analog gain: -6 .. 30 dB (default 10 dB)
• Digital gain: n/a
• Black level: 0 .. 25.5 DN (default 0 DN)
Auto functions
n/a
Area of interest (AOI)
Vertical AOI applicable directly at the sensor
Binning
n/a
Decimation
n/a
Mount
C-mount (CS-mount on request)
Dimension
• 44.8×31.4×91.7 mm (W×H×L, without connectors) — standard
version
• 44.8×37.56×96.0 mm (W×H×L, without connectors) — right
angle version
Weight
145 g
Power input
10-26V/5W
Ordering information
• 121602: PicSight P32B-Smart502-AS (PNX1502, 300MHz,
64MB-DDR, lens controller, Hirose/SDR-26 connector)
• 121603: PicSight P32B-Smart502-AS-H (PNX1502, 300MHz,
64MB-DDR, lens controller, Hirose/SDR-26 connector, 90º lens
mount)
• 121627: PicSight P32B-Smart502-PoE-S (PoE, PNX1502,
300MHz, 64MB-DDR, lens controller, Hirose/SDR-26 connector)
• 121628: PicSight P32B-Smart502-PoE-S-H (PoE, PNX1502,
300MHz, 64MB-DDR, lens controller, Hirose/SDR-26 connector,
90º lens mount)
Check latest price list or contact us to learn if more options are
available.
Table B.13. PicSight P32B-Smart502 technical specifications
B.14. PicSight P32M-Smart502
Specification
PicSight P32M-Smart502
Interface
Ethernet 1000/100/10 Mb/s
Smart technology
32-bit RISC VLIW processor PNX1502/300MHz, 64MB DDR2
RAM (128MB on newer and all currently delivered systems), 32MB
flash memory for user applications, real-time operating system,
C/C++ compiler, various APIs
Sensor
1/2" CCD, interline transfer, type SONY ICX414
Spectral sensitivity
Copyright © Leutron Vision
350
Leutron
Vision
PicSight-GigE user manual
Technical specifications for the “smart” models
Specification
PicSight P32M-Smart502
Monochrome/color
monochrome
Output image resolution (H×V) 656 × 492 pixels
Full sensor resolution (incl. black 692 × 504 pixels
pixels)
Frame rate
62.3 fps
Video format
12-bit, single tap
Scanning
progressive
Pixel size (H×V)
9.9 × 9.9 μm
Sensor size (H×V)
7.48 × 6.15 mm
Shutter
global, 5 μs –60000 ms (default 16 ms)
Operating (trigger) modes
• Free running
• Triggered mode
• Long range exposure mode
Gain & black level
• Analog gain: -6 .. 30 dB (default 4 dB)
• Digital gain: n/a
• Black level: 0 .. 25.5 DN (default 0 DN)
Auto functions
n/a
Signal/noise ratio
45 dB
Dynamic range
73 dB
Area of interest (AOI)
Vertical AOI applicable directly at the sensor
Binning
• Vertical: 2×
Decimation
n/a
Mount
C-mount (CS-mount on request)
Dimension
• 44.8×31.4×91.7 mm (W×H×L, without connectors) — standard
version
• 44.8×37.56×96.0 mm (W×H×L, without connectors) — right
angle version
Weight
145 g
Power input
10-26V/5W
Ordering information
• 120602: PicSight P32M-Smart502-AS (PNX1502, 300MHz,
64MB-DDR, lens controller, Hirose/SDR-26 connector)
• 120603: PicSight P32M-Smart502-AS-H (PNX1502, 300MHz,
64MB-DDR, lens controller, Hirose/SDR-26 connector, 90º lens
mount)
• 120627: PicSight P32M-Smart502-PoE-S (PoE, PNX1502,
300MHz, 64MB-DDR, lens controller, Hirose/SDR-26 connector)
• 120628: PicSight P32M-Smart502-PoE-S-H (PoE, PNX1502,
300MHz, 64MB-DDR, lens controller, Hirose/SDR-26 connector,
90º lens mount)
Check latest price list or contact us to learn if more options are
available.
Table B.14. PicSight P32M-Smart502 technical specifications
Copyright © Leutron Vision
351
Leutron
Vision
PicSight-GigE user manual
Technical specifications for the “smart” models
B.15. PicSight P33B-Smart502
Specification
PicSight P33B-Smart502
Interface
Ethernet 1000/100/10 Mb/s
Smart technology
32-bit RISC VLIW processor PNX1502/300MHz, 64MB DDR2
RAM (128MB on newer and all currently delivered systems), 32MB
flash memory for user applications, real-time operating system,
C/C++ compiler, various APIs
Sensor
1/3" CCD, interline transfer, type SONY ICX424
Spectral sensitivity
Monochrome/color
bayer pattern
Output image resolution (H×V) 656 × 492 pixels
Full sensor resolution (incl. black 692 × 504 pixels
pixels)
Frame rate
62.3 fps
Video format
12-bit, single tap
Scanning
progressive
Pixel size (H×V)
7.4 × 7.4 μm
Sensor size (H×V)
5.79 × 4.89 mm
Shutter
global, 5 μs –60000 ms (default 16 ms)
Operating (trigger) modes
• Free running
• Triggered mode
• Long range exposure mode
Gain & black level
• Analog gain: -6 .. 30 dB (default 12 dB)
• Digital gain: n/a
• Black level: 0 .. 25.5 DN (default 0 DN)
Auto functions
n/a
Area of interest (AOI)
Vertical AOI applicable directly at the sensor
Binning
n/a
Decimation
n/a
Mount
C-mount (CS-mount on request)
Dimension
• 44.8×31.4×91.7 mm (W×H×L, without connectors) — standard
version
• 44.8×37.56×96.0 mm (W×H×L, without connectors) — right
angle version
Weight
145 g
Power input
10-26V/5W
Copyright © Leutron Vision
352
Leutron
Vision
PicSight-GigE user manual
Technical specifications for the “smart” models
Specification
PicSight P33B-Smart502
Ordering information
• 111602: PicSight P33B-Smart502-AS (PNX1502, 300MHz,
64MB-DDR, lens controller, Hirose/SDR-26 connector)
• 111603: PicSight P33B-Smart502-AS-H (PNX1502, 300MHz,
64MB-DDR, lens controller, Hirose/SDR-26 connector, 90º lens
mount)
• 111627: PicSight P33B-Smart502-PoE-S (PoE, PNX1502,
300MHz, 64MB-DDR, lens controller, Hirose/SDR-26 connector)
• 111628: PicSight P33B-Smart502-PoE-S-H (PoE, PNX1502,
300MHz, 64MB-DDR, lens controller, Hirose/SDR-26 connector,
90º lens mount)
Check latest price list or contact us to learn if more options are
available.
Table B.15. PicSight P33B-Smart502 technical specifications
B.16. PicSight P33M-Smart502
Specification
PicSight P33M-Smart502
Interface
Ethernet 1000/100/10 Mb/s
Smart technology
32-bit RISC VLIW processor PNX1502/300MHz, 64MB DDR2
RAM (128MB on newer and all currently delivered systems), 32MB
flash memory for user applications, real-time operating system,
C/C++ compiler, various APIs
Sensor
1/3" CCD, interline transfer, type SONY ICX424
Spectral sensitivity
Monochrome/color
monochrome
Output image resolution (H×V) 656 × 492 pixels
Full sensor resolution (incl. black 692 × 504 pixels
pixels)
Frame rate
62.3 fps
Video format
12-bit, single tap
Scanning
progressive
Pixel size (H×V)
7.4 × 7.4 μm
Sensor size (H×V)
5.79 × 4.89 mm
Shutter
global, 5 μs –60000 ms (default 16 ms)
Operating (trigger) modes
• Free running
• Triggered mode
• Long range exposure mode
Copyright © Leutron Vision
353
Leutron
Vision
PicSight-GigE user manual
Technical specifications for the “smart” models
Specification
PicSight P33M-Smart502
Gain & black level
• Analog gain: -6 .. 30 dB (default 4 dB)
• Digital gain: n/a
• Black level: 0 .. 25.5 DN (default 0 DN)
Auto functions
n/a
Signal/noise ratio
40 dB
Dynamic range
63 dB
Area of interest (AOI)
Vertical AOI applicable directly at the sensor
Binning
• Vertical: 2×
Decimation
n/a
Mount
C-mount (CS-mount on request)
Dimension
• 44.8×31.4×91.7 mm (W×H×L, without connectors) — standard
version
• 44.8×37.56×96.0 mm (W×H×L, without connectors) — right
angle version
Weight
145 g
Power input
10-26V/5W
Ordering information
• 110602: PicSight P33M-Smart502-AS (PNX1502, 300MHz,
64MB-DDR, lens controller, Hirose/SDR-26 connector)
• 110603: PicSight P33M-Smart502-AS-H (PNX1502, 300MHz,
64MB-DDR, lens controller, Hirose/SDR-26 connector, 90º lens
mount)
• 110627: PicSight P33M-Smart502-PoE-S (PoE, PNX1502,
300MHz, 64MB-DDR, lens controller, Hirose/SDR-26 connector)
• 110628: PicSight P33M-Smart502-PoE-S-H (PoE, PNX1502,
300MHz, 64MB-DDR, lens controller, Hirose/SDR-26 connector,
90º lens mount)
Check latest price list or contact us to learn if more options are
available.
Table B.16. PicSight P33M-Smart502 technical specifications
B.17. PicSight P34B-Smart502
Specification
PicSight P34B-Smart502
Interface
Ethernet 1000/100/10 Mb/s
Smart technology
32-bit RISC VLIW processor PNX1502/300MHz, 64MB DDR2
RAM (128MB on newer and all currently delivered systems), 32MB
flash memory for user applications, real-time operating system,
C/C++ compiler, various APIs
Sensor
1/4" CCD, interline transfer, type SONY ICX098
Copyright © Leutron Vision
354
Leutron
Vision
PicSight-GigE user manual
Specification
Technical specifications for the “smart” models
PicSight P34B-Smart502
Spectral sensitivity
Monochrome/color
bayer pattern
Output image resolution (H×V) 656 × 492 pixels
Full sensor resolution (incl. black 692 × 504 pixels
pixels)
Frame rate
64.7 fps
Video format
12-bit, single tap
Scanning
progressive
Pixel size (H×V)
5.6 × 5.6 μm
Sensor size (H×V)
4.6 × 3.97 mm
Shutter
global, 5 μs –60000 ms (default 15 ms)
Operating (trigger) modes
• Free running
• Triggered mode
• Long range exposure mode
Gain & black level
• Analog gain: -6 .. 30 dB (default 16 dB)
• Digital gain: n/a
• Black level: 0 .. 25.5 DN (default 0 DN)
Auto functions
n/a
Area of interest (AOI)
Vertical AOI applicable directly at the sensor
Binning
n/a
Decimation
n/a
Mount
C-mount (CS-mount on request)
Dimension
• 44.8×31.4×91.7 mm (W×H×L, without connectors) — standard
version
• 44.8×37.56×96.0 mm (W×H×L, without connectors) — right
angle version
Weight
145 g
Power input
10-26V/5W
Copyright © Leutron Vision
355
Leutron
Vision
PicSight-GigE user manual
Technical specifications for the “smart” models
Specification
PicSight P34B-Smart502
Ordering information
• 101602: PicSight P34B-Smart502-AS (PNX1502, 300MHz,
64MB-DDR, lens controller, Hirose/SDR-26 connector)
• 101603: PicSight P34B-Smart502-AS-H (PNX1502, 300MHz,
64MB-DDR, lens controller, Hirose/SDR-26 connector, 90º lens
mount)
• 101627: PicSight P34B-Smart502-PoE-S (PoE, PNX1502,
300MHz, 64MB-DDR, lens controller, Hirose/SDR-26 connector)
• 101628: PicSight P34B-Smart502-PoE-S-H (PoE, PNX1502,
300MHz, 64MB-DDR, lens controller, Hirose/SDR-26 connector,
90º lens mount)
Check latest price list or contact us to learn if more options are
available.
Table B.17. PicSight P34B-Smart502 technical specifications
B.18. PicSight P34M-Smart502
Specification
PicSight P34M-Smart502
Interface
Ethernet 1000/100/10 Mb/s
Smart technology
32-bit RISC VLIW processor PNX1502/300MHz, 64MB DDR2
RAM (128MB on newer and all currently delivered systems), 32MB
flash memory for user applications, real-time operating system,
C/C++ compiler, various APIs
Sensor
1/4" CCD, interline transfer, type SONY ICX098
Spectral sensitivity
Monochrome/color
monochrome
Output image resolution (H×V) 656 × 492 pixels
Full sensor resolution (incl. black 692 × 504 pixels
pixels)
Frame rate
64.7 fps
Video format
12-bit, single tap
Scanning
progressive
Pixel size (H×V)
5.6 × 5.6 μm
Sensor size (H×V)
4.6 × 3.97 mm
Shutter
global, 5 μs –60000 ms (default 15 ms)
Operating (trigger) modes
• Free running
• Triggered mode
• Long range exposure mode
Copyright © Leutron Vision
356
Leutron
Vision
PicSight-GigE user manual
Technical specifications for the “smart” models
Specification
PicSight P34M-Smart502
Gain & black level
• Analog gain: -6 .. 30 dB (default 9 dB)
• Digital gain: n/a
• Black level: 0 .. 25.5 DN (default 0 DN)
Auto functions
n/a
Signal/noise ratio
44 dB
Dynamic range
69 dB
Area of interest (AOI)
Vertical AOI applicable directly at the sensor
Binning
• Vertical: 2×
Decimation
n/a
Mount
C-mount (CS-mount on request)
Dimension
• 44.8×31.4×91.7 mm (W×H×L, without connectors) — standard
version
• 44.8×37.56×96.0 mm (W×H×L, without connectors) — right
angle version
Weight
145 g
Power input
10-26V/5W
Ordering information
• 100602: PicSight P34M-Smart502-AS (PNX1502, 300MHz,
64MB-DDR, lens controller, Hirose/SDR-26 connector)
• 100603: PicSight P34M-Smart502-AS-H (PNX1502, 300MHz,
64MB-DDR, lens controller, Hirose/SDR-26 connector, 90º lens
mount)
• 100627: PicSight P34M-Smart502-PoE-S (PoE, PNX1502,
300MHz, 64MB-DDR, lens controller, Hirose/SDR-26 connector)
• 100628: PicSight P34M-Smart502-PoE-S-H (PoE, PNX1502,
300MHz, 64MB-DDR, lens controller, Hirose/SDR-26 connector,
90º lens mount)
Check latest price list or contact us to learn if more options are
available.
Table B.18. PicSight P34M-Smart502 technical specifications
B.19. PicSight P52B-Smart502
Specification
PicSight P52B-Smart502
Interface
Ethernet 1000/100/10 Mb/s
Smart technology
32-bit RISC VLIW processor PNX1502/300MHz, 64MB DDR2
RAM (128MB on newer and all currently delivered systems), 32MB
flash memory for user applications, real-time operating system,
C/C++ compiler, various APIs
Sensor
1/2" CCD, interline transfer, type SONY ICX415
Copyright © Leutron Vision
357
Leutron
Vision
PicSight-GigE user manual
Specification
Technical specifications for the “smart” models
PicSight P52B-Smart502
Spectral sensitivity
Monochrome/color
bayer pattern
Output image resolution (H×V) 776 × 580 pixels
Full sensor resolution (incl. black 823 × 592 pixels
pixels)
Frame rate
62.3 fps
Video format
12-bit, single tap
Scanning
progressive
Pixel size (H×V)
8.3 × 8.3 μm
Sensor size (H×V)
7.48 × 6.15 mm
Shutter
global, 5 μs –60000 ms (default 15 ms)
Operating (trigger) modes
• Free running
• Triggered mode
• Long range exposure mode
Gain & black level
• Analog gain: -10 .. 26 dB (default 12 dB)
• Digital gain: n/a
• Black level: 0 .. 25.5 DN (default 0 DN)
Auto functions
n/a
Area of interest (AOI)
Vertical AOI applicable directly at the sensor
Binning
n/a
Decimation
n/a
Mount
C-mount (CS-mount on request)
Dimension
• 44.8×31.4×91.7 mm (W×H×L, without connectors) — standard
version
• 44.8×37.56×96.0 mm (W×H×L, without connectors) — right
angle version
Weight
145 g
Power input
10-26V/5W
Copyright © Leutron Vision
358
Leutron
Vision
PicSight-GigE user manual
Technical specifications for the “smart” models
Specification
PicSight P52B-Smart502
Ordering information
• 131602: PicSight P52B-Smart502-AS (PNX1502, 300MHz,
64MB-DDR, lens controller, Hirose/SDR-26 connector)
• 131603: PicSight P52B-Smart502-AS-H (PNX1502, 300MHz,
64MB-DDR, lens controller, Hirose/SDR-26 connector, 90º lens
mount)
• 131627: PicSight P52B-Smart502-PoE-S (PoE, PNX1502,
300MHz, 64MB-DDR, lens controller, Hirose/SDR-26 connector)
• 131628: PicSight P52B-Smart502-PoE-S-H (PoE, PNX1502,
300MHz, 64MB-DDR, lens controller, Hirose/SDR-26 connector,
90º lens mount)
Check latest price list or contact us to learn if more options are
available.
Table B.19. PicSight P52B-Smart502 technical specifications
B.20. PicSight P52M-Smart502
Specification
PicSight P52M-Smart502
Interface
Ethernet 1000/100/10 Mb/s
Smart technology
32-bit RISC VLIW processor PNX1502/300MHz, 64MB DDR2
RAM (128MB on newer and all currently delivered systems), 32MB
flash memory for user applications, real-time operating system,
C/C++ compiler, various APIs
Sensor
1/2" CCD, interline transfer, type SONY ICX415
Spectral sensitivity
Monochrome/color
monochrome
Output image resolution (H×V) 776 × 580 pixels
Full sensor resolution (incl. black 823 × 592 pixels
pixels)
Frame rate
62.3 fps
Video format
12-bit, single tap
Scanning
progressive
Pixel size (H×V)
8.3 × 8.3 μm
Sensor size (H×V)
7.48 × 6.15 mm
Shutter
global, 5 μs –60000 ms (default 15 ms)
Operating (trigger) modes
• Free running
• Triggered mode
• Long range exposure mode
Copyright © Leutron Vision
359
Leutron
Vision
PicSight-GigE user manual
Technical specifications for the “smart” models
Specification
PicSight P52M-Smart502
Gain & black level
• Analog gain: -10 .. 26 dB (default 4 dB)
• Digital gain: n/a
• Black level: 0 .. 25.5 DN (default 0 DN)
Auto functions
n/a
Signal/noise ratio
44 dB
Dynamic range
69 dB
Area of interest (AOI)
Vertical AOI applicable directly at the sensor
Binning
• Vertical: 2×
Decimation
n/a
Mount
C-mount (CS-mount on request)
Dimension
• 44.8×31.4×91.7 mm (W×H×L, without connectors) — standard
version
• 44.8×37.56×96.0 mm (W×H×L, without connectors) — right
angle version
Weight
145 g
Power input
10-26V/5W
Ordering information
• 130602: PicSight P52M-Smart502-AS (PNX1502, 300MHz,
64MB-DDR, lens controller, Hirose/SDR-26 connector)
• 130603: PicSight P52M-Smart502-AS-H (PNX1502, 300MHz,
64MB-DDR, lens controller, Hirose/SDR-26 connector, 90º lens
mount)
• 130627: PicSight P52M-Smart502-PoE-S (PoE, PNX1502,
300MHz, 64MB-DDR, lens controller, Hirose/SDR-26 connector)
• 130628: PicSight P52M-Smart502-PoE-S-H (PoE, PNX1502,
300MHz, 64MB-DDR, lens controller, Hirose/SDR-26 connector,
90º lens mount)
Check latest price list or contact us to learn if more options are
available.
Table B.20. PicSight P52M-Smart502 technical specifications
B.21. PicSight P83B-Smart502
Specification
PicSight P83B-Smart502
Interface
Ethernet 1000/100/10 Mb/s
Smart technology
32-bit RISC VLIW processor PNX1502/300MHz, 64MB DDR2
RAM (128MB on newer and all currently delivered systems), 32MB
flash memory for user applications, real-time operating system,
C/C++ compiler, various APIs
Sensor
1/3" CCD, interline transfer, type SONY ICX204
Copyright © Leutron Vision
360
Leutron
Vision
PicSight-GigE user manual
Specification
Technical specifications for the “smart” models
PicSight P83B-Smart502
Spectral sensitivity
Monochrome/color
bayer pattern
Output image resolution (H×V) 1032 × 776 pixels
Full sensor resolution (incl. black 1077 × 788 pixels
pixels)
Frame rate
32.5 fps
Video format
12-bit, single tap
Scanning
progressive
Pixel size (H×V)
4.65 × 4.65 μm
Sensor size (H×V)
5.8 × 4.92 mm
Shutter
global, 5 μs –60000 ms (default 30 ms)
Operating (trigger) modes
• Free running
• Triggered mode
• Long range exposure mode
Gain & black level
• Analog gain: -8 .. 28 dB (default 16 dB)
• Digital gain: n/a
• Black level: 0 .. 25.5 DN (default 0 DN)
Auto functions
n/a
Area of interest (AOI)
Vertical AOI applicable directly at the sensor
Binning
n/a
Decimation
n/a
Mount
C-mount (CS-mount on request)
Dimension
• 44.8×31.4×91.7 mm (W×H×L, without connectors) — standard
version
• 44.8×37.56×96.0 mm (W×H×L, without connectors) — right
angle version
Weight
145 g
Power input
10-26V/5W
Copyright © Leutron Vision
361
Leutron
Vision
PicSight-GigE user manual
Technical specifications for the “smart” models
Specification
PicSight P83B-Smart502
Ordering information
• 141602: PicSight P83B-Smart502-AS (PNX1502, 300MHz,
64MB-DDR, lens controller, Hirose/SDR-26 connector)
• 141603: PicSight P83B-Smart502-AS-H (PNX1502, 300MHz,
64MB-DDR, lens controller, Hirose/SDR-26 connector, 90º lens
mount)
• 141627: PicSight P83B-Smart502-PoE-S (PoE, PNX1502,
300MHz, 64MB-DDR, lens controller, Hirose/SDR-26 connector)
• 141628: PicSight P83B-Smart502-PoE-S-H (PoE, PNX1502,
300MHz, 64MB-DDR, lens controller, Hirose/SDR-26 connector,
90º lens mount)
Check latest price list or contact us to learn if more options are
available.
Table B.21. PicSight P83B-Smart502 technical specifications
B.22. PicSight P83M-Smart502
Specification
PicSight P83M-Smart502
Interface
Ethernet 1000/100/10 Mb/s
Smart technology
32-bit RISC VLIW processor PNX1502/300MHz, 64MB DDR2
RAM (128MB on newer and all currently delivered systems), 32MB
flash memory for user applications, real-time operating system,
C/C++ compiler, various APIs
Sensor
1/3" CCD, interline transfer, type SONY ICX204
Spectral sensitivity
Monochrome/color
monochrome
Output image resolution (H×V) 1032 × 776 pixels
Full sensor resolution (incl. black 1077 × 788 pixels
pixels)
Frame rate
32.5 fps
Video format
12-bit, single tap
Scanning
progressive
Pixel size (H×V)
4.65 × 4.65 μm
Sensor size (H×V)
5.8 × 4.92 mm
Shutter
global, 5 μs –60000 ms (default 30 ms)
Operating (trigger) modes
• Free running
• Triggered mode
• Long range exposure mode
Copyright © Leutron Vision
362
Leutron
Vision
PicSight-GigE user manual
Technical specifications for the “smart” models
Specification
PicSight P83M-Smart502
Gain & black level
• Analog gain: -8 .. 28 dB (default 14 dB)
• Digital gain: n/a
• Black level: 0 .. 25.5 DN (default 0 DN)
Auto functions
n/a
Signal/noise ratio
42 dB
Dynamic range
73 dB
Area of interest (AOI)
Vertical AOI applicable directly at the sensor
Binning
• Vertical: 2×
Decimation
n/a
Mount
C-mount (CS-mount on request)
Dimension
• 44.8×31.4×91.7 mm (W×H×L, without connectors) — standard
version
• 44.8×37.56×96.0 mm (W×H×L, without connectors) — right
angle version
Weight
145 g
Power input
10-26V/5W
Ordering information
• 140602: PicSight P83M-Smart502-AS (PNX1502, 300MHz,
64MB-DDR, lens controller, Hirose/SDR-26 connector)
• 140603: PicSight P83M-Smart502-AS-H (PNX1502, 300MHz,
64MB-DDR, lens controller, Hirose/SDR-26 connector, 90º lens
mount)
• 140627: PicSight P83M-Smart502-PoE-S (PoE, PNX1502,
300MHz, 64MB-DDR, lens controller, Hirose/SDR-26 connector)
• 140628: PicSight P83M-Smart502-PoE-S-H (PoE, PNX1502,
300MHz, 64MB-DDR, lens controller, Hirose/SDR-26 connector,
90º lens mount)
Check latest price list or contact us to learn if more options are
available.
Table B.22. PicSight P83M-Smart502 technical specifications
B.23. PicSight R132M-Smart502
Specification
PicSight R132M-Smart502
Interface
Ethernet 1000/100/10 Mb/s
Smart technology
32-bit RISC VLIW processor PNX1502/300MHz, 64MB DDR2
RAM (128MB on newer and all currently delivered systems), 32MB
flash memory for user applications, real-time operating system,
C/C++ compiler, various APIs
Sensor
1/2" CMOS, sequential readout, type Aptina MT9M001
Copyright © Leutron Vision
363
Leutron
Vision
PicSight-GigE user manual
Specification
Technical specifications for the “smart” models
PicSight R132M-Smart502
Spectral sensitivity
Monochrome/color
monochrom
Output image resolution (H×V) 1280 × 1024 pixels
Frame rate
30 fps
Video format
10-bit, single tap
Scanning
progressive
Pixel size (H×V)
5.2 × 5.2 μm
Sensor size (H×V)
6.66 × 5.32 mm
Shutter
rolling, 28 μs –520 ms (default 30 ms)
Operating (trigger) modes
• Free running
• Triggered mode
Gain & black level
• Analog gain: 0 .. 23.53 dB (default 14 dB)
• Digital gain: n/a
• Black level: -51.2 .. 51 DN (default 0 DN)
Auto functions
• Automatic black level
Signal/noise ratio
42 dB
Dynamic range
52 dB
Area of interest (AOI)
Horizontal and vertical AOI applicable directly at the sensor
Binning
n/a
Decimation
• Horizontal: 2× 4× 8×
• Vertical: 2× 4× 8×
Mount
C-mount (CS-mount on request)
Dimension
• 44.8×31.4×91.7 mm (W×H×L, without connectors) — standard
version
• 44.8×37.56×96.0 mm (W×H×L, without connectors) — right
angle version
Weight
145 g
Power input
10-26V/5W
Copyright © Leutron Vision
364
Leutron
Vision
PicSight-GigE user manual
Technical specifications for the “smart” models
Specification
PicSight R132M-Smart502
Ordering information
• 420602: PicSight R132M-Smart502-AS (PNX1502, 300MHz,
64MB-DDR, lens controller, Hirose/SDR-26 connector)
• 420603: PicSight R132M-Smart502-AS-H (PNX1502, 300MHz,
64MB-DDR, lens controller, Hirose/SDR-26 connector, 90º lens
mount)
• 420627: PicSight R132M-Smart502-PoE-S (PoE, PNX1502,
300MHz, 64MB-DDR, lens controller, Hirose/SDR-26 connector)
• 420628: PicSight R132M-Smart502-PoE-S-H (PoE, PNX1502,
300MHz, 64MB-DDR, lens controller, Hirose/SDR-26 connector,
90º lens mount)
Check latest price list or contact us to learn if more options are
available.
Table B.23. PicSight R132M-Smart502 technical specifications
B.24. PicSight R312AB-Smart502
Specification
PicSight R312AB-Smart502
Interface
Ethernet 1000/100/10 Mb/s
Smart technology
32-bit RISC VLIW processor PNX1502/300MHz, 64MB DDR2
RAM (128MB on newer and all currently delivered systems), 32MB
flash memory for user applications, real-time operating system,
C/C++ compiler, various APIs
Sensor
1/2" CMOS, sequential readout, type Aptina MT9T001
Spectral sensitivity
Monochrome/color
bayer pattern
Output image resolution (H×V) 2048 × 1536 pixels
Frame rate
12.77 fps
Video format
10-bit, single tap
Scanning
progressive
Pixel size (H×V)
3.2 × 3.2 μm
Sensor size (H×V)
6.5536 × 4.9152 mm
Shutter
rolling, 47 μs –520 ms (default 10 ms)
Operating (trigger) modes
• Free running
• Triggered mode
Gain & black level
• Analog gain: 0 .. 18.07 dB (default 18 dB)
• Digital gain: 0 .. 24.08 dB (default 0 dB)
• Black level: -51.2 .. 51 DN (default 0 DN)
Copyright © Leutron Vision
365
Leutron
Vision
PicSight-GigE user manual
Technical specifications for the “smart” models
Specification
PicSight R312AB-Smart502
Auto functions
• Automatic black level
Signal/noise ratio
43 dB
Dynamic range
61 dB
Area of interest (AOI)
Horizontal and vertical AOI applicable directly at the sensor
Binning
• Horizontal: 2× 3×
• Vertical: 2× 3×
Decimation
• Horizontal: 2× 3× 4× 8×
• Vertical: 2× 3× 4× 8×
Mount
C-mount (CS-mount on request)
Dimension
• 44.8×31.4×91.7 mm (W×H×L, without connectors) — standard
version
• 44.8×37.56×96.0 mm (W×H×L, without connectors) — right
angle version
Weight
145 g
Power input
10-26V/5W
Ordering information
• 441602: PicSight R312AB-Smart502-AS (PNX1502, 300MHz,
64MB-DDR, lens controller, Hirose/SDR-26 connector)
• 441603: PicSight R312AB-Smart502-AS-H (PNX1502, 300MHz,
64MB-DDR, lens controller, Hirose/SDR-26 connector, 90º lens
mount)
• 441627: PicSight R312AB-Smart502-PoE-S (PoE, PNX1502,
300MHz, 64MB-DDR, lens controller, Hirose/SDR-26 connector)
• 441628: PicSight R312AB-Smart502-PoE-S-H (PoE, PNX1502,
300MHz, 64MB-DDR, lens controller, Hirose/SDR-26 connector,
90º lens mount)
Check latest price list or contact us to learn if more options are
available.
Table B.24. PicSight R312AB-Smart502 technical specifications
B.25. PicSight R502B-Smart502
Specification
PicSight R502B-Smart502
Interface
Ethernet 1000/100/10 Mb/s
Smart technology
32-bit RISC VLIW processor PNX1502/300MHz, 64MB DDR2
RAM (128MB on newer and all currently delivered systems), 32MB
flash memory for user applications, real-time operating system,
C/C++ compiler, various APIs
Sensor
1/2.5" CMOS, sequential readout, type Aptina MT9P031
Copyright © Leutron Vision
366
Leutron
Vision
PicSight-GigE user manual
Specification
Technical specifications for the “smart” models
PicSight R502B-Smart502
Spectral sensitivity
Monochrome/color
bayer pattern
Output image resolution (H×V) 2592 × 1944 pixels
Frame rate
11.7 fps
Video format
12-bit, single tap
Scanning
progressive
Pixel size (H×V)
2.2 × 2.2 μm
Sensor size (H×V)
5.702 × 4.277 mm
Shutter
rolling, 39 μs –55000 ms (default 10 ms)
Operating (trigger) modes
• Free running
• Triggered mode
• Global reset mode
Gain & black level
• Analog gain: 0 .. 18.06 dB (default 0 dB)
• Digital gain: 0 .. 24.08 dB (default 0 dB)
• Black level: 0 .. 2.55 DN (default 0 DN)
Auto functions
• Automatic black level
Signal/noise ratio
38 dB
Dynamic range
70 dB
Area of interest (AOI)
Horizontal and vertical AOI applicable directly at the sensor
Binning
• Horizontal: 2× 4×
• Vertical: 2× 4×
Decimation
• Horizontal: 2× 3× 4× 5× 6× 7×
• Vertical: 2× 3× 4× 5× 6× 7× 8×
Mount
C-mount (CS-mount on request)
Dimension
• 44.8×31.4×91.7 mm (W×H×L, without connectors) — standard
version
• 44.8×37.56×96.0 mm (W×H×L, without connectors) — right
angle version
Weight
145 g
Power input
10-26V/5W
Copyright © Leutron Vision
367
Leutron
Vision
PicSight-GigE user manual
Technical specifications for the “smart” models
Specification
PicSight R502B-Smart502
Ordering information
• 451602: PicSight R502B-Smart502-AS (PNX1502, 300MHz,
64MB-DDR, lens controller, Hirose/SDR-26 connector)
• 451603: PicSight R502B-Smart502-AS-H (PNX1502, 300MHz,
64MB-DDR, lens controller, Hirose/SDR-26 connector, 90º lens
mount)
• 451627: PicSight R502B-Smart502-PoE-S (PoE, PNX1502,
300MHz, 64MB-DDR, lens controller, Hirose/SDR-26 connector)
• 451628: PicSight R502B-Smart502-PoE-S-H (PoE, PNX1502,
300MHz, 64MB-DDR, lens controller, Hirose/SDR-26 connector,
90º lens mount)
Check latest price list or contact us to learn if more options are
available.
Table B.25. PicSight R502B-Smart502 technical specifications
B.26. PicSight R502M-Smart502
Specification
PicSight R502M-Smart502
Interface
Ethernet 1000/100/10 Mb/s
Smart technology
32-bit RISC VLIW processor PNX1502/300MHz, 64MB DDR2
RAM (128MB on newer and all currently delivered systems), 32MB
flash memory for user applications, real-time operating system,
C/C++ compiler, various APIs
Sensor
1/2.5" CMOS, sequential readout, type Aptina MT9P031
Spectral sensitivity
Monochrome/color
monochrome
Output image resolution (H×V) 2592 × 1944 pixels
Frame rate
11.7 fps
Video format
12-bit, single tap
Scanning
progressive
Pixel size (H×V)
2.2 × 2.2 μm
Sensor size (H×V)
5.702 × 4.277 mm
Shutter
rolling, 39 μs –55000 ms (default 10 ms)
Operating (trigger) modes
• Free running
• Triggered mode
• Global reset mode
Gain & black level
• Analog gain: 0 .. 18.06 dB (default 0 dB)
• Digital gain: 0 .. 24.08 dB (default 0 dB)
• Black level: 0 .. 2.55 DN (default 0 DN)
Copyright © Leutron Vision
368
Leutron
Vision
PicSight-GigE user manual
Technical specifications for the “smart” models
Specification
PicSight R502M-Smart502
Auto functions
• Automatic black level
Signal/noise ratio
38 dB
Dynamic range
70 dB
Area of interest (AOI)
Horizontal and vertical AOI applicable directly at the sensor
Binning
• Horizontal: 2× 4×
• Vertical: 2× 4×
Decimation
• Horizontal: 2× 3× 4× 5× 6× 7×
• Vertical: 2× 3× 4× 5× 6× 7× 8×
Mount
C-mount (CS-mount on request)
Dimension
• 44.8×31.4×91.7 mm (W×H×L, without connectors) — standard
version
• 44.8×37.56×96.0 mm (W×H×L, without connectors) — right
angle version
Weight
145 g
Power input
10-26V/5W
Ordering information
• 450602: PicSight R502M-Smart502-AS (PNX1502, 300MHz,
64MB-DDR, lens controller, Hirose/SDR-26 connector)
• 450603: PicSight R502M-Smart502-AS-H (PNX1502, 300MHz,
64MB-DDR, lens controller, Hirose/SDR-26 connector, 90º lens
mount)
• 450627: PicSight R502M-Smart502-PoE-S (PoE, PNX1502,
300MHz, 64MB-DDR, lens controller, Hirose/SDR-26 connector)
• 450628: PicSight R502M-Smart502-PoE-S-H (PoE, PNX1502,
300MHz, 64MB-DDR, lens controller, Hirose/SDR-26 connector,
90º lens mount)
Check latest price list or contact us to learn if more options are
available.
Table B.26. PicSight R502M-Smart502 technical specifications
Copyright © Leutron Vision
369
Leutron
Vision
PicSight-GigE user manual
Contacting Leutron Vision
Contacting Leutron Vision
Headquarters (Switzerland)
Address: Industriestrasse 57, CH-8152, Glattbrugg, Switzerland
Phone: ++41 44 809 88 22
Fax: ++41 44 809 88 29
E-mail (sales): <[email protected]>, e-mail (support): <[email protected]>
1
Web: www.leutron.com
Germany
Address: Macairestrasse 3, D-78467 Konstanz, Germany
Phone: ++49 7531 59 42 0
Fax: ++49 7531 59 42 99
E-mail (sales): <[email protected]>, e-mail (support): <[email protected]>
2
Web: www.leutron.com/de/
Other countries
3
Customers residing in other countries should have a look at the list of our representatives for a
distributor in their country. If no distributor exists in their country, they should contact the
headquarter office directly.
Useful links
4
• To download software, documentation and other stuff, please visit our download area .
5
• Get more information about our support . If you need to return some (defective) material to
6
Leutron Vision, please visit the Return Material Authorization (RMA) page .
7
• Get information about prices and ordering .
8
• Find out detailed information about our hardware and software product range .
1
http://www.leutron.com/
http://www.leutron.com/de/
3
http://www.leutron.com/sales-contact/
4
http://www.leutron.com/support-downloads/download-area/
5
http://www.leutron.com/support-downloads/
6
http://www.leutron.com/rma/client_id.php
7
http://www.leutron.com/price-request/
8
http://www.leutron.com/products-machine-vision-image-acquisition/
2
Copyright © Leutron Vision
370
Leutron
Vision