1
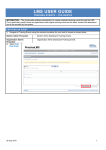
USER GUIDE ON WEBEX
Prepared by
Climate Finance Sub-programme
Finance, Technology and Capacity Building Programme
UNFCCC Secretariat
1
Table of Contents
A. System requirements…………………………………………………….. 3
B. Joining the webinar and setting up the audio/microphone
Microsoft Windows………………………………………………………. 4
Apple (Mac)………………………………………………………………. 9
C. Participating in the webinar
Microsoft Windows………………………………………………………. 14
Apple (Mac)………………………………………………………………. 17
D. Troubleshooting tips for audio/microphone
Windows XP……………………………………………………………… 20
Windows 7………………………………………………………………... 22
Apple (Mac)………………………………………………………………. 25
2
A. System Requirements
1. Computer (Windows or Mac) with internet connection
o Wired internet connection is recommended as wireless internet can be unstable
especially with the video feeds.
o Attendee to this webinar should have admin rights to his or her computer, as it is
essential to install the necessary software to attend this webinar.
o The webinar platform is WebEx, which is an online seminar solution from Cisco.
Please refer to http://www.webex.com/ for more information on WebEx.
o Connection through smartphones or tablet PCs will not be supported in this webinar.
2. Stereo headset with built-in microphone
o We STRONGLY recommend the user to prepare a headset with built-in microphone
for this webinar. Without the headset it is very easy to get echoing noises, which may
seriously undermine the overall quality of the webinar.
3. System administrator’s on-site support
o We STRONGLY recommend that the attendees consult with their system
administrator ahead of time, especially on the audio/microphone configurations and
admin rights for software installation.
o Please also consult with your system administrator on the firewall issues. Most of the
organizations have tight security regulation and you may be prevented or blocked
from connecting to the webinar.
o UNFCCC secretariat will not be able to provide any technical support on the attendees’
computer or network settings before or during the webinar.
3
B. Joining the webinar – Microsoft Windows computers
1. If you click the link in the invitation email at the time of the webinar, a new screen like below will be
displayed.
2. Please type in your full name and email address in the fields, and click the “Join Now” button.
4
3. You may be prompted with system warnings and/or questions asking if you will install WebEx software.
CLICK YES TO ALL AND AUTHORIZE THE DOWNLOAD AND INSTALLATION.
IMPORTANT NOTE: Firewall in your organization or internet service provider may prevent you from
installing the software on your computer. If you have any problem in installing the software, please
consult your system administrator to authorize this process on your computer. Without the WebEx
software installed in your computer, you won’t be able to participate in the webinar.
4. If you have successfully installed the WebEx software, the screen below will pop-up and WebEx will
run soon. If it doesn’t, close your browser completely and try again from step 1 above.
5
Setting up the audio/microphone – Microsoft Windows computers
1. Once you have successfully joined the webinar, screen below will be displayed soon, and it will ask you
if you wish to participate in the voice conference. Click YES.
2. Speaker/Microphone Audio Test box will automatically pop up.
If the above box does not automatically pop up, you may manually open it by clicking on the
Communicate menu on the top, and select Speaker/Microphone Audio Test.
6
3. To check your sound, click on the TEST button. You should be able to hear the test sound in your
headset. Adjust the volume bar to an appropriate level so that you can hear clearly.
4. To check your microphone, try speaking into the microphone on your headset. The green bar on the
bottom should move at least to the middle of the range.
IMPORTANT: Please make sure that you use a headset with microphone for this webinar. Without the
headset it is very easy to get echoing noises, which can undermine the overall quality of the webinar.
7
5. Click OK if both tests have been successful. If you didn’t hear anything from your headphone or if the
microphone did not respond, please refer to page 20-24 of this manual to troubleshoot the problem.
6. You will now see the screen below with a small Volume box (if you do not see it, you can bring up the
box by pressing Ctrl+Shift+V). Ensure the volume levels are adjusted to an appropriate level.
NOTE: If you are an attendee to this webinar, you will be automatically on mute when you join. When the cochairs invite attendees for discussion, the secretariat will unmute the corresponding attendee and yield the floor.
8
Joining the webinar – Apple (Macintosh) computers
1. If you click the link in the invitation email at the time of the webinar, a new screen like below will be
displayed.
2. Please type in your full name and email address in the fields, and click the “Join Now” button.
9
3. You may be prompted with this message that you have to install WebEx Add-On software. Click
Download and Install Add-On and authorize the download and installation.
IMPORTANT NOTE: Firewall in your organization or internet service provider may prevent you from
installing the software on your computer. If you have any problem in installing the software, please
consult your system administrator to authorize this process on your computer. Without the WebEx
software installed in your computer, you won’t be able to participate in the webinar.
4. If you have successfully installed the WebEx software, the webinar screen like below will appear soon.
If it doesn’t, close your browser completely and try again from step 1 above.
10
Setting up the audio/microphone – Apple (Macintosh) computers
1. Once you have successfully joined the webinar, screen below will be displayed soon, and it will ask you
if you wish to participate in the voice conference. Click YES.
2. Speaker/Microphone Audio Test box will automatically pop up
If the above box does not automatically pop up, you may manually open it by clicking on the
Communicate menu on the top, and select Speaker/Microphone Audio Test.
11
3. To check your sound, click on the TEST button. You should be able to hear the test sound in your
headset. Adjust the volume bar to an appropriate level so that you can hear clearly.
4. To check your microphone, try speaking into the microphone on your headset. The blue bar on the
bottom should move at least to the middle of the range.
IMPORTANT: Please make sure that you use a headset with microphone for this webinar. Without the
headset it is very easy to get echoing noises, which can undermine the overall quality of the webinar.
12
5. Click OK if both tests have been successful. If you didn’t hear anything from your headphone or if the
microphone did not respond, please refer to page 25 of this manual to troubleshoot the problem
6. You will now see the screen below with a small Volume box (if you do not see it, you can bring up the
box by pressing Cmd+Shift+V). Ensure the volume levels are adjusted to an appropriate level.
NOTE: If you are an attendee to this webinar, you will be automatically on mute when you join. When the cochairs invite attendees for discussion, the secretariat will unmute the corresponding attendee and yield the floor.
13
C. Participating in the webinar – Microsoft Windows computers
1. If you have successfully joined the webinar and set up the audio/microphone, you will see the screen
below. Click on the Participants on the right upper side.
2. You will now see two boxes on the right side: Participants box on the top will show you the list of
Panelists (the co-chairs and the UNFCCC secretariat) and Attendee (yourself). You will find that you
have been muted as default. The secretariat will unmute you when the co-chairs invite the attendees for
their comments.
14
3. The Chat box is where you can interact with the UNFCCC secretariat, if you face any technical
difficulty. Please make sure you send your chat to All Panelists.
4. How to request for the floor
a. Click on the Raise hand button under the Participants box to raise your hand. Your request will be
displayed on co-chairs’ screen in chronological order.
b. During the discussions, the co-chairs will verbally invite you to take the floor by calling out your name.
15
c. UNFCCC secretariat will unmute you so that you may speak into your microphone. You will see the
color of microphone button and headphone icon change as shown below.
NOTE: Please consult with your system administrator to make sure your headset functions properly. If your
microphone does not work or if you experience any technical difficulty, you may send your comments through
Chat box. Just type in your comments and send them to the All Panelists.
d. Please make sure you lower your hand once you’re done, by clicking on the Raise hand button again.
5. To bring up Participants box and Chat box while sharing a Powerpoint slide
When the co-chairs are sharing a Powerpoint slide, the Participants box and the Chat box will be
disappeared. You can bring them up by clicking on the respective icons, as shown below.
16
Participating in the webinar – Apple (Macintosh) computers
1. If you have successfully joined the webinar and set up the audio/microphone, you will see the screen
below. Click on the Participants icon on the right bottom side.
2. You will now see two boxes on the right side. Participants box on the top will show you the list of
Panelists (the co-chairs and the UNFCCC secretariat) and Attendee (yourself). You will find that you
have been muted as a default. The secretariat will unmute you when the co-chairs invite the attendees for
their comments.
17
3. The Chat box is where you can interact with the UNFCCC secretariat, if you face any technical
difficulty. Please make sure you send your chat to All Panelists.
4. How to request for the floor
a. Click on the Raise hand button under the Participants box to raise your hand. Your request will be
displayed on co-chairs’ screen in chronological order.
b. During the discussions, the co-chairs will verbally invite you to take the floor by calling out your name.
c. UNFCCC secretariat will unmute you so that you may speak into your microphone. You will notice the
color of two icons change.
NOTE: Please consult with your system administrator to make sure your headset functions properly. If your
microphone does not work or if you experience any technical difficulty, you may send your comments through
Chat box. Just type in your comments and send them to the All Panelists.
18
d. Please make sure you lower your hand once you’re done, by clicking on the Raise hand button again.
5. To bring up Participants box and Chat box while sharing a Powerpoint slide
When the co-chairs are sharing a Powerpoint slide, the Participants box and the Chat box will be
disappeared. You can bring them up by click on the respective icons as shown below.
19
D. Troubleshooting tips for Speaker/Microphone (For Windows XP)
1. Double click on the
icon on the right-bottom corner of your screen. Volume Control screen will
pop-up. Please ensure all volume levels are adjusted properly, and nothing is muted. This will ensure the
sound from the speakers.
2. Go to Options, and select Properties.
3. A Properties box will pop up (if there is any unchecked box on the bottom, check them and ensure their
volumes are also adjusted to appropriate levels).
20
4. Click on the Recording, and ensure all boxes on the bottom are checked. Click OK.
5. The Volume Control will turn into Recording Control. Select each microphone option by clicking on
the Select box, and test the mic to see if the green bar on the WebEx software moves.
6. The procedure above should solve any audio issue that you may be experiencing with your headset.
Please refer to the following Youtube video, which visually presents the troubleshooting procedure.
http://youtu.be/zkl8WRWmdPU
7. If you are still experiencing problem, please consult with your system administrator for further
troubleshooting.
21
Troubleshooting tips for Speaker/Microphone (For Windows Vista/7)
1. Double click on the
icon on the right-bottom corner of your screen. Volume Control screen will
pop-up. Please ensure all volume levels are adjusted properly, and nothing is muted. This will ensure the
sound from the speakers.
2. Go to your system’s Control Panel and select Sound.
22
3. A Sound box will pop up. Ensure your audio device is enabled in this box.
4. Click on the Recording tab on the top, and you will get the screen below. Ensure your preferred
microphone has been enabled.
23
5. Double click on the microphone, and go to Levels tab. Ensure your microphone level is adjusted to an
appropriate level.
6. Test if the microphone level on the WebEx software moves.
7. The procedure above should solve any audio issue that you may be experiencing with your headset.
Please refer to the following Youtube video, which visually presents the troubleshooting procedure.
http://youtu.be/FeUPrHCkI28
8. If you are still experiencing problem, please consult with your system administrator for further
troubleshooting.
24
Troubleshooting tips for Speaker/Microphone (For Apple computers)
1. Open System Preferences and click on Sound.
2. Select Input tab and check if correct device has been selected as your microphone. Also, check if the
level of Input Volume is appropriate and if the blue bar moves as you speak into your microphone.
3. The procedure above should solve any audio issue that you may be experiencing with your headset. If
you are still experiencing problem, please consult with your system administrator for further
troubleshooting.
25