1
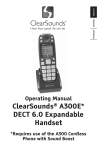
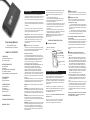
PRIOR TO USE
Congratulations on your purchase of the QLINK Bluetooth
Transmitter from ClearSounds Communications®. Please read
this User Manual carefully in order to get the best use out of
your new accessory. Keep this manual safe for easy reference.
Please visit our website at www.clearsounds.com to register
your product, download additional manuals and review troubleshooting tips.
Be sure to save your sales receipt as your proof of purchase
should you need warranty service. The serial number for this
product is located on the backside of the unit.
Operating Manual
ClearSounds® QLINK
Bluetooth Stereo Transmitter
TABLE OF CONTENTS
PRIOR TO USE
Pg. Important Safety Instructions
Pg. Location of Controls
INTRODUCTION & SET UP
Pg. Parts checklist
Pg. Charging
Pg.Pairing to the ClearSounds® QUATTRO
Pg. Attaching to a Television
Pg.Attaching to MP3 or other Sound Output Device
RE-CONNECTING
Pg.Out of Range
Pg.Device Powered Off
OTHER FUNCTIONS
Pg.Power On and Off
Pg. Resetting
Pg.Power Saving Mode
Pg.Dual Connection
TROUBLESHOOTING
TECHNICAL SPECIFICATIONS
WARRANTY POLICY
Warranty Service – This product is designed to provide years
of quality service. However, if there is a malfunction and the
troubleshooting recommendations on page do not resolve the
problem, follow the warranty procedure on page. It is very
important to read the following section on handling the
connecting cable.
The QLINK Bluetooth Transmitter has been designed to give
you years of dependable service. To ensure the utmost in
performance, follow these guidelines in caring for your
QLINK:
1.Avoid dropping or knocking the unit.
2.Always unplug the QLINK by grasping the 3.5mm plug.
Never unplug the QLINK by grasping and pulling on the
QLINK or the connecting wire.
3.Your QLINK comes with a built-in battery that never needs
to be replaced. Do not open the unit or attempt to remove or
replace the battery as this will damage the unit and void
your warranty.
4.Do not clean with harsh chemicals, cleaning solvents or
abrasive detergents. To clean, wipe with a soft cloth slightly
dampened in a mild soap-and-water solution.
IMPORTANT: YOUR RECEIPT IS PART OF YOUR WARRANTY AND
MUST BE RETAINED AND PRODUCED IN THE EVENT OF A
WARRANTY CLAIM.
PLEASE SAVE THESE INSTRUCTIONS
█
LOCATION OF CONTROLS
█
IMPORTANT SAFETY INSTRUCTIONS
This product is a mobile solution built on Bluetooth technology.
Please read and understand the Installation Guide and User
Manual before using your QLINK Transmitter.
QLINK Connecting Cable
The short cable from the QLINK to the 3.5mm stereo plug is
reinforced inside the QLINK but it is not indestructible. Always
unplug the 3.5mm plug by grasping the plug. DO NOT pull the
plug out by grasping the wire or the QLINK. You will put
excessive strain on the wire and can damage the wire and
internal connections and void your warranty.
Electromagnetic Interference/Compatibility: Nearly every
electronic device is susceptible to electromagnetic
interference (EMI) if inadequately shielded, designed, or
otherwise configured for electromagnetic compatibility.
Facilities: To avoid electromagnetic interference and/or
compatibility conflicts, turn off your QLINK in any facility where
posted notices instruct you to do so. Hospitals or health care
facilities may be using equipment that is sensitive to external
RF energy.
Aircraft: When instructed to do so, turn off your device when
on board an aircraft. Any use of a device must be in accordance
with applicable regulations per airline crew instructions.
WARNING: Use only the power supply indicated in the User's
Manual.
WARNING: To avoid the possibility of electrical shock, do not
use this product near water (For example, near a bathtub, wash
basin, kitchen sink or laundry tub, in a wet basement or near a
swimming pool) while in the bathtub or shower or when you are
wet.
WARNING: Avoid using the unit during electrical storms. There
may be a remote risk of electric shock from lightning. If the
electrical storm is present in your immediate area, possibility of
electrical shock exists.
WARNING: Occasionally a power surge can occur on electrical
lines without warning. With any electrical device that you plug
into an outlet, it is suggested you use a surge protector. A
surge protector will prevent power surges from damaging your
phone. Surge protectors are simple devices available at your
local hardware store.
USB Connector for AC Adapter
█ PARTS CHECKLIST
Check the contents of the box - The QLINK should contain:
QLINK Transmitter, AC Charger, RCA Cable & User Manual
█ CHARGING THE QLINK
Before using your QLINK for the first time, you need to
charge its self-contained Li-Polymer battery for 3 hours.
Using the AC Power Supply
1. Connect the USB cable into the charging port of the
QLINK then connect the other end into a standard AC wall
outlet. When you plug the QLINK into the charger, the red
light will go on.
2. The QLINK is fully charged when the red light goes
out. After a full charge, remove the charger from the wall
outlet and detach the USB cable from the unit.
NOTE: DURING CHARGING, YOU CAN CONTINUE TO
USE THE QLINK.
When your QLINK is low on power, the red light will begin to
flash until it is plugged into the charger or has no power. The
QLINK will turn off automatically once power is drained.
Simply charge the unit by following the instructions above.
Intermittent sound may also be an indication of a low
battery.
Restoration Key
█
On/Off Button & Multi
Function Button (MFB)
Stereo Audio Input Outlet
(3.5mm)
INTRODUCTION & SET UP
Bluetooth is a specification for short-range radio links
between mobile computers, mobile phones, digital cameras
and other portable devices. The radio operates on the
globally available 2.45 GHz ISM 'free band', allowing users to
use “Bluetooth” equipment worldwide. The Bluetooth devices
communicate within a certain distance and do not need to be
in line of sight.
The QLINK is a Class 2 Bluetooth V2.1+EDR device. The
QLINK is only compatible with Bluetooth devices that support
A2DP. It is recommended that the QLINK be used with
v2.1+EDR Bluetooth devices.
Installation of your ClearSounds® QLINK Bluetooth Stereo
Transmitter is easy.
If at any time you have questions about your QLINK after
reading this manual, please contact our ClearSounds®
Customer Service Department at 1-800-965-9043.
PAIRING THE QLINK WITH THE QUATTRO
Execute this step immediately after charging the unit for
the first time.
1.Make sure the QLINK is fully charged and is turned OFF.
2.Make sure your QUATTRO is fully charged and is turned
OFF. Place your QUATTRO within 2-3 feet of the QLINK.
3.Press the On/Off Multi Function Button on the QLINK until
you see the Blue light and the Red light flashing at the
same time. This indicates the QLINK is in pairing mode.
4.Press the Multi Function Button on your QUATTRO and
hold for approx. 6 seconds until you see the Blue light and
the Red light flashing at the same time. This indicates the
QUATTRO is in pairing mode. (Refer to your QUATTRO
manual for additional pairing instructions.)
5.The QLINK will automatically search for the QUATTRO.
When the QLINK pairs successfully with the QUATTRO,
the Blue light on the QLINK will flash 5 times rapidly. Your
QUATTRO Blue light will also flash and you will hear a
beep.
6.Once the QLINK is paired to your QUATTRO, you can plug
the QLINK into the audio device such as your TV or MP3
player. See 'Connecting the QLINK' instructions below.
7.If pairing does not occur as expected, turn off both the
QLINK and the QUATTRO. Wait 10 seconds and repeat
the process.
Please Note: The QLINK can also pair to other Bluetooth
Compatible Headsets. Follow pairing instructions in
your headset operating manual.
█ ATTACHING THE QLINK TO YOUR
TELEVISION
Before attaching to your television, refer to your TV's
user manual for information on your TV's audio
output. The QLINK must be connected to an analog
audio out jack.
Attaching to a 3.5mm Headset Jack:
Plug the 3.5mm plug into the 3.5mm Headset Jack on
located on your TV. Refer to your TV User Manual for
location of the headset jack. The volume of the
headset jack will be controlled by the TV's volume
control unless the TV has independent controls for
the headset jack.
Once you've paired the QLINK and Quattro, you should not
need to repeat the pairing process when you want to reconnect.
█ POWER SAVING MODE
If the QLINK is out of range of your QUATTRO for more than 2
minutes, your QLINK will go into “Power Saving Mode” and
will turn-off automatically to conserve battery power. To reestablish the connection, return within range of your QLINK
Transmitter and press the On/Off Multi Function Button for 2
seconds until the Blue light flashes, then release.
█ OUT OF RANGE
Intermittent sound or silence is an indication that you have
moved out of range of the QLINK. The QLINK will continue to
search for the QUATTRO (or the last Bluetooth Headset the
QLINK was paired to). If the QUATTRO is turned on and is
within range of the QLINK, the QLINK will connect to the
QUATTRO automatically.
Low Battery Power
When the QLINK is switched on and battery power is low, the
light will flash RED every 5 seconds. For use with fixed
position devices like the TV, you can use the QLINK while
plugged into the power adapter and not be concerned that the
battery will have to be recharged.
RE-CONNECTING THE QLINK
If the QLINK can not find the QUATTRO because the
QUATTRO is either turned off or not within range, it will turn off
automatically.
█
Attaching to an Analog RCA Audio Out Jack:
1.Take the RCA Cable included in the package and
put the red plug into the matching red jack on the
TV and the white plug into the matching white jack
on the TV.
2.Take the QLINK and put the 3.5mm plug into the
black 3.5mm jack on the RCA cable.
Attaching to a Digital Coax or Digital Optical
Audio Out Jack:
In order to connect to this type of output jack, you
must purchase a digital to analog convertor. Please
contact a Customer Solutions Representative at 800965-9043 for more information if you do not have this
device.
1.Install the Digital to Analog Convertor following
that product's instructions.
2.Plug the QLINK directly into the 3.5mm jack on
the Digital to Analog Convertor.
█ ATTACHING THE QLINK TO YOUR MP3
PLAYER OR OTHER SOUND OUTPUT DEVICE
Simply plug the QLINK into the 3.5mm headset jack
on your audio device.
The QLINK is designed to be used with STEREO
devices. If you are attaching the QLINK to a mono
audio device you must use a 3.5mm mono to
stereo adapter.
Your QLINK and QUATTRO are now ready to be
used.
QLINK OR QUATTRO HAS BEEN TURNED OFF
If either the QLINK or QUATTRO have been powered off, you
will need to re-connect.
1.Make sure the QLINK is fully charged.
2.Make sure the QUATTRO is fully charged and turned on.
3.Place the QUATTRO within 2-3 feet of the QLINK.
4.Press and hold the On/Off Multi Function Button on the
QLINK for 2 seconds until the Blue light flashes and then
release.
5.The QLINK will automatically connect to the QUATTRO. If the
QLINK can not find the QUATTRO within 2 minutes, it will
turn off automatically. If this occurs, make sure both devices
are fully charged and within range of each other, then repeat
the process.
6.If they still do not re-connect, you may need to repeat the
pairing process. See Pairing the QLINK with the
QUATTRO.
Please Note: Follow the same instructions when using
other Bluetooth Compatible Headsets.
Intermittent sound may also be an indication that you have a
low battery.
█ DUAL CONNECTION
Your QUATTRO (or other Bluetooth Headset) may be
connected with the QLINK and your cell phone at the same
time and you may be able to answer your cell phone while
listening to the QLINK-connected audio device. Please visit
www.clearsounds.com or call 800-965-9043 for more
information.
TROUBLESHOOTING
If you are having difficulty connecting the QLINK with your
QUATTRO, check the following:
[
Ensure the QLINK has been paired with your QUATTRO
[
Ensure the QLINK is charged and has been turned ON
[
Ensure the QUATTRO is charged and is turned ON. Refer to
your QUATTRO User manual for more information on
charging and activating the QUATTRO.
[
Ensure the distance between the QLINK and the QUATTRO
is less than 30 feet and there is no obstruction such as walls
or other electronic devices between the units.
OTHER FUNCTIONS
█
POWER ON AND OFF
To turn the QLINK ON:
Press and hold the On/Off Multi Function Button located on the
top of the QLINK for 2 seconds. The light will flash blue and
search for available paired devices.
To turn the QLINK OFF:
Press and hold the Multi Function Button located on the front of
the QLINK for 3 seconds. The light will flash red for 1 second,
then the QLINK will switch off.
█ RESETTING THE QLINK
To reset the QLINK, press the Restoration Key when the unit is
ON. The QLINK will automatically turn off.
TECHNICAL SPECIFICATIONS
Bluetooth Specifications:
Profile:
Frequency:
Playing Time:
Dimension:
Weight:
Range:
Charging Time:
V2.1+EDR, Class 2
A2DP
2.4 GHz Spectrum
Up to 7 hours
2L x 1 W x .4H mm
.6 oz
Up to 30 feet
2-3 hours
LIMITED ONE-YEAR WARRANTY
The QLINK is warranted by ClearSounds against
manufacturing defect in material and workmanship under
normal use for one (1) year from the date of purchase. Should
you experience a problem, contact our customer service
department or visit our website at www.clearsounds.com.
Be sure to save your sale receipt as the proof of purchase
date should you need warranty service.
In the event that this product fails to function properly within
one year of the original purchase due to defects in materials
or workmanship, return the unit (freight prepaid) with proof
of purchase (sales receipt or packing slip, no exceptions) to
ClearSounds Communications. ClearSounds
Communications will either repair or replace the unit (with a
refurbished unit or unit of equal condition) and return it you
(using UPS/USPS ground shipping) at no cost to you. The
warranty replacement or repair will be warranted for a period
of 90 days or the remainder of the original warranty period
(from original purchase date); whichever is longer.
The warranty does not cover accidents, negligence or
breakage to any parts. This includes shipping damage,
failure to follow instructions, misuse, fire, floods, use of
incompatible accessories, Acts of God or damage to the
connecting wire due to excessive stress. The product must
not be tampered with or taken apart by anyone who is not an
authorized ClearSounds Communications® representative.
Tampering with the QLINK will void any written or implied
warranties.
If a defect covered by this warranty should occur, promptly
contact a Customer Service Representative by phone or log
onto www.clearsounds.com to obtain a Return Merchandise
Authorization number and shipping instructions before
shipping the product to us. Any shipment without a (RMA)
Return Merchandise Authorization number will not be
accepted and will be returned to you at your expense. All
authorized returned products must be accompanied with
proof of purchase and a brief explanation of the problem.
For out of warranty repairs and service, please contact our
Customer Service Department for instructions. The repair
shall be warranted for 90 days.
IMPORTANT: YOUR RECEIPT IS PART OF YOUR
WARRANTY AND MUST BE RETAINED AND PRODUCED
IN THE EVENT OF A WARRANTY CLAIM.
Service in United States and Canada, contact:
ClearSounds Communications®
Attention: Repair Center
1743 Quincy Avenue, Suite 155
Naperville, IL 60540
USA
800-965-9043
Check our website, www.clearsounds.com, for additional
information and to download additional manuals and
information.