Transcript
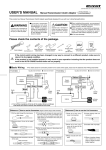
METER HOOD 60 “Multi-Purpose Type”
MH6 -U
(MH6-U As of July, 2014 No.3)
USER’S MANUAL
METER HOOD 60
Thank you for purchasing PIVOT METER HOOD 60 “Multi-Purpose Type” MH6-U.
Please read these instructions carefully before installing or using this device.
Please do not lose this user’s guide, as you will held liable for the cost of reissuing it.
Check
the contents
Hood ×1
(Flat Black Finishing)
Fastening Stays
×2
Tap Screws
×2
Nuts (small)・
Spring washers
×2
Bolts (large)
×2
Nuts (large)
×2
Double-sided
tapes ×2
Cushion
tape
User’s guide
If the hood gets dirty please wipe with a soft cloth to remove any dirt. Do not use chemical cleansers such as thinner, benzene, or alcohol.
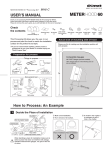
With just some double-sided tape, anyone can mount to
a flat surface such as a dashboard.
※ Simple processing is possible to match the mounting surface of
choice, but for curved surfaces use our “Processing Kit” .
1
2
Fastening the Hood
Installing with the Double-sided tapes (dashboard, etc.)
① With screws fasten the stays to
Decide the Place of Installation
① Make a trial installation.
② Try to choose a flat surface.
A-piller
② With a mild detergent or alcohol remove all dirt
and oil from the point of installation, lay the
wires down in the wire channels and fasten
down with the double-sided tape.
the holes.
Tap screw
On the meter hood
Dashboard
Place of
installation
Place of
installation
Tap
screw
Hole
Top of the
steering column cover
When deciding a place for installation make sure to select a
place that does not interfere with airbags, standard measurement gauges, nor gets in the line of vision.
Actual size of mounting side of hood
※For details about how to remove the A-pillar, see the maintenance guide for your model of car.
① Temporarily fasten the stays to the hood and for now fasten to
the location with double-sided tape.
Tap screw
Tap
screw
All PIVOT Gauges (current models)
Other Gauges that are of the following size can
also be installed:
Affix double-sided
tape to the bottom
of the stays and
fasten down
A-pillar
Stay
③ Remove the hood and tap
screws.
Tap screw
④ With the stays still
fastened remove the
A-pillar.
A-piller
Stay
74
ø 60
Remove
32 mm
Remove
Stay
Tap screw
Stay
Nut (large)
Fasten the supplied cushion tape to the
meter case and fix the meter hood.
The tap screws will make
ridges as they are being
screwed in, but if closed too tightly
they may not hold; if this happens
please use the nuts and washers
provided in
Tap screw
the kit to
securely
fasten.
Hole
Stay
PIVOT CORPORATION
Washer
Nut (small)
Tap screw
A-piller
When cutting away at the bottom of the hood to match the
shape of the installation surface please take note of the following.
Meter
ø3
Fasten the meter
to the meter hood
Cushion tape
⑧ As you are leading the
wires replace the A-pillar.
Stay
15°
3
Drill, etc.
⑦ Screw the hood back
onto the stays.
Bolt (large)
ss
⑤ Open holes for the
stays and for the
wiring (wire size) that
were made in ②.
Tap screw
⑥ Using the holes made in
⑤ fasten hood to the
stays with the screws.
or le
② With a marking
pen make a mark
for a wiring hole.
Hole
Hole
Compatible Gauges
Wire
Installing to the A-piller
Please use this for making sure the installation position will
work properly.
65
Clean to
remove
oil and dust
Stay
③ To install to the A-pillar it is
necessary to drill a hole in
the A-pillar.
Cutout for
wires
Double-sided
tapes
Hole
Side of
hood
Move the holes
up the same
amount that you
have cut away
Hole
Make sure not to cut
away too much so that
the bottom of the gauge
hits the installation point.
87-3, Shimookada Okada, Matsumoto-shi, Nagano, 390-0313 Japan
TEL0263-46-5901
If you have cut away the side of the hood,
make sure to reopen the screw holes for
the stays.
h ttp ://p i vo tj p.co m /