1
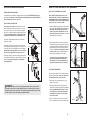
PROBLEM: The chest pulse sensor does not function properly
ASSEMBLY
SOLUTION: a. If the chest pulse sensor does not function properly, see CHEST PULSE SENSOR TROUBLESHOOTING on page 9.
Assembly requires two persons. Set the treadmill in a cleared area and remove all packing materials. Do not
dispose of the packing materials until assembly is completed.
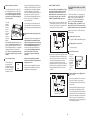
b. If the chest pulse sensor still does not function properly, the battery
should be changed. To replace the battery, first locate the battery
cover on the back of the sensor unit. Insert a coin into the slot in the
cover, and turn the cover counterclockwise to the “open” position.
Then, remove the cover.
Note: The underside of the treadmill walking belt is coated with high-performance lubricant. During shipping, a
small amount of lubricant may be transferred to the top of the walking belt or the shipping carton. This is a normal
condition and does not affect treadmill performance. If there is lubricant on top of the walking belt, simply wipe off
the lubricant with a soft cloth and a mild, non-abrasive cleaner.
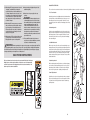
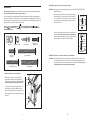
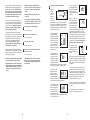
Assembly requires the included hex key
cutters
, and rubber mallet
hardware drawings below.
Battery Cover
and your own phillips screwdriver
, wire
. For help identifying the assembly hardware, see the
Next, remove the old battery from the sensor unit, and insert a new
CR 2032 battery, with the battery oriented so the writing on top.
Make sure that the rubber gasket is in place in the sensor unit. Then,
reinsert the battery cover and turn it to the closed position.
Nut (9)–2
b
Star Washer (77)–8
Short Console
Bolt (106)–2
Battery
Rubber
Gasket
Extension Leg
Bolt (130)–4
1” Screw (148)–4
Battery
Cover
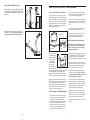
PROBLEM: The shock does not assist the lowering of the treadmill frame
Console Bolt (78)–2
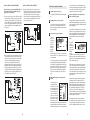
SOLUTION: a. Environmental factors such as cold temperatures can affect the performance of the shock. To restore shock performance, hold the ends of the frame near the endcaps firmly with both hands,
and carefully lower the frame to the floor and then raise it several times. To decrease the possibility of injury, bend your legs and keep your back straight.
Pulse Bar Bolt (33)–4
Wheel Bolt (94)–2
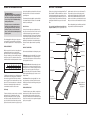
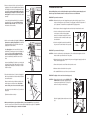
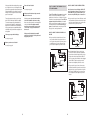
1. Make sure that the power cord is unplugged.
1
With the help of a second person, carefully tip the
treadmill onto its left side as shown. Partially fold the
Frame (110) so the treadmill is more stable. Do not fully
fold the treadmill until it is completely assembled.
Insert the two Extension Legs (102) into the base of the
Uprights (69); make sure that the Extension Legs are
turned so the Base Pads (99) are in the positions shown.
102
P
99
110
130
69
102
Attach each Extension Leg (102) with two Extension Leg
Bolts (130).
99
130
6
31