1
AH Series
AH-400 User's Manual
AH-400 Series User's Manual
Contents- (A) Machine
Chapter 1 Product Specifications ...................... A1
1-1 Appearance ................................................................................... A1
1-2 Basic Specifications..................................................................... A1
Chapter 2 Illustration of AH-400 Configuration ....... A3
2-1 Illustration of the Equipment ......................................................... A3
2-2 Illustration of the Programming Area ............................................ A4
2-3 Illustration of Circuit Distributors ................................................. A5
2-4 Illustration of Control Buttons ...................................................... A6
2-5 Loader and Unloader Systems ...................................................... A7
Ch a pte r 3 Installation & Replacement on The
Programmer Area ................................ A8
3.1 Programmer ......................................................................................... A8
3-1-1 Equipment Fixationg .................................................................... A8
3-1-2 Power Installation ......................................................................... A8
3-1-3 Air Source Installation ................................................................. A9
3-1-4 Programming Area Installation .................................................. A9
3-1-5 Loader/Unloader Module Installation ...................................... A11
3-1-6 Marker Position Adjustment ..................................................... A15
3-2 Boot Procedure ................................................................................. A16
3-3 Shutdown Procedure ....................................................................... A17
Ch a pte r 4 Installation & Replacement on The
Programmer Area .............................. A18
4-1 Programmer ....................................................................................... A18
4-2 Adapter Replacement ........................................................................ A18
4-3 Precissor Replacement ................................................................... A19
4-4 Pressbar Replacement ...................................................................... A19
4.5 Vacuum Nozzle Replacement ........................................................... A20
2
AH-400 Series User's Manual
Contents- (A) Machine
Chapter 5 Installation & Replacement For The Parts of
Electrical Box ....................................... A21
5.1 The Main Circuit Distribution Panel. ................................................. A21
5.2 The Control Loop Distribution Panel................................................ A23
5-3 The Vacuum Electromagnetic Valve Replacement ...................... A24
5-4 Electromagnetic Valve Replacement ............................................... A24
Chapter 6 Feeder Installation & Replacements .... A25
6-1 ATF Installation & Replacement ................................................. A25
6-2 ATR Installation .......................................................................... A28
Chapter 7 Taping Machine Replacement ............. A30
7-1 ATM-100 Use & Installation ......................................................... A30
7-2 MK-1 Adjustment ......................................................................... A33
Chapter 8 Simple Trouble Shootingt .................... A34
8-1 Power .......................................................................................... A34
8-2 Air Pressure ................................................................................ A34
8-3 Programmer ................................................................................. A34
3
AH-400 Series User's Manual
Contents- (B) Software
Chapter 1 Getting Started .................................. B1
1.1 Software Installation .................................................................... B2
1.2 Start the Software......................................................................... B6
Chapter 2 Operation Procedure ......................... B7
2.1 User Login ...................................................................................... B7
2.2 Order Manager Description ......................................................... B8
2.3 Production execution .................................................................. B20
2.4 Project Saving .............................................................................. B24
Chapter 3 System Setup ..................................... B37
3.1 System Setup Introduction ............................................................... B37
3.2 User's ID setting ................................................................................. B38
3.3 Other Settings .................................................................................... B40
3.4 System Settings ................................................................................. B41
3.4.1 Setting & Adjustment for Each Axis ....................................... B42
3.4.2 Test & Adjustment for each I/O..................................................... B70
3.5 Leave The System Setting Page .................................................... B78
Chapter 4 Message & Troubleshooting ................ B79
4.1 Message & Troubleshooting ........................................................ B79
4.1.1 Normal Message .............................................................. B80
4.1.2 Warning Message .................................................................... B81
4.1.3 Alarm Message ........................................................................ B82
4.1.4 Error Message3.5 Leave The System Setting Page .................. B89
Appendix ATM-100 Taping Machine ...................... B92
A1.1 Specifications ............................................................................ B92
A1.2 Operation ................................................................................... B93
A1.3 Maintenance .............................................................................. B95
4
AH-400 Series User's Manual
Chapter 1 Product Specifications
1-1 Appearance
1-2 Basic Specifications
Transmission
System
Throughput
UPH 1.5k
X axis ± 0.02mm Y axis ±0.05mm
Z axis ± 0.02mm
R axis 0.01°
X axis 200mm Y axis 550mm
Z axis 50mm
R axis 330°
Repeatability
Max. stroke
Pick & Place method
Multi vacuum nozzles
Component detection
Vacuum sensor
Dimensions
1400(H) x 1160(L) x 950(W) mm
Dimensions(including
ATM)
1400(H) x 1160(L) x 1400(W) mm
Net Weight
~300kg
A1
AH-400 Series User's Manual
Positioning
System
Programming
System
Positioning
Precissor Dimensions
Resident programmer
Socket site
Pin driver
Devices supported
Applicable packages
File formats supported
Communication
Safety
Tube-in
Tube-out
Loader/unloader
System
Tape-in
Operating
Requirements
QFN,SNT, LQFP64
INTEL HEX, MOTOROLA HEX, TEK
MEX, ASCII HEX, BINARY...
USB 2.0
CE compliant
150mil, 207mil, 300mil, 330mil
150mil, 207mil, 300mil, 330mil
Available for tape with 12~32mm tape
width
Press-sealing mode. Accept tape with
Tape-out
Control System
Precissor
max 30 x 30 mm
SU-6000 GANG-4 Programmer
2~16
40 universal pin drivers per set
EPROM, EEPROM, FLASH, MCU
SOP, SSOP, SON, TSSOP, MLP,
Operating system
Display
Data entry
Input voltage
Input line frequency
Power consumption
Air pressure
Air flow
A2
12~32mm
PC-based control with Windows XP
17" TFT LCD monitor
keyboard/mouse
AC200~245V, Single-phase, 3-wires
50/60Hz
1.5 KVA
0.6MPa(~6.0kg/ cm 2 )
32 liter/min.
AH-400 Series User's Manual
Chapter 2 Illustration of AH-400 Configuration
2-1 Illustration of the Equipment
1
7
8
2
9
3
4
5
10
6
1 Three-color indicator (Alarm)
2 Feeding area
3 Keyboard and mouse
4 Front door
5 Electric appliance front door
6 Carrier recycling area
7
8
Monitor
Control buttons
9 Unloading area (with optional maker)
10 Computer
A3
AH-400 Series User's Manual
2-2 Illustration of the Programming Area
● Front View
1
7
2
3
8
4
9
5
6
10
1 R0 axis
2
6 SOCKET site 5-6
X axis
7 Z0 axis
3 R1 axis
8 SOCKET site 1-2
4 IC programming failure
9 SOCKET site 3-4
recycling box
10 Safety sensor of front door
5 SOCKET site 7-8
3
4
5
1
6
2
7
1 SOCKET site 15-16
5 SOCKET site 9-10
2 SOCKET site 13-14
6 SOCKET site 11-12
3 Z1 axis
7 Safety sensor of back door
4 Z2 axis
A4
AH-400 Series User's Manual
2-3 Illustration of Circuit Distributors
● Main Circuit Distributor
5
1
2
6
3
7
8
4
9
1 Timer
6 R0 axis driver
2 Fuse
7 X axis driver
3 AC control circuit board
8 Breaker
4 Power supply
9 Magnetic switch
5 Relay
● Control Circuit Distributor
1
5
2
6
7
8
3
4
9
1 Relay
6 Z2 axis driver
2 DC control circuit board
7 R1 axis driver
3 814M0 terminal board
8 Z0 axis driver
4 814M1 terminal board
9 Z1 axis driver
5 I/O board
A5
AH-400 Series User's Manual
2-4 Illustration of Control Buttons
1
2
3
4
5
1 Emergency stop button
4 Start button
2 Power on button
5 Pause/Resume button
3 Power off button
A6
AH-400 Series User's Manual
2-5 Loader and Unloader Systems
● Loader System
(1) Automatic tape loader module
(FEEDER)
ATF-1
(2) Semiautomatic tube loader
module
STI-4-XXXkit
● Loader System
(1) Automatic tape unloader module
ATM-100
2. Semiautomatic tube unloader
module
STO-4-XXXkit
A7
AH-400 Series User's Manual
Chapter 3 Installation & Replacement on The
Programmer Area
3.1 Programmer
Before using the equipment, it should be fixed well and connected to the air source
and power. After inspecting all the accessories have been installed successfully, then
the power can be turned on to start the operation.
*.NOTE: Please make sure you have indeed followed the installation procedure and
have inspected each installation step carefully.
3-1-1 Equipment Fixation
nuts for fixed
nuts for adjusted
foodpads
After determining the location of the equipment, use a wrench to rotate the footpads
and to fix the associate nuts. If there is a need to adjust the height of the equipment,
release the fixed nuts first and then adjust the footpads.
3-1-2 Power Installation
While installing the power, use a 3-hole socket that supplies single-phase 220V
50/60Hz voltage and contains a ground line.
*.NOTE: In the absence of the same type of sockets, please contact us to assist in
the installation of power.
A8
AH-400 Series User's Manual
3-1-3 Air Source Installation
Use moisture-free and impurities-free gas as the air source. Since the air pressure
requirement of the equipment is 5-6 kg/cm², a stable pressure of 6 kg/cm² is
recommended.
3-1-4 Programming Area Installation
A. Programming Socket Sites
After connecting the flat cable of a programmer to a driver board, install it on the
equipment to match with the locating pins, and then lock it with the screws.
*.NOTE: The driver board should be indeed placed through the locating pins. Before
installing the socket, make sure whether the model is correct.
A9
AH-400 Series User's Manual
B. Press Modules
press bar
Remove the two screws of the left picture. Put on a press bar, and finally lock the
screws back.
*.NOTE: Before installation, make sure whether the press bar model matches with the
socket model.
C. Precissors
precissor
Remove the two screws of the left picture. Put on a precissor, and finally screw them
back.
*.NOTE: Before installation, make sure whether the precissor model matches with the
socket model.
A10
AH-400 Series User's Manual
D. Vacuum Nozzles
leaf springs
nozzle
Install the nozzle from the bottom of the nozzle shaft to the top. Then, clip the nozzle
with the leaf springs on the both sides of the nozzle.
*.NOTE: Make sure to rotate the inclined planes of the nozzle such that they match
with the leaf springs to fix.
E. IC Programming Failure Box
Put the IC programming failure box into its installation position.
*.NOTE: The IC programming failure box should be completely put on the desktop
flatly. Otherwise, the nozzle or shaft will be damaged if it collides with the IC
programming failure box while the equipment is running
3-1-5 Loader/Unloader Module Installation
A. ATF-1 Automatic Tape Loader Module (FEEDER)
Put the IC tape on the FEEDER, and then install the FEEDER into the feeding area.
A11
AH-400 Series User's Manual
Plug the FEEDER's connector into the “Feeder 1” socket location to complete the
installation.
B. RTF Automatic Carrier Recycling Module
IC carrier
For recycling the IC carrier, insert it into the recycling reel. After turning on the power,
the RTF module will automatically recycle the IC carrier.
*.NOTE: Adjust the speed of the RTF module to the position of 55. If the tape is too
tight, it will affect the stability of loading of FEEDER.
A12
AH-400 Series User's Manual
C. STI-4 Semiautomatic Tube Loader Module
Remove FEEDER module, and install the STI-4 onto the machine. Connect the power
line, the air pressure tube, and the COM1 cable to the machine to start the operation.
A13
AH-400 Series User's Manual
D. STO-4 Semiautomatic Tube Unloader Module
fixed plate
Fix the floor plate of the unloader module STO-4 to the machine. Adjust the IC
unloader to the proper place where the machine can correctly put ICs into the tubes.
Follow the direction to connect the power and air source. Then, adjust the controller
so that ICs will vibrate smoothly into the unloader tubes.
A14
AH-400 Series User's Manual
E. ATM-100 Automatic Tape Unloader Module
Install the tape unloader module ATM-100 to the machine and adjust it to the proper
place such that the machine can correctly put ICs into the tape. Then, turn on power.
3-1-6 Marker Position Adjustment
Adjust the location and depth of the marker.
A15
AH-400 Series User's Manual
3-2 Boot Procedure
Step 1:After connecting the power, switch the breaker to the “ON” position. Then,
the control buttons ON (green), Start (green), and Reset (yellow) will light
on, as shown in the following picture.
Step 2:Lift the protection cover of the ON button, and press it. Then, the light of the
ON button will turn off, and the light of OFF (red) button will turn on, as shown
in the following picture. This means that the main power is turned on.
Step 3:Connect the air source and push the manually actuated valve (blue slip ring) to
open air. Then, turn on the computer to complete the boot procedure.
manually
actuated
valve
A16
AH-400 Series User's Manual
3-3 Shutdown Procedure
Step 1:After the system has finished all its operations, power off the computer. Lift the
protection cover of the OFF button, and press it to turn off the main power.
Step 2:Switch the breaker to the “OFF” position to completely turn off the power.
Then, all the control buttons (ON, OFF, Start, and Reset) will light out.
Step 3:Close the air by pulling the manually actuated valve (blue slip ring) to complete
the shutdown procedure.
manually
actuated
valve
A17
AH-400 Series User's Manual
Chapter 4 Installation & Replacement on The
Programmer Area
4.1 Programmer
Fig 4-1: Programmer
4.2 Adapter Replacement
Fig 4-4: Adaptor
Dismantle the pressbar and take off the adapter. Please insert the adapter carefully.
A18
AH-400 Series User's Manual
4.3 Precissor Replacement
Fig 4-5: Precissor
We can change the precissor after remove the screw. Please take it in parallel way
carefully.
4.4 Pressbar Replacement
Fig 4-6: Pressbar
You can change the the pressbar after remove the screws. Please check if the
pressbar meet with the adapter and install it carefully.
A19
AH-400 Series User's Manual
4.5 Vacuum Nozzle Replacement
Fig 4-7: Vacuum Nozzle
After pull down and push the both side shrapnel, we can start the replacement.
A20
AH-400 Series User's Manual
Chapter 5 Installation & Replacement For The
Parts of Electrical Box
5.1 The Main Circuit Distribution Panel.
Fig 5-1: Main Circuit
If you would like to change the the AC distribution panel, please detach all of the
cables & parts, and loosen the 6 fixed screws.
Fig 5-2: distribution Panel
If the relay need change, please uproot. Please select the compliance of model of
DC24V.
Please note the direction.
A21
AH-400 Series User's Manual
Fig 5-3: Fuse
If the fuse burned, please remove the blue cover and do the exchange. Please select
the same specs fuse to avoid damage other parts
A22
AH-400 Series User's Manual
5.2 The Control Loop Distribution Panel
Fig 5-4: Motor Control Distribution panel
If the relay failure need to exchange, please uproot. And selection the same model for
exchange.
Fig 5-5: Relay
If the IO card failure, please loosen the 4 screws and detach. When you do the
exchange, please make sure that the IO card fixed holes are in conjunction with the
screw holes. Otherwise the IO card will be burned.
A23
AH-400 Series User's Manual
5.3 The Vacuum Electromagnetic Valve Replacement
Fig 5-6: Vacuum Electromagnetic Valve
Please detach the cable and loosen the 2 screws for replacement.
5.4 Electromagnetic Valve Replacement
Fig 5-7: Electromagnetic Valve set
Please detach the cable and loosen the 2 screws for replacement.
A24
AH-400 Series User's Manual
Chapter 6 Feeder Installation & Replacement
6.1 ATF Installation & Replacement
Fig 6-1: Feeder Holder
Please adjust the holders for matching the feeder of 12, 16, 24, 32mm bandwidth.
Fig 6-2: Installation Feeder
Please lift upward the handle (the red circle), move the front edge to the right place
and push down to fix it.
A25
AH-400 Series User's Manual
Fig 6-3: Feeder
Put the IC reel on the feeder. Put down the plate to fix.
Fig 6-4: Install the IC reel.
A26
AH-400 Series User's Manual
After IC reel go through the feeder, take the cover tape through the plate hole.
Fig 6-5: Fix IC reel
Install the IC reel on the drive gear and put the cover on.
Fig 6-6: Cover Tape
Put the cover tape on the recycle wheel. Connect the Feeder 1.
If you would like adjust the feeder position, please adjust the screws position as the fig
6.1.
A27
AH-400 Series User's Manual
6.2 ATR Installation
Fig 6-7: ATR
Please install the ATR on the right side of the machine as the left fig 6-7.
Fig 6-8: Installation
Tighten the screws, then, open the door and connect the power.
A28
AH-400 Series User's Manual
Fig 6-9: Installation
Install the carrier tape to the reel, power on for start recycle. Please adjust the speed
on 55. If too tight will influence to feeder Stability.
A29
AH-400 Series User's Manual
Chapter 7 Taping Machine Replacement
7.1 ATM-100 Use & Installation
Fig 7-1: Back Fixed Screws
Please remove the back fixed 3 screws for replacement.
Fig 7-2: Front Fixed Screws
After removing the front fixed 3 screws, you can start replacement.
A30
AH-400 Series User's Manual
Fig 7-3: Instal Carrier
Instal the carrier on the ATM-100 through the track. You can adjust the bandwidth.
Fig 7-4: Install Cover Tape
Stick the cover tape on the carrier, go through the press-handler to fixed the cover
tape and carrier.
Fig 7-5: Finish Installation
Install the carrier tape on the recycle wheel, power on to start the recycle.
A31
AH-400 Series User's Manual
Fig 7-6: Power on
After connecting the power cable and control cable, power on to start the movement.
2
A
B
1
If the position is not correct, please adjust the direction by the handler. After than,
please fix the the handler A by screw 1, handler B by screw 2.
A32
AH-400 Series User's Manual
7.2 MK-1 Adjustment
2
1
B
A
Fig 7-7: Adjust Position
If you would like to adjust the marking position. Please adjust the handler A&B. You
can screw the 1&2 for the handler A&B. You can connect the the pressure source and
control cable for start the movement.
A33
AH-400 Series User's Manual
Chapter 8 Simple Trouble Shooting
5-1 Power
1. After connecting the power, the power ON button does not turn on.
(1) Check whether the breaker of the main circuit distributor (Section 3-3) is on.
(2) Check whether the fuse of the main circuit distributor (Section 3-3) is burned
out.
2. The equipment cannot be turned off.
(1) Check whether the timer of the main circuit distributor (Section 3-3) is set too
long.
3. There are no responses to the keyboard or the mouse.
(1) Check whether the cables are connected to the computer properly.
4. There are no responses to the I/O points.
(1) Check whether the cable of the I/O board of the main circuit distributor
(Section 3-3) is connected to the main circuit distributor computer properly.
5-2 Air Press
1. There are no responses to the cylinder or the vacuum nozzle.
(1) Check whether the manually actuated valve is opened (Section 4-2).
(2) Check whether the barometer of air source (Section 4-1-3) is in the correct range
(5-6kg/cm2).
5-3 Programmer
1. There are no responses to programmers
(1) Check whether the power is turned on.
(2) Check whether the power of programmers is connected properly.
(3) Check whether the USB cable is connected properly (including the computer
site).
2. The failure rate of programming is too high.
(1) Check whether the cable is connected with the programming SOCKET (Section
4-1-4) properly.
(2) Check whether the press module has fully opened the programming SOCKET
(Section 4-1-4).
(3) Check whether the SOCKET is out of usable period.
A34
AH-400 Series User's Manual
Chapter 1 Getting Stared
1.1 Software Installation
This software is for the models of AH-200A, AH-400, AH-400A, AH-400B, AH-401.
When you need to install the software, please contact Leap to got the right versions.
They should be included:
1. Electronic control software, ah-400b_vX.XXX.zip, X.XXX is for the version.
2. Programmer conrol software, XXXXXXXX_SU-6000.exe, XXXXXXXX is for the
publish date.
Install the electronic control software:
1. 1. Double click the file. Start the install procedure.
Fig 1-1 Start the electronic control software
B1
AH-400 Series User's Manual
2. Click the model no.
Fig 1-2 Select the model
3. Key in the AH serial no..
Fig 1-3 Key in the serial no.
B2
AH-400 Series User's Manual
4. Select the destination location. Please use the default.
Fig 1-4 Select destination location
5. Confirm the Model no. and serial no..
Fig 1-5 Confirm the model no. and serial no..
B3
AH-400 Series User's Manual
6. Installing, please wait.
Fig 1-6 Installing
7. Click finish to complete.
Fig 1-7 Completing.
B4
AH-400 Series User's Manual
Then, instal the programmer control software. Click XXXXXX_SU-6000.exe The below
will show. Please select Yes. After completing, the window will close automatically.
Fig 1-8 Programmer location
Fig 1-9 Programmer installing.
B5
AH-400 Series User's Manual
1.2 Software Start
Power on the system. Power on the IPC. Enter the operation system, the below will
show.
Fig 1-10 : Software start
If can not start the software and show the below. Please contact Leap or the
distributors.
Fig 1-11 : Error message
The axis control card and I/O card quantity for each model are as below.
Model
AH200A
AH400
AH401
AH400A
Axis control card
2
2
2
2
2
I/O card
1
1
1
1
2
B6
AH400B
AH-400 Series User's Manual
Chapter 2 Operation Procedure
2.1 User Login
After starting the software, please enter your account and password. If account
and password are correct, the will light. Press it to login to project management
software. When you first login to the system, please use default account-Leaptronix
or (Administrator) and password-Leaptronix or (Administrator). After doing that please
set your personal account/password. And every character is case sensitive.
B7
AH-400 Series User's Manual
2.2 Order Manager Description
2.2.1 Column Description
After user login, the software will get in to Order Manager Screen. It is divided into
four regions. Each region will be explained as below.
B
A
C
D
圖2-1:四大區域分布
pic2-1 : four regions
Major function of four regions:
A. Project loading, action program of machine, save, import, export and control
panel
B. Project information and advanced setting, production volume,
action process selection, options.
C. Current production capacity (Unit Per Hour), production options.
D. The history of the current project's operation.
B8
AH-400 Series User's Manual
The 4 regions will be described as following :
Region A introduction
1
2
3
4
5
8
6
7
9
10
A
11
12
13
14
15
pic2-2 : Region A introduction
Column
Column name Description
1
User Name
User account name
2
Project Name
Show the project file path and file name.
3
IC Vender
Selected IC manufacturers of project file.
4
Part Number
Selected IC part number of project file.
5
Package
Selected IC package of project file.
6
CRC32
CRC32 Checksum of to be programmed data.
Due to NAND's lager capacity, it will be split according to the
data size. It may appear that more than two CRC32 Checksum.
7
procedure
Action procedure of the programmer in project file.
8
Quantity
Expected production volume
9
Tray Amount
When user uses the tray mode, it will automatically calculate the
production volume from tray.
10
Produce
Production mode: This part will be described later.
11
Save
Save parameters of each axle and production mode in the
project file.
12
IMPORT
According to the appointed location to load parameter file.
13
EXPORT
Save the current parameter file to user's appointed location.
14
Cancel
Leave the order manager screen back to the user login screen.
15
OK
After the user finish the parameter setting, and the programmer
is also normal. It will begin production project.
B9
AH-400 Series User's Manual
Region B introduction
B
1
2
3
4
5
6
7
8
9
10
11
12
pic2-3 : region B introduction
Column
Column name
1
Project
Display currently loaded project file name.
2
Description
Device
Shows selected IC brand and model in project file.
3
IC Sum
Shows IC SUM value in project file.
4
Procedure
5
Save & Back
6
Setting
7
Stop
8
Start
9
Target
10
Pass
The passed number and percentage from the completed quantity.
11
Fail
The failed number and percentage from the completed quantity.
12
Total
Shows the action procedure of the programmer in project file.
Leave the system settings page and return to current work page.
Switch from the current page to the system settings page.
To suspend production process while production.
The function is the same as "Reset" button in front of the machine.
Begin to produce in production process.
The function is the same as "start" button in front of the machine.
Shows the target number of production and completed percentage.
The number of production is based on the feed quantity.
Shows the current number which has been completely fed.
B10
AH-400 Series User's Manual
Region C Introduction
C
1
2
3
4
5
6
pic2-4 : Region Cintroductionintroduction
Column
Column name
1
UPH Pointer
Description
Shows the current capacity in the production process.
Divided into: feeding zone capacity, discharging zone
capacity and overall production capacity. The overall
production figure will show below the pointer.
2
Printing
3
Productivity calculation
4
Storage Status
Customer can close or open print function when system
shows print function during processing.
5
6
Programming time
Re-calculate the machine current capacity.
Save current on or off state of adapters.
Show the time during production process.
Programmer timeout handle When check this option, the system will be suspended
1 second for each action. In order to adjust machine
operation.
Region D Introduction
D
pic 2-5 : region D instruction
This region will record any malfunction of the software and any
adjustment.
B11
AH-400 Series User's Manual
2.2.2 Production mode selection
In Production mode selection, every button has its unique setting function
as pic2-6.We will explain the various functions as following.
pic2-6 : Production mode selection
Button
Button name
Button function
1
Tray Input Setup
Tray's related settings. The setting screen is the same as Tray Output setup.
2
Tray Output Setup
Tray's related settings. The setting screen is the same as Tray input setup.
(AH200, AH200A, AH400 are without this feature.)
(AH200, AH200A, AH400 are without this feature.)
3
Programming Setup
Programming-related settings, such as IC placement angle and Delay time.
4
Tape Input Setup
Set the interval of the IC feeding time and retry numbers.
5
Tape Output Setup
Set the interval of the IC discharging time and Pulse Width.
6
Print Setup
Set the interval of the printing time and Pulse Width.
The following will explain each button's function.
B12
AH-400 Series User's Manual
2.2.2.1 Tray Input Setup & Tray Output Setup
Tray input and output are the same function window.
1
2
3
5
6
4
7
8
9
10
pic2-7 : Tray Input Setup & Tray Output Setup
B13
AH-400 Series User's Manual
Code
Option name
1
Package &
Tray Type
Function
2
NEW
Add different type of tray by users.
3
Unit
Set the parameters of IC trays:
Select Package, it will reset all the parameters.
Select Tray Type , it will reset all the parameters except package.
C1 : IC number of Tray Row direction.
C2 : IC number of Tray Column direction.
CW : The length of Tray Row direction (unit: mm).
CH : The width of Tray Column direction (unit: mm).
4
Distance
(mm)
Set the IC and IC position in Tray, or IC and the edge of Tray position.
D1 : The center distance between IC and IC in Column direction.
(Unit: mm)
D2 : The center distance between IC and IC in Row direction.
(Unit: mm)
D3 : The distance between first IC center and the edge of Tray in Column
direction. (Unit: mm)
D4 : The distance between first IC center and the edge of Tray in Row
direction. (Unit: mm)
5
Height (mm) Set the height of IC placement in Tray.
H1 : The depth of the IC placement in Tray.
H2 : The total depth of the tray.
6
Times
7
Vacuum
8
OK
The amount of re-taking times when Z0 axis takes failure,
Whether use vacuum function when release IC (Default is recommended)
Select the timing to switch on vacuum generator, when absorb IC.
(Default is recommended)
Write current settings into parameter file and leave this page to last one.
9
Apply
Write current settings into parameter file and stay at this page
10
Cancel
Cancel current settings and leave this page to last one.
B14
AH-400 Series User's Manual
2.2.2.2 Programming Setup
Programming related parameter setting
1
2
4
5
6
3
7
8
9
10
11
pic2-8 : Programming Setup window
B15
AH-400 Series User's Manual
Code
Option name
Function
1
Operation
Select operation mode of automatic programmer. Include: "Single",
"Twin", "Rolling".
However, Twin and Rolling are special modes and locked.
2
Textool Mode
3
Angle
Select adapter mode. Include: "X1", "X2", and "X3".
However, X3 is special mode and locked.
Feeder In is the tank incline angle when Z0 axis is feeding in to
tank
Feeder Out is the tank incline angle when Z1 axis is feeding out
the tank.
Loader In is the tank incline angle when Z1 axis is discharging in
the tank.
Loader Out is the tank incline angle when Zo axis is discharging
out the tank.
4
Rolling Code Mode
Setting about Rolling, But the function is locked now.
5
Delay (ms)
Put IC Delay : The time from Z-axis are vacuumed to
Z-axis rising.
Socket Put IC Delay : The time from Z-axis are vacuumed to
Z-axis rising.
Get IC : The time from IC is vacuumed by Z-axis to Z-axis rising.
(Unit: ms)
PressBar Up Delay : The delay time of checking sensor when
Press Bar rises up.
PressBar Down Delay : The delay time of checking sensor when
Press Bar is down.
6
IC Height (mm)
7
Retry
8
Vacuum
H1 : Height of the IC, including the pins
H2 : Thickness of the IC
The retry time of Z-axis, when Z-axis fails in vacuuming IC on the
socket and Precissor.
Whether use vacuum function when release IC (Default is
recommended)
Select the timing to switch on vacuum generator, when absorb IC.
(Default is recommended)
9
OK
10
Apply
Write current settings into parameter file and stay at this page
11
Cancel
Cancel current settings and leave this page to last one.
Write current settings into parameter file and leave this page to
last one.
B16
AH-400 Series User's Manual
2.2.2.3 Tape Input Setup
1
2
3
4
5
6
7
pic2-9:Tape Input Setup Window
Code
Option name
1
Tape
Function
The quantity of operated Feeder. Click to turn on or off.
Need to turn on at least one Feeder when operating the machine.
2
Pulse
Feeder gun control signal, and the impulse width.
3
Times
The re-taking times if Z0 counters failure when absorb materials.
4
Vacuum
Whether use vacuum function when release IC (Default is
recommended)
Select the timing to switch on vacuum generator, when absorb IC.
(Default is recommended)
5
OK
Write current settings into parameter file and leave this page to last
one.
6
Apply
Write current settings into parameter file and stay at this page.
7
Cancel
Cancel current settings and leave this page to last one.
B17
AH-400 Series User's Manual
2.2.2.4 Tape Output Setup
1
2
3
4
5
6
pic2-10 : Tape Output Setup window
Code
Option name
1
Pulse Width
Setting the pulse width of the discharge end.
Function
2
Interval
Setting the interval time of the discharge end.
3
Vacuum
Whether use vacuum function when release IC (Default is
recommended)
Select the timing to switch on vacuum generator, when absorb IC.
(Default is recommended)
4
OK
5
Apply
Write current settings into parameter file and stay at this page.
6
Cancel
Cancel current settings and leave this page to last one.
Write current settings into parameter file and leave this page to last one.
2.2.2.5 Print Setup
1
2
3
4
5
pic2-11 : Print Setup window
Code
Option name
1
Pulse Width
2
Interval
Function
Setting the pulse width of the printing impulse.
Setting the interval time of printing.
3
OK
4
Apply
Write current settings into parameter file and stay at this page.
5
Cancel
Cancel current settings and leave this page to last one.
Write current settings into parameter file and leave this page to last one.
B18
AH-400 Series User's Manual
2.2.2.6 Tube Input Setup
1
2
3
4
5
7
6
8
pic2-12 : Tube Input Setup window
Code
Option name
Function
1
Tube
2
Continue Fail
When machine can not take the IC in one tube, it will turn to next one
Counter
and next till the original tube.
The quantity of operated Tube. Click to turn on or off.
Need to turn on at least one Tube when operating the machine.
This process is called a cycle. Continue Failure counter value means
the cycle times.
3
Times
The re-taking times if Z0 counters failure when absorb materials.
4
Warning / Disable
When one of the tube's warning time reaches the setting value, it will
close the tube.
After that, it will no longer take IC from this tube. If this tube is the last
one, it won't close.
5
Vacuum
Whether use vacuum function when release IC (Default is
recommended)
Select the timing to switch on vacuum generator, when absorb IC.
(Default is recommended)
6
OK
7
Apply
Write current settings into parameter file and stay at this page.
8
Cancel
Cancel current settings and leave this page to last one.
Write current settings into parameter file and leave this page to last
one.
B19
AH-400 Series User's Manual
2.3 Production execution
1.Select project file (extension file name-prj), like pic 2-13.
Click
Dialogue Box
pic2-13 : Select project file
2. After selecting, the software will load the project file and show
the file information. Like pic 2-14.
Shows Project file
information
pic2-14 : Show the project file information
B20
AH-400 Series User's Manual
3. If the project file is loaded successfully, it will show Order
information. The button
will also appear. Like pic2-15.
Note: The file loading time depends on the file size. Please be patient. If
the file is 264MB, it will take 1 minute on 3GHz CPU, 1GB RAM computer.
Appear Order information
OK button appears
pic2-15 : confirm loading
4. At this time, user can adjust any setting and key in production
quantity. After that, press
to get in program screen. User
can decide whether clearing the IC, please double check there's
no IC left. Like pic2-16.
pic2-16 : program screen
B21
AH-400 Series User's Manual
5. Programming status as shown in pic2-17.
Code
Icon
1
PASS
The successful IC number for programming.
2
FAIL
TOTAL
The failure IC number for programming.
3
pic2-17 : programming
status
* Move the cursor to
icon .
It will show each fail
details.
Function
The total programming IC number.
4
Whether the programmer is started and its
serial number.
5
Activated programmer.
6
The activated programmer. But it has just
been shut down by the user, and will stop the
action in next round.
7
The turned off programmer.
8
The programmer is waiting for IC.
9
The programmer is programming IC.
10
The success of programmed IC.
11
The failure of programmed IC.
6. If the error occurs during production, it will jump to troubleshooting
screen, shown in pic2-18.
pic2-18 : troubleshooting
Code
Name
Function
1
Front View
Front view of the fault location.
2
Top View
Top view of the fault location.
3
Focus
Photograph of the fault location.
Please follow the trouble reason to do troubleshooting.
B22
AH-400 Series User's Manual
7. User can press the yellow button on machine or button
on the
screen to pause the machine during production process. The screen
will be shown as pic2-19.
pic2-19 : pause
Code
Button
1
Function
Ignore the current state machine, return to the project management
screen directly.
2
Finish programming the remaining IC, and return to the project
management screen.
3
or
To continue production.
B23
AH-400 Series User's Manual
2.4 Project Saving
2.4.1 Control PressBar Procedure
For the first, please put the 4 th PressBar down.(The PressBar
near the far right side of the operator is the 4 th PressBar). If
it is the Single Socket, then put the master tape in Slot4(The
4 th Pre ssBar's corre sponding slot is the Slot4). If it is the
Double Socket, then put the IC master tape in Slot7(The 4th
PressBar's corresponding 2 slots, the lef t one is Slot7). And
raise the 4th PressBar. Pic2-20 ~ 2-21 indicates how to control
the PressBar. 2-20 ~ 2-21 indicates how to control the PressBar.
8
7
6
5
PressBar
1
2
3
4
※ Put the master IC in this socket.
Single Socket
Double Socket
B24
Triple Socket
AH-400 Series User's Manual
The way of control pressbar is as below.
Click
pic2-20 : control PressBar - step1
Select System test, and then select PressBar
Press “press_valve_4” to raise up or down
4th PressBar.
pic2-21 : control PressBar – step2
B25
AH-400 Series User's Manual
2.4.2 Read IC Master Tape Program.
Pic2-22 ~ 2-23 will indicate how start to read IC master tape
program.
Select “PASS/ Fail%” page.
Then click Read button
pic 2-22 : start to read IC master tape program - step1
pic 2-23 : start to read IC master tape program – step2
B26
AH-400 Series User's Manual
2.4.3 NOR Flash Project File Saving Procedure
If the IC type is NOR FLASH, click Read icon first. The screen will show as
pic2-24. (The process of reading IC master tape(NOR Flash) as pic2-24 ~
2-27.)
Click “Read”
Then click Read button
pic 2-24 : reading IC mater tape(NOR) - step1
Then just click “1” in column “01”.Which shown as pic2-25
click “1” in column “01”.
pic 2-25 : reading IC mater tape(NOR) – step2
B27
AH-400 Series User's Manual
Then Reading the IC master tape. Which shown as pic2-26.
pic 2-26 : reading IC mater tape(NOR) – step3
If software reads master tape successfully, it will show PASS and
CheckSum(Byte Sum) information(pic2-27).Then press OK to return Order
Manager, the screen image shown as Figure 2-28.
Show PASS and
CheckSum(Byte
Sum) information,
press ok to return
Order Manager
pic 2-27 : reading IC mater tape(NOR) – step4
B28
AH-400 Series User's Manual
Then set the NOR project file. For the first, set the default operating
process. Note: the NOR default operation can not be selected “Read”.
For example, the default operation is programming. The process only
checks whether the empty IC, and programs the IC. Finally do the basic
authentication. Then check the blue Blank Check(not blue-green Blank
Check), Program(the default is checked)and Verify Normal. Screen shown
as pic2-28.
Set default operation procedure
pic2-28 : setting project file (NOR) - step1
Then setting the required parameters by each IC (But not every IC can be
set the parameter).The screen shown as pic2-29.
Set the required
parameters by each IC
pic2-29 : setting project file (NOR) – step2
B29
AH-400 Series User's Manual
Then save the NOR project file. First click Save Project and set the storage
paith (C: \ Leaptronix \ AutoHandler \ Project). As pic2-26 shows. Save the
project file(NOR) as shown in pic2-30 ~ 2-32.
Click First
Saving Path: C: \ Leaptronix \
AutoHandler \ Project
pic2-30 : saving project file (NOR) - step1
Then change the project file name as you need and click save. It will jump
out the Project information, just click you want to do. Note: the NOR
default operation can not be selected “Read”. For example, the default
operation is clicking icon "Auto" for programming. Which shown as pic2-31.
Click default operation you need
pic2-31 : saving project file (NOR) – step2
B30
AH-400 Series User's Manual
Next, fill the Author and comment information as you need and press "OK"
in Project Information dialogue box. It will start to save the project file.
Waiting for "OK" of Order Manager turns gray to green, it means saving
completely. Which shown as pic2-32.
Waiting for "OK" turns gray to green, it means
saving completely.
pic 2-32 : saving project file (NOR) – step3
B31
AH-400 Series User's Manual
2.4.4 NAND Flash Project File Saving Procedure
If the IC type is NAND FLASH, click “Read” icon first. The screen will show
as pic2-33. (The procedure of reading IC Master-tape as shown like pic2-33
~ 2-36)
Click “Read”
pic 2-33 : reading IC mater-tape(NAND) – step1
Then just click the "1" in column "01". Which shown as pic2-34.
click “1” in column “01”.
pic 2-34 : reading IC mater-tape(NAND) – step2
B32
AH-400 Series User's Manual
Then, reading the IC master tape. Which shown as pic2-35.
Click to read IC master tape
pic 2-35 : reading IC mater-tape(NAND) – step3
If software reads master tape successfully, it will show PASS and
CheckSum(Byte Sum) information(pic2-36).Then press OK to return Order
Manager, the screen image shown as Figure 2-37.
Shows PASS, when reading successfully
Click to return to Order Manager
pic 2-36 : reading IC mater-tape(NAND) – step4
B33
AH-400 Series User's Manual
Then set the NAND project file. For the first, set the default operating
process. Note: the NAND default operation can not be selected “Read”. For
example, the default operation is programming. The process only checks
whether the Bad Block IC, and programs the IC. Finally do the basic
authentication. Then check the "Program", "Verify" and click “Scan Bad
Block”. Just like pic2-37 shows. Besides, if customer want to load Group
Define, then switch to the Group define page for setting. (Setting project
file (NAND) shows as pic2-37 ~ 2-38)
Set default operation process
pic2-37 : setting project file (NAND) – step1
Then setting the required parameters by each IC .The screen shown as
pic2-38.
Set the required parameters by each IC
Pic2-38 : setting project file (NAND)- step2
B34
AH-400 Series User's Manual
Then save the NAND project file. First click Save Project and set the
storage paith (C: \ Leaptronix \ AutoHandler \ Project). As pic2-39 shows.
And save the project file(NAND) as shown in pic2-39 ~ 2-41.
Click First
Saving Path: C: \ Leaptronix \
AutoHandler \ Project
pic 2-39 : saving project file (NOR) – step1
Then change the project file name as you need and click save. It will jump
out the Project information, just click you want to do. Note: The NAND
default operation can not be selected “Read”. For example, the default
operation is clicking icon "Auto" for programming. Which shown as pic2-40.
Click default operation you need
pic 2-40 : saving project file (NOR) – step2
B35
AH-400 Series User's Manual
Next, fill the Author and comment information as you need and press "OK"
in Project Information dialogue box. It will start to save the project file.
Waiting for "OK" of Order Manager turns gray to green, it means saving
completely. Which shown as pic2-41.
Note: The storage time depends on file size, please kindly wait. For
example: The 264MB size file will take 5 minute to program on 3GHz CPU,
1GB RAM PC.
Waiting for "OK" turns gray to
green, it means saving completely.
pic 2-41 : saving project file (NOR) – step3
B36
AH-400 Series User's Manual
Chapter 3 System Setup
3.1 System Setup Introduction
System setup is for adjusting motor position for each axis. And the
partial software setting. Please refer the below Fig 3-1. The details will be
introduced following.
Fig 3-1 : System setup icon
B37
AH-400 Series User's Manual
3.2 User's ID setting
The Fig 3-2 is ID setting for administration and operator. The Administrator
can set all of the parameter. The supervisor only can follow the default
parameter for production.
Fig 3-2 : User's ID setting
B38
AH-400 Series User's Manual
Click View All, you can see all of the ID. Fig 3-3 is for viewing all of the
administration ID, Fig 3-4 is for all of the operator.
If you would like to delete an ID, please click it to highlight, and click the
Delete will be OK. Please note that the Leaptronix ID on the Administrator
list can not be deleted or amended.
Fig 3-3 Administrator ID
Fig 3-4 Operator ID
When you would like to add user's ID, please key in the below information.
1. Please input a user name : key in the user's name.
2. Please input a new password : key in the password.
3. Please input a new password again : confirm the password.
Click the Add for adding. When the user name is exist, the system will
show a dialog box, confirm if override the original setting.
B39
AH-400 Series User's Manual
3.3 Other Settings
The Fig 3-5 is for production report location and open the GUI option.
1
2
Fig 3-5 Option setting
You can set the report location on 1. The 2 Read is for opening the NAND
FLASH or NOR FLASH GUI.
B40
AH-400 Series User's Manual
3.4 System Settings
The chapter is for adjusting motor parameter and position. The I/O
control point function and operation fig show as below.
Fig 3-6 System setting
Different models have different motor axes and functions. They are as
below.
Model
R0
X1
PR1
Z0
Z1
Z2
Y1
TZ1
AH-400
ˇ
ˇ
ˇ
ˇ
ˇ
ˇ
AH-401
ˇ
ˇ
ˇ
ˇ
ˇ
ˇ
╳
╳
╳
╳
AH-400A
ˇ
ˇ
ˇ
ˇ
ˇ
ˇ
ˇ
There are two kind of motors, rotation and linear.
Rotation motor axis: R0.PR1
Linear motor axis: X1.Z0.Z1.Z2.Y1.TZ1
The I/O controls are included:
a.Vacuum Control
b.Switch & Light Control
c.PressBar Control
d.Printer Control
e.Loader Control
f.Programmer Control
g.Tape Feeder Control
h.Tray Control
B41
╳
AH-400B
ˇ
ˇ
ˇ
ˇ
ˇ
ˇ
ˇ
ˇ
AH-400 Series User's Manual
3.4.1 Motor Control Page
Each axis motor has different function and position. The introduction chapters
are as below.
3.4.1.1 Axis R0:
rotation spindle, for programing area IC in & out.
3.4.1.2 Axis PR1:
the IC rotation angle on the feed-in side.
3.4.1.3 Axis X1 :
3.4.1.4 Axis Z0 :
3.4.1.5 Axis Z1 :
3.4.1.6 Axis Z2 :
linear movement, for the movement of IC from feed zone
to position groove. This is only for tray mode.
linear movement device for the feed zone.
linear movement device for the R0 axis pick and place.
inear movement device for R0 axis pick and place.
3.4.1.7 Axis Y1 :
3.4.1.8 Axis TZ1 :
for the tray movement device
for the tray change device.
3.4.1.1 R0 Axis control
This chapter is for RO to each work position and function introduce.
There are included 4 areas:
A. Sensor
B. Movement control
C. Adjust control
D. Movement parameter
A
C
B
D
Fig 3-7 R0 axis control
B42
AH-400 Series User's Manual
Sensor:
It's Included PEL and NEL limit sensor. When the motor position
reach the limit sensor position, the sensor will show red. At the
meantime, the software will control the motor can not go further.
Fig 3-7-1 R0 axis sensor display
Movement control:
Before the RO axis motor move to a new working position, need to
excite and return to the origin.
A. If the control motor excited
B. The control motor return to the origin.
C. The control motor move to the specified location
D. Select the motor target location
E. Show if the motor excitation. Yes is red, no is white.
F. Show if the motor return to the origin. Yes is red, no is white.
E
A
F
B
C
D
Fig 3-7-2 R0 axis operation
R0 axis title and the definition.
Item
1
Title
home_position
Definition
Z1 is the positioning axis, go to the 90 degrees position.
2
r_home_position
Z2 is the positioning axis, go to the 90 degrees position.
3
in_precissor
Z1 is the positioning axis, go to the precissor -in position.
Z1 is the positioning axis, go to the precissor-out position.
4
out_precissor
5
fail_zone
Z2 is the positioning axis, go to the fail zone position.
6
r_fail_zone
Z1 is the positioning axis, go to the fail zone position.
Z1 axis is in the feed-in precissor positive limit area.
7
z1_positive_limit
8
z1_negative_limit
Z1 axis is in the feed-in precissor negative limit area.
9
near_p_in_precissor
Z1 axis near the precissor positive position.
10
near_n_in_precissor
Z1 axis near the precissor negative position.
B43
AH-400 Series User's Manual
R0 axis title and the definition.
Item
Title
1
home_position
2
r_home_position
3
in_precissor
4
out_precissor
5
fail_zone
6
7
8
9
10
r_fail_zone
z1_positive_limit
z1_negative_limit
near_p_in_precissor
near_n_in_precissor
Definition
Z1 is the positioning axis, go to the 90 degrees
position.
Z2 is the positioning axis, go to the 90 degrees
position.
Z1 is the positioning axis, go to the precissor -in
position.
Z1 is the positioning axis, go to the precissor-out
position.
Z2 is the positioning axis, go to the fail zone
position.
Z1 is the positioning axis, go to the fail zone position.
Z1 axis is in the feed-in precissor positive limit area.
Z1 axis is in the feed-in precissor negative limit area.
Z1 axis near the precissor positive position.
Z1 axis near the precissor negative position.
B44
AH-400 Series User's Manual
Adjustment control:
fter R0 axis motor move to the working position, we can do the
necessary adjustment.
[ This adjustment may cause permanent damage, please
pay attention. ]
A. The control motor move by anti-clockwise angle
B. The control motor move by clockwise angle
C. Show the angle of the motor movement
D. Adjust the pulse of the motor movement
E. Current angle of the motor
F. Current pulse of the motor
A
C
B
D
E
F
Fig 3-7-3 R0 axis adjust control
Operation parameter:
Show the Motor operation parameter.
[ This adjustment may cause permanent damage, please
pay attention. ]
A. Show the motor operation speed. The unit is pps.
B. Motor acceleration and deceleration mode.
C. Acceleration curve parameter.
D. Deceleration curve parameter.
E. The second parameter of acceleration curve
F. The second parameter of deceleration curve
G. Confirm the adjustment
A
B
C
E
D
F
G
Fig 3-7-4 R0 axis operation parameter
B45
AH-400 Series User's Manual
3.4.1.2 PR1 Axis Control
This chapter is for introducing RP1 movement and function. It's
included 4 subject.
A. Sensor
B. Movement control
C. Adjustment control
D. Operation parameter
A
C
B
D
Fig 3-8 PR1 axis control
B46
AH-400 Series User's Manual
Sensor:
PR1 has the origin sensor. When the motor reach to the origin
sensor position, the sensor will show green.
Fig 3-8-1 PR1 axis sensor
Movement control:
Before the PR1 axis motor move to a new working position, need to
excite and return to the origin.
A. If the control motor excited
B. The control motor return to the origin.
C. The control motor move to the specified location
D. Select the motor target location
E. Show if the motor excitation. Yes is red, no is white.
F. Show if the motor return to the origin. Yes is red, no is white.
RP1 axis motor
E
A
F
B
C
D
Fig 3-8-2 PR1 axis operation
PR1 axis title and the definition.
Item
1
2
3
4
5
6
7
8
9
Title
home_position
0_Angle
90_Angle
180_Angle
270_Angle
feeder_in_angle
feeder_out_angle
loader_in_angle
loader_out_angle
Precissor
Precissor
Precissor
Precissor
Precissor
Precissor
Precissor
Precissor
Precissor
B47
rotate
rotate
rotate
rotate
rotate
rotate
rotate
rotate
rotate
to
to
to
to
to
to
to
to
to
Definition
45 degrees position
0 degree position
90 degree position
180 degree position
270 degree position
feed-in angle
feed-out angle
loader-in angle (Tray Mode)
loader-out angle (Tray Mode)
AH-400 Series User's Manual
Adjustment control:
After PR1 axis motor move to the working position, we can do the
necessary adjustment.
[ This adjustment may cause permanent damage, please pay
attention. ]
A. The control motor move by anti-clockwise angle
B. The control motor move by clockwise angle
C. Show the angle of the motor movement
D. Adjust the pulse of the motor movement
E. Current angle of the motor
F. Current pulse of the motor
C
A
D
B
E
F
Fig 3-8-3 PR1 axis adjustment control
Operation parameter:
Show the Motor operation parameter.
[ This adjustment may cause permanent damage, please pay
attention. ]
A. Show the motor operation speed. The unit is pps.
B. Motor acceleration and deceleration mode.
C. Acceleration curve parameter.
D. Deceleration curve parameter.
E. The second parameter of acceleration curve
F. The second parameter of deceleration curve
G. Confirm the adjustment
A
B
C
E
D
F
G
Fig 3-8-4 PR1 axis operation parameter
B48
AH-400 Series User's Manual
3.4.1.3 X1 Axis Control
This chapter is for introducing X1 movement and function. It's
included 4 subject.
A. Sensor
B. Movement control
C. Adjustment control
D. Operation parameter
A
C
B
D
Fig 3-9 X1 axis control
B49
AH-400 Series User's Manual
Sensor:
X1 is Included PEL and NEL limit sensor on the X1 axis. When the
motor position reach the limit sensor position, the sensor will show
red. At the meantime, the software will control the motor can not
go further.
Fig 3-9-1 X1 axis sensor
Movement control:
Before the X1 axis motor move to a new working position, need to
excite and return to the origin.
A. If the control motor excited
B. The control motor return to the origin.
C. The control motor move to the specified location
D. Select the motor target location
E. Show if the motor excitation. Yes is red, no is white.
F. Show if the motor return to the origin. Yes is red, no is white.
E
A
F
B
C
D
Fig 3-9-2 X1 axis operation
B50
AH-400 Series User's Manual
The X1 axis title and definition.
Item
Title
Definition
1
home_position
Move X axis to home.
2
precissor_position
Move X axis to precissor.
3
near_precissor_position
Move X axis to near precissor position, but will not
contact R0.
4
x_positive_limit
X axis positive limit.
5
x_negative_limit
X axis negative limit.
6
tape_feeder_1_position
X axis at the tape feeder 1 position.
7
tape_feeder_2_position
X axis at the tape feeder 2 position.
8
tube_feeder_1_position
X axis at the tube feeder 1 position.
9
tube_feeder_2_position
X axis at the tube feeder 2 position.
10
tube_feeder_3_position
X axis at the tube feeder 3 position.
11
tube_feeder_4_position
X axis at the tube feeder 4 position.
12
tray_base
X axis anchor under tray base.
13
column : n
X axis each column position under tray base.
Adjustment control:
After X1 axis motor move to the working position, we can do the
necessary adjustment.
[ This adjustment may cause permanent damage, please
pay attention. ]
A. The control motor move to left by unit.
B. The control motor move to right by unit.
C. Show the move unit of the motor movement.
D. Adjust the pulse of the motor movement.
E. Current position of the motor.
F. Current pulse of the motor
A
C
B
D
E
F
Fig 3-9-3 X1 axis adjustment control
B51
AH-400 Series User's Manual
Operation parameter:
Show the Motor operation parameter.
[ This adjustment may cause permanent damage, please
pay attention. ]
A. Show the motor operation speed. The unit is pps.
B. Motor acceleration and deceleration mode.
CI. Acceleration curve parameter.
D. Deceleration curve parameter.
E. The second parameter of acceleration curve
F. The second parameter of deceleration curve
G. Confirm the adjustment
A
B
C
E
D
F
G
Fig 3-9-4 X1 axis operation parameter
B52
AH-400 Series User's Manual
3.4.1.4 Z0 Axis Control
This chapter is for introducing Z0 movement and function.
It'sincluded 4 subject.
A. Sensor
B. Movement control
C. Adjustment control
D. Operation parameter
A
C
B
D
Fig 3-10 Z0 axis control
B53
AH-400 Series User's Manual
Sensor:
Z0 has the origin sensor. When the motor reach to the origin sensor
position, the sensor will show green.
Fig 3-10-1 Z0 axis sendor
Movement control:
Before the Z0 axis motor move to a new working position, need to
excite and return to the origin.
A. If the control motor excited
B. The control motor return to the origin.
C. The control motor move to the specified location
D. Select the motor target location
E. Show if the motor excitation. Yes is red, no is white.
F. Show if the motor return to the origin. Yes is red, no is white.
E
A
F
B
C
D
Fig 3-10-2 Z0 axis operation
B54
AH-400 Series User's Manual
The Z0 axis title and definition.
Item
1
2
3
4
5
Title
home_position
operation_position
socket_get_ic
socket_put_ic
precissor_in_get_ic
6
precissor_in_put_ic
7
precissor_out_get_ic
8
precissor_out_put_ic
9
tape_feeder_get_ic
10
tube_feeder_get_ic
11
tray_feeder_get_ic
12
tape_loader_put_ic
13
tube_loader_put_ic
14
tray_loader_put_ic
15
fail_zone_put_ic
Definition
Z axis move to the HOME position.
Z axis move to the Operation position.
Z axis move to socket for getting IC.
Z0 axis move to socket for putting IC.
Z0 axis move to the position for getting IC from
precissor-in.
Z0 axis move to the position for putting IC from
precissor-in.
Z0 axis move to the position for getting IC from
precissor-out.
Z0 axis move to the position for putting IC from
precissor-out.
Z0 axis move to the position for getting IC from
tape-feeder.
Z0 axis move to the position for getting IC from
tube-feeder.
Z0 axis move to the position for getting IC from
tray-feeder.
Z0 axis move to the position for putting IC from
tape-loader.
Z0 axis move to the position for putting IC from
tube-loader.
Z0 axis move to the position for putting IC from
tray-loader.
Z0 axis move to fail zone for putting IC.
B55
AH-400 Series User's Manual
Adjustment control:
After Z0 axis motor move to the working position, we can do the
necessary adjustment.
[ This adjustment may cause permanent damage, please
pay attention. ]
A. The control motor move to up by unit.
B. The control motor move to down by unit.
C. Show the move degree unit of the motor movement.
D. Adjust the pulse of the motor movement.
E. Current position of the motor.
F. Current pulse of the motor
A
B
C
D
E
F
Fig 3-10-3 Z0 axis adjustment control
Operation parameter:
Show the Motor operation parameter.
[ This adjustment may cause permanent damage, please
pay attention. ]
A. Show the motor operation speed. The unit is pps.
B. Motor acceleration and deceleration mode.
C. Acceleration curve parameter.
D. Deceleration curve parameter.
E. The second parameter of acceleration curve
F. The second parameter of deceleration curve
G. Confirm the adjustment
A
B
C
E
D
F
G
Fig 3-10-4 Z0 axis operation parameter
B56
AH-400 Series User's Manual
3.4.1.5 Z1 Axis Control
This chapter is for introducing Z1 movement and function. It's
included 4 subject.
A. Sensor
B. Movement control
C. Adjustment control
D. Operation parameter
A
C
B
D
Fig 3-11 Z1 axis control
Sensor:
Z1 has the origin sensor. When the motor reach to the origin sensor
position, the sensor will show green.
Fig 3-11-1 Z1 axis sensor
B57
AH-400 Series User's Manual
Movement control:
Before the Z1 axis motor move to a new working position, need to
excite and return to the origin.
A. If the control motor excited
B. The control motor return to the origin.
C. The control motor move to the specified location
D. Select the motor target location
E. Show if the motor excitation. Yes is red, no is white.
F. Show if the motor return to the origin. Yes is red, no is white.
E
A
F
B
C
D
Fig 3-11-2 Z1 axis operation
B58
AH-400 Series User's Manual
The Z1 axis title and definition.
Item
1
2
3
4
5
Title
home_position
operation_position
socket_get_ic
socket_put_ic
precissor_in_get_ic
6
precissor_in_put_ic
7
precissor_out_get_ic
8
9
precissor_out_put_
ic
tape_feeder_get_ic
10
tube_feeder_get_ic
11
tray_feeder_get_ic
12
tape_loader_put_ic
13
tube_loader_put_ic
14
tray_loader_put_ic
15
fail_zone_put_ic
Z1 axis move to
Z1 axis move to
Z1 axis move to
Z1 axis move to
Z1 axis move to
precissor-in.
Z1 axis move to
precissor-in.
Z1 axis move to
precissor-out.
Z1 axis move to
precissor-out.
Z1 axis move to
tape-feeder.
Z1 axis move to
tube-feeder.
Z1 axis move to
tray-feeder.
Z1 axis move to
tape-loader.
Z1 axis move to
tube-loader.
Z1 axis move to
tray-loader.
Z1 axis move to
B59
Definition
the HOME position.
the Operation position.
socket for getting IC.
socket for putting IC.
the position for getting IC from
the position for putting IC from
the position for getting IC from
the position for putting IC from
the position for getting IC from
the position for getting IC from
the position for getting IC from
the position for putting IC from
the position for putting IC from
the position for putting IC from
fail zone for putting IC.
AH-400 Series User's Manual
Adjustment control:
After Z1 axis motor move to the working position, we can do the
necessary adjustment.
[ This adjustment may cause permanent damage, please
pay attention. ]
A. The control motor move to up by unit.
B. The control motor move to down by unit.
C. Show the move degree unit of the motor movement.
D. Adjust the pulse of the motor movement.
E. Current position of the motor absolute distance.
F. Current pulse of the motor absolute step.
A
B
C
D
E
F
Fig 3-11-3 Z1 axis adjustment control
Operation parameter:
Show the Motor operation parameter.
[ This adjustment may cause permanent damage, please
pay attention. ]
A. Show the motor operation speed. The unit is pps.
B. Motor acceleration and deceleration mode.
C. Acceleration curve parameter.
D. Deceleration curve parameter.
E. The second parameter of acceleration curve
F. The second parameter of deceleration curve
G. Confirm the adjustment
A
B
C
E
D
F
Fig 3-11-4 Z1 axis operation parameter
B60
G
AH-400 Series User's Manual
3.4.1.6 Z2 Axis Control
This chapter is for introducing Z2 movement and function. It's
included 4 subject.
A. Sensor
B. Movement control
C. Adjustment control
D. Operation parameter
A
C
B
D
Fig 3-12 Z2 axis control
Sensor:
Z2 has the origin sensor. When the motor reach to the origin sensor
position, the sensor will show green.
Fig 3-12-1 Z2 axis sensor
B61
AH-400 Series User's Manual
Movement control:
Before the Z2 axis motor move to a new working position, need to
excite and return to the origin.
A. If the control motor excited
B. The control motor return to the origin.
C. The control motor move to the specified location
D. Select the motor target location
E. Show if the motor excitation. Yes is red, no is white.
F. Show if the motor return to the origin. Yes is red, no is white.
E
A
F
B
C
D
Fig 3-12-2 Z2 axis operation
The Z2 title and definition.
Item
1
Title
home_position
Definition
Move Z2 axis to the HOME position.
2
operation_position
Move Z2 axis to the Operation position.
3
socket_get_ic
Move Z2 axis to socket for getting IC.
4
socket_put_ic
Move Z2 axis to socket for putting IC.
5
precissor_in_get_ic
Move Z2 axis to the position for getting IC from precissor-in.
Move Z2 axis to the position for putting IC from precissor-in.
6
precissor_in_put_ic
7
precissor_out_get_ic Move Z2 axis to the position for getting IC from precissor-
8
precissor_out_put_ic Move Z2 axis to the position for putting IC from precissor-
9
tape_feeder_get_ic
out.
out.
Move Z2 axis to the position for getting IC from tape-feeder.
10
tube_feeder_get_ic
Move Z2 axis to the position for getting IC from tube-feeder.
11
tray_feeder_get_ic
Move Z2 axis to the position for getting IC from tray-feeder.
12
tape_loader_put_ic
Move axis to the position for putting IC from tape-loader.
13
tube_loader_put_ic
Move Z2 axis to the position for putting IC from tube-loader.
14
tray_loader_put_ic
Move Z2 axis to the position for putting IC from tray-loader.
15
fail_zone_put_ic
Move Z2 axis to fail zone for putting IC.
B62
AH-400 Series User's Manual
Adjustment control:
After Z2 axis motor move to the working position, we can do the
necessary adjustment.
[ This adjustment may cause permanent damage, please
pay attention. ]
A. The control motor move to up by unit.
B. The control motor move to down by unit.
C. Show the move distance of the motor unit movement.
D. Adjust the pulse of the motor movement.
E. Current position of the motor absolute distance.
F. Current pulse of the motor absolute step.
A
B
C
D
E
F
Fig 3-12-3 Z2 axis adjustment control
Operation parameter:
Show the Motor operation parameter.
[ This adjustment may cause permanent damage, please
pay attention. ]
A. Show the motor operation speed. The unit is pps.
B. Motor acceleration and deceleration mode.
C. Acceleration curve parameter.
D. Deceleration curve parameter.
E. The second parameter of acceleration curve
F. The second parameter of deceleration curve
G. Confirm the adjustment
A
B
C
E
D
F
G
Fig 3-12-4 Z2 axis operation parameter
B63
AH-400 Series User's Manual
3.4.1.7 Y1 Axis Control
This chapter is for introducing Y1 movement and function. It's
included 4 subject.
A. Sensor
B. Movement control
C. Adjustment control
D. Operation parameter
A
C
B
D
Fig 3-13 Y1 axis control
Sensor:
Y1 is Included PEL and NEL limit sensor on the X1 axis. When the
motor position reach the limit sensor position, the sensor will show
red. At the meantime, the software will control the motor can not
go further.
Fig 3-13-1 Y1 axis sensor
B64
AH-400 Series User's Manual
Movement control:
Before the Y1 axis motor move to a new working position, need to
excite and return to the origin.
A. If the control motor excited
B. The control motor return to the origin.
C. The control motor move to the specified location
D. Select the motor target location
E. Show if the motor excitation. Yes is red, no is white.
F. Show if the motor return to the origin. Yes is red, no is white.
E
A
F
B
C
D
Fig 3-13-2 Y1 axis operation
The Y1 axis title and definition.
Item
Title
1
home_position
2
tray_input_position
3
tray_output_position
4
Definition
Move Y1 to HOME position
Move Y1 to tray input position
Move Y1 to tray output position
tray_operation_position Move Y1 to tray default operation position
tray_base
row : n
Anchor of Y1 under tray base
Row position of Y1 under tray base
B65
AH-400 Series User's Manual
Adjustment control:
After Y1 axis motor move to the working position, we can do the
necessary adjustment.
[ This adjustment may cause permanent damage, please
pay attention. ]
A. The control motor move to the back of the AH.
B. The control motor move to the front of the AH.
C. Show the move unit of the motor movement
D. Adjust the pulse of the motor movement
E. Current position of the motor
F. Current pulse of the motor
A
C
B
D
E
F
Fig 3-13-3 Y1 axis adjust control area
Operation parameter:
Show the Motor operation parameter.
[ This adjustment may cause permanent damage, please
pay attention. ]
A. Show the motor operation speed. The unit is pps.
B. Motor acceleration and deceleration mode.
C. Acceleration curve parameter.
D. Deceleration curve parameter.
E. The second parameter of acceleration curve
F. The second parameter of deceleration curve
G. Confirm the adjustment
A
B
C
E
D
F
G
Fig 3-13-4 Y1 operation parameter
B66
AH-400 Series User's Manual
3.4.1.8 TZ1 Axis Control
This chapter is for introducing TZ1 movement and function.
It's included 4 subject.
A. Sensor
B. Movement control
C. Adjustment control
D. Operation parameter
A
C
B
D
Fig 3-14 TZ1 axis control
Sensor:
TZ1 is Included PEL and NEL limit sensor on the X1 axis. When the
motor position reach the limit sensor position, the sensor will show
red. At the meantime, the software will control the motor can not
go further.
Fig 3-14-1 TZ1 axis sensor
B67
AH-400 Series User's Manual
Movement control:
Before the TZ1 axis motor move to a new working position, need to
excite and return to the origin.
A. If the control motor excited
B. The control motor return to the origin.
C. The control motor move to the specified location
D. Select the motor target location
E. Show if the motor excitation. Yes is red, no is white.
F. Show if the motor return to the origin. Yes is red, no is white.
E
A
F
B
C
D
Fig 3-14-2 TZ1 axis operation
The TZ1 axis title and definition.
Item
1
2
3
4
5
Title
home_position
operation_position
tray_out_split_up
tray_in_split_up
tray_in_split_tray
Definition
Move TZ1 to HOME position
Move TZ1 to Operation position
Split up TZ1 to tray-out position
Split up TZ1 to tray-in position
Split to TZ1 to tray-in position
B68
AH-400 Series User's Manual
Adjustment control:
After TZ1 axis motor move to the working position, we can do the
necessary adjustment.
[This adjustment may cause permanent damage, please pay
attention.]
A. The control motor move to up by unit.
B. The control motor move to down by unit.
C. Show the move distance unit of the motor movement.
D. Adjust the pulse of the motor movement.
E. Current position of the motor absolute distance.
F. Current pulse of the motor absolute step.
A
B
C
D
E
F
Fig 3-14-3 TZ1 axis adjustment control
Operation parameter:
Show the Motor operation parameter.
[ This adjustment may cause permanent damage, please pay
attention. ]
A. Show the motor operation speed. The unit is pps.
B. Motor acceleration and deceleration mode.
C. Acceleration curve parameter.
D. Deceleration curve parameter.
E. The second parameter of acceleration curve
F. The second parameter of deceleration curve
G. Confirm the adjustment
A
B
C
E
D
F
G
Fig 3-14-4 TZ1 axis operation parameer
B69
AH-400 Series User's Manual
3.4.2 Test & Adjustment for each IO
According to the function of the IO, we can devide to the follow types.
AH400
AH401
Vacuum
Type
√
√
AH400A AH400B
√
√
Switch &
Light
PressBar
√
√
√
√
√
√
√
√
Printer
√
√
√
√
Loader
√
√
√
√
ATM-100 control & condition
sensing
Programmer
√
√
√
√
Programmer power control
Tape Feeder
Tray
√
х
√
х
√
х
√
√
Tape Feeder control
Auto change tray cylinder
control & condition sensing.
B70
Function
Suction & blow control, and
sensor detet of vacuum
Switch on/off display & light
control
PrerssBar control & condition
sensing
MK1 printer control & condition
sensing
AH-400 Series User's Manual
3.4.2.1 Vacuum Introduction
A
B
C
Fig 3-15 Vacuum Control
A. Show the vacuum sensor status, If has IC, show green, no
show green.
B. Only for control vacuum valve, suction, click for opening.
C. Only for control devacuum valve, blow, click for opening.
[ Please do not open suction & blow and the same time. ]
B71
AH-400 Series User's Manual
3.4.2.2 Switch & Light Introduction
A
B
C
D
E
Fig 3-16 Switch & Light Control
A. Show the emergency stop switch signal. Normal is green. If
click, it will show gray.
B. Show the front of AH START & RESET button condition. If
press the button, it will show green. No, it will show gray.
C. The door sensor. If the door open, it will show green. Close
will show gray. Please do not open the door during the
production.
D. The 3-color tower light and buzzer control icon. The user can
use those icons to control the 3-color tower light and buzzer.
Please do not open 3-color tower and buzzer at the same
time to avoid the damage.
E. To control on/off for the START and RESET light on the front
of AH.
B72
AH-400 Series User's Manual
3.4.2.3 PressBar Introduction
A
C
B
Fig 3-17 PressBar Control
A. Show the up-sensor of the pressbar OK or not. Green is OK,
otherwise gray.
B. Show the down-sensor of the pressbar OK or not. Green is
OK, otherwise gray.
C. The pressbars up and down status.
B73
AH-400 Series User's Manual
3.4.2.4 Printer Introduction
A
B
Fig 3-18 PressBar Control
A. Show the MK1 printer sensor condition. Green is for sensing.
B. Control MK1 up or down condition.
B74
AH-400 Series User's Manual
3.4.2.5 Loader Introduction
A
C
B
Fig 3-19 Loader Control
A. Show the ATM-100 taping machine alarm or not. If on alarm
condition, it will show green, otherwise is gray.
B. Show the ATM-100 taping machine ready or not. If ready, will
show green, otherwise is gray.
C. Control the ATM-100 to start.
B75
AH-400 Series User's Manual
3.4.2.6 Programer Introduction
A
Fig 3-20 Programmer Control
A. For controlling the programmer power on/off. Press is power
on, otherwise if off.
3.4.2.7 Tape Feeder Introduction
A
Fig 3-21 Tape Feeder Control
A. For controlling the feeder to start.
B76
AH-400 Series User's Manual
3.4.2.8 Tray Introduction
A
E
B
C
D
Fig 3-22 Tray Control
A. Show the tray split cylinder on the inner condition or not.
Green is for yes. Gray is for no.
B. Show the try split cylinder on the outer condition or not.
Green is for yes. Gray is for no.
C. Show the tray lock or not. Lock sensor show green, it means
lock. Unlock sensor show green, it means unlock.
D. Show the tray condition, empty, full or float.
Empty: no tray is green, has tray is gray.
Full: Over 10 trays will show green, vice versa.
Float: If float will show green, vice versa.
E. There are 2 control points.
1. Tray split cylinder: for control split cylinder expansion
condition.
2. Tray lock cylinder: for control split cylinder lock or
loose condition.
B77
AH-400 Series User's Manual
3.5 Leave System Setting Page
After finishing the system setting and adjustment, please click the
icon to leave the page.
Fig 3-23 Leave system
B78
AH-400 Series User's Manual
Chapter 4 Message & Troubleshooting
4.1 Messages & Troubleshooting
There are 4 type of messages.
Item
1
Type
Normal
Machine Action
Normal message, only display
2
3
4
Warning
Alarm
Error
Warning message, only display
Alarm message, display and stop the machine.
Error message, display and stop the machine
The 3-color indicator and buzzer actions are as below.
Item
Type
1
Normal operation
3-color indicator & buzzer action
Green indicator light
2
3
4
Suspended operation
Warning message
Alarm message
5
Error message
Yellow indicator light
Yellow indicator flicker
Red indicator flicker, buzzer alarm 3 times
Red indicator flicker, buzzer alarm
continually
The software will show the message in the red box as the fig 4-1.
fig 4-1 : Message area
B79
AH-400 Series User's Manual
4.1.1 Normal Message
The follow message will show.
A. The user load the program project, electronic control and
programmer software.
B. The user set the system, adjust for each axis.
C. The time of Start or end project.
Those messages will be only shown on the Information box as
Fig 4-2.
Fig 4-2 : Normal Message box
Those messages will not effect the AH. So, there is no
compulsory action. The contents are as below.
Item
Message
Content
1
Bring up agent process ...
2
Lauching agent ... please wait. Communicating with the programmer.
3
Agent: server_demo.exe
Show the programmer program.
4
Loading project file:
Show the loading project file.
5
Programmer agent is ready.
Finished the programmer control program and the
electronic control program connection.
6
Start AH400B Produce
Start the project production.
7
Project is finished, saving
report.
Finished the project, save the report automaticly.
Ready for starting the programmer.
B80
AH-400 Series User's Manual
4.1.2 Warning Message
These messages will not effect the AH movement, only for warning.
A. When Z0 axis can not pick the IC on the picking area. If re-pick
function has been set, the system will not stop, and do the pick action
again.
B. When Z1 axis can not pick the IC on the picking area. If re-pick
function has been set, the system will not stop, and do the pick action
again.
Fig 4-3 : Warning message
The message and content are as below.
Message
Content
W010011 When tape-in, Z0 pick IC fail, need to re-pick
IC. The user can set the re-pick times.
W010013 When tray-in, Z0 pick IC fail, need to re-pick
IC. The user can set the re-pick times.
W010014 When tray-in, Z0 pick IC fail, need to re-pick
IC. The user can set the re-pick times.
W010015 When tube-in, Z0 pick IC fail, need to re-pick
IC. The user can set the re-pick times.
W020001 Z1 axis precissor can not pick IC, need to repick IC. The user can set the re-pick times.
Procedure
Handle by the AH
procedure automatically.
Handle by the AH
procedure automatically.
Handle by the AH
procedure automatically.
Handle by the AH
procedure automatically.
Handle by the AH
procedure automatically.
W020002 Z2 axis precissor can not pick IC, need to repick IC. The user can set the re-pick times.
W020003 Z2 axis socket can not pick IC, need to re-pick
IC. The user can set the re-pick times.
Handle by the AH
procedure automatically.
Handle by the AH
procedure automatically.
W020004 Z1 axis socket can not pick IC, need to re-pick Handle by the AH
IC. The user can set the re-pick times.
procedure automatically.
W020005 Z2 axis place the fail IC on the fail tank and
detect no IC. The IC may be misplace on
socket.
W020006 Z1 axis place the fail IC on the fail tank and
detect no IC. The IC may be misplace on
socket.
B81
Handle by the AH
procedure automatically.
Handle by the AH
procedure automatically.
AH-400 Series User's Manual
4.1.3 Alarm Message
When these messages occur, AH will stop all of the action and start
alarming. It means that need operator to get in to handle the problem. The
situations are as below.
A. When Z axis pick the IC, can not get the IC. The IC position maybe
deviate or loss. It will need the operator to handle it.
B. When Z axis place the IC, can not get the IC placed message. The IC
can not be released by nozzle. It will need the operator to handle it.
C. When the pressbar up or down, can not be detected by the sensor. It
will need operator to check if there is external object to interfere the
sensor.
D. On the tray condition, there is no tray on the tray-in area, or too many
trays on the tray-out area, or float IC on the tray. Those situations will
need the operate to put in the new tray, or take away the programmed
IC trays, or check if there is float IC on the tray.
E. There is something wrong on the tape-out. It will need operator to get
rid of it.
F. Mark machine has problem, need the operator to handle it.
B82
AH-400 Series User's Manual
These type messages will stop the AH compulsorily. At the same time, The
GUI will change to another page. It will show the alarm situation and how
to do the trouble shooting as the fig 4-4.
A
B
Fig 4-4 : Alarm messages
A. Show the alarm place.
B. Show the problem and how to handle it.
B83
AH-400 Series User's Manual
The messages and contents.
Message
Content
W010011 When tape-in,the Z0 axis pick the
IC fail, need to re-pick the IC. The
operator can set the re-picked times.
However, still can not pick the IC
after re-picking.
W010013 When tray-out,the Z0 axis pick the
IC fail, need to re-pick the IC. The
operator can set the re-picked times.
However, still can not pick the IC
after re-picking.
W010014 When tray-in,the Z0 axis pick the
IC fail, need to re-pick the IC. The
operator can set the re-picked times.
However, still can not pick the IC
after re-picking.
W010015 When tube-in,the Z0 axis pick the
IC fail, need to re-pick the IC. The
operator can set the re-picked times.
However, still can not pick the IC
after re-picking.
W020001 The Z1 axis precissor pick the IC
fail, need to re-pick the IC. The
operator can set the re-picked times.
However, still can not pick the IC
after re-picking.
W020002 The Z2 axis precissor pick the IC
fail, need to re-pick the IC. The
operator can set the re-picked times.
However, still can not pick the IC
after re-picking.
W020003 The Z2 axis socket pick the IC
fail, need to re-pick the IC. The
operator can set the re-picked times.
However, still can not pick the IC
after re-picking.
W020004 The Z1 axis socket pick the IC
fail, need to re-pick the IC. The
operator can set the re-picked times.
However, still can not pick the IC
after re-picking.
W020005 Z2 axis place the fail IC on the fail
tank and detect no IC. The IC may
be misplace or stack on socket.
W020006 Z1 axis place the fail IC on the fail
tank and detect no IC. The IC may
be misplace or stack on socket.
A000001 Prompt the user to set ATM-100
taping machine.
B84
Reason & approach
1. The operator check if there is a
IC on the pick point.
2. Check if there is stacked or
stuck IC on the pick point.
Remove the abnormal IC.
3. Check if the nozzle OK or not.
4. Check the sensor value OK or
not.
If not OK, please adjust it.
5. The hardware connection is
abnormal. Please check the
repair technical person.
6. The I/O card is abnormal.
Please check the repair
technical person.
1. Sense fail, please adjust the
sensor value.
2. Hardware connection problem.
Please contact the repair
person.
3. I/O problem, please contact the
repair person.
1. Please follow the instruction
to set the ATM-100 taping
machine.
AH-400 Series User's Manual
A000002 Prompt the user to set MK-1 mark
machine.
A000010 Door-0 open.
A000011 Door-1 open.
A010001 There is no more tray on the tray-in
area. Prompt the user to put the new
tray.
1. Please follow the instruction to
set the MK-1 taping machine.
1. Please check if the door is
open.
2. If no, the sensor is broken,
please check the repair person.
3. Hardware connection problem.
Please contact the repair
person.
4. I/O problem, please contact the
repair person.
1. Please place the new IC tray for
the tray-in.
2. The sensor maybe broken,
please check the repair person.
3. Hardware connection problem.
Please contact the repair
person.
4. I/O problem, please contact the
repair person.
A010002 The tray is full on the tray-out area.
Prompt the user to take away the
finished tray.
1. Please take away the finished
IC tray. The tray quantity is over
on the finished area.
2. The sensor maybe broken,
please check the repair person.
3. Hardware connection problem.
Please contact the repair
person.
4. I/O problem, please contact the
repair person.
A010003 There is stack IC on the tray-loader.
Prompt user to take away the IC.
1. Please take the stack IC on the
tray.
2. The sensor maybe broken,
please check the repair person.
3. Hardware connection problem.
Please contact the repair
person.
4. I/O problem, please contact the
repair person.
B85
AH-400 Series User's Manual
A010005 Z0 axis can not release the IC.
Prompt the user to take away the IC.
A010007 Seize IC from the precissor failed on
the tray-loader.
A020001 Z1 axis can not release the IC.
Prompt the user to take away the IC.
A020002 Z2 axis can not release the IC.
Prompt the user to take away the IC.
A020042 Z1 axis can not release the IC on the
bad zone. Prompt the user to take
away the IC.
A020043 Z1 axis can not release the IC from
the precissor. Prompt the user to
take away the IC.
A020045 Z1 axis can not release the IC on the
bad zone. Prompt the user to take
away the IC.
A010008 Z0 axis IC is missing during the
movement on the tray-out. (PR>TrayLoader)
A010009 Z0 axis IC is missing during the
movement on the tray-in.
A020006 Z1 axis IC is flying during the
movement.(PR->TX)
A020008 Z2 axis IC is flying during the
movement.(TX->PR)
A020044 Z1 axis IC is flying during the R0
movement.(TX->PR)
~
A020010 PressBar go-down limit detect error.
A02001F
B86
1. Please check if there is any
problem on the Z asix height.
2. Check the nozzle.
3. The sensor maybe broken,
please check the repair person.
4. Hardware connection problem.
Please contact the repair
person.
5. I/O problem, please contact the
repair person.
11. The IC is missing or flaying
during the X axis or R0 axis
movement. Please take the IC
out from the area to avoid the
mixing situation.
2. Check the nozzle.
3. The sensor maybe broken,
please check the repair person.
4. Hardware connection problem.
Please contact the repair
person.
5. I/O problem, please contact the
repair person.
1. The PressBar go-down sensor
can not sense the go-down
position signal.
2. During the pressBar go down,
there is an external object
interfere the movement.
3. The sensor position is
abnormal. Please adjust the
position.
4. Hardware connection problem.
Please contact the repair
person.
5. I/O problem, please contact the
repair person.
AH-400 Series User's Manual
~
A020020 PressBar go-up limit detect error.
A02002F
1. The PressBar go-up sensor can
not sense the go-up position
signal.
2. During the pressBar go up,
there is an external object
interfere the movement.
3. The sensor position is
abnormal. Please adjust the
position.
4. Hardware connection problem.
Please contact the repair
person.
5. I/O problem, please contact the
repair person.
A030001 There is no tray on the tray-unloader
area.
1. Please place the new tray.
2. Check the sensor of tray
detection OK or not.
5. he sensor position is abnormal.
Please adjust the position.
6. Hardware connection problem.
Please contact the repair
person.
7. I/O problem, please contact the
repair person.
A030002 There is too many tray on the trayloader area.
B87
1. Please take away the tray.
2. Check the sensor of tray
detection OK or not.
3. The sensor position is
abnormal. Please adjust the
position.
4. Hardware connection problem.
Please contact the repair
person.
5. I/O problem, please contact the
repair person.
AH-400 Series User's Manual
A030003 There is stack IC on the loader tray.
1. There is stack IC situation
during the tray movement.
Please take the stack IC away.
2. Check the sensor of tray
detection OK or not.
3. The sensor position is
abnormal. Please adjust the
position.
4. ardware connection problem.
Please contact the repair
person.
5. I/O problem, please contact the
repair person.
A030004 Taping machine is abnormal 1.
A030005 Taping machine is abnormal 2.
A030006 Taping machine is abnormal 3.
A030007 Taping machine is abnormal 4.
A030008 Taping machine is abnormal 5.
A030009 Taping machine is abnormal 6.
A030010 Taping machine is abnormal 7.
A030011 No start the ATM-100 taping
machine.
A040001 The mark machine is not positioned.
B88
1. The ATM-100 taping machine
is abnormal. Please follow the
ATM-100 instruction for trouble
shooting
2. Check the sensor of ATM-100
OK or not.
3. The sensor position is
abnormal. Please adjust the
position.
4. The hardware connection is
abnormal. Please contact the
technical person.
5. I/O card is abnormal. Please
contact the technical person.
1. The positioned sensor of the
mark machine is abnormal.
Please adjust to the right
position
2. Check if the sensor of the mark
machine OK or not.
3. The hardware cable connection
is abnormal. Please check the
technical person.
4. The I/O card is abnormal.
Please check the technical
person.
AH-400 Series User's Manual
4.1.4 Error Message
When these messages occur, AH will stop all of the action and start
alarming. It means that need operator to get in to handle the problem. The
situations are as below.
A. Motor operation problem.
B. Cylinder movement time over the max time.
C. Unexpected situation happen.
hese type messages will stop the AH compulsorily. At the same time, The
GUI will change to another page. It will show the error situation and how to
do the trouble shooting as the fig 4-5.
A
B
Fig 4-5 : Error message
A. Show the error place.
B. Show the problem and how to handle it.
B89
AH-400 Series User's Manual
The message, content and reason & approach are as below.
Message
Content
E000001 EMG button action
Approach
1. Check if EMG button has been pressed.
2. Check if EMG button has been
damaged.
3. The hardware cable connection
problem.
Please contact the technical person.
E000002 run time error, fsm.enter()
sending back false
E000003 run time error, fsm.running()
sending back false
E000004 run time error, fsm.exit()
sending back false
E010001 Tray in cylinder lock position
overtime.
E010002 Tray in cylinder lock position
overtime.
4. I/O card has problem. Please contact
the technical person.
1. The system software has problem.
Please send to Leap the files of fsm.
log & fsm.log.bak which on under the
install content for analysis.
1. Check if the positioned LOCK/UNLOCK
devices were interfered by external
object.
2. Check if LOCK/UNLOCK sensor was
damaged.
3. The hardware cable connection
problem, Please contact the technical
person.
4. The I/O card has problem, Please
check the technical person.
B90
AH-400 Series User's Manual
Message
Content
E010020 Z0 AXIS back HOME failed.
Approach
1. Check if there is interfere object on
the motor movement route which
made the motor can not back home.
E010021 X1 AXIS back HOME failed.
E010022 Y1 AXIS back HOME failed.
2. Motor connected cable loose which
make the motor can not be excited.
Please check the cable assignment.
E010023 PR1 AXIS back HOME failed.
3. The home sensor is abnormal or
position wrong.
E010024 TZ1 AXIS back HOME failed.
4. The hardware cable connection
problem. Please check the technical
person.
E020020 Z1 AXIS back HOME failed.
5. I/O card has problem, Please check
the technical person.
E020021 Z2 AXIS back HOME failed
E020022 R0 AXIS back HOME failed.
B91
AH-400 Series User's Manual
Appendix ATM-100 Taping Machine
Appendix ATM-100
A1.1 Specifications
♦ Dimension: package size L1100*W350*H700(mm)
♦ Power: 1Φ 220vac 50/60HZ
♦ Compressed: 5kg/cm²
♦ Adjustable tape:8~72mm
♦ Carrier tape movement: multiple of 4mm
fig A1-1 : configuration
1 . Carrier
10 . Carrier for taping-in
2 . Operation display
11 . Carrier taping-in on/off detector.
3 . Pressure Gauge
12 . Hand-rolled wheel for tape-out
4 . Air force adjustment knob 13 . Hand-rolled wheel for adjust the bandwidth
5 . Power connector
14 . Input/output communicate interface.
6 . Thermometer
15 . Power on/off
7 . Floating detector
16 . Heat sealing knife
8. Empty detector
17 . Floating optical tube
9. Taping motor switch
18 . Empty optical tube
B92
AH-400 Series User's Manual
A1.2 Operation
1. Power on the button.
2. Wait for a while.
3. Enter the operation page.
Fig A1-2 : Operation page
Title
No.
Clear
Start
Contents
show the amount of tape which has displayed.
Press 2 second, the amount will be zero.
Press to start, ATM-100 will wait for the outside signal for
movement.
Press for the motor forward by inch. If you stop, the motor will
stop.
Mgn-off press for motor magnet-on / off. When magnet-off,you can use
hand to forward and backward.
Home Motor go home.
Fwd
No-auto message for manual / auto mode.
Heat
message show heat / no-heat mode.
Next
enter the next selection.
B93
Note
AH-400 Series User's Manual
5. Parameter Setting
fig A1-3 : Parameter Setting
Title
Distance
Total
Speed
Heat time
Acc. Time
Heat time
Content
key in the 1pc distance for motor.(mm).
set the package amount.
set the biggest speed for motor movement.
set the heat press time on the tape.
Set time of increasing and decreasing for motor.
set the heat press time on the tape.
Note
6. Manual Operation
fig A1-5 : Manual operation
Title
No Heat
Heat btn
Auto
Multi-pitch
Single-pitch
Content
for selection no heat or with heat.
press for heat on.
selection for auto or manual
multi-pitch movement for each time.
single-pitch movement for each time.
B94
Note
AH-400 Series User's Manual
7. Offset setting
fig A1-6 : Offset Setting位移設定
Title
+
Home
Non-auto
Content
press one for forward 1 pulse.
press one for backward 1 pulse.
Motor go home and offset.
f select auto, when reach the quantity, will auto multi-pitch
movement. If select non-auto, you have to go to the above 6
for press multi-pitch. The quantity can set on the space which
below the button.
Note
A1.3 Maintenance
♦ Optical fiber sensor: use air spear to air out the dust and use
soft cloth with alcohol to wipe the dust out.
♦ Tape track: use air spear to air out the dust every operation.
♦ Track Adjust screw and shaft: use lubricant every month.
B95
Document No : PME-121108-V-1.2
TEL : +886-2-2999-1860 #15
E-mail : [email protected]
WEB : www.leap.com.tw
www.leaptronix.com


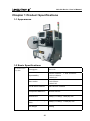

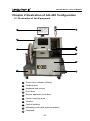

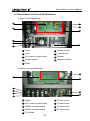

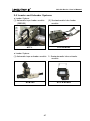

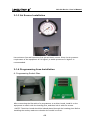

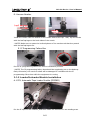


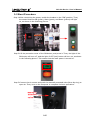

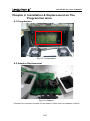


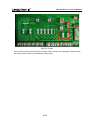

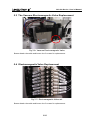

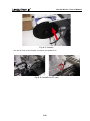
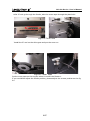
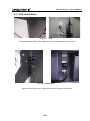
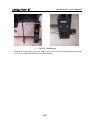


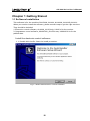
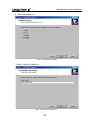

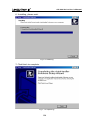
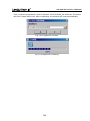

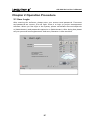

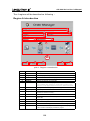


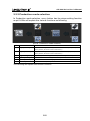


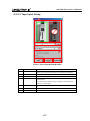
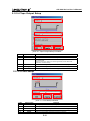


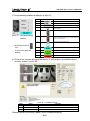
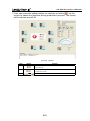


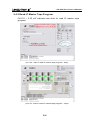
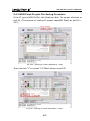
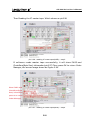
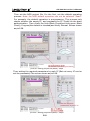
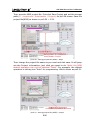


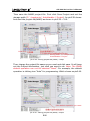

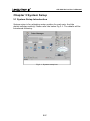


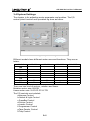


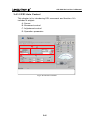


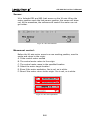


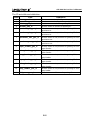
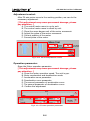
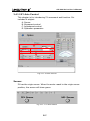

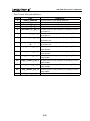


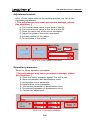
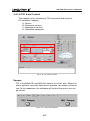
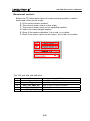

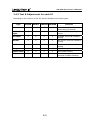

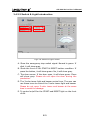

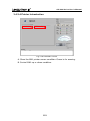


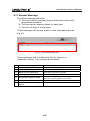
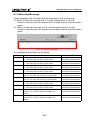


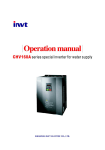


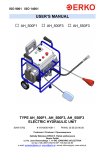


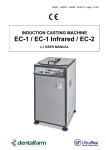

![User's Manual AH-480 Series [Machine / Software]](http://vs1.manualzilla.com/store/data/006867875_1-b2cd01726e15f409a063f19433f9385d-150x150.png)


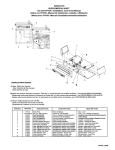
![English Manual AH-160C [Hardware & Software]](http://vs1.manualzilla.com/store/data/005931679_1-0c77ed47c849260a36e03decc8d56d96-150x150.png)