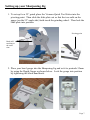
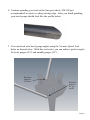
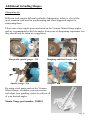
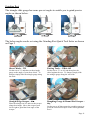
1
Vicmarc Grinding System
User Manual
Vicmarc Sharpening Jig
Part No. V00437
Vicmarc Grinding Rest
Part No. V00438
Vicmarc Machinery Pty Ltd
Manufacturer of Quality
Woodturning Lathes and Accessories
Vicmarc Machinery Pty Ltd
52 Grice Street Clontarf QLD 4019 Australia
Phone (07) 3284 3103
Fax (07) 3283 4656
Int. Ph 61-7 3284 3103
Int. Fax 61-7 3283 4656
Email [email protected]
Web www.vicmarc.com
Manufacturer of Quality Woodturning Lathes, Chucks and
Accessories
Vicmarc Machinery, a family owned and operated business, has been
manufacturing woodturning lathes and accessories for the hobbyists and
professionals since 1984. The company is dedicated to providing machinery of
the highest quality and precision engineering that has secured sales worldwide.
Through constant improvement, Vicmarc retains its place as a leader in the field.
Vicmarc lathes, chucks and accessories are known and respected internationally
for their robust design and ease of use. Only the best materials and latest high
precision, computer controlled machinery are used in the manufacture of
Vicmarc products.
The company continues to respond to the demands of the market, updating and
improving all stages of manufacture.
Contents
Description ……………………………………………….…….
Safety Information .………………………………………..……
Setting up your Grinder ………………………………………...
Setting up your Grinding Rest ….………….…………………...
Setting up your Sharpening Jig .………………………………..
Additional Grinding Shapes ...………..……………………..….
Maintenance ………………………………………….…………
The Vicmarc Guarantee ………………………………….……..
3
3
4
5
7
10
12
12
Page 2
Description
The Vicmarc Grinding system has been designed to make shaping and
sharpening your tools quick and easy. With standard angle gauges and multiple
adjustment positions, you get an excellent and consistent grind every time.
Important: when grinding V10 or any other High Speed Steel tools you must
make sure that the tool doesn’t get too hot and change colour (brown or blue) as
this will weaken the steel and shorten the life of your tool. You should
periodically dip the tip of the tool in water when it begins to get warm but before
it gets hot.
Safety Information
1. Read and understand this instruction manual before operating the Grinding
System.
2. Always wear eye protection.
3. Do not wear neckties, jewellery or loose clothing.
4. Do not operate without guards in place.
5. Tighten all handles before operating.
6. Make sure the grinder is off and has stopped rotating before making any
adjustments.
7. Do not operate while under the influence of drugs, alcohol or medication.
8. Some of the guards in this manual have been removed for photographic
purposes. Always use the guards as supplied and specified with your
grinder.
Please note: the following setting up instructions are a guide only. Personal
grinding setting can be achieved by adjusting the positions and angles to suit
your own preferences.
Page 3
Setting up your Grinder
Depth Gauge
1. Place your grinder on your bench 70mm back and parallel with the front
edge of your bench.
2. Line up slide assemblies so that the centre of the slide plates are in line with
the centre of the grinding wheels and protrude 20mm forward of your bench
top. See diagram above. Ensure they are also square to the bench.
3. Mark the 4 screw holes on your bench for the base of the grinder and the 4
holes for each slide. Also, mark the outline of the base of the grinder on your
bench.
4. Remove the grinder and the slides, and drill the holes to match the
mounting screws you are going to use for the grinder and the slides.
5. Mount the slides by inserting the screws. Before tightening ensure the
slides are square to the front edge of your bench and parallel to each other.
6. Place the grinder in place using the marked outline as a reference. Ensure
the grinder is parallel to the bench and the slides are centred with the grinding
wheels.
7. Tighten the screws ensuring the grinder is fastened to the bench.
8. Check again that the grinder is square to the bench, the slides are centred
with the wheels, are square to the bench and parallel with each other.
9. Screw the Depth Gauge to the centre of the bench top.
10. Your setup is complete.
Page 4
Setting up your Grinding Rest
Use the Grinding
Rest to grind this
angle
1. To initially shape the top angle of the bowl gouge, place the Vicmarc Quick
Tool Setter so that both radii contact the grinding wheel as shown below.
2. Then adjust the Grinding Rest to meet flush with the bottom of the Vicmarc
Quick Tool Setter as shown below. Lock the table and the bottom slide in
place. Make sure that the table does not touch the wheel. There should be
approximately 2mm clearance between the wheel and the rest.
Sharpening Jig
Quick Tool
Setter
Both radii
touching at
the same
time
Quick Tool
Setter flush with
Grinding Rest
The Grinding Rest Quick Tool
Setter can be used to set and
grind other popular angles
(22°, 33°, 44° & 66°).
To set the desired angle, place
the Grinding Rest tool setter
(numbers facing the right hand
side) as shown with the text
flat on the Grinding Rest and
both radii touching the wheel.
Page 5
3. Place your gouge upside down on the rest and grind the top of the tool away
until it meets the bottom of the flute. This pregrind makes your tool look
like the profile below.
4. Important: Make sure that the tool does not get too hot and change
colour (brown or blue) as this will reduce the hardness of the metal and
shorten the life of the tool. To prevent this, make sure you periodically dip
the tool in water. If you find the tool heating up too quickly then you may
need to re-dress your wheel or apply less pressure on the grinding wheel.
Page 6
Setting up your Sharpening Jig
1. To set-up for a 55° grind, place the Vicmarc Quick Tool Setter into the
pivoting point. Then slide the slide plate out so that the two radii on the
gauge (on the 55° angle side) both touch the grinding wheel. Then lock the
slide plate into position.
Pivoting point
Both radii
touching at
the same
time
2. Place your bowl gouge into the Sharpening Jig and set it to protrude 55mm
by using the Depth Gauge as shown below. Lock the gouge into position
by tightening the black hand knob.
Page 7
3. Line up the angle on the Sharpening Jig to the 55° mark as shown below.
This is done by holding the jig locating bar and the gouge, and manually
adjusting the angle.
Note: Do not loosen the nuts and bolts for this adjustment.
Angle indicators
33° & 55°
For additional
friction for the
locating bar,
tighten this nut
Jig locating bar
4. Place the Sharpening Jig in the pivoting point and swivel from side to side
until you have roughed out the bevel profile and removed most of the
material. Rotate the Jig constantly from right to left to avoid flat spots and
overheating
Gouge roughed out on
one side.
5. Important: Make sure that the tool does not get too hot and change
colour (brown or blue) as this will reduce the hardness of the metal and
shorten the life of the tool. To prevent this, make sure you periodically dip
the tool in water. If you find the tool heating up too quickly then you may
need to re-dress your wheel or apply less pressure on the grinding wheel.
Page 8
6. Continue grinding your tool on the finer grit wheel (120-180 grit
recommended) to achieve a sharp cutting edge. After you finish grinding,
your bowl gouge should look like the profile below.
7. You can check your bowl gouge angles using the Vicmarc Quick Tool
Setter as shown below. With this tool setter, you can achieve perfect angles
for bowl gouges (55°) and spindle gouges (33°).
Reference
angle for
55° bevel
Reference
angle for
55° top
profile
Page 9
Additional Grinding Shapes
Sharpening Jig
Different tools require different methods of sharpening, below is a list of the
most common tools used in woodworking and some suggested angles for
sharpening them.
Please note: these angles given are based on the Vicmarc Manta Gauge angles
and are recommended as the best angles from years of sharpening experience, but
they should only be taken as a suggestion.
Flat profile spindle gouges - 33°
Spindle Gouge - 55°
Roughing and Bowl Gouges - 44°
Scrapers - 66°
By using a tool gauge such as the Vicmarc
Manta Gauge, or similar, you can measure
and adjust your grinding system to achieve all
of your desired angles.
Manta Gauge part number: V00818
Page 10
Grinding Rest
The triangle slide gauge has some pre-set angles to enable you to grind precise
angles as shown below.
55°/55°
77°/33°
35°/90°
The below angles can be set using the Grinding Rest Quick Tool Setter as shown
on Page 5
Skew Chisels - 22°
Parting Tools - 33° & 44°
Set the rest to 33° and then set the triangle
gauge to the angle of your skew chisel. To
sharpen simply slide the triangle gauge along
the slide.
Set the rest to 33° or 44° and then place the
chisel against the rest. To sharpen simply slide
the triangle gauge along the tool slide.
Straight Edge Scraper - 66°
Roughing Gouge & Round End Scraper 66°
Place the triangle on 90° and rest the scraper
along the triangle. Move the scraper from
left to right to grind the front angle of the
scraper.
Set the rest to 66°then rotate the roughing gouge or
pivot the round end scraper on the rest to grind the
bevel.
Page 11
Maintenance
To ensure your grinding system works to the best of its ability you should dress
the grinding wheels when they become dull or dirty (do not dress CBN
Grinding wheels). By dressing the wheels, you get a smoother and quicker
grind, and a sharper finish. As less heat is generated, your tool will stay sharper
for longer.
It is also important to keep the grinding system clean of grit and debris as this can
jam the adjusting mechanisms and make setting up for different tools difficult
The Vicmarc Guarantee
Vicmarc Machinery, manufacturer of Vicmarc machine tools, hereby guarantee the
purchaser of the Grinding System that it was precision engineered from the finest
materials available and was thoroughly inspected and tested before leaving the factory.
If, within 12 months following the date of delivery, the product is proven to have been
defective because of faulty materials or workmanship, Vicmarc Machinery will repair
or replace the product free of charge. This guarantee is subject to the following
conditions:
1. The product shall be returned to Vicmarc Machinery within 12 months with a
brief description of the complaint.
2. The name and address of the purchaser, together with the date of purchase and
supplier details shall accompany the parts.
3. Vicmarc Machinery will accept no responsibility whatsoever under the
guarantee or otherwise if the product is not used strictly in accordance with the
instructions supplied, or if the fault can reasonably be explained by carelessness
or negligence.
4. The purchaser is responsible for all costs incurred in transport and packaging to
and from Vicmarc Machinery.
5. In the case of accident, liability is expressly excluded when the product is
tampered with or altered without authorization.
Overseas purchasers are advised to obtain local guarantees from their Vicmarc
agent. Conditions may vary to those detailed above.
Vicmarc Machinery Pty Ltd
52 Grice Street Clontarf QLD 4019 Australia
Phone (07) 3284 3103
Fax (07) 3283 4656
Int. Ph 61-7 3284 3103
Int. Fax 61-7 3283 4656
Email [email protected]
Web www.vicmarc.com
Page 12