1
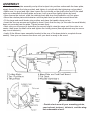
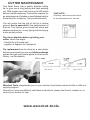
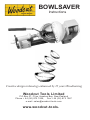
BOWLSAVER
Instructions
Creative design technology enhanced by 25 years Woodturning
Woodcut Tools Limited
P.O.Box 57, Clive, Hawkes Bay, New Zealand
Phone + 64 (06) 875 1066, Fax + 64 (06) 875 1067
e-mail: [email protected]
www.woodcut-tools.
ASSEMBLY
• Take the rotation plate assembly and put the toolpost into position underneath the base plate, simply thread it into the hole provided, and tighten it up tight with the tightening rod provided.
• Make sure it is good and tight, then loosen the lock screw on the shaft collar and lift the shaft
collar up underneath the base plate as far as it will go and then lightly tighten by hand.
• Now remove the toolrest, slide the tailstock back and drop the bowlsaver unit into place.
• Move the rotation plate anticlockwise until the plate lines up with the second thrust tab.
• Fit the large and small blades into position and place the handle clamp on top.
• Insert the two cap screws and tighten by hand, check that the lazy (in this case the small blade)
does not protrude past the plate. Tighten screws firmly.
• Next use your drive spur to determine the correct height, raise the saver until the cutter is on
centre then lower the shaft collar and tighten the locking screw (fine adjustment may be necessary to suit tailstock ).
• Lastly fit the Morse taper assembly bracket to the rear of the base plate to complete the assembly. Now you can remove the saver until your bowl is ready to be cored.
• Double check now all your mounting points,
your toolrest, toolpost , tailstock, and the wingnut underneath as well.
FITTING THE BOWL BLANK
• Select your bowl blank and measure the diameter. In this case the bowl blank is 13”
(330mm) and a thickness of 4-1/2” (110mm).
• Screw your faceplate to the front of the bowl ready to attach to your lathe. Choose a
chuck to suit the diameter of the bowl. I recommend that the chuck jaws should be approximately 30% of the diameter of the block held. For this particular block we will use
a 4”(100mm) jaw set fitted to a Nova Scroll chuck. As you can see it is important not to
use too small a set of jaws for the size of the bowl and risk the bowl coming loose.
• Set your lathe to a moderate speed (ours is 600 Rpm) and attach the bowl to the lathe.
• Adjust the chuck until almost closed, measure the inside diameter with callipers and
mark a circle with your pencil on the face of the bowl.
• Using a 3/8” (10mm) gouge or specialist tool cut the spigot accurately to suit the chuck.
The spigot height should be approximately 1/4”(6mm).
• Make sure the face is flat for the chuck to register against.
SHAPING THE BOTTOM OF THE BOWL
• The tools I am using to shape the bottom of this bowl are the 5/8” (16mm) and 1/2”
(13mm) replaceable tip bowl gouges available from Woodcut.
• Now shape the bowl to your desired shape, keep the bevel rubbing and cut with the
grain and slice the wood away.
What a great feeling to see shavings peeling off really sharp tools.
• Now remove the faceplate and fit the bowl squarely in the chuck and tighten firmly.
MARKING OUT THE BOWLS TO CUT
Proceed to face the front of the bowl and prepare to mark out the bowls you will reclaim.
It is important that we carefully consider the wood in the mother bowl and the finished
shape before we mark out the pitch circles on the face of the bowl.
The aim is to save as much wood as possible without compromising the largest most
valuable bowl.
• Allow a rim of 1” (25mm) for wet wood or 3/4”(19mm) for dry. More can be allowed for
a designer rim. Do not let the bowlsaver dictate the shape of the finished bowl.
• Once you have made a decision mark the pitch circle for that bowl, then divide the rest
of the face of the bowl up according to the number of additional bowls that you wish to
core out. This will largely depend on the depth of the blank.
• A blank of 3” (75mm) in depth will produce two bowls, a blank of 4” to 5” (100 to
125mm) in depth will safely produce three and a 6”(150mm) blank four. Do not to be
too greedy.
• We will now cut a spigot on the front of the blank to enable the core to be remounted or
the next bowl.
SETTING UP THE BOWLSAVER TO MAKE THE CUT
• Remove the toolrest from the toolpost and replace the bowlsaver back into the toolpost,
sitting down on the collar to set the height.
• Start off with the larger blade and remove the largest bowl first, then swap over to the
smaller blade for the next size down. Bowls under 8”(200mm) cut with the small blade.
• With the bowlsaver in the toolrest we will now move the whole toolrest and bowlsaver
unit up to the face of the bowl.
• Slide the toolrest across until the tip of the cutter lines up with the pitch circle.
• This is called the Point Of Entry. It is not necessary to have the pivot bolt in the centre of
the bowl.
• Next set the depth of cut (how far the bowl goes into the bowl) we have provided a template to make your own depth gauge. (Callipers can be used)
• Place the large gauge against the base of the bowl and move the unit forward until the
centre of the bolt is level with the point. Keep the cutter on the point of entry.
• If this is correct then lock your toolrest firmly.
• Slide your tailstock forward, loosen the wingnut underneath of the tailstock bracket fitting, and fit the Morse taper into the taper of your tailstock. Lock your tailstock in place
and wind the handwheel forward a little to hold the taper firmly in place.
• Double check now all your mounting points, your toolrest, toolpost , tailstock,
and the wingnut underneath as well. Now we are ready to start cutting.
FIRST CUT
• Check your lathe speed. This will depend upon the size and the balance of the block
that you are cutting but use a lower speed to start with.
• Once again to make sure that the chuck is tight on the bowl and then start the lathe.
• The hand positions of the bowlsaver are quite important. Bring your body close up to
the bowlsaver handle and your left hand can rest and apply downward pressure to
the blade. This will help dampen any vibration.
• It is very important that the blade is fed very slowly into the wood (Not hesitantly but at
steady rate). There is no need to rush this operation. The whole operation will take only
2 to 4 minutes and you can withdraw the blade at any time and start again at the same
point where you left off. • You can see that a few minutes time spent carefully conserving
a piece of this wood is going to be well worthwhile.
• As we progress we start to come around into the end grain you’ll notice that the shavings will become small, short little fibrous chips.
• It’s important at this time to stop and clear those shavings so that they don’t pack
around the blade and put extra strain on your lathe. Once you’ve done that, carry on as
before.
• From time to time a shaving will sit on top of the cutter and inhibit progress. Simply
withdraw blade and wipe it off and carry on cutting.
• Let the cutter work at it’s own pace the bowlsaver used patiently will do the job as effectively on a light machine as it will on a heavy-duty lathe.
• Now as we proceed around towards the finish of the cut, listen carefully and you will
hear a change in the tone of the cut. This will give you an indication of how much
wood is left in the base now to cut off. Stop the lathe at this point.
• Just feel the bowl with your fingers and check whether it’s almost ready to come off.
You may have to do this 2 or 3 times, particularly when you’re first starting out
with the bowlsaver, until you get used to it.
• Don’t be afraid, if you go too far and the bowl does dislodge simply switch the lathe off
and retrieve the bowl.
Now you have saved your first bowl you will be amazed how easy it was.
• We will now proceed to remount the saved bowl and the same procedure as before
create a new spigot on the bottom of the bowl, re-mount in the chuck and get ready
to core out the next bowl.
SECOND CUT
Now proceed to remount the saved bowl using the same procedure as before.
• Create a new spigot on the bottom of the bowl. Re-mount the bowl in the chuck and
replace the bowlsaver.
• Loosen the clamp bolts and exchange the blades, the small blade now becomes the working blade and the large the lazy blade.
• Tighten the screws firmly and proceed to line up the cutter with the point of entry.
• Take the small gauge and adjust the depth of cut until correct.
• Couple the tailstock to the taper and tighten all the mounting points including the chuck.
• You may wish to increase the lathe speed (ours is 800 rpm) for the smaller bowl.
• Proceed to make the cut as before withdrawing the blade frequently to clear shavings
until the bowl is ready to break free.
• Move the unit including the tailstock back and remove the second bowl.
FINAL BOWL
Place the new bowl in the chuck, replace the toolrest and turn a spigot on the base to suit
the small chuck (2”-50mm).
• Fit the small chuck, remount the bowl and hollow out the inside with a suitable gouge.
• We have used a 3/8” (10mm) Woodcut replaceable tip bowlgouge.
Now you have three bowls ready to be finish turned and polished once they have completely seasoned.
CUTTER MAINTENANCE
Your Bowl Saver has a quality Steelite cutting
tip, to give you a long lasting and hard wearing
cut. With proper care it will save up to 500 bowls
before it needs replacing. Contact the supplier for
an exchange set of blades or send blades back to
the factory for re-tipping. (Very moderate cost)
TAKE NOTE :
Grinding instructions are critical
to the performance of the tool.
You will notice that the top of the tip is hollow
ground, this is essential to the performance of
the tool. The Hollow grind is best left alone and
shaprening done by a very light grind to bring up
a burr,as per picture.
Pay close attention before grinding your
cutter, check the angle:
- Parallel for soft wood and
- negative 5 degrees for hardwood.
Tip replacement can be done by a saw doctor
but we recommend you use our blade exchange
system through your local supplier or direct to our
factory. via the website
Zero rake
Woodcut Tools congratulate you on your choice of purchase and would like to offer our
ongoing support.
Should you have any difficulty with these instructions, please feel free to contact us, or
consult your dealer for help.
www.woodcut-tools.