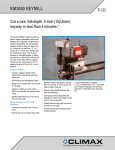
1
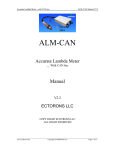
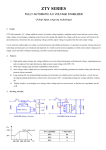
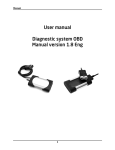
Easy Woodturning oW N E R ’ S M A N UA L │ 2 0 1 3 Just like every product we have ever made, your Easy Chuck is 100% designed and manufactured in America by Easy Wood Tools. The Easy Chuck will allow you to spend more time turning and less time adjusting and messing around with jaw changes. Please read this manual carefully and become thoroughly familiar with the operation of the chuck before use. What makes your Easy Chuck the best chuck on the planet Snap Lock Technology — Easy Jaws snap securely in place yet release instantly with the provided tool. Founder, Easy Wood Tools Inventor of the Easy Chuck Zoom Ring — Fingertip control for quick and easy jaw adjustment. Snap-Lock™ S LT Top Jaws Not Numbered — It makes no difference which top jaw goes in which slot. Table of Contents Box Contents Page 4 Major Components Page 5 Safety Page 6 Using Your Easy Chuck Pages 7-11 Easy Jaw Sets Pages 12-13 Changing Out Easy Jaw Sets Pages 14-15 Zoom Ring Page 16 Master Jaw Remove / Install Pages 17-18 Strong Jaw Design — Easy Jaws are held in place by the chuck body, not small screws that are susceptible to shearing. Safety Corners — Rounded outer corners of Easy Jaws reduce chance of injury. Hub Set Screws — Provided for locking chuck to lathe spindle for sanding in reverse. Easy Jaw Sets — A size for every project so you can chuck your project safely. Quality — ISO 9001:2008 Certified manufacturing assures you the highest possible quality. Chuck PartsPage 19 Warranty and Contact Info Page 20 ©2013 Easy Wood Tools 3 Easy Chuck’s Major Parts Box Contents EASY JAW CJ125 Easy oW N ER’ Woodt S M AN urning UAL │ 2 01 3 CHUCK BODY C1005 PINION C1013 Please be sure the following contents are included in your Easy Chuck box. If there are any missing components, please contact us toll free 866-963-0294. • One 4” Easy Chuck with 1 3/8” Dovetail Jaws • One Chuck Key — 5/16” Hex T-Handle • One Jaw Key — 1/8” Hex Ball Driver • One 1” Spindle Washer JAW STOP PIN C1018 SCROLL RING C1012 MASTER JAW C1001-1004 KEEPER C1009 ZOOM RING C1015 ZOOM RING SPACER C1017 • Two Spare Hub Set Screws • Two Spare Master Jaw Springs — Under normal usage we do not anticipate the need to replace a Master Jaw Spring, but if you ever do damage a spring, you will need to replace it. Having spare parts is “peace of mind” for you. SNAP RING C1016 HUB SET SCREW C1008 5 Safety First Using Your Easy Chuck ! General Woodturning Safety Mounting your Easy Chuck on the Lathe 1. PLEASE READ AND UNDERSTAND YOUR LATHE’S INSTRUCTION MANUAL BEFORE OPERATING. 2. Always wear eye protection – also using a face shield is best. The Easy Chuck directly fits lathes with a 1” - 8 TPI or 1 1/4”- 8 TPI spindle (depending on model purchased). Other spindle diameters may be utilized with the use of an available Easy Spindle Adapter. 3. Never wear gloves, neckties, jewelry or loose clothing. Do not use the Easy Chuck on lathe spindles smaller 3/4” diameter. 4. Never operate the lathe without guards in place. 1. Make sure spindle threads and Chuck Body threads are free of dust and debris. 5. Never run the lathe without a workpiece in the chuck. 6. Never mount a workpiece with split or a large loose knot. 2. Slip the supplied Spindle Washer onto your lathe spindle to prevent binding. 7. Tighten all locks at the lathe before operating. 8. Rotate the workpiece by hand before applying power to ensure proper clearance. 3. Screw Easy Chuck onto lathe spindle until tight. 9. Use the slowest lathe RPM when starting a new workpiece and do not exceed permitted speed. 4. Then tighten Hub Set Screws against lathe spindle using supplied Jaw Key. Do not to overtighten these screws or spindle threads will be damaged. 10. Disconnect machine from power source before making repairs, adjustments or removing/mounting your Easy Chuck. 11. Never operate machinery while impaired under the influence of drugs, alcohol, or medication. 12. Remove the tool rest before sanding or polishing your workpiece. ! Easy Chuck Safety The Easy Chuck is manufactured from the highest quality materials to ensure a safe and durable working life. To operate your Easy Chuck in the safest manner, confirm the following with each use: • The Easy Chuck is tightly threaded onto lathe spindle • Both Hub Set Screws are tightened against your lathe spindle Always contact us directly at 866-963-0294 • The Easy Jaws are securely locked for any concerns or in place issues you have with the use or safety of • The Jaw Stop Pin is securely installed your Easy Chuck. in Jaw Slot #4 of the Chuck Body We are always glad to • You have selected the proper size/type help you! of Easy Jaws for your project • The maximum RPM for the Easy Chuck is 2,000 RPM ! NOTE — The Jaw Key has a hex ball end which allows the tool to be used at up to a 15° angle. Jaw Key Never turn wood with your lathe running in reverse. Even with the hub set screws, the Easy Chuck can only be used in reverse for sanding, not turning 7 Using an Easy Spindle Adapter Chucking onto Tenons The Easy Chuck is available with body threads to directly fit lathes with a 1” - 8 TPI OR 1 1/4” - 8 TPI. When needed, select the appropriate Easy Spindle Adapter to adapt your chuck to other spindle sizes (sold separately). This refers to the closing of the jaws onto a workpiece tenon. Cut your tenon no longer than the height of the jaw so you always shoulder out on the top of the jaws and not the jaw base. It is safest to not exceed 2000 RPM for this operation To use Easy Spindle Adapter — 1. Slip on the provided Spindle Washer onto your lathe spindle to prevent binding. 2. Slip the 1” Spindle Adapter Washer onto the threaded post of your Spindle Adapter 3. Screw into the threads of the Easy Chuck. 4. Finally, screw this assembly onto the lathe spindle until tight; then tighten the set screws on the Spindle Adapter and chuck hub with the Jaw Key. Do not over-tighten these screws or spindle threads will be damaged. Shoulder out here TE N ON It is important to shoulder the workpiece to the top of the dovetail jaw… not the jaw base. DO NOT Shoulder out here Cut your Tenon to 10°ᵒAngle!! (One Jaw removed for clarity) Tenon Safety NOTE - Additional Spindle Adapter sizes are anticipated. Please see www.easywoodtools.com for availability. It is important to use the right jaws for your project. See page 12 for the chart to select the tenon diameter for the jaw set you are using. See the “Tenon” diameter and cut your tenon to no smaller than the size listed and no more than 1/4” larger than the size listed. The Easy Chuck comes stock with 1 3/8” Easy Dovetail Jaws. The jaws shown here INCORRECTLY contact the tenon only on the jaw corners. Select the appropriate size of Easy Jaws to ensure full jaw contact for maximum safety. The stock jaws and most Easy Jaw sets are made with a 10 degree (10°) dovetail gripping feature. Easy Dovetail jaws can chuck your work by both gripping onto tenons and expanding into recesses. In this illustration, either a smaller tenon should be turned or a larger jaw set should be selected in order for the jaws to make full contact with the tenon diameter. Details are as follows: This refers to the closing of the jaws onto a workpiece tenon. Cut your tenon no longer than the height of the jaw so you always shoulder out on the top of the jaws and not the jaw base. Chucking with Easy Dovetail Jaws 9 Chucking into a Recess Another way to hold your project is to cut an angled recess in the bottom of your project and open the dovetail jaws into the recess. This works great but is not as strong as a tenon and some additional safety guidelines must be followed. It is safest to not exceed 1250 rpm for this operation Cut your recess in the bottom of your project no deeper than the height of the jaws so you shoulder out on the top of the jaws and not the jaw base. A good rule of thumb is to leave 3/4” or more material past the outside of the recess so you don’t suffer a breakout of the recess when expansion pressure is applied. Also cut the foot shape at a flatter angle beyond the recess for maximum strength. Cut your recess to more closely match the top half of this illustration for strength and safety! Recess Safety Cut your Recess to a 10°Angle!! REC ES S (One Jaw removed for clarity) At least 3/4” wide Shoulder out here (One Jaw removed for clarity) ! Care must be taken to cut the recess correctly. You must cut the recess at a ten-degree angle (10°) to match the ten-degree angle (10°) of the dovetail jaws. It is important to use the right jaws for your project. See page 12 for the chart to select the recess diameter for the jaw set you are using. See the “Recess” diameter and cut your recess to no smaller than the size listed and no more than 1/4” larger than the size listed. DO NOT Shoulder out here It is also important to shoulder the workpiece to the top of the dovetail jaw…not the jaw base. 11 Easy Jaws Sold Separately Easy Jaws (not shown to scale) Stock Easy Jaws (CJ125 jaws come on your Easy Chuck) CJ150 – 2 3/8” Easy Dovetail Jaws Projects – Up to 12” bowls and platters Grips 2 3/8” Tenon Expands 3” Recess Jaw Length 7/16” CJ125 – 1 3/8” Easy Dovetail Jaws Projects – Up to 6” bowls and platters Grips 1 3/8” Tenon Expands 2” Recess Jaw Length 7/16” A B C CJ125 D A E Fig. 8 Easy Jaw Sets Sold Separately When you are ready to hold onto a different part of your project, you will need to change to a different size or different shape jaw set. Having a selection of Easy Jaws at hand so you can swap out jaws and be back to turning in less than a minute makes a lot of sense. Easy Wood Tools has anticipated many types of projects and has designed jaws that fit your needs. Item # Bowl or Platter Size Grips (Tenons) Expands (Recess) Jaw Length CJ150 up to 12” bowls 2 3/8” 3” 7/16” CJ210 up to 5” small projects 1/2” straight 1 1/4” 1 1/4” CJ225 up to 6” bowls 1 ⅜” 2” 1 1/4” CJ350 up to 24” bowls 3 1/2” 4 1/4” 1” CJ450 up to 20” bowls 2 1/2”, 3”, 3 1/2” 4 1/4” 1” B F C D E CJ210 –Fig.1/2” Easy Reach Dovetail Jaws 8 Projects – Small projects and bowls/platters up to 5” Grips 1/2” Tenon (Straight) Expands 1 ¼” Recess Jaw Length 1 ¼” CJ150 F CJ210 CJ225 – 1 3/8” Easy Reach Dovetail Jaws Projects – Up to 6” bowls and platters Grips 1 3/8” Tenon Expands 2” Recess Jaw Length 1 ¼” CJ225 CJ350 – 3 ½” Easy Reach Dovetail Jaws Projects – Up to 24” bowls and platters Grips 3 ½” Tenon Expands 4 ¼” Recess Jaw Length 1” CJ350 CJ450 – 3 ½” Easy Stepped Dovetail Jaws Projects – Up to 20” bowls and platters Grips 2 ½”, 3”, 3 ½” Tenon Expands 4 ¼” Recess Jaw Length 1” CJ450 As with the Easy Chuck, all Easy Jaw Sets and other accessories are 100% designed and manufactured in America by Easy Wood Tools. Check for more jaw sizes and shapes through your local retailer or at our website www.easywoodtools.com. 13 Changing Out Easy Jaw Sets Snap-Lock™ S LT When you are ready to grip a different part of your project, you will need to change to a different size or different shape jaw set. Quick Change Jaws - With Snap Lock Technology Additional Easy Jaw sets are available for most any turning project (see Pages 12-13). No wrenches or screws are needed, just the included Jaw Key. 3. SNAP IN NEXT JAW — Now you’re clear to slide in your next jaw until you hear the ‘snap’. The snap lets you know you have locked the jaw into place correctly. Always try to pull the jaw back out to confirm the Keeper has fully engaged. Snap-Lock™ S LT To change to a different jaw set: 1. RELEASE JAW — Insert the provided Jaw Key into the angled jaw hole until it bottoms out. The insertion angle is about 15 degrees relative to the chuck face. There will be a slight resistance as you disengage the Keeper mechanism. When you remove the tool, the jaw will pop out about ¼”. INSE RTIO N AN GLE 15 DE ! 4. REPEAT — Now you’re ready to change the other 3 jaws by repeating steps 1-3 for each jaw. GREE S 2. SLIDE OUT EXISTING JAW — Slide the jaw out and use compressed air (and a small paint brush) to clean wood dust from the chuck slot and snap lock components. Be sure to also clean the jaw you are about to install. Clean here WARNING - If you do not hear the snap, or the jaw pops back up when you pull on it, this means you have debris keeping the snap lock from engaging. Clean components more thoroughly and retry. ! WARNING!! – Grab each jaw by hand and attempt to slide it out of the chuck forcefully to ensure all the Keepers have definitely engaged. DO NOT USE THE CHUCK IF ANY JAW IS NOT FULLY LOCKED INTO PLACE. 15 Zoom Ring Master Jaw Removal Sequence When you need to move your jaws a long distance, such as when going from a large diameter to small diameter, instead of rotating the Chuck Key dozens of times, simply rotate the Zoom Ring by hand in the direction you need to open or close. This will position the jaws to another diameter. 1. Remove the Jaw Stop Pin from Jaw Slot #4. The hole for the stop pin is drilled all the way through the outer wall of the Chuck Body. To access this hole, simply turn the body over and locate the hole in the Zoom Ring. The Zoom Ring is only used for jaw positioning, NOT for final clamping. Using a 1/8” punch, line up the holes in the Zoom Ring, Zoom Ring Spacer and Chuck Body (rotate Zoom Ring with the punch and feel when aligned). Then tap out the stop pin from the bottom end. Tap out Jaw Stop Pin from 2. Then, to remove the Master Jaws, simply rotate bottom with a 1/8” punch and the Zoom Ring in the ‘Open” direction until all the Master Jaws drop out of their respective slots. small hammer ! 3. Use a piece of wood (match stick size), insert in the bottom of the scroll and rotate the scroll by turning the Zoom Ring. This will scrape out build-up of wood dust. ALWAYS use Chuck Key for final tightening 4. Use compressed air to clean out all other areas including the Top Jaw and the Keeper in each Master Jaw. 5. Reinstall Master Jaws as follows in next section. Clean Scroll Ring Grooves with small piece of wood ! General Maintenance Before the chuck is mounted on the lathe, make sure that all the threads are clean and free of debris. This will ensure the chuck will run true and balanced. Your new Easy Chuck is engineered and manufactured to very close tolerances and may initially be stiff to operate. With use, movement will become easier. To maintain, periodically remove the Easy Jaws and Master Jaws and spray a dry lube (we recommend TDL brand) onto the jaw slide area and scroll and work through the full range of movement. Wood dust build up can make the jaws difficult to move. If it becomes difficult to rotate the Zoom Ring by hand, you will likely need to remove the Master Jaws to clean out the dust and sap build up. ! Clean out the Keeper and the teeth at the bottom of the Master Jaw 17 Master Jaw Installation Sequence For instructions on the complete disassembly/assembly of the Easy Chuck, please visit the Easy Wood Tools website at www.easywoodtools.com or call us toll free at 1-866-963-0294. Orient the #1 Master Jaw and insert into the jaw slot #1 as shown. (See circles in picture for jaw and slot # locations) 1. Lightly push the Master Jaw inward as you rotate the Zoom Ring in the “Close” direction. STOP when the Scroll Ring tooth just engages the first tooth of the Master Jaw. To determine if the Master Jaw has engaged, try to pull the jaw out. If it pulls out, rotate Zoom Ring back a bit and retry. Chuck Parts The number on each Master Jaw corresponds to the number in each jaw slot of the Chuck Body 2. Push Master Jaw #2 (in slot #2) against the Scroll Ring and again turn (close) the Zoom Ring until the first tooth of this jaw engages. 3. Repeat for jaws #3 and #4 until all jaws are engaged. 4. Continue closing now and observe that all jaws are moving inward at the same time. 5. Confirm all Master Jaws are installed properly by running jaws in until they are nearly touching at the center. Look for an equal gap at the intersection points. If not equal, reinstall all Master Jaws. 6. Now install the Jaw Stop Pin in Jaw Slot #4 by tapping into place from the top until tooth notch in #4 jaw just passes over (no higher than 3/32”). 7. You are now ready to install the Easy Jaws best suited for your project. Note that Top Jaws are not numbered because they can go in any jaw slot. Complete Disassembly / Assembly Rotate the Zoom Ring as you insert the Master Jaw Tap Jaw Stop into place with a hammer The following table shows the part numbers, names and quantity for each Easy Chuck assembly. Quantity per Chuck Part Number Part Name C1001 Master Jaw #1 1 C1002 Master Jaw #2 1 C1003 Master Jaw #3 1 C1004 Master Jaw #4 1 C1005 Chuck Body 1 CJ125 Top Jaw 4 C1007 Master Jaw Spring 4 C1008 Hub Set Screw 2 C1009 Keeper 4 C1010 Keeper Spring 4 4 C1011 Keeper Pin C1012 Scroll Ring 1 C1013 Pinion 2 2 C1014 Pinion Pin C1015 Zoom Ring 1 C1016 Snap Ring 1 C1017 Zoom Ring Spacer 1 C1018 Jaw Stop Pin 1 C1019 Snap Ring Shim 1 C1020 Chuck Key - 5/16” T-Handle Hex 1 C1021 Jaw Key - 1/8” Hex Ball Driver 1 19 Warranty The Easy Chuck carries a 2-year warranty from time of purchase covering defective parts and labor. This warranty does not cover costs or damage arising from the mishandling or misuse of this product. Please keep you receipt of purchase for any warranty claims. Questions Please contact Easy Wood Tools at [email protected] or by calling toll free 1-866-963-0294 with questions regarding the proper use, maintenance or repair of your Easy Chuck. For more information on this product scan this QR Code with your smart phone. TM Easy Woodturning