1
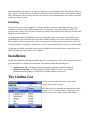
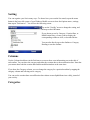
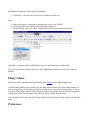
SplashNotes for Smartphone User Guide Introduction > Features What is Outlining? > Brainstorming > Organizing > Analyzing > Finishing Installation The Outline List > Sorting > Columns > Categories > Security Settings > Appearance Editing an Outline > Creating a New Item > Deleting Items > Moving Items > Working with Child Items > Checkboxes > Outline Numbering > Navigation > Printing > Undo Working with Notes Working with Drawings Working with Templates > Creating Templates > Editing Templates > Starting Outlines from a Template Backing Up and Restoring > Restoring a Backup Sharing Outlines > Sending via IR, Bluetooth & Email Export SplashNotes Desktop > Outline List > Synchronization > Filing Cabinet > Preferences > Importing and Exporting Ideas for SplashNotes Uses > Handheld Reference Guides > Brainstorming > Meeting Agendas & Notes > Education > Task Lists > Project Management > Product Testing & QA > Medical Care Introduction Welcome to SplashNotes for Smartphone, the easiest to use, most versatile outliner on a Smartphone device. SplashNotes can help you create plans, organize thoughts, make task lists, write speeches, and lots more. SplashNotes is also a great tool for communicating your projects and plans to your colleagues. This manual will teach you the basics of how to get started using SplashNotes for Smartphone, and will go over some features specific to the desktop application. SplashNotes is an organizational tool that is only limited by your own creativity. While reading through the manual, think of all the areas of your life where SplashNotes could benefit you and help you get organized. If you are new to outlining, be sure to read the chapter titled "What is Outlining?" to get the most out of the concepts that inspired SplashNotes. Features Organizational Features • • • • • • • Templates - Outlines that you can save and reuse over and over Sorting and Columns - Outlines can be sorted alphabetically, by category, creation date, modification date, or even manually by dragging and dropping them where you want them in the list. Hiding and Deleting Checked Items - You can hide checked items or delete them to focus only on the parts of an outline or project that have not yet been completed. Notes and Drawings - You can attach a note or drawing to an individual item in an outline. Collaboration Features Beaming - Transmit your ideas and plans to other SplashNotes owners. Backup Files - If you are using SplashNotes only on a handheld. Each outline is now stored in your backup directory (My Documents -> SplashNotes). You can give copies of these outline files to others to install into their own Windows Mobile devices. Your outlines can be emailed, or even posted on the Web for others to use. If you are using SplashNotes Desktop, your outlines are synchronized with your desktop computer. To make a file to share with others, choose "Export to Smartphone file" from the File menu. Export and Import - Transfers information to and from the Memo pad. Easy to Use • Duplicate and Delete - Duplicate or delete an item using a menu option. What is Outlining? Outlining is a multi-step process that helps you take raw ideas, organize them, and turn them into a final product. The steps of outlining are: 1. 2. 3. 4. Brainstorming Organizing Analyzing Finishing Brainstorming Brainstorming is the process of capturing your ideas about a subject, the raw material for your project. Brainstorming can be done individually, but is even more powerful when done in a group. Members of the group say out loud their ideas about something and one person attempts to write them all down. While brainstorming, no ideas should be ruled out. Anything goes. Brainstorming at its best is quite fun. Often times it can even be hilarious, with people shouting out the most ridiculous things. All ideas should be written down no matter how far out. If you are brainstorming on your own, try to stretch your mind to look for all angles to a problem or subject. By keeping all ideas open during the brainstorming phase, without judging them. Participants will feel more free to include them. Also, ideas that may eventually be ruled out might trigger other ideas that might be the best ones. By ruling out the ridiculous too early, you may never get to the good ideas that follow them. SplashNotes can help you capture ideas during the brainstorming phase. Simply enter one thought per line. Enter a return when starting a new thought and a new item will be created. SplashNotes is particularly powerful at this phase when used in conjunction with the Windows Mobile keyboard. You can quickly create a very large list of ideas. Organizing During the Organizing phase, you attempt to group the ideas together under logical headings. These groupings can then be further broken down into sub-groups. This process will help you break a large project down into smaller projects, and those into smaller still. Your goal here is break the project down into small enough groups that they are understandable and manageable. One problem with brainstorming on paper is that when you get to the organizing phase, you must rewrite all the ideas into some structure. Some people advocate writing all the ideas onto paper and cutting them up so they can be easily rearranged. However, if you want to contrast different arrangements at this phase, you must make multiple copies. It can be a nightmare. You can group ideas together by indenting them under larger concepts. If you want to contrast different ways of organizing an outlining, you can save an outline as a template and create as many copies as you need. Analyzing During the analyzing phase, you narrow the focus of your project to manageable goals, and you delete any ideas that you wrote down, but that you have decided not to use in this project. At this phase, you may discover parts of your outline which are incomplete, which may require you to go back to the Brainstorming and Organizing phases to fill out all areas of your outline. SplashNotes helps you analyze your ideas by allowing you to temporarily hide items that you think you may not need. You can then try out different scenarios of what your final outline will look like, without losing information. Once you have decided on a final list, you can permanently delete all the items that you do not want to include. Finishing Once you have your outline complete, it is time to finish your project. Depending on what you are working on, this may require different approaches. For example, if you are creating an outline of a report you are writing, you will want to export your outline to the Memo Pad so that you can edit it and finish it in a word processor. Or, keeping the outline in SplashNotes may be your finishing step. For example, many teachers use SplashNotes to create curriculum and lesson notes. While teaching a class, they check off items they have completed. They can then always know what progress they have made in a particular course. By saving an outline as a template, a teacher can reuse the course outline the next time the course is taught. Or perhaps your outline represents a project plan. SplashNotes's checklist feature can then be used to check off items in a project as they are completed. Installation Launch the SplashNotes Installer and follow the on screen instructions. You will be required to connect your Smartphone to complete the installation. The installer installs the following files: • • SplashNotes.CAB - A Windows Mobile Smartphone application on the Smartphone. SplashNotes Desktop -- A desktop application (for Windows) used to view and edit information on the desktop as well as Sync with the outlines on the device. The Outline List The List Screen displays the titles of each of the outlines that you have created. Each line in the list represents an outline that you have entered. To view or edit an outline, simply tap on its title. To create a new outline, tap the New button. Sorting You can organize your list in many ways. To choose how you want the list sorted, tap on the menu button in the lower left corner of your Windows Mobile screen to show the Options menu , settings, then tap on "Preferences" . You will see the following screen: Tap on the "Sort By" arrow to change the setting, and then tap on the OK button. If you choose to sort by Category, Creation Date, or Modification Date, you may want to display the corresponding column as well, as described below. You can also directly tap on the Outline or Category Heading to sort the outlines. Columns Use the Column checkboxes in the Preferences screen to show extra information next to the title of each outline. You can show the category and either the creation date or the modification date. Note that you cannot show both the creation date and the modification date at the same time. If you show the Category column, you can change the category for a particular outline by tapping the category column and selecting a new category. You can use the creation date or modification date column to turn SplashNotes into a daily journal of your activity. Categories By selecting the pop-up list in the upper right hand corner of the Outline List, you can choose to display the outlines for a particular category. Also, by selecting "Edit Categories" you can add or change your categories. The built-in Windows Mobile applications have similar capabilities. See your Windows Mobile User's Manual for more information about categories. Security Settings You may choose to hide outlines which are marked Private in the Details screen of the outline. To hide private outlines, choose Security from the Options menu. You will be shown the following screen: • • • Hide Records prevents any record marked Private from appearing in the list of outlines. Mask Records conceals private records by showing a gray box where the name would normally be. You will be able to see that there is an outline, but you will not be able to see the title of the outline. Show Records will show the titles of all outlines, regardless of the Private setting on the outline Appearance You can change the color scheme of SplashNotes by choosing Appearance from the Options Settings menu from the main list view. Check the item that you want to appear. Change the color by tapping on the box on the right side. Background color will put a background color behind most of the screens in SplashNotes. Row Color will alternate the background color with another color for each line of text on the List View and Outline View. Alter. Text Color lets you specify a color for alternating text. You can choose any combination of items, or all three to pick the look you want. Editing an Outline The Edit Screen lets you edit or view new outlines or previously entered outlines. To edit a new outline, tap the New button in the List Screen. To edit a previously entered outline, tap on the name of the outline in the List Screen. The first line, in bold, is the title of the outline. This is the text that will appear in the List Screen described in the previous chapter, and it appears at the top of the screen. The rest of the lines in the outline all start with a bullet. Child items are below its parent, and indented to the right. Items that have child items below them begin with an arrow. Items that have no child items begin with a dot. An item that has a right-pointing arrow is an item with child items that has been collapsed so that the child items are hidden. Creating a New Item To create a new item, either tap the button, or enter a Return at the end of a line.. Deleting Items There are many ways to delete an item: • • • Tap on the item and choose Delete Item from the Item menu Check off the item and choose Delete Checked Items from the Outline menu Backspace over the item. Moving Items To move an item, tap on its bullet, and drag it where you want it. Note that SplashNotes will only let you indent items one level more than the item just above it. Working with Child Items A child item is an item that is indented to the right of the item above it. The item above is called the "parent" item. When the parent item is moved, the child item moves with it. Use child items to elaborate on, or provide more detail for, a particular idea. For example, you might be doing a report on dogs. You could create two child items called "Long hair" and "Short hair" to further divide the idea of "Dogs". Underneath each of those, you could list some examples of short and long haired dogs. To make an item into a child item, do the following: • Tap the right arrow, a vertical line will appear indicating where the item will be placed. To show or hide the child items of a parent item, tap on the arrow next to the parent item. The arrow will highlight and change directions, and the child items will either be shown or hidden. Note that SplashNotes will only let you create an outline that "makes sense". In other words, you cannot create a child item that is two or more levels below its parent in the hierarchy. You also cannot make the first item a child item. To collapse all the items in an outline, so that only the top-level items remain visible, choose Collapse All from the Outline menu. Similarly, to show all the items in an outline choose Expand All from the Outline menu. Checkboxes Show Bullets Show Checkboxes Hide Checked Items To turn your outline into a checklist, tap on the Show Checkboxes button ( ) at the bottom of the screen. Checkboxes will appear next to each item. To check or uncheck an item, tap in the checkbox next to the item. When you check all the child items of a parent item, and Auto-Check is on in the Preferences screen, the parent is also automatically checked. Choose Delete Checked from the Outline menu to delete all checked items. To temporarily hide the checked items instead of deleting them, tap the Hide Checked Items button ( ). To show the checked items again, tap either the Show Checkboxes button or Show Bullets button ( ). Choose Uncheck All, from the Outline menu, to uncheck all checked items. Outline Numbering Choose Outline Menu, Settings and Options, if you want SplashNotes to automatically number the lines of the outline. A number of pre-selected numbering schemes are included in the Numbering list, including Legal, Roman, Numeric, Alphabetic, and a mixture. When you select a numbering scheme, a small arrow will appear to the right. Tap that arrow to select the number suffix that will appear after the number. For example, if you choose Numeric, and ")" as the suffix, your numbers will look like: 1) 2) 3) Navigation There are several ways to scroll an outline. • • You can scroll an outline by tapping on the arrows in the scrollbar, or by dragging the button in the scrollbar up and down. You can scroll up or down a page at a time by pressing the navigation buttons with your finger. Printing SplashNotes provides printing support (Menu-Settings-Print) if a Windows Mobile Print Library is installed on the device. Please refer to device documentation for more details. Undo Most actions in the Edit Screen can be undone, including entering text, deleting text, moving items, checking an item, and moving an item to the trash can or folder. To undo your last action, choose "Undo" from the Edit menu. To redo an action that you have undone, choose "Undo" from the Edit menu again. Working with Notes You can attach a note to any item by choosing Attach Note from the Item menu. To delete a note, while in the edit note screen, select options and delete note. Working with Drawings You can attach a drawing to any of your outline items by tapping in the text of the item, and then choosing Attach Drawing from the Item menu. To delete a drawing, while in the drawing screen, select options and delete drawing. . Working with Templates Templates allow you to save an outline and reuse that outline over and over. For example, if you are a teacher and you have created an outline of a class that you teach often, you can save the outline as a template and recall that outline every time you are about to teach that class. Creating Templates To save an outline as a template, go to the outline and choose Save As Template from the Outline menu. A copy of your outline will be put into the Template list. You can also create a template by choosing Edit Templates from the Options menu in the List View, and pressing the New button. Editing Templates To edit a template, choose Edit Templates from the Options menu. You will then see the Template List screen. Tap on the template you would like to edit to go to it. When you have finished with the template, tap the done button and you will return to the Template List screen. The changes to your template are automatically saved. Starting Outlines from a Template To create a new outline that is a copy of a template, choose New From Template from the Options menu in the List View. Then choose the template that you want to copy. A new outline will be created that is an exact duplicate of the selected template. Backing Up and Restoring All SplashNotes files on the device are stored under Documents -> SplashNotes folder In the Active Sync’s Sync providers, ensure that ‘Files’ is selected. This will make sure during every sync operation; all SplashNotes files on the device are copied onto the Desktop folder of the device. It is a good idea to occasionally save a copy of your backup directory in case your hard disk crashes or your Windows Mobile has a problem. Restoring a Backup Do the following steps in order to reinstall an outline file. 1) If SplashNotes is not installed, follow the installation instructions at the beginning of this manual to install SplashNotes. 2) Copy all the outline files in the SplashNotes folder. Sharing Outlines You can give your outlines and templates to others to install on their Windows Mobile devices in a number of ways. Sharing Backup Files If you are using SplashNotes only on a Windows Mobile device, every time you do a Sync, a backup file for each outline is created in your SplashNotes directory. To give someone an outline, give them a copy of the outline file in your backup directory that corresponds to that outline. They can then install it using the Windows Mobile Install Tool as described in the previous chapter "Restoring a Backup". If you have a great outline or template that you would like to share with the world, let us know. Sending Another way to give an outline to someone else is to send it them (also called beam). SplashNotes supports sending via beaming, Bluetooth, SMS and email. To beam an outline from one Windows Mobile to another, both Windows Mobiles must have SplashNotes installed. If only one Windows Mobile has SplashNotes installed, you can beam a trial version of SplashNotes to the other user so that the other user can receive your outline and use SplashNotes during the trial period. Once you are sure that SplashNotes is installed on both Windows Mobiles, tap on the title of the outline so that it is displayed. Then choose Beam from the Outline menu. Then you will be able to choose which method to send the data file -infrared, Bluetooth, or available email clients. If you are having trouble beaming, make sure that your Windows Mobile devices are between one and three feet apart, that the infrared ports are not obstructed, that ambient light is not extremely bright, and that Infrared Receive is turned on in the General preferences of the receiving Windows Mobile device. Export Export to Rich Text Format (RTF) The Export feature lets you export an outline to RTF Format, which can be read using to your word application. To export an outline, in the outline edit screen select Menu, Settings, export to RTF option The exported file will be stored in the same SplashNotes document folder in the device (Documents -> SplashNotes folder) SplashNotes Desktop Application Outline List The outline list gives you easy access to your SplashNotes outlines and lets you move outlines to and from your handheld device. To show an outline, simply click on it and the outline will appear to the right of the list. You can hide the outline list by clicking the Close Box. This will give you more room on your screen to edit outlines. To show the outline list again, choose Show Outline List from the Window menu. The Outline List is organized into folders that represent different parts of your hard disk, and have different functions, as follows: Outlines and This section keeps all the outlines (common to the desktop and device). You can change the location of this directory by choosing Preferences from the File menu. Templates This section keeps all the templates (common to the desktop and device). You can change the location of this directory by choosing Preferences from the File menu. Synchronization SplashNotes performs the following Sync Operation: RAPI Sync - Click this and select Sync to synchronize the device. Steps: 1) Make sure device is connected to desktop using Active Sync/ WMDC. 2) Ensure SplashNotes is installed both on Desktop and Device 3) On the desktop, select any outline, and hit the Sync menu item and select Start Sync Once Sync is complete; all the outlines between Device and Desktop are synchronized. To see the synchronized files on the device, in the SplashNotes outline list screen, select Options, Refresh. Filing Cabinet The Filing Cabinet expands on the functionality of the Folder on the handheld application. Click the filing cabinet icon to quickly show the filing cabinet outline. The filing cabinet outline is a place to temporarily put items that you may be moving between items or between outlines. To put an item in the filing cabinet outline, either drag the item from your outline onto the filing cabinet outline, or right click on the item and choose Move Item To Filing Cabinet from the menu. You can quickly delete the items in the filing cabinet by choosing Empty Filing Cabinet from the Edit menu. Preferences preferences Choose Preferences from the File menu to bring up the Preferences dialog. > Desktop Directory The outlines that are listed in the Desktop Outlines and Desktop Templates section of the Outline List are stored on your hard disk in the directory pointed to by the "My documents directory" setting. You may change the directory to which this points to by clicking the Browse button. The outlines that the Handheld Outline section and Handheld Templates section show are stored in your Windows Mobile directory on your hard disk. You cannot change this. > Fonts You can change the font of the Outline List or the text in the outlines by clicking the Select button next to the appropriate setting. Note that the Outline font is the font used to display the outline on the screen, and also to print the outline. If your printer does not have a font that matches the Outline font, Windows will substitute a different font when printing. To see your outline in the same font it will print, be sure to choose a printer font or a TrueType font for your Outline font. > Save New Outlines In When you save a new outline, it is automatically placed in your Handheld Outlines section by default. You can change this to automatically save outlines in your Desktop Outlines section by selecting Desktop Outlines section from the Save New Outlines drop down menu. > Auto-create new outline When you first start the program, SplashNotes will show the outlines on the screen that were there when you exited the program. If no outlines are on the screen, SplashNotes will instead create a new, Untitled Outline. To change SplashNotes so that it will leave the screen blank, uncheck the Auto-create New Outline checkbox. Importing and Exporting word > Microsoft Word Format If you have Microsoft Word 97 or above, you will be able to import and export your outlines to Word. To export an outline, open it, and choose Copy to MS Word from the File menu. Word will start, and the outline will appear in Word. Similarly, you can open an outline that was saved in Word and import it into SplashNotes by choosing Import MS Word Document from the File menu. Note that the import command expects to open a Word document that is in Word's Outline mode. Some word documents that have extensive formatting that is not part of Word's Outline mode may produce unexpected results. Ideas for SplashNotes Uses Creating Handheld References reference SplashNotes is ideal for reference information. Because it is hierarchical, you can quickly drill down to the information you need. Examples include: dictionaries, encyclopedias, catalogs, field guides, travel information, parts lists, web site lists, and more. You can even attach images to the items to enhance the effectiveness of the reference. For example, you may have a document in Microsoft Word that contains headings and descriptions of product quality standards. You choose Open MS Word Document from the File menu to create a new outline and then edit the items to create your handheld reference. Or you may want to download travel information and create a custom trip outline. Simply put the information in Word or in a SplashNotes outline and then HotSync. Brainstorming A brainstorming session is more helpful when the ideas are then organized, categorized, and prioritized. To use SplashNotes for this, jot down an idea for each item, then create categories under which the ideas belong. For example, for a brainstorm session on marketing strategies, the categories that would emerge might be: Internet marketing, TV, Mailings, Trade Shows, Magazines, etc. Underneath each of these would be other sub-categories, and so on. Meeting Agendas and Notes agenda Plan your meetings in SplashNotes, and then beam or email the meeting agenda to the attendees. During the meeting, you can take notes using the meeting agenda as a template. After the meeting, organize your notes on the desktop, export them to Microsoft Word, and then format the notes for report to management. Task Lists task s Use SplashNotes to create more complicated and hierarchical lists than the simple lists that come with your handheld. For example you may have tasks in different areas of your life: Work (which may have many sub-headings as well), house projects, travel, hobbies, health, food, volunteer work, movies to rent, raising the kids, web sites to remember, etc. Project Management project Education > Assessment Keep track of a project by first listing the major tasks of a project, then adding subordinate tasks to each major task to list the steps required to complete that task. As a task is completed, check it off. When all the subordinate tasks are checked, the parent task is automatically checked. Assign tasks to individuals by listing their name on the task. You can then search for which tasks are assigned to that person using the Find command. Teachers can easily move around the classroom to assess students while they are learning. For example, you can take a list of educational standards that is in Word and open it up as an outline, which you quickly turn into a checklist. You can create this list for each student and even add special notes to various items. You can also keep track of the mountains of homework data and other information. There are many different ways to create student files and to use rubrics and checklists for individualized and authentic assessments. Many examples of rubrics, checklists, and assessment ideas are included in SplashNotes for Teachers. > Lesson Plans Teachers can create lesson plans and use ideas for activities right there on the handheld. You can create your own lesson plan templates (or use the ones provided). Wherever you are (e.g., boring faculty meetings), you can develop lesson plans. You can refer to other resource outlines in SplashNotes for Teachers, such as Lesson Plan Creating, Lesson Plan Template, Before Reading Activities, etc. > Organizing Tasks & Ideas Teachers' "To Do" lists are so long and chaotic (& often lost) that things don't get done and you get further stressed by keeping it all in your heads. SplashNotes eases the mental burden by grouping ideas and tasks in logical ways. Examples include lists & priorities, parent contacts, materials & supplies, curriculum and instruction ideas > Note Taking & Research Students can take notes and create outlines as they listen learn. They can take notes on research materials or textbooks. They can use the Research Paper Template and other outlines. They can even do homework tasks on the handheld and easily upload the data to the desktop for formatting in Word. Product Testing and QA QA SplashNotes is perfect for creating test plans. As you think about the product you are testing, you can continuously add ideas and areas of the product you want to explore. Once all the portions of a product are mapped out, you can save the outline as a template, and then create copies of the outline for each type of test you want to perform (usability, stress, automated testing, functional, unit, etc.). Keep track of which tests you have completed by checking off the tested items. Medical Care The multi-level outline format is ideal for the complex data organizing that is involved in many areas of medicine and patient care. Medical professionals can create and share outlines to be used in patient diagnosis, administering medicines, keeping updated on medical practices, etc.