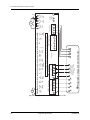
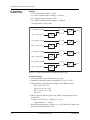
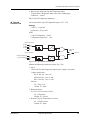
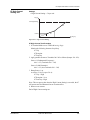
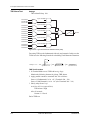
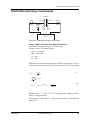
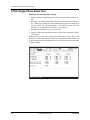
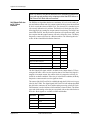
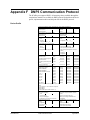
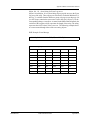
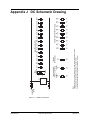
1
T-PRO Transformer Protection Relay Model 8700 User Manual Version 4.2 Rev 0 Preface Information in this document is subject to change without notice. © 2013 ERLPhase Power Technologies Ltd. All rights reserved. Reproduction in any manner whatsoever without the written permission of ERLPhase Power Technologies Ltd. is strictly forbidden. This manual is part of a complete set of product documentation that includes detailed drawings and operation. Users should evaluate the information in the context of the complete set of product documentation and their particular applications. ERLPhase assumes no liability for any incidental, indirect, or consequential damages arising from the use of this documentation. While all information presented is believed to be reliable and in accordance with accepted engineering practices, ERLPhase makes no warranties as to the completeness of the information. All trademarks used in association with B-PRO, F-PRO, L-PRO, ProLogic, T-PRO, TESLA, TESLA Control Panel, RecordGraph and RecordBase are trademarks of ERLPhase Power Technologies Ltd. Windows® is a registered trademark of the Microsoft Corporation. Procomm® is a registered trademark of Symantec. HyperTerminal® is a registered trademark of Hilgraeve. Modbus® is a registered trademark of Modicon. Contact Information ERLPhase Power Technologies Ltd. Website: www.erlphase.com Email: [email protected] Technical Support Email: [email protected] Tel: 1-204-477-0591 D01386R04.20 T-PRO User Manual 8700 i Table of Contents Preface ......................................................................................i Contact Information ...................................................................i Table of Contents .................................................................... iii Using This Guide ......................................................................v Version Compatibility .............................................................. vii 1 Overview ................................................................. 1-1 Front View........................................................................ 1-3 Back View ........................................................................ 1-3 Model Options/Ordering................................................... 1-4 2 Setup and Communications.................................. 2-1 Power Supply................................................................... 2-1 IRIG-B Time Input ............................................................ 2-1 Communicating with the Relay (IED) ............................... 2-2 Using HyperTerminal to Access the Relay’s User Interface ........................................................................... 2-5 Setting the Baud Rate...................................................... 2-7 Accessing the SCADA Services ...................................... 2-8 Communication Port Details ............................................ 2-9 Maintenance Menu ........................................................ 2-12 Firmware Update ........................................................... 2-13 3 Using the IED (Getting Started) ............................ 3-1 Start-up Sequence ........................................................... 3-1 Front Panel Display.......................................................... 3-2 Terminal Mode ................................................................. 3-5 Metering Data ................................................................ 3-14 4 Protection Functions and Specifications ............ 4-1 Protection and Recording Functions................................ 4-1 Recording Functions ...................................................... 4-30 Logging Functions.......................................................... 4-32 5 Offliner Settings Software ..................................... 5-1 Introduction ...................................................................... 5-1 Installing PC Software...................................................... 5-2 Offliner Features .............................................................. 5-2 Handling Backward Compatibility .................................... 5-4 D01386R04.20 T-PRO 8700 User Manual iii Table of Contents RecordBase View Software ............................................. 5-5 Main Branches from the Tree View.................................. 5-6 6 Acceptance/Protection Function Test Guide ..... 6-1 Acceptance Testing ......................................................... 6-1 T-PRO Acceptance Test Procedure Outline .................... 6-4 T-PRO Differential Slope Test Example ........................ 6-33 T PRO Single-Phase Slope Test ................................... 6-44 7 Installation .............................................................. 7-1 Physical Mounting............................................................ 7-1 AC and DC Wiring............................................................ 7-1 Communication Wiring..................................................... 7-1 Temperature Probes ........................................................ 7-1 Appendix A IED Specifications..................................... A-1 Frequency Element Operating Time Curves.................... A-4 Appendix B IED Settings and Ranges ......................... B-1 Appendix C Hardware Description ............................... C-1 Appendix D Event Messages ....................................... D-1 Appendix E Modbus RTU Communication Protocol .... E-1 Appendix F DNP3 Communication Protocol ................ F-1 Appendix G Mechanical Drawings ...............................G-1 Appendix H Rear Panel Drawings................................ H-1 Appendix I AC Schematic Drawing ............................... I-1 Appendix J DC Schematic Drawing ..............................J-1 Appendix K Function Logic Diagram............................ K-1 Appendix L Analog Phase Shift Table.......................... L-1 Appendix M Loss of Life of Solid Insulation ................ M-1 Appendix N Top Oil and Hot Spot Temperature Calculation ................................................................... N-1 Appendix O Temperature Probe Connections .............O-1 Index ..........................................................................................I iv T-PRO 8700 User Manual D01386R04.20 Using This Guide This User Manual describes the installation and operation of the T-PRO transformer protection relay. It is intended to support the first time user and clarify the details of the equipment. The manual uses a number of conventions to denote special information: Example Describes Start>Settings>Control Panel Choose the Control Panel submenu in the Settings submenu on the Start menu. Right-click Click the right mouse button. Recordings Menu items and tabs are shown in italics. service User input or keystrokes are shown in bold. Text boxes similar to this one Relate important notes and information. .. Indicates more screens. Indicates further drop-down menu, click to display list. Indicates a warning. D01386R04.20 T-PRO User Manual 8700 v Version Compatibility This chart indicates the versions of Offliner Settings, RecordBase View and the User Manual which are compatible with different versions of T-PRO firmware. RecordBase View and Offliner Settings are backward compatible with all earlier versions of records and setting files. You can use RecordBase View to view records produced by any version of T-PRO firmware and Offliner Settings can create and edit older setting file versions. Minor releases (designated with a letter suffix - e.g. v3.1a) maintain the same compatibility as their base version. For example. T-PRO firmware v3.1c and Offliner Settings v3.1a are compatible. T-PRO Firmware/Software Compatibility Guide T-PRO Firmware Setting Version Compatible Offliner Settings v4.2 11 4000 v1.1 or greater v4.1a 10 v4.1 and greater v4.1 10 v4.1 and greater v3.5c 8 v3.5 and greater v3.5b 8 v3.5 and greater v4.0 9 v4.0 and greater v4.0 9 v4.0 and greater Please contact ERLPhase Customer Service for complete Revision History. D01386R04.20 T-PRO User Manual 8700 vii 1 Overview Introduction The T-PRO (model 8700) is a microprocessor-based relay providing protection, monitoring, logging and recording for a power transformer. For asset management, the T-PRO includes adaptive overload, load shedding options and transformer overload early warning system (TOEWS©) functions. T-PRO has two working modes—online and offline. In the online mode you can use any communication software package (e.g. Procomm or HyperTerminal) to connect to the T-PRO using VT100 terminal emulation. In online mode you can: • change and review relay settings • view event and metering information • initiate and retrieve recordings, and retrieve settings In offline mode you can use Offliner Settings and RecordBase View software to: • create and review relay settings • analyze fault waveforms • store records T-PRO Transformer Protection Relay Offline Mode - Settings Software Online Mode - Terminal Mode In addition to the protection functions T-PRO provides fault recording (96 samples/cycle) to facilitate analysis of the power system after a disturbance has taken place. The triggers for fault recording are established by programming the output matrix and allowing any internal relay function or any external input to initiate recording. The primary protection is differential. The restraint is user-definable. 2nd and 5th harmonic restraint are provided as well as a high current unrestrained setting. D01386R04.20 T-PRO User Manual 8700 1-1 1 Overview To provide a complete package of protection and control T-PRO provides other functions such as: • temperature monitoring • TOEWS for asset monitoring loss of life • digital control of current inputs allow switching • overexcitation, frequency (fixed level or rate of change), neutral overvoltage, undervoltage, thermal overload, THD, adaptive pickup overcurrent, neutral differential functions provide additional protection needs • ProLogic control statements provide user-configurable logic functions High Voltage (HV) 67 PT 51 51 ADP 24 DEF 24 50 81-1 81-2 81-3 81-4 Rec 51N 50N 87N 27-1 27-2 52 59N Through Fault Monitor 5INV ProLogic 60 49-1 to Tertiary Voltage (TV) 49-12 THD 49/TOEWS 52 Rec Rec Rec 51N 50N 87N Rec 51N 50N 87N 52 87 Rec 51 50 Rec 51 50 Low Voltage (LV) 18 Analog Inputs 9 External Inputs 2 Temperature Inputs 14 Output Contacts 1 Relay Inoperative Alarm Contact Unregulated Isolated 30 Vdc Supply Trend Recording 9 Quantities 30 Day Trend Log T-PRO can be used for a two (2) or three (3) winding transformer with up to five (5) sets of CT inputs (three (3) winding example shown). Fault Recording 15 Currents 3 Voltages Protection Elements External Inputs Figure 1.1: T-PRO Function Line Diagram 1-2 T-PRO User Manual 8700 D01386R04.20 1 Overview Front View 1 2 3 T-PRO nal Transformer Protection Relay Model 8700 IRIG-B Functional Target Date & View Time Readings View Logs Previous Service Required Clear Target Next Test Mode 1. Front display of time, alarms and relay target 2. Relay target LED (red) 3. LEDs indicating status of relay 4. Communications serial Port 1 for laptop computer 5. Clear target push button 6. Push buttons to manipulate information on LED display 6 5 4 Figure 1.2: T-PRO Front View Back View 7 External Inputs 125VDC 125VDC 125VDC 125VDC 125VDC 125VDC 125VDC 125VDC 125VDC + 1 - + 2 - + 3 - + 4 - + 5 - + 6 - + 7 - + 8 - + 9 - 100 102 104 106 108 110 112 114 116 8 PORT 5 IRIG-B Unused 9 10 11 PORT 2 PORT 3 SCADA Unused Direct / Modem 12 PORT 4 13 Output Contacts 101 103 105 107 109 111 113 115 117 Temperature Inputs Relay Inoperative Out 1 Out 2 Out 3 Out 4 Out 5 Out 6 Out 7 Out 8 Out 9 Out 10 Out 11 Out 12 Out 13 Out 14 Ambient + - Top Oil + - 232 Unregulated Isolated 30 Vdc + - 233 234 235 N + 14 200 201 202 203 204 205 206 207 208 209 210 211 212 213 214 215 216 217 218 219 220 221 222 223 224 225 226 227 228 229 230 AC Current Inputs In, Freq. I1 A 5A, 60Hz I1 B I1 C I2 A I2 B I2 C I3 A I3 B I3 C 231 Power Supply AC Voltages I4 A I4 B I4 C I5 A I5 B I5 C VA VB VC - Nominal 48 - 250 Vdc 120 Vac Case Gnd 15 300 301 302 303 304 305 306 307 308 309 310 311 312 313 314 315 316 317 318 319 320 321 322 323 324 325 326 327 328 329 330 331 332 333 334 335 7. 8. 9. 10. 11. 12. 13. 14. Port 5 - 10BaseT Ethernet Port/Internal Modem (optional) External clock, IRIG-B modulated or unmodulated Port 2 - Direct/Modem RS-232 Port Port 3 - SCADA Port 4 - unused Case ground 9 programmable external inputs This row contains two distinct areas from left to right Relay inoperative contact and 14 programmable output relay contacts Temperature inputs and isolated power supply 15. This row contains three distinct areas from left to right 15 ac current inputs 3 ac voltage inputs Power supply Figure 1.3: T-PRO Back View D01386R04.20 T-PRO User Manual 8700 1-3 1 Overview AC Current and Voltage Inputs T-PRO is provided with terminal blocks for up to 15 ac currents and 3 phaseto-neutral voltages. Each of the current input circuits has polarity (•) marks. A complete schematic of current and voltage circuits is shown, for details see “AC Schematic Drawing” in Appendix I and “DC Schematic Drawing” in Appendix J. External Inputs The T-PRO Relay contains 9 programmable external inputs. External dc voltage of either 48/125 volts or 125/250 volts nominal are possible depending on the range provided. Output Relay Contacts The T-PRO Relay has 14 output relay contacts. Each contact is programmable and has breaker tripping capability. All output contacts are isolated from each other. The output contacts are closed for a minimum of 100 ms after operation. Relay Inoperative Alarm Output If the relay becomes inoperative, then the Relay Inoperative Alarm output contact closes and all tripping functions are blocked. Model Options/Ordering T-PRO is available for either horizontal or vertical mount, for details see “Mechanical Drawings” in Appendix G. T-PRO is available with an internal modem card or internal network card. The CT inputs are 1 A nominal or 5 A nominal. The external inputs are 48/125 Vdc or 125/250 Vdc. The system base frequency is either 50 Hz or 60 Hz. All of the above options must be specified at the time of ordering. 1-4 T-PRO User Manual 8700 D01386R04.20 2 Setup and Communications Power Supply A wide range power supply is standard. The nominal operating range is 48 to 250 Vdc, 120 Vac, 50/60 Hz. To protect against a possible short circuit in the supply use an inline fuse or circuit breaker with a 5 A rating. Make the chassis ground connection to ensure proper operation and safety. There are no power switches on the relay. When the power supply is connected, the relay starts its initialization process and takes about 40 seconds to complete showing the green Relay Functional LED. Case Grounding You must ground the relay to the station ground using the case-grounding terminal at the back of the relay, for details see for details see Figure 1.3: T-PRO Back View on page 1-3. WARNING! To ensure safety and proper operation you must connect the relay to the station ground using the rear grounding terminal on the relay. Ground the relay even when testing. Do not rely on the rack mounting screws to provide case grounding. IRIG-B Time Input The relay is equipped to handle modulated or unmodulated GPS satellite time IRIG-B signals. The IRIG-B time signal is connected to the BNC connection on the back of the relay. When the IRIG-B signal is provided to the relay and is enabled in the settings through the user interface, the IRIG-B functional LED comes on and the relay clock is referenced to this signal. No settings are required to differentiate between modulated or unmodulated signals; this is automatically detected by the relay. You can enable or disable the IEEE 1344 extension in the terminal mode settings Utilities>Setup>Time. The enabled mode receives the year from the IRIG-B signal. Disable this setting, if the available IRIG-B signal has no year extension. D01386R04.20 T-PRO User Manual 8700 2-1 2 Setup and Communications Communicating with the Relay (IED) You can connect to the relay to access its user interface and SCADA services by: • direct serial link (user interface and SCADA) • external or internal modem link (user interface only) • ethernet network link (user interface and SCADA) Direct Serial Link Port 2 - direct/modem Port 1 Serial Extension Cable T-PRO Port 1 or rear Port 2 to DB-9 female (laptop) Laptop PC Figure 2.1: Direct Serial Link The relay has three serial ports that provide direct access to its user interface and SCADA services. All of the relay’s serial ports (Ports 1, 2 and 3) are configured as EIA RS-232 Data Communications Equipment (DCE) devices with female DB9 connectors. This allows them to be connected directly to a PC serial port with a standard straight-through male-to-female serial cable, for pin-out see “Communication Port Details” on page 2-9. The relay’s user interface is accessed through a standard VT-100 terminal emulation program running on a PC. To create a direct serial link between the relay and your computer, connect the serial cable (provided) between your computer’s serial port and Port 1 on the relay’s front panel. Port 2 on the relay’s back panel can also be used for direct serial access, provided the port is not configured for modem use. Once connected, run the terminal emulation software on your computer to establish the communication link, for details see “Using HyperTerminal to Access the Relay’s User Interface” on page 2-5. The relay’s Modbus and DNP3 SCADA services can be accessed through a direct serial link to Port 3 on the relay’s back panel, for details see “Accessing the SCADA Services” on page 2-8. 2-2 T-PRO User Manual 8700 D01386R04.20 2 Setup and Communications Modem Link External Modem Cable (as supplied with modem) Analog Telephone Line Telephone System Analog Telephone Line External Modem Modem Adapter VA-465001 Supplied by ERLPhase DB-9-Male-Male Figure 2.2: External Modem Link Using an external modem, you can also access the relay’s user interface through a telephone link between the relay and your computer. Connect the serial port on the external modem to Port 2 on the relay’s back panel. Both devices are configured as RS-232 DCE devices with female connectors, so the cable between the relay and the modem requires a crossover and a gender change. Alternatively, you can use the ERLPhase modem port adapter provided with the relay to make Port 2 appear the same as a PC’s serial port. A standard modem-to-PC serial cable can then be used to connect the modem and the relay. For pin-out details see “Communication Port Details” on page 2-9. Connect the modem to an analog telephone line or switch using a standard RJ11 connector. You must appropriately configure the relay’s Port 2 to work with a modem. Log into the relay through a direct serial link, go to the Utilities>Setup>Ports screen, and set Port 2 Modem option to Yes. Set the Baud Rate as high as possible — most modems handle 57,600 bps. The Initialize setting allows you to set the control codes sent to the modem at the start of each connection session. The factory defaults are: “M0S0=0&B1” for an external modem and “M0S0=0” for an internal modem. D01386R04.20 T-PRO User Manual 8700 2-3 2 Setup and Communications Modem Link Internal Port 5 - RJ-11 modem Analog Telephone Line Telephone System Analog Telephone Line Desktop Computer Figure 2.3: Internal Modem Link You can access the relay’s user interface through a telephone link between the relay and your computer using an optional internal modem. If the modem has been installed, Port 5 on the rear panel is labelled “INTERNAL MODEM.” Connect the relay’s Port 5 to an analog telephone line or switch using a standard RJ-11 connector. When an internal modem is installed, the relay’s Port 2 is used to interface to the modem internally. Appropriate Port 2 settings are configured at the factory when the internal modem is installed. The factory defaults are: “M0S0=0&B1” for an external modem and “M0S0=0” for an internal modem. Network Link PC with TCP/IP TCP/IP Network 10BaseT Port 5 - RJ-45 Network Figure 2.4: Network Link You can access both the relay’s user interface and DNP3 SCADA services simultaneously through the same network port with an optional Ethernet TCP/IP LAN link. If the Ethernet option has been installed, Port 5 on the rear panel will be labelled “NETWORK.” The user interface accessed through the LAN is the same as that available through a direct serial connection or a modem link, but requires the use of a Telnet client on your PC. The HyperTerminal program, which is included in Windows XP and is also available separately as HyperTerminal PE, provides Telnet services. To select Telnet, go to HyperTerminal’s Properties dialog box and set the Connect Using field to TCP/IP (Winsock). If this option is not available in the pick list, you require a newer version of HyperTerminal (v1.2 or 2-4 T-PRO User Manual 8700 D01386R04.20 2 Setup and Communications greater). Alternatively, you can use any Telnet program that fully supports VT100 terminal emulation and z-modem file transfer. DNP3 SCADA services can also be accessed over the LAN, for details see “Accessing the SCADA Services” on page 2-8. Connect Port 5 to the Ethernet LAN using an appropriate 10BaseT cable with an RJ-45 connector. The relay supports 10 Mbit Ethernet, although a dual speed 10/100 Ethernet hub or switch can be used. By default, the relay is assigned an IP address of 192.168.1.100. If this address is not suitable, it may be modified using the relay’s Maintenance Menu. For details see “Using HyperTerminal to Access the Relay’s User Interface” on page 2-5. Using HyperTerminal to Access the Relay’s User Interface Change settings, view measured values and retrieve data from the relay using its user interface. This section describes how to configure a standard Windows VT-100 terminal program on your PC for use with the relay. The computer must be connected to the relay by one of its serial, modem or Ethernet communication ports, for details see “Communicating with the Relay (IED)” on page 2-2. The relay user interface is accessed using a standard VT-100 terminal style program on your computer eliminating the need for specialized user interface software. Any terminal program that fully supports VT-100 emulation and provides z-modem file transfer services can be used. The HyperTerminal program, which is included in Windows XP and is also available separately as HyperTerminal PE, is used here as an example. Configure your terminal program as described in the table below and link it to the appropriate serial port, modem or TCP/IP socket on your computer. Terminal Program Setup D01386R04.20 Baud rate For a direct serial link the baud rate must match that of the relay serial port. For a modem link the baud rate refers only to the link between your computer and its own modem. Refer to “Setting the Baud Rate” on page 2-7 for further information. Data bits 8 Parity None Stop bits 1 Flow control Hardware or Software. Hardware flow control is recommended. The relay automatically supports both on all its serial ports. Function, arrow and control keys Terminal keys Emulation VT100 T-PRO User Manual 8700 2-5 2 Setup and Communications Terminal Program Setup Font Use a font that supports line drawing (e.g. Terminal or MS Line Draw). If the menu appears outlined in odd characters, the font you have selected is not supporting line drawing characters. To initiate a connection with the relay use HyperTerminal’s Call>Connect function. When the connection is established, press Enter in the terminal window to bring up the following login prompt. ---------- ERLPhase T-PRO 8700 Terminal User Interface login ---------- Log in using one of the following usernames: 'view' - read-only access to settings and readings 'change' - read/write access to settings and readings 'service' - full access to all functions (Port 1 access only) 'maintenance' - access to the maintenance menu 'update' - to load a firmware update (Port 1 access only) Notes: - Serial and modem connections have a 60 minute inactivity timeout - Usernames and passwords are case sensitive login: change Instructions for logging in and running the user interface are given in “Terminal Mode” on page 3-5. If you see incorrect characters on a direct serial connection, it may mean there is a mismatch between the relay’s baud rate and that of the PC. Ending a User Interface Session 2-6 Use the Quit function in the relay’s user menu to end a session. This closes the interface and requires the next user to login to the relay. The relay automatically ends a session when it detects the disconnecting of a direct serial cable or a modem hang-up. For other types of connections (e.g. serial switches or Ethernet) use the Quit function to ensure the interface is closed and login protection is activated. T-PRO User Manual 8700 D01386R04.20 2 Setup and Communications Setting the Baud Rate The baud rate of the relay’s serial ports can be shown on the relay’s front panel display. From the main Date & Time display, press the Next button. Direct Serial Link For a direct serial connection both the relay and your computer must be set to the same baud rate. To change the baud rate of a relay serial port: 1 Access the relay’s user interface through any of the available ports. 2 Login to the user interface and go to the Utilities>Setup>Ports menu, for details see “Terminal Mode” on page 3-5. 3 Select the desired baud rate for the appropriate port by toggling through the options using the Space or Enter keys. Save the new setting with the F2 key. The message “New communications settings loaded” will appear. The new baud rate will be used on that port the next time you login to it. To change the baud rate on your computer’s serial port: 1 From HyperTerminal bring up the Properties dialog box, press the Configure button and set the baud rate field to the desired value. 2 Save the changes. Modem Link D01386R04.20 Unlike a direct serial link, the baud rates for a modem link do not have to be the same on your computer and on the relay. The modems automatically negotiate an optimal baud rate for their communication. The baud rate set on the relay only affects the rate at which the relay communicates with the modem. Similarly, the baud rate set in HyperTerminal only affects the rate at which your computer communicates with its modem. Details on how to set these respective baud rates are described in “Modem Link - External” on page 2-3, except that you modify the Port 2 baud rate on the relay and the properties of the modem in HyperTerminal. T-PRO User Manual 8700 2-7 2 Setup and Communications Accessing the SCADA Services The relay supports DNP3 (Level 2) and Modbus SCADA protocols as a standard feature on all relays. DNP3 is available through a direct serial link or the Ethernet LAN on top of either TCP or UDP protocols. The Modbus implementation supports both RTU (binary) or ASCII modes and is available through a direct serial link. The relay’s Port 3 is dedicated for use with Modbus or DNP3 serial protocols. Port 3 uses standard RS-232 signalling. An external RS-232<->RS-485 converter can also be used to connect to an RS-485 network. For details on connecting to serial Port 3 see “Communicating with the Relay (IED)” on page 2-2 and “Communication Port Details” on page 2-9. The DNP3 protocol can also be run across the optional Ethernet LAN. Both DNP over TCP and DNP over UDP are supported, for details on connecting to the Ethernet LAN see “Network Link” on page 2-4. Complete details on the Modbus and DNP3 protocol services can be found in “Modbus RTU Communication Protocol” in Appendix E and “DNP3 Communication Protocol” in Appendix F. Protocol Selection To select the desired SCADA protocol, login to the relay’s user interface and access the Utilities>Setup>SCADA menu. Select the protocol and set the corresponding parameters. The DNP3 LAN/WAN - TCP and UDP options are only available if the unit has an optional Ethernet LAN port installed. Communication Parameters Port 3’s communication parameters are set using the Utilities>Setup>Ports menu in relay’s user interface. Both the baud rate and the parity bit can be configured. The number of data bits and stop bits are determined automatically by the selected SCADA protocol. Modbus ASCII uses 7 data bits. Modbus RTU and DNP Serial use 8 data bits. All protocols use 1 stop bit except in the case where either Modbus protocol is used with no parity; this uses 2 stop bits, as defined in the Modbus standard. Diagnostics Protocol monitor utilities are available to assist in resolving SCADA communication difficulties such as incompatible baud rate or addressing. The utilities can be accessed through the Maintenance user interface, for details see “Maintenance Menu” on page 2-12. 2-8 T-PRO User Manual 8700 D01386R04.20 2 Setup and Communications Communication Port Details Port Location Function 1 Front Panel RS-232 Data Communication Equipment (DCE) female DB9. Used for user interface access through a direct serial connection. Default Setting: 38,400 baud, 8 data bits, no parity, 1 stop bit. 2 Rear Panel RS-232 DCE female DB9. Used for: • User interface access through a direct serial connection. • User interface access through an external modem. The optional ERLPhase Modem Adapter converts this port to a Data Terminal Equipment (DTE) to simplify connection to an external modem. Default Setting: 9,600 baud, 8 data bits, no parity, 1 stop bit. Port 2 is disabled if the relay is equipped with an internal modem (see Port 5). 3 Rear Panel RS-232 DCE female DB9. Used for SCADA communication. Default Setting: 9,600 baud, 8 data bits, no parity, 1 stop bit. 4 Rear Panel Not used 5 Rear Panel RJ-11/RJ-45 receptacle. When equipped with optional internal modem: • Used for user interface access through modem. When equipped with optional internal Ethernet card: • User interface access. • DNP SCADA access. Default Ethernet IP address: 192.168.1.100. D01386R04.20 T-PRO User Manual 8700 2-9 2 Setup and Communications Direction PC<-> Relay Pin # on the Relay Port DCD 1 RxD 2 TxD 3 DTR 4 Signal Name Common 5 DSR 6 RTS 7 CTS 8 No connection 9 Notes: • Relay is DCE, PC is DTE • Pins 1 and 6 are tied together internal to the relay 2-10 Male DB-9 Cable End for Relay Port Female DB-9 Cable End for Computer Port Pin # on Cable Pin # on Cable 1 1 2 2 3 3 4 4 5 5 6 6 7 7 8 8 9 9 T-PRO User Manual 8700 D01386R04.20 2 Setup and Communications Direction Modem <-> Relay Pin # on the Modem Adapter DCD 1 RxD 2 TxD 3 DTR 4 Signal Name Common 5 DSR 6 RTS 7 CTS 8 No connection 9 Notes: • Relay (with modem adapter) is DTE, modem is DCE • Pins 1 and 6 are tied together internal to the relay D01386R04.20 T-PRO User Manual 8700 2-11 2 Setup and Communications Maintenance Menu The relay has a Maintenance Menu that can be accessed by connection through a VT-100 terminal emulator (such as the HyperTerminal). Using either direct serial or modem connection: 1 Use the terminal program to connect to the serial port, either through direct serial link or modem. 2 Select Enter, the relay responds with a login prompt. 3 Login as “maintenance” in lower case. A menu appears as below. Figure 2.5: Commands 1, 4, 5, 6, 7 and 10 are Port 1 access only. 2-12 Modify IP address Modifies the LAN IP address when equipped with an optional internal 10BaseT Ethernet card. View system diagnostic Displays the internal status log. Retrieve system diagnostics Automatically packages up the internal status log plus setting and setup information and downloads it in compressed form to your computer. This file can then be sent to our customer support to help diagnose a problem. Restore settings Use this menu to force the system back to default values, if you suspect a problem due to the unit’s settings, calibration and/or setup parameters. Force hardware reset Manually initiates a hardware reset. Note that the communication link is immediately lost and cannot be re-established until the unit completes its start-up. T-PRO User Manual 8700 D01386R04.20 2 Setup and Communications View network statistics View IP, TCP and UDP statistics when equipped with internal 10BaseT Ethernet card. Monitor SCADA Shows real time display of SCADA data. Enable/disable Modem Enables or disables the internal modem. Firmware Update The relay has an update login that can be accessed by a connection through a VT100 terminal emulator (such as HyperTerminal). This login is available only from Port 1. 1 Use the terminal program to connect to Port 1. 2 Select Enter, the terminal responds with a login prompt. 3 Login as update in lower case. The firmware update is used to update the relay’s software with maintenance or enhancement releases. Please see the T-PRO Firmware Update Procedure documentation that comes with the firmware update for instructions on how to update the firmware on the relay. D01386R04.20 T-PRO User Manual 8700 2-13 3 Using the IED (Getting Started) T-PRO Transformer Protection Relay Offline Mode - Settings Software Online Mode - Terminal Mode Start-up Sequence The following initialization sequence takes place: Test Mode—red LED on 2 seconds after power applied Relay Functional—green LED on 5 seconds after power applied Front Display—on 30 seconds after power applied Test Mode—red LED off 40 seconds after power applied When the relay is powered up, the normal sequence of LED operation is Test Mode followed by Relay Functional and IRIG-B Functional (if available), display on, then Test Mode off. The entire sequence takes about 40 seconds. Ways to interface with the relay: • Front panel display • Terminal Mode • Offliner Settings software D01386R04.20 T-PRO User Manual 8700 3-1 3 Using the IED (Getting Started) Front Panel Display View or change settings using Terminal Mode or loading a setting file from Offliner Settings. The front panel display is the fastest and easiest way of getting information from the relay. Display LED Lights Relay Functional 2000 JUL 07 13:22:07 Target IRIG-B Functional Service Required View Date & Time Readings View Logs Previous Next Clear Target Test Mode Alarm Push Buttons Figure 3.1: Front Panel Display The display, the six LED lights and the six push buttons provide selective information about the relay. LED Lights 3-2 Relay Functional Indicates when the relay is functional. When the Relay Functional green LED goes on, the rear Relay Inoperative contact changes to open and the protective functions become functional. IRIG-B Functional Indicates the presence of a valid IRIG-B time signal. Service Required Indicates the relay needs service. This LED can be the same state as the Relay Functional LED or can be of the opposite state depending on the nature of the problem. The following items bring up this LED: • DSP failure - protection difficulties within the relay. • Communication failure within the relay. • Internal relay problems. Test Mode Occurs when the relay output contacts are intentionally blocked. Possible reasons are: • Relay initialization on start-up • User interface processor has reset and is being tested. You cannot communicate with the relay through the ports until the front display becomes active and the Test Mode LED goes out. Normally, the red Target LED remains off after this start-up unless the relay had unviewed target messages. Output contacts are controlled from the Utilities menu. T-PRO User Manual 8700 D01386R04.20 3 Using the IED (Getting Started) Alarm Occurs when an enabled relay function picks up. The red Alarm LED should be off if there are no inputs to the relay. If the Alarm LED is on, check the event log messages on the front display by pressing the View Logs button. Target Indicates that a fault has taken place. An event message with date and time is presented in the display. Date & Time Pressing the Date & Time button displays the date and time stored on the relay. If the time is incorrect, connect to a PC in Terminal Mode and go to Utilities>Setup>Time to make the change or connect to the IRIGB plug at the back of the relay. The front display time and date is automatically updated. The green IRIG-B Functional LED comes on. The relay accepts either modulated or unmodulated IRIG-B signals automatically. Options using IRIG-B, such as time skew for different time zones are available when you establish communication with the PC. View Readings Pressing the View Readings button obtains metering information about the transformer, for details see “Display” on page 3-4. View Logs Pressing the View Logs button displays the target information if a relay operation has occurred, for details see “Display” on page 3-4. Previous/Next Scroll through the menu by pressing Previous and Next. Clear Target When a fault takes place, the red target light appears. Use the Clear Target button to view all target information. If many faults have been stored, you may need to push this button several times. Clearing the target light does not clear the target information from the relay log. The relay holds all target messages during a power supply shutdown and restart. Pressing the Clear Target push button displays any targets not previously viewed on the front display and clears the Target LED after the last target has been viewed. Push Buttons D01386R04.20 T-PRO User Manual 8700 3-3 3 Using the IED (Getting Started) Display 2000 JUL 07 13:22:07 View Date & Time Readings View Logs Previous Target Next Clear Target View Readings Pri V 0.0 KV I 0.0 A ph–ph line View Logs 2000Jun28 19:34:31.823 Top Oil Under-Range:Alrm Figure 3.2: Display Examples Front Panel Display Messages PRI V, I, P, Q Ambient, top oil, hot spot temperature, trip date and time of all functions involved. 3-4 T-PRO User Manual 8700 D01386R04.20 3 Using the IED (Getting Started) Terminal Mode 1 Establish terminal mode connection, for details see “Using HyperTerminal to Access the Relay’s User Interface” on page 2-5. 2 Login as one of view, change or service (lower case). These three login names provide differing levels of permission. The relay supports the optional use of passwords. A pop-up dialogue box appears after login has taken place. If you have forgotten the password, go to Access>Passwords in Terminal Mode, for details see “Passwords” on page 3-6. 3 When connection is established and the terminal mode program appears on your screen, the following prompt should appear. If it doesn’t appear, press Enter. ---------- ERLPhase T-PRO 8700 Terminal User Interface login ---------- Log in using one of the following usernames: 'view' - read-only access to settings and readings 'change' - read/write access to settings and readings 'service' - full access to all functions (Port 1 access only) 'maintenance' - access to the maintenance menu 'update' - to load a firmware update (Port 1 access only) Notes: - Serial and modem connections have a 60 minute inactivity timeout - Usernames and passwords are case sensitive login: change 4 If login is successful, the Main Menu appears: TPRO Unit ID: Your ID entered earlier Main Menu User Access Level: VIEW ID Settings Metering Records Event Log 2000 Jun 08 11:53 Utilities Access Quit view, change or service (depends on how you log in) If the box around the menu does not appear as above, change the font in your terminal program to one that supports line draw characters, e.g. terminal fonts. Also ensure that emulation is set to VT100 (not VT100J). If there are incorrect characters in the display, improper line feeds or unerased portions, the baud rate is too high for the quality of the communication link. Use the Utilities>Setup>Ports menu to reduce the relay’s baud rate. The new rate is in effect at the next connection. D01386R04.20 T-PRO User Manual 8700 3-5 3 Using the IED (Getting Started) The relay supports three user access levels that control what relay functions are available to you. The current access level is always shown in the centre of the Main Menu heading. To change the Access Level either login again using the desired access level as your login name or use the Main Menu>Access menu. Access Level Allowed actions view lowest View settings, online readings and logs. List and retrieve records. At this level you cannot affect the operation of the controller. change middle Do all of the above, plus change the settings and delete records. service highest Do all of the above two categories, plus calibrate the analog inputs, manually control output auxiliary relays and modify passwords. Service access is only available through a local, front port connection. Passwords 3-6 Individual passwords for the view and change access levels are available to prevent or limit remote access to the relay. Passwords are not required for the service level. This level is only available at the front of the local relay through serial Port 1. You can only change the passwords from the service level through the Access menu minimizing the chance that a password is changed casually and provides a means of resolving situations where a password has been forgotten. T-PRO User Manual 8700 D01386R04.20 3 Using the IED (Getting Started) Terminal Mode Menus Use the right and left arrow keys and the Enter key to move around in the terminal mode screen. The mouse does not work in VT100 terminal mode. Items from the menu are selected by moving the highlight to the desired item and activating it using the Enter key. As a short-cut, use the first letter of the menu item to access it directly. Key Function <F2> Accept or Freeze or Execute <F3> Quit or Exit <Esc> Back to previous menu level The menu tree consists of a series of sub-menus, for details see Figure 3.3: Terminal Mode Menus on page 3-8. The Enter key allows you to toggle through a list of selections, i.e. enabled/disabled. The Enter key toggles forward through the list, while the space bar moves backward through the list. In this manner you do not have to scroll through the entire list to get back to a previous selection, you can use the space bar. For certain lists a pick box appears when there is a long list of selections to chose from, for example, ProLogic inputs. You can scroll though these boxes with the arrow keys or the Enter key. Use the F2 key to make a selection or F3 to leave. D01386R04.20 T-PRO User Manual 8700 3-7 ID 3-8 Analog Load from Offliner Retrieve to Offliner Operating Settings T-PRO User Manual 8700 Event Recording Trend Recording 49 49-1 - 49-12 Protection Functions 87.. 49.. TOEWS 24.. 59N 27 60 81 50/51.. 67 THD Alarm Through Fault Monitor 50/51 50/51 HV 50/51 LV 50/51 TV 50N/51N HV 50N/51N LV 50N/51N TV 51 ADP (HV) 24 24 INV 24 DEF 87 87 87N Modbus Status Message Modbus Diagnostic Modbus Log Password Diagnostics Transfer Diagnostics Modbus.. Maintenance Calibrate Outputs Erase VIEW Access Access CHANGE Access Temperatures Ambient Temperature Scaling Top Oil Temperature Scaling Diagnostics Setup Time Ports SCADA Connections Windings/CT/PT Connections Temperatures.. Identification Relay Comment Analog Input Names External Input Names Output Contact Names Through Fault I*I*t Maintenance Setup Protection Events Through Fault Peak Utilities Event Log Output Matrix #1 (87, 87N, 24INV, 24DEF, 59N, 27,60) Output Matrix #2 (81, 50/51) Output Matrix #3 (50N/51N, 67, THD) Output Matrix #4 (TOEWS, Temp, I*I*t) Output Matrix #5 (49) Output Matrix #6 (ProLogic) Output Matrix #7 (External Intputs) ProLogic 10 ProLogic ProLogic 1 List Records Fault Recording Settings Identification... Nameplate Data Connections... Protection Functions.. ProLogic.. Output Matrix.. Recording Dev 49/ TOEWS Trend I/O ProLogic Logic Metering Settings Quit Erase Records Event Log Trends Loss of Life Through Fault Output Contacts Toggle 1-14 Calibrate VA, VB, VC IA1, IB1, IC1IA5, IB5, IC5 Ambient Top Oil 3 Using the IED (Getting Started) Figure 3.3: Terminal Mode Menus D01386R04.20 3 Using the IED (Getting Started) The Main Menu display is: ID Settings Metering Records Event Log Utilities Access Quit ID Provides the device serial number, software version and required settings version, system frequency, CT rating and external input type. There are no user settings here. Settings Submenus: Settings, Load from Offliner, Retrieve to Offliner Settings Settings includes all the submenus pertaining to protection functions used to create a relay setting. When these settings are made or changed, you can load them into the relay allowing input of all settings information for the relay. Settings submenus: Identification, Nameplate Data, Connections, Protection Functions, ProLogic, Output Matrix and Recording. Identification.. Relay Serial Number, Software Version, Relay ID, Line Name, Station Name, Station Number and Location. Comments Enter any appropriate comment. Analog Input Names Name inputs, I1A, I1B, I1C, I2A, I2B, I2C, I3A, I3B, I3C, I4A, I4B, I4C, I5A, I5B, I5C, VA, VB, VC, N External Inputs Names Name external inputs 1 to 9. Output Contact Names Name auxiliary relay output contacts 1 to 14. The following characters are not allowed in the above setting parameters: “ ”, “\”, “/”, “:”, “*”, “?”, “|”, “"“, “<“, and “>”. Load From Offliner You can download the settings file into the relay using the terminal mode menu. 1 On the Window’s desktop, double-click T-PRO Offliner Settings icon. The initial Offliner Settings screen appears. 2 Enter the required settings. 3 Save the settings to a file on your PC. 4 Start the Terminal Mode of T-PRO, login as change or service, then access the Settings menu and activate Load from Offliner function. 5 Reply Yes to the “Ready to load remote setting.” prompt. 6 In your terminal program, initiate transfer of the setting file created in step 2 above. (For example, with HyperTerminal, you would select Transfer, then Send File. Browse to find the file, then select Open and finally, Send. 7 When the file has been transferred, verified and loaded, a message “New settings loaded and secure” is displayed. D01386R04.20 T-PRO User Manual 8700 3-9 3 Using the IED (Getting Started) A “serial number discrepancy” message may appear. This is to ensure that you are aware of the exact relay to which the settings are being loaded. If this happens, check the relay serial number using the terminal mode ID menu item. Type this serial number into the T-PRO Serial No. box in the Identification tab display area of Offliner Settings. Alternately you may check the Ignore Serial Number check box to bypass serial number supervision. Retrieve To Offliner To transfer the relay’s current settings to the PC do the following: 1 Navigate to Settings>Retrieve To Offliner. 2 Select Enter. 3 The relay asks you if you wish to continue. Select Y for yes. 4 The file is sent to the directory defined by the HyperTerminal menu Transfer>Receive File. When using HyperTerminal use Z-modem (no crash recovery), files are received and auto incremented. Metering 3-10 Submenus: Operating, Analog, Logic, ProLogic, I/O, Trend, Dev 49/TOEWS. Operating Provides information about the differential operating quantities. Analog Provides secondary values of the ac analog voltages and currents. Logic Provides the present status of the internal logic states. ProLogic Displays the present status of all ProLogic states. I/O Displays the state of the external inputs and the output contacts. Trend Provides trend quantities. Dev 49/TOEWS Displays operating variables for current and temperature overload conditions. T-PRO User Manual 8700 D01386R04.20 3 Using the IED (Getting Started) Records Submenus - List, Fault Recording, Trend Recording, Event Recording. Records contains the means for initiating and retrieving recordings. List Lists all records. Retrieve records from this menu. Fault Recording Creates one fault record. Trend Recording Creates one trend record. Event Recording Creates one event record. Retrieve Records from the Relay To retrieve records from the relay do the following: 1 Navigate to Records>List and press Enter; a records list appears. 2 Select Records using the space bar and select R. (You can also press Enter to retrieve a record directly.) The record will be saved in the directory specified by the terminal emulation program. When using HyperTerminal if “Use receiving protocol:” is set to “Z modem with Crash Recovery”, file transfers are skipped by HyperTerminal if the record already exists in the downloads folder. When using HyperTerminal use Z-modem (no crash recovery), files are received and auto incremented. Delete Records from the Relay To delete records from the relay do the following: 1 Navigate to Records>List and press Enter. 2 Select the records for deletion with the space bar and select D. The selected records will be deleted. Event Log Protection Events, Through Fault Peak, Through Fault I*I*t The event log lists events stored in the relay. A complete list of the types of events logged is available, for details see “Event Messages” in Appendix D. If an event triggered a record, then an (R) is displayed by the event. D01386R04.20 Protection Events Lists all the events except the Through Fault events Through Fault Peak Lists Through Fault peak value events Through Fault I*I*t Lists Through Fault I*I*t value events, including the total number of Through Faults and the accumulated Through Fault I*I*t values T-PRO User Manual 8700 3-11 3 Using the IED (Getting Started) Utilities Sub-menus: Setup, Maintenance, Diagnostics. To access different levels within the relay. Setup Time - set manual time, IRIG-B skew control. Requires change or service access level. Ports - change Baud rates on communication ports. Requires change or service access level. SCADA - select which SCADA protocol Modbus or DNP3) to run on the SCADA port. Configure parameters for the selected protocol such as address or timeout. Requires change or service access level. Maintenance Calibrate - calibrate all 18 analog ac. Requires service access level. Outputs - close and open output contacts independent of the associated relay functions. Requires service access level. Erase - use submenus Records, Event Logs and Trends to erase these records from the relay memory. Requires service access level. Loss of Life - Enter initial value of transformer. Requires change or service access level. Through Fault - Preset or reset the accumulated Through Fault quantities. Requires change or service access level. Diagnostics Transfer Diagnostics - transfers relay diagnostic file to the PC. The diagnostic file can be sent to ERLPhase for analysis. Modbus - allows Modbus Communications to enter its Diagnostic Mode. Follow directions on the screen. Programming done using the Modicon Modbus Protocol Reference Guide PI-MBUS-300 Rev. G published by Modicon, Inc., dated November 1994, for details see “Modbus RTU Communication Protocol” in Appendix E. 3-12 T-PRO User Manual 8700 D01386R04.20 3 Using the IED (Getting Started) Access Quit D01386R04.20 Submenus: VIEW Access, CHANGE Access, Password. Provides the ability to change access levels and passwords. View Changes the access level to view. Allows read-only access to relay information. Change Changes the access level to change. Allows you to modify settings and delete records. Service Changes the access level to service. Allows you to do everything, including calibration, manual control of the output contacts and modification of passwords (available through local Port 1 connection only). Passwords Allows you to read and change passwords. Requires service access level. Selecting this option ends serial port communication with the relay. T-PRO User Manual 8700 3-13 3 Using the IED (Getting Started) Metering Data Front Panel Metering The quantities provided on the front panel display are the L-L voltage line currents, the MW and the MVARs. These quantities are displayed for the side that the PT is connected to. In addition ambient, top oil and hot spot temperatures are displayed. TUI Metering The TUI provides the following metering quantities. Operating Operating metering provides the winding phase current in secondary amps, as well as the IO and IR currents in pu. Secondary amps refer to the reference CT input which is the first CT on the PT side. (Note that the reference CT input must be used because different CT ratios are allowed on the same voltage level side.) The positive sequence frequency is displayed. Analog Analog metering displays all secondary values of the voltage and current inputs, as well as the temperature input mA values. Logic Logic metering displays the status of all internal logic, including alarm and trip states of all the relay elements. ProLogic ProLogic metering displays the status of all the ProLogic. I/O I/O metering shows the status of all external inputs and output contacts. Trend Trend metering shows the current status of all trend quantities. These quantities are MW, MVAR, HV current, Device 51 pickup level, THD, ambient, top oil, hot spot temperature and transformer loss of life. Dev49/TOEWS Dev49/TOEWS metering displays the current values of the quantities used for the 49 device, as well as the status of TOEWS alarms and trip. 3-14 T-PRO User Manual 8700 D01386R04.20 4 Protection Functions and Specifications Protection and Recording Functions This section describes the equations and algorithms of the relay protection functions. All functions with time delay provide an alarm output when their pick up level is exceeded. All functions use the fundamental component of the analog inputs, except for THD Alarm. 87 Differential Protection D01386R04.20 The differential protection is used to detect transformer faults within the zone defined by comparing the currents on the HV, LV and TV side of the transformer. The differential protection consists of four functions and are as follows: 1 A slope characteristic consisting of two slopes (S1 and S2) and an IOmin part.The slope characteristic is user adjustable. In the T-PRO relay the S1 parameter is typically set at 20%, the S2 parameter at 40% and the break point between the two slopes, IRs is linked to and at 2 times the transformer MVA user setting. The minimum pick- up, IOmin is user-settable and defines the minimum amount of fault current required to result in the slope characteristic operation The slope function is also controlled by the second and fifth harmonic current restraint functions. These functions are used to detect transformer energization and are used to block the differential function trip. 2 The fast trip function is related to the slope characteristic function but does not have any slope characteristic. This function is a constant operating current horizontal line that is user-settable. 3 A phase angle delta phase supervision function that provides supervision to the slope characteristic. This function is described in detail later, see “Delta Phase Slope Characteristic Supervision” on page 4-6. This function provides security to the SLOPE function for external faults by ensuring that the phase angle of the fault currents are within 90 degrees of each other for internal faults. 4 A rate of change of operating and restraint quantities function (ROCOD). This function compares the derivative of the operating and the restraint quantities. If a fault is internal to the protection zone, the positive derivative value of the operating quantity will always be greater than the derivative value of the restraint quantity. This function therefore adds sensitivity to the differential protection. A further description of the ROCOD function is provided, for details see Delta Phase Slope Characteristic Supervision on page 4-6. T-PRO User Manual 8700 4-1 Operating Current IO (pu) 4 Protection Functions and Specifications Fast Trip Area (without harmonic restraint) High Current Setting S2 Normal Trip Area (with harmonic restraint) IOmin S1 IRs Restraint Current IR (pu) Figure 4.1: Differential Protection Characteristic Differential Slope Characteristic Description The slope characteristic consists of a restraint current, IR, on the horizontal axis and an operating current, IO on the vertical axis, see “87 Differential Protection” on page 4-1. If IO and IR are in the normal trip area, the 2nd harmonic restraint is examined to determine whether the trip should be blocked. If IO and IR are in the fast trip area, the 2nd harmonic restraint is not examined. The 87 characteristic is bound by the fast trip zone. During energization harmonic restraint logic is needed to prevent false tripping. All settings are done on the basis of the per unit transformer quantities. Note that the fundamental current must be greater than 5% of nominal (i.e. >0.25A for a 5A relay) before the T-PRO will calculate a harmonic restraint value. Care should be taken to ensure that the IOmin setting always be above the 5% of nominal value. Operating Current = IO = |IH + IL + IT| for each of phases A, B and C Where: IH is the current from the high voltage side current sources IL and IT are currents from the low voltage side and tertiary side respectively Restraint Current = IR = [ |I1| + |I2| + |I3| + |I4| + |I5| ] / 2 for each of phases A, B and C Where: I1, I2, I3, I4, I5 are current inputs into the relay terminals (magnitude sum) 4-2 T-PRO User Manual 8700 D01386R04.20 4 Protection Functions and Specifications Differential Harmonic Restraint Description The settings I2 and I5, which are for harmonic restraint to prevent false tripping during transformer energization inrush or transformer overexcitation conditions. If these are set for 0.3 pu, then if either the 2nd or 5th harmonic is more than 30% of the fundamental current, then the differential trip function is restrained. If the IOmin setting corresponds to a pickup value of < 0.25 A, then the harmonic restraint will not work. When I2 Cross Blocking is enabled (default), the 2nd harmonics restraint blocks the 87 trip if the ratio of the 2nd harmonics to the fundamental exceeds the I2 setting in any phase; when it's disabled, the 2nd harmonics restraint blocks the 87 trip only if the ratio of the 2nd harmonics to the fundamental exceeds the I2 setting in at least two phases. The latter might be used for a 3 single-phase transformer energization, to ensure the transformer will trip correctly when energizing to a fault. Since the 2nd harmonic calculation is carried out on the internal delta currents (for zero sequence current elimination), as a result, the single-phase fault current will contribute into two phases. The 2nd harmonic on these phases will not exceed the set point due to the dominant fault current (fundamental). As shown below, the 2nd harmonics restraint signal is stretched for 5 ms in the first cycle on transformer energization to prevent the 2nd harmonics restraint signal from any possible momentary reset due to the current signal transition in the first cycle. Note that this logic only becomes active when the transformer has been de-energized or very lightly loaded (the restraint current is less than 30% of IOmin setting). Device 37: under-current 37 IRA (30% of IOmin) 37 IRB (30% of IOmin) 37 IRC (30% of IOmin) 10 s 17 ms Transformer has been de-energized 0 5 ms Block 87 2nd Harmonics Restraint Signal I5 Restraint Enabled allows the T-PRO’s differential element to be blocked using 5th harmonic current restraint. This prevents the 87 element from misoperating during a high over-voltage system condition. During the high voltage condition there is an increase in 5th harmonic current causing the current wave shape to distort creating an unbalance in the differential current circuit. This unbalance is not a true transformer differential, so this is a false trip condition that should be blocked. 87 Transformer Differential Setting Ranges D01386R04.20 87 Transformer Differential Enable/disable IOmin (pu) 0.1 to 1.0 pu IRs (pu) 1.5 to 50 pu T-PRO User Manual 8700 4-3 4 Protection Functions and Specifications S1 (%) 6 - 40 % S2 (%) 20 - 200% High Current Setting (pu) 0.9 - 100 pu I2 Cross Blocking Enable/Disable I2 Setting (pu) 0.05 to 1.00 I5 Restraint Enable/disable I5 Setting (pu) 0.05 to 1.00 HV, LV and TV winding current calculations The T-PRO has 5 three phase current inputs that can be used to sum currents going into a transformer winding. These inputs can be configured to have different CT ratios and CT connections. This flexibility requires that certain corrections be carried out before summing them to get the winding current. This process includes three steps: • Selection of reference current input • Phase Corrections • Magnitude Corrections The three steps are described in the following sections. Selection of reference current input The reference current input is the CT input that will be used as a reference for all the other CT inputs. All corrections will be performed with reference to this input. This selection is done automatically by the relay and is defined as being the first input on the PT side. Consider the following example: Input #1 Input #2 Y Δ I1a, I1b, I1c I2a, I2b, I2c Hv Input #5 Tv Transformer Y/Δ /Δ Y I5a, I5b, I5c Lv Input #3 Input #4 Y Δ I3a, I3b, I3c I4a, I4b, I4c Figure 4.2: Reference Current Input 4-4 T-PRO User Manual 8700 D01386R04.20 4 Protection Functions and Specifications Phase Corrections There are two corrections required, one for the transformer winding and one for CT connections. These corrections are always applied with reference to the reference input. Consider the above example. The following table describes what corrections must be made to each input based on the example above. Table 4.1: Phase Corrections Winding Voltage (KV) Main Winding Phase Curr. Input Physical CT Conn. Phase CT Turn’s Ratio Total Phase Shift Phase Correction Required Phase After Correction HV 230 Y 00(ref) #1 Y 00 200 :1 00 00 00 #2 -300 250 :1 -300 300 00 #3 Y 00 400 :1 -300 300 00 #4 -300 450 :1 -600 +600 00 #5 Y 00 4000 :1 +300 -300 00 LV TV 115 13.8 -300 +300 The formulas for the phase shift corrections are in “Analog Phase Shift Table” in Appendix L. Note that in addition to correcting the phase, these formulas will also eliminate the zero sequence current from the analog inputs. Magnitude Corrections The next step is to correct the magnitude of each current input. There are three things that need to be corrected for: • CT Ratio Mismatch • CT Connection Correction • Transformer Ratio The Magnitude Correction Factor is applied as follows: Mismatch _ Correction _ Factor[i ] PhysicalCT _ Root 3_ Factor[i] Voltage _ Level[i ] CT _ Ratio[i] Voltage[ REF ] CT _ Ratio[ REF ] Where: i = Current input being considered. PhysicalCT_Root3_Factor[i] = 1 for a Y connected CT, 1/SQR(3) for Delta connected CT. Voltage_Level[i] = Voltage level of the input being considered CT_Ratio[i] = CT ratio of the input being considered. Voltage[REF] = Voltage level of the reference (PT) side. CT_Ratio[REF] = CT ratio of the first current input on the reference (PT) side. D01386R04.20 T-PRO User Manual 8700 4-5 4 Protection Functions and Specifications After the phase and magnitude corrections have been performed, the currents can now be summed on a single-phase basis to arrive at the HV, LV and TV winding currents. For the example above the following summations will take place: IHa I1A I 2 A IHb I1B I 2 B IHc I1C I 2C ILa I 3 A I 4 A ITa I 5 A ILa I 3 B I 4 B ILa I 3C I 4C ITa I 5 B ITa I 5C These delta currents (i.e. with zero sequence current elimination) are used in device 87 regardless. However, for device 50/51, 67, 49 and TOEWS, whether the delta currents (with zero sequence current elimination) or the Wye currents (without zero sequence current elimination, i.e. without applying the formulas in Appendix L) are used will depend on how the CTs are connected. Wye current quantities will be used in these functions when all the associated input CTs are connected in Wye; otherwise Delta current quantities will be used (i.e. at least one of the associated input CTs are connected in Delta). Delta Phase Slope Characteristic Supervision The slope characteristic of the transformer differential operates on Kirchoff's current principle. This principle states that current entering an area must be equal to the current leaving this area if no faults are present in this area. The protection zone is defined as the area within the measurement CT locations. In the ideal situation the slope characteristic can be set to cause the characteristic to trip only for internal faults. In practice, however, current measurement errors caused by CT saturation, DC offsets, or parallel transformer bank sympathetic energization can disrupt this current measurement balance and cause the relay to trip unnecessarily for external faults. The delta phase function is provided to supervise the slope characteristic and prevent relay differential tripping for external faults by providing extra security to the differential function. In operation, delta phase compares the phase angle of the HV, LV and TV currents to determine which currents are a fixed angle of 90 degrees of each other. If all currents are within 90 degrees or less of each other, this is recognized as the condition necessary for an internal fault. If one or more the currents are greater than 90 degrees of one another, this is recognized as an external fault. Extensive simulation and testing has shown that even with CT current distortion issues, the phase angle of the currents is maintained and can be used to verify external or internal faults, for details see Figure 4.3: Delta Phase Supervision of T-PRO 87T Slope Characteristic on page 4-7. 4-6 T-PRO User Manual 8700 D01386R04.20 4 Protection Functions and Specifications External Fault I HV IHV I LV I TV Internal Fault ILV ITV External Fault Internal Fault I LV Angle > 90 degrees Angle < 90 degrees IHV IHV ITV ITV I LV Phase angles between currents Less than 90 degrees, delta Phase ALLOWS differential trip. Phase angles between currents Greater than 90 degrees, delta Phase BLOCKS differential trip. Figure 4.3: Delta Phase Supervision of T-PRO 87T Slope Characteristic The overall logic function of the differential 87 function can be seen in “Differential 87 Differential Logic” on page 4-7. High CURRENT TRIP HIGH CURRENT TRIP SLOPE Characteristic High Mismatch & 2nd & 5th Harmonic Restraint Phase or Zero Seq. Current Angle< 90 deg. Rate Of Change Of Operating and Restraint Currents dI0>dIr * * OR & 87/87N Trip Zero sequence current is used if 87N function is enabled. Figure 4.4: Differential 87 Differential Logic D01386R04.20 T-PRO User Manual 8700 4-7 4 Protection Functions and Specifications Rate Of Change Of Derivative Function (ROCOD) For some internal fault cases where a radial load may be present on the low side or on the tertiary side of the transformer, a high resistance ground fault may not cause the load current to change. As a result delta phase may not be able to operate until the fault resistance becomes low. To cater to this condition, a rate of change of the operating and the restraint current is performed. It has been found that for internal faults the positive magnitude of the operating current derivative will always exceed the positive value of the restraint current derivative. If this condition occurs, this ROCOD function allows the slope function to trip. If the fault is external to the differential zone, the positive value of the operating current will not exceed the positive value of the restraint current. The ROCOD function is therefore in place to add sensitivity to the differential relay for internal faults. Internal Fault External Fault dIo/dt Io dIo/dt Io dIr/dt dIr/dt Ir Ir dIo/dt > dIr/dt dIo/dt < dIr/dt Figure 4.5: Rate Of Change Of Operating And Restraint Quantities Figure 4.5: Rate Of Change Of Operating And Restraint Quantities on page 8 shows how the dio/dt and the dIr/dt quantities occur during an internal and during an external fault. For an internal fault, the dIo/dt quantity will always be greater than the dIr/dt quantity. When this happens, ROCOD generates a positive logic that will allow the slope function to generate a relay trip. On the other hand, if an external fault occurs, dIo/dt will always be less than dIr/dt. This in turn will prevent operation of ROCOD and thus prevent operation of a differential trip. 4-8 T-PRO User Manual 8700 D01386R04.20 4 Protection Functions and Specifications 87N Neutral Differential Neutral Differential protection function (sometimes called Restricted Ground Fault) protects against internal winding-to-ground faults in cases where the normal differential protection (87) may not see a ground fault which occurs on the lower third section of one of the windings. In this case, the 87 setting is normally too high to see the fault, but the 87N is very sensitive, because the fault current for a near-neutral-to-ground fault can be very high. To intentionally limit this current, sometimes a grounding resistor is connected between the transformer neutral and ground. The principle of operation is that the transformer neutral current (IN) is compared to the sum of the three phase currents (3I0), for a grounded wye winding. If these are not equal, there is an internal ground fault on that winding. The characteristic used is the same as that for the 87, for details see “87 Differential Protection” on page 4-1. Operating Current IO = IA + IB + IC + IN Restraint Current IR = IN + IA + IB + IC 2 Where: IA, IB and IC are the phase currents IN is the neutral current for a particular three-phase winding of the transformer All current reference directions are into the transformer. The 87N can also be used to protect an auto transformer. IO = |3I0_HV + 3I0_LV + IN | (1) Where: IO = 0 for external ground faults IO>0 for internal ground faults IR = (|3I0_HV| + |3I0_LV| +| IN |)/2 (2) Where: 3I0_HV, 3I0_LV and IN are all in primary amps. Note that this is a direct addition of the currents between different voltage levels, which is different from the calculation of 87 or 87N for ordinary transformer, i.e. no conversion (reflection) between different voltage levels is required. Since the 87N characteristic is defined in per unit rather than in primary amps, convert it to per unit by using the reference, i.e. the side primary base current where the PT is located. D01386R04.20 T-PRO User Manual 8700 4-9 4 Protection Functions and Specifications When the reference input is determined, the base current is calculated as: Ibase = MVA * 1000/(Root3 * Ref_Side_kV) IO (pu) = IO/Ibase (3) IR (pu) = IR/Ibase (4) The settings depend on the value of the neutral grounding resistor (if used) and assumptions regarding CT saturation. 87N Neutral Differential Setting Ranges HV, LV, TV Enable/disable IOmin (pu) 0.1 to 1.0 pu IRs (pu) (not settable) 2x MVA rating S1 (%) 6 - 40% S2 (%) 20 - 200% CT Turns Ratio 1.00 to 10000.00 Note: 87N auto is available for autotransformer application. For this application, the HV side and the LV side CTs have the 3Io quantity calculated and the neutral CT is connected to Input # 5. In this way the 3Io is compared from the three sources. 87N Delta Phase Supervision Like the 87 differential protection, the 87N neutral differential also is supervised by a delta phase function. Because the 87N protection only uses the 3IO current from the phase and neutral CTs, delta phase uses the same 3IO currents for the phase angle comparison. The delta phase principle of operation is one that compares the zero sequence current as seen by the phase CTs on one winding side of the transformer with the neutral current through the neutral connection. This comparison can be made on the HV, LV and TV sides of the transformer. Obviously, if a transformer winging is in a delta configuration, or if the phase CTs on that winding are in a delta configuration, the 87N cannot be applied to that winding. In addition, for the case of an auto transformer, an 87N setting option can be chosen to accommodate this transformer configuration. For an auto transformer, zero sequence currents from the HV, LV and common neutral side are compared. 4-10 T-PRO User Manual 8700 D01386R04.20 4 Protection Functions and Specifications 3 Winding Transformer 3IoHV Auto Transformer 3IoLV + + 87N HV 87N TV - 87N LV 3IoN 3IoN 87N 87N can be applied on HV,LV Or TV side of Grd Wye Transformer Zero sequence current phase Angle compared on each side For internal faultcurrents within 90 degrees Of each other 87N can be applied to An auto transformer Example of external fault, phase angles > 90 degrees Figure 4.6: 87N Neutral Differential The 87N differential has only one setting, that of IOmin. The slope characteristics like 87 are user adjustable. There is no fast trip function for the 87N protection function. 49-1 to 49-12 Thermal Overload Transformer Top Oil Feeders Highest Priority hs 1 170 I 160 150 140 12 Lowest Priority 110- (normal) T-PRO calculates hot spot temperature Ambient Other Functions: SCADA Alarm, Block Tapchanger, Prevent Load Restoration, etc. Figure 4.7: 49-1 to 49-12 Thermal Overload Modules Thermal overload protection protects the transformer winding from excessive insulation damage due to heavy loading and/or high temperature conditions. There are 12 identical devices that use a combination of current and temperature monitoring to shed and to restore load based on the level of current in the winding and/or the temperatures inside the transformer. D01386R04.20 T-PRO User Manual 8700 4-11 4 Protection Functions and Specifications Current Input Switch IHV_RMS_Max ILV_RMS_Max ITV_RMS_Max Off I Pickup Setting with Hysteresis Tp1: Pickup Delay Tp1 1 Td1 Td1: Dropout Delay 0 Temp. Input Switch Hot Spot Temperature Top Oil Temperature Off T Pickup Setting with Hysteresis Logic Gate Switch Output Tp2: Pickup Delay Tp2 1 Td2 Td2: Dropout Delay 0 Figure 4.8: Thermal Overload Protection Logic Diagram The Current Input Switch selects which winding current to either of the HV, LV or TV windings. It has a pickup level and delay setting, as well as hyteresis and pickup/dropout delay settings. All current settings are in pu and the time settings are in seconds. In this manner the current based portion of the 49 device is used to detect high loading situations and tolerates them for a specified time before the element operates. When the level of current drops below pickup, the hysteresis keeps the 49 device picked up until the current drops below the level specified by the hysteresis setting and the dropout delay timer has expired. The Temperature Input Switch monitors the Top Oil Temperature (sensed or calculated) or the Hot Spot Temperature (calculated based on inputs). The settings are made in a similar fashion to the current settings with pickup and hysteresis levels and pickup and dropout delay settings. In this manner the temperature based portion of the 49 device monitors the internal temperatures of the transformer and tolerates them for a specified time. An AND/OR gate provides two switches that can be ANDed or ORed together allowing for flexible logic and for monitoring different parts of the transformer under different loading and temperature conditions. You can set each individual 49 device to provide a simple Alarm LED or a Target LED with a front panel message indicating which 49 device has operated. 49 Thermal Overload Setting Ranges 4-12 Current Input Switch Off, HV, LV, TV Pickup (pu) 0.10 to 20.00 Hyteresis (pu) 0.00 to 1.00 Pickup Delay (Tp1, seconds) 0.00 to 1800.00 Dropout Delay (Td1,seconds) 0.00 to 1800.00 Temperature Input Switch Off, Hot Spot, Top Oil Pickup (degrees) 70.0 to 200.0 Hysteresis (degrees) 0.0 to 10.0 Pickup Delay (Tp2, hours) 0.00 to 24.00 T-PRO User Manual 8700 D01386R04.20 4 Protection Functions and Specifications 49TOEWS Transformer Overload Early Warning System Dropout Delay (Td2, hours) 0.00 to 24.00 LED Switch Target LED or Alarm LED Logic Gate OR or AND This feature extends the thermal overload concept of the previous section in two ways: • Predicts excessive hot spot temperature to thirty minutes in advance. • Predicts excessive loss of life to thirty minutes in advance. Both of these are based on the availability of an adequate thermal model of the transformer, for details see “Top Oil and Hot Spot Temperature Calculation” in Appendix N. To use this feature the relay must have an ambient temperature probe available from ERLPhase. Excessive Hot Spot Temperature Warning Enabling this feature, hot spot temperature is calculated at every time step (five seconds) into the future. The assumption is that the load current and ambient temperature do not change. If this calculation indicates that the hot spot temperature exceeds its trip setting, the following happens: • 15-minute warning alarm is activated, if the calculated time is fifteen minutes or less. • 30-minute warning alarm is activated, if the calculated time is between thirty minutes and fifteen minutes. • Trip output is activated if the calculated time is zero. The actual time to trip, in minutes, is also available (30, 29,...1, 0 minutes). If the time to trip is greater than 30 minutes, the display value is “+++++”. Excessive Loss of Life Warning This feature overcomes a difficulty with simple over-temperature as an indication of overload. If the hot spot temperature trip setting is 140°C and the temperature hovers at values just below that level, then damage to the cellulose insulation occurs, but no trip. Also, if the temperature briefly exceeds the setting (less than an hour) and then falls back to normal levels, a trip should not occur, but will. You can overcome these unreliability and security issues by using the “loss of life” concept. The calculation is outlined in “Top Oil and Hot Spot Temperature Calculation” in Appendix N. The 30-minute warning, 15-minute warning and trip outputs occur if either the hot spot temperature or loss of life limits are exceeded. The three settings are: THS Trip Setting Use 175°C with loss of life protection enabled. The latter will not allow temperatures near this level to last too long. D01386R04.20 T-PRO User Manual 8700 4-13 4 Protection Functions and Specifications If loss of life protection were not enabled, then a lower setting would be necessary, say 140°C, a temperature at which oil bubbles might start to form, depending for one thing, on the oil water content. THS To Start Loss of Life Calculation For this 65°C rise transformer the normal hot spot temperature is 110°C. Therefore, some value above this is appropriate for the start of “excessive loss of life” calculation initiation. Select 125°C. Loss of Life Trip Setting Select 2 days as the setting. This, in combination with the above, allows overloads similar to those recommended in the Standard (C57.91-1995). A study for this transformer shows that for these settings, a sudden overload will trip due to hot spot temperature for times less than about fifteen minutes, and due to excessive loss of life for times greater than about fifteen minutes. The software for this kind of study is available from ERLPhase. TOEWS Transformer Overload Early Warning System Setting Ranges 4-14 TOEWS Enable/disable THS (Temperature Hot Spot) Trip Setting (degrees) 70.0 to 200.0 THS to Start LOL (Loss of Life) Calculation (degrees) 70.0 to 200.0 LOL (Loss of Life) Trip Setting (days) 0.5 to 100.0 T-PRO User Manual 8700 D01386R04.20 4 Protection Functions and Specifications 24 Overexcitation 24INV provides inverse-time overexcitation (over-fluxing) protection. The activating quantity is the ratio of voltage to frequency because flux is proportional to the voltage and inversely proportional to the frequency. 24INV protects the transformer from overfluxing because either voltage increases or system frequency changes. 24INV is defined as: K T = -----------------------------------2V -- f – Pickup Where: T is the tripping time in seconds V is the positive sequence voltage in per unit f is the frequency in per unit K is a parameter raising or lowering the inverse time curve Pickup is the user-set value of V/f at which the element starts to progress toward trip The element uses the positive sequence voltage and compares the pu positive sequence magnitude to the pu positive sequence frequency. 24DEF Definite Time Delay protection is similar to the 24INV except that the operating time delay is definite. Use this function to trip off a capacitor bank on the HV side of the system if a controller fails. 24 Overexcitation Setting Functions K Factor for altering inverse time curve Pickup (24INV) Minimum level that operates device 24INV Reset Time Time for 24INV to reset after element has dropped out Pickup (24DEF) Minimum level that operates device 24DEF Pickup Delay Operating time for 24DEF 24 Overexcitation Setting Ranges D01386R04.20 24INV Enable/disable K 0.10 to 100.00 Pickup (pu) 1.00 to 2.00 Reset Time (seconds) 0.05 to 100.00 T-PRO User Manual 8700 4-15 4 Protection Functions and Specifications 59N Zero Sequence Overvoltage 24DEF Enable/disable Pickup (pu) 1.00 to 2.00 Pickup Delay (seconds) 0.05 to 99.99 Zero Sequence Overvoltage protection is provided for ground fault monitoring. This function also uses standard IEC and IEEE curves as well as a userdefined curve type. You can apply the PT voltage source either to the HV or the LV side of the transformer. When used, apply the device 59N (3V0) to this winding to provide ground fault monitoring looking at the zero sequence voltage. Pickup A T 3V 0 = TMS B + ----------------------------------------p 3V 0 ----------------------- – 1 3V 0Pickup Reset TR T 3V 0 = TMS ----------------------------------------2 3V 0 ---------------------- 3V 0Pickup – 1 Table 4.2: IEC and IEEE Curves No Curve Type A B p 1 IEC Standard Inverse 0.14 (fixed) 0.00 (fixed) 0.02 (fixed) 2 IEC Very Inverse 13.50 (fixed) 0.00 (fixed) 1.00 (fixed) 3 IEC Extremely Inverse 80.00 (fixed) 0.00 (fixed) 2.00 (fixed) 4 IEEE Moderately Inverse 0.0103(fixed) 0.0228 (fixed) 0.02 (fixed) 5 IEEE Very Inverse 3.922 (fixed) 0.0982 (fixed) 2.00 (fixed) 6 IEEE Extremely Inverse 5.64 (fixed) 0.0243 (fixed) 2.00 (fixed) 7 User-defined [0.001, 1000] [0.0, 10.0] [0.01, 10.0] 59N Zero Sequence Overvoltage Setting Functions 4-16 3VO Pickup Minimum level that operates device 59N Curve Type Sets the type of curve TMS Factor for inverse time curve A, B, p Parameters for defining the curve TR Factor for altering the reset time T-PRO User Manual 8700 D01386R04.20 4 Protection Functions and Specifications 59N Zero Sequence Overvoltage Setting Ranges 27 Undervoltage 59N Enable/disable 3V0 Pickup (volts) 75.00 to 150.00 Curve Type See “IEC and IEEE Curves” on page 4-16 TMS 0.01 to 10.00 A 0.0010 to 1000.0 B 0.0000 to 10.0 p 0.01 to 10.00 TR 0.10 to 100.00 Two sets of undervoltage protection elements are provided to monitor the bus voltage. When the voltage level applied to the analog voltage inputs is below the pickup level, the 27 operates after the time delay has expired. The 27-1 and 27-2 functions are identical in terms of operation. Use the gate switch to select between an AND or an OR gate in order to detect a three-phase undervoltage or a single-phase undervoltage condition. When the gate switch is set to OR, a drop of voltage on any one phase causes the element to operate. Set the definite time delay to 0.0 for a instantaneous output. Gate Switch (Setting) 27 Va 27 Vb 27 Vc OR T O AND Figure 4.9: 27 Undervoltage 27 Undervoltage Setting Functions D01386R04.20 Pickup (volts) Minimum level that operates device 27 Pickup Delay (seconds) Operating time of the 27 Gate Switch Allows either single-phase or three-phase operation T-PRO User Manual 8700 4-17 4 Protection Functions and Specifications 27 Undervoltage Setting Ranges 60 AC Loss of Potential 27-1, 27-2 Enable/disable Gate Switch AND or OR Pickup (volts) 1.0 to 120.0 Pickup Delay (seconds) 0.00 to 99.99 59 VA (fixed 0.5 pu) 59 VB (fixed 0.5 pu) 59 VB (fixed 0.5 pu) 206 10 s Loss of Potential 197 0.0 207 Figure 4.10: AC Loss of Potential Logic This protection detects the loss of potential from either one or two phases of a PT and issues an alarm. The alarm is intended to detect a blown fuse or an open circuit in the PT circuit. If this function is enabled and an ac loss of potential takes place, an output contact can be closed. 60 Loss of Potential Setting Ranges 4-18 60 Loss of Potential Enable/disable Pickup Time Delay 10 seconds (fixed) T-PRO User Manual 8700 D01386R04.20 4 Protection Functions and Specifications 81 Over/Under Frequency The relay has four frequency devices available. Each frequency element can be set to operate either at a fixed level of under-frequency, a fixed level of overfrequency, or at a rate of change level (df/dt). The df/dt function can be set to operate for a positive rate of change or a negative rate of change. Each frequency element has a definite time delay setting to create a time delayed output. A fixed level of positive sequence voltage of 0.25 pu or 5 volts, whichever is greater provides an undervoltage inhibit on each element. T 81-1 O Figure 4.11: Over/Under Frequency 81 Frequency Setting Functions Pickup Minimum level that operates device 81 Pickup Delay Operating time for the 81 81 Frequency Setting Ranges D01386R04.20 81-1, 81-2, 81-3, 81-4 Enabled, disabled, fixed level, rate of change Pickup (Hz/second) (60 Hz) Fixed Level Between [50.000, 59.995] or [60.005, 70.000] Pickup (Hz/second) (60 Hz) Rate of Change Between [-10.0, -0.1] or [0.1, 10.0] Pickup Delay (seconds) (60 Hz) Fixed Level 0.05 to 99.99 Pickup Delay (seconds) (60 Hz) Rate of Change 0.20 to 99.99 Pickup (Hz/second) (50 Hz) Fixed Level Between [40.000, 49.995] or [50.005, 60.000] Pickup (Hz/second) (50 Hz) Rate of Change Between [-10.0, -0.1] or [0.1, 10.0] Pickup Delay (seconds) (50 Hz) Fixed Level 0.05 to 99.99 Pickup Delay (seconds) (50 Hz) Rate of Change 0.20 to 99.99 T-PRO User Manual 8700 4-19 4 Protection Functions and Specifications 50/51 Overcurrent Pickup A T I = TMS B + --------------------------------I ---------------- p – 1 I Pickup Reset TR T I = TMS --------------------------------I ---------------- 2 – 1 I Pickup These functions provide backup protection for device 87 and downstream protections. Device 50/51HV provides high voltage side instantaneous and inverse time, device 50/51LV provides overcurrent protection for the LV winding and 50/51TV provides overcurrent protection for the TV winding. Depending on the associated CT connections, either the Wye current or the Delta currents could be used in the 50/51 functions for details see Magnitude Corrections on page 4-5. Each of the above overcurrent functions provide three IEC inverse time curve types and three IEEE inverse time types of overcurrent protection as well as a user-defined inverse time type is also provided. Each device 50/51 is applied on each of the windings as defined by the settings. Each operates on the sum of that particular winding side per unit current (positive and negative sequence values only) irrespective of the CT ratio or connection on that side. The input of each device 50/51 is the maximum fundamental rms current, Imax, among phases A, B and C. If Imax is greater than pickup, an alarm is set and the relay starts to integrate towards trip. When the integrated torque is greater than 1, a trip signal is issued. The 51 characteristic reset is a back integration process where the reset time is based on the time the relay takes to reset from its trip condition. An adaptive feature is applied to device 51HV as well and is described in “51ADP Adaptive Overcurrent” on page 4-21. The 50 device is an instantaneous element and operates when the Imax B is above the pickup level for the desired time. 50/51 Phase Overcurrent Setting Functions 4-20 50 Pickup Minimum level that operates device 50 50 Pickup Delay Operating time for the 50 51 Pickup Minimum level that operates device 51 Curve Type Sets the type of curve TMS Factor for altering inverse time curve A, B, p Parameters for defining the curve TR Factor for altering the reset time T-PRO User Manual 8700 D01386R04.20 4 Protection Functions and Specifications 50/51 Phase Overcurrent Setting Ranges 50 HV, LV, TV Enable/disable Pickup (pu) 0.10 to 20.00 Pickup Delay (seconds) 0.00 to 99.99 51 HV, LV, TV Enable/disable Pickup (pu) 0.50 to 2.10 (for HV) 0.10 to 5.00 (for LV, TV) Curve Type See Table 4.2: “IEC and IEEE Curves” on page 4-16 Tms (Time Multiplier Setting) 0.05 to 1.00 (if curve type is 1 to 3) 0.50 to 10.00 (if curve type is 4 to 6) 0.05 to 10.00 (if curve type is 7) A 0.0010 to 1000.0 B 0.0000 to 10.00 p 0.01 to 10.0 TR 0.10 to 100.00 51ADP Enable/disable Multiple of Normal LOL 0.5 to 512.0 51ADP Adaptive Overcurrent Overload Region 0.7 1.0 1.5 Fault Region 2.15 Current per unit Hot day Cold day Figure 4.12: Ambient Temperature Adaption Ambient Temperature Adaption (ADP) adjusts the pickup level of device 51HV based on the ambient temperature, a user-entered multiplier of normal loss of life and the equations defined in IEEE standard C57.92.1981. The adaptation function is executed at a rate of one time per second. If this function is enabled, the calculated adaptive pickup value becomes the device 51HV pickup setting. The 51ADP function re-shapes the inverse-time D01386R04.20 T-PRO User Manual 8700 4-21 4 Protection Functions and Specifications curve only in the overload region (up to 2.15 per unit), for details see Figure 4.12: Ambient Temperature Adaption on page 21. If the ambient temperature signal is out of range, the pickup of device 51HV reverts to the user-set value. 51ADP Adaptive Overcurrent - Cold Climates If this function is turned on, the 51HV pickup is affected by the ambient temperature input and the rate of loss of life setting value. If this function is not used, the 51HV pickup is not affected. If rate of loss of life is set to one and ambient temperature is 30 degrees Celsius, the pickup level of 51 will be 1.0 per unit. Use the curves in Example 1, “Loss of Life of Solid Insulation” in Appendix M to change the 30°C pickup level. The alarm function of 51HV indicates when the pickup threshold has been exceeded. When the ambient temperature input probe is connected, you can use the adaptive overcurrent function. Set the rate of loss of life value to 1.0. The pickup values can be affected over the range 0 < pickup < 2.15 per unit. No change in the overcurrent characteristic takes place above 2.15x pickup. Since most fault coordination with other overcurrent relays occurs at fault levels above this value, coordination is not usually affected by the adaptive nature of the 51ADP function. However, check all specific applications. If the ambient temperature input goes out of range with the adaptive function armed, an alarm is generated. The event is logged and the overcurrent pickup reverts to the user setting provided for the 51HV. 50N/51N Neutral Overcurrent T-PRO provides overcurrent protection for up to three neutral connected transformer windings using an analog current input set number 5. To apply these devices connect I5 A current to HV side transformer neutral current, I5B to LV side transformer neutral CT and I5C to TV side transformer neutral. If only one function is used (e.g. 50N/51N-HV), connections to analog inputs I5B and I5C are not used and can not be used as inputs for the differential protection, but these inputs can be used for fault recording from a CT source. Neutral Overcurrent is similar to 50/51 except that the input currents are taken from the transformer neutral CTs and are in secondary amps rather than per unit. To enable 50N/51N, Current Input #5 must be set to 51N (i.e. option 87N/51N) in Connection (Winding/CT Connections). If Input 5 is set to 87N auto, only 50/51N-HV is available. 50N/51N Neutral Overcurrent Setting Functions 4-22 50N Pickup Minimum level that operates device 50N 50N Pickup Delay Operating time for the 50N 51N Pickup Minimum level that operates device 51N Curve Type Sets the type of curve TMS Factor for altering inverse time curve T-PRO User Manual 8700 D01386R04.20 4 Protection Functions and Specifications A, B, p Parameters for defining the curve TR Factor for altering the reset time 50N/51N Neutral Overcurrent Setting Ranges 50N HV, LV, TV Enable/disable Pickup (A) 0.50 to 50.00 Pickup Delay (seconds) 0.00 to 99.99 51N 67 Directional Overcurrent HV, LV, TV Enable/disable Pickup (pu) 0.50 to 50.00 Curve Type See Table 4.2: “IEC and IEEE Curves” on page 4-16 Tms (Time Multiplier Setting) 0.05 to 1.00 (if curve type is 1 to 3) 0.50 to 10.00 (if curve type is 4 to 6) 0.05 to 10.00 (if curve type is 7) A 0.0010 to 1000.0 B 0.0000 to 10.00 p 0.01 to 10.0 TR 0.10 to 100.00 -180° < Alpha <180° 0° <Beta <360° Positive sequence voltage and current Alpha I1 Beta Trip Zone LV Side Reference I1 V1 V1 (reference) HV Side Reference I1 V1 Figure 4.13: Directional Overcurrent Protection Characteristic This device provides directional overcurrent protection applied to the HV or LV winding that has the PT connected to it. If the angle between the positive sequence current and the positive sequence voltage is in the region labelled “Beta,” then a timed trip occurs. Use either HV side voltage and HV side current or LV side voltage and LV side current, de- D01386R04.20 T-PRO User Manual 8700 4-23 4 Protection Functions and Specifications pending on which side the PT is connected. In either case, the reference direction is into the transformer. You can select an inverse time characteristic of the function. Directional Overcurrent allows for the application of a directional controlled overcurrent relay. Direction is determined from the reference voltage quantities of the HV side PT. 67 Directional Overcurrent Setting Functions 67 Pickup Minimum level that operates device 67 Curve Type Sets the type of curve TMS Factor for altering inverse time curve A, B, p Parameters for defining the curve TR Factor for altering the reset time Alpha Defines the starting angle for the trip region Beta Defines the size of the trip region in degrees offset from alpha 67 Directional Overcurrent Setting Ranges 4-24 67 Enable/disable Curve Type See Table 4.2: “IEC and IEEE Curves” on page 4-16 Pickup (pu) 0.05 to 1.95 TMS 0.01 to 10.00 A 0.001 to 1000.0 B 0.00 to 10.00 p 0.01 to 10.00 TR (seconds) 0.10 to 100.00 Alpha (degrees) -179.9.0 to 180.0 Beta (degrees) 0.1 to 360.0 T-PRO User Manual 8700 D01386R04.20 4 Protection Functions and Specifications THD Alarm I1a I1b I1c I2a I2b I2c I3a I3b I3c I4a I4b I4c I5a I5b I5c THD THD THD THD THD THD THD THD THD THD THD THD THD THD THD Max Level Detector 40.0 THD Alarm 10.0 Figure 4.14: Total Harmonic Distortion Function The THD Alarm function alerts you to the degree of current waveform distortion and therefore harmonic content. Setting this value at 10% means that the THD function operates if the total harmonic distortion exceeds 10% in any of the fundamental protection currents. THD = square root of the sum of the squares of the harmonics (2nd–25th) divided by the fundamental times 100 for THD% value. . THD is defined as 25 2 In n=2 100 THD = --------------------I1 Where: I1 is the fundamental component I2 to I25 are the harmonics components The inputs to this function are the THD values of all the current input channels that are connected to the transformer. The channels that are not connected to the transformer (e.g. for recording only) or channels with low fundamental signals (less than 14% of nominal current) are not calculated for THD. The alarm is activated if the highest THD found exceeds the setting. There is a built-in fixed time delay of from 30–40 seconds pickup and 1–10 seconds dropout to ensure that this is not just a fault condition. This function is executed in a slow rate, once per second. The THD values are calculated from the 96 samples buffer rather than the decimated 8 samples buffer because higher harmonics content (up to the 25th) can be included with 96 samples. D01386R04.20 T-PRO User Manual 8700 4-25 4 Protection Functions and Specifications Total Harmonic Distortion (THD) Alarm Through Fault Monitor THD Alarm Enable/disable Pickup (%) 5.0 to 100.0 The Through Fault monitor function in T-PRO is used to monitor the through faults that the transformer has experienced so as to analyze thermal and mechanical effects of through faults to the transformer. The monitored quantities include the duration of each through fault, the current peak RMS value and the accumulated I2t value of each phase during each through fault. Besides, the total number of the through faults and the total accumulated I2t values of each phase over the transformer life are also monitored. The overall through fault monitor scheme is shown in the following figure: Figure 4.15: Overall Through Fault Monitor Scheme The through fault duration is defined as from when the input current Imax (the maximum current among phase A, B and C) exceeds the pickup threshold to when Imax drops below the pickup threshold - hysteresis. Note that the maximum allowed through fault duration is 30 seconds, this is to avoid the through fault event may never stop in case the pickup setting is set improperly so that the through fault event might be triggered under some load conditions. Pickup delay Tp1 and dropout delay Td1 are set to zero by default, however they can be set to other values based on user’s needs. The 2nd harmonics restraint logic output from device 87 is brought here to be used to block the through fault event creation on inrush. The pickup and dropout timer (Tp2 and Td2) are used to distinguish between the 2nd harmonics caused by the fault transient and the 2nd harmonics caused by transformer en- 4-26 T-PRO User Manual 8700 D01386R04.20 4 Protection Functions and Specifications ergization inrush. 2nd harmonics in the fault current only last for a very short period of time (e.g. 1 cycle or shorter) and 2nd harmonics in the inrush current last for quite a long time (e.g. a second or even longer). The figure below showed that the 2nd harmonics existed in the fault current during load to fault transition. Figure 4.16: 2nd Harmonics Contents in Fault Current Tp2 setting (default to 20ms) is used to ensure that the 2nd harmonics blocking will be only applied on the inrush current (rather than fault current). Td2 setting is used to stretch the 2nd harmonics blocking signal once it picks up. This is to prevent it from early reset in order to endure a reliable blocking. An alarm will be issued when the total accumulated I2t value of any phase exceeds the preset threshold. When this occurs, some necessary maintenance to the transformer should probably be performed. After that is completed, the total accumulated I2t value should be reset. The I2t alarm limit threshold may also need to be adjusted accordingly after successive accumulated I2t values have been reached. The through fault events and the associated monitored quantities can be viewed through Event Log/Through Fault Peak and Event Log/Through Fault I*I*t in Terminal VI respectively. They can also be retrieved to RecordBase View and exported to MS Excel CSV format (refer to RecordBase View for details). To D01386R04.20 T-PRO User Manual 8700 4-27 4 Protection Functions and Specifications avoid data loss of the through fault events, “Event Auto Save” feature should be enabled. Through Fault Monitor Setting Ranges 4-28 Through Fault Monitor Enable/Disable Input Current HV, LV OR TV Pickup Level (pu) 0.10 to 20.00 Hysteresis (pu) 0.00 to MIN (1.00, Pickup Level) Pickup Delay (Tp1, seconds) 0.00 to 99.99 Dropout Delay (Td1, seconds) 0.00 to 99.99 l*l*t Alarm Limit (kA2*s) 0.1 to 9999.9 2nd Harmonics Block Enable/Disable 2nd Harmonics Block Pickup Timer (Tp2, seconds) 0.00 to 99.99 2nd Harmonics Dropout Timer (Td2, seconds) 0.00 to 99.99 T-PRO User Manual 8700 D01386R04.20 4 Protection Functions and Specifications ProLogic ProLogic Control Statements With ProLogic you can pick any of the protection functions or external inputs and place them into Boolean-like statements. ProLogic handles up to five functions to generate one ProLogic statement; ten statements are possible. The results from these statements are mapped to output contacts using the output matrix. The ProLogic control statements are used to create Boolean-like logic. The relay can use any of the protection functions or external inputs combined with logic gates to create a ProLogic control statement. The possible gates are AND, NAND, OR, NOR, XOR, XNOR, NXOR and LATCH. The control can be time delay pickup and or time delay dropout, and can drive the front panel target LED. Ten ProLogic control statements outputs are available and can be used in the output matrix to customize the relay to your specific needs. Inputs to ProLogic are all the elements plus previous ProLogic statements for logic nesting usage. The example shows A to E inputs are status points of devices that are user-selectable. Each ProLogic output can be given a specific name, pickup and reset time delay. Op 1 Op 2 A Op 3 B Op 4 C Op 5 D T E D Figure 4.17: ProLogic ProLogic Setting Functions D01386R04.20 Name Give the ProLogic a meaningful name Pickup Delay Delay time from pickup to operate Dropout Delay Delay time from dropout to a ProLogic status of low A, B, C, D, E Relay elements as input statements Operators Boolean-type logic gates T-PRO User Manual 8700 4-29 4 Protection Functions and Specifications Recording Functions The T-PRO Relay provides numerous recording and logging functions, including a fault recorder, a trend log and an event log to analyze faults, to know the performance of the relay and to observe the status of the protected device. Fault Recorder Fault recording captures the input signal waveforms and other derived quantities when a fault or an abnormal situation occurs. The relay determines this by allowing the functions in the Output Matrix to enable the Recording or fault record option. Obtain this information by uploading the records from the relay using the terminal mode file transfer process and view them with RecordBase View. Up to a total of 15 seconds of information can be stored with automatic overwrite of the oldest data. The quantities recorded are: • 18 analog channels (3 voltages and 15 currents in secondary volts and amperes respectively), 96 samples/cycle up to the 25th harmonic • 9 external digital inputs, 96 samples/cycle • 6 derived analog channels (3 operating currents, 3 restraint currents, all are magnitude quantities in per unit), 8 samples/cycle. These derived and analog channels are displayed as a Differential Trajectory graph). • 57 relay internal logic signals, 8 samples/cycle • 10 ProLogic signals, 8 samples/cycle. Parameters that are user-selectable with respect to recording faults: • Record length (30–120 cycles of which 10 cycles is pretrigger) with automatic extension to capture successive triggers • Recorder triggering by any internal logic or external digital input signal Trend Recorder The trend recorder provides continuous, slow-speed recording of the transformer and its characteristics with an adjustable sample period from 3 to 60 minutes per sample. This same global trend sampling rate is applied to all the trend quantities. The relay stores a fixed number of samples. At the nominal sample period of 3 minutes per sample T-PRO stores one month of trend records with automatic overwrite of the oldest. If the sample interval increases to 30 minutes per sample, the relay stores 300 days of trend records. Sample Interval Trend Record Length 3 minute 30 days 5 minute 50 days 10 minute 100 days 30 minute 300 days 60 minute 600 days Figure 4.18: Examples of the Trend Record Length Use the terminal mode file transfer to view the trend records, and then open RecordBase View software to analyze the records. 4-30 T-PRO User Manual 8700 D01386R04.20 4 Protection Functions and Specifications To view the present values of trend quantities use the Metering option of the terminal mode interface: • Ambient Temperature (in degrees Celsius) if the ambient input is active. • Top Oil Temperature (in degrees Celsius) either calculated from ambient or measured if input is active. • Hot Spot Temperature (in degrees Celsius) calculated from Top Oil Temperature. • Transformer Load HV side maximum current among phase A, B and C in per unit. • Device 50/51HV pickup in per unit equal to the Dev51ADP’s adaptive pickup value if Dev51ADP is turned on or equal to the default pickup setting of Dev51 if it’s turned off. If ambient is not available, the default pickup setting is used. • Accumulated loss of life in percent of total loss of life as defined by the C57 standard. • HV or LV side real power in MW (for HV side PT, power leaving the HV bus is positive and for LV side PT, power going to HV side is considered positive). • HV or LV side reactive power in MVAR (same definition as for real power above). • Maximum selected THD value in percent of the fundamental of all the analog current inputs selected for protection. Analog current inputs used for recording only not included. D01386R04.20 T-PRO User Manual 8700 4-31 4 Protection Functions and Specifications Logging Functions Event Log The relay maintains a log of events in a 250 entry circular log. Each entry contains the time of the event plus an event description. This log includes the time that the event took place and a predefined description of the event. Trip and alarm events are logged only if these events have been user-programmed to initiate output relay closures or have been programmed to initiate fault recording in the Output Matrix of the settings. The event log can be viewed in two ways: Front Panel The front panel display shows events in abbreviated form (Trip and Alarm events only). Terminal User Interface The full event log is available through the Event Log menu of the terminal user interface. This display is a snapshot of the event list which must be manually refreshed to display new events that occur while the display is up. There is a list of Event Messages, for details see “Event Messages” in Appendix D. 4-32 T-PRO User Manual 8700 D01386R04.20 5 Offliner Settings Software 8 v8 Setting Area Setting Tree Figure 5.1: Opening Screen Introduction Use the Offliner Settings software to create relay settings on a PC. Offliner Settings provides an easy way to view and manipulate settings. PC System Requirements Hardware The minimum hardware requirements are: • • • • • 1 GHz processor 2 GB RAM 20 GB available hard disk space USB port Serial communication port Operating System The following software must be installed and functional prior to installing the applications: • Microsoft Windows XP Professional Service Pack 3 or • Microsoft Windows 7 Professional Service Pack 1 32-bit or 64-bit D01386R04.20 T-PRO User Manual 8700 5-1 5 Offliner Settings Software Installing PC Software Insert the CD-ROM in your drive. The CD-ROM should open automatically. If the CD-ROM does not open automatically, go to Windows Explorer and find the CD-ROM (usually on D drive). Open the T-PRO.exe file to launch the CDROM. To install the software on your computer, click the desired item on the screen. The installation program launches automatically. Installation may take a few minutes to start. To view the T-PRO User Manual you must have Adobe Acrobat on your computer. If you need a copy, download a copy by clicking on Download Adobe Acrobat. Anti-virus/Anti-spyware Software If an anti-virus/anti-spyware software on your local system identifies any of the ERLPhase applications as a “potential threat”, it will be necessary to configure your anti-virus/anti-software to classify it as “safe” for its proper operation. Please consult the appropriate anti-virus/anti-spyware software documentation to determine the relevant procedure. Offliner Features The Offliner software includes the following menu and system tool bar. Help - User Manual About T-PRO Offliner New Save Open Copy Cut Undo Paste Print About Show or Hide Copy Left-Hand Side Graph Tree to Clipboard Figure 5.2: Top Tool Bar Tool Bar Windows Menu 5-2 Icon Restore, minimize, close. File New, open, close, save, save as, convert to print, print setup and exit. Edit Undo, cut, copy, paste. Tools Options T-PRO User Manual 8700 D01386R04.20 5 Offliner Settings Software Window Cascade, tile. Help User Manual, About T-PRO Offliner. Settings Program Icons Graphing Protection Functions New Create a new document. Open Open an existing document. Save Save the active document. Cut Cut the selection. Copy Copy the selection. Paste Insert clipboard contents. Copy graph to clipboard. Copy graph to clipboard. Print Print active document. About Display program information. Show or Hide Left-Hand Side Tree Show or Hide the Tree View. Undo Undo last action. Grid On/Grid Off The graph can be viewed with the grid on or off by clicking the Grid On or Grid Off button. A right-click on the trace of the curve gives you the x and y coordinates. Print Graph To print a particular graph, click the Print Graph button. Zoom on Graphs Graphs can be zoomed to bring portions of the traces into clearer display. Leftclick on any graph and drag to form a small box around the graph area. When you release the mouse, the trace assumes a new zoom position determined by the area of the zoom coordinates. To undo the zoom on the graph, click the Refresh button. D01386R04.20 T-PRO User Manual 8700 5-3 5 Offliner Settings Software Handling Backward Compatibility Offliner Settings displays the version number in the second pane on the bottom status bar. The settings version is a whole number (v2, v3, v4, etc.). The Offliner Settings is backward compatible. Open and edit older settings files and convert older settings files to a newer version. Offliner Settings handles forward conversion only; it converts an older setting file to a newer setting file. Converting a Settings File 1 Open the setting file you wish to convert. 2 In the File menu, select Convert to... and then select the version x (where x is the newer version). A dialog box pops up prompting Offliner for a new file name. Use either the same file name or enter a new file name. The conversion process inserts default values for any newly added devices in the new setting file. When the conversion is complete, Offliner Settings displays the new file. Figure 5.3: Converting Setting Files Sending a New Setting File to the Relay 1 Make sure the settings version and the serial number of the relay in the setting file match. The relay will reject the setting file if either the serial number or the settings version do not match. A “serial number discrepancy” message may appear. This is to ensure that you are aware of the exact relay in which settings are to be loaded. If this happens, check the relay serial number using the terminal mode ID menu item. Type this serial number into the TPRO Serial No. box in the Identification tab display area of Offliner Settings. Alternately you may check the Ignore Serial Number check box to bypass serial number supervision. 2 Check the serial number and the settings version of the relay, for details see “ID” on page 3-9. The Device Serial Number and Required Settings Version on the Identification screen indicate the serial number and the settings version of the relay. Creating a Setting File from an Older Version 5-4 1 Offliner Settings displays a default setting file on start up showing the settings version in the bottom status bar. As an example T-PRO Offliner is shipped with a set of default sample files of older settings versions. These T-PRO User Manual 8700 D01386R04.20 5 Offliner Settings Software sample files are “v2 sample.tps”, “v3 sample.tps”, etc. Each sample file contains default values of an older settings version. For a new installation these sample files are placed in the default directory C:\Program Files\ERLPhase\T-PRO Offliner Settings, or you can choose the path during the Offliner software installation. If an older version of T-PRO Offliner was previous ly installed on your PC, then the default directory may be C:\Program Files\APT\T-PRO Offliner Settings. 2 Open a sample file of the desired version. Use File/Save As to save the sample file to a new file name. Then edit the setting file and the serial number, save it and load it into the relay. RecordBase View Software Figure 5.4: RecordBase View Use RecordBase View to analyze the records from a relay. 1 Set the receive directory on your terminal program to point to a convenient directory on your PC’s hard disk or network. For example with HyperTerminal, select Transfer>Receive File to set the receive directory. 2 Select one or more records on the relay using the List function in the Terminal Mode’s Records menu. 3 Initiate transfer of the selected records by selecting R on the keyboard. 4 Start the RecordBase View program and use the File>Open menu command to open the downloaded record files located in the receive directory specified in step 1. For further instructions refer to the RecordBase View Manual at the back of the printed version of this manual. D01386R04.20 T-PRO User Manual 8700 5-5 5 Offliner Settings Software Main Branches from the Tree View Identification RHS - Information relating to specific menu Item, accessed by LHS menu or top tabs. LHS Menu Tree 8 8 Nominal System Frequency - set to either 50 Hz or 60 Hz Unique relay serial number Nominal CT Sec. Current - set to either 1 A or 5 A Figure 5.5: Relay Identification The first screen presents all the menu items in the left menu tree. You can access the menu items by clicking the tabs at the top of the screen or the item on the left menu tree. Identification Settings Version Indicates the version number. Ignore Serial Number Enable/disable Serial Number Available at back of each relay. Unit ID User-defined up to 20 characters. Nominal CT Sec. Current 5 A or 1 A Nominal System Frequency 60 Hz or 50 Hz Comments User-defined up to 78 characters. Setting Software Setting Name User-defined up to 20 characters. Date Created/Modified Indicates the last time settings were entered. Station 5-6 Station Name User-defined up to 20 characters. Station Number User-defined up to 20 characters. Location User-defined up to 20 characters. Bank Name User-defined up to 20 characters. T-PRO User Manual 8700 D01386R04.20 5 Offliner Settings Software Important Note Nominal CT Sec. Current can be set to either 1 A or 5 A. Nominal System Frequency can be set to either 50 Hz or 60 Hz. Ensure setting selection matches that of target T-PRO. The serial number of the relay must match the one in the setting file, or the setting will be rejected by the relay. This feature ensures that the correct setting file is applied to the right relay. You can choose to ignore the serial number enforcement in the identification screen. The relay only checks for proper relay type and setting version if the ignore serial number has been chosen. Analog Inputs Figure 5.6: Analog Inputs Identify all ac voltage and current inputs to the relay. These names appear in any fault disturbance records the relay produces. Analog Input Names Voltage Inputs VA, VB, VC Current Inputs IA1, IB1, IC1 IA2, IB2, IC2 IA3, IB3, IC3 IA4, IB4, IC4 IA5, IB5, IC5 Temp Inputs D01386R04.20 Temp 1, Temp 2 T-PRO User Manual 8700 5-7 5 Offliner Settings Software External Inputs Figure 5.7: External Inputs Define meaningful names for the nine external digital inputs. External Input Names 1 to 9 User-defined Output Contacts Figure 5.8: Output Contacts Define meaningful names for the 14 output contacts. Output Contact Names Outputs 1 to 14 5-8 User-defined T-PRO User Manual 8700 D01386R04.20 5 Offliner Settings Software Nameplate Data Figure 5.9: Nameplate Data This data informs the relay that the transformer maximum rating is 100 MVA. This quantity becomes the per unit base quantity for the relay. Any reference in the settings or the outputs related to per unit are based on this value. The temperature rise value and the cooling method provided form the basis for loss of life calculations for the transformer. When user-defined is selected in transformer cooling method, 7 transformer temperature parameters become editable. If you select other cooling methods, these parameters are no longer editable, and the default values (based on IEEE standards) are used for the transformer temperature calculation. Nameplate Data Transformer 3-phase Capacity (MVA) 1 to 2000 Transformer Windings 2 or 3 Tap Changer Range (percent) -100 to 100 Normal Loss of Life Hot Spot Temperature (degrees) 70.0 to 200.0 Transformer Temperature Rise (degrees) 55 or 65 Transformer Cooling Method Self-cooled Forced air cooled, (OA/FA) rated 133% or less of self cooled rating Forced air cooled, directed flow (FOA, FOW, OA/FOA/FOA) Forced air cooled, (OA/FA/FA) rated over 133% of self-cooled rating Forced air cooled, non-directed flow (FOA/FOW, OA/FOA/FOA) User-defined D01386R04.20 Temp. Rise Hot Spot (TriseHS) (degrees) 10 to 110 Temp. Rise Top Oil (TriseTop) (degrees) 10 to 110 Temp. Time Const. Hot Spot (TauHS) (hours) 0.01 to 2.00 T-PRO User Manual 8700 5-9 5 Offliner Settings Software Connections Temp. Time Const. Top Oil (TauTop) (hours) 0.02 to 20.00 Ratio of Load Loss to Iron Loss (R) 0.50 to 10.00 Hot Spot Temp. Exponent (m) 0.50 to 2.00 Top Oil Temp. Exponent (n) 0.50 to 2.00 Windings/CT Connections Figure 5.10: Windings /CT Winding CT Connection Transformer Nameplate Winding HV LV TV Voltage (kV) LV to 1000.0 TV to HV 1.0 to LV Connection Choose delta or wye Choose delta or wye Choose delta or wye Phase (degree) 0, 30, 60, 180, -30, -60 (Options depend on connection) Voltage Input Connection PT Turns Ratio (:1) 1.0 to 10000.0 Location HV or LV Current Input Connection 5-10 Current Input 1 to 5 Winding HV, LV, TV, NC, 51N/87N (for Input 5), 87N auto (for Input 5) CT Connection Choose delta or wye CT Phase (degree) 0 or 180, -30 or 30 (Options depend on connection) T-PRO User Manual 8700 D01386R04.20 5 Offliner Settings Software CT Turns Ratio (:1) 1.00 to 10000.00 External Control None, 1 to 9 This setting provides the relay with the information related to CT ratios, winding connections (wye or delta), main winding nominal voltage and main winding connection. The relay allows any combination of wye and delta combinations in the main and CT windings. Since the actual current inputs used by the differential relay do not contain any zero sequence quantities no external zero sequence current trap is required. The relay is secure for external faults. The field location associated with the PT ratio is user-selectable and you can connect to the HV or the LV side. The field toggles when clicked between HV and LV. You can assign five sets of ac currents to the HV, LV, TV sides or to NC (not connected). Assigning a current to NC makes it available to be recorded. In our example: • Inputs 1 & 2 are assigned to the HV (high voltage) side • Inputs 3 & 4 are assigned to the LV (low voltage) side • Input 5 is assigned to the TV (tertiary voltage) side The current inputs must have at least one input on each of the HV, LV and TV side. An error message appears if this is violated. If the 51N or 87N functions are used, analog input # 5 is automatically used for neutral current inputs. You can use the 87N in T-PRO for autotransformers provided there is a zero sequence current trap. If that is the case, analog input IA5 becomes the input for this current. IB5 and IC5 are not used. T-PRO allows assignment of external control to the ac input as indicated in the above figure. In this example ac current inputs 1, 2, 3 are controlled by external inputs 1, 2, 3 respectively, i.e. the ac current input will be automatically shut off internally when the corresponding external input is high. In general, each of 5 ac current inputs can be controlled by any of the relay’s external inputs. In this way, the differential protection and overcurrent protection will automatically adapt to the different transformer configurations in real time. D01386R04.20 T-PRO User Manual 8700 5-11 5 Offliner Settings Software Temperature Scaling Figure 5.11: Temperature Scaling Ambient and Top Oil Temperature Relate the Ambient and Top Oil temperature range with the corresponding mA input current quantity. This relationship is defined at both the high and the low levels. An input received outside this range results in an alarm indicating an over or under condition. You can also set whether the top oil is sensed or calculated. Temperature Scaling Ambient Maximum Valid Temperature (degrees) x to 50.0, x = Minimum Valid Temperature +10° Minimum Valid Temperature (degrees) -50.0 to x, x = Maximum Valid Temperature -10° Maximum Current Value (mA) x to 20.00, x = Minimum Current Value +1 mA Minimum Current Value (mA) 4.00 to x, x = Maximum Current Value -1 mA Top Oil 5-12 Calculated Enable/disable Sensed Enable/disable Maximum Valid Temperature (degrees) x to 200.0, x = Minimum Valid Temperature +10° Minimum Valid Temperature (degrees) -50.0 to x, x = Maximum Valid Temperature -10° Maximum Current Value (mA) x to 20.00, x = Minimum Current Value +1 mA Minimum Current Value (mA) 4.00 to x, x = Maximum Current Value -1 mA T-PRO User Manual 8700 D01386R04.20 5 Offliner Settings Software Protection Functions The protection function features are described in detail, see “Protection Functions and Specifications” on page 4-1. Figure 5.12: Protection Functions ProLogic v8 Figure 5.13: ProLogic Example - Lockout Trip The relay’s integrated ProLogic feature provides Boolean control logic (graphic-driven) with multiple inputs to create an output based on qualified inputs. ProLogic enables up to 10 ProLogic control statements and allows those logics to be programmed to output contacts. Name the function being created and set a pickup and dropout delay. Start with input A by selecting any of the relay functions or digital inputs using the pulldown list. Repeat for up to 5 possible inputs. Put these inputs into AND/OR, NAND/NOR and exclusive logics by clicking on the gate. Invert the input by clicking on the input line. The output of ProLogic 1 can be nested into ProLogic 2 and so forth. If Target Enabled is selected, you can illuminate the front target LED on operation of D01386R04.20 T-PRO User Manual 8700 5-13 5 Offliner Settings Software this function. The operation of the ProLogic statements are logged on the events listing. ProLogic statements are shown on the view fault records. In the example, ProLogic illustrates a lockout condition. Operation of device 87, receipt of fast gas operation, operation of device 87N or 81-1 results in a lockout trip where an output contact is held closed until a lockout reset input is received. This lockout reset quantity could be an external input or another function within the relay. Record Length Figure 5.14: Record Length Define the fault recording record length and the Output Matrix characteristics. • Fault record sampling rate fixed at 96 samples per cycle • Prefault data is fixed at 10 cycles. • Thermal logging rate setting. Record Length Fault Prefault time fixed at 10 cycles. Sample Rate fixed at 96 samples per cycle. 5-14 Fault Record Length (seconds) 0.2 to 2.0 Thermal Logging Enable/disable Trend Sampling (minutes/sample) 3 to 60 Event Auto Save Enable/Disable T-PRO User Manual 8700 D01386R04.20 5 Offliner Settings Software Output Matrix v8 Figure 5.15: Output Matrix The Output Matrix assigns protective functions to specific output relays and allows these internal protection functions to initiate fault recording. Clicking the check box toggles between checked and unchecked. A scroll bar on the right shows all the protection functions. The recording column on the extreme right allows the protection function to initiate a fault record. The alarm functions for time delay elements and refers to options that are selectable to determine when the threshold level of that function has been exceeded. All output relays have a 0.1 second stretch time. At this stage the basic differential offline settings of the relay are complete. Save the settings to a file and then load this file into the relay after the terminal connection with the relay is established. The output contact matrix determines which function initiates which output relay. Functions also initiate recording as required. For a particular function to operate correctly, it must be enabled and must also have its logic output assigned to at least one output contact if it is involved in a tripping function. Print the entire output matrix by selecting the printer icon. This printout is produced on 2 pages. D01386R04.20 T-PRO User Manual 8700 5-15 5 Offliner Settings Software Setting Summary v8 Figure 5.16: Settings Summary Select Settings Summary to view and print the relay settings in text form, for details see “IED Settings and Ranges” in Appendix B. 5-16 T-PRO User Manual 8700 D01386R04.20 6 Acceptance/Protection Function Test Guide Acceptance Testing ERLPhase relays are fully tested before leaving the factory. A visual inspection of the relay and its packaging is recommended on receipt to ensure the relay was not damaged during shipping. The electronics in the relay contain static sensitive devices and are not user-serviceable. If the front of the relay is opened for any reason exposing the electronics, take extreme care to ensure that you and the relay are solidly grounded. Generally an analog metering check, as well as testing the I/O (External Inputs and Output Contacts) is sufficient to ensure the functionality of the relay. Further tests can be performed on delivery and acceptance of the purchaser’s option according to the published relay specifications in “IED Settings and Ranges” in Appendix B. The following acceptance test section is intended to be a guide for testing any and all protection elements in the relay. The most convenient time to perform these tests is on delivery, prior to in-service settings being applied. Once inservice settings are applied, ERLPhase recommends that enabled functions be tested to ensure that the designed application is fulfilled. Test Equipment Requirements • 3 voltage sources • 2 sets of three-phase currents recommended (to test differential element), but can be completed single-phase by using 1 set of 3-phase currents (variable frequency capability) • 1 ohmmeter • 1 dc mA calibrating source or • 1-1 k to 10 k 1.0 W variable resistor and a milliammeter (up to 25mA) Set nominal CT secondary current to either 5 A or 1 A, and nominal system frequency to either 60 Hz or 50 Hz. This example uses 5 A/ 60 Hz. D01386R04.20 T-PRO User Manual 8700 6-1 6 Acceptance/Protection Function Test Guide Calibration The relay is calibrated before it leaves the factory; but if component changes are made within the relay, you may need to do a re-calibration. Before you begin a new calibration, establish the accuracy of the equipment being used. To perform a calibration, you must be logged into the relay in Terminal Mode at the Service access level. Proceed to the Utilities>Maintenance>Calibrate. The Calibrate menu leads you through every analog input and prompts you to apply the appropriate quantity. T Figure 6.1: Enter actual applied signal level T Figure 6.2: Calibration error - out of range For example, when you select voltage VA for calibration, a prompt appears which asks you which quantity the relay should try to calibrate. If a 66 volt 6-2 T-PRO User Manual 8700 D01386R04.20 6 Acceptance/Protection Function Test Guide phase-to-neutral quantity is applied to the back VA terminals, 66.0 volts would be indicated as the desired calibration. In a similar way, you are prompted to go through all 18 ac analog quantities and provide the information about the injected calibration quantities. You must have a test source to perform the function. Only the magnitude of the analog input requires calibration, not the angle. When an analog input channel is calibrated, you can verify the quantity measured by selecting the Metering menu and the Analog Quantity submenu. VA of the ac voltage input is used as a reference quantity by T-PRO. Therefore, if it is absent, there is not a locked, valid relationship among all of the analog quantities. Testing the External Inputs To test the external inputs connect the relay to a laptop in Terminal Mode, Service level>Metering>I/O. This screen displays the status of the Input and Output Contacts. Placing a voltage of 125 Vdc nominal, (150 V maximum), to each of the external inputs in turn causes the input to change from Low to High status. These inputs are polarity sensitive and this screen has a 0.5 seconds update rate. Testing the Output Relay Contacts Test the output relays to verify their integrity using the Utilities>Maintenance>Outputs. The output contacts are closed by pressing the Enter key. Toggle the output contacts from open to closed by pressing the Enter key. Verify the output contact status using an ohmmeter. When you exit this sub-menu, all contact status reverts to the open position D01386R04.20 T-PRO User Manual 8700 6-3 6 Acceptance/Protection Function Test Guide T-PRO Acceptance Test Procedure Outline Devices to Test 6-4 • • • • • • • • • • • • • • • • • • 60 AC Loss of Potential 24INV Time Inverse Overexcitation (volts per hertz) 24DEF Definite Time Overexcitation 59N Zero Sequence Overvoltage 27 Undervoltage 81-1 (set to fixed Over Frequency) 81-3 (set to fixed Under Frequency) 50N/51N (Neutral Overcurrent) 67 Directional Overcurrent 50/51 (Phase Overcurrent) 51 ADP Adaptive Overcurrent Top Oil Temperature Alarm Ambient Temperature Alarm 49 49 TOEWS 87 Differential (Single- and Three-Phase) THD Alarm 87N Neutral Differential T-PRO User Manual 8700 D01386R04.20 6 Acceptance/Protection Function Test Guide Nameplate Settings and Transformer Connections To perform maintenance tests modify the applicable relay test quantities by going through the calculation processes described in the following procedures (i.e. substitute acceptance test setting values with your actual setting values). 1 To perform acceptance tests use the appropriate Acceptance Test Setting File, (TPROaccTestsetting##hz.tps). You can find this setting file in C:\Program Files\ERLPhase\T-PRO Offliner Settings after T-PRO Offliner Setting software has been installed. If an older version of T-PRO Offliner was previously installed on your PC, then the default directory may be C:\Program Files\APT\T-PRO Offliner Settings. See “About the Acceptance Test Setting File” on page 6-5). Load the Acceptance Test Setting File into the relay. Note that this file has “Ignore Serial Number” checked. If this was not checked, the exact T-PRO serial number would need to be entered into the file and saved in order for the T-PRO to accept it. 7 Figure 6.3: Relay Identification About the Acceptance Test Setting File D01386R04.20 The acceptance test setting file provided is not necessarily configured to a provide a realistic setting example. Its configuration is intended to demonstrate test methods for each relay element. Tests are organized to prevent interference of one protection element on the next within the relay for ease of testing without using multiple setting files and minimizing the number of test connection changes. Meanwhile, all contacts in the relay will be tested if all elements in this procedure are tested as written. When the acceptance test file is loaded into the T-PRO, the Alarm LED may illuminate. This is no cause for concern; it is an indication of a protection element threshold exceeded. Generally this condition is caused by not having applied a minimum of 4 mA to the temperature inputs. Check Metering>Logic to find which elements are High. T-PRO User Manual 8700 6-5 6 Acceptance/Protection Function Test Guide Load the Setting File into T-PRO Connect to T-PRO in service or change mode through the front port (Port 1) using your terminal program (e.g. HyperTerminal or Procomm). ---------- ERLPhase T-PRO 8700 Terminal User Interface login ---------- Log in using one of the following usernames: 'view' - read-only access to settings and readings 'change' - read/write access to settings and readings 'service' - full access to all functions (Port 1 access only) 'maintenance' - access to the maintenance menu 'update' - to load a firmware update (Port 1 access only) Notes: - Serial and modem connections have a 60 minute inactivity timeout - Usernames and passwords are case sensitive login: change Figure 6.4: Login to the Relay 1 From the Main Menu select Settings. 2 From the Settings submenu select Load From Offliner. 3 Select Y, yes you are ready to continue. Figure 6.5: Load from Offliner 6-6 T-PRO User Manual 8700 D01386R04.20 6 Acceptance/Protection Function Test Guide 4 Find “Send File” in your terminal software (e.g. for HyperTerminal it’s under “Transfer”). 5 Browse to the folder location where the setting file was saved and send it to the relay. Figure 6.6: Send File The relevant nameplate and connection settings for tests that follow are: • MVA: 100 • Windings: 2 • HV kV: 230 Y (0°) • LV kV: 115 Delta (-30°) • HV CT: 250:1 Y (0°) • LV CT: 500:1 Y (0°) • PT Location: High Side • Base Frequency: 60 Hz (1.0 per unit frequency) Calculated Values The PT location is on the high side; everything will be referenced to the high side. Nominal secondary phase-to-phase voltage = Nominal secondary phase-to-neutral voltage = Primary Ibase = Secondary Ibase = D01386R04.20 T-PRO User Manual 8700 HVkV 230kV -------------------= ---------------- = 115.0V PTratio 2000 115 --------- = 66.4V 3 kVA 100e3 ----------------= -------------------- = 251A 3 kV 3 230 PrimaryIbase ------------------------------------ = 251A ------------- = 1.004A CTratio 250 6-7 6-8 T-PRO User Manual 8700 300 51Trip, ADP, 59N Alm OUT 2 IA 301 IB 302 IC 304 IN 306 308 309 310 311 These Currents required for Slope Testing or LV Pickup only 307 OUT 8 60, THD, 24Inv51NAlarm, Alarm 51Alarm OUT 7 AMB TMP OUT 9 TOP OIL Temp OUT 10 T O E W S OUT 11 49-1 OUT 12 81, 50N OUT 13 324 VA VB VC VN ...Inputs 3 and 4... 325 326 327 328 231 Amb. Temp. 230 331 332 333 334 235 1K to 10K 30V Isol. DC 234 335 Power Supply 233 Top Oil Temp. 232 mA Meter VOLTAGES 330 50, Gas, Wdg Temp OUT 14 329 I5 (Neutral Inputs) T-PRO 8700 SIMPLIFIED REAR VIEW 59NTrip, 87N OUT 6 Regulated Voltage and Current Source 303 67Trip OUT 5 I2ABC (LV Inputs) 27, 67Alm, 24InvTrip OUT 4 305 49-2, 51NTrip OUT 3 I1ABC (HV Inputs) 87, 24Def OUT 1 Ω 6 Acceptance/Protection Function Test Guide Figure 6.7: Suggested Test Connections for Acceptance Tests D01386R04.20 6 Acceptance/Protection Function Test Guide Note 1 Where each test specifies “Metering>Logic”, you view the following terminal screen: Figure 6.8: Metering Logic 60 Loss of Potential Test Settings (Only Enable Setting can be modified) • Voltage = 0.5 per unit on 1 or 2 phases (does not operate on loss of 3 phases). 59 VA (fixed 0.5 pu) 59 VB (fixed 0.5 pu) 59 VB (fixed 0.5 pu) Out 7 Figure 6.9: Logic Loss of Potential (60) 60 Test Procedure 1 In Terminal Mode access T-PRO Metering>Logic. 2 Monitor the following element for pickup: 60 Alarm. 3 Apply balanced 3-phase nominal voltage (66.4 V) to the T-PRO terminals: Ph A: 330, 66.4 V 0 ° Ph B: 331, 66.4 V -120 ° Ph C: 332, 66.4 V +120 ° Ph N: 333 4 Observe: 60 Alarm = Low. 5 Ramp down single-phase voltage: At 33.6 to 32.8 V (setting = 0.5 per unit = 66.4/2 = 33.2 V secondary) 60 Alarm = High D01386R04.20 T-PRO User Manual 8700 6-9 6 Acceptance/Protection Function Test Guide 6 Turn all voltage off. 60 Alarm = Low Timing Test 1 Monitor timer stop on Output Contact 7. 2 Set timer to start from single-phase 0.0 V to 66.4 V transition (i.e. V off to on). Time Delay (definite) = 10 seconds End of 60 test. 24 Overexcitation Test Settings • 24INV Pickup = 1.2 per unit = 1.2 * 66.4 V @ 60 Hz = 79.7 V @ 60 Hz • K = 0.1 • 24DEF Pickup = 1.25 per unit = 1.25 * 66.4 V @ 60 Hz = 83 V @ 60 Hz DTD 24DEF Enabled 0 24VPOS/Freq Out 1 Out 7 24INV Enabled Out 4 24VPOS/Freq Figure 6.10: Logic Overexcitation (24) 24INVerse and 24DEFinite Test Procedure 1 In Terminal Mode access T-PRO Metering>Logic. Monitor the following elements for pickup: 24INV Alarm, 24DEF Trip. 2 Apply balanced 3-phase nominal voltage to the T-PRO terminals: Ph A: 330, 66.4 V 0 ° Ph B: 331, 66.4 V -120 ° Ph C: 332, 66.4 V +120 ° Ph N: 333 3 Slowly ramp the 3-phase voltage up. At 79.5 – 80.5 V (expect 79.7 V): 24INV Alarm = High Output Contact 7 = Closed At 82.5 – 83.5 V (expect 83.0 V): 24DEF Trip = High Output Contact 1 = Closed 4 Turn voltages off. 24INV Alarm = Low Output Contact 7 = Open 24DEF Trip = Low Output Contact 1 = Open 6-10 T-PRO User Manual 8700 D01386R04.20 6 Acceptance/Protection Function Test Guide Timing Test 1 Monitor timer stop on Output Contact 4. 2 Set timer to start from 3-phase 0.0 V to 86.3 V transition (this equates to 1.3 per unit @ 60 Hz) K 0.1 0.1 ---------------------------------- = ------------------------------------------------= ---------- = 10s 2 2 0.01 v-86.3 79.68 ---------- ------------- – Pickup 66.4 66.4 f ---------------- – ------------------60 60 Time Delay = Where: v is the per unit voltage f is the per unit frequency. Vary either v or f. In this example we’re varying v only (with f @ 60 Hz = 1.0 per unit). End of 24 test. 59N Zero Sequence Overvoltage (3V0) Test Settings • 59N (3V0) Pickup = 75 V • Time Curve = IEC Standard Inverse A = 0.14 B=0 p = 0.02 TMS = 0.2 Out 2 59N Enabled Out 6 24VPOS/Freq Figure 6.11: Logic Zero Sequence OverVoltage (59N) 59N (3V0) Test Procedure 1 In Terminal Mode access T-PRO Metering>Logic. Monitor the following element for pickup: 59N Alarm. 2 Apply 3-phase prefault voltage “In-phase” to the T-PRO terminals as follows: Ph A: 330, 20 V 0 ° Ph B: 331, 20 V 0 ° Ph C: 332, 20 V 0 ° Ph N: 333 Note: The above prefault 3V0 = VA + VB + VC = (20V 0 ° + 20V 0 ° + 20V 0 ° = 60V 0 ° V) D01386R04.20 T-PRO User Manual 8700 6-11 6 Acceptance/Protection Function Test Guide 3 Slowly ramp the 3-phase voltage up. At 24.5 – 25.5 V per phase (expect 25.0 V): 59N Alarm = High Output Contact 2 = Closed 4 Turn voltage off. 59N Alarm = Low Output Contact 2 = Open Timing Test 1 Monitor timer stop on Output Contact 6. 2 Set timer start from 3-phase 0.0 V to 50.0 V transition (all at 0°). 3V0 = 50 + 50 + 50 = 150 V (This equates to 2x pickup.) Time Delay = A 0.14 0.14 - = 0.2 0 + ------------------------------= 0.2 ------------- = 2.0s TMS B + ---------------------------------p 0.02 0.014 150 3VO ------------------ – 1 --------- –1 75 Pickup End of 59N test. 6-12 T-PRO User Manual 8700 D01386R04.20 6 Acceptance/Protection Function Test Guide 27 (27-1 SinglePhase [OR], 27-2 Three-Phase [AND] Test This example testing 27-2 only in this procedure, but testing 27-1 is just a matter of enabling the function and reducing only one-phase voltage. Settings • • • • • • 27-1 Gate = OR (single-phase) 27-1 Pickup = 50 V secondary 27-1 Delay = 0.5 seconds 27-2 Gate = AND (3-phase) 27-2 Pickup = 50 V secondary 27-2 Delay = 0.6 seconds 27-1 Undervoltage 27 Va 27 Vb 27 Vc 188 T O 189 27-2 Undervoltage 27 Va 27 Vb 27 Vc 190 191 T Out 4 O Figure 6.12: Logic UnderVoltage (27) 27 Three-Phase Undervoltage Test Procedure 1 In Terminal Mode access T-PRO Metering>Logic. Monitor the following element for pickup: 27-2 Alarm. 2 Apply balanced 3-phase voltage to the T-PRO terminals as follows: Ph A: 330, 66.4 V 0 ° Ph B: 331, 66.4 V -120 ° Ph C: 332, 66.4 V 120 ° Ph N: 333 3 Slowly ramp the 3-phase voltage magnitudes down. At 50.5 to 49.5 V per phase (expect 50.0 V): 27-2 Alarm = High Output Contact 4 = Closed 4 Turn voltages off. End of 27 test. D01386R04.20 T-PRO User Manual 8700 6-13 6 Acceptance/Protection Function Test Guide 81 Over/Under Frequency Test Settings • • • • • 81-1 Over Frequency Pickup = 61 Hz 81-2 Over Frequency Rate of Change = 0.1 Hz/sec 81-3 Under Frequency Pickup = 59 Hz 81-4 Under Frequency Rate of Change = -0.1Hz/sec All Time Delays = 0.2 seconds 81-1 Frequency or Df/Dt T Out 13 0 200 ms Vpos > 0.25 pu (or 5 V) 0 81-2 Frequency or Df/Dt T Out 13 0 200 ms Vpos > 0.25 pu (or 5 V) 0 81-3 Frequency or Df/Dt T Out 13 0 200 ms Vpos > 0.25 pu (or 5 V) 0 81-4 Frequency or Df/Dt T Out 13 0 200 ms Vpos > 0.25 pu (or 5 V) 0 Figure 6.13: Logic Over/Under/Rate of Change of Frequency (81) 81 Test Procedure 1 In Terminal Mode access T-PRO Metering>Logic. 2 Monitor the following elements for pickup: 81-1 Trip, 81-3 Trip. 3 Apply balanced 3-phase nominal voltages to the T-PRO terminals. Ph A: 330, 66.4 V 0° Ph B: 331, 66.4 V -120° Ph C: 332, 66.4 V +120° Ph N: 333 4 Slowly ramp (less than 0.1 Hz/sec) the 3-phase voltage frequency up towards 61 Hz. At 60.99 – 61.01 Hz: 81-1 = High (81-3 = Low) Output Contact 13 = Closed 5 Slowly ramp (greater than -0.1 Hz/sec. e.g.: -0.05 Hz/sec) the 3-phase voltage frequency down towards 59 Hz. 6-14 T-PRO User Manual 8700 D01386R04.20 6 Acceptance/Protection Function Test Guide At 58.99 – 59.01 Hz: 81-3 = High (81-1 = Low) Output Contact 13 = Closed 6 Turn voltages off. 81-1 = Low 81-3 = Low Output Contact 13 = Open End of 81 test. 50N/51N Neutral Instantaneous and Time Overcurrent Test Settings • 50N Pickup = 5.0 A • 51N Pickup = 2.0 A • Time Curve = IEEE Extremely Inverse A = 5.64 B= 0.0243 p=2 TMS = 5.0 50NHV Enabled Tp Out 13 50HV 3IO 0 Out 8 51NHV Enabled Out 3 51HV 3IO Figure 6.14: Logic Neutral Instantaneous and Time Overcurrent (50N/51N) 50N and 51N Test Procedure 1 In Terminal Mode access T-PRO Metering>Logic. Monitor the following element for pickup: 51N Alarm. 2 Apply one-phase current to the T-PRO terminals as follows: Ph N: 324–325, 1.8 A (I5A is the input for HV neutral) 3 Slowly ramp the current up. At 1.95 to 2.05 A (expect 2.00 A): 51N Alarm = High Output Contact 8 = Closed 4 Continue to raise current. At 4.90 to 5.10 A (expect 5.00 A): 50N Trip = High Output Contact 13 = Closed 5 Turn currents off. 51N Alarm = Low 50N Trip = Low D01386R04.20 T-PRO User Manual 8700 6-15 6 Acceptance/Protection Function Test Guide Contacts 8 and 13 = Open Timing Test 1 Monitor timer stop on Output Contact 3. 2 Set timer start from one-phase 0.0 amp to 8.00 A transition (This equates to 4x pickup.). Time Delay = A 5.64 5.64 - = 5 0.0243 + -----------------TMS B + ----------------------------------= 5 0.0243 + ---------- = 2.00s p 2 15 I multiple – 1 4 – 1 End of 50N/51N test. 67 Directional Time Overcurrent Test Settings • 67 Pickup = 1.2 per unit • Alpha = 180° (This is the positive sequence current angle start point with respect to positive sequence voltage angle.) • Beta = 180° (This is the operating “Window”. In this case the 67 element should operate between [Alpha to (Alpha + Beta)] = [180° to (180° + 180°)] = 180° to 360°) • Time Curve = IEEE Moderately Inverse A = 0.0103 B = 0.0228 p = 0.02 TMS = 8.0 PT = LV Side Alpha < (Line Angle) < (Alpha + Beta) ILVMax pu Out 4 Out 5 PT = HV Side Alpha < (Line Angle) < (Alpha + Beta) IHVMax pu Figure 6.15: Logic Directional Overcurrent (67) 67 Test Procedure 1 In Terminal Mode access T-PRO Metering>Logic. Monitor the following element for pickup: 67 Alarm. 2 Following are the default test quantities. Apply balanced 3-phase currents to the T-PRO terminals as follows: Ph A: 300–301, 1.0 A -90° Ph B: 302–303, 1.0 A +150° Ph C: 304–305, 1.0 A +30° 6-16 T-PRO User Manual 8700 D01386R04.20 6 Acceptance/Protection Function Test Guide Apply single-phase polarizing voltage to: Ph A: 330–333, 66.4 V 0° 3 Slowly ramp the 3-phase currents up. At 1.15 to 1.25 A (expect 1.20 A): 67 Alarm = High 4 Increase currents to 2.0 A. Observe: 67 Alarm = High 5 Ramp current angle in positive direction from -90°. At -1.0° to +1.0° (expect 0°): 67 Alarm = Low 6 Ramp current angle in negative direction from -90°. At -179° to -181° (expect -180°): 67 Alarm = Low 7 Turn currents off (Keep voltage on for the timing test). 67 Alarm = Low 67 Timing Test 1 Monitor timer stop on Output Contact 5. 2 Set timer start from 3-phase current (default angles) 0 to 3.60 A transition (3x pickup). Time Delay= A 0.0103 0.0103 - = 8 0.0228 + -----------------------TMS B + ----------------------------------= 8 0.0228 + ---------------- = 3.89s p 0.02 0.0222 I multiple – 1 3 –1 T-PRO Target: “Dir. Overcurrent (67): Trip” End of 67 test. D01386R04.20 T-PRO User Manual 8700 6-17 6 Acceptance/Protection Function Test Guide 50/51 Instantaneous and Time Overcurrent ThreePhase Test Settings • 50 Pickup = 1.5 per unit • 51 Pickup = 1.2 per unit • Time Curve = IEEE Very Inverse A = 3.922 B = 0.0982 p=2 TMS = 4.0 50HV Enabled Tp Out 14 IHVA IHVB IHVC CT Ratio Magnitude Correction and 3IO Elimination Select Maximum Phase Current for 50 Element 51 Element 0 Out 7 Out 2 Ipickup (adjusted by 51ADP if enabled) 51HV Enabled Figure 6.16: Logic phase Overcurrent (50/51) 50/51 Three-Phase Test Procedure 1 In Terminal Mode access T-PRO Metering>Logic. Monitor the following element for pickup: 51 Alarm. 2 Apply balanced 3-phase currents to the T-PRO terminals as follows: Ph A: 300–301, 1.0 A 0° Ph B: 302–303, 1.0 A 120° Ph C: 304–305, 1.0 A +120° 3 Slowly ramp the 3-phase currents up. At 1.15 to 1.25 A (expect 1.20 A): 51 Alarm = High Output Contact 7 = Closed 4 Continue to raise currents. At 1.45 to 1.55 A (expect 1.50 A): 50 Trip = High Output Contact 14 = Closed 5 Turn currents off. 51 Alarm = Low (Output Contact 7 Open) 50 Trip = Low (Output Contact 14 Open) 6-18 T-PRO User Manual 8700 D01386R04.20 6 Acceptance/Protection Function Test Guide Timing Test 1 Monitor timer stop on Output Contact 2. 2 Set timer start from 3-phase 0.0 A to 3.60 A transition (This equates to 3x pickup.). A 3.922 3.922 - = 4 0.0982 + -----------------TMS B + ----------------------------------= 4 0.0982 + ------------- = 2.35s p 2 8 I multiple – 1 3 – 1 Time Delay = 51ADP Adaptive Pickup Test Settings • Nameplate: Cooling: Type 1, Self Cooled OA or OW • Ambient Temperature Scaling: 4mA = -40°C, 20mA = +40°C • 51ADP Multiple of Normal Loss of Life = 1.0 51 HV ADP Enabled T Ambient 51 HV ADP Pickup Adjustment To 51 I Pickup Figure 6.17: Logic Overcurrent Adaptive Pickup (51ADP) 51ADP Test Procedure To simulate an ambient temperature of +30°C, inject 18.0 mA dc into the Ambient Temperature Input (+230, -231). In Metering>Trend confirm a +30°C reading. Using the graph Figure M.3: Allowed Loading: 65°C Rise Transformer, Type 1 Cooling on page M-4, see that at +30°C the overload characteristic is de-rated to 1.0 per unit for a relative loss of life setting of 1.0. 1 In Terminal Mode access T-PRO Metering>Logic. Monitor the following element for pickup: 51 Alarm. Monitor 51HV Alarm: Output Contact 7. 2 Apply balanced 3-phase currents to the T-PRO terminals as follows: Ph A: 300–301, 0.8A 0° Ph B: 302–303, 0.8A -120° Ph C: 304–305, 0.8A +120° D01386R04.20 T-PRO User Manual 8700 6-19 6 Acceptance/Protection Function Test Guide 3 Slowly ramp the 3-phase currents up. At 0.95 to 1.05 A (expect 1.0 A): 51 Alarm = High Contact 7 = Closed 4 Turn currents off. 51 Alarm = Low Out 7 = Open End of 51ADP test. Checking Ambient Temperature Alarm 1 In Terminal Mode access T-PRO Metering>Logic. 2 Monitor the following element for pickup: Amb. Alarm. 3 With 18 mA being injected into Ambient Temperature input: Amb. Alarm = Low Contact 9 = Open Note: The Ambient Temperature Alarm will activate if the Ambient Temperature is outside of the Setting Range. 4 Ramp mA input up from 18 mA, At Approximately 21 mA: Amb. Temp Alarm = High Contact 9 = Closed 5 Remove mA input from Ambient Temperature input. Amb. Alarm = High (since 0mA is out of the setting range) Contact 9 = Closed. End of Ambient Temperature Alarm test. Checking the Top Oil Temperature Alarm Switch mA input from Ambient Temperature input to Top Oil Temperature input (+232, -233). Top Oil Settings (measured) Top Oil Temperature Scaling: 4 mA = -40°C, 20mA = +200°C View the corresponding temperature in Metering>Trend. 1 In Terminal Mode access T-PRO Metering>Logic. Monitor the following element for pickup: TopOil Alarm. 2 With 18 mA being injected into Top Oil Temperature input: TopOil Alarm = Low Contact 10 = Open Note: The Top Oil Temperature Alarm will activate if the Top Oil Temperature is outside of the Setting Range. 3 Ramp mA input up from 18 mA. At approximately 21 mA: TopOil Alarm = High Contact 10 = Closed 6-20 T-PRO User Manual 8700 D01386R04.20 6 Acceptance/Protection Function Test Guide 4 Remove mA input from Top Oil Temperature input. TopOil Alarm = High (since 0mA is out of the setting range) Contact 10 = Closed. End of Top Oil Temperature Alarm test. 49 Thermal Overload Test mA is injected into Top Oil Temperature input (+232 – 233) Settings • 49 HV = 1.2 per unit • Hysteresis = 0.1 per unit AND • Top Oil Temperature = 160°C • Temperature Hysteresis = 1.0°C Current Input Switch IHV Max ILV Max ITV Max Off Tp1 Td1 Output 12 Temp. Input Switch Hot Spot Temperature Top Oil Temperature Off Logic Gate Switch Tp2 Td2 Figure 6.18: Logic Thermal Overload (49) Monitor the following element for pickup: 49_1 Trip. 1 Inject: 18 mA into Top Oil Temperature input (160°C setting is exceeded) 3-phase currents into: Ph A: 300–301, 1.0 A 0° Ph B: 302–303, 1.0 A -120° Ph C: 304–305, 1.0 A +120° Observe: 49_1 Trip = Low Contact 12 = Open 2 Ramp current up. At 1.15 to 1.25 A (expect 1.20 A): 49_1 Trip asserts Contact 12 = Closed 3 Decrease Top Oil Temperature to 16 mA. 49_1 Trip De-asserts Contact 12 = Open D01386R04.20 T-PRO User Manual 8700 6-21 6 Acceptance/Protection Function Test Guide 4 Ramp Top Oil Temperature input up to 17.0 to 17.6 mA 49_1 Trip Asserts Contact 12 = Closed 5 Remove: mA from Top Oil Temperature input Currents from HV input Contact 12 = Open End of 49 test. 49 TOEWS Test This system warns and trips for conditions of either excessive hot spot temperature or excessive loss of life during any one overloading occurrence. Settings • • • • • • • Transformer MVA 100 Cooling Type 1: OA/OW Temperature Rise: 65°C Normal Loss of Life Hot Spot Temperature: 110°C Ths Trip Setting: 150°C Ths to start LOL Calculation: 120°C LOL Trip Setting: 1 day IHVA IHVB IHVC Select IHV Max pu Maximum Phase Current 15 min alarm TOEWS Ta Ttop Trend Quantities Calculationt T Hot Spot 30 min alarm TOEWS Trip Hot Spot or LOL Out 11 Figure 6.19: Logic Transformer Overload Early Warning System (49TOEWS) TOEWS Test Procedure 1 Apply balanced 3-phase currents to the T-PRO terminals as follows: Ph A: 300–301, 1.00 A 0° Ph B: 302–303, 1.00 A -120° Ph C: 304–305, 1.00 A +120° 2 Apply 16 mA dc (140°C) to Ambient Temperature input terminals +230, -231 (Top Oil Setting = Calculated) Re-boot the T-PRO (cycle power) to reset the steady state condition, otherwise the T-PRO only assumes a new steady state after hours of “settling in”. When the T-PRO is installed, this is not a problem and is the correct way to respond. 6-22 T-PRO User Manual 8700 D01386R04.20 6 Acceptance/Protection Function Test Guide 3 In Terminal Mode access T-PRO Metering>Dev49>TOEWS. Monitor the following elements for pickup. 30min Alarm = Low 15min Alarm = Low Trip = Low Observe: HV current = 1.00 per unit. Ambient Temperature = 20°C Top Oil Temerature = 75°C Hot Spot Temperature = 100°C 4 Increase current to simulate an overload condition (e.g. 180% Load). Over a period of time (hours) observe, in order: 30 min Alarm = High 15 minutes later: 15 min Alarm = High 15 minutes later: TOEWS Trip = High Contact 11 = Closed Hint: If you set the T-PRO to trigger a recording on each of these events, you can ensure that you will retain records of when these elements operate. T-PRO Target: “TOEWS: Trip” Checking the warning and trip times can only be properly done by comparing “heat runs” made on software (an MS Excel spreadsheet) available from ERLPhase. Very stable temperature mA inputs and current inputs over a period of hours are necessary to get predictable and satisfactory timing test results. End of TOEWS test. D01386R04.20 T-PRO User Manual 8700 6-23 6 Acceptance/Protection Function Test Guide 87 Differential Test This section covers the testing of the minimum operating point. For more detailed testing see the example in “T-PRO Differential Slope Test Example” on page 6-33. Settings • • • • IOmin: 0.3 per unit IRs: 2.0 per unit Slope 1: 20% Slope 2: 40% I1A I1B I1C CT Ratio Mismatch Correction and 3IO Elimination Input 1 I2A I2B I2C CT Ratio Mismatch Correction and 3IO Elimination Input 2 I3A I3B I3C CT Ratio Mismatch Correction and 3IO Elimination Input 3 I4A I4B I4C CT Ratio Mismatch Correction and 3IO Elimination Input 4 I5A I5B I5C CT Ratio Mismatch Correction and 3IO Elimination Input 5 IO=IHV+ILV+ITVI IOA 2nd Harmonic Restraint IOB IOC IO Trip A Trip B Out 1 Trip C 5th Harmonic Restraint IR IRA IRB IRC IR=(I1+I2+I3+I4+I5) 2 Figure 6.20: Logic Phase Differential (87 Magnitude Correction Factor HVkV HVCTRatio 230 250 MCF = --------------- ------------------------------- = --------- --------- = 1.0 LVkV LVCTRatio 115 500 Note: A delta connected CT on either side would add an additional factor of 3 to that side. High side current at base = 1.00 A (in the “Calculations” section) Low side current at base = HighSideCurrentAtBase MCF = 1.00A 1.00 = 1.00A Therefore: HVMinimumOperate = 0.3pu 1.00A = 0.30A 6-24 T-PRO User Manual 8700 D01386R04.20 6 Acceptance/Protection Function Test Guide LVMinimumOperate = HVMinimumOperate MCF = 0.30A 1.00 = 0.30A 87 HV Minimum Operate Test Procedure 1 In Terminal Mode access T-PRO Metering>Logic. Monitor the following element for pickup: 87 Trip. 2 Prepare to apply balanced 3-phase currents to the T-PRO terminals as follows: Ph A: 300–301, 0° Ph B: 302–303, -120° Ph C: 304–305, +120° 3 Simultaneously and slowly ramp all 3 currents up: At 0.29 to 0.31A (expect 0.301A): 87 Trip = High Contact 1 = Closed 4 T-PRO Target: “Diff. (87) on ???: Trip” (phase target will depend on which reaches pickup first). The exact same test can be applied to the LV Side since the MCF is 1.0. Testing 87 HV Minimum Operate Single-Phase To test single-phase, obtain an additional MCF to compensate for the T-PRO zero sequence elimination (T-PRO uses formulae from “Analog Phase Shift Table” in Appendix L.). T-PRO is a 3-phase relay, but will operate on a phase-by-phase basis (i.e. when the differential setting is exceeded on any one phase (or more), the 87 element will operate). Calculate how much current each phase of the T-PRO will “see” by using 1.0 A as a base in the formulae of “Analog Phase Shift Table” in Appendix L. The result gives a ratio that is valid for any magnitude of current applied. For a 0° shift, which is present on the HV side (Y 0° + Y 0° = 0°): D01386R04.20 T-PRO User Manual 8700 6-25 6 Acceptance/Protection Function Test Guide If you inject 1.0 A on Phase A only, on the high side, the values below can be confirmed in Metering>Operating. 2Ia – Ib – Ic 2 1 – 0 – 0 2 IA = ------------------------------- = -------------------------------------- = --- A 3 3 3 2Ib – Ic – Ia 2 0 – 0 – 1 – 1 IB = ------------------------------- = -------------------------------------- = ------ A 3 3 3 2Ic – Ia – Ib 2 0 – 1 – 0 – 1 IC = ------------------------------- = -------------------------------------- = ------ A 3 3 3 Note that the strongest phase is IA, so IA operates first. From the 3-phase test section note that IOmin = 0.30 A. For the T-PRO to see 0.30 A on Phase A, inject 3/2 * 0.30A (= 0.45 A), since the T-PRO only sees 2/3 the current injected. Single-Phase Method #1 Test Procedure 1 Connect current Source 300 – 301. Slowly ramp current up. At 0.44 to 0.46 A (expect 0.45 A): 87 Trip = High 2 Turn current off. 87 Trip = Low 6-26 T-PRO User Manual 8700 D01386R04.20 6 Acceptance/Protection Function Test Guide Method 2 Another way to do the single-phase test is to use a single source injected A-B (into Terminal 300, out of 302 with 301 and 303 jumpered together). So if you use 1.0 A, then Phase A = 1.0° 0 ° (= +1.0 A) and phase B = 1.0° 180° (= -1.0 A). Apply the Phase Shift formulae from “Analog Phase Shift Table” in Appendix L. 2Ia – Ib – Ic 2 1 – – 1 – 0 3 IA = ------------------------------- = ------------------------------------------ = --- = 1.0A 3 3 3 2Ib – Ic – Ia 2 – 1 – 0 – 1 – 3 IB = ------------------------------- = ------------------------------------------ = ------ = – 1.0A 3 3 3 2Ic – Ia – Ib 2 0 – 1 – – 1 0 IC = ------------------------------- = ------------------------------------------ = --- = 0A 3 3 3 In this case see that the strongest phases are both A and B so they will operate first. Inject 1.0 A and the T-PRO will see 1.0 A, so no correction factor is required. If you use this method, injecting A-B will result in a minimum operating current of 1.0 * 0.30 = 0.30 A. Single-Phase Method #2 Test Procedure 1 Connect current source 300–302 (Jumper 301–303). Slowly ramp current up. At 0.29 – 0.31 A (expect 0.301 A): 87 Trip = High Testing 87 LV Minimum Operate Single-Phase To test single-phase, perform the same process as on the HV side, again use “Analog Phase Shift Table” in Appendix L. For a -30° shift, which is what is present on the LV Side (Delta (-30°) + Wye (0°) = -30°), use the +30° formulae to null the angle. To inject 1.0 A on Phase A only on the LV Side: Ia – Ib 1 – 0 1 IA = ---------------- = --------------------- = ------- = 0.577A 3 3 3 Ib – Ic 0 – 0 0 IB = ---------------- = --------------------- = ------- = 0A 3 3 3 Ic – Ia 0 – 1 – 1 IC = ---------------- = --------------------- = ------- = – 0.577A 3 3 3 Note that the strongest phases are IA and IC, so they will operate first. D01386R04.20 T-PRO User Manual 8700 6-27 6 Acceptance/Protection Function Test Guide For the T-PRO to see 0.30 A on Phase A, you need to inject 3 * 0.30 A (= 0.52 A), since the T-PRO will only sees 1/3 of the current injected. For further clarification see the full example provided in “T-PRO Differential Slope Test Example” on page 6-33. End of 87 test. 87 2nd Harmonic Restraint Test Settings • I2 Cross Blocking = Enabled • I2 (2nd Harmonic) = 0.30 per unit (2nd Harmonic Restraint if 30% of fundamental current). 2nd Harmonic Restraint Test Procedure 1 In Terminal Mode access T-PRO Metering>Logic. Monitor the following elements for pickup. 87 Trip 87 Restraint 2 Apply parallel currents to Terminals 300–302 (Jumper 301– 303): Source 1 (Fundamental): 1.0 A 0° (Terminals 300 – 302) Source 2 (2nd Harmonic): 0.40 A 0° (also Terminals 300 – 302) Observe: 87 TRIP = Low 87 Restraint = High 3 Slowly ramp down Source 2. At 0.31 to 0.29 A (expect 0.301 A): 87 Trip = High 87 Restraint = Low End of 2nd harmonic restraint test. 6-28 T-PRO User Manual 8700 D01386R04.20 6 Acceptance/Protection Function Test Guide 87 High Current Setting Test Settings • High Current Setting = 5.0 per unit IO (pu) IOH High Setting S2 IOmin S1 IR (pu) IRmin IRs Figure 6.21: High Current Setting 87 High Current Test Procedure 1 In Terminal Mode access T-PRO Metering>Logic. Monitor the following elements for pickup. 87 Trip 87 Restraint 87 FastTrip 2 Apply parallel currents to Terminals 300–302 as follows (Jumper 301–303): Source 1 (Fundamental Frequency): 4.0 A 0° (Terminals 300 – 302) Source 2 (2nd Harmonic): 4.0 A 0° (also Terminals 300 – 302) 3 Ramp Source 1 up. At 4.90 to 5.10 A (expect 5.0 A): 87 Trip = High 87 Restraint = Low 87 FastTrip = High Note: This test proves that when the High Current Setting is exceeded, the 87 will operate and 2nd Harmonic has no restraint affect. 4 Remove test currents. End of High Current setting test. D01386R04.20 T-PRO User Manual 8700 6-29 6 Acceptance/Protection Function Test Guide THD Alarm Test Settings THD Alarm Pickup: 10% 50 I1A THD 50 I1B THD 50 I1C THD 50 I2A THD 50 I2A THD 50 I2A THD 50 I3A THD 50 I3A THD 50 I3A THD 50 I4A THD 50 I4A THD 50 I4A THD 50 I5A THD 50 I5A THD 50 I5A THD Input 1 Enabled Input 2 Enabled 40 s Input 3 Enabled Out 8 10 s Input 4 Enabled Input 5 Enabled Figure 6.22: Logic Total Harmonic Distortion Alarm (THD) For testing THD, use the fundamental with only one harmonic. In this case the T-PRO uses the following formula for calculating Total Harmonic Distortion: 25 I THDpercent = 100 2 n 2 Iharmonic Iharmonic = 100 ----------------------------------- = 100 ----------------------------------- Ifundamental Ifundamental Ifundamental 2 ----------------------------------- THD Test Procedure 1 In Terminal Mode access T-PRO Metering>Logic. Monitor the following element for pickup: THD Alarm. 2 Apply parallel currents to terminals 300–301 as follows: Source 1 (Fundamental): 2.0 A 0° (Terminals 300 – 301) Source 2 (2nd Harmonic): 0.0 A 0° (also Terminals 300 – 301) 3 Slowly ramp Source 2 up. At 0.19 to 0.21 A (expect 0.20 A) THD Alarm = High After 30 seconds: Contact 8 = Closed End of THD test. 6-30 T-PRO User Manual 8700 D01386R04.20 6 Acceptance/Protection Function Test Guide 87N Differential Test Testing the 87N uses the same process as testing the 87 with the following exception: I5A is used for the neutral associated with HV wye connected winding (I5B for LV, I5C for tertiary). Settings • • • • • • • HV kV: 230 kV IOmin: 0.3 per unit IRs: 5.0 per unit Slope 1: 20% Slope 2: 40% HV CT Ratio: 250:1 Neutral CT Ratio: 100:1 I1A I1B I1C CT Ratio Mismatch Correction Input 1 I2A I2B I2C CT Ratio Mismatch Correction Input 2 I3A I3B I3C IO=IA+IB+IC+IN IOHV IOLV IOTV IO 87N HV Trip CT Ratio Mismatch Correction Input 3 Out 6 87N LV Trip 87N TVTrip I4A I4B I4C CT Ratio Mismatch Correction Input 4 I5A I5B I5C CT Ratio Mismatch Correction Input 5 IR IRHV IRLV IRTV IR=(IA+IB+IC+N) 2 Figure 6.23: Logic Neutral Differential (87N) MCF Calculation PhaseCTRatio 250 MagnitudeCorrectionFactor MCF = ---------------------------------------------- = --------- = 2.50 NeutralCTRation 100 Phase Winding 87N IOmin Pickup Calculation Expect for I5A HV winding side kVA 1 100e3 1 IOmin = ------------------ ----------- IOminPerUnit = -------------------- --------- 0.3 = 0.30A 3 230 250 3 kV CTR D01386R04.20 T-PRO User Manual 8700 6-31 6 Acceptance/Protection Function Test Guide Neutral Winding 87N IOmin Pickup Calculation Expect for I5A HV winding side kVA 1 100e3 1 IOmin = ------------------ ----------- IOminPerUnit = -------------------- --------- 0.3 = 0.753A 3 kV CTR 3 230 100 Note: Repeat previous calculation for LV and TV winding side and remember I5B (326-327) should be selected for LV winding and I5C (328-329) for TV winding inputs. 87N IOmin Neutral Test Procedure 1 Connect current source to T-PRO Terminals 324–325. (I5A HV) 2 Slowly ramp current up. At 0.74 to 0.77 A (expect 0.753 A): 87N-HV Trip = High T-PRO Target: “Neu. Diff. (87NHV): Trip” Output Contact 6 = Closed 3 Turn current off. End of 87N test. 6-32 T-PRO User Manual 8700 D01386R04.20 6 Acceptance/Protection Function Test Guide T-PRO Differential Slope Test Example 100 MVA 1250/5 230 kV Wye 0 VT 115 kV 2500/5 Wye 0 Gnd Wye Delta -30 CT Input #1 CT Input #2 T-PRO Figure 6.24: T-PRO Differential Slope Test Example Testing T-PRO Transformer Relay Differential Element Calculations to be performed prior to T-PRO testing Settings for the 87 differential element: • IOmin = 0.3 per unit • IRS = 5.0 per unit • S1 = 20% • S2 = 40% Establish base load current for transformer reference side (where the VTs are located). For this example the VTs are located on the 230 kV HV side winding. (1) KVA I BasePri = -----------------3 kV 100000 = -------------------- = 251A 3 230 I?V BaseSec = I?V BasePri * CTDeltaFactor * 1 (1A) CTRatio Equation Note 1: “?” = “H”, “L” or “T” depending on the winding on which the base is being calculated. Equation Note 2: “Delta factor” = 1.0 for wye connected CTs, 3 for delta connected CTs. D01386R04.20 T-PRO User Manual 8700 6-33 6 Acceptance/Protection Function Test Guide Calculate the Base current (amps) for each winding using Equation 1 and Equation 1A. High Voltage Side: kVA 100000 I BasePri = ------------------ = -------------------- = 251A 3 kV 3 230 1 I HVBaseSec = I HVBasePri CT DeltaFactor ---------------------CTRatio 1 = 251 1.0 --------- = 1.004A 250 Low Voltage Side: kVA 100000 I BasePri = ------------------ = -------------------- = 502A 3 kV 3 115 1 I LVBaseSec = I LVBasePri CT DeltaFactor ---------------------CTRatio 1 - 502 1.0 -------= 1.004A 500 T-PRO Three-Phase Testing 1 Three-phase testing is done by applying a balanced 3-phase current into current input group #1 and another balanced set of currents into current input group #2 2 For this example inject HV side currents at angles: Ph A 0º, Ph B -120º, Ph C 120º. LV side currents at angles: Ph A 150º, Ph B 30º, Ph C -90º. Explanation of LV Side angle: Because of a -30º net shift on the LV Side, adjust the LV test current angles by -30°. If you had a 0º shift on both sides, currents on the LV side for load or through fault conditions would be 180º from HV side (i.e. current into the transformer HV side and out of transformer LV side is normal). Shift the LV side by -30º because of the –30º delta connection. 6-34 T-PRO User Manual 8700 D01386R04.20 6 Acceptance/Protection Function Test Guide The testing the points in the following graphic are highlighted. Dev 87: Differential Protection 4.0 3.5 IO (pu) 3.0 2.5 IR>IRs 2.0 1.5 IRs 1.0 0.5 IOmin IRmin 0 0 1 2 3 4 IR (pu) 5 6 7 8 9 Figure 6.25: Three-Phase Testing Points Load Conditions The following diagram shows a summary of the process used for calculating the currents required to simulate load or through fault condition. This process checks the differential element for normal load or large external fault conditions. The T-PRO 87 element should not operate under such conditions unless the differential (operate current) exceeds the slope IO level at the corresponding amount of restraint current. Use Equations 1 and 1A to obtain the values in the diagram. Summary of Calculations for Load/External Fault Conditions High Side 230 kV Primary Values [251 A] Wye 0 0° CT ratio = 250:1 Calculate Secondary Base [251/250 = 1.004 A] CT Delta Factor = 1.0 (wye) Low Side 115 kV Primary Values [502 A] Delta -30 180 - 30 = 150° CT ratio = 500:1 Calculate Secondary Base [502/500 = 1.004 A] CT Delta Factor = 1.0 (wye) Base x Delta Factor [1.004 x 1.0 = 1.004 A] Base x Delta Factor [1.004 x 1.0 = 1.004 A] Base value Base value Determine the IO and IR current values on the 87 through fault restraint (slope) characteristic where the T-PRO operates. Determine the current pickup values of current for any values of IO and IR on the curve. D01386R04.20 T-PRO User Manual 8700 6-35 6 Acceptance/Protection Function Test Guide 3 The following formulae determine the operating currents for the differential slope characteristic: IO = I HV – I LV (2) or for a through fault IO = I HV – I LV I HV + I LV IR = ----------------------------2 (3) 4 Testing of IOmin (minimum operating current). Apply balanced 3-phase currents. Watch for Target: “87 Trip” IOmin = 0.3 per unit and IR = 0.0 per unit. HV IOmin Apply 3-phase current (ramp up). IHVbase sec x IOmin = 1.004 x 0.3 = 0.301 A LV IOmin Apply 3-phase current (ramp up). ILVbase sec x IOmin = 1.004 x 0.3 = 0.301 A 6-36 T-PRO User Manual 8700 D01386R04.20 6 Acceptance/Protection Function Test Guide Minimum Operating Current of the Differential Element High Side 230 kV LowSide 115 kV Inject HV Current Only [0.3 pu x 1.004] Inject LV Current Only [0.3 pu x 1.004] OR Minimum Pickup [0.301 A] Minimum Pickup [0.301 A] 5 Test IR = IRmin (minimum restraint current = 1.5 per unit). S1 IR min IO = -------------------------100 (4) 20 IR min 0.3 = -------------------------100 Note: at IR = IR min , IO = IO min Therefore solve for IHV and ILV at IO = 0.3 per unit and IRmin = 1.5 per unit. Use Formulae 2 and 3 from above to solve for IO and IR. IO = IHV – I LV 0.3 = I HV – I LV I HV + I LV IR = ---------------------------2 I HV + I LV 1.5 = ---------------------------2 1.5 2 = I HV + I LV 3.0 = I HV + I LV D01386R04.20 T-PRO User Manual 8700 6-37 6 Acceptance/Protection Function Test Guide Determine the currents required to operate the 87 element using the above formulae. Solve for IHV by adding the two equations together. 0.3 = I HV – I LV + 3.0 = I HV + I LV Total 3.3 = 2I HV 3.3 ------- = I HV = 1.65pu 2 I HVamps = I HVbaseSec I HVperunit = 1.004 1.35 = 1.356A Now solve for ILV by subtracting the two equations. 0.3 = I HV – I LV - 3.0 = I HV + I LV Total – 2.7 = 2I LV –--------2.7= I LV = 1.35pu –2 I LVamps = I LVbaseSec I LVperunit = 1.004 1.35 = 1.356A 6-38 T-PRO User Manual 8700 D01386R04.20 6 Acceptance/Protection Function Test Guide Summary of Calculations for Testing Minimum Restraint Current (IRmin) High Side 230 kV Low Side 115 kV HV Current Value (1.65 per unit) HV Current Value (1.35 per unit) Convert to Amps [1.65 x 1.004] Convert to Amps [1.35 x 1.004] HV Test Current [1.657 A] LV Test Current [1.356 A] Test for IR = IRs = 5.0 per unit. S2 IR S1 – S2 IO = ------------------ + ------------------ IRs 100 100 (5) 40 5 20 – 40 IO = --------------- + ------------------ 5 100 100 IO = 1.0pu Therefore IRs = 5.0 per unit and IO = 1.0 per unit Solving for IHV and ILV IO = IHV – I LV 1.0 = I HV – I LV I HV + I LV IR = ---------------------------2 I HV + I LV 5.0 = ---------------------------2 5.0 2 = I HV + I LV 10.0 = I HV + I LV D01386R04.20 T-PRO User Manual 8700 6-39 6 Acceptance/Protection Function Test Guide Solve for IHV by adding the two equations together. 1.0 = I HV – I LV + 10.0 = I HV + I LV Total 11.0 = 2I HV 11.0 ---------- = I HV = 5.5pu 2 I HVamps = I HVBaseSec I HVperunit = 1.004 5.5 = 5.522A Now solve for ILV by subtracting the two equations. 1.0 = I HV – I LV - 10.0 = I HV + I LV Total – 9.0 = – 2I LV –--------9.0= I LV = 4.5pu –2 I LVamps = I LVBaseSec I LVperunit = 1.004 4.5 = 4.52A 6-40 T-PRO User Manual 8700 D01386R04.20 6 Acceptance/Protection Function Test Guide Summary of Calculations for IRs Testing = 5.0 per unit High Side 230 kV Low Side 115 kV HV Current Value [5.5 per unit] LV Current Value (4.5 per unit) Convert to Amps [5.5 x 1.004] Convert to Amps [4.5 x 1.004] HV Test Current [5.522 A] LV Test Current [4.52 A] 6 Test IR > IRs Let IR = 7.0 per unit S2 IR S1 – S2 IO = ------------------ + ------------------ IRs 100 100 40 7.0 20 – 40 IO = ------------------- + ------------------ 5.0 100 100 IO = 2.8 – 1.0 IO = 1.8pu Solving for IHV and ILV. IO = IHV – I LV 1.8 = I HV – I LV I HV + I LV IR = ----------------------2 I HV + I LV 7.0 = ----------------------2 7.0 2 = I HV + I LV 14.0 = I HV + I LV D01386R04.20 T-PRO User Manual 8700 6-41 6 Acceptance/Protection Function Test Guide Solve for IHV by adding the two equations together. 1.8 = I HV – I LV + 14.0 = I HV + I LV Total 15.8 = 2I HV 15.8 ---------- = I HV = 7.9pu 2 I HVamps = I HVbaseSec I HVperunit = 1.004 7.9 = 7.93A Now solve for ILV by subtracting the two equations. 1.8 = I HV – I LV - 14.0 = I HV + I LV Total – 12.2 = – 2I LV –-----------12.2= I LV = 6.1pu –2 I LVamps = I LVbaseSec I LVperunit = 1.004 6.1 = 6.124A 6-42 T-PRO User Manual 8700 D01386R04.20 6 Acceptance/Protection Function Test Guide Summary of Calculations for Testing IR > IRS (IR = 7.0) High Side 230 kV Low Side 115 kV HV Current Value (7.9 per unit) LV Current Value (6.1 per unit) Convert to Amps [7.9 x 1.004] Convert to Amps [6.1 x 1.004] HV Test Current [7.93 A] LV Test Current [6.124 A] Summary of Three-Phase Test 1 2 3 4 Calculate base current for each side. Determine an IO (operating) and IR (restraint) values to be tested. Calculate IHV and ILV per unit currents for a given IO and IR. Adjust angles by analog phase shift and convert IHV and ILV per units to amperes. 5 Apply IHV and ILV with 3-phase sources. Set reference side at zero degrees (0.0°) and the opposite side at the opposing angle. In this example, 180°30° = 150° to account for the -30° delta shift. D01386R04.20 T-PRO User Manual 8700 6-43 6 Acceptance/Protection Function Test Guide T PRO Single-Phase Slope Test Steps to perform Single-Phase Testing 1 Perform the current calculations for 3-phase testing from the previous section. 2 Determine the natural current phase shift into each of the current inputs of the T-PRO relay, and thus the compensating angle required to null that angle (e.g. a delta -30º connection requires a +30º shift, so use the +30º shift formula, see “Analog Phase Shift Table” in Appendix L). 3 Determine which phase to inject on each side. 4 Apply the additional magnitude correction factor to the calculated 3-phase test currents. Monitor Metering>Operating values in the T-PRO relay to check. This screen shows the current phasors that the T-PRO uses for differential calculations (after performing phase shift manipulations), as well as the per unit operating and restraint currents. Figure 6.26: Metering/Operating Screen 6-44 T-PRO User Manual 8700 D01386R04.20 6 Acceptance/Protection Function Test Guide Details of Calculations Step 1: Three-phase calculations. See 3-phase test section. Step 2: Determine transformer net phase shift. Sum the suffixes of your winding CT configurations. e.g. (Delta +30º = 30º), (Wye –30º = –30º), (Delta 60º = 60º), (Wye 0º = 0º), etc. To Demonstrate: Transformer: HV = Wye 0º and LV = Delta -30º. CTs: HV CT = Wye 0º and LV CT = Wye 0º: Your Net High Side angle = 0º + 0º = 0º. (T-PRO uses 0º phase shift formulae to null the angle). Your Net Low Side angle = -30º + 0º = -30º. (T-PRO uses +30º phase shift formulae to null the angle). Step 3: The following Shift Requirement Table shows the net transformer phase shift on the left. Injecting into Phase A only of T-PRO yields current in the phases displayed in the right column. Confirm this by checking the T-PRO’s Metering>Operating screen. Table 6.1: Shift Requirement Table (Inject Phase A only) D01386R04.20 Transformer Net Phase Shift (degrees) Use Formulae from Analog Phase Shift Table (Appendix M) Injecting only T-PRO A Phase shows these “Operating” Phase(s) 0º 0º A –30º +30º A–C +30º –30º A–B +60º –60º –B –60º +60º –C 180º 180º –A +90º –90º C–B –90º +90º B–C 150º –150º C–A –150º +150º B–A –120º +120º B +120º –120º C T-PRO User Manual 8700 6-45 6 Acceptance/Protection Function Test Guide Table 6.2: Shift Requirement Table (Inject Phase B only) Transformer Net Phase Shift (degrees) Use Formulae from Analog Phase Shift Table (Appendix M) Injecting only T-PRO B Phase shows these “Operating” Phase(s) 0º 0º B –30º +30º B–A +30º –30º B–C +60º –60º –C –60º +60º –A 180º 180º –B +90º –90º A–C –90º +90º C–A +150º –150º A–B –150º +150º C–B –120º +120º C +120º –120º A Table 6.3: Shift Requirement Table (Inject Phase C only) 6-46 Transformer Net Phase Shift (degrees) Use Formulae from Analog Phase Shift Table (Appendix M) Injecting only T-PRO C Phase shows these “Operating” Phase(s) 0º 0º C –30º +30º C–B +30º –30º C–A +60º –60º –A –60º +60º –B 180º 180º –C +90º –90º B–A –90º +90º A–B +150º –150º B–C –150º +150º A–C –120º +120º A +120º –120º B T-PRO User Manual 8700 D01386R04.20 6 Acceptance/Protection Function Test Guide You should set up a test condition where both sides of the transformer see current on the same 2 phases (must be 2 phases only for the method explained here). Note that the right-hand column above refers to the “strongest” phase, i.e. the one with the most current, as this is the phase that would operate first. So for example, if you continue with the same transformer example of HV 0º and LV -30º: Low side angle is -30º which means you inject current into Phase A input to yield “Operating” LV currents on Phase A and Phase C in the T-PRO. Therefore inject Phase A only since it meets the condition of the T-PRO seeing 2 currents in the LV side of the operating element. Set this current to 0º to be the reference. Now you know that it is necessary to see Phase A and Phase C currents in the HV side of the operating element (the same phases as on the low side). There is a net 0º shift on the HV side so from the “Analog Phase Shift Table” in Appendix L, injecting Phase A will yield Phase A only (and Phase B will yield Phase B only and Phase C will yield Phase C only). So to obtain Phase A – Phase C on high side, inject current into polarity of Phase A and out of polarity Phase C. (This will simulate a through fault, so inject Phase A – Phase C @ 180º). See for details see Figure 6.27: Single-Phase Test Connections on page 6-47 for connection diagram. Single-Phase Test Connections to T-PRO Relay AC AC Current Source Current Source IHV = 180° ILV = 0° A B HV Side (Current Input #1) C A T-PRO B C LV Side (Current Input #2) Figure 6.27: Single-Phase Test Connections Step 4 Determining the additional Magnitude Correction Factor: Using the above method, you only need to remember 2 Magnitude Correction Factors, 1.0 and 3. The values in the tables can be proven by manually calculating the phase shift resultants using the “Analog Phase Shift Table” in Appendix L. D01386R04.20 T-PRO User Manual 8700 6-47 6 Acceptance/Protection Function Test Guide The Table below relates the Net Transformer Shift angle to the applicable Correction Factor: Table 6.4: Single-Phase Correction Factor Table Transformer Net Phase Shift (degrees) Additional Magnitude Correction Factor (Multiplier) 0º 1.0 +60º 1.0 +120º 1.0 +180º 1.0 –120º 1.0 –60º 1.0 +30º 3 +90º 3 +150º 3 –150º 3 –90º 3 –30º 3 Multiply the 3-phase current values (determined earlier) by the correction factor in the right column of the “Single-Phase Correction Factor Table” on page 6-48. Performing the Single-Phase Test 1 Continuing with the example, on the 0º high side, our minimum operating point is: Inject Phase A – Phase C (which = Phase A - Phase C): In the Single-Phase Correction Table, 0º gives a Correction Factor of 1.0. HV 3-Phase IOmin * Additional MCF = 0.301 x 1.0 = 0.301 A 2 On the -30º Low Side our minimum operating point is: Inject Phase A (which = Phase A - Phase C): In the table, -30º gives a Correction Factor of 3. LV 3-Phase IOmin * Additional MCF = 0.301 x 3 = 0.522 A Apply the same process to any other point being tested. 6-48 T-PRO User Manual 8700 D01386R04.20 6 Acceptance/Protection Function Test Guide Conclusion The only additional multipliers required to obtain single-phase test currents from 3-phase test currents are the multipliers in the “Single-Phase Correction Factor Table” on page 6-48. Note: Single-phase correction factor in these diagrams means multiplying 3phase calculated amperes by this value to find the single-phase test current. Also, these connections are applicable to any side. Find the appropriate connection for each side. Other single-phase test connections to obtain A–B (in polarity A out polarity B): 0° Connection AC +60° Connection AC Current Source Current Source A B C T-PRO 8700 Terminals HV, LV or TV A B Single-Phase Correction Factor = 1.0 +120° Connection 180° Connection AC AC Current Source Current Source A B C A B C T-PRO 8700 Terminals HV, LV or TV Single-Phase Correction Factor = 1.0 T-PRO 8700 Terminals HV, LV or TV -120° Connection -60° Connection Single-Phase Correction Factor = 1.0 AC AC Current Source A B Current Source C T-PRO 8700 Terminals HV, LV or TV Single-Phase Correction Factor = 1.0 D01386R04.20 C T-PRO 8700 Terminals HV, LV or TV Single-Phase Correction Factor = 1.0 T-PRO User Manual 8700 A B C T-PRO 8700 Terminals HV, LV or TV Single-Phase Correction Factor = 1.0 6-49 6 Acceptance/Protection Function Test Guide +30° Connection AC +90° Connection AC Current Source Current Source A B C A B T-PRO 8700 Terminals HV, LV or TV Single-Phase Correction Factor = √3 Single-Phase Correction Factor = √3 +150° Connection -150° Connection AC AC Current Source Current Source A B C A B C T-PRO 8700 Terminals HV, LV or TV Single-Phase Correction Factor = √3 T-PRO 8700 Terminals HV, LV or TV -90° Connection -30° Connection Single-Phase Correction Factor = √3 AC AC Current Source Current Source A 6-50 C T-PRO 8700 Terminals HV, LV or TV B C A B C T-PRO 8700 Terminals HV, LV or TV T-PRO 8700 Terminals HV, LV or TV Single-Phase Correction Factor = √3 Single-Phase Correction Factor = √3 T-PRO User Manual 8700 D01386R04.20 7 Installation Physical Mounting The relay is 3 rack units or 5.25 inches high and approximately 12.25 inches deep. The standard relay is designed for a 19-inch rack. A complete mechanical drawing is shown, for details see “Mechanical Drawings” in Appendix G. To install the relay you need the following: • 19 inch rack • 4 - #10 screws A vertical mounting package is also available. AC and DC Wiring For details see “AC Schematic Drawing” in Appendix I and “DC Schematic Drawing” in Appendix J. Communication Wiring EIA-232 The relay’s three serial ports (Ports 1, 2 and 3) are configured as EIA RS-232 Data Communications Equipment (DCE) devices with female DB9 connectors. This allows them to be connected directly to a PC serial port with a standard straight-through male-to-female serial cable. For pin-out details see “Communication Port Details” on page 2-9. An adapter is available for connecting an external modem to Port 2. For details, see “Modem Link - External” on page 2-3. RJ-45 The relay may have an optional internal modem or an optional internal 10BaseT Ethernet port. Connection to either of these is via the relay’s Port 5 RJ-45 receptacle. Labeling above the port will indicate which option, if any, has been installed. IRIG-B Wiring The relay accepts both modulated and unmodulated IRIG-B standard time signals with or without the IEEE 1344 extensions. The IRIG-B connector on the back of the relay is BNC type. Temperature Probes The ambient temperature probe must be mounted facing downward or horizontally with a slight downward angle to prevent the accumulation of moisture. Connection of external ambient and top-oil temperature probes to the relay is detailed in “Temperature Probe Connections” in Appendix O. D01386R04.20 T-PRO User Manual 8700 7-1 Appendix A IED Specifications T-PRO Model 8700 Specifications General: Quantity/Specifications Note Nominal Frequency 50 or 60 Hz Operate Time 1 to 2 cycle typical For 87 element including output contact operation Sampling Rate 96 samples/cycle Records up to 25th harmonic Power Supply Nominal Range: 48 to 250 Vdc, 120 Vac, 50/60 Hz Full Operating Range: 40 to 300 Vdc Power Consumption: 30VA Memory Settings and records are stored in nonvolatile memory Records are stored in a circular buffer 2 or 3 winding transformer with up to 5 sets of CT inputs Fault protection, overload management as well as monitoring and fault recording 96 s/c oscillography of all analog and external input channels Viewing software provides waveform, symmetrical components and harmonic analysis Protection Functions: IEEE Dev. 87, 87N, 49, TOEWS, 24, 59N, 27, 60, 81, 50/51, 50N/51N, 67 and THD Recording: Fault Capacity: up to 15 x 2 second records Trend Variable rate logging of MW, MVAR, Ambient Temperature and Loss of Life, Top Oil, Hot Spot Temperature, HV Current, 51HV pickup level and THD Variable length, dependant on sample rate Events 250 events Circular event log A/D Resolution 13 bits, 8192 counts full scale Input & Output: Analog Input Channels 15 currents and 3 voltages transformer protection and recording Rating: In = 5 A or 1 A Vn = 69 V Continuous: 3x In, 2x Vn One Second: 20x In without distortion Temperature Inputs, Ambient and Top Oil Capable of receiving 2 sets of isolated 420 mA current loops for ambient and top oil temperatures Sampling Resolution 12 bits plus sign, amplitude measurement accuracy: +/-0.5% for 54 to 66 Hz Burden ac input voltage: < 0.15 VA @ 67 V, ac input current: < 0.25 VA @ 5 A D01386R04.20 T-PRO User Manual 8700 No damage for 3x nominal for 1 minute/ hour for Vn External temperature transducers can be powered from relay. Unregulated 30 Vdc supply output, 24 Vdc load at 40 mA. Appendix A-1 Appendix A IED Specifications T-PRO Model 8700 Specifications Analog Input Sampling Sample rate: 96 samples/cycle for protection algorithm 8x/cycle for protection External Inputs 9 isolated inputs Optional 48/125 or 125/250 Vdc Burden Burden resistance: > 10 k ohms Isolation Internal optical isolation 1 ms resolution Sample rate 1 ms resolution Output Relays (contacts) 14 programmable outputs plus relay inoperative contact Optional 48 to 125 or 125 to 250 Vdc nominal, externally wetted Make: 30 A as per IEEE C37.90 Carry: 8 A Break: 0.9 A at 125 Vdc resistive 0.35 A at 250 Vdc resistive Interface & Communication: Front Display 2 lines x 24 characters, fluorescent Exceptional visibility in all ambient light conditions Front Panel Indicators 6 LEDs Target, Relay Functional, IRIG-B Functional, Service Required, Test Mode, Alarm Serial User Interface Front and rear RS-232 ports to 115 K baud Rear port can support an external modem Internal Modem 33.6 Kbps, V.32 bis Optional internal modem Network 10BaseT Ethernet port Optional Ethernet card SCADA Interface DNP3 (RS-232 or Ethernet) or Modbus (RS-232) Rear port Time Sync IRIG-B, BNC connector Modulated or unmodulated, auto-detect Self Checking/Relay Inoperative 1 contact closed when relay inoperative Terminal User Interface VT100 terminal emulation Accessible via serial, modem or network interface Ambient Temperature Range -40°C to 85°C IEC 60068-2-1/IEC 60068-2-2 Humidity Up to 95% without condensation IEC 60068-2-30 Insulation Test (Hi-Pot) Power supply, analog inputs, external inputs, output contacts at 1.5 kV, 50/60 Hz, 1 minute (isolated 30 Vdc supply at 1 kV) IEC 60255-5 Environmental: Electrical Fast Transient ANSI/IEEE C37.90.1 - 1989 Oscillatory Transient ANSI/IEEE C37.90.1 - 1989 RFI Susceptibility ANSI/IEEE C37.90.2, IEC 255-22-3 Shock and Bump IEC 60255-21-2 Class 1 Appendix A-2 T-PRO User Manual 8700 D01386R04.20 Appendix A IED Specifications T-PRO Model 8700 Specifications Sinusoidal Vibration 10 Hz to 150 Hz, 0.15 mm or 20 m/s2, 10 sweep cycles IEC 60068-2-6 Weight 11.8 kg 26 lbs Dimensions 13.3 cm 3U high, 5.25" 48.3 cm rack mount 19" rack mount 30.5 cm deep 12" deep External Time Source The relay is synchronized using IRIG-B input (modulated or unmodulated) auto detect. Free Running Accuracy: In the absence of an external time source, the relay maintains time with a maximum ±15 minutes drift per year over the full operating temperature range, and maximum ±90 seconds drift per year at a constant temperature of 25°C. The relay detects loss or re-establishment of external time source and automatically switch between internal and external time. Synchronization Accuracy Sampling clocks synchronized with the time source (internal or external). Physical: Time Synchronization and Accuracy Overall T-PRO Accuracies Current ± 2.5% of inputs from 0.1 to 1.0 x nominal current (In) ± 1.0% of inputs from 1.0 to 20.0 x nominal current (In) Voltage ± 1.0% of inputs from 0.01 to 2.0 x nominal voltage (Vn) Differential element ± 5.0% of set value IOmin from 0.10 to 1.0 per unit (pu) Directional Phase Angle ± 2.5% or >± 2.0° of set value from 0.01° to 360.0° Frequency Elements ±0.001 Hz (fixed level) ±0.05 Hz (df/dt) Timers Inverse Overcurrent Timers ± 2.5% or ± 1 cycle of selected curve Definite Overcurrent Timers ±2.5% or ±1 cycle non-directional Frequency Timer ±2.5% of set value plus 1.25 cycles to 1.75 cycles of inherent delay (fixed level) at 2x pickup, error <40 ms (df/dt) at 0.1 Hz/s above pickup, error <100 ms Timers ± 3 ms of set value Burden AC Voltage Inputs, < 0.15 VA @ 67 volts AC Current Inputs, < 0.50 VA @ 5 amps D01386R04.20 T-PRO User Manual 8700 Appendix A-3 Appendix A IED Specifications Frequency Element Operating Time Curves Figure A.1: Time delay Error at .2 Seconds, Figure A.2: Time Delay Error at 1 Second and Figure A.3: Time Delay Error at 10 Seconds show operating times for the T-PRO frequency rate of change elements at different time delay settings and rate of change settings. The diagrams show operating times at each test point including output contact operate time. Operating times are the same for both 50 Hz and 60 Hz. Time Delay Error @ 0.2s 195 180 165 150 135 Delay error (ms) 120 105 0.1 Hz/s 1 Hz/s 10 Hz/s 90 75 60 45 30 15 0 0 1 2 3 4 5 6 7 8 9 10 11 Hz/s Pickup Multiple Figure A.1: Time delay Error at .2 Seconds Time Delay Error @ 1s 195 180 165 150 Time Delay Error (ms) 135 120 105 0.1 Hz/s 1 Hz/s 10 Hz/s 90 75 60 45 30 15 0 0 1 2 3 4 5 6 7 8 9 10 11 Multiple of Hz/s Pickup Figure A.2: Time Delay Error at 1 Second Appendix A-4 T-PRO User Manual 8700 D01386R04.20 Appendix A IED Specifications Time Delay Error @ 10s 195 180 165 150 Time Delay Error (ms) 135 120 105 0.1 Hz/s 1 Hz/s 90 75 60 45 30 15 0 0 1 2 3 4 5 6 7 8 9 10 11 Multiple of Hz/s Pickup Figure A.3: Time Delay Error at 10 Seconds D01386R04.20 T-PRO User Manual 8700 Appendix A-5 Appendix B IED Settings and Ranges When a setting has been completed in Offliner Settings software, it can be printed along with the ranges available for these settings. This is a view only option; to change the settings you must go back into the particular setting that you wish to change. The summary is a quick way to view all the settings in a compact form. The top part of the settings summary contains all the information from the Relay Identification screen. The setting summary provides a list of all the current and voltage analog input quantity names used for protection and recording. External Inputs and Output contact names are also identified on this summary. T-PRO Settings Summary Name Symbol/Value Unit Range Relay Identification Settings Version 6 Ignore Serial Number No Serial Number TPRO-8700-980130-06 Unit ID UnitID Nominal CT Secondary Current 5A Nominal System Frequency 60 Hz Comments Comments Setting Name Default Settings Date Created-Modified 1999-03-22 11:50:00 Station Name Station Name Station Number 1 Location Location Bank Name TB3 Analog Input Names D01386R04.20 VA Voltage A VB Voltage B VC Voltage C IA1 IA1 IB1 IB1 IC1 IC1 IA2 IA2 IB2 IB2 IC2 IC2 IA3 IA3 IB3 IB3 T-PRO User Manual 8700 Appendix B-1 Appendix B IED Settings and Ranges T-PRO Settings Summary Name Symbol/Value IC3 IC3 IA4 IA4 IB4 IB4 IC4 IC4 IA5 IA5 IB5 IB5 IC5 IC5 Temp1 DC1 Temp2 DC2 Unit Range 1.0 to 2000.0 External Input Names 1 Spare 1 2 Spare 2 3 Spare 3 4 Spare 4 5 Spare 5 6 Spare 6 7 Spare 7 8 Spare 8 9 Spare 9 Output Contact Names Output 1 Spare 1 Output 2 Spare 2 Output 3 Spare 3 Output 4 Spare 4 Output 5 Spare 5 Output 6 Spare 6 Output 7 Spare 7 Output 8 Spare 8 Output 9 Spare 9 Output 10 Spare 10 Output 11 Spare 11 Output 12 Spare 12 Output 13 Spare 13 Output 14 Spare 14 Nameplate Data Appendix B-2 Transformer 3 Phase Capacity 100.0 MVA Transformer Winding 3 - Tap Changer Range 0 % T-PRO User Manual 8700 -100 to 100 D01386R04.20 Appendix B IED Settings and Ranges T-PRO Settings Summary Name Symbol/Value Unit Range Normal Loss of Life Hot Spot Temp. 110.0 °C 70.0 to 200.0 Transformer Temperature Rise 65 °C - Transformer Cooling Method Self cooled Temp. Rise Hot Spot (TRiseHS) 25.00 °C - Temp. Rise Top Oil (TRiseTop) 55.00 °C - Temp. Rise Time Const. Hot Spot (TauHS) 0.08 hours - Temp. Rise Time Const. Top Oil (TauTop) 3.00 hours - Ratio of Load Loss to Iron Loss (R) 3.20 - - Hot Spot Temp. Exponent (m) 0.80 - - Top Oil Temp. Exponent (n) 0.80 - - PT Turns Ratio 2000.0 - 1.0 to 10000.0 Location HV - Voltage 230.0 kV 115.0 to 1000.0 Connection Y Phase 0° kV 13.8 to 230.0 kV 1.0 to 115.0 :1 1.00 to 10000.00 Winding Voltage Input Connection Transformer NamePlate HV: (as PT Source) LV: Voltage 115.0 Connection Y Phase 0° TV: Voltage 13.8 Connection Y Phase 0° CT Connections Current Input 1 Winding HV Connection Y Phase 0° Turns Ratio 100.00 External Input Selection <Not Used> Current Input 2 D01386R04.20 Winding LV Connection Y Phase 0° T-PRO User Manual 8700 Appendix B-3 Appendix B IED Settings and Ranges T-PRO Settings Summary Name Symbol/Value Unit Range Turns Ratio 200.00 :1 1.00 to 10000.00 External Input Selection <Not Used> :1 1.00 to 10000.00 :1 1.00 to 10000.00 :1 1.00 to 10000.00 Current Input 3 Winding TV Connection Y Phase 0° Turns Ratio 1667.00 External Input Selection <Not Used> Current Input 4 Winding NC Connection Y Phase 0° Turns Ratio 450.00 External Input Selection <Not Used> Current Input 5 Winding 51N/87N Connection Y Phase 0° Turns Ratio 4000.00 External Input Selection <Not Used> Ambient Temperature Scaling Max Valid Temperature 50.0 °C -40.0 to 50.0 Min Valid Temperature -50.0 °C -50.0 to 40.0 Max Correlating Current Value 20.00 mA 5.00 to 20.00 Min Correlating Current Value 4.00 mA 4.00 to 19.00 Top Oil Temperature Scaling Top Oil Calculated Max Valid Temperature 200.0 °C -30.0 to 200.0 Min Valid Temperature -40.0 °C -50.0 to 190.0 Max Correlating Current Value 20.00 mA 5.00 to 20.00 Min Correlating Current Value 4.00 mA 4.00 to 19.00 Protection Summary Appendix B-4 87 Enabled 87N-HV Enabled 87N-LV Enabled 87N-TV Enabled T-PRO User Manual 8700 D01386R04.20 Appendix B IED Settings and Ranges T-PRO Settings Summary Name Symbol/Value TOEWS Enabled 24INV Enabled 24DEF Enabled 59N Enabled 27-1 Enabled 27-2 Enabled 60 Enabled 81-1 Fixed Level 81-2 Rate of Change 81-3 Fixed Level 81-4 Rate of Change 50-HV Enabled 51-HV Enabled 50-LV Enabled 51-LV Enabled 50-TV Enabled 51-TV Enabled 51ADP Enabled 50N-HV Enabled 51N-HV Enabled 50N-LV Enabled 51N-LV Enabled 50N-TV Enabled 51N-TV Enabled 67 Enabled THD Enabled Unit Range 87 - Differential 87 Enabled IOmin 0.30 pu 0.10 to 1.00 IRs 5.00 pu 1.50 to 50.00 S1 20.00 % 6.00 to 40.00 S2 40.00 % 20.00 to 200.00 High Current Settings 10.00 pu 0.90 to 100.00 I2 Cross Blocking Enabled I2Setting 0.30 pu 0.05 to 1.00 I5 Disabled I5 Setting 0.30 pu 0.05 to 1.00 87N - Neutral Differential D01386R04.20 T-PRO User Manual 8700 Appendix B-5 Appendix B IED Settings and Ranges T-PRO Settings Summary Name Symbol/Value 87N-HV Enabled Unit Range IOmin 0.30 pu 0.10 to 1.00 IRs 5.00 pu 1.50 to 50.00 S1 20.00 % 6.00 to 40.00 S2 40.00 % 20.00 to 200.00 CT Turns Ratio 100.00 :1 1.00 to 10000.00 87N-LV Enabled IOmin 0.30 pu 0.10 to 1.00 IRs 5.00 pu 1.50 to 50.00 S1 20.00 % 6.00 to 40.00 S2 40.00 % 20.00 to 200.00 CT Turns Ratio 200.00 :1 1.00 to 10000.00 87N-TV Enabled IOmin 0.30 pu 0.10 to 1.00 IRs 5.00 pu 1.50 to 50.00 S1 20.00 % 6.00 to 40.00 S2 40.00 % 20.00 to 200.00 CT Turns Ratio 1000.00 :1 1.00 to 10000.00 OFF - Pickup 1.20 pu 0.10 to 20.00 Hysteresis 0.10 pu 0.00 to 1.00 Pickup Delay (Tp1) 0.10 s 0.00 to 1800.00 Dropout Delay (Td1) 0.00 s 0.00 to 1800.00 Temperature Input Switch OFF - Pickup 120.0 °C 70.0 to 200.0 Hysteresis 1.0 °C 0.0 to 10.0 Pickup Delay (Tp2) 0.01 hours 0.00 to 24.00 Dropout Delay (Td2) 0.00 hours 0.00 to 24.00 Logic Gate Switch OR - LED Switch Target LED - OFF - Pickup 1.00 pu 0.10 to 20.00 Hysteresis 0.10 pu 0.00 to 1.00 Pickup Delay (Tp1) 0.00 s 0.00 to 1800.00 Dropout Delay (Td1) 0.00 s 0.00 to 1800.00 49-1 - Thermal Overload Current Input Switch 49-2 - Thermal Overload Current Input Switch Appendix B-6 T-PRO User Manual 8700 D01386R04.20 Appendix B IED Settings and Ranges T-PRO Settings Summary Name Symbol/Value Unit Range Temperature Input Switch OFF - Pickup 120.0 °C 70.0 to 200.0 Hysteresis 1.0 °C 0.0 to 10.0 Pickup Delay (Tp2) 0.02 hours 0.00 to 24.00 Dropout Delay (Td2) 0.00 hours 0.00 to 24.00 Logic Gate Switch OR - LED Switch Target LED - OFF - Pickup 1.00 pu 0.10 to 20.00 Hysteresis 0.10 pu 0.00 to 1.00 Pickup Delay (Tp1) 0.00 s 0.00 to 1800.00 Dropout Delay (Td1) 0.00 s 0.00 to 1800.00 Temperature Input Switch OFF - Pickup 120.0 °C 70.0 to 200.0 Hysteresis 1.0 °C 0.0 to 10.0 Pickup Delay (Tp2) 0.03 hours 0.00 to 24.00 Dropout Delay (Td2) 0.00 hours 0.00 to 24.00 Logic Gate Switch OR - LED Switch Target LED - OFF - Pickup 1.00 pu 0.10 to 20.00 Hysteresis 0.10 pu 0.00 to 1.00 Pickup Delay (Tp1) 0.00 s 0.00 to 1800.00 Dropout Delay (Td1) 0.00 s 0.00 to 1800.00 Temperature Input Switch OFF - Pickup 120.0 °C 70.0 to 200.0 Hysteresis 1.0 °C 0.0 to 10.0 Pickup Delay (Tp2) 0.04 hours 0.00 to 24.00 Dropout Delay (Td2) 0.00 hours 0.00 to 24.00 Logic Gate Switch OR - LED Switch Alarm LED - OFF - Pickup 1.00 pu 0.10 to 20.00 Hysteresis 0.10 pu 0.00 to 1.00 Pickup Delay (Tp1) 0.00 s 0.00 to 1800.00 49-3 - Thermal Overload Current Input Switch 49-4 - Thermal Overload Current Input Switch 49-5 - Thermal Overload Current Input Switch D01386R04.20 T-PRO User Manual 8700 Appendix B-7 Appendix B IED Settings and Ranges T-PRO Settings Summary Name Symbol/Value Unit Range Dropout Delay (Td1) 0.00 s 0.00 to 1800.00 Temperature Input Switch OFF - Pickup 120.0 °C 70.0 to 200.0 Hysteresis 1.0 °C 0.0 to 10.0 Pickup Delay (Tp2) 0.05 hours 0.00 to 24.00 Dropout Delay (Td2) 0.00 hours 0.00 to 24.00 Logic Gate Switch OR - LED Switch Alarm LED - OFF - Pickup 1.00 pu 0.10 to 20.00 Hysteresis 0.10 pu 0.00 to 1.00 Pickup Delay (Tp1) 0.00 s 0.00 to 1800.00 Dropout Delay (Td1) 0.00 s 0.00 to 1800.00 Temperature Input Switch OFF - Pickup 120.0 °C 70.0 to 200.0 Hysteresis 1.0 °C 0.0 to 10.0 Pickup Delay (Tp2) 0.00 hours 0.00 to 24.00 Dropout Delay (Td2) 0.00 hours 0.00 to 24.00 Logic Gate Switch OR - LED Switch Alarm LED - OFF - Pickup 1.00 pu 0.10 to 20.00 Hysteresis 0.10 pu 0.00 to 1.00 Pickup Delay (Tp1) 0.00 s 0.00 to 1800.00 Dropout Delay (Td1) 0.00 s 0.00 to 1800.00 Temperature Input Switch OFF - Pickup 120.0 °C 70.0 to 200.0 Hysteresis 1.0 °C 0.0 to 10.0 Pickup Delay (Tp2) 0.00 hours 0.00 to 24.00 Dropout Delay (Td2) 0.00 hours 0.00 to 24.00 Logic Gate Switch OR - LED Switch Alarm LED - OFF - Pickup 1.00 pu 0.10 to 20.00 Hysteresis 0.10 pu 0.00 to 1.00 49-6 - Thermal Overload Current Input Switch 49-7 - Thermal Overload Current Input Switch 49-8 - Thermal Overload Current Input Switch Appendix B-8 T-PRO User Manual 8700 D01386R04.20 Appendix B IED Settings and Ranges T-PRO Settings Summary Name Symbol/Value Unit Range Pickup Delay (Tp1) 0.00 s 0.00 to 1800.00 Dropout Delay (Td1) 0.00 s 0.00 to 1800.00 Temperature Input Switch OFF - Pickup 120.0 °C 70.0 to 200.0 Hysteresis 1.0 °C 0.0 to 10.0 Pickup Delay (Tp2) 0.00 hours 0.00 to 24.00 Dropout Delay (Td2) 0.00 hours 0.00 to 24.00 Logic Gate Switch OR - LED Switch Alarm LED - OFF - Pickup 1.00 pu 0.10 to 20.00 Hysteresis 0.10 pu 0.00 to 1.00 Pickup Delay (Tp1) 0.00 s 0.00 to 1800.00 Dropout Delay (Td1) 0.00 s 0.00 to 1800.00 Temperature Input Switch OFF - Pickup 120.0 °C 70.0 to 200.0 Hysteresis 1.0 °C 0.0 to 10.0 Pickup Delay (Tp2) 0.00 hours 0.00 to 24.00 Dropout Delay (Td2) 0.00 hours 0.00 to 24.00 Logic Gate Switch OR - LED Switch Alarm LED - OFF - Pickup 1.00 pu 0.10 to 20.00 Hysteresis 0.10 pu 0.00 to 1.00 Pickup Delay (Tp1) 0.00 s 0.00 to 1800.00 Dropout Delay (Td1) 0.00 s 0.00 to 1800.00 Temperature Input Switch OFF - Pickup 120.0 °C 70.0 to 200.0 Hysteresis 1.0 °C 0.0 to 10.0 Pickup Delay (Tp2) 0.00 hours 0.00 to 24.00 Dropout Delay (Td2) 0.00 hours 0.00 to 24.00 Logic Gate Switch OR - LED Switch Alarm LED - OFF - 1.00 pu 49-9 - Thermal Overload Current Input Switch 49-10 - Thermal Overload Current Input Switch 49-11 - Thermal Overload Current Input Switch Pickup D01386R04.20 T-PRO User Manual 8700 0.10 to 20.00 Appendix B-9 Appendix B IED Settings and Ranges T-PRO Settings Summary Symbol/Value Unit Range Hysteresis 0.10 pu 0.00 to 1.00 Pickup Delay (Tp1) 0.00 s 0.00 to 1800.00 Dropout Delay (Td1) 0.00 s 0.00 to 1800.00 Temperature Input Switch OFF - Pickup 120.0 °C 70.0 to 200.0 Hysteresis 1.0 °C 0.0 to 10.0 Pickup Delay (Tp2) 0.00 hours 0.00 to 24.00 Dropout Delay (Td2) 0.00 hours 0.00 to 24.00 Logic Gate Switch OR - LED Switch Alarm LED - OFF - Pickup 1.00 pu 0.10 to 20.00 Hysteresis 0.10 pu 0.00 to 1.00 Pickup Delay (Tp1) 0.00 s 0.00 to 1800.00 Dropout Delay (Td1) 0.00 s 0.00 to 1800.00 Temperature Input Switch OFF - Pickup 120.0 °C 70.0 to 200.0 Hysteresis 1.0 °C 0.0 to 10.0 Pickup Delay (Tp2) 0.00 hours 0.00 to 24.00 Dropout Delay (Td2) 0.00 hours 0.00 to 24.00 Logic Gate Switch OR - LED Switch Alarm LED - Name 49-12 - Thermal Overload Current Input Switch TOEWS (Transformer Overload Early Warning System) TOEWS Enabled THS (Temperature Hot Spot) Trip Setting 150.0 °C 70.0 to 200.0 THS To Start LOL (Loss of Life) Calculation 140.0 °C 70.0 to 200.0 LOL Trip Setting 2.0 days 0.5 to 100.0 24INV - Inverse Time 24INV Enabled K 0.10 - 0.10 to 100.00 Pickup 1.20 pu 1.00 to 2.00 Reset Time 0.50 s 0.05 to 100.00 24DEF - Definite Time Delay 24DEF Enabled Pickup 1.20 pu 1.00 to 2.00 Pickup Delay 0.05 s 0.05 to 99.99 59N - Zero Sequence Overvoltage Appendix B-10 T-PRO User Manual 8700 D01386R04.20 Appendix B IED Settings and Ranges T-PRO Settings Summary Name Symbol/Value Unit Range 59N Enabled 3V0 Pickup 80.00 V 75.00 to 150.00 Curve Type IEC very inverse TMS 0.50 - 0.01 to 10.00 A 13.5000 - - B 0.0000 - - p 1.00 - - TR 47.30 - 0.10 to 100.00 27 - Undervoltage 27-1 Enabled Gate Switch AND Pickup 10.0 V 1.0 to 120.0 Pickup Delay 0.00 s 0.00 to 99.99 27-2 Enabled Gate Switch AND Pickup 10.0 V 1.0 to 120.0 Pickup Delay 0.00 s 0.00 to 99.99 60 - Loss of Potential Alarm 60 Enabled 81 - Over/Under Frequency 81-1 Fixed Level Pickup 61.000 Hz [50.000, 59.995] or [60.005, 70.000] Pickup Delay 2.00 s 0.05 to 99.99 81-2 Rate of Change Pickup 10.0 Hz/s [-10.0, -0.1] or [0.1, 10.0] Pickup Delay 2.00 s 0.20 to 99.99 81-3 Fixed Level Pickup 61.000 Hz [50.000, 59.995] or [60.005, 70.000] Pickup Delay 2.00 s 0.05 to 99.99 81-4 Rate of Change Pickup 10.0 Hz/s [-10.0, -0.1] or [0.1, 10.0] Pickup Delay 2.00 s 0.20 to 99.99 pu 0.10 to 20.00 50/51 - Phase Overcurrent: HV 50-HV Pickup D01386R04.20 Enabled 1.50 T-PRO User Manual 8700 Appendix B-11 Appendix B IED Settings and Ranges T-PRO Settings Summary Name Pickup Delay 51-HV Symbol/Value Unit Range 1.00 s 0.00 to 99.99 pu 0.50 to 2.10 Enabled Pickup 1.50 Curve Type IEC very inverse TMS 0.50 - 0.01 to 10.00 A 13.5000 - - B 0.0000 - - p 1.00 - - TR 47.30 - 0.10 to 100.00 - 0.5 to 512.0 51ADP Enabled Multiple of Normal Loss of Life 1.0 50/51 - Phase Overcurrent: LV 50-LV Enabled Pickup 1.50 pu 0.10 to 20.00 Pickup Delay 1.00 s 0.00 to 99.99 pu 0.10 to 5.00 51-LV Enabled Pickup 1.50 Curve Type IEC very inverse TMS 0.50 - 0.01 to 10.00 A 13.5000 - - B 0.0000 - - p 1.00 - - TR 47.30 - 0.10 to 100.00 50/51 - Phase Overcurrent: TV 50-TV Enabled Pickup 1.50 pu 0.10 to 20.00 Pickup Delay 1.00 s 0.00 to 99.99 pu 0.10 to 5.00 51-TV Enabled Pickup 1.50 Curve Type IEC very inverse TMS 0.50 - 0.01 to 10.00 A 13.5000 - - B 0.0000 - - p 1.00 - - TR 47.30 - 0.10 to 100.00 A 0.50 to 50.00 50N/51N - Neutral Overcurrent: HV 50N-HV Pickup Appendix B-12 Enabled 10.00 T-PRO User Manual 8700 D01386R04.20 Appendix B IED Settings and Ranges T-PRO Settings Summary Name Pickup Delay 51N-HV Symbol/Value Unit Range 1.00 s 0.00 to 99.99 A 0.50 to 50.00 Enabled Pickup 10.00 Curve Type IEC very inverse TMS 0.50 - 0.01 to 10.00 A 13.5000 - - B 0.0000 - - p 1.00 - - TR 47.30 - 0.10 to 100.00 50N/51N - Neutral Overcurrent: LV 50N-LV Enabled Pickup 10.00 A 0.50 to 50.00 Pickup Delay 1.00 s 0.00 to 99.99 A 0.50 to 50.00 51N-LV Enabled Pickup 10.00 Curve Type IEC very inverse TMS 0.50 - 0.01 to 10.00 A 13.5000 - - B 0.0000 - - p 1.00 - - TR 47.30 - 0.10 to 100.00 50N/51N - Neutral Overcurrent: TV 50N-TV Enabled Pickup 10.00 A 0.50 to 50.00 Pickup Delay 1.00 s 0.00 to 99.99 A 0.50 to 50.00 51N-TV Enabled Pickup 10.00 Curve Type IEC very inverse TMS 0.50 - 0.01 to 10.00 A 13.5000 - - B 0.0000 - - p 1.00 - - TR 47.30 - 0.10 to 100.00 A 0.05 to 1.95 - 0.01 to 10.00 67 - Directional Overcurrent D01386R04.20 67 Enabled Pickup 1.50 Curve Type IEC very inverse TMS 0.50 T-PRO User Manual 8700 Appendix B-13 Appendix B IED Settings and Ranges T-PRO Settings Summary Name Symbol/Value Unit Range A 13.5000 - - B 0.0000 - - p 1.00 - - TR 47.30 - 0.10 to 100.00 Alpha 0.0 - -179.9 to 180.0 Beta 180.0 - 0.1 to 360.0 % 5.0 to 100.0 THD - Total Harmonic Distortion THD Enabled Pickup 10.0 Through Fault Monitor Through Fault Monitor Enabled Input Current HV Pickup Level 1.20 Pu 0.10 to 20.00 Hysteresis 0.10 Pu 0.00 to 1.00 Pickup Delay 0.00 S 0.00 to 99.99 Dropout Delay 0.00 S 0.00 to 99.99 l*l*t Alarm Limit 1000.0 *A*A.S 0.1 to 9999.9 2nd Harmonic Blocking Disabled Pickup Delay 0.02 S 0.00 to 99.99 Dropout Delay 0.02 S 0.00 to 99.99 PL 1 [ProLogic 1] ProLogic 1 Disabled Target Enabled Pickup Delay 0.00 s 0.00 to 999.00 Dropout Delay 0.00 s 0.00 to 999.00 Operator 1 Input A <Unused = 0> Operator 2 Input B <Unused = 0> Operator 3 Input C <Unused = 0> Operator 4 Input D <Unused = 0> Operator 5 Input E <Unused = 0> PL 2 [ProLogic 2] Appendix B-14 ProLogic 2 Disabled Target Enabled T-PRO User Manual 8700 D01386R04.20 Appendix B IED Settings and Ranges T-PRO Settings Summary Name Symbol/Value Unit Range Pickup Delay 0.00 s 0.00 to 999.00 Dropout Delay 0.00 s 0.00 to 999.00 Operator 1 Input A <Unused = 0> Operator 2 Input B <Unused = 0> Operator 3 Input C <Unused = 0> Operator 4 Input D <Unused = 0> Operator 5 Input E <Unused = 0> PL 3 [ProLogic 3] ProLogic 3 Disabled Target Enabled Pickup Delay 0.00 s 0.00 to 999.00 Dropout Delay 0.00 s 0.00 to 999.00 Operator 1 Input A <Unused = 0> Operator 2 Input B <Unused = 0> Operator 3 Input C <Unused = 0> Operator 4 Input D <Unused = 0> Operator 5 Input E <Unused = 0> PL 4 [ProLogic 4] ProLogic 4 Disabled Target Enabled Pickup Delay 0.00 s 0.00 to 999.00 Dropout Delay 0.00 s 0.00 to 999.00 Operator 1 Input A <Unused = 0> Operator 2 Input B <Unused = 0> Operator 3 Input C D01386R04.20 <Unused = 0> T-PRO User Manual 8700 Appendix B-15 Appendix B IED Settings and Ranges T-PRO Settings Summary Name Symbol/Value Unit Range Operator 4 Input D <Unused = 0> Operator 5 Input E <Unused = 0> PL 5 [ProLogic 5] ProLogic 5 Disabled Target Enabled Pickup Delay 0.00 s 0.00 to 999.00 Dropout Delay 0.00 s 0.00 to 999.00 Operator 1 Input A <Unused = 0> Operator 2 Input B <Unused = 0> Operator 3 Input C <Unused = 0> Operator 4 Input D <Unused = 0> Operator 5 Input E <Unused = 0> PL 6 [ProLogic 6] ProLogic 6 Disabled Target Enabled Pickup Delay 0.00 s 0.00 to 999.00 Dropout Delay 0.00 s 0.00 to 999.00 s 0.00 to 999.00 Operator 1 Input A <Unused = 0> Operator 2 Input B <Unused = 0> Operator 3 Input C <Unused = 0> Operator 4 Input D <Unused = 0> Operator 5 Input E <Unused = 0> PL 7 [ProLogic 7] Appendix B-16 ProLogic 7 Disabled Target Enabled Pickup Delay 0.00 T-PRO User Manual 8700 D01386R04.20 Appendix B IED Settings and Ranges T-PRO Settings Summary Name Symbol/Value Unit Range Dropout Delay 0.00 s 0.00 to 999.00 Operator 1 Input A <Unused = 0> Operator 2 Input B <Unused = 0> Operator 3 Input C <Unused = 0> Operator 4 Input D <Unused = 0> Operator 5 Input E <Unused = 0> PL 8 [ProLogic 8] ProLogic 8 Disabled Target Enabled Pickup Delay 0.00 s 0.00 to 999.00 Dropout Delay 0.00 s 0.00 to 999.00 Operator 1 Input A <Unused = 0> Operator 2 Input B <Unused = 0> Operator 3 Input C <Unused = 0> Operator 4 Input D <Unused = 0> Operator 5 Input E <Unused = 0> PL 9 [ProLogic 9] ProLogic 9 Disabled Target Enabled Pickup Delay 0.00 s 0.00 to 999.00 Dropout Delay 0.00 s 0.00 to 999.00 Operator 1 Input A <Unused = 0> Operator 2 Input B <Unused = 0> Operator 3 Input C <Unused = 0> Operator 4 D01386R04.20 T-PRO User Manual 8700 Appendix B-17 Appendix B IED Settings and Ranges T-PRO Settings Summary Name Symbol/Value Input D <Unused = 0> Unit Range Operator 5 Input E <Unused = 0> PL 10 [ProLogic 10] ProLogic 10 Disabled Target Enabled Pickup Delay 0.00 s 0.00 to 999.00 Dropout Delay 0.00 s 0.00 to 999.00 s 0.2 to 2.0 minutes/sample 3 to 60 Operator 1 Input A <Unused = 0> Operator 2 Input B <Unused = 0> Operator 3 Input C <Unused = 0> Operator 4 Input D <Unused = 0> Operator 5 Input E <Unused = 0> Record Length Appendix B-18 Fault Record Length 0.5 Thermal Logging Disabled Trend Sample Rate 3 T-PRO User Manual 8700 D01386R04.20 Appendix C Hardware Description The T-PRO is a sophisticated transformer protection relay with integral highquality fault recording. External Input and Comm Board The T-PRO Relay has 9 channels of external inputs provided by the External Input and Comm Board. Inputs are optically isolated, factory pre-set to the customer’s requested voltage level. Two dual-range user-selectable external-input voltage-level model of the External Input and Comm Board are available. This allows you to select between 48 Vdc and 125 Vdc or 125 Vdc and 250 Vdc (nominal) on a per input basis. The External Input and Comm Board also provides the relay with two rearpanel RS-232 ports, IRIG-B time synchronization input, and optional network or telephone connection. The RS-232 ports are female DB-9S connectors, IRIG-B is a male BNC, and network or telephone is a female RJ-45 modular jack. Relay Output and DC Analog Input Board The Relay Output Board provides 14 normally open contact outputs for relaying, alarms and control, one normally closed output contact for indicating proper relay operation. This board also provides two 4-20mA current inputs and one unregulated 30 Vdc supply. Power Supply Board The power supply operates from 40 to 300 Vdc or 120 Vac +- 20% at 50/60 Hz. This wide operating range provides easier installation by eliminating power supply ordering options. AC Analog Input Board The AC Analog Input Board has 15 current transformer inputs and 3 potential transformer inputs for ac current and voltage inputs. On-board anti-aliasing filters provide accurate and secure digitization of the ac input signals. Main Processor Board (MPB) The MPB has analog data acquisition, high-speed digital signal processing for triggering and data conversion, communications, and interface logic to perform the core functions of the relay. The Digital Signal Processor (DSP) on a MPB performs the protective relaying functions of the relay, separate from the 486 CPU. It has its own flash memory and self-checking for fully independent operation. The Main Processor Board has: • 24 channels of high-speed 12 bit-plus-sign analog-to-digital conversion • Re-programmable flash memory for the DSP allows independent relay operation and field software upgrades • Floating point DSP for fast capture and manipulation of data • Standard RS-232 serial communications ports • High speed link between DSP and 486 processors • Time synchronism processor with automatic detection of modulated and unmodulated IRIG-B • Sophisticated fault detection and “watchdog” recovery hardware D01386R04.20 T-PRO User Manual 8700 Appendix C-1 Appendix C Hardware Description 486 CPU Board A 486-class CPU provides data storage, information management, housekeeping, and communications for the relay. The 486 runs a real-time operating system optimized for high speed, high precision computing. The 486 provides sophisticated facilities for communications and field software updates. Local and wide area networking is supported by providing the relay with a path to future networking capability. A highly reliable solid-state flash disk on the CPU board provides the operating software for the 486, and stores the relay’s recordings. Front Panel Board The Front Panel Board provides visual indication of the status of the relay, an alphanumeric display and keypad for system monitoring, and a front-panel RS232 port. Relay Output and DC Analog Input Board (DC Analog Inputs are optional, only used on T-PRO) External Input and Comm Board Power Supply Board AC Analog Input Board 486 CPU Board Main Processor Board Front Panel Board Appendix C-2 T-PRO User Manual 8700 D01386R04.20 Appendix D Event Messages T-PRO Event Messages Event Log Message Notes 87: Trip on ABC The possible phase information is: •A •B •C •N • AB • BC • CA • ABC 87N-HV: Trip 87N-LV: Trip 87N-TV: Trip 51-HV: Trip 50-HV: Trip 51-LV: Trip 50-LV: Trip 51-TV: Trip 50-TV: Trip 51N-HV: Trip 50N-HV: Trip 51N-LV: Trip 50N-LV: Trip 51N-TV: Trip 50N-TV: Trip 67: Trip 24INV: Trip 24DEF: Trip 59N Trip 60: Alarm 51-HV: Alarm 51-LV: Alarm 51-TV: Alarm 51N-HV: Alarm 51N-LV: Alarm 51N-TV: Alarm 67: Alarm 24INV: Alarm 59N: Alarm THD Exceeds Limit: Alrm D01386R04.20 T-PRO User Manual 8700 Appendix D-1 Appendix D Event Messages T-PRO Event Messages Ambient (P1) - Range: Alrm P1 - could be Over or Under Top Oil (P1) - Range: Alrm P1 - could be Over or Under TOEWS: 15 min Alarm TOEWS: 30 min Alarm TOEWS: Trip 49-1: Trip/Alarm 49-2: Trip/Alarm 49-3: Trip/Alarm 49-4: Trip/Alarm 49-5: Trip/Alarm 49-6: Trip/Alarm 49-7: Trip/Alarm 49-8: Trip/Alarm 49-9: Trip/Alarm 49-10: Trip/Alarm 49-11: Trip/Alarm 49-12: Trip/Alarm 81-1: Trip 81-2: Trip 81-3: Trip 81-4: Trip Appendix D-2 27-1: Trip on ABC 27-2: Trip on ABC The possible phase information is: •A •B •C •N • AB • BC • CA • ABC l*l*t Alarm on ABC The possible phase information is: •A •B •C •N • AB • BC • CA • ABC ProLogic Name: PLn ProLogic outputs names are user-assigned Where n = 1 to 10 External Input Name: EIn: High External input names are user-assigned Where n = 1 to 9 External Input Name: EIn Low External Input names are user-assigned Where n = 1 to 9 Output Contacts name: Out n: Open Output contact names are user-assigned Where n= 1 to 14 Output Contact name: Out n = Closed Output contact names are user-assigned Where n= 1 to 14 Self Check: DC Ch.n: Alarm Continuous dc level on Ch. n, where n = 1 to 18. T-PRO User Manual 8700 D01386R04.20 Appendix D Event Messages T-PRO Event Messages Self Check: DC Alarm Reset Continuous dc level, condition has reset. Self Check: DC Ch.n: O/P Block Continuous dc level on Ch. n, where n = 1 to 18. New Setting Loaded Manual settings load request completed Completion of user-initiated settings change Unit recalibrated Unit restarted User logged in Details of Failure Modes T-PRO Relay Inputs Outputs User DSP Digital Signal Processor X86 Microprocessor Watch-dog Watch-dog Laptop or Remote Connection System Failure or Self Check Fail DSP Failure Relay Functional on front panel goes from green to off The Master Relay is deenergized. Two of its contacts open, disconnecting all power to the other auxiliary relays. A separate contact labelled, Relay Inoperative on the rear panel closes to activate a remote alarm. DSP-to-X86 Communication Failure or Self Check Fail Service Required on front panel goes from off to red Self Check Fail to user-selectable aux. output relay contacts close. The watch-dog repeatedly attempts to re-start the DSP for diagnostic purposes. The green light stays off and the relays remain de-energized, even for a successful re-start. Only a power-down/power-up will reset the LED to green and re-energize the relays. D01386R04.20 T-PRO User Manual 8700 Appendix D-3 Appendix D Event Messages Note: For either of the above cases the DSP controller functions continue with normal auxiliary relay outputs provided that DSP failure or Self Check Fail: Block has not occurred. Self Check Fail due to DC Offset Detector The DSP has an algorithm that detects continuous dc levels on the analog inputs and initiates alarms and relay output contact blocking when the measured dc level exceeds the Alarm or Block level. The Alarm level is intended to provide an early indication of a problem. The Block level blocks the relay from false-tripping by preventing any output contact from closing. The Relay Functional LED turns off, but the protection functions will operate normally, with the exception that the output contacts will not be allowed to close. The Relay Inoperative contact will close for a Block condition. The following table describes all the Alarm/Block indication functions. Action Condition Alarm Relay Functional LED off Block X Service Required LED on X X Self Check Fail Signal high X X Relay Inoperative Contact closed X Output Contacts held open X Event Log Message X X Status available through SCADA X X The Self Check Fail signal, which is available in the Output Matrix, TUI metering and SCADA, can be used to signal an alarm. Note that if this signal is mapped to an output contact, the contact which it is mapped to will only be closed for an alarm condition. If the relay is in the Block condition, the Relay Inoperative contact must be used to signal an alarm. The status of the Self Check Fail is available through the SCADA services provided by the T-PRO. The digital signal Self Check Fail will indicate that DSP has detected a continuous dc level and the analog metering value Self Check Fail Parameter is used to indicate which condition, Alarm or Block. The failure types and which analog values they are associated with are described in the table below. Both signals are available in DNP and Modbus. Appendix D-4 Point Value Condition 0 Normal 1 Alarm 2 Block 3 Alarm has evolved to block T-PRO User Manual 8700 D01386R04.20 Appendix D Event Messages The Alarm condition is allowed to reset if the continuous dc level drops below the pickup level. The Block condition has no reset level. If power is cycled to the relay it will go into its normal state until the continuous dc level is detected again. D01386R04.20 T-PRO User Manual 8700 Appendix D-5 Appendix E Modbus RTU Communication Protocol The SCADA port supports DNP3 and Modicon Modbus protocols. All metering values available through the terminal user interface are also available through the Modbus protocol. Additionally, the Modbus protocol supports the reading of unit time and time of the readings, and provides access to trip and alarm events, including fault location information. A “Hold Readings” function is available to freeze all metering readings into a snapshot (see Force Single Coil function, address 0). Read Coil Status D01386R04.20 Channel Address Value Hold Readings 00001 0: Readings not held 1: Readings held Reserved 00257 Reserved Reserved Output Contact 1 00513 0: Contact Open (inactive) 1: Contact Closed (active) Output Contact 2 00514 0: Contact Open (inactive) 1: Contact Closed (active) Output Contact 3 00515 0: Contact Open (inactive) 1: Contact Closed (active) Output Contact 4 00516 0: Contact Open (inactive) 1: Contact Closed (active) Output Contact 5 00517 0: Contact Open (inactive) 1: Contact Closed (active) Output Contact 6 00518 0: Contact Open (inactive) 1: Contact Closed (active) Output Contact 7 00519 0: Contact Open (inactive) 1: Contact Closed (active) Output Contact 8 00520 0: Contact Open (inactive) 1: Contact Closed (active) Output Contact 9 00521 0: Contact Open (inactive) 1: Contact Closed (active) Output Contact 10 00522 0: Contact Open (inactive) 1: Contact Closed (active) Output Contact 11 00523 0: Contact Open (inactive) 1: Contact Closed (active) Output Contact 12 00524 0: Contact Open (inactive) 1: Contact Closed (active) Output Contact 13 00525 0: Contact Open (inactive) 1: Contact Closed (active) Output Contact 14 00526 0: Contact Open (inactive) 1: Contact Closed (active) Dev 87 Trip 00769 0: Off (inactive) 1: On (active) Dev 87 Restrain 00770 0: Off (inactive) 1: On (active) Dev 87 Fast Trip 00771 0: Off (inactive) 1: On (active) Dev 51HV Trip 00772 0: Off (inactive) 1: On (active) Dev 51HV Alarm 00773 0: Off (inactive) 1: On (active) Dev 50HV Trip 00774 0: Off (inactive) 1: On (active) Dev 51LV Trip 00775 0: Off (inactive) 1: On (active) Dev 51LV Alarm 00776 0: Off (inactive) 1: On (active) Dev 50LV Trip 00777 0: Off (inactive) 1: On (active) Dev 51TV Trip 00778 0: Off (inactive) 1: On (active) T-PRO User Manual 8700 Appendix E-1 Appendix E Modbus RTU Communication Protocol Appendix E-2 Dev 51TV Alarm 00779 0: Off (inactive) 1: On (active) Dev 50TV Trip 00780 0: Off (inactive) 1: On (active) Dev 51NHV Trip 00781 0: Off (inactive) 1: On (active) Dev 51NHV Alarm 00782 0: Off (inactive) 1: On (active) Dev 50NHV Trip 00783 0: Off (inactive) 1: On (active) Dev 51NLV Trip 00784 0: Off (inactive) 1: On (active) Dev 51NLV Alarm 00785 0: Off (inactive) 1: On (active) Dev 50NLV Trip 00786 0: Off (inactive) 1: On (active) Dev 51NTV Trip 00787 0: Off (inactive) 1: On (active) Dev 51NTV Alarm 00788 0: Off (inactive) 1: On (active) Dev 50NTV Trip 00789 0: Off (inactive) 1: On (active) Dev 67 Trip 00790 0: Off (inactive) 1: On (active) Dev 67 Alarm 00791 0: Off (inactive) 1: On (active) Dev 24INV Trip 00792 0: Off (inactive) 1: On (active) Dev 24INV Alarm 00793 0: Off (inactive) 1: On (active) Dev 24DEF Trip 00794 0: Off (inactive) 1: On (active) Dev 59N Trip 00795 0: Off (inactive) 1: On (active) Dev 59N Alarm 00796 0: Off (inactive) 1: On (active) Dev 60 Alarm 00797 0: Off (inactive) 1: On (active) THD Alarm 00798 0: Off (inactive) 1: On (active) Self Check Fail 00799 0: Off (inactive) 1: On (active) Ambient Temp Alarm 00800 0: Off (inactive) 1: On (active) Top Oil Temp Alarm 00801 0: Off (inactive) 1: On (active) Dev 49-1 Trip/Alarm 00802 0: Off (inactive) 1: On (active) Dev 49-2 Trip/Alarm 00803 0: Off (inactive) 1: On (active) Dev 49-3 Trip/Alarm 00804 0: Off (inactive) 1: On (active) Dev 49-4 Trip/Alarm 00805 0: Off (inactive) 1: On (active) Dev 49-5 Trip/Alarm 00806 0: Off (inactive) 1: On (active) Dev 49-6 Trip/Alarm 00807 0: Off (inactive) 1: On (active) Dev 49-7 Trip/Alarm 00808 0: Off (inactive) 1: On (active) Dev 49-8 Trip/Alarm 00809 0: Off (inactive) 1: On (active) Dev 49-9 Trip/Alarm 00810 0: Off (inactive) 1: On (active) Dev 49-10 Trip/Alarm 00811 0: Off (inactive) 1: On (active) Dev 49-11 Trip/Alarm 00812 0: Off (inactive) 1: On (active) Dev 49-12 Trip/Alarm 00813 0: Off (inactive) 1: On (active) Dev 87NHV Trip 00814 0: Off (inactive) 1: On (active) Dev 87NLV Trip 00815 0: Off (inactive) 1: On (active) Dev 87NTV Trip 00816 0: Off (inactive) 1: On (active) TOEWS 15 Minute Alarm 00817 0: Off (inactive) 1: On (active) TOEWS 30 Minute Alarm 00818 0: Off (inactive) 1: On (active) T-PRO User Manual 8700 D01386R04.20 Appendix E Modbus RTU Communication Protocol TOEWS Trip 00819 0: Off (inactive) 1: On (active) ProLogic 1 Trip 00820 0: Off (inactive) 1: On (active) ProLogic 2 Trip 00821 0: Off (inactive) 1: On (active) ProLogic 3 Trip 00822 0: Off (inactive) 1: On (active) ProLogic 4 Trip 00823 0: Off (inactive) 1: On (active) ProLogic 5 Trip 00824 0: Off (inactive) 1: On (active) ProLogic 6 Trip 00825 0: Off (inactive) 1: On (active) ProLogic 7 Trip 00826 0: Off (inactive) 1: On (active) ProLogic 8 Trip 00827 0: Off (inactive) 1: On (active) ProLogic 9 Trip 00828 0: Off (inactive) 1: On (active) ProLogic 10 Trip 00829 0: Off (inactive) 1: On (active) 81-1 Trip 00830 0: Off (inactive) 1: On (active) 81-2 Trip 00831 0: Off (inactive) 1: On (active) 81-1 Trip 00832 0: Off (inactive) 1: On (active) 81-2 Trip 00833 0: Off (inactive) 1: On (active) 27-1 Trip 00834 0: Off (inactive) 1: On (active) 27-2 Trip 00835 0: Off (inactive) 1: On (active) l*l*t Alarm 00836 0: Off (inactive) 1: On (active) Read Input Status Channel Address Value External I/P 1 10001 0: off (inactive), 1: on (active) External I/P 2 10002 0: off (inactive), 1: on (active) External I/P 3 10003 0: off (inactive), 1: on (active) External I/P 4 10004 0: off (inactive), 1: on (active) External I/P 5 10005 0: off (inactive), 1: on (active) External I/P 6 10006 0: off (inactive), 1: on (active) External I/P 7 10007 0: off (inactive), 1: on (active) External I/P 8 10008 0: off (inactive), 1: on (active) External I/P 9 10009 0: off (inactive), 1: on (active) Read Holding register table Channel Address Units Scale T-PRO Clock Time (UTC). Read all in same query to ensure consistent time reading data. D01386R04.20 Milliseconds Now 40001 0-999 1 Seconds Now 40002 0-59 1 T-PRO User Manual 8700 Appendix E-3 Appendix E Modbus RTU Communication Protocol Minutes Now 40003 0-59 1 Hours Now 40004 0-23 1 Day of Year Now 40005 1-365 (up to 366 if leap year) 1 Years since 1900 40006 90-137 1 Sync’d to IRIG-B 40007 0: No 1: Yes 1 Time of Acquisition (UTC). Read all in same query to ensure consistent time reading data. Appendix E-4 Milliseconds Now 40008 0-999 1 Seconds Now 40009 0-59 1 Minutes Now 40010 0-59 1 Hours Now 40011 0-23 1 Day of Year Now 40012 1-365 (up to 366 if leap year) 1 Years since 1900 40013 90-137 1 Sync’d to IRIG-B 40014 0: No 1: Yes 1 Offset of UTC to IED local time. 40015 2’s complement half hours, North America is negative 1 T-PRO User Manual 8700 D01386R04.20 Appendix E Modbus RTU Communication Protocol Read Holding register table D01386R04.20 Channel Address Units Scale Va Magnitude 257 KV 10 Va Angle 258 Degrees 10 Vb Magnitude 259 kV 10 Vb Angle 260 Degrees 10 Vc Magnitude 261 kV 10 Vc Angle 262 Degrees 10 Positive Sequence Voltage 263 kV 10 Positive Sequence Current 264 A 1 Instantaneous Watts 265 MW 10 Instantaneous VARs 266 MVAR 10 I1a Magnitude 267 A 1 I1a Angle 268 Degrees 10 I1b Magnitude 269 A 1 I1b Angle 270 Degrees 10 I1c Magnitude 271 A 1 I1c Angle 272 Degrees 10 I2a Magnitude 273 A 1 I2a Angle 274 Degrees 10 I2b Magnitude 275 A 1 I2b Angle 276 Degrees 10 I2c Magnitude 277 A 1 I2c Angle 278 Degrees 10 I3a Magnitude 279 A 1 I3a Angle 280 Degrees 10 I3b Magnitude 281 A 1 I3b Angle 282 Degrees 10 I3c Magnitude 283 A 1 I3c Angle 284 Degrees 10 I4a Magnitude 285 A 1 I4a Angle 286 Degrees 10 I4b Magnitude 287 A 1 I4b Angle 288 Degrees 10 I4c Magnitude 289 A 1 I4c Angle 290 Degrees 10 I5a Magnitude 291 A 1 I5a Angle 292 Degrees 10 T-PRO User Manual 8700 Appendix E-5 Appendix E Modbus RTU Communication Protocol Appendix E-6 I5b Magnitude 293 A 1 I5b Angle 294 Degrees 10 I5c Magnitude 295 A 1 I5c Angle 296 Degrees 10 HVa Current Magnitude 297 A 1 HVa Current Angle 298 Degrees 10 HVb Current Magnitude 299 A 1 HVb Current Angle 300 Degrees 10 HVc Current Magnitude 301 A 1 HVc Current Angle 302 Degrees 10 LVa Current Magnitude 303 A 1 LVa Current Angle 304 Degrees 10 LVb Current Magnitude 305 A 1 LVb Current Angle 306 Degrees 10 LVc Current Magnitude 307 A 1 LVc Current Angle 308 Degrees 10 TVa Current Magnitude 309 A 1 TVa Current Angle 310 Degrees 10 TVb Current Magnitude 311 A 1 TVb Current Angle 312 Degrees 10 TVc Current Magnitude 313 A 1 TVc Current Angle 314 Degrees 10 Ia Operating 315 A 1 Ib Operating 316 A 1 Ic Operating 317 A 1 Ia Restraint 318 A 1 Ib Restraint 319 A 1 Ic Restraint 320 A 1 Frequency 321 Hz 100 DC1 322 mA 100 DC2 323 mA 100 HV Current 324 p.u. 100 LV Current 325 p.u. 100 TV Current 326 p.u. 100 TOEWS Minutes to trip 327 Minutes 1 Self Check Fail Parameter 328 N/A 1 Ambient Temperature 513 c 10 Top Oil Temperature 514 c 10 Hot Spot Temperature 515 c 10 Loss of Life 516 p.u. 100 T-PRO User Manual 8700 D01386R04.20 Appendix E Modbus RTU Communication Protocol Pickup Level 517 p.u. 100 THD 518 % 100 Accumulated IA*Ia*t 519 KA*KA*S 10 Accumulated IB*IB*t 520 KA*KA*S 10 Accumulated IC*IC*t 521 KA*KA*S 10 Accumulated Through Fault Count 522 N/A 1 Read Input Register (Function Code 04) No input registers supported. Response from IED indicates “ILLEGAL FUNCTION.” Force Single Coil (Function Code 05) Only the “hold readings” coil can be forced. When active, this coil locks all coil, input and holding register readings simultaneously at their present values. When inactive, coil, input and holding register values read their most recently available state. Channel Type Address Value Hold Readings Read/Write 01 0000: Readings update normally (inactive) FF00: Hold readings (active) Preset Single Register (Function Code 06) Channel Address Value Scaled Up By Refresh event list 40769 No data required N/A Acknowledge the current event and get the next event 40770 No data required N/A Get the next event (without acknowledge) 40771 No data required N/A Event Message Control (See below for details of use) Diagnostic Subfunctions (Function Code 08) D01386R04.20 Return Query Data (Subfunction 00) This provides an echo of the submitted message. Restart Comm. Option (Subfunction 01) This restarts the Modbus communications process. Force Listen Only Mode (Subfunction 04) No response is returned. IED enters “Listen Only” mode. This mode can only be exited by the “Restart Comm. Option” command. T-PRO User Manual 8700 Appendix E-7 Appendix E Modbus RTU Communication Protocol Report Slave ID (Function Code 17/0x11) A fixed response is returned by the IED, including system model, version and issue numbers. Channel Type Bytes Value Model Number Read Only 0 and 1 0 x 21FC = 8700 decimal Version Number Read Only 2 and 3 Version number Issue Number Read Only 4 and 5 Issue number • The T-PRO IED model number is 8700. • Version and issue will each be positive integers, say X and Y. • The T-PRO is defined by as “Model 8700, Version X Issue Y”. Accessing T-PRO Event Information All T-PRO detector event messages displayed in the Event Log are available through Modbus. The following controls are available. Appendix E-8 Refresh Event List (Function Code 6, address 40769): Fetches the latest events from the T-PRO’s event log and makes them available for Modbus access. The most recent event becomes the current event available for reading. Acknowledge Current Event and Get Next Event (Function Code 6, address 40770): Clears the current event from the read registers and places the next event into them. An acknowledged event is no longer available for reading. Get Next Event (Function Code 6, address 40771): Places the next event in the read registers without acknowledging the current event. The current event reappears in the list when Refresh Event List is used. Size of Current Event Message (Function Code 3, address 40772): Indicates the number of 16 bit registers used to contain the current event. Event data is stored with two characters per register. A reading of zero indicates that there are no unacknowledged events available in the current set. (N.B. The Refresh Event List function can be used to check for new events that have occurred since the last Refresh Event List.) Read Event Message (Function Code 3, addresses 40774 - 40832): Contains the current event message. Two ASCII characters are packed into each 16 bit register. All unused registers in the set are set to 0. T-PRO User Manual 8700 D01386R04.20 Appendix E Modbus RTU Communication Protocol Modbus Event Message Example " 2000 Sep21 20:16:16.966: Diff. (87) on ABC: Trip Register D01386R04.20 Value Meaning High Byte Low Byte 40772 0x00 0x1D Event text size = 29 (0x1D hex) 40773 0x20 0x20 ’<sp>’, ’<sp>’ 40774 0x32 0x30 ‘2’, ‘0’ 40775 0x30 0x30 ‘0’, ‘0’ 40776 0x53 0x65 ‘S’, ‘e’ 40777 0x70 0x32 ‘p’, ‘2’ 40778 0x31 0x20 ‘1’, ‘<sp>’ 40779 0x32 0x30 ‘2’, ‘0’ 40780 0x3A 0x31 ‘:’, ‘1’ 40781 0x36 0x3A ‘6’, ‘:’ 40782 0x31 0x36 ‘1’, ‘6’ 40783 0x2E 0x39 ‘.’, ‘9’ 40784 0x36 0x36 ‘6’, ‘6’ 40785 0x20 0x3A ‘<sp>’, ‘:’ 40786 0x20 0x44 ‘<sp>’, ‘D’ 40787 0x69 0x66 ‘ i’, ‘f’ 40788 0x66 0x2E ‘f’, ‘. ‘ 40789 0x20 0x28 ‘<sp>’, ‘(’ 40790 0x38 0x37 ‘8’, ‘7’ 40791 0x29 0x20 ‘)’, ‘ ’ 40792 0x6F 0x6E ‘o’, ‘ n‘ 40793 0x20 0x41 ‘<sp>’, ‘A’ 40794 0x42 0x43 ‘B ’, ‘C’ 40795 0x3A 0x20 ‘:’, ‘<sp>’ 40796 0x54 0x72 ’T’,’r’ 40797 0x69 0x70 ’i’, ’p’ T-PRO User Manual 8700 Appendix E-9 Appendix F DNP3 Communication Protocol The SCADA port supports DNP3. All metering values available through the terminal user interface are available by DNP3 protocol. Included are the device profile, implementation table and the point list for the DNP3 protocol. Device Profile Vendor Name: ERLPhase Power Technologies Ltd. Device Name: Relay Model # Highest DNP Level Supported: Device Function: For Requests: 2 _ Master For Responses: 2 x Slave Maximum Data Link Frame Size (octets): Maximum Application Frame Size (octets): Transmitted: 292 Transmitted: 2048 Received: 292 Received: 2048 Maximum Data Link Re-tries: Maximum Application Layer Re-tries: _ None x None x Fixed at 3 _ Configurable, range __ to __ _ Configurable, range __ to __ Requires Data Link Layer Confirmation: Requires Application Layer Confirmation: _ Never _ Never _ Always _ Always (not recommended) _ Sometimes x When reporting Event Data (Slave) x Configurable, either always or never x When sending multi-fragment responses (Slave) _ Sometimes _ Configurable Timeouts (in seconds) while waiting for: Data Link Confirm __None x Fixed at 2 __Variable __Configurable Complete Application Fragment x None __Fixed at 2 __Variable __Configurable Application Confirm __None x Fixed at 5 __Variable __Configurable Complete Application Response x None __Fixed at 2 __Variable __Configurable x Fixed at 10 __Variable __Configurable Others__________________________ Select to execute delay __None Sends/Executes Control Operations: WRITE Binary Outputs x Never __Always __Sometimes __Configurable SELECT/OPERATE __Never x Always __Sometimes __Configurable DIRECT OPERATE __Never x Always __Sometimes __Configurable DIRECT OPERATE No ACK __Never x Always __Sometimes __Configurable Count > 1 x Never __Always __Sometimes __Configurable Pulse On __Never x Always __Sometimes __Configurable Pulse Off x Never __Always __Sometimes __Configurable Latch On __Never x Always __Sometimes __Configurable Latch Off __Never x Always __Sometimes __Configurable Queue x Never __Always __Sometimes __Configurable Clear Queue x Never __Always __Sometimes __Configurable Maximum number of control objects per request: 16 Notes: Control Trip/Close - Code Combination supported: Latch On/NUL Latch Off/NUL Pulse On/NUL (Pulse duration fixed at 1 s) D01386R04.20 Report Binary Input Change Events when no specific variation requested: Reports time-tagged Binary Input Change Events when no specific variation requested __Never __Never __Only time-tagged x Binary Input Change with Time x Only non-time-tagged _ Binary Input Change with Relative Time _ Configurable to send both, one or the other _ Configurable Sends Unsolicited Response: Sends Static Data in Unsolicited Responses: x Never x Never _ Configurable _ When Device Restarts _Only certain objects _ When Status Flags Change _ Sometimes No other options are permitted. T-PRO User Manual 8700 Appendix F-1 Appendix F DNP3 Communication Protocol _ ENABLE/DISABLE UNSOLICITED Function codes supported Default Counter Object/Variation: Counters Roll Over at: x No Counter Reported x No Counters Reported _ Configurable _ Configurable _ Default Object ________________ _ 16 Bits _ Default Variation _______________ _ 32 Bits _ Point-by-point list attached _ Other Value __________________ _ Point-by-point list attached Implementation Table Object Request Grp VAR Description Function Code 1 0 Binary Input - All Variations 1 1 1 Response Qualifier Codes (hex) Function Code Qualifier Codes (hex) 1 (read) 0x00, 0x01, 0x06, 0x07, 0x08, 0x17, 0x28 129 (response) 0x00 Binary Input (default) 1 (read) 0x00, 0x01, 0x06, 0x07, 0x08, 0x17, 0x28 129 (response) 0x00 2 Binary Input with Status 1 (read) 0x00, 0x01, 0x06, 0x07, 0x08, 0x17, 0x28 129 (response) 0x00 2 0 Binary Input Change - All Variations 1 (read) 0x06, 0x07, 0x08 129 (response) 0x17 2 1 Binary Input Change without Time 1 (read) 0x06, 0x07, 0x08 129 (response) 0x17 2 2 Binary Input Change with Time (default) 1 (read) 0x06, 0x07, 0x08 129 (response) 0x17 2 3 Binary Input Change with Relative Time 1 (read) 0x06, 0x07, 0x08 129 (response) 0x17 10 0 Binary Output - All Variations 1 (read) 0x00, 0x01, 0x06, 0x07, 0x08, 0x17, 0x28 129 (response) 0x00 10 2 Binary Output Status (default) 1 (read) 0x00, 0x01, 0x06, 0x07, 0x08, 0x17, 0x28 129 (response) 0x00 30 0 Analog Input - All Variations 1 (read) 0x00, 0x01, 0x06, 0x07, 0x08, 0x17, 0x28 129 (response) 0x01 30 1 32-bit Analog Input 1 (read) 0x00, 0x01, 0x06, 0x07, 0x08, 0x17, 0x28 129 (response) 0x01 30 2 16-bit Analog Input 1 (read) 0x00, 0x01, 0x06, 0x07, 0x08, 0x17, 0x28 129 (response) 0x01 30 3 32-bit Analog Input without flag 1 (read) 0x00, 0x01, 0x06, 0x07, 0x08, 0x17, 0x28 129 (response) 0x01 30 4 16-bit Analog Input without flag (default) 1 (read) 0x00, 0x01, 0x06, 0x07, 0x08, 0x17, 0x28 129 (response) 0x01 32 0 Analog Input Change Event - All Variations 1 (read) 0x06, 0x07, 0x08 129 (response) 0x28 32 1 Analog Input Change Event - 32-bit without Time 1 (read) 0x06, 0x07, 0x08 129 (response) 0x28 32 2 Analog Input Change Event - 16-bit without Time (default) 1 (read) 0x06, 0x07, 0x08 129 (response) 0x28 32 3 Analog Input Change Event - 32-bit with Time 1 (read) 0x06, 0x07, 0x08 129 (response) 0x28 32 4 Analog Input Change Event - 16-bit with Time 1 (read) 0x06, 0x07, 0x08 129 (response) 0x28 51 1 Time and Data CTO 129 (response) 0x07, quantity=1 52 1 Time Delay Coarse 129 (response) 0x07, quantity=1 60 1 Class 0 Data Appendix F-2 1 (read) 0x06 T-PRO User Manual 8700 D01386R04.20 Appendix F DNP3 Communication Protocol 60 2 Class 1 Data 1 (read) 0x06, 0x07, 0x08 60 3 Class 2 Data 1 (read) 0x06, 0x07, 0x08 80 1 Internal Indications 2 (write) 0x00, index=7 110 0 Octet String 1 (read) 0x06 129 (response) 0x07 111 0 Octet String Change Event 1 (read) 0x06 129 (response) 0x07 No Object 14 (warm restart) Point List Binary Inputs (Obj 1, 2) Static Points Change Event Points Object Group 1 2 Object Variation 1 – Binary Input (default) 1 – Binary Input Change without Time 2 – Binary Input with Status 1 – Binary Input Change with Time (default) 3 – Binary Input Change with Relative Time Class 0 1 Note: Binary inputs are scanned with 1 ms resolution. Change event buffer size 100 Binary Inputs Point Index Change Event Class External Input 1 0 1 External Input 2 1 1 External Input 3 2 1 External Input 4 3 1 External Input 5 4 1 External Input 6 5 1 External Input 7 6 1 External Input 8 7 1 External Input 9 8 1 Binary Outputs (Obj 10) Static Points Change Event Points Object Group 10 Not Applicable Object Variation 2 – Binary Output Status (default) Not Applicable Class 0 Not Applicable Note: Binary outputs are scanned with 500 ms resolution. No change buffer D01386R04.20 T-PRO User Manual 8700 Appendix F-3 Appendix F DNP3 Communication Protocol Appendix F-4 Binary Outputs Point Index Change Event Class Output Contact 1 0 N/A Output Contact 2 1 N/A Output Contact 3 2 N/A Output Contact 4 3 N/A Output Contact 5 4 N/A Output Contact 6 5 N/A Output Contact 7 6 N/A Output Contact 8 7 N/A Output Contact 9 8 N/A Output Contact 10 9 N/A Output Contact 11 10 N/A Output Contact 12 11 N/A Output Contact 13 12 N/A Output Contact 14 13 N/A Dev 87 Trip 14 N/A Dev 87 Restrain 15 N/A Dev 87 Fast Trip 16 N/A Dev 51HV Trip 17 N/A Dev 51HV Alarm 18 N/A Dev 50HV Trip 19 N/A Dev 51LV Trip 20 N/A Dev 51LV Alarm 21 N/A Dev 50LV Trip 22 N/A Dev 51TV Trip 23 N/A Dev 51TV Alarm 24 N/A Dev 50TV Trip 25 N/A Dev 51NHV Trip 26 N/A Dev 51NHV Alarm 27 N/A Dev 50NHV Trip 28 N/A Dev 51NLV Trip 29 N/A Dev 51NLV Alarm 30 N/A Dev 50NLV Trip 31 N/A Dev 51NTV Trip 32 N/A Dev 51NTV Alarm 33 N/A Dev 50NTV Trip 34 N/A Dev 67 Trip 35 N/A Dev 67 Alarm 36 N/A T-PRO User Manual 8700 D01386R04.20 Appendix F DNP3 Communication Protocol D01386R04.20 Dev 24INV Trip 37 N/A Dev 24INV Alarm 38 N/A Dev 24DEFTrip 39 N/A Dev 59N Trip 40 N/A Dev 59N Alarm 41 N/A Dev 60 Alarm 42 N/A THD Alarm 43 N/A Self Check Fail 44 N/A Ambient Temp Alarm 45 N/A Top Oil Temp Alarm 46 N/A Dev 49-1 Trip/Alarm 47 N/A Dev 49-2 Trip/Alarm 48 N/A Dev 49-3 Trip/Alarm 49 N/A Dev 49-4 Trip/Alarm 50 N/A Dev 49-5 Trip/Alarm 51 N/A Dev 49-6 Trip/Alarm 52 N/A Dev 49-7 Trip/Alarm 53 N/A Dev 49-8 Trip/Alarm 54 N/A Dev 49-9 Trip/Alarm 55 N/A Dev 49-10 Trip/Alarm 56 N/A Dev 49-11 Trip/Alarm 57 N/A Dev 49-12 Trip/Alarm 58 N/A Dev 87NHV Trip 59 N/A Dev 87NLV Trip 60 N/A Dev 87NTV Trip 61 N/A TOEWS 15 Minute Alarm 62 N/A TOEWS 30 Minute Alarm 63 N/A TOEWS Trip 64 N/A ProLogic 1 Trip 65 N/A ProLogic 2 Trip 66 N/A ProLogic 3 Trip 67 N/A ProLogic 4 Trip 68 N/A ProLogic 5 Trip 69 N/A ProLogic 6 Trip 70 N/A ProLogic 7 Trip 71 N/A ProLogic 8 Trip 72 N/A ProLogic 9 Trip 73 N/A ProLogic 10 Trip 74 N/A 81-1 Trip 75 N/A 812 Trip 76 N/A T-PRO User Manual 8700 Appendix F-5 Appendix F DNP3 Communication Protocol 81-1 Trip 77 N/A 81-2 Trip 78 N/A 27-1 79 N/A 27-2 80 N/A l*l*t Alarm 81 N/A Analog Inputs (Obj 30, 31) Static Points Change Event Points Object Group 30 32 Object Variation 1 - 32-bit Analog Input 1 - Analog Input Change - 32-bit without Time 2 - 16-bit Analog Input 2 - Analog Input Change - 16-bit without Time (default) 3 - 32-bit Analog Input without flag 3 - Analog Input Change - 32-bit with Time 4 - 16-bit Analog Input without flag (default) 4 - Analog Input Change - 16-bit with Time 0 2 Class Note: Analog Inputs are scanned with 500 ms resolution. Note: Nominal is based on 69 V secondary voltage * PT ratio for voltage channels, and either 1A or 5A secondary current * CT ratio for current channels dependent upon the format of CT installed in the T-PRO. Change event buffer size Appendix F-6 100 Analog Inputs Point Index Units Scale Change Event Class Deadband Va Magnitude 0 kV 10 2 2% Nominal Va Angle 1 Degrees 10 2 0.5 Degrees Vb Magnitude 2 kV 10 2 2% Nominal Vb Angle 3 Degrees 10 2 0.5 Degrees Vc Magnitude 4 kV 10 2 2% Nominal Vc Angle 5 Degrees 10 2 0.5 Degrees Positive Sequence Voltage 6 kV 10 2 2% Nominal Positive Sequence Current 7 A 1 2 2% Nominal Instantaneous Watts 8 MW 10 2 4% Nominal Instantaneous VARs 9 MVAR 10 2 4% Nominal I1a Magnitude 10 A 1 2 2% Nominal I1a Angle 11 Degrees 10 2 0.5 Degrees I1b Magnitude 12 A 1 2 2% Nominal I1b Angle 13 Degrees 10 2 0.5 Degrees I1c Magnitude 14 A 1 2 2% Nominal I1c Angle 15 Degrees 10 2 0.5 Degrees T-PRO User Manual 8700 D01386R04.20 Appendix F DNP3 Communication Protocol D01386R04.20 I2a Magnitude 16 A 1 2 2% Nominal I2a Angle 17 Degrees 10 2 0.5 Degrees I2b Magnitude 18 A 1 2 2% Nominal I2b Angle 19 Degrees 10 2 0.5 Degrees I2c Magnitude 20 A 1 2 2% Nominal I2c Angle 21 Degrees 10 2 0.5 Degrees I3a Magnitude 22 A 1 2 2% Nominal I3a Angle 23 Degrees 10 2 0.5 Degrees I3b Magnitude 24 A 1 2 2% Nominal I3b Angle 25 Degrees 10 2 0.5 Degrees I3c Magnitude 26 A 1 2 2% Nominal I3c Angle 27 Degrees 10 2 0.5 Degrees I4a Magnitude 28 A 1 2 2% Nominal I4a Angle 29 Degrees 10 2 0.5 Degrees I4b Magnitude 30 A 1 2 2% Nominal I4b Angle 31 Degrees 10 2 0.5 Degrees I4c Magnitude 32 A 1 2 2% Nominal I4c Angle 33 Degrees 10 2 0.5 Degrees I5a Magnitude 34 A 1 2 2% Nominal I5a Angle 35 Degrees 10 2 0.5 Degrees I5b Magnitude 36 A 1 2 2% Nominal I5b Angle 37 Degrees 10 2 0.5 Degrees I5c Magnitude 38 A 1 2 2% Nominal I5c Angle 39 Degrees 10 2 0.5 Degrees HVa Current Magnitude 40 A 1 2 2% Nominal HVa Current Angle 41 Degrees 10 2 0.5 Degrees HVb Current Magnitude 42 A 1 2 2% Nominal HVb Current Angle 43 Degrees 10 2 0.5 Degrees HVc Current Magnitude 44 A 1 2 2% Nominal HVc Current Angle 45 Degrees 10 2 0.5 Degrees LVa Current Magnitude 46 A 1 2 2% Nominal LVa Current Angle 47 Degrees 10 2 0.5 Degrees LVb Current Magnitude 48 A 1 2 2% Nominal LVb Current Angle 49 Degrees 10 2 0.5 Degrees LVc Current Magnitude 50 A 1 2 2% Nominal LVc Current Angle 51 Degrees 10 2 0.5 Degrees TVa Current Magnitude 52 A 1 2 2% Nominal TVa Current Angle 53 Degrees 10 2 0.5 Degrees TVb Current Magnitude 54 A 1 2 2% Nominal TVb Current Angle 55 Degrees 10 2 0.5 Degrees T-PRO User Manual 8700 Appendix F-7 Appendix F DNP3 Communication Protocol Appendix F-8 TVc Current Magnitude 56 A 1 2 2% Nominal TVc Current Angle 57 Degrees 10 2 0.5 Degrees Ia Operating 58 A 1 2 2% Nominal Ib Operating 59 A 1 2 2% Nominal Ic Operating 60 A 1 2 2% Nominal Ia Restraint 61 A 1 2 2% Nominal Ib Restraint 62 A 1 2 2% Nominal Ic Restraint 63 A 1 2 2% Nominal Frequency 64 Hz 100 2 0.05 Hz DC1 65 mA 100 2 0.24mA DC2 66 mA 100 2 0.24mA HV Current 67 p.u. 100 2 0.02 LV Current 68 p.u. 100 2 0.02 TV Current 69 p.u. 100 2 0.02 Ambient Temperature 70 C 10 2 0.5 Top Oil Temperature 71 C 10 2 2 Hot Spot Temperature 72 C 10 2 3 Loss of Life 73 % 100 2 0.02 51 Pickup Level 74 p.u. 100 2 0.02 THD 75 % 100 2 0.25 TOEWS Minutes to trip 76 Minutes 1 2 0.5 Minutes Self Check Fail Parameter 77 N/A 1 2 0.5 Accumulated IA*IA*t 78 kA*kAs 1000 2 0.001 Accumulated IB*IB*t 79 kA*kA*s 1000 2 0.001 Accumulated IC*IC*t 80 kA*kA*s 1000 2 0.001 Accumulated Through Fault count 81 N/A 1 2 1 T-PRO User Manual 8700 D01386R04.20 Appendix F DNP3 Communication Protocol Object 110, 111 - Octet String for Event Log access Object 110 and Object 111 are Octet String objects provide access to the Event Log text of the relay. These objects are described in Technical Bulletin 9701004.zip_71 available from the DNP user group web page (www.dnp.org). Object 110 always contains the most recent event in the relay. Object 111 is the corresponding change event object. As stated in the DNP technical bulletin, the variation of the response object represents the length of the string. The string represents the ASCII values of the event text. The following example shows an event returned through either of the octet string objects. DNP Example: Event Message “ 2000Sep21 20:16:16.966 : Diff. (87) on ABC: Trip” DNP Octet string object contents: D01386R04.20 0x46 0x4C 0x32 0x30 0x30 0x30 0x53 0x65 0x70 0x32 0x31 0x20 0x32 0x30 0x3A 0x31 0x36 0x3A 0x31 0x36 0x2E 0x39 0x36 0x36 0x20 0x3A 0x20 0x44 0x69 0x66 0x66 0x2E 0x20 0x28 0x38 0x37 0x29 0x20 0x6F 0x6E 0x20 0x41 0x42 0x43 0x3A 0x20 0x54 0x72 0x69 0x70 T-PRO User Manual 8700 Appendix F-9 D01386R04.20 T-PRO User Manual 8700 5.25" 0.34" Transformer Protection Relay Model 8700 T-PRO 19.00" Date & View Time Readings 18.31" View LogsS Previous Top View 17.17" Next Target Clear Target Port 1 Alarm Test Mode Service Required IRIG-B Functional Relay Functional ø 0.25" 4.75" 0.25" 11.37" 12.12" Side View Panel cut out hole: 17.19" x 5.17" 5.15" Appendix G Mechanical Drawings Figure G.1: Mechanical Drawing Appendix G-1 Appendix G-2 232.6 mm (9.16") 131.3 mm (5.17") T-PRO User Manual 8700 CL (18.31") 465.1 mm (17.19") 436.6 mm Cut Out Template 14.2 mm (.56") ø 6.4 mm (.25") 5.3 mm (.21") 120.7 mm (4.75") Appendix G Mechanical Drawings Figure G.2: Cut-out Template D01386R04.20 Appendix G Mechanical Drawings Top View 307.9 mm (12.12") 161.9 mm (6.38") T-PRO TransformerProtection Relay Model 8700 Relay Functional IRIG-B Functional 432.1 mm 482.6 mm (17.01") (19.00") Service Required Side View 436.2 mm (17.18") Test Mode Alarm Date & View Time Readings View Logs Previous Next Target Clear Target Port 1 13.0 mm (.51") 6.4 mm (.25") 15.6 mm (.62") 120.7 mm (4.75") 6.4 mm (.25") 303.1 mm (11.94") Figure G.3: Vertical Mount Mechanical Drawing D01386R04.20 T-PRO User Manual 8700 Appendix G-3 Appendix G Mechanical Drawings 120.7 mm (4.75") 5.3 mm (.21") 9.0 mm (.36") 11.6 mm (.46") ø 6.4 mm (.25") 2.4 mm (.09") 14.2 mm (.56") Holes for APT Vertical Mount 4 places ø 6.4 mm(ø 0.25") Retrofit Installation New Installation Cut Out Template ABB Type FT42 Cut (ref. ABB dwg 57D79 465.1 mm 436.6 mm (18.31") (17.19") C L C L 131.3 mm (5.17") 232.6 mm (9.16") (.09") 2.4 mm Figure G.4: Vertical Mount Cut-out Template Appendix G-4 T-PRO User Manual 8700 D01386R04.20 D01386R04.20 T-PRO User Manual 8700 5A, 60Hz In, Freq. Output Contacts External Inputs 300 200 I1 A 301 201 Relay Inoperative 302 202 303 I1 B 203 Out 1 103 102 100 101 125VDC + 2 - 125VDC + 1 - 125VDC 105 304 204 305 I1 C 205 Out 2 104 + 3 - 125VDC 107 306 206 307 I2 A 207 Out 3 106 + 4 - 125VDC 109 308 208 309 I2 B 209 Out 4 108 + 5 - 125VDC 111 310 210 311 I2 C 211 Out 5 110 + 6 - 125VDC 113 312 212 313 I3 A 213 Out 6 112 + 7 - 125VDC 115 314 214 315 I3 B 215 Out 7 114 + 8 - 125VDC 117 316 216 317 I3 C 318 I4 A PORT 5 319 320 I4 B 321 221 Out 10 220 Unused 219 Out 9 218 AC Current Inputs 217 Out 8 116 + 9 - 322 I4 C 222 323 223 Out 11 IRIG-B PORT 2 324 224 I5 A 325 225 Out 12 326 I5 B 327 227 Out 13 226 Direct / Modem 328 229 329 I5 C 228 Out 14 PORT 3 SCADA 330 VA 230 232 331 VB 332 VC - 333 N 233 Top Oil + AC Voltages 231 - Temperature Inputs Ambient + PORT 4 Unused 334 + - 335 - 235 Power Supply 234 + Unregulated Isolated 30 Vdc Case Gnd Nominal 48 - 250 Vdc 120 Vac Appendix H Rear Panel Drawings Figure H.1: Rear Panel Appendix H-1 Appendix H-2 T-PRO User Manual 8700 5A, 60Hz In, Freq. Output Contacts External Inputs 300 200 I1 A 301 201 Relay Inoperative 302 202 303 I1 B 203 Out 1 103 102 100 101 125VDC + 2 - 125VDC + 1 - 125VDC 105 304 204 305 I1 C 205 Out 2 104 + 3 - 125VDC 107 306 206 307 I2 A 207 Out 3 106 + 4 - 125VDC 109 308 208 309 I2 B 209 Out 4 108 + 5 - 125VDC 111 310 210 311 I2 C 211 Out 5 110 + 6 - 125VDC 113 312 212 313 I3 A 213 Out 6 112 + 7 - 125VDC 115 314 214 315 I3 B 215 Out 7 114 + 8 - 125VDC 117 316 216 317 I3 C 318 I4 A PORT 5 319 320 I4 B 321 221 Out 10 220 Unused 219 Out 9 218 AC Current Inputs 217 Out 8 116 + 9 - 322 I4 C 222 323 223 Out 11 IRIG-B PORT 2 324 224 I5 A 325 225 Out 12 326 I5 B 327 227 Out 13 226 Direct / Modem 328 I5 C 228 329 229 Out 14 PORT 3 SCADA 330 VA 230 232 331 VB 332 VC - 333 N 233 Top Oil + AC Voltages 231 - Temperature Inputs Ambient + PORT 4 Unused 334 + - 335 - 235 Power Supply 234 + Unregulated Isolated 30 Vdc Case Gnd Nominal 48 - 250 Vdc 120 Vac Appendix H Rear Panel Drawings Front Panel Overhang Bottom Figure H.2: Vertical Mount Rear Panel D01386R04.20 D01386R04.20 HV side C B A HV side PT's T-PRO User Manual 8700 IA 1 301 IB 1 IB 1 302 303 IC 1 304 IC 1 305 N IA 2 306 IA 2 307 IB 2 308 IB 2 309 IC 2 310 IC 2 311 IA 3 312 IB 3 IB 3 314 315 IC 3 316 AC Current Inputs IA 3 313 CT Input #3 LV or TV side CT's IC 3 317 IA 4 318 IA 4 319 IB 4 320 IB 4 321 IC 4 322 CT Input #4 IC 4 323 IA 5 324 IA 5 325 IB 5 326 IB 5 327 IC 5 328 CT Input #5 IC 5 329 Notes: 1. If more than 2 current inputs are required, delta or wye inputs would be connected to CT inputs #3,#4, and #5 as needed 2. Phase and magnitude adjustments are done within the relay. If no more than 2 current inputs are required, inputs 3, 4, and 5 can be connected to other sources for recording purposes 3. Unused current inputs should be shorted together & grounded. T-PRO IA 1 300 HV side CT's Power Transformer (Any Configuration Of Windings) VC 332 N 333 AC Voltages VA VB 330 331 Appendix I AC Schematic Drawing Figure I.1: T-PRO AC Schematic Appendix I-1 D01386R04.20 T-PRO User Manual 8700 - 335 + 334 Alarm NC 203 202 - - - 231 233 235 3 + 2 + 234 1 + 209 208 Isolated 30VDC supply 207 206 232 205 204 230 Temperature Inputs (4-20 mA current loop) Ambient Top Oil 201 200 211 210 - 101 1 + In1 100 213 212 - 103 2 + In2 102 215 214 219 218 221 220 223 222 225 224 - 105 3 + In3 104 - 107 4 + In4 106 - 109 5 + In5 108 - 111 6 + In6 110 - 113 7 + In7 112 - 115 8 + In8 114 227 226 External Inputs (90-150 VDC range) 217 216 - 117 9 + In9 116 229 228 Relay Output Relay Contacts Inoperative Out1 Out2 Out3 Out4 Out5 Out6 Out7 Out8 Out9 Out10 Out11 Out12 Out13 Out14 Notes: 1. IRIG-B and comm ports shown separately on T-PRO rear panel layout drawing # 371003. 2. All output relays can be programmed to operate on any relay function. 3. All outputs are rated tripping duty, interrupting via breaker aux "a" contact. (-) (+) 40-250VDC, 120VAC Appendix J DC Schematic Drawing Figure J.1: T-PRO DC Schematic Appendix J-1 Appendix K Function Logic Diagram Diagram in plastic sleeve. D01386R04.20 T-PRO User Manual 8700 Appendix K-1 Appendix L Analog Phase Shift Table D01386R04.20 +30°(-330°) Shift +60°(-300°) Shift Ia – Ib IA = ---------------3 Ia – 2Ib + Ic IA = ------------------------------3 Ib – Ic IB = ---------------3 Ib – 2Ic + Ia IB = ------------------------------3 Ic – Ia IC = ---------------3 Ic – 2Ia + Ib IC = ------------------------------3 +90°(-270°) Shift +120°(-240°) Shift Ic – Ib IA = ---------------3 2Ic – Ia – Ib IA = ------------------------------3 Ia – Ic IB = ---------------3 2Ia – Ib – Ic IB = ------------------------------3 Ib – Ia IC = ---------------3 2Ib – Ic – Ia IC = ------------------------------3 +150°(-210°) Shift -30°(+330°) Shift Ic – Ia IA = ---------------3 Ia – Ic IA = ---------------3 Ia – Ib IB = ---------------3 Ib – Ia IB = ---------------3 Ib – Ic IC = ---------------3 Ic – Ib IC = ---------------3 T-PRO User Manual 8700 Appendix L-1 Appendix L Analog Phase Shift Table Appendix L-2 -60°(+300°) Shift -90°(+270°) Shift Ia – 2Ic + Ib IA = ------------------------------3 Ib – Ic IA = ---------------3 Ib – 2Ia + Ic IB = ------------------------------3 Ic – Ia IB = ---------------3 Ic – 2Ib + Ia IC = ------------------------------3 Ia – Ib IC = ---------------3 -120°(+240°) Shift -150°(+210°) Shift 2Ib – Ic – Ia IA = ------------------------------3 Ib – Ia IA = ---------------3 2Ic – Ia – Ib IB = ------------------------------3 Ic – Ib IB = ---------------3 2Ia – Ib – Ic IC = ------------------------------3 Ia – Ic IC = ---------------3 0° Shift ±180° Shift 2Ia – Ib – Ic IA = ------------------------------3 Ic – 2Ia + Ib IA = ------------------------------3 2Ib – Ic – Ia IB = ------------------------------3 Ia – 2Ib + Ic IB = ------------------------------3 2Ic – Ia – Ib IC = ------------------------------3 Ib – 2Ic + Ia IC = ------------------------------3 T-PRO User Manual 8700 D01386R04.20 Appendix M Loss of Life of Solid Insulation The loss of life calculation equation is based on IEEE Standard C57.91-1995. The per unit rate of loss of life is called the aging acceleration factor (FAA), given by F AA = e 15000 - -------------------15000 ----------------------– 110 + 273 H + 273 per unit. [Eq. (2) of C57.91-1995] where H is the hot spot temperature in degrees celsius. For example, if H = 110°C, then FAA = 1; if H =117°C, then FAA = 2. The definition of “normal lifetime” for a transformer was 65,000 hours (7.42 years) in C57.115-1991. In C57.91-1995 options were given including 65,000 hours, but suggesting that 180,000 (20.55 years) hours was more reasonable. This is really a judgment call. Since the 65,000 hour (7.42 years) figure appears in both versions of the Standard, it was decided to use 7.42 years in the T-PRO software, until a more definitive statement appears. The above equation is the same, regardless of which “end of life” value is chosen. For example, if FAA is on average equal to 0.2 (not unusual) over a period of 20 years, then the loss of life over that period would be (0.2 x 20 years)/(7.42 years) = 54%. The equation in the previous standard (C57.115-1991) is written differently, but is identical mathematically. C57.91-1995 is under review, as of November 2001. A new version may be issued in the year 2002. Adaptive Overcurrent Relay Pickup Level Feature D01386R04.20 There are two basic ideas here, based on ANSI/IEEE Standards C57.92-1981 and C57.115-1991, for Mineral Oil Immersed Power Transformers: 1 When the ambient temperature is low, a transformer can carry more load, when high, less load. 2 It is OK to exceed the transformer rated (hot spot) winding temperature, for a limited time. The T-PRO Relay implements these ideas as follows: When Ambient Temperature Adaptation is selected, the pickup level of the overcurrent protection follows the Allowed Loading curves below, which are calculated in accordance with the Standards. An ambient temperature probe feeds information into the back of the relay. Five different cooling types are accommodated, in accordance with the Standard. T-PRO User Manual 8700 Appendix M-1 Appendix M Loss of Life of Solid Insulation Example 1 Suppose the transformer is 65°C rise, cooling is type 5: Forced Air Cooled (OA/FA/FA) and a “relative rate of loss of life” of “1” has been selected. Then the overload characteristic pickup will automatically be one per unit when the Ambient Temperature is 30°C, because that is the design condition for the transformer. As the ambient temperature deviates from 30°C, the relay pickup will track the lower curve in the diagram, so that for example at -30°C, the overcurrent relay pickup is automatically changed to 1.4 per unit. Conversely, the transformer is automatically de-rated to about 0.93 per unit, if the ambient temperature goes to 40°C. Allowed Loading: 65 degC rise Transformer, Type 5 cooling 2 1.8 Allowed Loading per unit 1.6 1.4 1.2 1 Relative rate of loss of life = 64 (top curve) 32 16 8 4 2 1 (bottom curve 0.8 0.6 0.4 0.2 0 -40 -35 -30 -25 -20 -15 -10 -5 0 5 10 15 Ambient Temp. deg C 20 25 30 35 40 45 50 Figure M.1: Allowed Loading: 65°C Rise Transformer, Type 5 Cooling If a “relative rate of loss of life” of “1” is chosen, and a loading just below pickup were to persist for 24 hours, “normal” i.e. design loss of life would occur. However, loading is seldom this constant. Thus it can be seen that higher rates of loss of life might be reasonably accepted (2, 4, 8, 16, 32). Under such conditions, the continued “trend logging” of internal temperatures and accumulated loss of life become valuable features of the T-PRO Relay. Appendix M-2 T-PRO User Manual 8700 D01386R04.20 Appendix M Loss of Life of Solid Insulation Example 2 Refer to the same curve in “Example 1” in Appendix M. Suppose for the same transformer a “relative rate of loss of life” of “8” has been selected. First, note that this corresponds to a steady-state hot spot temperature of 130°C (see Table “65°C Rise Transformer” in Appendix M on page Appendix M-6), not a dangerous level. Suppose also that the ambient temperature is 35°C. From the curves, the Allowed Loading is 1.1 per unit. In other words, the inverse-time overcurrent relay pickup will adapt to 1.1 per unit. [At an ambient of -25°C, a 48% overload trip level would pertain.] What does this mean? The meaning is that at just under this trip level, the transformer insulation is deteriorating at just under 8 times the normal rate. This is not a problem unless the situation is never ‘balanced’ by lower operating levels, as is usually the case. Another way of looking at this is that the adaptive feature, with settings of rate of loss of life greater than normal, allows temporary overloads. Note that the shape of the inverse-time curve above 2 per unit current is not affected, as shown in for details see Figure M.2: Adaptive Pickup Characteristic on page M-3. Overload Region 0.7 1.0 1.5 Fault Region 2.15 Current per unit Hot day Cold day Figure M.2: Adaptive Pickup Characteristic The “Trend Logging” feature of the T-PRO relay allows you to keep track of the accumulated loss of life to ensure that overloads are not causing a long term problem. D01386R04.20 T-PRO User Manual 8700 Appendix M-3 Appendix M Loss of Life of Solid Insulation Overloading Curves for 65°C Rise Transformers Allowed Loading: 65 degC rise Transformer, Type 1 cooling 2 1.8 Allowed Loading per unit 1.6 1.4 1.2 1 Relative rate of loss of life = 64 (top curve) 32 16 8 4 2 1 (bottom curve 0.8 0.6 0.4 0.2 0 -40 -35 -30 -25 -20 -15 -10 -5 0 5 10 15 Ambient Temp. deg C 20 25 30 35 40 45 50 35 40 45 50 Figure M.3: Allowed Loading: 65°C Rise Transformer, Type 1 Cooling Allowed Loading: 65 degC rise Transformer, Type 2 cooling 2 1.8 Allowed Loading per unit 1.6 1.4 1.2 1 0.8 Relative rate of loss of life = 64 (top curve) 32 16 8 4 2 1 (bottom curve 0.6 0.4 0.2 0 -40 -35 -30 -25 -20 -15 -10 -5 0 5 10 Ambient Temp. deg C 15 20 25 30 Figure M.4: Allowed Loading: 65°C Rise Transformer, Type 2 Cooling Appendix M-4 T-PRO User Manual 8700 D01386R04.20 Appendix M Loss of Life of Solid Insulation Allowed Loading: 65 degC rise Transformer, Type 3 cooling 2 1.8 Allowed Loading per unit 1.6 1.4 1.2 1 0.8 Relative rate of loss of life = 64 (top curve) 32 16 8 4 2 1 (bottom curve 0.6 0.4 0.2 0 -40 -35 -30 -25 -20 -15 -10 -5 0 5 10 15 20 25 30 35 40 45 50 40 45 50 Ambient Temp. deg C Figure M.5: Allowed Loading: 65°C Rise Transformer, Type 3 Cooling Allowed Loading: 65 degC rise Transformer, Type 4 cooling 2 1.8 Allowed Loading per unit 1.6 1.4 1.2 1 0.8 Relative rate of loss of life = 64 (top curve) 32 16 8 4 2 1 (bottom curve 0.6 0.4 0.2 0 -40 -35 -30 -25 -20 -15 -10 -5 0 5 10 15 20 25 30 35 Ambient Temp. deg C Figure M.6: Allowed Loading: 65°C Rise Transformer, Type 4 Cooling D01386R04.20 T-PRO User Manual 8700 Appendix M-5 Appendix M Loss of Life of Solid Insulation Allowed Loading: 65 degC rise Transformer, Type 5 cooling 2 1.8 Allowed Loading per unit 1.6 1.4 1.2 1 Relative rate of loss of life = 64 (top curve) 32 16 8 4 2 1 (bottom curve 0.8 0.6 0.4 0.2 0 -40 -35 -30 -25 -20 -15 -10 -5 0 5 10 15 Ambient Temp. deg C 20 25 30 35 40 45 50 Figure M.7: Allowed Loading: 65°C Rise Transformer, Type 5 Cooling The above curves are for 65°C rise transformers. Curves for 55°C rise transformers can be supplied on request. Each “Relative rate of loss of life” curve is related directly to a specific hot spot temperature as follows: 65°C Rise Transformer Relative Rate of Loss of Life 1 2 4 8 16 32 Hot Spot Temperature °C 110 116 123 130 137 145 Relative Rate of Loss of Life 1 2 4 8 16 32 Hot Spot Temperature °C 95 101 107 113 120 127 55°C Rise Transformer Appendix M-6 T-PRO User Manual 8700 D01386R04.20 Appendix N Top Oil and Hot Spot Temperature Calculation The parameters used in calculating the Top Oil and Hot Spot (Winding) temperatures as functions of the ambient temperature and the load current, are as shown below [Based on IEEE/ANSI Standards C57.115-1991 and C57.921981]. Parameters for 65°C Rise Transformers OA or OW FA 133% or less (Type 1)* (Type 2) FA more than 133% (Type 4) Non-directed FOA or FOW (Type 5) Directed FOA or FOW (Type 3) 25 30 35 35 35 55 50 45 45 45 3.0 2.0 1.25 1.25 1.25 0.08 0.08 0.08 0.08 0.08 R 3.2 4.5 6.5 6.5 6.5 m 0.8 0.8 0.8 0.8 1.0 n 0.8 0.9 0.9 1.0 1.0 Cooling Type H,R TO,R TO W °C °C hours hours Parameters for 55°C Rise Transformers Cooling Type OA or OW FA 133% or less FA more than 133% Non-directed FOA or FOW Directed FOA or FOW H,R 20 25 28 28 28 45 40 37 37 37 3.0 2.0 1.25 1.25 1.25 0.08 0.08 0.08 0.08 0.08 R 3.0 3.5 5.0 5.0 5.0 m 0.8 0.8 0.8 0.8 1.0 n 0.8 0.9 0.9 1.0 1.0 TO,R TO W °C °C hours hours D01386R04.20 T-PRO User Manual 8700 Appendix N-1 Appendix N Top Oil and Hot Spot Temperature Calculation The meanings of the symbols, and the equations used are as follows: H,R rated hot spot rise over top oil in °C TO,R rated top oil rise over ambient in °C TO top oil rise time constant in hours W hot spot (winding) rise time constant in hours R ratio of full load (rated) copper loss to rated iron loss, dimensionless m exponent relating load level to hot spot rise, dimensionless n exponent relating load level to top oil rise, dimensionless The newest version of this Standard, at the time of writing (1998), is C57.911995. The only numerical difference in the new table is for Non-Directed FOA or FOW cooling: n = 0.9 (rather than 1.0). Also, in the new standard, it is recommended that all parameters in the table except m and n should be found “from test.” Of course, this is not usually possible, especially if the transformer is already in service. The temperature calculation equations are most concisely described in block diagram form, for details see for details see Figure N.1: Block Diagram of Top Oil and Hot Spot Temperature Calculation Method on page N-3 (Inputs: per unit load and Ambient Temperature.) and for details see Figure N.2: Block Diagram of Top Oil and Hot Spot Temperature Calculation Method on page N-3 (Inputs: per unit load and Top Oil Temperature.). The two situations are 1 Top Oil temperature not sensed. For this case, the Top Oil temperature is calculated as a rise above the Ambient temperature, and the Hot Spot temperature as a rise above Top Oil temperature. 2 Top Oil temperature is sensed (an electrical analog input to the relay). For this case, the Hot Spot temperature is calculated as a rise above the measured Top Oil temperature. Those parameters not already defined for the equations are as follows: Appendix N-2 H,U ultimate hot spot rise over top oil, in °C H time-varying hot spot rise over top oil, in °C TO,U ultimate top oil rise over ambient, in °C TO time-varying top oil rise over ambient, in °C A ambient temperature, in °C T-PRO User Manual 8700 D01386R04.20 Appendix N Top Oil and Hot Spot Temperature Calculation Per Unit Load (measured) Steady-state Function Time Dependance ΔθH, U 2m ΔθH, R K 1+ τw s K 2 K R 1 R+1 Hot Spot Rise Time Dependance Steady-state Function ΔθTO, R ΔθH 1 n 1 1 + τTO s ΔθTO, U ΔθTO θ TO Top Oil Rise Top Oil Temp. Hot Spot Temperature (calculated) θH Time Dependance Ambient Temperature (measured) 1 1 + τTO θ OA Effect of Ambient Temperature s Figure N.1: Block Diagram of Top Oil and Hot Spot Temperature Calculation Method Inputs: per unit load and Ambient Temperature. Per Unit Load (measured) K Steady-state Function 2m ΔθH, R K Time Dependance ΔθH, U 1 1+ τw s ΔθH Top Oil Temperature (measured) Hot Spot Rise Hot Spot Temperature (calculated) θH θ TO Figure N.2: Block Diagram of Top Oil and Hot Spot Temperature Calculation Method Inputs: per unit load and Top Oil Temperature. D01386R04.20 T-PRO User Manual 8700 Appendix N-3 Appendix O Temperature Probe Connections Example 1 Using one top oil probe and one ambient temperature probe with one T-PRO A, both powered from the T-PRO A. T-PRO A (Back view) 30 VDC @ Ambient Top Oil 40 mA + + + - 230 - + Gray 231 232 233 234 235 - + Orange (T) Ambient Temperature Probe (T) Top Oil Temperature Probe Figure O.1: T-PRO A (Back view) Example 2 Using two top oil probes powered by two T-PRO relays (B and C) and one ambient temperature probe powered by T-PRO C. D01386R04.20 T-PRO User Manual 8700 Appendix O-1 Appendix O Temperature Probe Connections T-PRO B (Back view) 30 VDC @ Ambient Top Oil 40 mA + + + - 230 - + 231 232 233 234 T-PRO C (Back view) Ambient Top Oil 30 VDC @ 40 mA + + + - 235 230 231 - 233 234 + Gray (T) Top Oil Temperature Probe #2 232 235 - + Orange (T) Ambient Temperature Probe (T) Top Oil Temperature Probe #1 Figure O.2: T-PRO B (Back view) and T-PRO C (Back view) Appendix O-2 T-PRO User Manual 8700 D01386R04.20 Index Numerics D 24 overexcitation 4-15 27 undervoltage 4-17 49 thermal overload 4-11 49TOEWS transformer overload early warning system 4-13 50/51 overcurrent 4-20 50N/51N neutral overcurrent 4-22 51ADP adaptive overcurrent 4-21 59N zero sequence overvoltage 4-16 60 ac loss of potential 4-18 67 directional overcurrent 4-23 81 over/under frequency 4-19 87 differential protection 4-1 87N neutral differential 4-9 date&time 3-3 dc schematic drawing J-1 diagnostics 3-12 differential slope test 6-33 direct serial link 2-2 display 3-4 DNP3 F-1 A firmware update 2-13 front display 3-2, 3-4 front view 1-3 function line diagram 1-2 ac and dc wiring 7-1 ac schematic drawing I-1 access 3-12, 3-13 alarm 3-3 ambient temperature connections O1 analog inputs 3-9, 5-7 analog phase shift table L-1 B back view 1-3 backward compatibilty 5-4 baud rate direct serial link 2-7 modem link 2-7 C calibrate 3-12 calibration 6-2 change access 3-13 clear target 3-3 communication direct serial link 2-2 DNP3 F-1 internal modem link 2-4 modbus E-1 network link 2-4 with the relay 2-2 communication ports 2-9 communication wiring 7-1 communication with the relay 2-2 connections 5-10, 6-5 converting a settings file 5-4 creating a setting file from an older version 5-4 D01386R04.20 T-PRO User Manual 8700 E erase 3-12 event log 3-11, 4-32 event messages D-1 external inputs 3-9, 5-8 F G graphing protection functions 5-3 grounding 2-1 H hardware C-1 hot spot temperature 4-13, N-1 HyperTerminal 2-5 I ID 3-9 identification relay 5-6 Installation software 5-2 installation 7-1 IRIG 3-2 IRIG-B time input 2-1 L LED lights 3-2 load from Offliner 3-9 loss of life 4-13, 4-14, M-1 M maintenance menu 2-12 mechanical drawings G-1 metering 3-10, 3-14 modbus 3-12, E-1 modem link - external 2-3 modem link - internal 2-4 mounting 7-1 I N nameplate 5-9, 6-5 network link 2-4 O Offliner features 5-2 output contacts 5-8 output matrix 5-15 outputs 3-12 P password 3-5, 3-13 physical mounting 7-1 power supply 2-1 ProLogic 4-29, 5-13 push buttons 3-3 Q quit 3-13 R rear panel drawings H-1 record length 5-14 RecordBase View 5-5 recording 4-30 fault 4-30 trend 4-30 records 3-11 relay functional 3-2 retrieve to Offliner 3-10 S SCADA 2-8, 3-12 sending a new setting file 5-4 service 3-2 service access 3-13 setting summary 5-16 setting the baud rate 2-7 settings 3-9 settings and ranges B-1 setup 3-12 single-phase slope test 6-44 specifications A-1 start-up 3-1 system requirements 5-1 27 undervoltage 6-13 49 thermal overload 6-21 49 TOEWS 6-22 50/51 overcurrent 6-19 50N/51N neutral overcurrent 6-15 51ADP adaptive pickup 6-19 59N zero sequence overvoltage 611 60 loss of potential 6-9 67 directional time overcurrent 6-16 81 over/under frequency 6-14 87 2nd harmonic restraint 6-28 87 differential 6-24 87 high current setting 6-29 87N differential 6-31 ambient temperature 6-20 THD alarm 6-30 top oil temperature 6-20 test mode 3-2 test setting file 6-5 Testing external inputs 6-3 output relay contacts 6-3 testing procedures 6-1 THD alarm 4-25 time 3-12 tool bar 5-2 top oil N-1 U utilities 3-12 V view access 3-13 view logs 3-3 view readings 3-3 W windings/CT connections 5-10 wiring ac and dc 7-1 communication 7-1 hardware 5-1 operating system 5-1 T temperature ambient 5-12 scaling 5-12 top oil 5-12 terminal mode 3-5, 3-7 terminal program setup 2-5 test 24 overexcitation 6-10 II T-PRO User Manual 8700 D01386R04.20