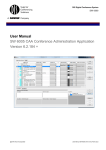
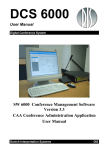
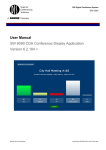
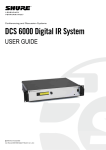
1
DIS Digital Conference System SW 6000 User Manual SW 6008 CUA Conference User Application Version 6.2 @2013 Shure Incorporated User Manual SW 6008 CUA ver 6.2 RevA.docx @2013 Shure Incorporated User Manual SW 6008 CUA ver 6.2 RevA.docx 1 List of Contents ‘Proxy Votes’ sub-panel.....................28 1 List of Contents ................................................. 3 2 Introduction ...................................................... 5 5.10 Messages .................................................29 3 Features .............................................................. 6 5.11 Web Browser .........................................30 5.12 Conference .............................................31 Stop/start a conference ................31 4 3.1 SW 6000 General description ............ 6 3.2 CUA Features............................................ 6 ‘Timers’ sub-panel ..........................32 Operation Instructions .................................. 7 4.1 Starting the CUA...................................... 7 4.3 Screen sizes .............................................. 8 4.5 Facilities in the different layouts...... 9 4.6 Language selection ................................ 9 4.7 Login ........................................................ 10 Main menu ............................................. 10 Microphone Parameters...............34 Microphone Operation Mode .....34 Microphone Interrupt Ability ....35 6 6.1 6.2 Main Menu ....................................................... 13 5.1 Main ......................................................... 13 5.3 Microphones ......................................... 14 Lists........................................................... 14 6.3 Mic Attenuation ....................................40 6.4 System Messages ..................................41 ‘Database’ sub-panel ..........................41 6.5 Line In ...................................................... 18 AO Unit Control.....................................42 Channel Selection ................................42 Podium 1, Podium 2 & Podium 3.. 18 Volume Control ....................................42 Number field ......................................... 17 ‘Request Ctrl.’ sub-panel .................. 18 6.6 Display Control .....................................43 ‘Timers’ sub-panel .............................. 19 6.7 Main Menu ..............................................43 ‘Delegate List’ sub-panel .................. 19 5.4 Mimic Diagram ..................................... 19 5.5 Agenda .................................................... 21 ‘Hyperlinks’ sub-panel ...................... 23 7 Voting and Registration Check .................44 7.1 Results ..................................................... 25 ‘Timers’ sub-panel .............................. 25 ‘Not Voted’ sub-panel ........................ 26 Delegate .................................................. 27 ‘Not Present’ sub-panel .................... 27 @2013 Shure Incorporated Start Voting ............................................44 Attendance check ................................45 Start voting session ............................46 Stop voting session .............................47 Viewing of Voting Results ................47 ‘Votes Status’ sub-panel ................... 26 5.8 Volume Control.....................................38 With CU 6005/6011 Central Unit. 38 With CU 6105/6110 Central Unit. 39 Function buttons ................................. 16 5.6 Interpretation .......................................36 ‘Channels’ sub-panel ..........................37 ‘Setup’ sub-panel .................................37 Panel menu ............................................ 11 5 Control Menu .................................................. 36 Vote from CUA ......................................50 7.2 Registration Check .............................. 51 User Manual SW 6008 CUA ver 6.2 RevA.docx @2013 Shure Incorporated User Manual SW 6008 CUA ver 6.2 RevA.docx DIS Digital Conference System 2 User Manual Introduction The SW 6000 Conference Management Software is designed to operate with hardware units in the DCS 6000 Digital Conference System. SW 6000 opens a completely new way of managing conferences. It DCS 6000 Digital Conference System is a complete “State of the Art” fully digital integrated interpretation, discussion and voting system offering interpretation, language distribution, conference microphone and voting facilities with attendance check with Chip Card™. The DCS 6000 system is based on a new, unique digital DATA and AUDIO bus using standard network cable. This ensures a very cost effective installation and easy set-up of portable systems. A total of 4000 units (delegate or interpreter units) can be connected to the system. User Manual SW 6008 CUA ver 6.2 RevA.docx 5 DIS Digital Conference System User Manual 3 Features 3.1 In addition to the standard modules a number of advanced modules are available to expand the features further in the SW 6000. SW 6000 General description The SW 6000 software package consists of following main applications: SW 6005 CAA Conference Administrator Application SW 6008 CUA Conference User Application SW 6090 CDA Conference Display Applications SW 6032 ECA External Control Application The functionality in the SW 6000 applications is controlled by the following standard system modules: SW 6010 Microphone Control SW 6012 Agenda Control SW 6015 Messaging SW 6018 Mimic/synoptic layout SW 6020 Delegate Information Table SW 6032 Interpretation Control SW 6050 Multiple Languages SW 6060 Parliamentary Voting SW 6070 Chip Card Registration SW 6071 Chip Card Programming SW 6080 Multiple Room Control SW 6085 Streaming Application Control of SW 7010 Streaming application SW 6086 Web Service Interface (Dynamic data) SW 6110 Advanced Microphone Control SW 6112 Advanced Agenda Control SW 6125 Advanced Speech Time Control SW 6186 Advanced Import/Export of meetings The SW 6000 software package has the following main features: Client/server system for multiple PCs Multiple user profiles with different functionality Full language support Very user friendly graphical design of high quality Data stored in SQL database format Voting from CUA screen 3.2 CUA Features The main features of the SW 6008 Conference User Application (CUA) are: Used by the Chairman, Interpretation Manager, Delegates or other persons attending or managing a conference. Also used by a Technician for monitoring conferences and to configure and setup parameters The functionality is controlling of microphones, voting, interpretation, intercom, messaging, agenda and delegate information. The functionality depends on the user profile and facilities installed. Designed for use with both touch screen and mouse/keyboard. 6 User Manual SW 6008 CUA ver 6.2 RevA.docx DIS Digital Conference System User Manual 4 Operation Instructions 4.1 Starting the CUA After the CUA has been installed, the CUA shortcut is placed on the Desktop and in the start folder. Clicking the CUA shortcut starts the application. The CUA user application can in the CAA Administrator application be configured to start up in one of four layout types. Figure 4.1-A The layout types are designed to be used at different screen resolutions (screen sizes). At larger screen it is possible to include more information in one display. Consequently there is more control functionality available in type 3 and 4 than in type 1 or 2. The layout type 1 is default when starting the CUA for the first time. The CUA application has to be restarted when a configuration change has been done. Hint There is an advanced option for configuring the following parameters in the CUA application: Background colors Font sizes, colors, type Button colors The configuration is done in the CUA configuration file ‘prjCUA.exe.config.xml’ which is to be found in the CUA executable folder. User Manual SW 6008 CUA ver 6.2 RevA.docx 7 DIS Digital Conference System 4.3 User Manual Screen sizes The CUA user interface (UI) is designed to run in a window or as a full screen application (configurable). The CUA application accepts screen resolution from 1024x768 and higher. The application can be opened in four layout types: Type Displays/panels Min. width x height 1 One main display One row of panel buttons (controls) 1024x768 2 One main display with one subpanel related to the main display, Two rows of panel buttons (controls) 1280x768 3 One main display with one subpanel related to the main display, Two rows of panel buttons (controls) 1280x800 4 Two main displays with one subpanel related to the main display, Two rows of panel buttons (controls) 1920x1080 Example Figure 4.3-A The CUA window can be dragged and dropped and minimized. The window cannot be dragged to a size less than the min. height and width of the layout type. 8 User Manual SW 6008 CUA ver 6.2 RevA.docx DIS Digital Conference System 4.5 User Manual Facilities in the different layouts The next table shows the facilities available in the four layout types: Facility ‘Interpretation’ screen Layout 1 ‘AO Control’ screen Layout 3 Available Layout 4 Available Available Available Available ‘Volume Control’ screen Available Available Available Other screens Available Available Available Available Available Available Available Control facilities in ‘Panel Button’ top row Layout 2 Figure 4.5-A 4.6 Language selection After starting the application, the user will be presented for the Language Selection screen. Depending of the conference options configured the user has to always select a language. Figure 4.6-A If a conference with a “Prepared Delegate Seat Table”, “Login Using Code on Seat”, “Login Using Code on Preferred Seat” or “Automatic Login on Preferred Seat” is started then the name of the delegate will be displayed next to the language selection buttons. If some data or information like delegate names etc. have not been entered in the selected language then the information will be presented automatically in the system’s default language. The users can select any of the presented languages to have a complete user interface presented to them in their preferred language. User Manual SW 6008 CUA ver 6.2 RevA.docx 9 DIS Digital Conference System 4.7 User Manual Login If a conference is started, which requires all users to login using a personal code then the following screen will be displayed after selecting a language. Figure 4.7-A The users must enter their numeric code and press [Login]. Mistakes made when entering the code can be erased by pressing [Clear]. There is no limit to how many times the users can retry to enter their code. Press [Return] to go back to the language selection screen. Main menu After a successful login a menu will be presented to the user. Each selection on the menu calls one of the screens, which are described one by one in this manual. The menu selections available to the user depend on the settings that were assigned to the user or the seat in ‘User Type’ in the CAA Conference Administration Application during configuration of the seats and assigning of ‘User Types’ when adding delegates. Selecting the ‘Control Menu’ displays buttons to access screens for changing parameters and settings. Please refer to the section ‘6 Control Menu’ for more details. 10 User Manual SW 6008 CUA ver 6.2 RevA.docx DIS Digital Conference System User Manual Panel menu The buttons on the panel available to the user depend on the settings that was assigned to the user or the seat in ‘User Type’ in the CAA Conference Administration Application during configuration of the seats and assigning of ‘User Types’ when adding delegates. Type 1 layout Type 1 layout features one row of buttons, where the two left most are Function buttons, where the functionality depends on the screen selected and the item selected on the screen: Figure 4.7-B Type 2, 3 and 4 layout Type 2, 3 and 4 layout features two rows of buttons, where the three left most buttons in the lowest row are Function buttons, where the functionality depends on the screen selected and the item selected on the screen: Panel buttons (lowest row) The buttons will feature the following functionality: [1] Function button, related to the selected screen [2] Function button, related to the selected screen [3] Function button, related to the selected screen [STF] The STF (Speaking Too Fast) is an indication from an Interpreter, which presses the STF button on his Interpreter Set to give the “messages” that the present speaker is talking too fast and that it is difficult for the Interpreters to follow him. The button is lighting red in 10 sec after the STF button on an Interpreter Set is activated. [Start Voting] Pressing the Start Voting button will start a voting session. See the later section ‘Voting’. [Registration Check] Pressing the Registration Check button will start a registration session. Note. Please refer to the ‘User Manual SW 6000 Registration Facility ver 6.x’ for detailed use of the Registration facility. [Exclusive] Pressing the Exclusive button will open the user’s microphone and close all delegate microphones. The delegates cannot open their microphones while the user’s microphone is open in exclusive mode. Pressing the button again deactivates exclusive mode. The button is red when the Exclusive mode is active. [Mute] or [Reply] The function of this button is configured in ‘CAA – Setup – User Types’ [Mute] Pressing this button will mute own microphone as long as depressed. The button bitmap is red when mute is active. User Manual SW 6008 CUA ver 6.2 RevA.docx 11 DIS Digital Conference System User Manual [Reply] Pressing this button bring the use in the Reply queue. Replies are shown above Requests in the request window. [Speak] The speak button in the right bottom corner is used for switching ON the microphone or for request to speak. The functionality is similar to the button on the microphone unit. The ring around the button indicates the state of the microphone: Neutral The microphone is off. Green The user’s request to speak is placed on the request list to be granted speak right by a Conference Administrator or Chairman. Red The microphone is on. If a delegate unit is available the label “Mic” is shown in the button. If the Microphone unit is lost, not assigned etc, the label “Mic” shall change to “No Mic” and “button” field in the mid of the button change to standard background. The request queue number is displayed in the “Mic” label and is updated when the queue position is changed. When the user is number one in the queue, the green lamp in the Mic button and the indication in the mimic diagram shall flash. 12 User Manual SW 6008 CUA ver 6.2 RevA.docx DIS Digital Conference System User Manual 5 Main Menu 5.1 Main This Main screen shows the user’s personal information, the conference name, the active agenda subjects and a list of Delegates speaking, replying or requesting to speak. This screen is shown as default after logging in to the application. Figure 5.1-A Speaking Delegates are displayed with a red dot and Delegates in the request list are displayed with a green dot. Delegates in the reply list are displayed with a grey dot at default, but the color is configurable. When a conference is started and an agenda subject is active the number of delegates logged is shown. User Manual SW 6008 CUA ver 6.2 RevA.docx 13 DIS Digital Conference System 5.3 User Manual Microphones This screen allows the user to view the status of the microphones and to open or close microphones. Figure 5.3-A The screen is divided into three lists showing delegates speaking, delegates in the request/reply list and the last five speakers. In layout type 2, 3 and 4 a sub-panel is available for additional control facilities. The microphone control buttons will only be available if the ‘Microphone Control’ is selected in the CAA application, Setup/User Type/Functionality. Lists Speaker The list shows delegates whose microphones are on. Elapsed speech time is displayed for each delegate. If the alarm time is set the speech time will flash when the alarm time is reached. The list is sorted with the first one opened on the top of the list. Request and Replies The list shows delegates who have requested to speak or want to give a reply to a current speaker. The list is first sorted with replies first, then requests. Both ‘lists’ in ‘Speak Priority’ groups, highest priority on top. VIP’s before delegates then by the time when the request was made, the first on top. The delegate is shown in the list with name and other configurable info or just by the seat number if running conference with ‘No login’ conference mode. The total number of Requests is shown in brackets after the label ‘Requests. 14 User Manual SW 6008 CUA ver 6.2 RevA.docx DIS Digital Conference System User Manual The delegates in the request or reply list can be moved up and down within the requests or replies by drag and drop within delegates with same speak priority. Replies cannot be moved in the requests and requests cannot be moved into replies. Last 5 Speakers This list shows the 5 last Delegates, which have had their microphone opened. User Manual SW 6008 CUA ver 6.2 RevA.docx 15 DIS Digital Conference System User Manual Function buttons The three left most buttons are functions buttons, which changes functionality. In the next figure the Button [1] is shown enabled and Button [2] is shown disabled. Figure 5.3-B The buttons can have the following functionality: Button [1] ‘Mic Off, Mic On or Next On’ depending of the selected Delegate Button [2] ‘All Del Off, All Requests Off, Request On or Request Off’ depending of the selected Delegate Button [3] ‘Reply On, Reply Off or All Reply Off’ depending of the selected Delegate Mic Off [1] When a Delegate in the Speaker list is selected, Button [1] will have ‘Mic Off’ functionality. When the Mic Off button is pressed the speaker is turned off and the delegates is removed from the speaker list and any speakers below move one position up. After activating the button, no Delegate is selected. Delegates Off [2] This button turns OFF all delegate microphones After activating the button, no Delegate is selected. Next On [1] When no Delegate is selected in any lists the button [1] will have ‘Next On’ functionality. When the Next On button is pressed the first request moves up at the last position in the speaker list. The next request moves up as the first request. After activating the button, no Delegate is selected. Mic On [1] When a Delegate in the Requests list or Last 5 Speakers/Delegates list is selected, button [1] will have ‘Mic On’ function and will turn on the selected delegate when pressed When the Mic On button is pressed the selected delegate moves up at the last position in the speaker list. After activating the button, no Delegate is selected. All Req Off [2] When no Delegate selection is made, button [2] will have ‘All Req Off’ function and will turn off all requests when pressed (a warning message has to be shown first). When the warning appears the user is asked to confirm the action by pressing the OK button or to cancel the action by pressing the Cancel button. The warning disappears when one of the two buttons is activated. If the requests were confirmed to be removed, the request list becomes empty and no Delegate is selected. Req Off [2] 16 When a Delegate in the Requests list is selected, button [2] will have ‘Req Off’ function and will remove the selected delegate from the request list when pressed User Manual SW 6008 CUA ver 6.2 RevA.docx DIS Digital Conference System User Manual When the [Req Off] button is pressed the delegates in the list below moves up one position. After the button is activated no Delegate is selected. Request On [2] When a Delegate in the Last 5 Speakers/Delegates list is selected, button [2] will have ‘Request On’ function and will place the selected delegate in the request list when pressed After the button is activated no Delegate is selected. All Reply Off [3] When no Delegate selection is made, Button [3] will have ‘All Replies Off’ function and will turn off all replies when pressed. Reply Off [3] When a Delegate in the Reply list is selected, Button [3] will have ‘Reply Off’ function and will remove the selected delegate from the reply list when pressed When the [Reply Off] button is pressed the delegates in the list below moves up one position. After the button is activated no Delegate is selected. Reply On [3] When a Delegate in the Last 5 Speakers or Delegates list is selected, Button [3] will have ‘Reply On’ function and will place the selected delegate in the reply list when pressed After the button is activated no Delegate is selected. The [Reply on] will always activate reply option 1. Number field Figure 5.3-C This field is used for controlling microphones using a numerical keyboard. The number field is used to type in a seat number or to show the seat number of the selected microphone and is placed in the right lower corner of the display. Showing of the number field depends on the ‘User Type’ settings. The field is visible only if “Speak” is disabled and “Microphone Control Buttons” and “Microphone” display is enabled. The input to the field can be done by: 1. Selecting a microphone in one of the lists (Speakers, Requests, Last 5 Speakers or Delegates List). The seat number of the selected microphone is shown. Only the last selected is shown 2. Typing in the seat number using a keyboard From the keyboard the following entries (controls) shall be possible. Typing a number (max 7 digits): + Request On - Mic/Request Off , Next On Enter Mic On Back Space Delete last digit Delete Delete single digit User Manual SW 6008 CUA ver 6.2 RevA.docx 17 DIS Digital Conference System * User Manual Selects the whole field. Subsequent entry will delete all. The color code indicator dot uses colors identical to the colors used in the Mimic diagram: Blue – logged in Grey – not logged in / seat unavailable / seat not existing Red – microphone in speak Green – microphone in request Line In Pressing the ‘Line In’ button will un-‘Mute’ the ‘Line input’ on the CU 6005/6011 and un-‘Mute’ the ‘Audio In 1’ on CU 6105 and CU 6110 The button is red when the input is on. Podium 1, Podium 2 & Podium 3 Those buttons are subject to ‘SW 6110 Advanced Mic Control’ module. A unit is configured in the CAA/Setup/Conference Units in the column ‘Seat Type. Up to 3 delegate units can be configured as podium microphones Pressing one of the Podium buttons will turn on the Podium microphone. If there is more than one Podium microphone configured extra buttons will appear to activate the individual Podium microphones. Pressing the Podium microphone button again will turn the microphone off. The button is red when the Podium microphone is on. Selecting a delegate in one of the list and then clicking the Podium microphone will turn on the Podium microphone with the name of the selected delegate. ‘Request Ctrl.’ sub-panel The ‘Request Ctrl.’ sub-panel is available if the option “Request List Control” is selected in the ‘User Type’. [Close Req] Pressing this button will close the request queue. No new delegate can be placed in the request queue. [Hide Req] Pressing this button will hide the request queue. No new delegate can be placed in the request queue. [Tech Cont Req] Pressing this button closes the request queue for all except a ‘Technician’ user (Seat type: Technician). 18 User Manual SW 6008 CUA ver 6.2 RevA.docx DIS Digital Conference System User Manual ‘Timers’ sub-panel The ‘Timers’ sub-panel is available if the option “Speech Time Control” is selected in the ‘User Type’. [No Speech Time Limit] Field that shows the current speech time configuration. [Load Timers] Press this button to load a speech time configuration. Please refer to the ‘User manual SW 6125 Advanced Speech Time Control’ for information on speech time configuration. [Reset Timers] Press the button to reset the speech time for active speakers. The button is disabled when there is no active speech time configuration. [Pause Time] Press the button to pause the speech time. If paused, the button will light red. ‘Delegate List’ sub-panel Press the button to display a list of all delegates attending the conference and with a microphone. Select a delegate or a microphone and press [Mic On] or double-click to turn on the microphone or press [Request On] to put the delegate in the request queue or press [Reply On] to put the delegate in the reply queue. Clicking [Mic On] will open the microphone if the maximum number of speaking delegates or max. open microphones has not been reached or if the delegates has right to interrupt. Delegates speaking will be shown with a red dot and speakers in request queue are shown with a green dot. Speakers in reply queue are shown with a dot in the configured color. Default for option 1 is grey. Double-clicking a delegate speaking will turn off the microphone. Double-clicking a delegate in request or reply will turn on the microphone. 5.4 Mimic Diagram The Mimic Diagram displays a graphical overview of the conference room or hall. Each seat or microphone is indicated by a colored dot. The Mimic Diagram opens in a separate, scalable window, which can be opened together with the main CUA window. The position and size of the mimic will be maintained for getting the same position and size after the CUA application has been closed. The mimic graphics will preserve the aspect ratio in window. User Manual SW 6008 CUA ver 6.2 RevA.docx 19 DIS Digital Conference System User Manual Figure 5.4-A Each seat is represented by a colored dot: Grey No delegate is logged in at the seat Blue A delegate has logged in at the seat Green The delegate has requested to speak and has been registered in the request list Light grey The delegate has activated his reply button and is in the reply list. The color is configurable Red The microphone is turned on The buttons on the Mimic diagram are: [Return] Close the mimic screen and return to the previous screen which was active when the mimic diagram screen was selected. [Next Mic On] Press the button to grant speaking right to the first delegate on the reply/request list. The microphone will open if the maximum number of speaking delegates has not been reached. [Delegates Off] Press the button to turn off all delegate microphones. Chairman microphones will not be turned off. [All Req Off] Press the button to remove all delegates from the request list. [Exclusive] Press the button to activate the exclusive speak function for own microphone. Press it again to deactivate the function. The function is described above in the Panel section. [STF] ‘Speaking Too Fast’ indication message received from an interpreter. The message is cancelled by pressing the button. [Ambient] Press the button to disable the ambient microphone. Press again to enable the microphone. [CU Line in] Press the button to turn on the line input on the CU. Press again to disable the line input. 20 User Manual SW 6008 CUA ver 6.2 RevA.docx DIS Digital Conference System [Menu] User Manual This button switches the functionality at the mimic diagram between presenting a menu and switching On/Off the microphone directly when touching the dot representing a microphone. When activated (red color), the menu will be presented. The menu appears when a seat is selected showing seat number and the delegate’s name. The following buttons are available: [Login] Press this button to login a user at the selected seat. This button is not active in the conference modes ‘No Login’ and ‘Prepared Delegate Seat Table’. [Logout] Press the button to logout the selected delegate. [Mic On/Off] Press the button to turn on or off the selected delegate’s microphone including the speaker stand microphone or any other microphone in the room. [Volume Control] Press the button to show a small popup for adjusting volume for the selected microphone. The volume control is only active when the ‘User Type’ has volume control user rights. [+1dB] / [-1dB] Press (and hold) the buttons to increase or decrease the levels in steps of one dB [Close] close the popup. 5.5 Press the button to Agenda This screen is used for viewing the agenda and for setting a Subject current. The agenda is created in the CAA application. Changes made to the agenda in the CAA application will reflect the Agenda screen in the CUA immediately. If the has been a voting session to a subject, the result and the Attendance number will be shown for those subjects. User Manual SW 6008 CUA ver 6.2 RevA.docx 21 DIS Digital Conference System User Manual Figure 5.5-A [Set subject] Select the subject, which shall be current and press the button. This subject will now be shown as the current subject and all voting sessions started will be related to this subject. Note: This button is not available in Layout 1. The current subject is marked with a dark blue bar. [No subject] Press this button for setting no subjects current. Note: This button is not available in Layout 1. [Description] Show the description and optional the title for the subject The whole subject title (Max. 1000 characters) and the description (Max. 10.000 characters) can be shown when selecting the subject and clicking the Description button. The CUA Agenda [Description] button has an option for opening a screen to show Title, Description, Vote Result and Hyper Links. The default screen to open is Description; however a selection in the User Type configuration determines which option to open. User Type selection: ‘Agenda Title and Description’ 22 User Manual SW 6008 CUA ver 6.2 RevA.docx DIS Digital Conference System User Manual Figure 5.5-B User Type selection: ‘Agenda, Description’ Figure 5.5-C [Set New], [Set Postponed] & [Set Cancelled] Buttons for assigning status to the agenda subjects [Alert on CDA] Used to invoke an alert on the CDA display (customized) and to send a message using the ECA application ‘Hyperlinks’ sub-panel The hyperlink sub-panel shows all hyperlinks attached to the agenda subject. [Open Link] Press this button to open the selected hyperlink. . User Manual SW 6008 CUA ver 6.2 RevA.docx 23 DIS Digital Conference System 24 User Manual User Manual SW 6008 CUA ver 6.2 RevA.docx DIS Digital Conference System 5.6 User Manual Results This screen is used to show the result of the voting session. Figure 5.6-A [Print Result] This button is available for immediate printing of the voting result if the ‘User Type’ functionality ‘Print Vote Result Button’ has been enabled. The printer is configured in the CAA/Setup/Configurations/Print Server Configuration. ‘Timers’ sub-panel This panel is used to change the voting time if a ‘Preset Voting Time’ is applied in ‘Conference/Options’. [Limit/Changed] Radio button for selecting the option to change the limit. The field next the button shows the actual voting time limit for the selected delegate [Increment] Radio button for selecting the increment value. The field next the button shows increment value. The value can be set between 00:00-59:59 [‘Arrow up’] Button for increasing the voting time limit [‘Arrow down’] Button for decreasing voting time limit User Manual SW 6008 CUA ver 6.2 RevA.docx 25 DIS Digital Conference System User Manual ‘Votes Status’ sub-panel This panel is used to indicate the status of the available delegates who are allowed to vote. If the voting configuration includes quorum check, it is indicated if quorum is reached. The ‘Votes Status’ displays the number of votes that can be cast by delegates who are logged in. Delegates that have voting right are counted according to the ‘Voting Weights’. Delegates with no voting rights are not counted. The ‘Proxy Vote’ field displays the number of proxy votes that can be cast if a voting session is conducted. The delegate to whom the proxy vote has been assigned must be logged in for the proxy vote to be counted. Proxy votes are counted according to voting weight. The ‘Total’ field displays the sum of the votes that can be cast i.e. the sum of Votes and Proxy Votes. The ‘Quorum Reached’ field displays the quorum status that would be reached if a voting session was conducted. A pre-requisite for calculating quorum status is that the formula use only ‘totalpresent’ and ‘totalseats’. Parameters available only when a voting session has been conducted like ‘total1’ should not be used in a quorum formula if the quorum status is to be displayed runtime. Votes Shows the number of delegate present allowed to vote Proxy Votes Shows the number of proxy votes assigned Total Shows the sum of ‘Votes’ and ‘Proxy Votes’ Quorum Reached This filed is green if quorum is reached and red if quorum is not reached. If no color, the Voting Configuration applied does not include quorum check. ‘Not Voted’ sub-panel This sub panel is a run-time option to show which delegates, who has not voted. The delegates shown depend on the conference mode: ‘Login Using Code’ ‘Not Voted’ shows all delegates in the ‘Delegate Table’, who has not voted ‘Login Using Code ……..’ ‘Not Voted’ shows all delegates in the ‘Delegate Seat Table’, who has logged in, but not voted. ‘Automatic Login on Preferred Seat’ ‘Not Voted’ shows all delegates in the ‘Delegate Seat Table’, who has logged in, but not voted. ‘No login’ Button disabled ‘Prepared Delegate Seat Table’ ‘Not Voted’ shows all delegates in the ‘Delegate Seat Table’, who has not voted This facility is available in Layout 2, 3, 4. 26 User Manual SW 6008 CUA ver 6.2 RevA.docx DIS Digital Conference System 5.8 User Manual Delegate The Delegate screen shows delegates who are attending the conference. Only delegates who are logged into the system will be shown on the list. Figure 5.8-A Detailed information for each delegate is displayed when a delegate is highlighted on the list. ‘Not Present’ sub-panel The sub-panel ‘Not Present’ is a run-time option to show delegates not presents. Depending on the Conference mode the absent delegates are presented in the following way: ‘Prepared Delegate Seat Table’ ‘Not present’ shows all delegates in the ‘Delegate Seat Table’, who are not logged in due to ‘no conference unit’ on the seat ‘Login Using Code’ ‘Not present’ shows all delegates in the ‘Delegate Table’, who are not logged in. ‘Not Active’ delegates are not shown. ‘Login Using Code on Seat’, ‘Login Using Code on List’, ‘Login Using Code on Preferred Seat’ & ‘Automatic Login on Preferred Seat’ ‘Not present’ shows all delegates in the ‘Delegate Seat Table’, who are not logged in. ‘No Login’ Button disabled This facility is available in CUA Layout 1, 2, 3, 4. In Layout 1 the list is shown in the main window. User Manual SW 6008 CUA ver 6.2 RevA.docx 27 DIS Digital Conference System User Manual ‘Proxy Votes’ sub-panel The proxy vote’s sub-panel shows the currently delegated votes (proxy votes). If the proxy has a time limitation this is shown in the bottom of the panel for the selected delegate. 28 User Manual SW 6008 CUA ver 6.2 RevA.docx DIS Digital Conference System 5.10 User Manual Messages This screen allows users to send pre-recorded or written messages between CUA’s or from CUA’s to DC 6990 P Conference Units. Figure 5.10-A The screen is divided in three parts showing a list of delegates attending the conference having this application available to them (including CUAs and DC 6990 P’s), a list of available prerecorded messages and a message text box allowing the user to read received messages and write own messages if a keyboard is available. [Send to One] Select a message (or write one), select a delegate from the list and press this button to send the message to the selected delegates. [Send to All] Select a message (or write one) and press this button to send the message to all of the delegates who are attending the conference and who have this screen available to them. [Read Next] Press the button to read the next message from the queue of received messages. [Clear] Press the button to clear the message text box. When a message is received, the ‘Message’ button will flash red until the message is read. Note: Users with a DC 6990P conference unit can receive messages from CUAs provided that the users have the Messages functionality enabled in the ‘User Type’. A user can however not send messages from a DC 6990 P. User Manual SW 6008 CUA ver 6.2 RevA.docx 29 DIS Digital Conference System 5.11 User Manual Web Browser This screen allows the user to open a web browser. Standard browser facilities are available in the browser window. Figure 5.11-A 30 User Manual SW 6008 CUA ver 6.2 RevA.docx DIS Digital Conference System 5.12 User Manual Conference Stop/start a conference This screen allows the user to start and stop conferences and to change various microphone operation settings. Figure 5.12-A Conferences with start dates before and end dates after today’s date will be displayed on the list of conferences. [Start Conf.] Select a conference and press the button to start the conference. The button text will change to ‘Stop’ and the selected conference name will be displayed in the active conference field. Starting a conference with a prepared delegate list will automatically login delegates on the list. If starting a conference with “Prepared delegate list” and no delegates has been assigned to the list the following message will appear if trying to start that conference: When a conference with “Prepared delegate list” is started and you try to start a CUA assigned to a seat, which is not assigned a user in the “Prepared delegate list” the following error messages will appear: User Manual SW 6008 CUA ver 6.2 RevA.docx 31 DIS Digital Conference System [Stop] User Manual Press the button to stop the active conference. The button text will change to ‘Start’. All delegates will be logged out automatically. The full functionality of the system is available even if no conference is started. Seat numbers will be displayed instead of delegate names. The various settings on this screen will be initialized with the values that were specified for the active conference. The user can change these settings during the conference at any time. [Start Streaming] Press this button to start streaming of the active conference. The button will blink red while the system activates the streaming and turn to [Stop Streaming] and remain red if the streaming is activated. The button is only available if the Web Service State in the CUI is ready. [Stop Streaming] Press this button to stop streaming of the active conference. The button will blink red while the system de-activates the streaming and turn back to [Start Streaming] when the streaming is de-activated. [Start Archiving] Press this button to start archiving of the streamed conference. The archiving can only be activated when the streaming has been activated. The button will blink red while the system activates the archiving and turn to [Stop Archiving] and remain red if the archiving is activated. The button is only available if the Web Service State in the CUI is ‘Ready’. [Stop Archiving] Press this button to stop archiving of the streamed conference. The button will blink red while the system de-activates the archiving and turn back to [Start Archiving] when the archiving is de-activated. [Prepare Conference] Press this button to place a message on the ‘Prepare Conference’ display on a CDA application. The message to show is inserted in the CAA/Configuration/CDA Configuration. ‘Timers’ sub-panel The purpose of this sub-panel is to assign Speech Time limitation to the conference, if a limitation is not assigned when creating the conference Please refer to section ‘0 32 User Manual SW 6008 CUA ver 6.2 RevA.docx DIS Digital Conference System User Manual ‘Timers’ sub-panel’ for details. User Manual SW 6008 CUA ver 6.2 RevA.docx 33 DIS Digital Conference System User Manual Microphone Parameters [Up] & [Down] Press the buttons to set the ‘Max. Delegates’, Max. Open Mics or Max. Requests. [Max. Delegates] Maximum delegate microphones allowed can be set from 1 to 8. [Max. Open Mics] Maximum open simultaneous microphones allowed can be set from 1 to 8. [Max. Requests] Maximum simultaneous requests to speak allowed on the request list can be set from 0 to 255. [Auto off (sec)] When activated a conference unit will switch off after the time set in (in seconds), if nobody is talking in the microphone. Microphone Operation Mode Select one of the four values: [Manual] All requests to speak from delegates will automatically be inserted into the request list. The microphones must then be turned on from the ‘Microphone’ screen or from the ‘Mimic Diagram’ screen. Microphones with Chairman Priority (Priority 5) will turn on directly even if the maximum number of open microphones has not been reached. [Manual + Reply] As manual mode, however the delegate has the option additional to activate a reply. Replies are inserted on the top of the request list. [Automatic] All requests to speak from delegates will either result in an open microphone or a rejected speak request depending on the number of already opened microphones. The request list is not used. [Automatic+ Reply] As automatic mode, however the delegate has the option additional to activate a reply. Replies are inserted into the request list. [FIFO] All requests to speak from delegates will either result in an open microphone or the request to speak being inserted onto the request list depending on the number of already open microphones. The first delegate’s microphone on the request list will automatically be turned on when a microphone is turned off. Changing the microphone operation mode will not override possible individual settings for a microphone. [VOX] Voice activation mode allows for the microphone units to be switched on automatically if speaking into the microphone or by pressing the microphone ON/OFF button. [VOX+ Reply] As VOX mode, however the delegate has the option additional to activate a reply. Replies are inserted into the request list. Those Operation modes will only apply to units (seats) with ‘User Type’ which has the following settings in ‘Microphone parameters’: Operation mode Use CU mode Speak Priority Priority 1-4 Interrupt Ability Use CU mode Reply Functionality This functionality is used by a delegate or chairman who wants to indicate that he want to give a short comment to the present speaker(s). The functionality can be used both in Manual, Automatic and VOX modes, but not in FIFO, where the reply button is disabled. Three operations modes with reply is available: ‘Manual & Reply’, ‘Automatic & Reply’ 34 User Manual SW 6008 CUA ver 6.2 RevA.docx DIS Digital Conference System User Manual and ‘VOX & Reply’ modes. The three new modes are available for assigning individual operation modes to users as well. Most DCS 6000 conference units have a ‘Function’ button, which at present is configured with ‘Mute’ Functionality. When using Reply functionality, the Function button shall be configured as ’Reply’ button. It means that a user (Chairman or Delegate) can have either Mute or Reply, but not both. Microphone Interrupt Ability Select one of the three values: None Cannot interrupt another speaker Lower Can interrupt a speaker with a speak priority less than own speak priority Same/Lower Can interrupt a speaker with the same speak priority or a speak priority which is less than own speak priority. User Manual SW 6008 CUA ver 6.2 RevA.docx 35 DIS Digital Conference System User Manual 6 Control Menu Selecting the ‘Control Menu’ displays new buttons to access screens for changing parameters and settings Each selection on the menu calls one of the screens, which are described one by one in the next sections. The menu selections available to the user depend on the settings that were assigned to the user or the seat in ‘User Type’ in the CAA Conference Administration Application during configuration of the seats and assigning of ‘User Types’ when adding delegates. 6.1 Interpretation This screen allows the user to monitor the interpreter Units and to setup and control the individual Interpreter Unit. NOTE: This screen is only available in Layout 3 and 4 Figure 6.1-A The ‘Interpretation’ screen is giving control of the selected interpreter unit. The unit is selected by selecting the booth in the “Channels” sub-panel. If more interpreter units are available in the booth the Previous and Next buttons are available 36 User Manual SW 6008 CUA ver 6.2 RevA.docx DIS Digital Conference System User Manual [Mic] Pressing the ‘Mic’ button turn On/Off the microphone in the booth. [‘Other buttons’] For the use of the other buttons please consult the User Manual for the Interpreter Set. ‘Channels’ sub-panel This sub-display shows the status of the Language channels: Channel Booth number 1-31. The sign after the number represent the ‘quality’ of the Interpretation (please refer to the user manual for the Interpreter Unit). A Language This field is showing the A-language for the booth. A ‘Green’ indication shows that interpretation on language A is going on in the booth. B Language This field is showing if interpretation on the B-language is taken place. A ‘Green’ indication shows the ‘Channel’ number and ‘Language’. The sign after the number represent the ‘quality’ of the Interpretation (please refer to the user manual for the Interpreter set). Clicking the ‘Channel’ field for any of the channels selects the interpreter units in this booth for controlling/setting up the individual interpreter set in each booth. ‘Setup’ sub-panel Selecting the Setup sub-panel give the option to setup operation parameters for the selected interpreter unit. For explanation of the various setup modes, please consult the User Manual for the Interpreter Unit. User Manual SW 6008 CUA ver 6.2 RevA.docx 37 DIS Digital Conference System 6.2 User Manual Volume Control With CU 6005/6011 Central Unit. This screen allows the user to turn up and down for various volume controls in the CU 6005/6010/6011 Central Unit. NOTE: This screen is only available in Layout 1, 3 and 4 Figure 6.2-A The User Manual for CU 6005 or CU 6011 Central Unit explains in details the functions of the individual volume controls, however please note the following: [+1dB] / [-1dB] Press (and hold) the buttons to increase or decrease the levels in steps of one dB for the control selected. [Mute] This button mutes the Control. When muted, the button changes to red color. Indication The indication next to the graphic illustration of the volume indicates the actual setting of the volume (in dB). When the volume setting is turned all down, this indication changes to ‘Off’. [Microphone Attenuation] This control is used to adjust the Microphone level for all microphones. If individual settings of the microphones are used, then changing this level will bring all microphones back to the same level. So don’t use this control, if the level has been set individual for the microphones. Hint: Before performing individual setting of the microphones, it might be useful to use this control to set the level to ‘-3dB’ for all microphones. Then the individual adjustment of the microphones can be done as +/- 3 dB instead of -6dB. 38 User Manual SW 6008 CUA ver 6.2 RevA.docx DIS Digital Conference System User Manual With CU 6105/6110 Central Unit. This screen allows the user to turn up and down for various volume controls in the CU 6105 or CU 6110 Central Unit. NOTE: This screen is only available in Layout 1, 3 and 4 Figure 6.2-B The User Manual for CU 6105 or CU 6110 Central Unit explains in details the functions of the individual volume controls, however please note the following: [+1dB] / [-1dB] Press (and hold) the buttons to increase or decrease the levels in steps of one dB for the control selected. [Mute] This button mutes the Control. When muted, the button changes to red color. ‘Indication’ The indication next to the graphic illustration of the volume indicates the actual setting of the volume (in dB). When the volume setting is turned all down, this indication changes to ‘Off’. User Manual SW 6008 CUA ver 6.2 RevA.docx 39 DIS Digital Conference System 6.3 User Manual Mic Attenuation This screen allows the user to change volume settings for individual microphones during a meeting. The mimic diagram is opened when then Mic Attenuation menu button is selected. Select any seat equipped with a microphone and press the [Volume control] button. A small popup appears that allows adjusting of volume for the selected microphone. The Mic Attenuation screen opens in a separate, scalable window, which can be opened together with the main CUA window. The position and size of the Mic Attenuation window will be maintained for getting the same position and size after the CUA application has been closed. The mimic graphics will preserve the aspect ratio in window. Figure 6.3-A [+1dB] / [-1dB] Press (and hold) the buttons to increase or decrease the levels in steps of one dB. [Close] Press the button to close the popup. 40 User Manual SW 6008 CUA ver 6.2 RevA.docx DIS Digital Conference System 6.4 User Manual System Messages System messages are displayed on this screen. Figure 6.4-A [Sort: Date/Time] Press the button to sort the system messages by the date/time they were received. [Sort: Message] Press the button to sort the list alphabetically by the message text. [Clear list] Press the button to clear the list. ‘Database’ sub-panel [Connect] This button is used to switch between the available configured databases. The button is visible if the Database Selection functionality is enabled in the CAA/Setup/User Type. User Manual SW 6008 CUA ver 6.2 RevA.docx 41 DIS Digital Conference System 6.5 User Manual AO Unit Control This screen allows the user to set output channel and volume for eight outputs from one or more AO units connected to the CU. NOTE: This screen is only available in Layout 1, 3 and 4 Figure 6.5-A An AO unit is identified by the system in the same way as microphone units. It has a serial number and first time an AO unit is connected to the CU a row in Setup/Equipment/Audio Output Units (AO) is created with a seat number following the same naming rules as for microphone units. The ‘Comment’ field in the ‘Seat’ table is used to create a label for the AO units (e.g. “Recording”as shown). The label identifying the AO is shown in the upper left corner. [Next] Used to “scroll” between existing AO units if more than one exists. This button shows the next unit sorted by name. [Previous] Used to “scroll” between existing AO units if more than one exists. This button show the previous unit sorted by name. Channel Selection An AO unit has eight analogue outputs named A to H. Any one of the 32 digital sound channels can be assigned to each of the 8 outputs. Channel 0 is the Floor sound in three qualities and channel 1 to 32 is an interpretation channel. The available languages are selectable from the drop down list. Volume Control The volume for each of the 8 outputs can be set by selecting and Output button and then use the 1 dB buttons to increase and decrease the volume from off and from -40 dB to +15 dB in steps of 1 dB. The volume can be turned up and down by pressing and holding one of the two buttons [-1dB] and [+1dB] in the same way as in the present implementation of the volume control screen. 42 User Manual SW 6008 CUA ver 6.2 RevA.docx DIS Digital Conference System 6.6 User Manual Display Control This screen allows the user to select the display to show on each of the connected CDA applications. Figure 6.6-A The available CDA displays with status are shown in the top left window. The desired screen to display is selected by clicking one of the screens in the list ‘Available Screens’. [Manual/Automatic] When automatic is selected event controlled change of screens to display is performed. When ‘Automatic’ is selected, a user can always manually select another screen, however as soon as an event is taking place, the CDA will change screen in accordance with the settings in the ‘CDA Configuration’. The configuration of the event controlled change of screens is done in the CAA in Setup/Configurations/CDA Configuration. Please refer to the ‘User Manual SW 6090 CDA’ for details about the screens. 6.7 Main Menu This button brings up the Main screen. User Manual SW 6008 CUA ver 6.2 RevA.docx 43 DIS Digital Conference System User Manual 7 Voting and Registration Check 7.1 Start Voting Pressing the ‘Start Voting’ button in the panel buttons starts a voting session. After pressing the button the screen will change to show the result screen and the user will be presented for a popup menu. An optional parameter in the ‘User Type’ can be set to bypass the popup menu. Figure 7.1-A The popup allows the user to continue without changing the ‘Voting Configuration’ assigned to the Conference or to the Subject. If a change is requested it can be done using the dropdown menu to select any of the available Voting Configurations created in the CAA. [Attendance] If ‘Attendance check’ is required in the ‘Voting Configuration’ setup used, the ‘Attendance’ button is enabled. Press this button to make an attendance check. If ‘Attendance’ check is not required, the button is greyed out. [Cancel] Press this button to cancel the session. [Start Voting] Press this button to start the voting session. If the button is greyed out, an Attendance check session has to be performed first. [Enter Result] Press this button to manually entering a voting result. The ‘Enter Result’ button is only available if ‘Manual Voting Result’ has been checked in the CAA under Setup/User Type/Functionality. Pressing [Enter Result] brings another popup: 44 User Manual SW 6008 CUA ver 6.2 RevA.docx DIS Digital Conference System User Manual A manual result can then be entered using a keyboard and confirmed by pressing [OK] or cancelled by pressing [Cancel]. The result is validated by the ‘Passed’ conditions but not by the ‘Quorum’ condition. Attendance check Press the ‘Attendance’ button in the Start Voting popup menu to start an attendance check. The ‘Attendance’ button will only show if the ‘Voting Configuration’ have been set to include attendance check. The menu to the right will disappear when the ‘Attendance’ button has been pressed. Figure 7.1-B Delegates, who are present, are now required to press the ‘Present’ button on their voting units. If the parameters ‘Delegate Interim Result’ and/or ‘Chairman Interim Result’ are chosen in Setup/Configurations/Voting Configuration/Parameters in the CAA, the display will update the counts of ‘Present’ during the Attendance check session. [Stop] Press this button to stop the session. [Cancel] Press this button to cancel the session. User Manual SW 6008 CUA ver 6.2 RevA.docx 45 DIS Digital Conference System User Manual Start voting session Press the ‘Start Voting’ panel button to start the voting session. Figure 7.1-C The menu to the right will disappear and the voting result will be shown: Figure 7.1-D Delegates, who want to vote, are now required to press the ‘Voting’ button on their voting units. The choices are Yes, Abstain or No on a 3-button voting unit and ++, Yes, Abstain, No, or -- on a 5-button voting unit. The user can change his choice until the voting session is ‘Closed’ If the parameters ‘Delegate Interim Result’ and ‘Chairman Interim Result’ are chosen in Setup/Configurations/Voting Configuration in the CAA, the display will update the counts of ‘Present’ during the Attendance check session as well as the votes during the voting session. If the parameter “Secret 46 User Manual SW 6008 CUA ver 6.2 RevA.docx DIS Digital Conference System User Manual Voting” voting has been chosen in Setup/Configurations/Voting Configuration in the CAA, no individual result will be shown on the mimic screen and no Interim results will be shown [Pause] Press this button to pause the session. The session is paused for all delegates except for the delegates, which has the user rights “Right to vote when paused’. They can still cast their votes. [Stop] Press this button to stop the session. If the parameter “Secret Voting” was chosen, the result of the voting session would now be shown on the CUA display and on the CDA display. [Cancel] Press this button to cancel the session. Stop voting session Press the ‘Stop’ button to stop a voting session. The result will be stored in the database and the total results presented on the voting result screens at the CUAs and CDAs. The menu to the right will appear again. The result ‘Passed’ or ‘Not Passed’ will be shown on the screens as well and the result will be written to the agenda. Figure 7.1-E Viewing of Voting Results The interim voting result as well as the final result of the voting session can be seen in three different views: User Manual SW 6008 CUA ver 6.2 RevA.docx 47 DIS Digital Conference System User Manual Total Results Figure 7.1-F Individual Results Figure 7.1-G 48 User Manual SW 6008 CUA ver 6.2 RevA.docx DIS Digital Conference System User Manual Group Results Figure 7.1-H User Manual SW 6008 CUA ver 6.2 RevA.docx 49 DIS Digital Conference System User Manual Vote from CUA If ‘Voting on CUA’ has been checked in the CAA/Setup/User Type/User Rights, voting buttons will appear on the CUA screen when a voting session is started. The number of voting buttons can be from 1 to 5. This depends on the ‘Voting Configuration’. When a voting session is started all CUA’s are forced into voting mode displaying the voting screen. If the user type’s ‘Right to Vote’ option is not checked the user cannot vote and voting buttons on the conference unit will be disabled, and no voting buttons will be presented on the CUA. If the user type’s ‘Right to Vote’ option is checked the user will be able to vote. If ‘Voting on CUA’ is checked voting buttons will be presented to the user on the CUA while voting buttons will be disabled on the Conference unit. If ‘Voting on CUA’ is not checked voting buttons will not be presented to the user on the CUA while voting buttons will be enabled on the conference unit. The next figure shows the 5 different layouts of the voting buttons: Figure 7.1-I The number of voting buttons (1-5) and “Cancel” and their labels and color depends on the voting configuration for the selected subject. If a voting configuration has not been set specially for a subject then the voting configuration set for the conference is used. The buttons in the Conference units (1 to 5 buttons) correspond to the buttons on the CUA in the way that only the number of buttons selected in the voting configuration will work in the Conference Units. If the available buttons in a conference is less that the configured buttons, the unit will not participate in the voting. If a voting button is pressed and the voting mode is not secret the button changes color to show the user what he voted. In the next figures the ‘Yes’ button is shown activated. The “Cancel” button has no indication when selected, but will cancel any vote given. The user can change his vote by pressing another button while the voting session is open. A voting session will only end with a valid voting result if all votes cast by CUA and voting units have been verified. 50 User Manual SW 6008 CUA ver 6.2 RevA.docx DIS Digital Conference System User Manual 3 button voting from CUA Figure 7.1-J 5 buttons voting from CUA Figure 7.1-K 7.2 Registration Check Please refer to the ‘User Manual SW 6000 Registration Facility ver 6.x’ for detailed use of the Registration facility. User Manual SW 6008 CUA ver 6.2 RevA.docx 51 www.shure.com United States, Canada, Latin America, Caribbean: Shure Incorporated 5800 West Touhy Avenue Niles, IL 60714-4608 USA Europe, Middle East, Africa: Asia, Pacific: Shure Europe Gmbh Jakob-Dieffenbacher-Str. 12 75031 Eppingen Germany Shure Asia Limited 22/F, 625 King's Road North Point, Island East, Hong Kong Phone: +1 847 600 2000 Fax: +1 847 600 1212 (USA) Fax: +1 847 600 6446 Email: [email protected] Phone: +49 (0) 7262-9249-100 Fax: +49 (0) 7262-9249-114 Email: [email protected] Phone: (+852) 2893-4290 Fax: (+852) 2893-4055 Email: [email protected]