1
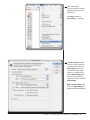
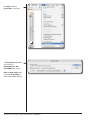
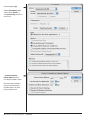
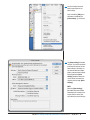
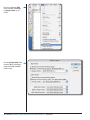
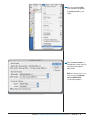
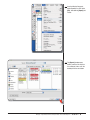
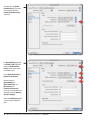
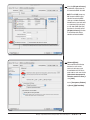
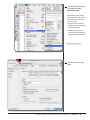
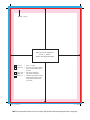
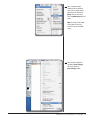
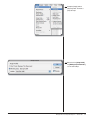
printing mailing marketing
Illustrator
Color Settings / Assign Profile
Illustrator
Color Settings / Assign Profile
Synchronized color with other Adobe software ensures the same color effects are maintained throughout
the production of electronic artwork. Production steps include generating vector files, placing them in a
pagination program and producing perfect PDFs with an embedded destination color profile. The results
of these processes is a foundation to vivid color.
On the next two pages follow the screen captures for color settings and assigning a profile.
Open an Illustrator file.
As a general practice, perform the
following color settings for each
illustrator file.
Click [Edit], slide down to
[Color Settings…] and release.
The [Color Settings] Dialog Box
will open. The closed color wheel
on the top left indicates that the
Color Settings in illustrator are
synchronized with other Adobe
software. It is a good practive to
open the [Color Settings] dialog
box for the user to review and
confirm the contents of illustrator’s
[Color Settings].
NOTE: The[Color Settings] should
match to the [Color Settings] for
Adobe InDesign & Adobe Photoshop.
Illustrator – Color Settings / Assign Profile, Advantage Inc — 08.01.2011 3
Click [Edit], slide down to
[Assign Profile…] and release.
The [Assign Profile] Dialog Box will
open. Veify that the
[Working CMYK: U.S. –Web
Coated (SWOP) v2] is selected.
NOTE: The [Assign Profile] should
match to the [Assign Profile] for
Adobe InDesign & Adobe Photoshop.
4 Illustrator – Color Settings / Assign Profile, Advantage Inc — 08.01.2011
printing mailing marketing
Illustrator
File SetUp
Illustrator
File SetUp
Preparing vector files to either (.ai) or to an (.eps) to place in a pagination software is of crucial
importance. Equally important as the contents are preparing the internal technical aspects which apply
to color management, resolution, transparency flattening, and color space. As applications are upgraded,
file architecture has become more complicated. But the use of vector images integrated into design
has remained the same with respect to the ability of the file to be placed or imported into pagination
software. Once the final design has been completed, illustrator artwork file must behave well during the
processes of PDFing, ripping and finally separations. In the following pages, follow the screen captures
closely as each indicate settings geared towards first making Perfect PDFs.
It is recommended to set up an illustrator file when first opened. Allthough some files are
supplied from advertisers, they must also adhere to the same requirements.
There are other programs which can generate (.eps) files. For purposes of these instructions, illustrator
will be used.
Beginning by simply opening the file, then assessing the recommended settings through saving the file.
Open an Illustrator file.
SetUp CMYK colors in illustrator.
Select or highlight all elements on
the pasteboard. From the pull-down
menus, select the [Filter] menu,
slide down to [Colors], slide to the
right to [Convert to CMYK].
NOTE: RGB, LAB colors will be
converted to CMYK with this
process. CMYK colors will remain.
Spot colors WILL NOT convert to
CMYK. If using Spots to create a
gradient. It is recommended to
always use CMYK. If placing images
in illustrator, make sure to convert
images to CMYK before placing
them. See the Adobe Photoshop
Color Settings.
If a spot color is used in the file,
but the final use of the file is to be
CMYK printing convert ALL Spots to
CMYK in the swatches pallete.
Also, delete any unused colors
in the file. This process is called,
(Cleaning up Colors.)
From the pull-down menus,
click on [File], slide down to
[Document Color Mode], slide
to the right and highlight [CMYK
Color] and release. Always verify
this setting to avoid color shifts in
case the file accidently was set to
[RGB Color] mode.
Illustrator – File SetUp, Advantage Inc — 08.01.2011 7
From the pull-down menus,
click on [File], slide down to
[Document SetUp…], and release.
Once in the [Document Setup],
click on the [Next} button until
[Transparency] appears. Notice
that the button is shown on the
top/left of the window. Next, Click
the [Custom…] button to open the
[Custom Transparency Flattener
Options] window.
Set the [Raster/Vector Balance]
to [100%}.
Set the [Line Art and Text
Resolution;] to [2540 ppi].
Set the [Gradient and Mesh
Resolution] to [150].
Make sure to leave all other items
are unchecked. Click O.K. to exit
the window.
8 Illustrator – File SetUp, Advantage Inc — 08.01.2011
[Save] or [Save As] to save the
illustrator file as an (.ai) or an
(.eps). Browse to a job folder of
your choice. (Both versions can be
placed in InDesign.)
Illustrator – File SetUp, Advantage Inc — 08.01.2011 9
Select either (.ai) or (.eps).
Follow the [EPS Options] window
settings. Click the [Custom…]
under [Transparency] to verify once
more that the…
…[Custom Transparency
Flattener Options] remained.
If not, adjust the window as shown.
Close the file before importing or
placing the illustrator file onto a
pagination program. This avoids
placing a previous version.
10 Illustrator – File SetUp, Advantage Inc — 08.01.2011
printing mailing marketing
InDesign
Color Settings, Assign Profile and Convert to Profile
InDesign
Color Settings, Assign Profile and Convert to Profile
The importance of preparing image files that are to be placed in InDesign is the begining of
good PDF files and files for separations and print. These images should be prepared with
Adobe Photoshop for (Raster) images and Adobe illustrator for (Vector) images.
Once color settings have been set and checked make a preflight from within InDesign.
After the preflight verification of images and fonts. The InDesign Document can be considered
completed. Follow the (InDesign Export Instructions) to Export the PDF.
Save the InDesign Document
before continuing to set the
Color Settings.
Click and hold the [Edit] menu,
slide down and highlight the
[Color Settings…] and release.
The [Color Settings] Dialog Box
will open. The closed color wheel
on the top left indicates that the
Color Settings in InDesign’s are
synchronized with other Adobe
graphic programs Color Settings.
Always opening the [Color
Settings] dialog box allows the
user to review and confirm the
contents of the InDesign [Color
Settings].
NOTE:
Match the [Color Settings]
from Adobe illustrator & Adobe
Photoshop to this example. Save
images with the correct color
space before placing in InDesign.
InDesign Color Settings, Assign Profile and Convert to Profile, Advantage Inc — 08.01.2011 13
Next, click and hold the [Edit]
menu, slide down and highlight
the [Assign Profiles…] and
release.
Once the [Assign Profile] dialog
box opens. Match and verify the
contents of the RGB and CMYK
Profiles exactly.
14 InDesign Color Settings, Assign Profile and Convert to Profile, Advantage Inc — 08.01.2011
Next, click and hold the [Edit]
menu, slide down and highlight
the [Convert to Profile…] and
release.
Once the [Convert to Profile…]
dialog box opens, match and verify
the contents of thae RGB and
CMYK Profiles.
NOTE: To avoid color shifts, it is very
important to set the Destination
Space to [CMYK Profile]
U.S. Web Coated (SWOP) v2.
InDesign Color Settings, Assign Profile and Convert to Profile, Advantage Inc — 08.01.2011 15
printing mailing marketing
InDesign
Export Adobe PDF & Save Export Adobe Preset
InDesign
Export Adobe PDF & Save Export Adobe Preset
The importance of preparing image files to be placed in InDesign, is the beginning of good PDF
files used for separations and printing. For optimum results, prepare (Raster) images with Adobe
Photoshop, and prepare (Vector) images with Adobe illustrator. It is important to keep in mind that
with the instructions of this handout, it is assumed that Photoshop and illustrator have been used to
create images at the prescribed settings.
Before placing any images, please read the Advantage Inc General Guidelines
– Customer Graphics Construction & PDF File Preparation, Adobe Photoshop and Illustrator
Handouts. The handouts contain important technical settings which must be applied beforehand
with native software.
Once the InDesign document has been completed, to export PDFs, follow the InDesign instructions
and screen captures on the following pages.
Save the InDesign Document
before Exporting to a PDF. Select
[File], slide down to [Export] and
release.
The [Export] window opens,
browse, name the file and place
it to a folder of choice, or on the
desktop. Click the save button.
InDesign – Export Adobe PDF & Save Export Adobe Preset, Advantage Inc — 08.01.2011 18
The [Export Adobe PDF] dialog
window will appear with
[PDF/X - 1a: 2001] within
[Adobe Preset:].
On the list of items on the left,
[General] is the first item.
Directly under [Pages], choose
all to make one PDF containing
all pages or choose [Range] and
enter specific pages.
Under [Options], ONLY select the
[View PDF after Exporting] box
to view the PDF after it has been
exported.
[Compression]
Set compression to [ZIP] for
both color Images and grayscale
Images. Image integrity will
be preserved and no image
degradation will occur. Leave
[Bicubic Downsamppling to]
[300] for imges over [450].
Follow the [Monochrome images]
as shown.
NOTE: As soon as changes are
made to the original preset, it
becomes (modified). At the end of
all adjustments, a new preset will
be saved [Save As…].
19 InDesign – Export Adobe PDF & Save Export Adobe Preset, Advantage Inc — 08.01.2011
[Marks and Bleeds] Certain marks
and information about each page
is required for easy identification.
Therefore, select
and check [Crop Marks] and
[Page Information].
How marks are placed on the PDF
is also important and shouldn’t
obstruct any page elements. Set
[Offset] to (.25"). This will push the
crop marks and page information
(.25") away from the trims. Set
(.25" for [Bleeds]. As a result
the physical size of the PDF will
be (1 in.) larger than the InDesign
document size.
For example if the size of the
document is:
(8.375" x 10.875") plus (.25 in)
for the offset, plus (.25 in) for crop
marks on all four sides, making
the final PDF size
(9.375" x 11.875")
[Output] Notice the
[Compatibility] is to
[Acrobat 4 (PDF 1.3)] and that
the [Profile Inclusion Policy:]
is grayed out. Click and hold the
[Acrobat 4 (PDF 1.3)]. Select the
[Acrobat 7 (PDF 1.6)] option and
release.
NOTE: The toggle back and forth
needs to be done to activate the
[Profile Inclusion Policy:].
InDesign – Export Adobe PDF & Save Export Adobe Preset, Advantage Inc — 08.01.2011 20
You'll notice that the [Profile
Inclusion Policy:] is now active.
Click and hold it, select the
[Include Destination Profile],
and release.
For [Compatibility], toggle back
to [Acrobat 4 (PDF 1.3)]. You’ll
notice the [Profile Inclusion
Policy:] remains active and the
new setting in place.
Set the [Color Conversion:] to
[Convert to Destination].
Make sure that the
[Compatibility:] and
[Color Conversion:] and
[Destination:] and
[Profile Inclusion Policy:]
are set up as shown.Color is now
directed to match the [InDesign
CS2 Color Settings].
Select the [Ink Manager] button.
The ink manager window will
open.
21 InDesign – Export Adobe PDF & Save Export Adobe Preset, Advantage Inc — 08.01.2011
Select the [All Spots to Process].
By definition all Spot colors will
be converted to CMYK. Click O.K.
NOTE: This will NOT change any
RGB images to CMYK. Images
should be converted to CMYK
color space in Adobe Photoshop.
Should there be a spot color used
as a 2nd Color (Black plus Spot)
or a 5th Color (CMYK plus Spot)
then there is no need to convert
[All Spots to Process]. All colors
in the InDesign Color Pallete
should be converted to CMYK.
[Advanced] [Fonts]
Fonts used within the InDesign
document as well as fonts
used in placed images, must
be embedded in the PDF file. In
order to do so, make sure that the
[Subset fonts when percent of
characters used is less than:] is
set to [100%].
Set the [Transparency Flattener]
to [Preset:] [High Resolution].
InDesign – Export Adobe PDF & Save Export Adobe Preset, Advantage Inc — 08.01.2011 22
Click on the [Save Preset…]
to name and save the changes
under a new name. In the
[Save Preset] window, name the
new preset as shown:
ADV Export PDF Preset_JD
This will identify a new InDesign
PDF Export Preset setting from
others supplied to you.
The new preset now appears at
the top. Now the PDF is ready
to export. Click on [Export] at
the bottom right to create the
PDF. Once the exported PDF is
generated, Acrobat Reader will
open the PDF for review.
See the example of a PDF on the
last page of these instructions.
NOTE: At this point if the process
is canceled, the new preset will
have been saved, but no PDF
generated.
23 InDesign – Export Adobe PDF & Save Export Adobe Preset, Advantage Inc — 08.01.2011
The new PDF preset also appears
as an option under [File]
[Adobe PDF Presets].
Before Exporting a PDF from the
InDesign Document make sure that
all prerequisites have been done.
See the list below;
• All pages have been finalized.
• All elements have been prepared
to CMYK specifications.
• Color Management has been
setup and settings reviewed. See
the InDesign Color Color Settings.
ADV Export PDF Preset_JD...
The document is now ready for
export.
InDesign – Export Adobe PDF & Save Export Adobe Preset, Advantage Inc — 08.01.2011 24
Margin = .375”
Page size for this example is
8.375” x 10.875”
Arrows show page trim edges
Trim Size
=
8.375” x 10.875”
Image area
=
Live Area, text, images, graphics
& folios. Keep elements within
this area.
Margin .375” =
Safety Area
May contain graphics &
color panels which bleed.
Bleeds 1/4”
Includes page elements from the
image area through the margin
area past the trims & extend
1/4” beyond.
=
8.375 x 10.875 Layout.indd 1
8/1/11 2:53:32 PM
NOTE: This layout example is not to size. It use is to simply show the PDF results from the export process for a single page.
10 InDesign CS2 – Export Adobe PDF & Save Export Adobe Preset, Rodgers & McDonald — 04.24.2007
printing mailing marketing
Photoshop
Photoshop Color Settings & Color Management
Photoshop
Photoshop Color Settings & Color Management
An important factor in image preparation is color settings, assigning a profile and converting to profile or
destination space. Adhering color management to a raster image is the difference between a flat image,
unwanted color shifts, and vivid colors of an image which seem to almost pop out of the printed page.
The basis is a good (HiRes) or High Resolution scan. The list below delineates other factors:
Converting the image to CMYK Color Space
Color correction, a subjective view and adjustment function done by the user
Color Settings – Always review color settings for content
Assign Profile – Assigns the source of the color from the color settings
Convert to Profile – The Convert to Profile, destination working color space is required to be set
at the working CMYK color space for the image to true CMYK image.
The Heat Set D-Max = Adding the CMYK colors of an image should no greater than 320.
The OpenWeb D-Max = Adding the CMYK colors of an image should no greater than 240.
The purpose of these instructions and screen captures on the following pages, is to set up Color settings
for CMYK and Grayscale images.
Open an image with Adobe
Photoshop. From the pull down
menus click on [Image], hold the
mouse down and slide down to
[Mode], slide over to the right,
select the [CMYK Color] option and
release.
NOTE: The image still not a CMYK
image. Follow the remaining
instructions to make true CMYK
images.
Click and hold the [Edit] menu,
slide down to [Color Settings]
and release to open the
[Color Settings] window.
InDesign Print / Postscript, Advantage Inc — 08.01.2011 28
The [Color Settings…] window
shows [Settings:] to be defaulted to
[North America General Purpose 2].
The closed or complete wheel
indicates that Photoshop is
synchronized with other Adobe
applications such as InDesign and
Illustrator. Verify the contents of the
screen capture to those on your
system.
Click on [Edit], hold and slide down
to [Assign Profile…] and release
29 InDesign Print / Postscript, Advantage Inc — 08.01.2011
Within the [Assign Profile] window
make sure that the
[Working CMYK:
U.S. Web Coated (SWOP) v2]
button is selected. Click [O.K.] to
assign the profile.
Again, from the pull-down menus
click and hold the [Edit] and slide
down, highlight the [Convert Profile]
and release it to open the [Convert
Profile] window.
InDesign Print / Postscript, Advantage Inc — 08.01.2011
30
Once open, match & verify the
contents of the both [Source Space]
and [Destination Space].
The destination space probably is
defaulted to an (RGB) setting.
Change the [Destination Space] to
[Profile:] [Working CMYK U.S. Web Coated (SWOP) v2].
The destination space set with this
parameter ensures that the image
can now be saved with a CMYK
color profile.
31 InDesign Print / Postscript, Advantage Inc — 08.01.2011
Change the [Image] mode to
[Grayscale] mode. This makes a
grayscale image.
Notice that in the [Assign Profile]
the [Working Gray: Dot Gain 20%]
as in the color settings.
InDesign Print / Postscript, Advantage Inc — 08.01.2011
32
The [Convert Profile] also
shows grayscale settings on
both the [Source Space] and the
[Destination Space]. Again, follow
the screen capture.
Open [Image Size] and verify that
the [Resolution:] is set at [300]. Do
not attempt to change the resolution
by typing in the number. It will not
change the image. As a rule of thumb,
a (300 dpi) image can be resized
from the (8.5 in. x 11 in.) to a smaller
size at (300 dpi) because the pixel
information is there from the start.
But an image at (8.5 in. x 11 in.)
at (72 dpi) cannot be physically made
into a (300 dpi) image at the same
size. The exception, if the same
image at (72 dpi) is placed at 25%
in a pagination program, its effective
resolution will be at (288 dpi). Pixels
are scaled down, thus fitting more
pixels per inch.
Photoshop can achieve re sizing
by resampling the image. See the
Photoshop User Manual.
The effective resolution of an image depends on the percentage of placement. If the image is reduced,
the effective resolution will multiply. During the export, with the correct settings, the images will be
downsampled to [300 dpi]. The same effect will result when distilling a postscript with correct Adobe
Acrobat Distiller Settings.
LoRes (Low Resolution) images placed at 100% in the pagination program, will remain at LoRes and will
not be affected during distilling or exporting a PDF. Images must be replaced.
33 InDesign Print / Postscript, Advantage Inc — 08.01.2011