1
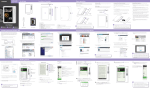
UserManualforaddingcontenttothe
SkiClubwebsite
Website URL: www.skiclubsa.co.za
Glossary
“Post” – a new article
“Comment” – a comment on a Post. The post has to exist before you can comment on it, obviously.
Step 1 – click on ‘login’ on bottom right hand corner of Home page
Step 2 – login using your assigned Username and password
Username = surname + initial
e.g. Jim Bean = beanj
If you can’t remember your password, then click on the “Lost your password?” button and it will be
e-mailed to you.
Note – by default everyone has been set-up as a ‘Contributor’. If you feel that you need a higher
level of access, then please contact the Web Site Administrator.
Step 3 – add your content!
Option 1 – QuickPress is a quick way to create a Post
Title - Type the Title or ‘description’ of your entry here (keep it short)
Ideally start with the date if a report on an event or duty officer report. Check other posts to see
what has been used in the past.
Content - Cut and paste the content from another application or simply type it.
Tags – not mandatory, but can be useful for anyone that is searching the site for particular topics.
Examples might be “duty officer”, “skiing”, “snow report”
Save Draft – use this if you need to edit later
Reset – only hit this if you want to clear everything and start again
Submit for Review – this effectively publishes the article. The web site administrator receives an
email that something is waiting and can then login to add it to the correct page.
Note – if you have any doubt about what the final article might look like, click on ‘Save Draft’ and
then review it as indicated below.
Recent Drafts section – circled below
This section is where anything that you “Saved to Drafts” appears (i.e. clicked on the ‘Save Draft’
button). If you wish to edit or otherwise change a draft, just click on the title, highlighted in blue
(marked with an arrow in the picture above). The same screen will then appear as for adding a new
Post as described below.
Option 2 – add a Post using the ‘Posts’ menu
If you hover your mouse over the word ‘Posts’ on the left hand side of the screen, two options
appear
1) All Posts – shows a list of every post that you have made
2) Add New – goes straight to the Add New Post screen
An example of what the ‘All Posts’ screen might look like
An example of what the ‘Add New Post’ screen looks like
Note 1
Note 2
Note 3
Note 4
Note 1 – add the title of the Post/article here
Note 2 – copy and paste the body of your article or simply type the content here.
Note 3 – choose where you wish the article to appear (“Notice Board” is recommended)
Note 4 – add your ‘tags’ as required. If you click on “Choose from the most used tags”, it may give
you some useful suggestions.
Click on ‘Submit for Review’ when finished