1
www. pirengo.org
User Manual for Managing Website
Table of Contents
Introduction ...............................................................................................................................................4
Guide Method .......................................................................................................................................4
Using WordPress .......................................................................................................................................5
First Concepts .......................................................................................................................................5
Great Things About WordPress ............................................................................................................5
Getting Started ......................................................................................................................................6
Navigating Around the Administration Panel ....................................................................................12
The Admin Bar ..............................................................................................................................13
Understanding the difference between pages and posts .....................................................................14
Adding and Editing Content ...............................................................................................................14
Formatting text using the rich editor .............................................................................................15
Formatting text using the HTML editor ........................................................................................17
Writing a post ................................................................................................................................18
Adding links to your posts .............................................................................................................19
Opening a link in a new window vs. Using the current window ...................................................28
Adding images to your posts .........................................................................................................28
Adding a gallery of images ............................................................................................................38
Adding video clips to your posts ...................................................................................................40
Setting posting and page options ...................................................................................................43
Post Formats ..................................................................................................................................45
Saving & publishing your post or page .........................................................................................46
Creating and managing your categories ........................................................................................47
Writing Pages and Structuring Them .................................................................................................54
Writing Pages .................................................................................................................................54
Page Attributes ...............................................................................................................................60
Publishing Content Created by Other Contributors ...........................................................................63
Moderating Comments .......................................................................................................................63
Managing Links ..................................................................................................................................66
Creating link categories .................................................................................................................67
Creating links .................................................................................................................................78
Administering WordPress .......................................................................................................................82
Managing Users ..................................................................................................................................82
Adding users ..................................................................................................................................83
Remove users .................................................................................................................................83
Edit the details of a user ................................................................................................................84
Manage the content created by a user ............................................................................................86
Managing Options and Settings .........................................................................................................86
Managing the Look & Feel of your website ......................................................................................87
Appearance ....................................................................................................................................87
Widgets ..........................................................................................................................................89
Custom Headers .............................................................................................................................91
Custom Backgrounds .....................................................................................................................95
Creating Custom Menus ...................................................................................................................101
Defining a Menu ..........................................................................................................................101
Adding Items to a Menu ..............................................................................................................104
Deleting a menu item ...................................................................................................................104
Customising Menu Items .............................................................................................................105
Creating multi-level menus .........................................................................................................106
The Menu in Action .....................................................................................................................107
Site Tips .................................................................................................................................................109
Structuring a Site ..............................................................................................................................109
Simple Structuring Rules: ............................................................................................................109
Engaging with visitors ......................................................................................................................109
Search Engines ................................................................................................................................. 110
Going Further ........................................................................................................................................ 111
Training ............................................................................................................................................ 111
Do you need something special? ...................................................................................................... 113
Beware of strangers bearing gifts ..................................................................................................... 113
All Done! ............................................................................................................................................... 114
Credits .............................................................................................................................................. 114
Introduction
The first of our WordPress User Guides was originally written for non technical users of DEF who had
registered a website using WordPress under any of our programme like eNGO, eMSME & Digital Panchayat.
This guide doesn't cover WordPress installation – installation is well documented on wordpress.org, and if you
wish you can go for a hosted solution on wordpress.com. If you need help installing, migrating or upgrading
your WordPress installation you should get in touch with us for a quote. You'll need to contact us through our
website's contact form at http://www.interconnectit.com/contact/ We may well add installation information at a
later date, but time, at the moment, doesn't allow.
The guide also doesn't cover configuration of WordPress – all those lovely options in the settings page.
However, we're planning to add something about them – perhaps more a 'frequently asked questions' section,
with simple answers.
If you want further, personal training, we run training programmes regularly where you'll be able to learn a range
of WordPress skills – from beginner to advanced.
Guide Method
This guide covers the basics in each section, trying to take a progressive approach so that each section builds on
knowledge and skill acquired earlier in the guide.
Our screenshots and usage all come from WordPress installed on a local computer, but they apply equally to
WordPress installed on normal web server.
One new change in this version is to include a series of exercises which are aimed at developing the reader's
skills.
Getting Started
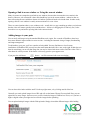
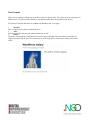
So the first thing to do is: Log In!
If you haven't got a login link on your site's front page, simply add /wp-admin to the root address and you'll
arrive at the login page as above. The default themes always show login links in their initial configuration.
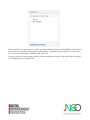
If you lose your login details provided by DEF, you can click on “Lost your password?” and a new
password will be generated and e-mailed to you. You'll need to change this to something more memorable.
Enter your details, select “Remember me” if your computer is secure and only used by you and you'd like not
to have to log in each time, and click on the Login button.
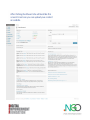
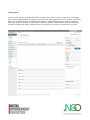
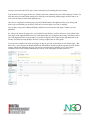
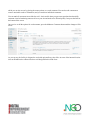
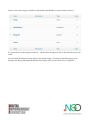
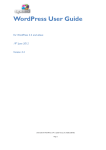
Now you're logged in, you'll arrive at the Dashboard – a screen that gives a range of information about your
website:
You'll notice here that there's a great deal of information showing here in a series of widgets. You can
organise this information to best suit you, moving widgets around and expanding or contracting them in
whichever you find appropriate.
To move a widget, click and drag the bar of the widget around. To roll it up, simply click on the right hand edge
of the bar where you'll see an arrow appear.
On the left hand side, you'll notice that there's a large list of links such as Posts, Media, Links and so on. What
you see here will depend a lot on the user level you have on your blog. Administrators can see
everything and subscribers the least.
QUICK EXERCISES:
1. Try moving the widgets around – for example, place
Recent Comments at the bottom of the right hand column.
What happened?
2. Extend the QuickPress Box – what do you think this is
for? Try writing something there. What happened?
3. Arrange the entire page in a way you feel would be most
useful to you. Experiment – you can always change this page
again in the future.
Navigating Around the Administration Panel
Navigation of the admin panels in WordPress is pretty straightforward, but it can feel like there are a
bewildering range of options to choose from.
You'll notice that to the left of the dashboard you have a series of links that you can quickly and easily click on –
these then expand out to show you other sub pages. The quick reference below reveals the range of functions,
with a brief explanation alongside:
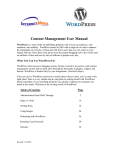
If you notice, there's an alternative, less screen hungry option which is great for those of you with smaller
monitors – simply click on the little slider you see in parts of the menu to make it smaller:
When you click it, you will get a smaller icon-only version of the menu with the options appearing in a little
pop-up.
The Admin Bar
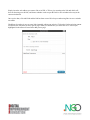
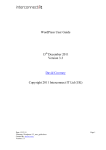
At the top of your WordPress site you will see the admin bar. By default this is only shown when you are logged
in and browsing the website but it can be switched on or off for the administration area and website by visiting
your user profile and checking the appropriate boxes shown below.
The admin bar itself provides you with quick access to the administration area in the following ways:
•
The user section, including quick links to your profile editing screen, dashboard and logout link
•
Edit Post: A link to edit the current post or page you are on
•
Add New: A dropdown to quickly add a new post or page
•
Comments: A link to the comments administration area which will indicate how many comments are
awaiting approval if any
•
Appearance: Quick links to the theme selection, widgets and menus admin areas
•
Updates: A link that shows you if any plugins require updating and takes you to the plugin admin area
•
Shortlink: A short version of the current post or page address that you can copy for use with a service
such as Twitter to save space
You can also search your website's content directly from the admin bar using the search box on the right hand
side.
Understanding the difference between pages and posts
Before we start working on your site, it's important to have a clear understanding of the difference between
pages and posts:
Pages are usually those which have a static purpose in life. For example an about page, resumé page or
contact forms. They do not usually contain information about news items, for example, which are added
to the site on a regular basis. Pages are generally defined so that they are always accessible from the
front page. Some people build entire sites with just Pages – this is especially the case for sites with little
need for dynamic content and is very popular with small businesses who simply want an online
brochure.
Posts usually contain semantically and chronographically arranged information – for example, news
reports, event results, and of course blog entries! The semantic structure is defined by categories and
tags, and whilst making it easy for people to navigate your site will also help search engines to
understand the content of your site and so improve the relevance of search results.
Adding and Editing Content
Rather than drone on about concepts, structure and methods, let's start to get some content into the site right
away.
WordPress provides a number of tools – for editing, and for image management. It allows you to easily
manage your content with a familiar editing interface. You don't need to learn HTML – just the skills you've
already acquired using word processors like Microsoft Word.
Formatting text using the rich editor
You can easily enter format text using the rich editor if you're familiar with any word processing packages.
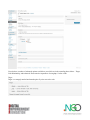
Let's create a news article – just go to Posts and Add New in the left hand toolbar (if you're writing a static Page,
you go to Pages and Add New instead):
As you can see from the buttons, it's possible to format text in a number of ways using the buttons and they'll be
familiar to any user of word processor software. You can also extend the size of the box by dragging on the
bottom right of it.
By default you'll only see one line of buttons, not the two below – that's because you need to press the
Advanced Options button on the far right to see them.
Don't forget – if you get stuck, hovering over the buttons will describe what they do, and the short cut to use
them quickly from the keyboard.
Essentially, what you're working with should be familiar to you – it's rather like using Wordpad or some other
similar low-end word processor.
On the page you'll also see the usual Tags and Categories options. You'll see a full description of all these options
in Setting Posting and Page Options
Text Styling Notes:
When you're writing you may have a style guide to work with. If this is your own site, the following will be
useful to you when choosing what text styles to apply in your content:
1.
Heading 1 through to Heading 6 – in most themes headings within a post or page will start at
Heading 3 (H3), going down to H6. The higher the value, the more important a search engine will consider it,
but remember that H1 is usually reserved for the site title at the top of the page, and H2 for the post or page's
title. Interfering with that order can result in search engine penalisation.
2.
Use Unordered or Ordered lists for lists that are relatively short, but resist the temptation to use them
for lists of paragraphs – instead, use the Heading styles.
3.
Use Bold and Italic in moderation. Do NOT use bold as a substitute for heading styles – bold is not as
important to a search engine.
4.
Some themes may override your styling decisions – for example, enforcing alignment, what an italic
actually looks like and so on. You should experiment with this.
5.
Most themes will highlight links in a different colour and with hover properties – you shouldn't need
to worry too much about these.
6.
What something looks like in the visual editor and how it will look on the page are quite different,
unfortunately – make good use of the Preview button before publishing.
Formatting text using the HTML editor
You can also click on the HTML tab on the editor and input text in HTML – the language that describes web
pages. This is for the more technically inclined and does have the advantage of making it easier for you to create
more sophisticated designs. It's worth noting that WordPress MU (used on sites such as WordPress.com and
Edublogs) will, by default, filter out a lot of HTML, which will limit your options.
IMPORTANT: When using the html editor it's essential that you close all tags, or ask WordPress to do it for you
by pressing the 'Close Tags' button. If you don't then your site's layout will be broken whenever that posting or
page is displayed.
IMPORTANT (2): If a page or posting has been written using the html editor then any attempt to edit that
article using the visual rich editor may result in content or formatting being lost. This isn't the problem it used to
be.
Writing a post
As you can see from the screenshot down below, writing a post is just the same as a page – but it's something
that, if you're using WordPress for blogging, is going to be far more important for you. To get there, select Write,
then, if it's not already on Post, select Post. Some options are slightly different, because posts are organised
differently. If you are an Editor or Administrator on the site, you have a Publish button. Once pressed the post
becomes available on the website. Before the post is ready, however, you can save it and keep it as a draft.
In the example above, you can see the Categories box to the bottom-right of the editor window. Select a
category of 'news'.
Let's make this a short article about launching the website. Place the text below into it the text box, with the
title Our First News:
Today we launched a new website. We'll be producing news and articles here for your
enjoyment.
Scroll back up and press Publish. Your article is on the website!
Now create a couple of articles for testing with – one called “Interesting cats for 2010”, and one called
“WordPress Is Great”. Enter any text you like in the post box. Make sure that these two posts are in Trivia
and WordPress categories respectively. Don't forget to add tags as well!
Adding links to your posts
One of the most important things you can do on your website is to link out to other sites. Those other sites will
appreciate the links, but it also shows where you get your information from. This is useful to the reader and
also a sign of an experienced and skilful blogger who cites his references. There's also absolutely nothing
wrong with linking within your own site. Of course, it takes a little extra time, but it's worth it for the extra
engagement.
To create a link in text, highlight the text you wish to link, and then click on the link icon in the editor:
Once the link icon is selected, you have a pop-up dialog:
Simply insert the web address you want to link to in URL, a Title to give meaning to the link and which will
show on hovering over the link, and choose whether or not to open the link in a new window/tab or stay in the
current window/tab.
Once you're done, click Add Link and the link has been created. It's always worth testing links in case a mistake
was made.
WordPress also makes it easy to create links internally within your website. Click on the Link to existing content
text and use the search box to find a post or page. When you find the one you want click on it. The text you
highlighted in the editor will now link to that post or page.
Opening a link in a new window vs. Using the current window
Many site owners are tempted to open links in new windows, because then it means their site remains in the
browser. However, web convention is that a link should keep you in the current window – otherwise after an
hour of browsing the user could have dozens of windows open that all need to be closed down. In other words,
opening a link in a new window is usually an inconvenience for a site visitor.
There are some situations where a new window works – usually this is to pop something up where you just know
that the visitor will want to quickly look at and then close – however, in blogging this is relatively rare, so the
best advice is to try and stick to opening links in the current window.
Adding images to your posts
You can easily add images using the standard WordPress tools. Again, like so much of WordPress, there have
been some dramatic improvements in recent versions – including the automatic sizing of images, thumbnailing
and image management.
To add media to your post, you'll see a number of tools added. You may find that on a lot of custom
installations of WordPress MU you only have the small button that looks like a sun, on the right. If that's the case
then for most things you can use that image, but you may be limited with items such as YouTube videos. This is
often done for security reasons. If the feature is necessary, speak to your support team.
If you press the Add Image
button
you'll be presented with a pop-up window:
You can close this window with the small X in the top-right corner, or by clicking outside of the box.
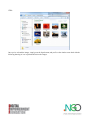
Generally you won't upload images from a URL and will use the button 'Choose files to upload'. Here you can
upload one or many images. On most servers you'll be limited to images of 2MB or less in size, so if you have a
high-res digital camera you might need to resize the images before uploading.
You can upload multiple images with the Flash uploader. Simply selected the different images while holding
CTRL:
Once you've selected the images, simply press the Open button, and you'll see the window come back with the
following showing in it as it uploads and resizes the images:
Once
you'll see
the
you've
attached
post.
done,
a list of
images
just
to the
This
the
shows
thumbnails created. If something went wrong at this stage and no thumbnails were created, there may be a
problem with your connection or with the server's configuration.
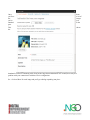
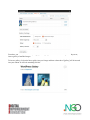
So – click on 'Show' for each image and you'll get a dialog expanding into place:
This dialogue provides a lot of options and controls – let's go through them:
Title – this is the title of the image.
Alternative Text- a brief description of the image.
Caption – the caption text for the image.
Description – the description. Not used by all themes, but handy to complete and may be used further in the
future. It's often just seen when you view an image as an attachment.
Link URL – this is the address of the original image you've uploaded, by default, but it also allows you to create
a link to another website here – quickly and effectively. You can also press the three buttons – None, meaning the
image has no link, File URL, the default, and Post URL which will show your image within the design of the site
rather than as an image on its own.
Alignment – This allows you to set how the image is aligned. The small icons show the effect on the textwrapping.
Size – you'll want to choose how big the image is. If it's not too massive, you can use the Full Size image –
just make sure it fits into the space available. Otherwise, a Thumbnail, by default is a 150x150px square, and
Medium is cropped to fit in a 300x300px space.
Once you've selected your options, you press the Insert into Post button to add the image to where your cursor
was when you chose to Add Images. In this example we've gone for a thumbnail to the right, with a caption.
In the editor it now looks like this:
And if you press the preview button, you can see that on the website, it looks like:
It's worth noting that deleting a captioned image from the post can appear a little tricky if you try and do it the
same way as you might in Word. Instead, if you click on the picture you'll see two icons appear as shown to
the right, one a red circle with a line, and another a little panorama. The red circle is for deleting the image,
and the panorama (which is mostly used only by advanced users) allows you to change some settings in the
image, but without actually changing the attachment details.
After uploading, if you forgot to add images to a post you can still press the Add Images button and then click on
the Gallery tab. In there you can see all images attached to this post, and insert them individually.
Next we want to experiment with a couple of other features, so press Edit to edit this post and let's do some
more:
Click on the Add video
button
Now, you can upload a file, but if your site isn't set up with a suitable player, it'll just create a link to the file or
page which your user can visit. This is OK, but not amazing. There are plugins to help this along, but that's for
you or your systems administrator to arrange.
The same applies to the Add Audio Button, and add Media. In essence, they allow you to upload files, but
mostly leave you just on links unless you use suitable plugins.
Adding a gallery of images
One new feature that came with WordPress 2.5 was galleries – this allows you to present a grid of image
thumbnails in a post or page which people can click on to enlarge.
To insert a gallery into a post, you can upload a number of images (which are then attached to this post), click
the Save All Changes button in the bottom left-hand corner and then click on the Gallery tab:
From here, you can adjust the order by dragging and dropping, insert the individual images into the post or,
insert a gallery of attached images.
To insert a gallery, click on the 'Insert gallery into post' image and then a shortcode of [gallery] will be inserted
into your content. It will look something like this:
Adding video clips to your posts
Since WordPress 2.9, new video embedding facilities have been added to WordPress. Simply put, all you need
to do now is get the link for a video on a website and click on the video link button. Let's take the video Dot
that was recently released as a way of advertising a new mobile phone. The link is
http://www.youtube.com/watch?v=olPDrqC2MGM and to embed it into your WordPress site is really easy.
Simply put, all you need to do is to copy (ctl+c) the URL from the browser bar, and then paste it into the text
editor as so:
And now, if you look at the post, it should look something like the following image:
Other forms of video upload are beyond the current scope of this document – however, lots of help is available
on WordPress's support forums. One thing worth noting is that with most methods you need to upload first to
a media server (via whichever means you prefer) and then use the embed media button in the editor . This is, I'm
afraid, one of those things that is hard to describe clearly, but once you've done it a couple of times will come
easily and naturally.
A shortcut for video embedding is to use a plugin called Viper's Video Quicktags – this gives more control over
embeds from different sources, allowing for different sizes.
Setting posting and page options
There is a large range of posting options that are available to you if you look around the writing area and which
give you finer control over how your content is presented. The order can change according to user preferences –
what's important are the titles.
Excerpt
Use this to create a short introductory text (you can add HTML if
you desire) about your post. This is used by some themes and
plugins, as well as by your site's RSS feed.
Send Trackbacks
Not often used these days, but this allows trackbacks to be sent to
a specific location. You can use it to notify certain sites of your
new post. Other WordPress blogs, and sites that support a
protocol called XML-RPC are automatically informed if you
happen to link to them.
Custom Fields
Custom fields are used by certain themes and plugins. Some will
use these fields but you won't ever have to touch them, others will
require you to input values. Information on this should be
included in your theme or plugin instructions.
Top-of-the-range themes tend to add boxes for you to tick but use
custom fields – you may see values added automatically. In some
cases being able to edit these values will give you finer control
over your posting, or allow you to fix problems that
might come up.
Discussion
Allow Comments on
This Post
If checked, allows a visitor to add comments to the posting albeit
according to rules defined in Settings | Discussion
Allow Trackbacks and This means that if someone links to the posting from another
Pingbacks on this post website using similar software you will be notified on the
Dashboard page and the trackback may show in the comments
section if authorised.
Since WordPress 2.9 you can view, reply to, moderate and edit
comments from the edit panel.
Comments
Author
Revisions
Allows you to set a
Post Author
If your site has multiple authors, you can change them here if you
have a suitable user rights – generally Editor and above although
this can change on some configurations.
You can revert to an old version of your post or page, and can
track the changes made to a post. This option will not normally
be visible when you are creating a new post/page.
Roughly the same fields are available in Page writing, with some added and some removed. Some themes and
plugins may return some options – such as excerpts for pages which are used by some themes.
The additional options for writing pages are covered in the section Writing Pages.
Post Formats
When you are creating or editing a post you have a choice of post formats. These allow posts to be displayed in
different ways. The post formats available (if any) depend on the theme being used by your website.
The Twenty Ten theme that comes as standard with WordPress has 3 post types.
1.
Standard
This is a regular post as has been described above
2.
Aside
This format displays only the post content with no title or link.
3.
Gallery
The gallery format displays a thumbnail of one of the images uploaded to the post and the total number of
images associated with the post. You still need to insert the image gallery into the post content as described
earlier.
Saving & publishing your post or page
Once you've written your masterpiece you'll want to save it... and then publish it (ie. Make it visible on the
site) for the whole world to see – you've probably already pushed that publish button, but we're returning to it
because there are various options that are worth learning:
The Publish box above is usually at the top right of the page. By default it looks like the above.
As you can see, the simplest way to publish your content is simply to press that big blue Publish button.
If you're a contributor, you'll have found that you can't do much in WordPress beyond contribute words, and
your Publish box will actually look like this:
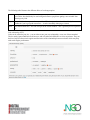
The following table gives a breakdown of the different functionality available here:
Preview
This button allows you to preview how the content will look.
Status
This shows the Status of your post, for example, whether it is
visible
Private
Publish
(immediately) edit
If you want to keep the post from prying eyes you can do this. If a
post is private only registered members of the site can see it.
Making a post private means it can't be published – you'll see the
button change to reflect this.
Public
If you click on Edit the box will expand to offer you the facility to
edit the date on which this page will become published. This allows
you to create content in advance – handy for holidays or embargoes.
Password Protected You can also create posts that are protected with a password which
you will have to distribute amongst readers. This can be useful
where you want to give a selected few advance access to content.
Save Draft
This saves the post or page, instead you will be working on the
currently live version of the page (WordPress only has modest
workflow and versioning capabilities) and the Publish button will
change to say Update Post or Update Page.
Publish/Submit for
Review
The moment you push this button, the content becomes visible on
the site.
If you're a Contributor you will not be able to Publish but instead
only submit for review.
Move To Trash
This option will move the post/page to the “Trash” area (the
“Trash” area is a bit like the Recycle Bin in Windows.)
Creating and managing your categories
Organising categories can be one of the greatest influences in how easy it is to navigate your site. It can also be
one of the hardest things to get right, and there's many a blog owner who wishes they'd done it differently.
You can always reorganise the categories at a later date, but that can be quite a tedious task as you will often
need to re-categorise each and every posting that is affected. However, adding a new category is always easy
and straightforward and can even be done while you create a post, if you have the appropriate user level:
For the categories we're going to use we need to go to Posts and then Categories in the WordPress administration
area. For this site we want to create categories called 'Editing', 'Comments', and 'Presentation'. As well as those,
we want to create a subcategory of Editing called 'Advanced'.
To do this, go back to your site Admin and click on Posts, and then the Categories link beneath that. You should
see something like the screenshot below:
As you can see, there's already a category called Uncategorized which comes with the standard installation of
WordPress.
You now need to add a series of new categories. It's easy – simply go down to the area of the screen marked Add
Category, and get started. You have the following fields to consider:
Category Name
This is the nice, short name of the category. Try to avoid length descriptions. One or two
words are best, and easiest to read on most websites
Category Slug
This is an advanced option – it's automatically populated if you don't put anything in. Until
you get to more advanced techniques you can leave this field alone. It describes the
permalink path to the category when the permalinks option in WordPress is set. Read the
permalinks section of this document to learn more about the subject.
Category Parent If you're creating a subcategory, this allows you to define which category is a parent.
Description
Optional, but can be helpful – especially if you have multiple contributors to your site.
Explain concisely
but clearly what the purpose of the category is.
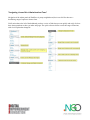
Let's create three categories on this site – called News, Trivia, and WordPress. Your Categories screen should
look like this now:
If you create a category in error, you can also delete it here by selecting the category you want to delete in the
box to the left, then clicking the delete button. Be careful – there's no undo function here!
You'll notice you can't delete Uncategorized – that's because it's the default category used if you don't assign
one to a post. You can change your default category in Settings | Writing.
You also have the possibility of creating a hierarchical tree for your categories – for example, under News you
could have Politics and Entertainment.
And wow! Suddenly your website is looking a lot more complete and full.
You've now completed the basic part of how to structure your website. There are a range of tasks that you will
need to do and these are covered in forthcoming sections. Depending on your user level these include setting up
users, how to do more sophisticated formatting in posts, uploading images, administering the options for how the
site is laid out, advanced publishing options and so on.
QUICK EXERCISES:
1. Create an article with an introduction
(you can cut and paste the actual text
for the purposes of this exercise)
and break it up with titles for each section.
2. Highlight in bold the lead sentence.
Italicise some words for emphasis.
3. Create some links to external sites.
4. Create an image gallery using
some of the images on your computer.
5. Add your favourite YouTube video to a post.
Writing Pages and Structuring Them
Pages are essentially similar to Posts, but as explained in Understanding the difference between pages and
posts they differ in that they contain information that is by and large static – your resumé, your contact details,
your terms and conditions – that kind of thing.
Writing Pages
Writing a page is essentially the same as writing a post, so there's little to learn, but we'll go through some things
again.
Already on the site is a page called About – every default WordPress install has such a page. You don't need to
edit it immediately – let us, instead, create a page called My Beliefs.
So – it's already time to write your first page! Click on Page and then Add New:
If you need help with the editor and advanced options read the section Adding and Editing Content for more
information.
You now just need to add a Title, put in some content and you're building the static content.
Type in the title of your page (in this case, 'About') and a little content about your website and why it's there. For
now don't worry too much about getting clever with your text formatting, adding images and files and so on –
we'll cover the editor in much more depth later on.
Once you've completed your About page, press the Publish button to the right but while you're writing and
before you press Publish you can always click on Preview this Page to see how it's looking.
You can Save at any point without publishing, and that will create a draft of the page if it hasn't yet been
published.
So, where is the link to the page you've just created? In some themes, you'll be able to see a list of links to the
sites pages on the right-hand side. However, in the theme that we're using here (the Twenty Ten Theme) such a
list is not displayed on the site by default. It is possible to display a list of pages on the right-hand side in the
Twenty Ten Theme by using Widgets. We'll be covering widgets later on in this guide.
If you now have another look at the list of pages on the site you will see that there are two 'About' pages - But
don't worry – that's because the default installation of WordPress includes an About page that you now need to
remove. And it's not difficult to do. First you need to go back to Pages, and Edit, to see a list of pages
available to edit. In the example underneath you can see a list of the pages currently on the site.
In this case, you'll need to remove the earlier page – you don't need it. When you remove a page, or indeed a
post, in the way this guide will show you, the page or post itself is not permanently deleted but retained in
WordPress “Trash” area. A page or Post only becomes lost forever when you delete it from the “Trash” area.
There are two ways you can do this: The first way is to place the mouse pointer over the page entry you want to
remove (which will result in the options in the screenshot below being displayed) then click the Trash option.
This method is fine for removing a single post or page at a time, but what if we wanted to remove many posts or
pages quickly? To do this, select the check box next to the post(s) or page(s) you want to remove, select the
Move To Trash option, then press the Apply button next to it.
Be sure to empty the “Trash” area if you're sure you no longer want the pages/posts moved there. You can use
the same approach for doing this as you did for the previous step.
So, after you've removed the extra 'About' page entry you don't need, go back to your website and you'll now
see just the one 'About' page displayed in the Pages menu on the right. Click on it and you'll see the page you
just created.
Page Attributes
We'll now create the first subordinate page to 'About' – called Interconnect IT. In there you can put some
information about us, the providers of this guide. You'll also need to set the page hierarchy accordingly, so...
First things first, you need to create your 'Interconnect IT' page if you haven't already done so before continuing.
In the dashboard, select Pages from the Pages menu and hover over the mouse pointer over the page entry titled
“Interconnect IT” to bring up the menu (As you did when removing posts).
From the menu, click the Quick Edit option. A number of options should now appear, as shown the screenshot
below:
The three options we need to concern ourselves with here are Parent, Template and Order. The Parent option lets
you select the hierarchical level of your page. The Template option allows you to choose a design for your site
and the Order option selects the order in which your page appears (more of that later).
To set the parent option for a page, you need to click on the corresponding drop down box and change its value
from Main Page to the page you want to be the parent. In this case, the About page is going to be our parent
here, so we can just select the About option from the drop down box then click the Update button in the
bottom right-hand corner to save the changes.
Explanation of Page Attributes
This allows you to set a parent page that introduces a navigational hierarchy. Most themes
Page Parent
will display subpages either in drop-down menus, on alternative pages, or indented in lists of
pages.
Page Template
Your website's theme design may include templates – for example with contact forms. Other
forms – for example application forms and similar, can be designed in this way.
Page Order
By assigning numbers to pages in this field, you can set the order of pages. We suggest you
use increments of 10 when setting page orders. That way if you wish to insert a page
between one identified as 10 and another identified as 20 you can just use the number 15,
rather than finding yourself changing all the page numbers.
QUICK EXERCISES:
1. Write another page, called Contact Details
and put your contact details in there.
Publish it, and see it appear on the site.
2. Create a subpage to the About page,
called WordPress where you can say
a few nice things about WordPress.
Publishing Content Created by Other Contributors
If you're an Administrator or Editor you can publish the work created by Contributors. Authors can publish
their own work but cannot publish the work of other users.
As an Editor you'll need to be aware of drafts that are awaiting publication. Usually the contributor should
inform you that they've completed a document and, when you select Posts and Edit in the administration panel
you will see a list of Other's Drafts as pending:
When you select a draft you will be taken to page where you can review the contribution, see the preview, edit it
if necessary, add media and publish – just like it was your own post.
You can also change the post author if you have multiple users defined who have the facility to create posts,
should you require it, and any other details, including post-dating the article so it appears after an embargo, for
example.
Moderating Comments
One of the tasks an Editor or Administrator may do, so long as the 'moderate comments' option is switched is to
check that comments that have been made against posts are suitable for publication. We recommend you always
opt to moderate comments as otherwise you may find problems with people using the facility to advertise their
companies – 'comment spam' as it's known. You may also wish to implement some anti-spam filtering.
WordPress comes with Akismet included as a plugin, which does an excellent job. If you run a personal blog it's
free, and if you run a commercial blog you can pay for various license levels. Alternatively, 'Captcha' plugins are
available.
When a user posts a comment, they will be able to see their own comment and a line telling them that their
comment is awaiting moderation. By default, you will receive an e-mail to the administrator's e-mail account
advising you that a comment is waiting to be approved (this e-mail can be turned off) and you can click directly
on a link within the email in order to approve the comment. Once signed in you will be asked for confirmation –
click yes and the comment will now be visible to all site visitors.
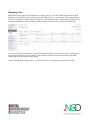
You can also carry out bulk moderation by going to the Comments link.
If you have comments to moderate the tab will show the number of comments waiting. Click it and you'll see a
list of comments awaiting moderation in the queue.
Here you'll have a set of options for each comment ('Approve', 'Reply', 'Quick Edit', 'Edit', 'Spam' and 'Trash')
which you can also access by placing the mouse pointer over each comment. You can also edit comments to
remove unsuitable words or information, and you can delete individual comments.
You can mark all comments in one block as well – that's useful when you get some spam bots that cheerfully
comment a load of marketing nonsense all over your site and needs to be deleted quickly. Just press the links at
the bottom of the screen.
Once you've set all the options for each comment, press the Moderate Comments button and the changes will be
saved.
As you can see, the facility is designed to work with quiet and busy sites alike. As some of the internet's busiest
sites run WordPress the software has been well designed for this kind of use.
QUICK EXERCISES:
1. Write an offensive
(we don’t mean with swear words, just something harsh!)
comment on your blog.
Then delete it through comment moderation!
2. Add a few comments on your blog while signed out.
3. Reply to a comment on your blog
(even if it’s one of your own!)
to see how it looks.
Managing Links
Most websites run a links section. With many it's simply a page or a post full of links and connections. With
WordPress you can do this if you wish, but a more powerful feature is to use the proper link management tools.
Then you can display your links in the site's sidebar or, if the theme provides it, using a links page template. In
the administration menu, click on Links then Edit to manage your links, and you will see the following:
As you can see, the initial installation is already populated with links. As these aren't relevant to your website,
you can delete them all if you wish: Simply select each link you don't want, then select Delete in the Bulk
Actions drop down and click the Apply button.
You'll see also that you can filter this view – particularly useful if you manage a large number of links.
Creating link categories
Before creating new links, you need first to create some suitable categories, so click on the 'Link Categories' link
in the menu to do this.
In here, create a link category called News, and another called WordPress so the list looks as follows:
It's also possible to create categories on the fly – just like when writing posts. This is more limited in power, but
useful.
You can't delete the Blogroll category while it's the default category. To change your default category go to
Settings, then Writing and change the Default Link Category value. For now we'll leave it at Blogroll.
Creating links
Now we've created our Link Categories above, you can create some links quickly and easily.
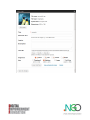
To create a new one, click Add New and you'll see the following :
The most commonly used items are on display first and you should create the link and categorise it accordingly.
Let's create a link the BBC News website:
You also have a number of advanced options available to you which are in the extending boxes below – Target,
Link Relationship, and Advanced. Please note the importance of using http:// before a link.
Target
Target is a strangely marked and named option if you're new to the web:
The following table illustrates the different effects of each target option:
_blank Will open the link in a new window – handy where you need a link to not take someone away from
your website, but should only be used with good reason as people hate getting a new window after
following every link.
_top
Opens the link in the top most frame or window. This is very rarely used and should only be
considered if you've got good reason for it – it can be incredibly annoying to visitors!
_none
Conventional behaviour – the link will open in the current window – this is generally the best option to
use.
Link relationship (XFN)
Links can be related to your site – you can either create your own relationship, or use one of those attached.
They're mostly ignored and little used, however, and will make little difference to visitor experience. They can,
however, help to inform search engines and directories of the relationships between websites which may help
with search engine performance.
Advanced
In the Advanced Links options you have a range of options:
Image Address You can insert a link to an image here – be careful, you should prepare images with care – to
the correct size and resolution, in order for them to look good. Many people who use this
option tend to end up with untidy websites.
RSS Address
If there is also and RSS feed available at the site you're linking to, you can include it here.
Some themes, widgets and plugins will use this information and show an RSS icon to match.
Notes
You can keep notes about links here.
Rating
This is used in some themes, widgets and plugins as a way of ordering links.
For any queries: mail to: [email protected]