1
WedgeLink Keyboard Wedge
Copyright © 1997-2014 MicroRidge Systems, Inc.
All rights reserved. No parts of this work may be reproduced in any form or by any means - graphic, electronic, or
mechanical, including photocopying, recording, taping, or information storage and retrieval systems - without the written
permission of the publisher.
Products that are referred to in this document may be either trademarks and/or registered trademarks of the respective
owners. The publisher and the author make no claim to these trademarks.
While every precaution has been taken in the preparation of this document, the publisher and the author assume no
responsibility for errors or omissions, or for damages resulting from the use of information contained in this document or
from the use of programs and source code that may accompany it. In no event shall the publisher and the author be liable
for any loss of profit or any other commercial damage caused or alleged to have been caused directly or indirectly by this
document.
Printed: Tuesday, February 11, 2014 at 9:09 AM in Sunriver, Oregon.
This User's Guide has been formatted for double-sided printing.
WedgeLink Keyboard Wedge
Contents
I
Table of Contents
Chapter 1 Quick
...................................................................................................................................
Start
1
Chapter 2 Introduction
...................................................................................................................................
3
Preview
...................................................................................................................................
& Evaluation Modes
4
WedgeLink
...................................................................................................................................
Editions
5
Main...................................................................................................................................
Window
6
Program
...................................................................................................................................
Limits
7
Chapter 3 Setup
...................................................................................................................................
Menu
9
Parsing
...................................................................................................................................
for WedgeLink Lite
10
Label Tab
....................................................................................................................... 10
Parsing .......................................................................................................................
Tab
11
Parsing
...................................................................................................................................
for WedgeLink Standard
12
Label Tab
....................................................................................................................... 12
Parse Tab
....................................................................................................................... 13
Delay Tab
....................................................................................................................... 15
Packet Tab
....................................................................................................................... 16
Position .......................................................................................................................
Tab
17
Match Tab
....................................................................................................................... 18
Mask Tab
....................................................................................................................... 20
Remove .......................................................................................................................
Tab
23
Replace.......................................................................................................................
Tab
24
Math Tab....................................................................................................................... 25
Prefix Tab
....................................................................................................................... 27
Suffix Tab
....................................................................................................................... 28
Test Tab....................................................................................................................... 29
Send...................................................................................................................................
Commands
30
Serial
...................................................................................................................................
Port Overview
31
Preferences
................................................................................................................................... 33
Chapter 4 Targets
...................................................................................................................................
Menu
35
Keyboard
...................................................................................................................................
Wedge Transfer
35
Get Target
.......................................................................................................................
Application
36
Hidden Applications................................................................................................. 37
Copyright © 1997-2014 MicroRidge Systems, Inc.
II
Contents
WedgeLink Keyboard Wedge
Chapter 5 File ...................................................................................................................................
Transfer
39
Chapter 6 Test...................................................................................................................................
Menu
41
Parsing
...................................................................................................................................
Test
41
ComTestSerial
................................................................................................................................... 42
Chapter 7 Data...................................................................................................................................
Collection
43
Toolbar
................................................................................................................................... 44
Status
...................................................................................................................................
Indicators
45
Chapter 8 Troubleshooting
...................................................................................................................................
Tips
47
Chapter 9 License
...................................................................................................................................
Agreement
49
Chapter 10 Support
...................................................................................................................................
& Contact Information
51
Contact
...................................................................................................................................
MicroRidge
51
Copyright © 1997-2014 MicroRidge Systems, Inc.
WedgeLink Keyboard Wedge
1
Quick Start
1
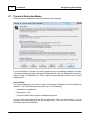
Quick Start
Want to quickly get started using WedgeLink? The steps shown below should get you moving in
the proper direction. Be sure to refer to other items in this User's Guide.
This Quick Start procedure deals with serial communications and data parsing. If you are using
WedgeLink Lite, skip the steps that reference data parsing.
In order to use WedgeLink to collect data from the serial ports and send this data to an
application or file, you need to determine the following:
What serial port(s) are your device(s) connected to?
What is the baud rate and communications parameters of your serial device?
What Windows application or file do you want to send the data to?
How do you want the data formatted that will be sent to the application or written to the file?
WedgeLink Standard provides a wide range of formatting options. WedgeLink Lite only
allows adding a date and time prefix.
The general steps you should follow in setting up a WedgeLink configuration are given below.
Depending upon your knowledge of your serial device and the amount of data parsing that must
be performed, you may be able to skip some of these steps.
Use ComTestSerial to verify the serial port, communications parameters and determine the
format of data output from your serial device. ComTestSerial is available from the Test/
42
ComTestSerial Communications Test Program menu.
Set up the serial port from the Setup/Input Serial Port
31
menu item.
Set up the data parsing, if needed, from the Setup/Parsing
requires WedgeLink Standard.
13
menu item. Full data parsing
Test the data parsing with the data parsing test dialog. This dialog is part of the Parsing
29
Setup dialog and is available from the Test tab and the Test/Parsing menu item.
35
Select the target application or file . You can bring up the appropriate dialog by double
clicking the Target application or Target file edit controls on the main WedgeLink screen.
These dialogs can also be accessed from the Targets menu item.
If you are sending data to a Windows application, you need to manually start the
application. You should then set the input focus to the first location that will receive data
from WedgeLink.
Enable the Serial port, Send to app via Keybrd (or Send to disk file) and send data from
your serial device.
Document the purpose of the current configuration in the Label tab of the Parsing Setup
dialog.
Save the WedgeLink configuration for later use by pressing the save button on the toolbar
or selecting the File/Save menu item.
Copyright © 1997-2014 MicroRidge Systems, Inc.
WedgeLink Keyboard Wedge
2
Introduction
3
Introduction
WedgeLink is a software keyboard wedge program that allows you to do the following:
Transfer information from the serial port to applications such as Microsoft Excel.
Use with any Windows application that accepts keyboard input.
Make your application think that the information coming from the serial port is actually being
entered through the keyboard.
Parse the serial port data so that only the information that you need gets sent to your
application (Standard Edition only).
Add a date and time prefix to your data packet (Lite & Standard Editions).
Send the serial port data to a disk file.
In many cases, the only setup you will have to do is to select the target application and configure
the serial port. It will be necessary for you to refer to the documentation for your serial device so
that you can select the baud rate and communication parameters for the serial port.
WedgeLink is available in 2 different editions: WedgeLink Lite and WedgeLink Standard. Each
edition was designed to meet a specific set of user requirements. For an overview of the 2
5
editions, go to the WedgeLink Editions .
User’s Guide Organization
This User’s Guide covers all of the WedgeLink editions and has been configured for
double-sided printing. If you print this document single sided, there will be several blank pages
included in the printout.
If you are viewing the PDF version of this User's Guide, you will see page numbers to the right of
links within the PDF document. For example the number to the right of the Support & Contact
51
Information link indicates the actual page number this link is directed to.
Copyright © 1997-2014 MicroRidge Systems, Inc.
4
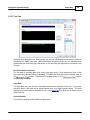
2.1
Introduction
WedgeLink Keyboard Wedge
Preview & Evaluation Modes
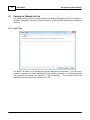
When you first run WedgeLink, the following dialog will be displayed.
You have the ability to Preview or Evaluate WedgeLink prior to purchasing a WedgeLink license.
If you have already purchased a WedgeLink Registration ID, click the "WedgeLink Registration"
button to enter you Registration ID. Each computer running WedgeLink must have a unique
Registration ID.
Preview Mode
The Preview Mode gives you access to most of the features of WedgeLink Lite and WedgeLink
Standard. The Preview Mode does not allow you to do the following:
Send data to an application.
Write data to a file.
Test the Packet Position feature in WedgeLink Standard.
You can configure the serial ports and view the data coming from your serial device(s). You can
configure your data parsing and test the parsing results. There are no time limit restrictions
associated with the Preview Mode.
Copyright © 1997-2014 MicroRidge Systems, Inc.
WedgeLink Keyboard Wedge
Introduction
5
You should use the Preview Mode to become familiar with WedgeLink before you start the
Evaluation Mode. After the 3-day evaluation period expires, you can still access the Preview
Mode.
Evaluation Mode
The Evaluation Mode gives you access to all of the WedgeLink feature, but only for a period of 3
days. You should not enter the Evaluation Mode until you have worked with WedgeLink in the
preview Mode. Once the Evaluation period has expired, the only way to get access to all of the
WedgeLink features is to purchase a Registration ID. You cannot extend the Evaluation period
by uninstalling and then reinstalling WedgeLink.
WedgeLink Registration
51
You can purchase a WedgeLink Registration ID by contacting MicroRidge or by going to the
WedgeLink Keyboard Wedge Store on the web. Each computer that is running WedgeLink must
have a unique Registration ID.
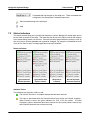
2.2
WedgeLink Editions
WedgeLink is available in 2 different editions.
WedgeLink Lite
WedgeLink Standard
The differences between the editions of WedgeLink can best be summarized by comparing the
input sources, data parsing and output targets.
WedgeLink Lite
WedgeLink Lite is a subset of WedgeLink Standard. The Lite Edition is intended for users that
only need to perform minimal data parsing on the input packets.
Input Sources: RS-232 serial port. Two input ports available.
Data Parsing: Add date & time as a packet prefix and change commas to tabs or carriage
returns.
Output Targets: Windows application via keyboard and disk file.
WedgeLink Standard
WedgeLink Standard contains all of the of the parsing and output features.
Input Sources: RS-232 serial port. Two input ports available.
Data Parsing: Extensive parsing capabilities.
Output Targets: Windows application via keyboard and disk file.
Copyright © 1997-2014 MicroRidge Systems, Inc.
6
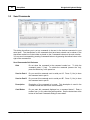
2.3
Introduction
WedgeLink Keyboard Wedge
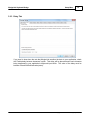
Main Window
The main WedgeLink window is used to monitor and control data collection and data transfer to
a Windows application or disk file. The main WedgeLink window can be displayed as shown
above or in a reduced size as shown below.
The size of the window can be controlled by the
Copyright © 1997-2014 MicroRidge Systems, Inc.
toolbar button
WedgeLink Keyboard Wedge
2.4
Introduction
7
Program Limits
The limits list below applies to WedgeLink Standard and WedgeLink Lite where noted.
Maximum length of the user supplied description = 1,000 characters (WedgeLink Lite &
Standard)
Maximum length of the prefix string = 50 characters
Maximum length of the suffix string = 50 characters
Maximum length of the match string = 50 characters
Maximum length of insert string for parsing mask = 15 characters
Maximum number of insert strings for parsing mask = 25
Maximum length of the mask string = 500 characters
Maximum number of replacement strings = 5
Maximum length of a replacement string = 50 characters
Number of parsing groups = 5
Copyright © 1997-2014 MicroRidge Systems, Inc.
WedgeLink Keyboard Wedge
3
Setup Menu
9
Setup Menu
The WedgeLink setup is performed from the Setup menu. In many cases, the only setup
31
required will be to select the proper serial port , baud rate and communications parameters.
After completing your setup you can save the configuration to a file for later use. If you are using
12
multiple configurations, it is recommended that you make use of the parsing description to help
document the purpose and operation of a particular configuration.
The configuration and parsing differ for WedgeLink Lite and WedgeLink Standard. This
document contains a different parsing section for WedgeLink Lite and WedgeLink Standard.
Copyright © 1997-2014 MicroRidge Systems, Inc.
10
3.1
Setup Menu
WedgeLink Keyboard Wedge
Parsing for WedgeLink Lite
The parsing functions are the primary differences between WedgeLink Lite and WedgeLink
Standard. WedgeLink Lite parsing setup consists of 2 tabs and are described in the following
sections.
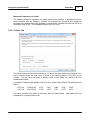
3.1.1 Label Tab
The Label Tab allows you to document the current WedgeLink configuration. If you are using
multiple configurations or have implemented unique parsing schemes, it is recommended that
you document the purpose and operation of the configuration. The maximum number of
characters that can be used in a description is 1,000.
Copyright © 1997-2014 MicroRidge Systems, Inc.
WedgeLink Keyboard Wedge
Setup Menu
11
3.1.2 Parsing Tab
Parsing with WedgeLink Lite is restricted to adding a date/time stamp and changing commas to
tabs or carriage returns. If you are sending data to Excel and your input packet contains
measurements separated by commas, you will need to change the commas to tabs so that each
measurement gets sent to a different cell.
The options contained in the Parsing Tab are very straight forward and should be easy to set up.
If you need parsing functions beyond what is available in WedgeLink Lite, take a look at the
parsing capabilities in WedgeLink Standard.
Copyright © 1997-2014 MicroRidge Systems, Inc.
12
3.2
Setup Menu
WedgeLink Keyboard Wedge
Parsing for WedgeLink Standard
WedgeLink Standard contains many parsing features that allow the user to extract the
information they need from the input packets received from a serial port. Before you try to set up
the parsing procedures, you should obtain a copy of what is being sent from you serial device
and clearly identify what information you want to extract from the input data.
The parsing features allow you to remove unwanted characters or add characters to the serial
port string. In many cases you will not have to do any parsing. An example of removing
unwanted characters would be the removal of all blanks in the string. If you are transferring the
string to a spreadsheet, you may want to add tab and/or cursor keystrokes to the string. Once
you have set up your parsing, you can use the Test tab in the parsing dialog to test and fine-tune
your parsing scheme.
There are 5 parsing groups that can be setup within WedgeLink. You can specify what group or
groups should be used with the 2 input ports. You will use the Match tab to define what groups
are used with each port.
The labels on the tabs, Mask through Suffix, will contain a number ranging from 1 to 5. These
number indicate what parsing group data is currently displayed on that tab. For example, Mask
‘2’ indicates that the parsing for group 2 is being displayed on the Mask tab.
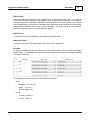
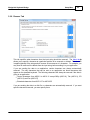
3.2.1 Label Tab
The Label Tab allows you to document the current WedgeLink configuration. If you are using
multiple configurations or have implemented complex parsing schemes, it is recommended that
you document the purpose and operation of the configuration. The maximum number of
characters that can be used in a description is 1,000.
Copyright © 1997-2014 MicroRidge Systems, Inc.
WedgeLink Keyboard Wedge
Setup Menu
13
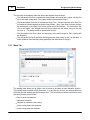
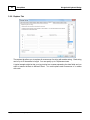
3.2.2 Parse Tab
The Parse tab allows you to enable and disable parsing functions, select what parsing groups
are active and define unique parsing group names. The default settings for a new configuration
file are all parsing functions active and only parsing Group 1 active.
By having 5 parsing groups, you actually have 5 different prefixes, suffixes, etc. that can be
18
defined. The multiple parsing groups in conjunction with the setup on the Match tab , gives
you a lot of control when parsing complex packets and provides the ability to use different
parsing schemes for each input serial port.
Active Parsing Functions
This group of check boxes in the upper right-hand corner controls which parsing functions are
enabled. If a parsing function is not checked, that function will not be used on the serial port
data. If a parsing function is disabled, you will not be able to modify any of the parsing features
18
for that particular function. Please refer to the Important Rules paragraph on the Match tab for
information about how parsing Group 1 is applied under certain situations. The parsing
functions that are available are:
Match string
18
Parsing mask
20
Character removal
String replacement
Math functions
Data prefix
Data suffix
23
24
25
27
28
Copyright © 1997-2014 MicroRidge Systems, Inc.
14
Setup Menu
WedgeLink Keyboard Wedge
The process that WedgeLink follows when parsing an input packet is as follows.
The input packet is checked against the selections on the Match tab. If it is determined that
parsing needs to be preformed, the following steps will be applied to the packet.
The instructions defined in the Mask tab are applied.
The instructions defined in the Remove tab are applied.
The instructions defined in the Replace tab are applied.
The instructions defined in the Math applied.
If a prefix is defined, it is added to the front the packet.
If a suffix is defined, it is added to the end of the packet.
The resulting packet is sent to the application or the file.
Parsing Group Names
The default parsing group names are Group 1, Group 2, etc. The user can change these names
to something that may be more meaningful. For example, assume that you are using Group 1 to
parse data from input port A and Group 2 to parse data from port B. You may want to rename
Group 1 and 2 to Port A and Port B.
Active Parsing Groups
The active parsing group checkboxes allow you to enable and disable individual parsing groups.
If a parsing group is not check, it will not be used in the parsing, even if it is selected on the
Match tab.
Copyright © 1997-2014 MicroRidge Systems, Inc.
WedgeLink Keyboard Wedge
Setup Menu
15
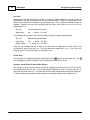
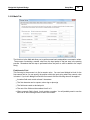
3.2.3 Delay Tab
If you need to slow down the rate that WedgeLink transfers the data to your application, check
the “Enable delay between characters” option. This delay will be place between each character
being transferred to your application's keyboard input buffer. The value of the delay must be
between 50 and 2000 milliseconds (msec).
Copyright © 1997-2014 MicroRidge Systems, Inc.
16
Setup Menu
WedgeLink Keyboard Wedge
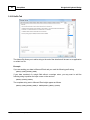
3.2.4 Packet Tab
WedgeLink collects information from the serial port and does not process it until the end of the
data packet is encountered. The end-of-packet identifier can be a specific character, specific
number of characters or a time gap. You need to specify an end-of-packet for both Ports A and
31
B. Port B will be disabled if the port is disabled in the Serial Port Setup dialog .
Specific Character
For most serial devices, the end-of-packet character will be a carriage return (CR or ASCII 13).
In some cases the serial device will end its output packet with a carriage return and linefeed
combination (CR/LR). In this case, you should select the LF (ASCII 10) character as the end-ofpacket character. Select the end-of-packet character by dragging it from the list box on the righthand side of the dialog box.
Gap Time
If your serial device does not place a specific character at the end of the packet, you can use a
gap time to detect a packet. When using the gap time, WedgeLink waits for a period of time
when no data is received from the serial port. Once this gap time period exceeds the specified
gap time, WedgeLink will consider the information received as a packet and process it per the
parsing setup.
Number of Characters
The number of characters can also be used to identify a packet. An example could be that your
serial device sends out a string of 30 characters and this string is actually made up of 3 10
character packets with no unique character at the end of each packet. In this case you would
set the number of characters to 10. The maximum number of characters is 4,000.
Copyright © 1997-2014 MicroRidge Systems, Inc.
WedgeLink Keyboard Wedge
Setup Menu
17
Maximum Characters in a Packet
The maximum number of characters in a packet must also be specified. If WedgeLink receives
more characters than are allowed in a packet, the characters are discarded and WedgeLink
saves the next character as the first character in a new packet. Normally this value can be set to
the default value of 300. The acceptable range is from 5 to 4,000.
3.2.5 Position Tab
The Packet Position Control feature allows you to control how many packets are displayed on a
row (or column) before the input focus is moved to the starting position in the next row (or
column). You also have the option of adding a date or time stamp as a prefix to the first
measurement packet.
An example of what the data display would look like with the Packet Position Parameters shown
above:
1-15-2014
12:38:44 PM
3.675
3.681
3.689
3.672
3.669
1-15-2104
12:41:52 PM
3.678
3.678
3.681
3.675
3.674
The above example is the result of receiving 2 sets of 5 data packets. Each packet must be
terminated by a carriage return or tab.
Copyright © 1997-2014 MicroRidge Systems, Inc.
18
Setup Menu
WedgeLink Keyboard Wedge
3.2.6 Match Tab
The Match Tab controls when the parsing groups are applied and to what ports the parsing
groups are applied. If a parsing group is not checked as active on the Parse tab, the parsing
group will not be used in the parsing, even if it is specified in the Match Found or Match Not
found columns.
Important Rules
There are a couple of important rules that are applied to determine what parsing groups are
applied to an input packet. It is important that you understand these rules when configuring
parsing Group 1 and the Match tab.
If the Match tab is disabled on the Parse tab
packets.
13
, parsing Group 1 will be used for all input
13
If the Match tab is enabled on the Parse tab , but no ports are selected on the Match tab,
parsing Group 1 will be used for all input packets.
Ports A & B
Use the first 2 columns of check boxes to specify what ports should be used with a parsing
match row. If you are receiving data form a port and that port is not checked on any of the
parsing rows, the match processing will not be applied to the data packet.
Copyright © 1997-2014 MicroRidge Systems, Inc.
WedgeLink Keyboard Wedge
Setup Menu
19
Match String
Enter the match string that you want to search for in a data packet from a port. If a match is
found, the instructions indicated in the Match Found column will be preformed. If no match is
found, the instructions indicated in the Match Not Found column will be preformed. If you do not
enter a match string, it will always be assumed that a match has been found and the instructions
indicated in the Match Found column will be preformed. The match string is case sensitive,
therefore the string “Chan A” is not the same as “chan A”.
Match Found
If a match is found, the instructions in this column will be preformed.
Match Not Found
If a match is not found, the instructions in this column will be preformed.
Example
To help you understand how you might set up the match options, let’s consider the example
shown below. In this example we are using 2 input ports and we want to use different parsing
schemes for each port.
The packets we receive from Ports A & B could be as follows:
Port A
Weight, 134.56 oz
Tare, 1.34 oz
Reset complete
Port B
1.2455, Chan A
23.45, Chan B
Copyright © 1997-2014 MicroRidge Systems, Inc.
20
Setup Menu
WedgeLink Keyboard Wedge
The following would happen when the above data packets were received.
The first packet from Port A contains the string Weight and would find a match with the first
row in the match string table. This packet would be parsed with Group 1.
The second packet from Port A contains the string Tare. Since this packet came from Port
A it would be checked against the match string Weight. Since Tare does not match Weight,
the instructions in the Match Not Found column would be followed. The instructions say
“Go to next match” and WedgeLink would find a match with the match string on the next
row (row 2). This packet would be parsed with Group 2.
The third packet from Port A does not match any of the match stings for Port A and would
be discarded.
The first packet for Port B would be tested against the match string in row 3 of the table. A
match would be found and the packet parsed per the instructions in Group 3.
3.2.7 Mask Tab
The parsing mask allows you to define a set of actions to be taken at each character position.
The parsing mask is limited to 500 characters. It is rare that you will run into data packets from
the serial port that exceeds this 500-character limit. The functions that can be performed at each
character position are as follows:
Sort or move the character
Delete the character
Replace the character with a string
Insert a string before the character
Insert a string after the character
Copyright © 1997-2014 MicroRidge Systems, Inc.
WedgeLink Keyboard Wedge
Setup Menu
21
The grid will not respond to the mouse or user input if the Parsing mask has not been selected
13
on the Parse Tab . The list box can only be used if the input cell is on the Input Data, Replace,
Insert Before or Insert After rows.
Limits
There are limits that you should be aware of before starting to set up the parsing mask.
Maximum number of character positions in the mask = 500
Sort codes = 1 to 9
Total number of strings that can be used (Replace + Insert Before + Insert After) = 25
Maximum length of a string = 15 characters
Toolbar
The toolbar provides zoom, erase, display and edit functions. Some of these functions are not
available when the input cell is on the Sort or Delete rows. Tool tips are displayed when the
mouse pointer is placed on a button.
Transfer the data from the Input data section on the Test tab to row 1 of the grid
Show fewer grid cells (Zoom in and make cells larger)
Set grid cells to the default size
Show more grid cells (Zoom out and make cells smaller)
Clear grid data. When this button is pressed, a dialog box appears and allows you to
reset any of the rows to the default values.
Set the grid columns to the default width
Set grid column widths to show all data in the cells
Change the number of columns in the grid
Cut the contents from the marked area in a cell to the clipboard
Copy the contents from the marked area in a cell to the clipboard
Paste the clipboard to the marked area in a cell
Input Data Row
The input data row allows you to display a sample of your input packet. It may be much easier to
set up the parsing mask with a reference copy of the input packet. You can enter characters into
29
the cells by typing or dragging the items from the list box. If the Test tab Input data window
contains data, you can also copy this Test data into this row by pressing the
toolbar button.
Copyright © 1997-2014 MicroRidge Systems, Inc.
22
Setup Menu
WedgeLink Keyboard Wedge
Sort Row
Characters in the input string can be sorted or moved to a different position. Do not confuse an
alphanumeric sort with the sorting that can be performed here. What is provided here is the
ability to move blocks of information to specified positions. This is easiest to explain through an
example. Assume you have the following serial port input string with the sort row set to the
default value of 1.
Sort row
1111111111111111111
Input String
12,
1.8725, 13.678
If you change the sort row to the following values, the output string will be as shown.
Sort row
2221111111113333333
Input String
12,
Output String
1.8725, 13.678
1.8725,12, 13.678
What the sort numbers indicate is what is the first block of characters to send, what is the
second block, what is the third, etc. The sort values can range from 1 to 9. If all of the sort
numbers are set to the same value, no sorting will occur.
Delete Row
The character in a character position will be deleted if an appears in the delete row. The
can be toggled by double clicking the cell or pressing the space bar or X key.
Replace, Insert Before & Insert After Strings
The strings for these rows can be constructed by dragging items from the list box or by typing
the strings directly into the cell. If an invalid string is entered into a cell, the string will turn red
when the cell loses the focus. You must correct all invalid strings before leaving the mask tab.
To edit a cell start typing when the cell has the focus, double click the cell or press key F2.
Copyright © 1997-2014 MicroRidge Systems, Inc.
WedgeLink Keyboard Wedge
Setup Menu
23
3.2.8 Remove Tab
20
This tab specifies what characters from the input string should be removed. The Mask tab
allows you to specify a character at a particular position to be removed or deleted. This function
is applied globally to the string and will remove all occurrences of a character. For example, you
may need to remove all the blanks from the input string before sending it to your application.
If you are sending the data to an application, certain characters are always automatically
removed. The only characters that can be sent to an application are those characters that
appear on the standard keyboard. The following characters will always be removed if the data is
going to an application.
Control characters from ASCII 0 to ASCII 31 except BkSp (ASCII 8), Tab (ASCII 9), CR
(ASCII 13) and Esc (ASCII 27)
Extended characters from ASCII 127 to ASCII 255
If you are sending the data to a disk file, no characters are automatically removed. If you want
specific characters removed, you must specify them.
Copyright © 1997-2014 MicroRidge Systems, Inc.
24
Setup Menu
WedgeLink Keyboard Wedge
3.2.9 Replace Tab
The replace tab allows you to replace all occurrences of a string with another string. Each string
can be up to 50 characters in length. You can specify up to 5 replacement sets.
A typical example might be that your input string has commas separating the data fields and you
want to transfer the data to Microsoft Excel. You could replace each occurrence of a comma
with a tab.
Copyright © 1997-2014 MicroRidge Systems, Inc.
WedgeLink Keyboard Wedge
Setup Menu
25
3.2.10 Math Tab
The functions in the Math tab allow you to perform some basic manipulations on numeric values.
The process of extracting a number value from the input packet is the last step in the parsing
process. Remember that this step is performed before the prefix or suffix is added to the output
string.
Find Numeric Field
This first step in the process is to find a numeric value. You can have WedgeLink look for the
first numeric field or you can specify the position within the input string where the numeric value
is located. If you have WedgeLink find the first numeric field the following rules will be applied.
A number field must contain at least 3 characters.
The first character can be a space, minus sign or plus sign
The field must contain a decimal point
The rest of the field must be numbers from 0 to 9
When a numeric field is found, it only contains a number. You will probably need to use the
suffix tab to add a carriage return or tab to the number.
Copyright © 1997-2014 MicroRidge Systems, Inc.
26
Setup Menu
WedgeLink Keyboard Wedge
Examples:
Input string = 01MUX 1.3485INCH{CR}
Output string = 1.3485
as a Suffix)
(Note: Normally you will need to add a carriage return {CR}
Input string = A, 1-9-2014, 12:23:51, 165.3 grams{CR}
Output string = 165.3
a Suffix)
(Note: Normally you will need to add a carriage return {CR} as
If you use the “Find in positions” option, the value does not have to contain a decimal point.
Minimum Acceptable Value
You can specify a minimum acceptable value. If the value determined in the above process is
less than this minimum value, the packet will not be sent to the designated targets. If a low value
is identified, you can have WedgeLink send a predefined string to the targets.
Maximum Acceptable Value
The maximum value function operates the same as the minimum value function.
Absolute Value
The absolute value function will convert a negative value to a positive value. If the value is
already positive, no changes to the value will be made.
Equation
The numeric value can be modified with an equation in the form of y = a + bx + cx**2.
Decimal Places
You can specify the number of places to the right of the decimal to be from none to 20.
Copyright © 1997-2014 MicroRidge Systems, Inc.
WedgeLink Keyboard Wedge
Setup Menu
27
3.2.11 Prefix Tab
The data prefix allows you to add a string to the beginning of the data that will be sent to an
application or written to a file.
Example
If you are sending your data to Microsoft Excel and you want to precede the data with the current
date and time you could use the following prefix string.
{Date}{Tab}{Time}{Tab}
This prefix will put the current date in the first cell and the time in the next cell to the right. The
tab character moves the input cell 1 position to the right.
Copyright © 1997-2014 MicroRidge Systems, Inc.
28
Setup Menu
WedgeLink Keyboard Wedge
3.2.12 Suffix Tab
The data suffix allows you to add a string to the end of the data that will be sent to an application
or written to a file.
Example
If you are sending your data to Microsoft Excel and you used the following prefix string:
{Date}{Tab}{Time}{Tab}
If your data consisted of a single field without a carriage return, you may want to add the
following string to position the input cursor on the next row.
{Down}{Left}{Left}
The complete string sent to Microsoft Excel might appear as follows:
{Date}{Tab}{Time}{Tab}1.3850{Down}{Left}{Left}
Copyright © 1997-2014 MicroRidge Systems, Inc.
WedgeLink Keyboard Wedge
Setup Menu
29
3.2.13 Test Tab
After you have developed your data parsing, you can use the parsing test functions to see how
the parsing will modify your data. When performing the parsing tests, you can manually enter
the data that will come from your input device or you can have your input device send data to the
Test tab.
Serial Port Send Command
You can enter a command here to be sent to your input device. If the background color of this
box is dark blue, the send feature is disabled. To enable the Serial port send command, click on
the
button. When the LED displays green on the
button,
the serial port is enabled.
Input Data
The input data from your device or manually entered data is displayed in this box. If you press
the parse button, this data will be parsed based upon your current parsing setup. The data
20
displayed in this box can be transferred to row 1 of the Mask tab to assist you in setting up the
mask functions.
Parsing Results
The results of parsing the input data are shown here.
Copyright © 1997-2014 MicroRidge Systems, Inc.
30
3.3
Setup Menu
WedgeLink Keyboard Wedge
Send Commands
This dialog box allows you to set up commands to be sent to the devices connected to your
serial ports. The descriptions for the commands that have been entered can be shown in the
drop-down combo box on the toolbar or placed on the 6 command buttons on the main window.
You can send a command by pressing a command button or by pressing the toolbar button to the
right of the command list.
Send Commands Grid Columns
Hide
Do not show the command in the command combo box. To hide the
command, press Y (Yes). To unhide the command (remove the Yes),
press the delete key or the space bar.
Send to Port A
Do you want this command sent to serial port A? Press Y (Yes) to have
this command sent to port A.
Send to Port B
Do you want this command sent to serial port B? Press Y (Yes) to have
this command sent to port B.
Description
Description of the command to be sent. This description is used in the
command combo box and on the control buttons.
Cmd Button
Do you want this command displayed on a command button? Enter a
number from 1 to 6 to select the button position. See the instructions at the
bottom of the Send Commands Dialog for more detail.
Copyright © 1997-2014 MicroRidge Systems, Inc.
WedgeLink Keyboard Wedge
Command
Setup Menu
31
Command to be sent. Each command can be up to 100 characters in
length. Commands within { } such as {Esc} or {CR}, use a single character
position. If you enter an invalid command string, the string will be shown
in red when you leave the cell. All invalid command strings must be
corrected before the commands can be saved. To transfer a command
from the list box to the command column, drag and drop the command to
the desired location. It is suggested you set the zoom lever to 140% when
using the command drag and drop.
Number Cycles A command can be repeated or continuously sent a specified number of
times. In order for this value to be used the "Cycle Interval" field must also
be defined. If this field is blank and the "Cycle Interval" field is defined, the
command will be repeated continuously. The maximum value for this field
is 60,000.
Cycle Interval
3.4
The interval between each command cycle. This value can range from
0.01 seconds to 86,400 seconds. A single day is equal to 86,400 seconds.
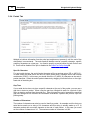
Serial Port Overview
In order to use serial port communications with WedgeLink, you must properly configure the
serial ports. If you need to use serial port B, you must enable this port in the Select & Configure
Serial Port B dialog. Serial devices communicate at a variety of baud rates (9600, 4800, etc.)
and can use several different sets of communications parameters (N-8-1, E-7-2, etc.). You will
need to refer to the operations manual for your serial device in order to determine the proper
baud and communication parameters settings. If you have trouble getting WedgeLink to
47
communicate with your serial device, refer to the Troubleshooting section for some tips.
Copyright © 1997-2014 MicroRidge Systems, Inc.
32
Setup Menu
WedgeLink Keyboard Wedge
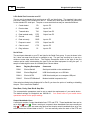
9-Pin Serial Port Connector on a PC
The pin outs for a standard 9-pin serial port on a PC are listed below. The standard 9-pin serial
port uses a male D-Sub connector on the PC. Please note, these pins are what you would find
on the standard PC serial port. The pins on some serial devices may be somewhat different.
1
Carrier detect
CD
Input to PC
2
Receive data
RxD
Input to PC
3
Transmit data
TxD
Output from PC
4
Data terminal ready
DTR
Output from PC
5
Ground
GND
6
Data set ready
DSRI
Input to PC
7
Request to send
RTS
Output from PC
8
Clear to send
CTS
Input to PC
9
Ring indicator
RI
Input to PC
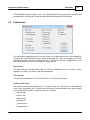
Serial Ports
The serial ports detected on your PC are listed in the Serial Ports group. If a port is shown in the
list, it does not mean that the port is available to use. The port may currently be in use by a
modem or some other serial device. The Registry Description shown to the right of the port
number can be useful in determining the type of port and what equipment is using the port. A
sample of what might be seen for installed ports is shown below.
Name
Registry Description
Comments
COM1
\Device\Serial0
Serial port installed on the motherboard
COM3
\Device\EdgeSer5
USB Virtual serial port on a USB hub
COM11
\Device\VCP0
USB Virtual serial port on a computer USB port
COM15
\Device\GTWModem5
Modem installed in expansion slot
If the serial port dialog being displayed is for Port B, you have the option of enabling or disabling
the port. Port A cannot be disabled.
Baud Rate, Parity, Data Bits & Stop Bits
The communication parameters must be set to match the requirements of your serial device.
The default settings for WedgeLink are 9600-N-8-1. You should refer to your serial device
operations manual for the proper settings.
Output Handshake Lines
A serial port contains 2 output handshake lines: DTR and RTS. These handshake lines can be
set to high ( ) or low ( ). When a serial port is opened, these handshake lines are normally set
high ( ). However, there are some serial devices that require certain handshake lines to be low
before the device will send data to the PC. You can manually select the state of the DTR and
Copyright © 1997-2014 MicroRidge Systems, Inc.
WedgeLink Keyboard Wedge
Setup Menu
33
RTS handshake lines to be high or low. The LEDs displayed in this group mimic the LEDs that
are displayed in the Parsing Test tab and the Serial Communications Test Program.
3.5
Preferences
The preferences dialog allows you to set the format for the date and the time, what WedgeLink
should restore at file open and where to place the program icon. After you change any of these
parameters be sure to save your configuration file. If you do not save the configuration file, your
selected parameters will not be set when you reopen the file.
Date Format
The date format can be Month-Day-Year (12-4-2013) or Day-Month-Year (4-12-3013). A date
separator of a dash (-) or slash (/) can also be specified.
Time Format
The time can be specified in a 12 (2:48:14 PM) or 24 (14:48:14) hour format.
Restore at File Open
The state of most functions (Characters in { }, Always on top, etc.) are set to the values defined
in the .WLC configuration file. However, there are several functions that the user may not want
to set to their previous state. These functions are as follows:
Send to app
Write to file
Serial port A
Serial port B
Paused port A
Paused port B
Copyright © 1997-2014 MicroRidge Systems, Inc.
34
Setup Menu
WedgeLink Keyboard Wedge
If any of the above items are checked, they will be restored to the state that existed when the
configuration file was last saved. Any items not checked will be set to the off ( ) state. After you
have specified the items to be restored at file open, go to the main display and be sure that the
proper state is currently set for these items. For example, if you have checked "Send to app", be
sure that "Send to app via keybrd" is enabled. Next, you should save the configuration file.
You can also specify that WedgeLink automatically minimize (show as icon) itself when a
configuration file is opened. To automatically minimize WedgeLink check the Run minimized
box in the Restore at File Open group.
Program Icon
The program icon can be place in the task bar (default location) or the system tray. If the icon is
in the system tray and you try to close WedgeLink, you will be required to acknowledge that you
really want to close the program.
Copyright © 1997-2014 MicroRidge Systems, Inc.
WedgeLink Keyboard Wedge
4
Targets Menu
35
Targets Menu
Data from the input serial ports can be sent to an application and/or written to a disk file. Data
parsing can be applied to the data whether it is going to an application or a file. However, there
are a couple of differences that you should be aware of:
The end-of-packet characters for a disk file are typically a carriage return (ASCII 13) and a
linefeed (ASCII 10). The end-of-packet characters for an application are typically a carriage
return (ASCII 13) or a tab (ASCII 9).
All ASCII characters (0 to 255) can be used when writing to a disk file. Only those
characters found on the standard keyboard can be used when sending data to an
application. The valid characters for an application are as follows:
Backspace (ASCII 8)
Tab (ASCII 9)
Enter or carriage return (ASCII 13)
Esc (ASCII 27)
Standard characters in center portion of keyboard (ASCII 32 to ASCII 126)
4.1
Keyboard Wedge Transfer
You can enable the Keyboard Wedge Transfer by one of the following procedures.
Select the Enable Keyboard Wedge Transfer in the Targets menu. A check mark will
appear by this item when it is enabled.
Click the
Click the
toolbar button.
status item.
When sending keystrokes to an application you can use the application that currently has the
input focus or you can specify the application to receive the keystrokes.
Copyright © 1997-2014 MicroRidge Systems, Inc.
36
Targets Menu
WedgeLink Keyboard Wedge
4.1.1 Get Target Application
The Get Target Application dialog box is used to identify the application to receive the parsed
data packet when you are using the keyboard wedge mode to transfer the data. The Get Target
Applications dialog can be accessed from the Targets menu or by double-clicking K/B App edit
control.
In order to send keystrokes to a specific application, you must first identify the application that is
to receive the input data. The data will always be sent to the active window in the application.
The target application can be selected from the list of Available applications or the application
name can be entered into the Target application edit box.
To refresh the list of Available applications, press the Get Apps button.
Available Applications
The list of available applications shows the applications currently running on your PC. The list
does not show the list of all applications installed on your PC. Certain currently running
applications can be hidden from this list. If the Show hidden applications check box is not
checked, some of the applications will not be shown. The reason for hiding some of the
applications is that there are applications that you will never send data to and it is easier for the
user to work with the list of applications that may receive serial port data. To transfer an
application to the Target application edit box, double click the application name. After
transferring the application name to the edit box, you may want to edit the application name as
described below.
Copyright © 1997-2014 MicroRidge Systems, Inc.
WedgeLink Keyboard Wedge
Targets Menu
37
Target Application
The application that will receive the data from the serial port must be entered here. You must be
careful how you identify the application. WedgeLink takes the text string that you have entered
and attempts to locate that string in the list of available applications. It is normally better to use
only a portion of the application name.
Example
You have started Microsoft Excel and it has a blank sheet as the active window. The name
shown in the Active applications list is Microsoft Excel – Book 1. If you enter Microsoft Excel –
Book 1 into the Target application, WedgeLink will only find this application if Book 1 is the
active window. If you change the active window or spreadsheet to gage_data.xls, WedgeLink
will not be able to locate the target application. Therefore, it is usually better to only use the
application name without any filename or active window name. In this example, any of the
following Target applications names would be recommended.
Microsoft Excel
microsoft excel
Excel
excel
If you used just the word Microsoft, WedgeLink might find Microsoft Excel or perhaps Microsoft
Word. The application name is not case sensitive so there is no difference between Excel and
excel.
Use Application with Current Input Focus
Rather than selecting a specific application to use as the target application, you can tell
WedgeLink to use the active window of the current application as the target. This allows you to
move from window to window or application to application and still get the data from WedgeLink
into the application. When this option is selected, most of the selection options in the Get Target
Application dialog are disabled.
Where Do I Put the Cursor
You should place the cursor on the target sheet in the location you want the data entry to start.
WedgeLink will reposition the cursor after each data packet is transferred to the application.
4.1.1.1 Hidden Applications
Application names can be hidden from the Get Target Application dialog box. There are certain
applications that you will never send data to, and you can identify those applications in this
dialog box. For example, you would not send data to instances of Windows Explorer, Microsoft
Office Shortcut Bar, start, etc.
To enter a new application name, press the New button. To edit or delete an existing application
name, double click the name in the list box.
Copyright © 1997-2014 MicroRidge Systems, Inc.
WedgeLink Keyboard Wedge
5
File Transfer
39
File Transfer
You can enable the File Transfer by one of the following procedures.
Select the Enable File Transfer in the Targets menu. A check mark will appear by this item
when it is enabled.
Click the
toolbar button. This toolbar button will only be enabled if a Target File has
been specified.
Click the
status item. This status button will only be enabled if a
Target File has been specified.
To specify a target file, select the Targets/Get Target File menu item or double click the File edit
control on the main window.
Copyright © 1997-2014 MicroRidge Systems, Inc.
WedgeLink Keyboard Wedge
6
Test Menu
41
Test Menu
Testing functions are accessible from or built into WedgeLink that allow you to test the serial
communications and parsing setup. In setting up WedgeLink, the first step is to understand what
serial ports you have available on your PC and what information is really coming from your serial
device. After understanding the output of your serial device, you will be ready to setup any
parsing that may be needed for your data.
6.1
Parsing Test
The parsing test is included as one of the tabs on the Parsing Setup dialog and can be found on
29
the Test Data Parsing page. The parsing test functions are only available with WedgeLink
Standard.
Copyright © 1997-2014 MicroRidge Systems, Inc.
42
6.2
Test Menu
WedgeLink Keyboard Wedge
ComTestSerial
ComTestSerial is the standalone serial communications test program that is accessed from the
WedgeLink Test Menu. To view the User's Guide for ComTestSerial, run ComTestSerial and
select the User's Guide from the Help menu.
ComTestSerial is a free test program developed by MicroRidge Systems. ComTestSerial can be
downloaded from the MicroRidge web site at www.microridge.com/comtestserial.htm.
Copyright © 1997-2014 MicroRidge Systems, Inc.
WedgeLink Keyboard Wedge
7
Data Collection
43
Data Collection
The collecting of the serial port data and sending it to an application or writing it to a file is
controlled by the Collect menu, toolbar and Status Indicators. Many of the collection control
functions are duplicated in these 3 areas.
In order to collect and save data to an application or a file there are certain steps you must
perform. This process is fairly simple and in most cases you should be able to start your data
collection after configuring a few basic setup parameters.
Be sure you understand what information is being sent by your serial device. Use the
42
Communications Test Program if necessary.
Set up the data parsing (if any) that will be required for your data.
Select the keyboard transfer and/or specify the target application parameters.
Select a target file if you are writing to a file.
Configure the serial port.
Enable your target (Send to app and/or Send to file).
Enable the serial port.
Start collecting you data.
If you are sending the data to an application, start the application and position the cursor
where you want the data to be sent.
Use the features on the toolbar and status controls to control the data collection process.
Copyright © 1997-2014 MicroRidge Systems, Inc.
44
7.1
Data Collection
WedgeLink Keyboard Wedge
Toolbar
Most of the collection process can be controlled from the toolbar. You may find it useful to keep
the WedgeLink on top and show the window at a minimum height. Using these 2 features,
keeps WedgeLink visible and keeps its size to a minimum.
The function of each toolbar button is described below.
Create a new WedgeLink configuration. If you have not save the current configuration,
you will be asked if you want to save it.
Open an existing WedgeLink configuration.
If you have not saved the current
configuration, you will be asked if you want to save it.
Save the current WedgeLink configuration
Select a target application
Select a target file
Send keystrokes to the target application
Write data to the target file.
Enable input Port A
Enable input Port B
Pause Port A inputs and outputs
Pause Port B inputs and outputs
Show certain characters in { }. These { } strings are not sent to the application or
written to the file, only the actual character is sent or written.
Keep WedgeLink on top of all other windows
Clear the serial port input buffer, and the input and output strings shown on the main
WedgeLink window.
Show the main WedgeLink at a minimum height. This button will hide all but the title
bar, menu items, toolbar and control buttons.
Copyright © 1997-2014 MicroRidge Systems, Inc.
WedgeLink Keyboard Wedge
Data Collection
45
Commands that can be sent to the serial port. These commands are
configured in the Setup/Send Commands menu item
Send command string to the serial port
Help
7.2
Status Indicators
The status controls allow you to quickly see the state of various WedgeLink control items and to
set the state of several of the items. The items that can be set in the status controls will respond
to the mouse being moved over the item. If the text becomes grayed when the mouse is over an
item, this item is currently disabled and canned be changed. An example of a disabled item will
occur for the Send to app if no target application has been identified.
Status Indicators
Typical Status for
Normal Operation
Typical Status with
Position Control
Serial Port A
is Paused
No End-of-Packet
Character Received
Indicator Colors
The indicators can be green, yellow or red.
The function is active or a complete data packet has been received.
This color is associated with the Paused function being active and Packet complete.
When Paused is active, the green indicators for Port x will turn yellow. If Packet
complete is yellow, characters have been received for the current packet, however the
end-of-packet character has not been received.
Copyright © 1997-2014 MicroRidge Systems, Inc.
46
Data Collection
WedgeLink Keyboard Wedge
The function is inactive. In the case of Packet complete, this means that nothing has
been received since enabling or clearing the serial port.
The function is disabled.
Copyright © 1997-2014 MicroRidge Systems, Inc.
WedgeLink Keyboard Wedge
8
Troubleshooting Tips
47
Troubleshooting Tips
Troubleshooting WedgeLink usually falls into 1 of the 3 following areas.
Serial communications
Data parsing
Sending data to an application
Most of the time that people experience difficulties, it is with serial communications. The other
two areas listed generally do not present problems that are difficult to solve.
Serial Communications
One of the biggest problems in troubleshooting serial communications problems is due to the
difficulty in seeing what is actually happening on the serial lines. This problem of determining
the state of the serial lines can be eliminated with a device known as a line status indicator or
breakout box. We have known people spending hours (and in some cases days) trying to figure
why they could not get serial communications to work. Typically if they had invested less than
$20.00 for a data line monitor, they could have solved their problem in a matter of minutes.
These data line monitors can be obtained from a variety of sources.
A data line monitor will contain a red and green LED for each signal line. When the monitor is
connected to a serial line, a high signal (+ voltage) will be shown with the red LED and a low
signal (- voltage) will be shown with the green LED (some monitors may reverse these colors).
With the monitor connected, you will be able to determine the following:
Is your serial device sending any data? If it is sending data, you will see the LED’s for the
PC received pin changing from red to green.
Are the handshake lines properly set?
Can your PC send commands to your serial device? If your PC can send commands, you
will see the PC transmit LED’s change colors. You should try to send commands to your
serial device even if your serial device does not need a command to send data. If you do
not see the PC transmit line changing state, you may have selected the wrong serial port,
have an improperly configured serial port or have a defective serial port.
Data line monitors are available in both 9 and 25 pin configurations. Some monitors use a dual
color single LED rather than 2 separate LED’s for each line. We have tried some of these single
LED models and feel they are of a lower quality than the dual LED models.
The following is a checklist of things to do when troubleshooting serial communications:
Purchase a data line monitor.
Is your serial cable wired correctly? Check the Serial Port Setup
outs on a 9-pin serial port.
31
for the standard pin
Does your serial port work with other devices or other applications?
Have you enabled the serial port in WedgeLink?
Can you open the serial port with ComTestSerial?
Do you have the proper baud rate and communications parameters set?
Copyright © 1997-2014 MicroRidge Systems, Inc.
48
Troubleshooting Tips
WedgeLink Keyboard Wedge
Data Parsing
If you are having problems with the data parsing, try using the procedures described below:
Do you really know what your serial port input packets look like? Have you used
42
ComTestSerial to verify the serial input?
29
If you are having problems with the data parsing, you should go to the Test tab on the
data parsing dialog (Test/Parsing menu item). With the parsing test functions available,
you should be able to determine how your input data is being modified by the parsing
functions.
It may be useful to turn off some of the parsing functions so that you can see how each
parsing function is modifying your input data. The parsing functions can be turned on and
13
off on the Parse tab in the Parsing Setup & Test dialog (Setup/Parsing menu item)
Sending Data to an Application
The following tips may help with problems associated with sending the data to an application:
Have you started the application? Have you activated the proper display in the application
and have you placed the cursor where you want the data to be transferred to?
Do you know the correct name for the application? Are you looking for Microsoft Excel –
Book 1, when you really should be looking for Microsoft Excel?
Copyright © 1997-2014 MicroRidge Systems, Inc.
WedgeLink Keyboard Wedge
9
License Agreement
49
License Agreement
The Software is owned by and remains the property of MicroRidge Systems, Inc., is protected by
international copyrights, and is transferred to the original purchaser and any subsequent owner
of the Software media for their use only on the license terms set forth below. Using the Software
indicates your acceptance of these terms. If you do not agree to all of the terms and conditions,
or if after use you are dissatisfied with the Software, return the Software, manuals and any
partial or whole copies within thirty days of purchase to MicroRidge Systems for a refund, subject
to our restocking fee.
Grant of License
MicroRidge Systems grants the original purchaser (Licensee) the limited rights to possess and
use the WedgeLink software (Software) and User Manual on the terms and conditions
specifically set out in this License.
Term
This License is effective as of the time Licensee receives the Software, and shall continue in
effect until Licensee ceases all use of the Software and returns or destroys all copies thereof, or
until automatically terminated upon the failure of Licensee to comply with any of the terms of this
License.
Single Machine License
The Software is provided for use on a single computer. Only a single user at a time may use the
Software. If you wish to use the Software for more users, you will need an additional license for
each user.
Licensee may transfer its rights under this License, PROVIDED that the party to whom such
rights are transferred agrees to the terms and conditions of this License. Upon such transfer,
Licensee must transfer or destroy all copies of the Registration ID.
Except as expressly provided in this License, Licensee may not use, copy, disseminate, modify,
distribute, sub-license, sell, rent, lease, lend, give or in any other way transfer, by any medium,
including telecommunications, the Registration ID for the single Machine License. Licensee will
use its best efforts and take all reasonable steps to protect the Registration ID from unauthorized
use, copying or dissemination, and will maintain all proprietary notices intact.
Limited Warranty
MicroRidge Systems warrants the Software media to be free of defects in workmanship for a
period of thirty days from purchase. During this period, MicroRidge Systems will replace at no
cost any such media returned to MicroRidge Systems postage prepaid. This service is
MicroRidge Systems sole responsibility under this warranty.
DISCLAIMER
License fees for this software do not include any consideration for assumption of risk by
MicroRidge Systems and MicroRidge Systems disclaims any and all liability for incidental or
consequential damages arising out of the use or operation or inability to use the software, or
Copyright © 1997-2014 MicroRidge Systems, Inc.
50
License Agreement
WedgeLink Keyboard Wedge
arising from the negligence of MicroRidge Systems, or their employees, officers, directors,
consultants or dealers, even if any of these parties have been advised of the possibility of such
damages. Furthermore, licensee indemnifies and agrees to hold MicroRidge Systems harmless
from such claims. The entire risk as to the results and performance of the software is assumed
by the licensee. The warranties expressed in this license are the only warranties made by
MicroRidge Systems, and are in lieu of all other warranties, expressed or implied, including but
not limited to implied warranties of merchantability and of fitness for a particular purpose. This
warranty gives you specified legal rights, and you may also have other rights which vary from
jurisdiction to jurisdiction. Some jurisdictions do not allow the exclusion or limitation of
warranties, so the above limitations or exclusions may not apply to you.
General
This License is the complete and exclusive statement of the parties agreement. Should any
provision of this License be held to be invalid by any court of competent jurisdiction, that
provision will be enforced to the maximum extent permissible, and the remainder of the License
shall nonetheless remain in full force and effect. This License shall be controlled by the laws of
the State of Oregon and the United States of America.
Copyright © 1997-2014 MicroRidge Systems, Inc.
WedgeLink Keyboard Wedge
10
Support & Contact Information
51
Support & Contact Information
The WedgeLink license is a single machine license. If you are calling for support for multiple
installations, you must have purchased a license for each machine. To make your support
assistance call the most productive for both you and the technical support team, please perform
the following steps before calling:
Troubleshooting You Can Do Before Calling for Support Assistance
Check the documentation:
Check online Help or User's Guide.
Review Troubleshooting Tips
47
.
Get the version number for the WedgeLink program.
If the problem appears to be a serial communications problem:
Determine if any recent changes have been made to your computer.
Use a breakout box to determine if data is being transmitted or received on the serial
port lines. A breakout box is a tool that can save you hours of frustration. The breakout
box provides a visual indication of what is happening on the serial port lines.
If you are having problems with the data parsing, you should try to use the testing function
29
.
Have a phone by your computer.
10.1 Contact MicroRidge
Email:
Support:
[email protected]
Sales:
[email protected]
Information:
[email protected]
Phone:
Support:
541.593.1656
Sales:
541.593.3500
Main office:
541.593.1656
Fax:
541.593.5652
Mailing Address:
MicroRidge Systems, Inc.
PO Box 3249
Sunriver, OR 97707-0249
Copyright © 1997-2014 MicroRidge Systems, Inc.
52
Support & Contact Information
WedgeLink Keyboard Wedge
Shipping Address:
MicroRidge Systems, Inc.
56888 Enterprise Drive
Sunriver, OR 97707
Note: There is no mail delivery to this address. This address should only be used for
package delivery services such as UPS, FedEx, etc.
Web: www.microridge.com
Copyright © 1997-2014 MicroRidge Systems, Inc.
WedgeLink Keyboard Wedge
Character Removal 23
Character Replacement Strings
Description (Label) 12
End-of-Packet Character 16
Find First Numeric Field 13
Functions 13
Mask 20
Match String 18
Math 25
Overview 12
Position Control 17
Prefix 27
Suffix 28
Testing 29
Preferences Dialog 33
Preview Mode 4
Program limits 7
Index
-CComTestSerial 47
Contact Information
51
-DData Collection
Introduction 43
Status Controls 45
Toolbar 44
-EEditions 5
Evaluation Mode
Quick Start
Find First Numeric Field
13
24
1
-RRegistration ID
-I-
4
-S-
3
-LLicense Agreement
Lite Edition 5
49
-MMain Window
53
-Q-
4
-F-
Introduction
Index
36
-T-
6
-OOutput Commands
Select Target Application Dialog
Serial Port 31
ComTestSerial 42
Setup Menu 9
Standard Edition 5
30
-PParsing for WedgeLink Lite
Description (Label) 10
Overview 10
Parsing 11
Parsing for WedgeLink Standard
Character Delay 15
Targets Menu 35
Technical Support 51
Test Menu
ComTestSerial 42
Parsing 41
Testing 41
Testing Data Parsing 29
Troubleshooting Tips 47
Copyright © 1997-2014 MicroRidge Systems, Inc.