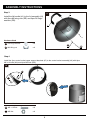
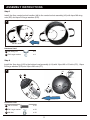
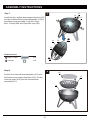
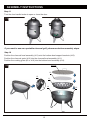
1
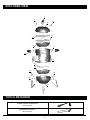
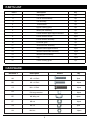
BIG "A" WATER SMOKER
USER MANUAL
STYLE # FSODBG3200
keep this
instruction manual
for for
future
reference
Please Please
keep this
instruction
manual
future
reference
Warning:
Adult assembly required.
Keep screws and parts out of reach of children.
FOR OUTDOOR USE ONLY
Customer Service: (866) 814-0585, 8:00am to 8:00pm, Eastern Standard Time
Monday through Friday
(Made in China)
Page 1 of 15
SAFETY WARNINGS
DANGER
Failure to follow the Dangers, Warnings, and Cautions contained in this Owner’s Manual
may result in serious bodily injury, death, or fire causing damage to property.
Do not use indoors! This smoker is designed for outdoor use only. If used indoors, toxic fumes
will accumulate and cause serious bodily injury or death.
Never use charcoal saturated with charcoal lighter fluid.
Do not add charcoal lighter fluid or charcoal saturated with charcoal lighter fluid to hot or warm
coals.
Do not use lighter fluid, gasoline, alcohol, or other highly volatile fluids to ignite or re-ignite
charcoal.
Do not use or store lighter fluid, gasoline, alcohol, or other highly volatile fluids within five feet of
the smoker.
Do not leave infants, children, or pets unattended near a hot smoker.
ATTENTION! This smoker will become very hot, do not move it during operation.
Do not use this smoker within five feet of any combustible material.
Do not use this smoker unless all parts are in place.
Do not remove ashes until all coals are completely burned out and are fully extinguished.
Do not wear clothing with loose flowing sleeves while lighting or using the smoker.
Do not use the smoker in high winds.
Keep the smoker in a level position at all times.
Combustion by-products produced when using this product contain chemicals known to the state
of California to cause cancer, birth defects, or other reproductive harm.
Remove the lid from the smoker while lighting charcoal briquettes.
Always put charcoal on top of the charcoal grate and not directly into the bottom bowl.
Never touch the cooking or charcoal grate, or the smoker, to see if they are hot.
Barbecue mitts or hot pads should always be used to protect hands while using the smoker or
adjusting the vents.
Use proper barbecue tools with long, heat-resistant handles.
To extinguish the coals, place the lid on the smoker and close all vents. Do not use water,
since it will damage the porcelain-enamel finish.
To control flare-ups, place the lid on smoker. Do not use water.
Handle and store hot electric starters carefully.
Keep electrical cords away from the hot surfaces of the smoker. Route all electrical cords away
from traffic areas.
Lining the bowl with aluminum foil will obstruct the air flow.
Using sharp objects to clean the cooking grate or remove ashes will damage the finish.
Using abrasive cleaners on the cooking grate or the smoker itself will damage the finish.
Remove all debris from the bottom heat shield prior to operating the smoker.
2
TABLE OF CONTENTS
SAFETY WARNINGS ....................................................................................... 2
TABLE OF CONTENTS .................................................................................... 3
GETTING STARTED ......................................................................................... 4
EXPLODED VIEW .............................................................................................5
PART LIST......................................................................................................... 6
HARDWARE...................................................................................................... 6
ASSEMBLY INSTRUCTIONS............................................................................ 7
CARE AND MAINTENANCE............................................................................ 14
ONE-YEAR LIMITED WARRANTY.................................................................. 15
REMINDER
BEFORE ASSEMBLY
Vertify that all parts are included with your smoker BEFORE you begin assembly by checking the Parts and
Hardware List. For your convenience, some parts may be pre-assembled or attached to smoker components.
If all parts are not included, do not attempt to assemble smoker. Call the toll free number on the cover page
for replacement parts.
Leave nuts HALF-TIGHTENED on the smoker during assembly until unit is completely assembled, then
finish tightening nuts.
YOUR OWNER’S MANUAL
Keep and store this User Manual for future reference - it contains important instructions and procedures for
safety, cooking methods and maintenance.
3
GETTING STARTED
BEFORE LIGHTING
A) The smoker should be placed on a level, heat proof, non-combustible surface away from buildings and out of general
traffic path. The smoker is for outdoor use only and not recommended for use on outdoor carpeted surfaces.
B) Remove the lid and center bucket assembly before lighting the charcoal briquettes. Acedemy recommends you to use
the charcoal briquettes. Lump charcoal or heat beads are not recommended.
Never use charcoal saturated with charcoal lighter fluid . Failure to follow this warning may result in serious
bodily injury, death, or fire, causing damage to property.
C) Ensure that ashes have been removed from bottom bowl and that the charcoal grate and charcoal bowl are in place.
D) Open all vents on the bottom of the bowl.
LIGHTING INSTRUCTIONS
A) Fill charcoal bowl with the amount of charcoal and light using a long-neck lighter or matches.
Never use charcoal saturated with charcoal lighter fluid. Failure to follow this warning may result in serious
bodily injury, death, or fire, causing damage to property.
B) Add 2-3 chunks of dry hardwood on top of the hot coals. More can be added if you prefer a stronger smoke flavor.
SMOKING INSTRUCTIONS
A) Place the center bucket assembly on the bottom bowl assembly . Place the water pan in position on the lower
support brackets in the center bucket assembly.
B) Using an appropriate container, fill the water pan to capacity. Position the lower cooking grate directly above the water
pan.
WARNING: Do not spill any water into the hot coals. This can cause steam and ash to rise and could cause
serious bodily injury or death.
C) If you are cooking on both the upper and lower cooking grates, place food to be smoked on the lower grate first.
Position the upper grate on the center bucket upper support brackets and place food to be smoked on the upper grate.
D) Pick up the lid by the handle, place it on top of the center bucket assembly and open the vent on the lid .
E) The vents are used to regulate heat within the smoker. Opening vents increases temperature and closing vents
decreases temperatures.
WARNING: Always use protective mitts or gloves to protect hands and forearms. Failure to follow this warning
may result in serious bodily injury or death.
F) The smoker is working properly when internal temperature is between 170 and 250 degrees or in “ideal” range on built
in thermometer. Increased internal temperatures can be achieved if your smoker is placed away from strong breezes.
If, after a minimum of 45 minutes the smoker has not reached “ideal” range, open the door to allow more air to the fire.
Once the smoker has reached the “ideal” range, close the door and avoid opening it again for each time it is opened,
cooking time will be prolonged an additional 15 minutes.
G) Meats that require more than 4 hours of cooking time to reach doneness may require additional water and charcoal. If
the temperature inside the smoker drops below “ideal” range, add more charcoal through the door with long handled
tongs. The initial amount of hot water added (4 quarts) should last 4-6 hours. After 4-6 hours, check water level and add
more hot water as necessary.
H) Performance of the smoker is dependent on ambient temperature and wind conditions. With temperatures below 60°F
and winds of 5 miles per hour or more, the smoker can lose a significant amount of heat and it may not be possible to
raise internal temperature of meat high enough to cook it in a reasonable time.
I) After removing food from the smoker, put lid back on and allow smoker to stand at least 24 hours or until all fire is
completely extinguished. Do not attempt removal of charcoal and water pans until completely cooled down. This can take
as long as 48 hours. Be certain all fire is extinguished before proceeding. Discard foil lining and any residue from water
pan as well as foil lining and charcoal residue from charcoal pan. Wash the whole smoker with sudsy water. Reassemble
clean smoker, spray the inside body with nonstick vegetable spray, cover and store.
Note: Do not use water to extinguish the coals as it may damage the porcelain-enamel finish.
4
EXPLODED VIEW
1
4
3
2
16
5
6
7
8
9
10
11
13
12
15
14
TOOLS REQUIRED
Phillips Head Screwdriver
(Not included)
Adjustable Wrench
(Not included)
5
PARTS LIST
Description
Qty
1
Lid handle
1pc
2
Lid air vent assembly
1pc
3
Lid assembly
1pc
4
Thermometer
1pc
5
Upper cooking grate
1pc
6
Water pan assembly
1pc
7
Center bucket upper support bracket
3pcs
8
Center bucket handle
2pcs
9
Center bucket assembly
1pc
10
Charcoal grate
1pc
11
Charcoal bowl assembly
1pc
12
Bottom bowl support bracket
4pcs
13
Bottom bowl buckle assembly
4pcs
14
Bottom bowl assembly
1pc
15
Leg
3pcs
16
Lower cooking grate
1pc
Part #
HARDWARE
Hardware #
Description
Picture
Qty
AA
M5 x 12 Bolt
7pcs
BB
M4 x 10 Bolt
12pcs
CC
M6 x 15 Bolt
12pcs
DD
D6 Large washer
18pcs
EE
M6 Wing nut
6pcs
FF
M6 nut
12pcs
GG
M5 nut
7pcs
HH
M4 Nut
12pcs
6
ASSEMBLY INSTRUCTIONS
Step 1
1
Install the lid air vent assembly (#2) to the lid
assembly (#3) with 1pc M5 x 12 bolt (AA) and
1pc M5 nut (GG).
2
AA
3
Hardware Used
AA
M5 x 12 Bolt
x1
GG
M5 Nut
x1
GG
Step 2
2
Unscrew the 1pc M10 nut and 2pcs D10 large
washers, which have been pre-installed on the
thermometer (#4). Then install the thermometer
(#4) to the lid assembly (#3) with the 2pcs D10
large washers and 1pc M10 nut.
D10 large washer 3
4
D10 large washer
M10 nut
7
ASSEMBLY INSTRUCTIONS
Step 3
3
3
Install the lid handle (#1) to the lid assembly (#3)
with 2pcs M6 wing nuts (EE) and 2pcs D6 large
washers (DD).
1
Hardware Used
DD
D6 Large washer
x2
EE
M6 Wing nut
x2
DD
EE
Step 4
Install the 3pcs center bucket upper support brackets (#7) to the center bucket assembly (#9) with 6pcs
M5 x 12 bolts (AA) and 6pcs M5 nuts (GG).
4
GG
7
AA
Hardware Used
AA
M5 x 12 Bolt
x6
GG
M5 Nut
x6
8
ASSEMBLY INSTRUCTIONS
Step 5
Install the 2pcs center bucket handles (#8) to the center bucket assembly (#9) with 4pcs M6 wing
nuts (EE) and 4pcs D6 large washers (DD).
9
5
DD
EE
8
Hardware Used
EE
M6 Wing nut
x4
DD
D6 Large washer
x4
Step 6
Install the 3pcs legs (#15) to the bottom bowl assembly (#14) with 12pcs M6 x 15 bolts (CC), 12pcs
D6 large washers (DD) and 12pcs M6 nuts (FF).
6
14
FF
DD
DD
15
15
CC
Hardware Used
CC
M6 x 15 Bolt
x 12
DD
D6 Large washer
x 12
FF
M6 Nut
x 12
9
ASSEMBLY INSTRUCTIONS
Step 7
13
7
12
Install the 4pcs bottom bowl support bracket (#12)
and 4pcs bottom bowl buckle assemblies (#13) to
the bottom bowl assembly (#14) with 12pcs
M4 x 10 bolts (BB) and 12pcs M4 nuts (HH).
14
HH
12
14
13
Hardware Used
BB
M4 x 10 Bolt
x 12
HH
M4 Nut
x 12
BB
Step 8
8
10
Position the charcoal bowl assembly (#11) onto
the bottom bowl support brackets (#12). Put the
charcoal grate (#10) into the charcoal bowl
assembly (#11).
11
12
10
ASSEMBLY INSTRUCTIONS
Step 9
Put the water pan assembly (#6), lower cooking grate (#16), upper cooking grate (#5) into the center
bucket (#9) in order as shown. Then put the center bucket assembly (#9) onto the bottom bowl
assembly (#14).
Note: The upper cooking grate (#5) and lower cooking grate (#16) are in the same size.
5
9
16
6
7
9
Center bucket
assembly lower
support bracket
12
14
Step 10
Put the lid assembly (#3) onto the center bucket assembly (#9).
Lock the 4pcs bottom bowl buckle assemblies (#13) to the relevant buckle brackets tightly .
10
3
9
Buckle bracket
13
11
ASSEMBLY INSTRUCTIONS
Step 11
Turn the door handle locker to open or close the door.
11
If you want to use as a portable charcoal grill, please see below assembly steps.
Step 12
Position the charcoal bowl assembly (#11) onto the bottom bowl support brackets (#12).
Position the charcoal grate (#10) into the charcoal bowl assembly (#11).
Position the cooking grate (#5 or #16) into the bottom bowl assembly (#14).
5 or 16
12
10
12
11
14
12
12
ASSEMBLY INSTRUCTIONS
Step 13
13
3
Position the lid assembly (#3) onto the bottom
bowl assembly (#14) directly, lock the 4pcs
bottom bowl buckle assemblies (#13) to the
buckle brackets tightly.
Buckle bracket
14
13
Step 14
14
Assembly completed.
13
CARE AND MAINTENANCE
Cleaning your smoker
AFTER EACH USE
1. Make sure the smoker is cool and coals are totally extinguished.
2. Remove the cooking and charcoal grates.
3. Remove ashes.
4. Wash your smoker with a mild detergent and water. Rinse well with clear water and wipe dry.
5. It is not necessary to wash the cooking grate after each use. Simply loosen residue with a grill
brush or crumpled aluminium foil, then wipe off with paper towels.
ON A REGULAR BASIS
To prevent rapid rusting:
1. Use warm soapy water to clean the cooking grates, charcoal grate, and the interior and exterior
surfaces of your smoker.
2. Rinse well with water.
3. Wipe completely dry with a soft cloth or paper towel. Do not allow the smoker and grates to
drip dry.
4. To prevent rust, apply a light coat of vegetable oil or vegetable cooking spray to the interior
surface of the lid and cooking grates. Gently wipe dry with paper towels. DO NOT apply oil to
the interior surface of the bowl.
IF RUST OCCURS
On exterior surface of the grate
1. Clean and buff all rust spots with a smoker brush.
2. Touch-up affected areas with a good high-temperature resistant paint.
On interior surface of the smoker
1. Clean and buff all rust spots with a smoker brush.
2. Lightly coat affected areas with vegetable oil or vegetable cooking spray to minimize rusting.
Gently wipe dry with paper towels. Never apply paints to the interior surface of the smoker.
CAUTION
Do not use sharp objects or abrasive cleaners to clean the cooking grate, charcoal grate or
the smoker, as these will damage the finish.
To remove grease deposit, simply brush these flakes off with a brass brush or crumpled
aluminum foil. To prevent future buildup, after each use and while the lid is still warm
(NOT HOT), wipe inside surface of the lid with paper towels or clean with soapy water.
Storing your smoker
Cover and store your smoker in a dry place when not in use.
You may wish to purchase a smoker cover to store your smoker. A smoker cover can add several
years to the life of the smoker.
14
ONE-YEAR LIMITED WARRANTY
Academy, Ltd. warrants your smoker to be free from manufacturer’s defects in workmanship or material under normal
operating conditions for one (1) year from the original date of purchase.
This warranty applies if the item is available to the original purchaser only.
This warranty applies only to products sold at retail.
Academy, Ltd. will, at its option, repair or replace free of charge any defective part, where the Purchaser has notified
their Retailer within the warranty period. In the event of product replacement, the current equivalent model will be
provided. The obligation of Academy, Ltd. under this warranty is expressly limited to such repairs or replacement.
This warranty does not cover the freight costs to and from the authorized repair facility.
One (1) year warranty on all parts in regards to damage affecting the operation of the smoker.
damages or labor costs.
enamel parts or any damage to other components used in the installation or operation of the smoker.
Some states do not allow limitations on how long an implied warranty lasts, so the above limitation may not apply to you.
Some states do not allow the exclusion or limitation of incidental or consequential damages, so the above limitation or
exclusion may not apply to you. This warranty gives you specific legal rights. You may also have other rights, which vary
from state to state.
Additional assistance can be found by calling our toll-free customer service line at
1-866-814-0585, Monday through Friday from 8:00 AM to 8:00 PM EST.
15