1
Issue 2 - September 2009
Oshawa Camera Club Monthly Newsletter
Contents
Welcome to the second issue of In Focus.
Page 2
Page 3
Page 4
Page 5
Page 7
Page 9
Page 10
Page 12
Page 14
Page 16
Page 17
Page 18
Page 20
- Presidents Musings
by Valerie Slagter
- Photograph of the Month
by Monica Taylor
- Apple Cart
by Brian Greenway
- Canon Connections
by Brian Greenway
- Club Outings
by Darryl Kennedy
- Creative/Abstract
Techniques
by Fred Sewel
- Education Program Update
by Monica Taylor
- Frame of Mind
by Bharat Mistry
- Lightroom
by Des McKee
- The Nikon Nook
by Bharat Mistry
- Random Topics
by Peter Tomblin
- The Traveling Photographer
by Brian Greenway
- The Last Word
by Des McKee
We have a new feature this month, "Random Topics" and
our first contribution is from Peter Tomblin. This is where
you can go to share your ideas with the membership. If you
have a photography story, a favorite photography technique
or a great location or anything else you want to share,
please send it to me via [email protected]
and it will get published here.
I am also thinking of starting a new regular column, "Ask an
Expert". However, this will only work if you send in your
questions. So if you have any, please sent to
[email protected]
Hope you enjoy this issue.
The Editor
The Photography Month at a glance
Sept 9 - 1st club meeting. Guest speaker - Stan Bain will
talk about the use of Waterglass.
Sept 23 - Start 6:15 for a pre-meeting tutorial by Bharat
Mistry on the rules and regulations for clinic entries.
At the formal meeting, Peter Tomblin will be presenting the
2009 GTCCC competition results.
This summer I took a two week road trip
through the Rockies in British Columbia
and part of Alberta. Around each corner
of the winding roads were some of the
most breathtaking sights I have seen in all
my travels. Many of the mountain ranges
reminded me of the Andes in South
America. The saying “beauty is in the eye
of the beholder” came to mind when I
reviewed the many shots I took of each
scene. What was captured by the
camera’s “eye” had a different impact on
me when compared to the actual feeling I
had and what my eye saw at the time I
took the shot.
This made me think about how all of our
senses come into play when we engage in
the art of photography. It’s not just about
our technical ability to create good
photographic compositions. Our personal
sense of good photography brings all of
our discerning knowledge and emotions
into play. If we are able to capture in our
images all of the basic elements that we
consider must be present in a “good shot”,
we usually feel pretty satisfied with the
outcome. Whether or not others see the
same quality in the images we consider to
be winners is not all that important. Our
sense of accomplishment and the
enjoyment we get from our creations
carries much more weight in the long run
than another person’s subjective
evaluation. However, if we can accept the
opinions of others as an opportunity to see
our images from a different perspective, it
can be a vital learning and motivation tool.
thought to this when it comes time for us
to submit our “winners” to the various
clinics. After all, the clinic judges are
human beings with their own set of criteria
and biases and will evaluate each image
based on their personal experience,
knowledge and individual preferences.
The number that judges assign to an
image is only an indication of their
personal assessment. Their comments
can often help us to see the images from
a different point of view. If the assigned
number to an image is lower than you
expect, it does not mean that you should
consider it an inferior shot. It could mean
an opportunity to gain a deeper insight
from another person’s perspective and
perhaps build a heightened awareness of
your photographic style and preferences.
In the words of the highly successful
photographer, Ansel Adams “Simply look
with perceptive eyes at the world about
you, and trust your own reactions and
convictions. Ask yourself; does this
subject move me to think, feel and dream?
Can I visualize a print, my own personal
statement of what I feel and want to
convey about the subject before me?”
I look forward to seeing all of the
wonderful images submitted to the clinics
this coming season and feel very pleased
to be associated with such a talented and
creative group of photographers. Your
willingness to participate in the planned
program activities and to share your talent
and expertise is what makes our club
successful, worthwhile and productive.
I encourage all of you to give some
In Focus
Issue 2
Page 2
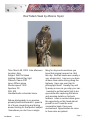
Red Tailed Hawk by Monica Taylor
Time: March 28, 2009 Late afternoon
Location: Ajax
Subject: Red Tail Hawk
Lighting: Natural Day light
Camera: Canon 30D
Lens: 400mm prime
Shutter speed: 1250
Aperture: F8
ISO: 200
Handheld with a shoulder brace.
Nature photography is my passion,
primarily birds and animals. I spend a
lot of hours researching and driving
around looking for that perfect subject.
Sometimes you don’t see a single
In Focus
Issue 2
thing for days and sometimes you
have that magical moment as I did
this day. Red tail hawks are usually a
very elusive bird. I am sure you have
all seen them while driving along the
highway. Have you ever tried to
photograph them? Usually they will
fly away as soon as you stop your car.
I wanted to get that catch light in his
eyes while also capturing the talons
and amazing details on his back
feathers. I was so excited when given
the opportunity as this hawk almost
posed for me! It was the most
cooperative hawk I have ever
encountered. Opportunities do come
to those who are patient.
Page 3
Assessing Apple’s Aperture: A
Personal View Pt.1
Other than IPhoto, Aperture is
Apples’ big entry into the Digital image
processing market. How good is it? Should
Mac users switch from Lightroom or even
Capture One? How easy is it to learn the
operating features of this application? This type
of software constitutes a sizable investment so I
thought it would be useful to report on my own
personal experiences with assessing Aperture in
the next few columns.
Looking at the glossy magazine
reviews and a few blogs is nothing like having
your own hands-on opportunity so I installed
Aperture on a 30-day trial. Most of the editors of
software and media reviewers must be afraid of
lawsuits because they are all so friendly and
careful to point out the strengths and
weaknesses of competing software and but they
were consistently full of phrases like “Importing
images couldn’t be easier” or “very intuitive
interface.” Using Aperture should be a breeze.
So after an easy install I looked
forward to quickly Importing some images into
Aperture and quickly into some heavy duty
processing. I quickly discovered it is much
different from Lightroom, not intuitive at all!
When they say the interface is “Intuitive” that
means to me I can use all the old habits I’ve
learned over the years and don’t have to learn
anything new. When I right click on a thumbnail
it should list some standard actions that I know
or that’s not intuitive. Intuitive also means I can
by my lazy self and not have to learn any new
fancy lingo or even think about reading the
manual.
Starting at the beginning with
importing images from my camera card the
display is fast and in an attractive browser
format rather than a dialogue box style.
Frustratingly for me however I have to put them
into a Project Folder. Why does Apple persist in
In Focus
Issue 2
wanting to put everything in to ‘projects’ and
‘albums’? Gripes I just went out to enjoy a
photo shoot and quickly want to process the
images - there is no project, no album, no
nothing until an idea seizes me, and wouldn’t
that group of images make a great photo album
or slide show.
Aperture allows you to leave it untitled and even
create a subfolder but the images can only go
into the project folder - why then can I create a
sub-folder? I have some flower images from a
trip to Newfoundland -why can’t I put them
straight into the sub-folder I created under the
project Newfoundland called flowers? Off to the
User Manual then. Ten minutes of searching
later and the term “intuitive” is beginning to
rankle somewhat. There seems nothing to fit
the bill but I begin to realize that Aperture
separates the storage function of importing files
(naming files/Hard-drives/folders/sub-folders,
etc) apart from the Project/Album/Book/Light
table system which is a major part of Aperture.
The subfolder created in the project system is
not related at all to the file’s folder destination on
the hard-drive. So much for “intuitive interface”
and “importing images couldn’t be easier”, its
back to more tutorials, manuals and right-click
menus. The problem, I realize is that I come
from a Windows/Lightroom experience and see
the new software as a variant of that
experience rather than something new and
requiring a different mind set, in this case the
Apple-image management mindset from Iphoto.
Because I have no experience with the projectsand-albums approach I’m already confused and
unhappy with the software, but for most of us
that is how we do come to a new situation by
using our past experiences. I have learned this
software evaluation is a task fraught with pitfalls
and bias -I vow to calm down and be more
objective.
Page 4
now provided sets of these adjustments called
“PIcture Styles” which have been based on the
experience of photographers. The pre-set styles
are Standard, Portrait, Landscape, Neutral,
While all those photons of light are “cooking” in
the camera sensor they can either be left alone Faithful, and Monochrome. Usually Canon
throws in 3 user-defined custom settings too.
(RAW), or processed to create a JPEG. Most
And, even more styles can now be downloaded
Canon DSLRs starting with the model 10D
onwards have let the user adjust this processing and installed...anyone for Nostalgia, Emerald, or
Autumn Hues?
using four main “Image Parameters”
(sharpness, contrast, saturation and color tone). Here are the Canon descriptions of the 6 basic
pre-sets:
Later models 40D, 450D, 5D, and 1D’s have
PIcture Styles - Are these really
useful?
In Focus
Issue 2
Page 5
To see examples and get a more detail with a
dynamic explanation see:
http://www.dpreview.com/reviews/canoneos5
d/page14.asp or Canon’s site at
http://www.usa.canon.com/content/picturest
yle/viewers/index.html, or
http://www.canon.co.jp/imaging/picturestyle/
style/neutral.html.
Picture styles do not affect RAW files and those
who are comfortable with post-processing may
not feel the need for using them at all. For my
eye, other than Monochrome, the different
styles are hardly distinguishable. The
difference between neutral and faithful is
particularly confusing. The in-camera settings
are identical yet Canon’s Japanese site says
the saturation is lower in Faithful and the
colours are more accurate. Is that, therefore, a
factory setting that cannot be adjusted in the
camera?
Because these image parameters, including
the pre-sets, can be user-adjusted and if you
are shooting only JPEG files then the Picture
Style option can be a useful tool in obtaining
the style of images you prefer. Experiment with
your cameras styles and see if there can be
significant differences in your images. As
Canon says, its analogous to choosing the
various types of film qualities available such as
Ektachrome, Velvia 100 or Fuji Provia. On the
other hand is Canon selling something more
supernatural, for example, their Twilight Style
“Affords a magical finish to the entire photo.”
That’s what my images definitely need - more
magic!
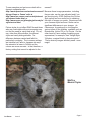
Wolf by
Monica Taylor
In Focus
Issue 2
Page 6
Confirmed Outings – 2009
/2010 Season
On this special day, there will be the usual
activities including spinning demonstrations,
baking demonstrations, wood stove
demonstrations, blacksmith demonstrations,
gardening demonstrations, kids dress-up, rural
runway fashion show, and hay rides. There will
also be a host of fundraising activities.
Hours & Rates
Open from 12 noon until 4 pm
Admission is FREE
Location
Bowmanville Zoo , “ Sat. Sept. 19, 2009 2365 Concession Road #6
Pickering, Ontario
“( Rain Day Sunday )
Bowmanville Zoo has over 300 creatures
including many famous animal celebrities.
Hours & Rates September 10:00 a.m. to 4:00
p.m. Weekdays ( Weekends 10:00 a.m. to 5:00
p.m. ).
P:905.683.8401
Crawford Lake Conservation Area (
Niagara Escarp.) ,“Oct. 17 , 2009”
Showtimes at 12:00 , 2:00 and 4:00 pm ( mainly
on weekends )
Carnivore feeding at 3:00 pm ( mainly on
weekends )
Adults ... $18.50 Seniors ... $15.50 Groups of 10
to 35 people … $15.00 per person
The pristine waters of Crawford Lake have
drawn people to its shores for hundreds of
years. The rare lake, with surrounding
boardwalk, is nestled in lush forests atop the
stunning Niagara Escarpment where visitors can
watch soaring turkey vultures glide through the
Nassagaweya Canyon. You can even step back
Location: 40 King Street East
in time and explore the 15th century Iroquoian
Bowmanville, Ontario, L1C 3K5
Village that has been reconstructed on its
original site. The spirits still sing in the rustic
P:905.623.5655
longhouses where tools, animal hides and the
smell of smoke let you experience the life and
times of Ontario’s First Peoples.
Crawford Lake Facts
- 468 hectare park established in 1969 on the
Niagara Escarpment in Milton
- Regionally Environmentally Sensitive Area
- Provincial Area of Natural and Scientific
Interest
- World Biosphere Reserve as part of
Pickering Museum Village – Family
Niagara Escarpment
th
- Rare meromictic lake with surrounding
Day, October 4 , 2009 ” (NO Rain Day)
boardwalk
Take a step back in time and enjoy what history
- One of the most accurately dated prehas to offer. With an impressive range of events
the possibilities are endless at Pickering
contact archeological sites in Canada
Museum Village. This award winning village has
- 15th century reconstructed Iroquoian
fifteen restored heritage buildings which
Village and heritage site
comprise a quaint pioneer village, including a
blacksmith and wood shop, general store,
- Nassagaweya Canyon Interpretive Lookout
schoolhouse, houses, barns and churches.
In Focus
Issue 2
Page 7
- 19 km of hiking and cross-country skiing
and snowshoeing trails with connections to
Bruce Trail
- Elevated boardwalk with interpretation
stations surrounding Crawford Lake
- Education programs and exhibits
- Visitors Centre and Gathering Place
facilities with Gift Shop, theatres,
lunchrooms, exhibits, displays and outdoor
picnic areas
Hours & Rates
north of the Q.E.W.
GPS Coordinates: 43.47 -79.951
P:905.854.0234 Customer Service: Extension
221
Summary of Proposed Outings for the
remainder of the season
Brickworks ,“Late Oct. / Early Nov. 2009”
Distillery District (Gooderam & Worts), “Late
Nov. / Early Dec. 2009”
Open All Year! Crawford Lake is open weekends
and holidays (closed Christmas Day) all year
long and daily May to October. Open at 10 am
to 4pm daily.
*Note: with the exception of July & August,
weekday services and facilities are limited.
Please contact the park prior to your visit for
details (905) 854-0234.
Canadian Automotive Museum, “Jan - Feb.
Adults ... $ 6.50
Seniors ... $ 5.50
Kensington Market , “April 2010”
Location
Driving Directions:
- Crawford Lake Conservation Area is
located at Steeles Avenue and Guelph Line,
5 km. south of Highway 401 and 15 km.
Northwood Zoo & Animal Sanctuary, “Late May
2010”
Baps Shri Swaminarayan Mandir, “Mar - Apr.
2010”
Riverdale Farm , “Mar - Apr. 2010”
Black Creek Pioneer Village, “Early May 2010”
2010”
The Guild, “Early June 2010”
Summer Lily by
Brian Greenway
In Focus
Issue 2
Page 8
LIGHTING EFFECTS using Elements 4. An average image may just turn out to be a gem.
If you have ever just wanted to have some fun
Lighting Effects is just the answer. It can change
an ordinary image into something exciting; it can
give a lift to a flat image. The following effect is
best done with an image that has texture. ie.
wood door, barn, straw, brick or stone.
STEP 1:- As always before you do anything
make a working copy of the original image.
While this could be in JPG format, it is much
better to use Tiff.
For use on
Flowers and
Portraits omit
steps 5 to 8.
Try some of
the other
lighting
effects; you
just may have an image you can use them on.
Remember, have fun.
STEP 2:- Select the working
copy you just made, then
select FILTER>
RENDER>Lighting Effects.
STEP 3:- Click Default then
select Flashlight.
STEP 4:-select light type OMNI.
STEP 5:- Set the intensity to approx. 50, (try
different settings to see what they produce).
Then locate the light to the desired position (the
one third points generally work well) and adjust
the size of the circle.
STEP 6:- On the texture select ie, Red - also try
the others.
STEP 7:- For the height I have found 50 to be a
good start but every image can
be different so try other
settings.
STEP 8:-Once you have it the
way you want it Click OK, then
Save it.
In Focus
Issue 2
Page 9
How fast time passes by. It’s
September and we are ready and
excited to have our first meeting of
the season!! I hope you have all
been out shooting this summer. We
look forward to all of your images.
I have provided the information for
October’s program so go ahead and
mark these on your Calendar.
October 7th, 2009 meeting:
October promises to be another
informative month. We start with a
live clinic judging. We have three
of our local judges including one of
our own, Vern Mossey coming out
to a mock clinic. This is a great
opportunity for you to witness the
process of judging for our clinics as
well as what judges are looking for
in your images.
The pre-tutorial will be presented
by Des McKee.
Des took his first picture in 1955,
using a Kodak Brownie camera
owned by his father. By 1963, he
had purchased his first 35mm
camera and by 1968 was
developing and processing B&W
prints and colour slides. He and his
wife moved to Canada in 1974
where he continued his interest in
photography. He purchased the first
of many digital cameras in 1995 (a
0.24Mpixel camera). He bit the
bullet and got rid of his 35mm film
cameras in 2004. Digital
photography also ties well into his
other hobby; that of building and
In Focus
Issue 2
playing around with computers. He
is mainly interested in the technical
aspects of photography and in
airshow and aircraft photography.
He joined the Oshawa Camera Club
in 2006 and under the influence of
other members, is branching out
into nature, portrait and wedding
photography.
This tutorial is on shooting Raw and
the benefits. For those of you who
are still shooting jpeg this will be
especially beneficial for you. Des
has done many tutorials for the
club in the past and I think you will
all agree, he has always been
informative and inspiring. Start
time is 6:15pm
October 21st meeting:
The very first clinic of the season!
Bharat Mistry will host this
meeting. It is always an
entertaining evening. This is a
wonderful chance to see some of
our members’ images as well as the
opportunity to encourage each
other. With the judges’ comments
and critiques, you can also learn
how to take better images.
Today’s pre-tutorial will be
presented by Nick and Sharon
Janishewski. Nick’s photography
history is short, he started in 2004.
To catch up to the OCC talent, he
took three workshops with Craig
Tanner: Next Step, Tetons and
Death Valley. Three with Rocky
Page 10
Mountain School of Photography,
Nova Scotia, Light Studies and Art
of Macro and one with Mark
Johnson in Washington. More are
planned for 2010. He was a team
facilitator in 2008 where he started
to learn ProShow Producer.
He also photographs stage
productions for ACT One in
Pickering, Wardrop Engineering
events, did a wedding and does
volunteer photography in the
community. Nick hasn’t developed
a preference for a style of
photography and is open to new
directions. He has become fairly
proficient in Photoshop but likes to
minimize its use.
He has retired from Ontario
Hydro’s Protection and Control in
2000. But still does consulting
work for Wardrop Engineering
(where he designed more than half
the windfarms in Ontario) he
continues to design independently
and implement the SONET system
in Markham’s PowerStream to
support Sharon’s and his
photography habit!
For several years, Sharon’s
husband Nick encouraged her to
join him in his passion for
photography. In April 2008,
shortly after she got her first
Digital SLR camera, he enrolled
her in a Women’s Foundation
Workshop in Savannah, GA where
she was able to learn photography
basics.
Additional workshops to practice
her newly learned skills followed
with Nova Scotia Fishing Villages
with Rocky Mountain School of
Photography (RMSP), The Grand
In Focus
Issue 2
Tetons with The Mindful Eye, The
Vibrant Colours of Skagit Valley
and Butchart Gardens with Mark S.
Johnson Photography; Light
Studies: The Light and
Atmosphere of Place and The Art
of Macro with RMSP.
Future workshops include Zion
National Park with The Mindful Eye
and England’s Lake District with
The Digital Dawn. In addition to
the workshops, she and Nick will
join photography friends in
Newfoundland and Colorado in
2010. What better way to see the
world, but through the lens of a
camera.
Sharon joined the Oshawa Camera
Club in September 2008,
participating in Club outings and
clinics and is a Team Facilitator for
2009-2010. For a second year,
she will be a volunteer
photographer for Whitby in Bloom.
Sharon is a retired Medical
Laboratory Technologist, who
volunteers as secretary and
director of the Vasculitis
Foundation Canada. When not
away taking workshops, she likes
to spend time with her three
grandchildren.
The pre-tutorial for this meeting
will be on High dynamic range in
Photomatix . This is an amazing
software package that I am sure
you will be enticed to try. This is a
great way to enhance some of
your images. Nick and Sharon will
share their knowledge and tell us
what images work best and how to
get the best out of them. Start
time is 6:15pm
Page 11
Moments of Awe
I’m sure you’ve had moments during your day
where you’ve wished you had a camera to
capture a subject or an occurring event. It just
seems natural for us as humans to document
certain things that intrigue us. But what about a
time when the camera was the last thing on your
mind? I’m not talking about everyday routine
events, but something that stops you dead in
your tracks and leaves you totally mesmerized
that even if you did have a camera in hand, you
were unconcerned with it in any way. These I call
having a “Moment of Awe”.
To define this
phenomenon,
they are usually a
first time
experience or
occurrence and
sometimes take
you off guard. For
example,
witnessing the
birth of your first
born, (second
one, not so
much!), peering
over the Grand
Canyon for the
first time,
watching the sun break over Machu Pichu or
even something grisly as a car crash unfolding
before you – in all instances, it’s individually
relevant to you and may seem ho-hum and trivial
to another. In any case, your body is in such
sensory overload that it goes into a somewhat
state of shock and the camera becomes just an
after-thought. Why?
Well, I bet you that you don’t experience these
moments often – maybe a handful of times over
our lifetime. And I also bet that you can recall
each and every one of these “Moments of Awe”
In Focus
Issue 2
with amazing clarity and detail – just as if you
were looking at a photograph. The memory of it
has been etched into your mind that nothing will
erase it.
I was lucky enough to have two of these
Moments of Awe a few years back while Scuba
diving in Hawaii. On our first dive, we were drift
diving a drop-off at about 40 feet. Visibility was
clear on the shallow side on our left, but faded
into the dark blue depths on our right. I was
observing and photographing the various marine
flora/fauna as we went along – many for the first
time. The Dive Master points to the right and as I
look over, like a ghost from the depths emerges a
Giant Manta. It
glides by the
group, its 14
foot wingspan
undulating
effortlessly
through the
water. I can still
picture its eye
as it went by us.
And just like
that, it vanishes
into the blue.
The whole event
lasted maybe 10
seconds, but I
was pretty
certain I had stopped breathing. Camera clutched
uselessly at my side – 0 frames shot.
The second Moment of Awe occurred on a latter
dive the same day. I was descending down at
about 60 feet and I’m distracted by a series of
unfamiliar clicks. I look around in time to catch a
pod of wild Spinner Dolphins come into view.
Once again, totally hypnotized by the sight.
Somehow I did manage to remember the camera
and get off 3 shots before they disappeared into
the blue. I still remember the baby flipping upside
down and swimming under its mother’s belly.
Even if I hadn’t taken any shots, I don’t think I
Page 12
would have mind.
Sure I’ve seen Manta and Dolphins before in
print, TV and at Aquariums, but this was
something else. I don’t know what it is, but it
kind of shocks you on an emotional and
spiritual level. We did see more dolphins and
Manta rays later on, but the connection wasn’t
the same as that first time. Sort of reinforces
my theory that these moments are rare per
person.
So next time you come across a situation that
leaves you awestruck and muttering Holy
@*$% under your breath, be grateful of your
Moment of Awe. If you should be lucky to
capture it on camera, great. But if you don’t, I
don’t think it matters as you’ve captured it
within you and no virus, hard drive crash or
computer meltdown can erase it.
Think Different-ly and Discover the
Possibilities. Cheers, B.
Spitfire Mk 18 by
Des McKee
In Focus
Issue 2
Page 13
Why would you want to start using
Lightroom? You have been taking and
processing digital images for a while
now and your current set of software
tools work for you. You may be using
Adobe Bridge, Adobe Camera Raw
and Photoshop CS or Elements
and/or some other combination of
tools to import your images, catalog
and reference them, browse for a
particular image, process the pixels,
print an image or create a slideshow
or upload them to the web. You have
a routine (or workflow) worked out
that suits you. Why would you change
it now to use Lightroom?
Lightroom was designed from the
ground up for the digital photographer,
so once you understand the
Lightroom paradigm; it is very logical and easy
to navigate around. There are no extraneous
features, no hidden commands and no dead
ends. I think that there are five main reasons
why everyone should be using Lightroom. There
are:
1. Lightroom’s ability to give photographers a
totally integrated program, from importing,
organizing, editing and sharing is unmatched by
any other program (I think it’s even better that
Apple’s Aperture).
2. Lightroom is designed for speed and efficient
processing
3. Lightroom uses a database to file and store
metadata about your images, thus making it
easier to find a particular image (even if you
have many thousands of images). I currently
have close to 50,000 images in Lightroom.
4. Lightroom was designed to make RAW
processing an easy, integrated part of your
workflow.
In Focus
Issue 2
5. Lightroom used non-destructive processing
When you start Lightroom for the first time, it
may appear bewildering. Where do you start?
Basically, you work from left to right and top to
bottom. Fig 1 shows the opening screen for
Lightroom. On the top right are the five major
modules within Lightroom: Library, Develop,
Slideshow, Print and Web. I think these are self
explanatory but I will highlight the major
functions within each module.
Library Module: the library is where you will
tend to start and end your Lightroom session.
Common tasks are: importing images as well as
exporting the finished product, keywording and
metadata entry, file moving, deletion and
renaming and finding, sorting and grouping
images.
Develop Module: this is where you do your
image processing such as: white balance
adjustment, contrast and colour adjustment,
cropping, tonal adjustments and camera and
lens adjustments
Page 14
Slideshow Module: as the name implies, this
creates a presentation of your images and
allows you to: select images, adjust slideshow
layout, adjust slideshow transitions and add
music.
Print Module: here you create layouts and
print packages, use output-specific colour
profiles and print to a local printer or print to a
JPG file.
Web Module: this allows you to get your
images online very quickly by letting you chose
from various photo gallery styles, configure the
look and feel, and upload directly to your web
server.
All modules have a common interface, as can
be seen in Fig 1. This shows the Library
module components:
Along the top is the Menu bar for all the
commands in each module. Below this is the
Module Picker to select the module you want
to work with. On the left is the Left Panel
group. The contents vary with each module but
generally involve accessing, grouping and
previewing images and templates. The Right
Panel group is naturally on the right of the
screen. The contents here also vary with each
module but generally you find controls for
adjusting and tweaking. Between the right and
left panels is the main image. Underneath this
is the Toolbar, where again the contents are
specific to each module. Finally, along the
bottom of each module is the Filmstrip, which
displays thumbnails of the image grouping you
are working on. At the top of the film strip, is a
row of tools that you will find yourself using alot.
Next issue, I will explore the Library Module in
greater detail.
Bee-Ready by Brian Greenway
In Focus
Issue 2
Page 15
To VR or not to VR & Getting Gridded!
Given the plethora of features that
manufacturers are bent on squeezing into the
current set of cameras (Don’t get me started on
Video on SLRs!); there are some features that
are actually beneficial for shooting.
The first one, VR Lenses (Vibration Reduction)
or Image Stabilization in some form or another.
The benefits that this provides is a given –
ability to shoot handheld at a few stops higher
than without VR. Always a plus in lowlight
shooting and allowing you to get away without
using the tripod or flash in certain situations.
So what is the best way to maximize the VR
benefit? You’ve probably noticed the set of
switches on the side of your VR Lense. You have
VR On/Off which is pretty obvious but you also
have Normal/Active. (The other M/A-M switch is
for the focusing mode – Auto or Manual)
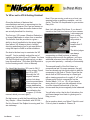
For Hand Held shooting, VR is set to ON. If
you’re using a Tripod,
set VR to OFF.
Normally the VR
expects camera
motion, but when
tripod mounted there
is no motion so the
image stabilization
actually causes a jitter
thus defeating the
purpose. (It’s in the
manual, which you read, right?)
So that leaves us with the Normal/Active Switch.
Very Simple – When Handheld, with VR ON –
Set it to Normal if the Subject is moving and You
are stationary.
In Focus
Issue 2
Now if You are moving, such as on a boat, car,
swaying bridge or anything unstable – set it to
Active. This lets VR compensate for your motion.
Easy Huh.
Next, let’s talk about Grid Lines. If you haven’t
turned on the Grid Line feature on your camera,
I encourage you
to do so and
leave it on. This
will provide a
number of
benefits that I’ll
explain.
The clinic judges
are always
commenting on tilted horizons or leaning
buildings and now with the gridlines, you have
additional reference lines that allow you to line
up your shot precisely – vertically or horizontally.
The second benefit of the Grid Lines is a
compositional aid. On some cameras, the grid
lines are already set into thirds which is ideal for
composing to the Rule of Thirds. Some like the
above from a D300 are set up in a Quad grid
with a viewing proportion of roughly 4” x 6” and
follows pretty close to composition on the
Golden Mean (1:1.5 vs. 1.6). All you have to
worry about is to get your key elements to line
up at the internal intersections of the four
corners and the picture magically looks balanced.
You will also notice, that in dim lit situations, the
grid lines change from black to glowing red to
help you out.
Got a question about your Nikon? Send it in and
I’ll do my best to answer it. Cheers, B.
Page 16
Early Morning Photography by Peter Tomblin
has been up for more than an hour or so. Such a
mist adds considerably to the beauty of many
landscape and nature pictures. Also many
things, especially plant life, spider's webs and
Have you noticed that almost all
the like will be enhanced by tiny beads of dew.
the best outdoor photographs are taken in the
Real dew is quite different in appearance from
early morning or in the late afternoon, that is,
within a couple of hours of sunrise or a couple of the water droplets which some people apply with
hours of sunset. The photographer who doesn't a spray bottle. (Yes, I admit I have done it
myself!)
get up with the dawn, or doesn't go out when
Most of us tend to take the majority
everyone else is eating dinner will seldom get
of our pictures on vacation trips and the difficulty
those winning shots.
that arises then is the impractibility of waiting for
There are a number of reasons
the right time of day to take your picture,
why this should be so. The first that comes to
especially if one is traveling with a non
mind is the angle of the light. The low angle at
photographer partner. I find more and more that I
which the suns rays strike the surfaces of the
take my best pictures when my specific purpose
subject are ideal for bringing out texture or for
is to take pictures, and travel pictures are just
backlighting. Leaves, petals, fur, hair are all
travel pictures, not potential prize winners. The
improved by backlighting, while wood, brick,
best photo opportunities arise when I can set my
sand, shells, skin all have textures which are
alarm clock for 5 a.m. and go off alone or with
enhanced by low angle, oblique lighting.
Then there is the colour of the light, one or two like minded fellow photographers,
who don't mind if you take an hour setting up
what scientists refer to as colour temperature.
one shot, or if you want to wait for the sunlight to
Morning and evening light is softer, often pinker
be at just the right angle before you release the
than midday light and will bring out the delicacy
shutter. Then when I travel I can think of the
of subtle colour differences in your subject. You
might also explore the differences between early pictures I take as records of a holiday. Of course
when taking this approach one may still come up
morning light and late afternoon light.
with a potential competition shot in your travels.
As well as the colour of the light,
I have frequently said to beginner
there is a big difference in the intensity of the
photographers that one of their most important
light between sunrise and midday. On a sunny
accessories is a waste paper basket. I would
day the brightness of the sun will give you a
range of contrast between highlight and shadow add to that another important piece of
that may well be beyond the ability of your film to equipment, that is an alarm clock, so that those
precious spring mornings are not lost and you
record. In that case your exposure will not be
able to record detail in the darkest shadows or in can be out there producing masterpieces. Dress
warmly, take a Thermos, double check your
the brightest highlights.
equipment and sally forth. You will not be
Photographers who are up at the
disappointed.
crack of dawn will often find a soft mist over the
landscape which will not be there when the sun
Methought I heard a voice cry
no more - (Macbeth)
In Focus
Issue 2
Sleep
Page 17
What is the best companion camera for the
Traveling Photographer? Really, after lugging
around your DSLR and its accompanying lenses
and gadgets for a couple of days in a new city
(or any place) it starts to become a little tiring.
The black monster can also be pretty
intimidating to people, awkward for a candid
street scene or for a social evening out. The
DSLR can even generate some local hostility in
some museums or historical sites as you may
be competing with their own souvenir sales. At
some places extra charges are made for DSLRs
and even tripods. Perhaps a small companion
camera is needed in addition to your DSLR. Is
a pocket size point and shoot the answer? Well
maybe not for some serious image-making. The
compact super zooms like the Canon SX200
are really light and versatile but lack image
quality ( high noise ), wide angle ability, and
RAW. Maybe a step up to a higher-end
compact camera is better choice. Dpreview
calls these the “Enthusiast Compacts” and they
did a good review of several in a group test just
last December. (See
http://www.dpreview.com/reviews/Q408enthusias
tgroup/ ) such as Nikon’s P6000, Canon’s G10,
Panasonic’s LX3 or the very new Richo GRIII
are light, small, uncompromising on quality,
have lots of control features, a good lens, and
have that all important enthusiast’s requirement
- RAW file capability.
cameras in addition to their regular gear as a
sort of companion or second camera. For the
Traveling Photographer too, they maybe the
best walk around camera to travel with when
the DSLR is just too much and the control and
quality of the compact super zooms are not
enough.
Panasonic’s LX3 took a new path, by
eschewing the conventional mega-pixel race of
cramming more and more of them on to the
same size sensor they kept the pixel count
comparatively lower to give better low-noise
images - (max ISO 6400) ; and also providing a
super fast f2.0 - f2.8 lens with 24 mm equivalent
wide-angle capability they created quite a buzz
in the photographic community. Of the 7
cameras tested by Dpreview in this group the
LX3 was rated the “best of the bunch” for image
quality in low light and tied with the Canon G10
in outdoor light. Dpreview rated it the overall
winner against the other cameras in the
category. This rating has certainly been
validated by the praise in the photography
podcasts and blogs where people have raved
about it’s quality. On a note of caution,
however, they all agree the 60 mm limit to the
zoom can be a major disadvantage in many
situations and this should be given careful
consideration.
The ability to capture your travel images in RAW
gives you lots of room to make adjustments
under sometimes difficult lighting situations and
avoid the strong noise, over-sharpening, and
automatic colour corrections built into many
point and shoots and super-zooms. What the
premiums lack in resolution, zoom, and lens
quality, compared to the DSLR, is
compensated for by their compact size, light
weight, considerable depth of field and wide
angle possibilities. Its not surprising, then, to
discover that many top flight professional
photographers use one of these high-end
In Focus
Issue 2
Page 18
All this buzz convinced me to part with my
trusty G9 on Craig’s list and purchase the LX3.
At the moment the LX3 , compared to the
Canon G9 or G10, in my mind it is the ideal ,
carry- anywhere camera for the travel
photographer who wants great image quality for
close-ups, street scenes, and landscapes in a
very small package. It certainly has lived up to
the hype. To further reinforce the idea this is a
travel camera you can set in-camera start and
end “vacation dates”, along with world times for
overseas travel destinations. You record them,
along with the name of the location, when you
take the picture. My wife takes a lot of indoor
pictures at club and church meetings
photographing groups in low light. The extra
fast and wide angle lens was perfect for these
types of situations and she discovered a very
successful feature which Panasonic calls
“Intelligent Auto Mode.” Effectively the camera
detects if its looking at a portrait, scene, or
macro situation in night or day situations and
adjusts accordingly.
Any of these enthusiast compacts such as
Canon’s G10, Nikon’s P6000 (even has GPS) or
the Panasonic LX3 with its rich feature set and
RAW, would make the ideal family travel
companion camera to the mighty DSLR. So
good, in fact, it could be the only camera you
take.
--------“Fiona” LX3 switched to “Portrait” mode
automatically. 1/1000 @ f2.0 ISO 80 by Joan
Greenway
“Waiting at #42 Charles De Gaulle”
Panasonic LX3 - 1/25 @ f2.3 - ISO 400 auto
Big Cat
by
Des McKee
In Focus
Issue 2
Page 19
Dawn Patrol by Des McKee
Oshawa Camera Club
email:
[email protected]
web: www.oshawacameraclub.ca
Time: Jan 19, 2007, 8:29am
Location: CFB Cold Lake, Alberta
Subject: CF-18
Lighting: Natural Day light
Camera: Canon 20D
Lens: 28-135 IS
Program Mode
Shutter speed: 200
Aperture: 7.1
ISO: 400
Handheld.
Aviation and aircraft have always
been my top choice for
photography. My son and I used to
go to all the airshows together, now
I go on my own. This photograph
was taken at Canadian Forces
Base, Cold Lake in Northern Alberta
in mid January. (Temperature was a
cool -30 degrees). We were there to
watch our son graduate from the CF18 training program (did you see
Jetstream on the Discovery
channel?) as a fully qualified fighter
pilot. As we were bring laid into the
main building, I saw a door leading
out to the parking area and looking
out, took this image. Of all the
images I took that day (>2000), this
is my favorite and seeing it brings
back to me how proud I am of my
son and his chosen profession.
The Oshawa Camera Club is
now in its 72nd year of
continuous operation. It serves
the photographic community of
Durham Region and the
surrounding area. We meet on
the second and fourth
Wednesday of each month at
7:30 pm, from September to
April, at the Northview Branch
of the Oshawa Public Library,
which is located at the northwest corner of the intersection
of Beatrice and Ritson Road in
Oshawa.
Visitors are always welcome at
our regular meetings.
This newsletter would not be
possible without the time and
effort put in by a very talented
team of photographers and
writers.
A special thanks to Bharat
Mistry at q-vision who
developed the graphics used
throughout this newsletter.
Published by Des McKee on behalf
of the Oshawa Camera Club.
Email questions and comments to:
[email protected]
The articles and photographs in this newsletter are copyrighted and are not to be reproduced or modified
without the creator's written permission. For more information or a release, please contact the editor at:
[email protected]