1
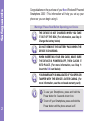
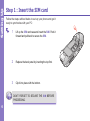
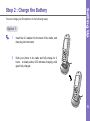
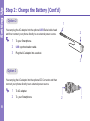
Smart Phone
Quick Start Guide
Safeguards
Congratulations on the purchase of your New Windows® Powered
Smartphone 2003 ! This information will help you set up your
phone so you can begin using it.
Warnings! Please Read Before Operating your Device
THE DEVICE IS NOT CHARGED WHEN YOU TAKE
IT OUT OF THE BOX. (For information, see Step 2:
Charge the battery below)
DO NOT REMOVE THE BATTERY PACK WHEN THE
DEVICE IS CHARGING.
WHEN INSERTING YOUR SIM CARD, MAKE SURE
THE DEVICE IS POWERED-OFF, THEN CLICKS IT
INTO PLACE. (For more information, see Step 1:
Insert the SIM card below)
YOUR WARRANTY IS INVALIDATED IF YOU OPEN OR
TAMPER WITH THE DEVICE’s OUTER CASING. (For
more information, see the enclosed warranty card)
2
1
To use your Smartphone, press and hold the
Power button for 3 seconds to turn it on.
2
To turn off your Smartphone, press and hold the
Power button until the phone screen is off.
Contents
n Setting Up
n The Basics
n Navigating
n Using for the First Time
3
Follow the steps outlined below to set up your phone and get it
ready to synchronize with your PC:
1
Lift up the SIM card case and insert the SIM. Push it
forward and pull back to secure the SIM.
2
Replace the back panel by inserting the top first.
3
Clip it into place with the bottom.
DON’T FORGET TO SECURE THE SIM BEFORE
PROCEEDING.
4
F
Setting Up
Step 1 : Insert the SIM card
You can charge your Smartphone in the following ways:
Option 1
1
Insert the AC adapter into the back of the cradle, and
then plug into the mains.
2
Dock your phone in its cradle and fully charge for 3
hours. A steady amber LED indicates charging; solid
green fully charged.
Setting Up
Step 2 : Charge the Battery
5
Setting Up
Step 2 : Charge the Battery (Cont’d)
Option 2
1
You can plug the AC adapter into the optional USB/Serial cable head
and then connect your phone directly to an external power source.
1
2
3
2
To your Smartphone.
USB synchronization cable.
Plug the AC adapter into a socket.
3
Option 3
You can plug the AC adapter into the optional DC Converter and then
connect your phone directly to an external power source.
1
2
6
To AC adapter.
To your Smartphone.
2
1
Once you have Started to charge your device, you can switch it on.
First time, it is however recommended that you fully charge your
device about 1 hour - before switching it on.
1
Press the power button indicated as the right for about 3
seconds – wait for your operator and Microsoft screens
to load.
2
Active your PIN as set out by your operator.
3
Enter your PIN and press the left soft key below Done.
Power Button
Setting Up
Step 3 : Switching on and Entering your PIN
7
Setting Up
Step 4 : Installing ActiveSync
Using Microsoft® ActiveSync® you can synchronize information on
your desktop computer with the information on your phone. ActiveSync
compares the information on your phone with the information on your
desktop computer and updates all locations, keeping you up-to-date
with the most recent information.
Before you can begin synchronization with your desktop PC, you must
install ActiveSync on your desktop computer from the Smartphone 2003
Companion CD. ActiveSync is already installed on your phone.
Hardware Connection
Dock your Smartphone in its cradle and plug the USB/Serial to your
desktop PC for synchronizaton.
Software Installation
8
1
Insert the Smartphone 2003 Companion CD into the
CD-ROM drive of your desktop computer.
2
Follow the directions on the screen when you PC Start
to run the CD program.
After the installation is completed, the New Partnership
Wizard will helps you set up a partnership between your
phone and your desktop computer so that you can Start
synchronizing information and customizing your synchronization settings.
Setting Up
To Create a Partnership
To prevent synchronization problems, it is
important that you select Synchronise with
this desktop in the New Partnership Wizard
options.
Synchronizing Information
Select the information you would like to snychrozine with you
PC (optional items are Calendar, Inbox, Contacts, Tasks),
then your first synchronization process will automatically
begin when you Finish using the wizard. After the first synchronization, you will notice that your Outlook information
now appears on your phone.
9
The Basics
Front View
LED indicator
Speaker
Display
The screen on your phone that displays
information. The top of the display
shows the title bar.
Put your ear here to listen to a call
Navigation pad
Use to move left, right, up
and down through on-screen
information; press the center to
select.
Programs screen
Displays the program list.
Left soft key
This button selects the command
above, at the base of the screen.
Right soft key
This button selects the command
above, at the base of the screen.
Talk
Press once for the Dialer
screen and to dial a number.
End
Press once to end a call. Key lock.
Press and hold to lock the key pad.
Home
Press to return to the Home screen.
Press and hold for the disconnect
GPRS, or Bluetooth headset menu..
Asterisk
Pressing and holding the asterisk
key switches between text and
numeric input modes.
10
Pound key
Pressing and holding the pound key
displays a list of symbols
abc
gh
i
pq
rs
jkl
tuv
def
mo
wx
n
yz
Back
Press to go back to the previous
screen.
Earphone jack
When you want to
listen to music or talk hands-free
insert the earphone jack here.
Power On/Off
Press and hold for 3 seconds to
turn on/off your phone.
Quick List
Press once for a list of commonly
used settings and programs.
Camera
Press to launch the camera
Car Antenna
Connector
If your car supports, you
can attach your phone to
its antenna and utilize its
superior reception quality.
The Basics
Back, Side and Base View
Camera Lens
Preview Mirror
Volume
Press to turn up or down the
volume.
SD/MMC
Card Slot. Slot SD cards here to
increase memory.
Universal Connector
Attach the USB/Serial synchronization cable here.
Fixing Lock
Push to release the back
cover
Microphone.
Sound enters the device
here when making a call or
recording.
11
The Basics
Function Keys on Your Device
Talk button/Speakerphone
Dials a phone number you entered using the
keypad.
n
Dials a phone number you selected from the
Call History list.
n
Answers an incoming call.
n
Places a call on hold to answer a second
incoming call (call waiting).
n
Switches between an active call and a call that
is on hold.
Back button
n
Press and hold to active/deactivate the
speakerphone.
n
Back to the previous screen.
n
Backspaces over characters when you are
entering a text message or dialing numbers.
End button/Key Lock
12
Home button
n
n
Ends active voice/data calls at any time.
n
Ends a call when one party is on the line, and
ends the active call when multiple parties are
connected.
n
Press and hold to lock the keyboard.
n
Displays the Home screen.
n
Ensure that you have exited any programs and
are in the Home screen, you can do this by
simply pressing Home button.
n
Press and hold to enter a quicklist where you
can disconnect/reconnect GPRS and enable/
disable the bluetooth headset.
Navigation Pad
n
Use the navigation pad to move the selection
focus up, down, left, or right. In a text field, use
the navigation pad to move the cursor right or
left, character by character.
Power key
Press the Action key to open a selected item, or to
select or clear a check box. The Action key works
much like the ENTER key on a keyboard, and is
sometimes referred to as the Do It key.
n
When the Smartphone is turned off, press the
Power key to turn on the Smartphone.
n
When the Smartphone is on:
The Soft Keys
There are two soft keys on your phone, located
directly below the display screen. Each soft key performs the command displayed immediately above
it on the screen, making it easy to navigate around
your phone and to perform common commands.
abc
gh
i
pq
rs
jkl
tuv
1
Press the Power key to display the Quick
List of common commands.
2
Press and hold the Power key to turn off
the Smartphone.
The Basics
Action key
To ensure you don’t lose valuable
data on your device, always power
down as described above.
def
mo
wx
n
yz
13
Naviaging
14
Display
The top of the display shows the title bar, where you can see status
indicators about the current mode of your phone, or the name of the
current activity or active program.
Title bar with various indicators.
The five programs that you have most
recently used
Home Screen
n
The Home screen is your Starting place for most tasks. You can
gain access to all of the Smartphone features and programs from
the Home screen.
n
The top of the Home screen displays icons for the five programs
that you have most recently used. The center of the Home screen
displays your Next appointment, the number of messages in
Inbox, and your current profile. When you scroll to one of
these items and press the Action key, the associated program
opens.
n
On the bottom left side of the Home screen is the Start Menu.
Pressing the soft key for this Menu takes you to the list of installed
programs. You can scroll to a program in the list and press the
Action key to open it. To the right of the Start Menu is a variable
Menu. Pressing this soft key opens the associated program.
n
The Home screen displays automatically when you turn on the
Smartphone or leave the Smartphone idle when it is on, but you
can go to it at any time by pressing the Home key.
abc
gh
def
mo
n
Press any time toi returen
jkl to Home
pq
screen.
rs
tuv
wx
yz
n
Select a recently-used program at the top of the screen, and then
press the Action button to open the program.
n
Select an item in the center of the Home screen, such as your
Next appointment, your E-mail information, or your profile type,
and then press the Action button to open the program or access
the settings as sociated with the item selected.
n
Press the Programs soft key to display the list of programs available on your phone, select the program you want, and then press
the Action button.
n
Press the Contacts soft key to display the Contacts list, select the
contact you want to open, and then press the Action button.
Push right or left to the navigation button
to select a program and then press.
Navigating
Navigation Options
Menus
On many screens, the right soft key is labeled Menu. The Menu soft
key displays a list of Menu options that are relevant to the screen
you are viewing. Selecting a Menu option will either perform the
command or take you to another part of the user interface where
you can perform the command.
15
Naviaging
Navigation Options (Cont’d)
Using the Programs List
Your phone comes pre-installed with many programs that you can
Start using. To install additional programs on your phone, refer to
the Smartphone 2003 Companion CD that came with your phone. If
your phone provides a SIM toolkit to access programs on your SIM
card, the toolkit is added to Programs.
To Navigate to a Program
1
2
On the Home screen, press the Start soft key.
Select the program you want, and press the Action
button.
Using Numbers
You can also use numbers to quickly navigate to programs and
settings on your phone. Just press the number on the keypad that
corresponds to the number shown Next to the program or setting
you want.
16
For example, in Start, press 3 on the keypad to open Calendar.
Navigating
For lists where numbers are not visible, such as a Menu
list, you can still press the number that corresponds to
the item in top-down order. For example, if you want to
select Filter in the list of Contacts Menu options, you
can press 4 on the keypad because the Filter option is
fourth in the list.
Using the Quick List
The Quick List displays a list of commands, such as locking your
phone, locking the keypad of your phone, and turning off the radio,
as well as the list of available profile types.
To Access the Quick List
Press the Power button once.
17
Navigating
Programs Menu
The main features of the programs Menu are listed below. To access them simply press the Start soft
key in the Home screen. To access an item scroll to it, and then press the Action key.
Inbox
Contacts
Calendar
Opens the Messaging
feature in the Inbox,
where you can read text
messages or emails, and
compose New ones.
Opens your contacts
list alphabetically.
Record your important
events, and setup
alarms to remind you
when important events
mature.
MSN
Messenger
Settings
Shortcuts
Personalize your phone
to suit the way you
use it.
View a summary of the
contacts you have set
up speed dials for.
Keep in touch with your
friends in real time by
subscribing to this free
service.
18
ActiveSync
Call History
Keep your contacts,
tasks, emails and
calendar events upto-date be-tween your
computer and phone
by synchro-nizing
regularly.
Find out who has
called you and when,
then return the call or
save their details to
your contacts list.
Tasks
Voice Notes
Keep track of what
you need to do,
when, and even have
your phone alert you
of an important deadline in advance.
Record your thoughts
and save them to play
back later.
Windows
Media Player
Browse the Internet or
visit your favorite WAP
sites straight from your
phone, even while on
the move.
Navigating
Internet
Explorer
Play music and watch
video clips while on
the move.
19
Using for the First Time
20
Make Your First Call
There are many ways to make a call, covered in more details in the
User Manual. The most common are described below:
1
Press Home to enter the Home screen.
2
Dial the number you want to call using the keypad.
3
If the number or name is already in your contacts list,
enter the name or number of the person you want to
call.
4
When it appears in the list → scroll to it → and press the
Talk key.
1
In the Home screen → press Start → Inbox → and the
Action key.
2
Select New by the below soft key and then scroll up the
Action button for SMS message.
→ In the To: line either enter the number that you want
to send the message to, or press the Action key to
open your phonebook where you can select a contact
by scrolling to it and pressing the Action key. You can
only send text messages to contacts whose phone
number is saved as a mobile number.
In the To: line, you can insert a semicolon (;) between
multiple addresses.
3
Scroll down the body of the screen, where you can
enter your New message using predictive text input.
This means that your phone predicts the word as you
enter it, so you need only press each key once. For
example, to get the word Hello, you would press 4 3 5
5 and 6 once only each.
4
When you have Finished entering your message, SIMply
press the soft key under the word Send.
Using for the First Time
Write Your First SMS
21
Using for the First Time
22
Take Your First Photo
1
To go to Camera you have the following options:
n Press the hardware button on the side of the device.
By default, the first time you go to Camera it will
be in Image mode. To change to Video → press
the Menu → Capture Mode → then 2 Video.
n On the Home screen, if in the list of recently used
programs, press :
n On the Home Screen, press Start →, More → then
Video Recorder or Camera.
2
Press Capture, the camera hardware button or
Action.
3
If you opted for video, when finished → press Stop.
The file is saved immediately in the JPEG file
format, to the storage media, filename convention,
output quality, and Capture Size that you have
specified in Options. For Options details see the
user manual, chapter 3.
Setting up your phone for using the Internet, email and WAP is one of
the most important things you will have to do. However, once done,
you will be able to access a world of information anywhere, all at the
touch of a few keys.
1
In the Home screen → press Start → and scroll down
to select Settings → and press the Action key.
2
Scroll to Data Connections → and press the Action
key.
3
Scroll to Internet connection, and then scroll left or
right to see the available options. Select the service
recommended by your operator.
4
Now scroll to WAP connection. Scroll right or left to select
the service recommended by your operator.
5
When you have Finished press Done.
Using for the First Time
Connect to the Internet
You have now set up your connection to the Internet, but
you still have to insert the details of your email accounts
for receiving or sending E-mails.
23
Using for the First Time
24
Using Pocket Internet Explorer
1
From the Home screen → press Start → Internet
Explorer → and then Action.
2
Scroll to an item on the list of Favorites and press
Action.
3
Alternatively, press Menu, and then Address Bar. In
the box at the top of the page enter an email address,
and press Action.
By connecting to a POP3 or IMAP4 e-mail server to send and receive Internet e-mail messages. You may set up an Internet e-mail
account as follows:
1
2
Prepare your email account details.
3
Press Menu → scroll to Options → press Action →
and then enter Account Setup → Menu → New .
From the Home screen → press Start → scroll to Inbox
→ and then Action.
→ In Your name, enter your display name for e-mail
messages.
→ In E-mail address, enter the e-mail address for this
account.
Using for the First Time
Setting Up Your Email Accounts
→ In Server type, scroll to select the type of e-mail
server that hosts your mailbox-IMAP4 or POP3-and
select Next.
→ In User name, enter your user name. This is usually
the first part of your e-mail address, which appears
before the "at" sign (@).
→ In Password, enter your password.
→ In Domain, enter the domain name, if required.
25
Using for the First Time
→ To save your password, so that you do not need to
enter it each time you connect to your e-mail server,
select Save password. Select Next.
→ In Account name, enter a name for this account.
You must use a different name for each account
that you set up.
→ In Network, scroll to the type of network that your
e-mail server runs on and select Next.
→ Enter information about your e-mail servers and
select Next. If you are not sure what to enter, ask
your network administrator.
→ Select message download options and select Next.
→ Select a connection option, select Next, and then
select Finish.
If you save your password and then lose your
Smartphone, someone finding your Smartphone might
be able to gain access to your e-mail.
26
When you have Finished, you will see the Set-up Complete screen.
Press Finish to save the account. You can repeat the process for as
many accounts as you wish to setup.
1
2
On the Home screen, select Start and then Inbox.
Select New and then select the account to use :
→ In To, enter recipient e-mail addresses → Insert a
semicolon (;) between multiple addresses.
You can only enter SMS numbers in an SMS message,
and e-mail addresses in an e-mail message.
→ In Cc, enter the e-mail addresses of persons to
receive a copy. This field does not appear for SMS
messages.
3
→ In Subj, enter a subject. This field does not appear
for SMS messages.
Enter a message and select Send. E-mail messages
are stored in Outbox and sent to recipients the next
time you synchronize or connect to your e-mail server
and send and receive mail. (SMS messages are sent
immediately.)
To insert punctuation such as the "at" sign (@), a period
(.), or a semicolon (;), repeatedly press the 1 key in
Multipress mode until the punctuation appears. To cancel
a message, select Menu and then Cancel Compose.
Using for the First Time
Send Your First Email
27
Information Guide
28
Information Guide
The following table is a guide to finding information to help you use your phone.
Information about
Source
Making a phone call
Smartphone 2003 User’s Guide: Chapter 3,
Phone Calls
Sending MMS, E-mail and SMS
messages
Smartphone 2003 User’s Guide: Chapter 5,
Messaging Features
Taking a photograph
Smartphone 2003 User’s Guide: Chapter 8,
Additional Application”
Programs on the phone
Smartphone 2003 User’s Guide
Additional programs that can be
installed on the phone
Smartphone 2003 Companion CD
Connecting to and synchronizing
with a desktop computer
Smartphone 2003 Quick Start Card or ActiveSync Help on your desktop computer
Text entry
Smartphone 2003 User’s Guide or Smartphone 2003 Quick Reference Card
Last-minute updates and detailed
technical information
Readme files, located in the Microsoft ActiveSync folder on the desktop computer.
Up-to-date information on your
Smartphone 2002
http://www.microsoft.com/mobile
Microsoft, ActiveSync, Outlook, Pocket Outlook, Windows, Windows NT, and
the Windows logo are either registered trademarks or trademarks of Microsoft
Corporation in the United States and/or other countries.
29