1
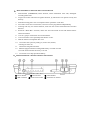
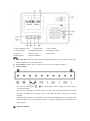
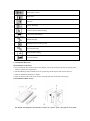
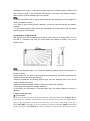
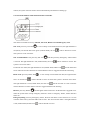
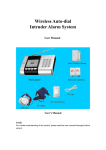
Intelligent GSM/PSTN Auto-Dial Alarm System
Users’ Manual
Before use please have a through reading of this book for right usage
Forward
Welcome to use intelligent GSM/PSTN auto-dial alarm system with powerful
functions. Large LCD screen with English menu navigation function make the operation
easier. It can call 5 users’ numbers by GSM/PSTN dual-network (PSTN first) when it
alarming. Listening-in function is available for users by using mobile phone and
telephone.
This alarm system is widely used for security protecting, data surveying and remote
monitoring in families, shops, villas, financial offices, residential estates and
department of electricity, petroleum, coal, government, public security and so on.
Please read the manual carefully in hopes that the product could serve you well.
Menu
Ⅰ、Features…………………………………………………………
Ⅱ、Main Panel Button’s Function and Ports Introduction………
Ⅲ、Operation Manual………………………………………………
1. Installation Setting……………………………………………
1.1
Basic Installation Direction……………………………..
1.2
Power on Direction……………………………………...
1.3
Installation Direction……………………………………
1.4
Basic Setting Direction…………………………………..
1.5
Detector Management………………………………..
2. User Guide……………………………………………………..
2.1 Test the alarm function………………………..
2.2 Control the Monitor with Wireless Remote Controller…...
2.3 History Research……………………………………………
3. System Reset…………………………………………………..
Ⅳ、Technology Parameter…………………………………………..
Ⅴ、Whole Kit List…………………………………………………...
Ⅵ、Storage, Transportation and After Services……………………..
Ⅰ、Main Panel Button’s Function and Ports Introduction
1. Dual-network (GSM&PSTN) alarm function, alarm information more safe; Intelligent
recording PSTN first.
2. Large LCD screen with menu navigation function, by which users can operate it easily and
directly.
3. Full-function keypad. Users can complete all the operations on the host.
4. 99 wireless zones and 3 wired zones; each zone can be programmed independently.
5. Learning code way for wireless detector, each zone can connect with all kinds of wireless
detector.
6. Powerful"Black Box"function, which can store and search 99 arm and disarm historic
alarm information.
7. Can set 6 groups of fixed time for arm and disarm.
8. Can record alarm voice repeatedly and check it on-site.
9. Hint the function of telephone line error.
10. Can control the system by calling-in, such as arm, disarm,
listening-in and so on.
11. Alarm first and grab-line alarm.
12. Built-in high-performance rechargeable battery can make sure the
host still work when the electricity is cut off.
13. Use of time-save chip specialized battery.
II、Main Panel Button’s Function and Ports Introduction
① Power Socket
④ SIM Card Seat
② Horn Socket
⑤ Phone Line Socket
③ Cable Outlets
⑥ External Line Socket
⑴ Status Indicator Lamp
⑵ LCD Screen
⑶ Power Switch
⑷ Number Button
⑸ Programming Button
⑹ Emergency Alarm
⑺ Disarm
⑻ Home Alarm
⑼ Out Alarm
⑽ Microphone
⑾ Function Button
NOTE:
1) SIM Card Slot: click the yellow button near the SIM card seat, take out the card seat, put a
effective SIM card in it and insert it back.
2) Power Socket: connect 12V/1.5A DC, inner core is positive, shell is negative.
3) 10 Core Socket:
The first and second ports (
) are internal power source output pin (load capacity:
12V/300mA output).
The third and fourth ports are internal relay exit. They are normally opened. They will keep
closed for 2 minutes when alarming. They can also link the power, video and so on when
working.
The fifth and sixth ports are wired input1. The seventh and eighth ports are wired input2. The
ninth and tenth ports are wired input3. These 3 wired ports will trigger alarm when they are
open-collector.
Ⅲ、Operation Manual
1、Installation Setting
1.1 Basic Installation Direction
1) Prepare a useful SIM card;
2) Put the SIM card in the card seat on the back of the host;
3) Connect with telephone line;
4) Prolong the antenna and connect all the wired detectors with the host if any;
5) Connect with power and turn on the host;
6) Power light turns green and GSM antenna icon (
) is flashing means the host is checking the
SIM card and searching the GSM signal. This icon won’t flash and the signal strength icon
(
) will come out in a few seconds, then equipment start working.
1.2 Power on Direction
LED Light Status Explanation
LED Light
Power
ALARM
LED Status
Off
Didn’t turn on the host / didn’t plug the power / no
power in built-in battery
Green
Power supply is normal
Red
In alarm status
Red (flash)
Alarm memoring, can be closed after arm again
Alert remove
Off
HOME
AWAY
System Working Status
Red
Home Arm
Off
Home Disarm
Red
Out Arm
Red (flash slowly), 30’s later
red on
Out Arm with delay time
Off
Out Disarm
LCD Icons Introduction
Without flash: GSM module and SIM card normal
Flash: GSM module and SIM card error
Show GSM network signal strength
Flash: External telephone line error
Without flash: External telephone line normal
Programming Status: Phone number setting
Without flash: Operation records
Programming Status: History Checking
Show Battery Power
Home Arm
Out Arm
System Alarming
Conventional Paramater Setting
Function On-Off Setting
Record Message
Wireless Detector Learing Code
Zone Mode Setting
Time and Date Setting
Password Setting
1.3 Installation Direction
1)Installation of the Host
a. Try to install the host in the center of the defense zone and prolong the antenna for getting more
wireless signal receiving distance.
b. The installation position should be far away with huge metal objects and wireless devices.
c. The host should be installed in a shelter.
d. Turn on the host and it will come into the working state after 2 minutes warming-up.
2) Installation of Door Sensor
We define the Magnetic door/window contact for 2 parts : part A and part B. First pack
the battery into the part A , and then according to the show of sketch map to fis part A and
part B (with screws) on the monitored door/window. It is better if the distance between
them is closer (≤15mm between part A and part B )
NOTE:
a. Magnet should be close to signal status and make the transmitter box and magnet as
close as possible (<10mm).
b. In order to get the best receiving distance, you should pull the antenna and make it
upwards.
c. If the indicator lights of door sensor are still blinking, it shows battery fails. So please
replace it as soon as possible.
3)Installation of Wireless PIR
PIR Sensors are used for detecting if someone moves within in a certain place. Fix it on
the wall, 2—2.2meters high and you should adjust the position to make it face to the
defense zone.
NOTE:
a.Adjust the detecting angle, try to make the detecting window plumb to the direction of
people’s walking.
b.Keep away from the heat or air-conditioner blowing and air convection area(close the
window & door when alarm the detector)
c.Make the obstacles and floating objects away from the detecting area, such as the
clothes, durtain and flowers.
d.Make the detector steadily installed, without any shake and trembling.
e.Keep away from the direct sunlight irradiation.
f.If the light in the PIR keep on, it shows battery fails. So please replace it as soon as
possible.
1.4 Basic Setting Direction
◆ System Setup
Please enter the correctly password (original password: 1234) and press the button【MENU】on the
panel before any operation. Two beeps show that the operation is successful. The LED indicates
lights of Arm and Disarm will be on at the same time. You can see 6 icons in the screen. Press
button【▲】
【▼】or keypad to chose corresponding icon. Then press button【OK】to do detailed
setting . Please press button【OK】to save after you finished your operations. The system will show
“saved” in screen and with two beeps. Four short beeps shows failure. Please press【MENU】to try
it again.
◆ Exist System Setup
Please press button【#】to end the programming status after you finish your operations. System will
exist automatically if there is any order within 30 seconds.
a、Record alarm message
Enter system setting status and press button 【▲】【▼】or keypad【5】to chose icon
:
(1) Please chose “Record” or press button【OK】. System will show “Recording” and
recording time in screen. Facing to the microphone in the left side of the host to record alarm
message. The message should be short and clear. For example: This is room××,building×
× and zone×× asking for help. The system will exist with two beeps automatically after
10 seconds.
(2) Chose “PLAY” and press button【OK】, you can hear the voice you record in the telephone
connected with the host. Record again if you want to change the voice.
b、Set user’s and alarm center phone numbers to receive alarm
Enter system setting status and press button 【▲】【▼】or keypad【4】to chose icon
:
2 groups of receiving alarm center number: number to connect with the alarm center.
NOTE: It is unnecessary to setup this Number by the individual user.
6 groups of users’ number: number to receive alarm for users. (mobile phone or telephone
number)
Press button【▲】【▼】to chose the number group you want to modify or delete and then press
button.【OK】
Modify: input telephone number or mobile phone number with the host keypad and then press
button【OK】to save it. The screen will show “Saved”.
Delete: Press button【OK】and the screen will show “Deleted”
NOTE:
◇
The host will make a voice of “di” for three times in every 25 seconds if there is any
receive-alarm-number.
◇
Each group of phone number cannot over 16 digitals. Please dial
the “Out No. *”before the receive-alarm-number if your system use extension
number.
(E.g.: If you should dial 9 when you make an outside line call, please set the
receive-alarm-number as “9*outside line call number”)
c、Conventional System Setup
Enter system setting status and press button 【▲】
【▼】or keypad【2】to chose icon
button【OK】and then press button【▲】【▼】to chose options as followings:
User’s account: to set user’s ID in alarm receiving center. 4 numbers (0001~9999)
NOTE: It is not necessary to setup by the individual user.
, press
Ringing times: to set remote control ringing times. 00~12 times.
00 means turn off the remote control function.
(Default Setting: 8 times )
Siren ring time: to set siren ring time when alarming. 00~30mins.
00 means turnoff the hooter whistle function.
(Default Setting: 1 minute)
Delay alarm time: to set the host alarm time between the host receive detector’s signal and start
to alarm. 00~30sec,
00 means turnoff the alarm delay function.
(Default Setting: 30sec)
Delay arm time: to set the host arm time between the host receive controller’s signal or remote
arm order and start to arm. 00~30sec.
00 means turnoff the arm delay function.
(Default Setting: 30sec)
d、Function on/off setup
Enter system setting status and press button 【▲】
【▼】or keypad【3】to chose icon
, press
【OK】and then press button【▲】【▼】to chose options as followings:8
Line-Cut alarm: to set whether hooter whistle alarm when external line error.
Press button【▲】【▼】to chose On / Off.
(Default Setting: Off)
Wired Input Port: to set whether the host enables the wired input port
Press button【▲】【▼】to chose On / Off.
(Default Setting: Off)
NOTE: Please disable all the wired input ports when there is no wired detector linked with
to make the host work steadily.
e 、Host Zones Mode Setup
Enter system setting status and press button【▲】
【▼】or keypad【7】to chose icon
, then press
【OK】, input zone number with keypad in the zone number blank. Press button 【▲】【▼】to
chose wired or wireless, press【OK】and press button【▲】
【▼】or keypad to chose zone mode,
and then press【OK】to save. There are 5 modes for each zone as following:
1. Close —— no matter arm or disarm, the host won't alarm when detectors in this zone are
triggered
2. Immediate —— host will alarm immediately when detectors in this zone are triggered in
arm mode.
3. Delay —— host will alarm after the delay time when detectors in this zone are triggered in
arm mode.
4. Emergency —— no matter arm or disarm, the host will alarm immediately when detectors
in this zone are triggered.
5. Home —— in this mode, the host won't alarm even if detectors in this zone are triggered. It
will alarm when at Away Home mode.
Default Setting for all modes: Immediate
Note: wireless zone can be set 01~03 and wired zone can be set as 01~99.
f 、System time and the time of timing arm/disarm setup:
Enter system setting status and press button【▲】
【▼】or keypad【8】to chose icon
, press button
【OK】, then press button【▲】【▼】to chose setting options:
System time: enter the page of system time setting and use the button【▲】【▼】to chose the
number you want to modify, input the number with keypad and press button【OK】to save it.
Time Setting Form: Year—Month—Day Hour—Minute
Timing Setting group 1 to group 6: to set timing arm/disarm and arm mode. Enter the page of
system time setting, use the button【▲】
【▼】to chose a group of timing time and press button
【OK】to save it.
Timing Task: Out Arm----system start our arm automatically at the timing time.
Home Arm----system start home arm automatically at the timing time.
Disarm----system disarm automatically at the timing time.
Timing Time: input the timing time with the keypad in the form of “hour: minute”.
Timing Status: to set whether this timing group is available. Use the button【▲】
【▼】to chose
on/off. Default Setting: Off
g 、Change Password:
Enter system setting page and press button【▲】
【▼】or keypad【9】to chose icon
, press
button 【OK】, input the new password with keypad, press button【OK】to save it, and then press
button【MENU】to return to the main menu page.
1.5 Detector Management
Please enter the correctly password (original password: 1234) and press the button【MENU】on the
panel before any operation. Two beeps show that the operation is successful. The LED indicates
lights of Arm and Disarm will be on at the same time. You can see 6 icons in the screen. Press
button【▲】
【▼】or keypad【6】to chose icon
, then press button【OK】to enter detector
administration page.
Total number of sensors: show total number of wireless detectors saved in system (include
remote controller);
Arm Zone: show serial number of wireless defense zone. Total: 99 (01~99). You can change it
with keypad.
a、 Add new detectors
● Input the defense zone serial number of the wireless detector you need add in defense zone
serial number blank, press button【▲】【▼】to chose “Start codin” and press button【OK】
to save it. You can see the total number of wired/wireless detector have been saved in this
defense zone in the first line of the screen.
● Please trigger the wireless detector need to learn into this defense zone.(such as separate door
sensor and press any button on the remote controller). Two beeps from the host show learning
code successfully. The total number of detectors will add one. You can add more wireless
detectors in each defense zone. But the total number can’t over 99.
● Two beeps from the host but the total number won’t change if the wireless detector has been
saved.
● Press button【MENU】after learning code. System will exit automatically if there is no wireless
signal to learn within 2 minutes.
b、Change wireless detectors’ defense zone
If you want to move a saved wireless detector into another defense zone, please do the same steps
as “add new detectors”. The formal defense zone can delete this wireless detector automatically.
c、Delete lost detectors
If the host needs to delete lost sensors in wireless zones (such as remote controller)
● Input the defense zone serial number of the wireless detector you need delete in defense zone
serial number blank, press button【▲】
【▼】to chose “DEL this sensor” and press button【OK】
to save it. “Deleted” will be showed in screen.
● Press button【▲】【▼】to chose “ delete all” if you want, and press button【OK】to save it.
Deleted” will be showed in screen. The total number of detectors will be showed as “00”.
2. User Guide
2.1 Test the alarm function
When the host is powered, it will keep the status in last time power off (arm/disarm). Users can
use wireless controller to arm. Under arming status, the arm red light will be on without flash and
the icon (
) will be showed in screen. The host will send alarm message to users when
wireless detectors are triggered. Such as wireless PIR detector, wireless door sensor, emergency
button on the remote controller).
a. If the host has SIM card in and linked to a telephone line. When it’s alarming, the host will dial
to alarm receiving center and users first through telephone line;
If the host has SIM card in but no telephone line linked or the telephone line has faults. When
it’s alarming, the host will dial to alarm receiving center and users through GSM network.
b. Users can hear the alarm voice which recorded before when answering the alarming call and
press any key to stop. Press “*” to open listening-in function. If you press “#”, the host won’t
call other users and turnoff the siren alarm. The host will continue to call other users if you
don’t press “#”.
c. Users can use every telephone and mobile phone to call SIM Card’s number in the host or
telephone number linked to the host to control the host remote. The host will answer the call
automatically after ringing times set before. Two beeps can be heard after you input password
and it shows you can make remote control.
Dial “1”------ Arm
Dial “2”------ Disarm
Dial “3”------ Play record voice in 10 seconds
Dial “4”------ Turn on the siren scene alarm
Dial “5”------ Turn off the siren scene alarm
Dial “*”------ Open listening-in function
Dial “#”------ Exit remote control and the host hang up
If you failed password in three times, or there is any operation in 30 seconds during the remote
control, the system will exit remote control automatically and the host will hang up.
2.2 Control the Monitor with Wireless Remote Controller
The remote controller has 4 keys: Disarm, Out Arm, Home Arm and Emergency Arm.
,a voice of beep can be heard from host, the light STATUS is
Out Arm: press key Out Arm
red (flash), 30 seconds later turns green (without flash), the icon
will be showed in screen.
The system is in out arm status.
Out Arm Immediate: first press key Out Arm
, and then press key Emergency Alarm within
3 seconds. The light STATUS is red (without flash), the icon
will be showed in screen. The
system is in out arm status.
Under Out Arm status, the light STATUS is red (without flash) and the icon
will be showed in
screen when the wireless detectors in external defense zone are triggered and the host alarming.
Home Arm: press key Home Arm
arm is on and the icon
, a voice of beep can be heard from host, the light of home
will be showed in screen. It means the system is in Home Arm status.
The light STATUS is red (without flash) and the icon
will be showed in screen when the
wireless detectors in inner defense zone are triggered and the host alarming.
Disarm: press key Disarm
, all the lights will be turned off. All the detectors triggered won’t
make the system alarm except emergency detectors. Such as emergency button, smoke detectors
and so on.
Emergency Help: press key Emergency Alarm, the host will alarm at once whenever it is in arm
or disarm status. The system will make calls to users. The siren will also alarm. The light STATUS
is red (without flash) and the icon
will be showed in screen.
2.3 History search
Input the correct password on the keypad (original password: 1234) and press button【MENU】,
two beeps will be hear from the host. The home arm and out arm lights are turn on. You can see
six icons in screen. Please press button【▲】
【▼】or keypad【1】to chose icon
, and then press
button【OK】to enter the history research page.
Search records:
To search system arm, disarm and alarm records. Every page shows one record. You can press
button【▲】
【▼】to page down. The system can store 99 history records. Press button【MENU】
to returen.
Delete all records:
Press button【OK】to confirm and you can see “Deleted” in screen.
Press button【#】to exit and the system turn into the standby status.
3. System Reset
Input 0000# when the system is in standby status. Three seconds later, you will hear two beeps. It
means system reset successfully. All the information about wireless detectors learning code and
alarm telephone numbers is deleted. All setup options restore to factory defaults and the password
comes back to the original: 1234.
Ⅳ、Technology Parameter
1. Standby Current: 80mA
2. Working Current: 500mA
3. Power Supply: DC9~12V
4. Operating Temperature: -10℃~ +40℃
5. GSM Frequency: 900/1800/1900 MHz
6. Receive Coding: ASK
7. Receive Frequency: 315/433 MHz
8. Receive Sensitivity: 5mV/m
9. Anti-interfere: 1V/m(20~1KMHz)
10. Remote Control Distance: No obstacle 100m
11. Acceptable wireless detectors: 99
Ⅴ、Whole Kit List
Alarm system (alarm host): 1 pc
4 keys remote controller: 2 pcs
Wireless door sensor MC-02B: 1 pc
Power supply: 1 pc
Wireless PIR detector: 1 pc
Telephone line: 1 pc
Alarm siren: 1 pc
User’s manual: 1 pc