1
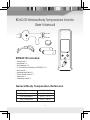
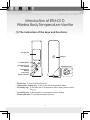
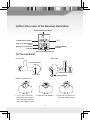
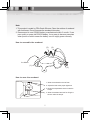
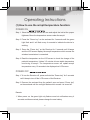
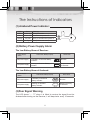
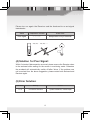
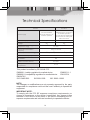
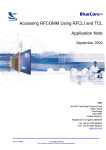
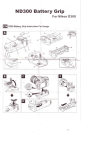
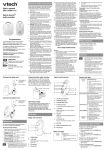
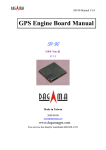
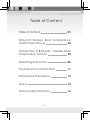
Table of Content
01
Table of Content
BTM-D1D Wireless Body Temperature
Monitor User Manual
02
Introduction of BTM-D1D – Wireless Body
Temperature Monitor
03
Operating Instructions
06
The Instructions of Indicators
11
Importance Precautions
13
Q&A
14
Technical Specifications
16
BTM-D1D Wireless Body Temperature Monitor
User Manual
BTM-D1D includes:
•
•
•
•
•
•
•
•
•
ReceiverX 1
Armband X 1
AAA battery X 2
3 Volt lithium cell battery (CR2032) X 1
Arm-belt X 1
Assisted arm belt X 1
Quick Guide Card X 1
Manual X 1
Warranty CardX 1
General Body Temperature Reference
Ear Temperature
35.8℃∼38.0℃
ArmpitTemperature
34.7℃∼37.3℃
Oral Temperature
35.5℃∼37.5℃
Anus Temperature
36.6℃∼38.0℃
Introduction of BTM-D1D
Wireless Body Temperature Monitor
(1) The instruction of the keys and functions:
LCD Screen
Beeper
LO Setting Key
HI Setting Key &
℃/℉ Switch
AAA batteres X 2
Temperature
Setting
Power Key
Power Indicator
• Power key: To turn on/off the Receiver.
• Temperature setting key: To set up the Hi/Lo temperature alarm.
• Hi setting key: To increase the Hi temperature alarm setting and to switch
the℃/℉.
• Lo setting key: To decrease the Lo temperature alarm setting.
• Power indicator: To indicate the status of power.
(2)The LCD screen of the Receiver illustration:
Armpit Temperature Mode
℃/℉
Temperature Indicator
High / Low Temperature
Alarm
Wireless Transmdission
Indicator
Armband Battery
Indicator
Receiver Battery Indicator
(3) The armband:
Back side
Front side
Power Indicator
Temperature Sensor
Power Key
CR2032 Battery
Battery Installation:
1. T u r n t h e c o u n t e r clockwise by using a
coin or a screw-driver to
open the battery cover.
2. Insert the cell battery.
3. Turn the clockwise to
close the battery cover.
Note:
1. This product is made by FDA Grade Silicone. Clean the surface of armband
with wet tissue. Do not immerse the armband into water.
2. Recommend to use CR2032 battery manufactured within 2 month. If use
poor quality or years-old CR2032 battery, it may easy to become powerless
when power-on which means the battery can not supply power normally.
How to assemble the armband:
(2)
(4)
to attach
(1)
(3)
How to wear the armband:
1. Wear the armband on the left arm.
2. Adjust the belt at the proper tightness.
3. Move the temperature sensor under the
armpit.
4. Wear the assisted arm belt for fixing the
sensor under the armpit.
Operating Instructions
(1) How to use the armpit temperature function:
POWER ON
Step 1: Wear the armband on the left arm and adjust the belt at the proper
tightness. Move the temperature sensor under the armpit.
Step 2: Press the “Power key” on the armband for 2 seconds until the green
light flash and it will flash every 4 seconds to indicate the device is
working.
Step 3: Press the “Power key” on the Receiver for 2 seconds until it beeps
and the LCD screen display the armpit temperature which means the
wireless transmission is connected.
Step 4: Read the temperature on the LCD screen to check the change of the
patient’s temperature. It takes 3-5 minutes to have stable temperature
monitoring of armpit. The temperature sensor will update armpit
temperature every 12 seconds to be displayed on LCD screen.
POWER OFF
F
Step 1: To turn the Receiver off, press and hold the “Power key” for 2 seconds
until it beep to turn off the LCD screen of the Receiver.
Step 2: Remove the armband from the patient’s arm and press “Power key”
on the armband until the red light flashes which means it is turned off.
Remark:
1. When power on, the green light only flashes once but not flashes every 4
seconds and disconnected, please change the new battery.
2. If outside of signal area and then result in disconnection, please remove
the receiver close to the armband within 3 min and then the signal will be
connected.
3. Any abnormal occurred when turn on the armband, please check and
change the battery.
4. Recommend turning on both Receiver and Armband power within 20
seconds for connection, otherwise it will automatically power off.
(2)How to set the temperature alarm:
Before using the body temperature monitor function, the operator may need
to set both high and low temperature alarm figures according to the patient’s
general armpit temperature status. When the temperature is out of the setting
range, the Receiver will start a series of "Beeps" alerting the caregiver to take
appropriate actions. The alarm setting procedures must be done when the
armband is on. Follow the steps below:
Step1: High temperature setting: Press the “Temperature setting key” for 2
seconds, the Receiver will beep twice to get into the temperature
alarm setting mode. The LCD screen flashes “HI” and the original
figures will be displayed.
Step2: Press “Temperature Setting Key” to adjust the alarm temperature
setting. The temperature standard is 0.5℃ a time such as 38.5℃ to
39℃ then to 39.5℃ and so on, then press “Temperature setting key”
to complete the setting.
Step3: Low temperature setting: low temperature setting starts automatically
after finishing high temperature setting. Please press “Temperature
Setting Key” when “LO” is flashing, and then adjust the low
temperature setting. The temperature standard is 0.5℃ a time such
as 34℃ to 34.5℃ then 35℃ then 35.5℃ and so on and then press
“Temperature setting key” to complete the setting.
Remark:
‧ The range of setting: The default figures of the temperature alarm setting
are: Hi: 38℃(104℉) and Lo:34℃(96℉). The high temperature alarm
range from 36℃ to 40℃(96℉-104℉). The low temperature alarm range
from 32℃-35.5℃(89℉-96℉).
‧ Faulty-prevention mechanism: If the above steps setting are not
completed, the Receiver will return to the temperature monitoring mode
without changing any setting within 10 seconds.
‧ Priority alarm processing: The product is designed to process the alarm
situation prior to the High/Low temperature alarm setting mode, or any
other operations. Without saving any setting if not pressing “Temperature
setting key”, the user is better off to operate the temperature alarm setting
with the full power supply.
‧ Please re-set the Hi/Lo temperature alarm figures after replacing the
batteries. The Receiver will take the default as the temperature alarm
setting after battery replacement.
(3) Check the Hi/Lo temperature alarm setting:
The Hi/Lo setting
(4) The Abnormal temperature alarm:
Alarm: The Hi/Lo temperature alarm setting on the LCD screen will be flashing
on the “Hi” or “Lo” if the reading of the patient is out of the temperature
alarm setting range. That is, the “Hi” and its figures are flashing. The
Receiver will beep every 2 seconds to inform the caregiver to take
appropriate action.
Anti-sleepyhead mechanism: The Receiver will check every 10 minutes the
temperature of the patient if it is still in the
temperature alarm setting. The Receiver will
keep noticing the caregiver to take appropriate
action via the constant beeps if the patient’s
temperature is out of the temperature alarm
setting. Press any key on the Receiver to stop
the beep alarm.
Remark:
‧ Please keep checking the patient’s temperature when alerting, even some
action to the patient had been done. For not triggering the alarm every
10 minutes, the caregiver can set the Hi/Lo temperature alarm a little bit
higher/lower, and then result the setting after the patient is getting better.
‧ In case that the temperature, when power on, lowers the low temperature
alarm setting then starts the alarm system, this product will trigger the low
temperature alarm system after normal temperature higher than the low
temperature setting by 0.5℃.
‧ It may cause low temperature alarm when the armband becomes loose.
Please check immediately the patient and adjust appropriately the armbelt.
10
The Instructions of Indicators
(1) Armband Power Indicator:
Light
Green
Red
Orange
Red
Status
Power On
Power Off
Low Volt
No Signal
Flashing
Every 4 seconds
One blink then power off
Every 4 seconds when power on
Every 10 seconds when power on
(2) Battery Power Supply Alarm
The Low Battery Alarm of Receiver:
Power Supply
Status
LCD Screen Battery Display
Alarm Siren
Full power supply
Full battery on Receiver Battery
Indicator
No siren
Low power supply
Flashing on Receiver Battery
Indicator
Beeps twice every
10 seconds
The Low Battery Alarm of Armband:
Power Supply
Status
LCD Screen Battery Display
Alarm Siren
Full power supply
Full battery on Armband
Battery Indicator
No siren
Low power supply
Flashing on Armband
Battery Indicator
Beeps twice every
10 seconds
(3)Poor Signal Warning
The LCD shows “- - -℃” when it is failed to receive the signal from the
Armband after turning on the Receiver, it will beep twice every 10 seconds.
11
Please turn on again the Receiver and the Armband to re-set signal
transmission.
Status
Temperature Indicator
Alarm Siren
Poor signal
— — —℃
Beeps twice every10 seconds
“Beep, Beep” “Beep, Beep”…..
(4) Solution for Poor Signal:
Within 3 minutes if disconnection occurred, please remove the Receiver close
to the armband while waiting for the screen in monitoring mode. Otherwise
the armband will automatically switch off after 3mins. If the problem can
not be solved from the above suggestion, please restart both Armband and
Receiver again.
(5) Error Solution:
LCD Screen
Meaning
Solution
Er0
Connection Abnormal
System breakdown, needed repair
12
Importance Precautions
1. Please follow the manual to operate this product carefully.
2. This product is designed to put the armband on the left arm.
3. This product is designed to function properly under the conditions of the
surrounding temperature between 15℃ to 40℃, and the relative humidity
of 95% or lower. Please do not use this product when temperature and
humidity is out of the ranges mentioned above.
4. The transmission distance of this product is approximately 20 meters
without any interference.
5. The armband has passed the Biocompatibility Tests; however, if found
allergic to the armband, please stop using it.
6. Please do not use this product in the hospital in case the signal
transmission would interfere with some electronic medical equipment.
7. The main function of this product is to alert the caregiver that the patient is
out of the abnormal temperature range. The measurement result, however,
could sometimes be influenced by the surrounding temperature. The
measurement result is ONLY for reference, Please seek qualified physician’
s help, if necessary.
8. Please pay much attention on children with using this product. Please also
keep it out of reach of children and place it on a higher position.
9. Please do not use any rechargeable battery; or mix of new and used
batteries. Please take out the batteries if the Receiver and the Armband
will not be operated for a longer time.
10. Please use the products after it has been placed under the normal room
temperature for 30 minutes.
11. Do not use this product directly after exercising, bathing, having meals,
and taking a walk, etc. Wait 30 minutes before using after all physical
activity.
12. The patient’s armpit should be cleaned and dry before using this product.
13. Please use the soft dry cloth to clean this product to avoid scratching. Do
not wash it with water or any other cleaner.
13
Q&A
Q: The armpit temperature monitored is much
higher or lower than normal?
A: Please check the possible situation as follows:
1. The patient may have a fever or the temperature may be too low.
2. The Temperature Sensor does not reach the armpit or the armband is
not tight enough.
3. Low power supply: please change batteries.
4. Make sure you are not using this product directly after exercising,
bathing, etc, please put the product for 30 minutes at room
temperature and then wipe it up.
5. Possible interference, please turn the product power on again.
6. Out of order (contact customer service immediately).
Q: If allergy is evident after using this product?
A: Please stop using it.
Q: Failure to use the armband?
A:
1. Please read carefully the manual again.
2. Contact the seller.
14
Q: Cannot turn on the Receiver?
A:
1. Please read carefully the manual again.
2. Check the battery well to make sure batteries are in it, or please
change new batteries.
3. Batteries may be not installed correctly.
4. This product may be out of order, please call to customer center.
Q: The armband power indicator flashing with
green and red light?
A:
1. Press the power key of armband, the red light will light on; and then
press the power key again, the green light will turn on. And then press
the power key for 2secs until red light is on to power off. Now re-start
the Armband. (Press the power key for 2 seconds until green light is
flashing.)
2. Replace the battery and start the device again.
15
Technical Specifications
Receiver
Armband
Power supply
Two AAA batteries
Up to 80-100 hours of
constant operation
One 3 Volt lithium cell battery
(CR2032). Up to 72-96 hours
of constant operation.
*If under airwave interference
environment, the battery life
will be shortened.
Dimensions(mm)
130H X 50W X 32D
136H X 85W X 9.5D
Weight
81g
Operational surrounding
temperature range
Temperature transmission
frequency
Valid temperature alarm ranges
25g
15~40℃
Every 12 seconds
HI:36-40℃ (96-104℉) LO:32-35.5℃ (89-96℉)
Transmission frequency
The technique of the Radio
modulation
2.4 GHz
Valid transmission distance
20 meters
FSK
The precision of the Armpit
temperature
±0.1℃
This product is certified by CE 0434 & FCC
EN60601-1 safety regulation for medical device
EN60601-1-1
EN60601-2 compatibility regulation for medical device
EN12470-4
EN12470-5
ISO 13485:2003
ISO 9001:2000
ISO 10993-1:2003
NOTE:
The changes or modifications are not expressly approved by the party
responsible for compliance could void the user’s authority to operate the
equipment.
IMPORTANT NOTE:
To comply with the FCC RF exposure compliance requirements, no
change to theantenna or the device is permitted. Any change to the
antenna or the device could result in the device exceeding the RF
exposure requirements and void user’s authority to operate the device.
16