1
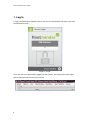
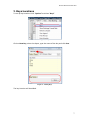
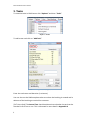
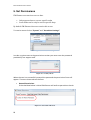
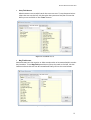
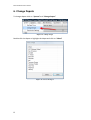
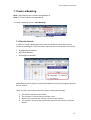
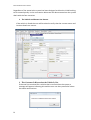
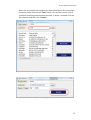
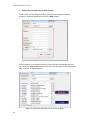
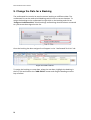
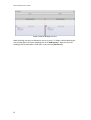
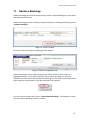
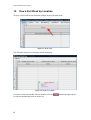
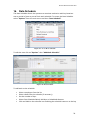
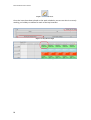
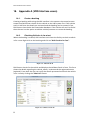
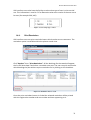
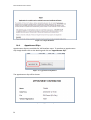
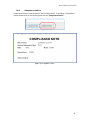
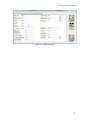
FLEETMINDER
PLANNER MANUAL
v1.0.4
Planner Manual V1.0.4.docx
2
Planner Manual V1.0.4.docx
Table of Contents
1.
Log In ............................................................................................................................................. 6
2.
Bays/Locations .............................................................................................................................. 7
3.
Tasks .............................................................................................................................................. 8
4.
Change Date .................................................................................................................................. 9
5.
Set Permissions ............................................................................................................................ 10
6.
Change Depots............................................................................................................................. 12
7.
Create a Booking ......................................................................................................................... 13
7.1.
Find the Vehicle................................................................................................................... 13
7.2.
Select the Task ..................................................................................................................... 17
7.3.
Add the Booking .................................................................................................................. 18
8.
Modify a Booking ........................................................................................................................ 19
9.
Change the Date for a Booking .................................................................................................. 20
10.
Block Bookings ............................................................................................................................ 21
11.
Advance Bookings ....................................................................................................................... 23
12.
Assign a Booking to a Job........................................................................................................... 24
13.
View a Full Week by Location ................................................................................................... 26
14.
View Bookings Legend ............................................................................................................... 27
15.
Send a Reminder SMS ................................................................................................................ 28
15.1.
SMS Sent when booking Created ......................................................................................... 28
15.2.
Batch SMS ........................................................................................................................... 28
15.3.
Sending an Ad Hoc SMS ...................................................................................................... 28
16.
Rota Schedule .............................................................................................................................. 29
17.
Booking Re-occurrence .............................................................................................................. 31
18.
Appendix A (VRS Interface users) ............................................................................................ 32
18.1.
Create a booking ................................................................................................................. 32
18.2.
Checking Vehicles in for a test ............................................................................................ 32
18.3.
Print Reminders ................................................................................................................... 33
18.4.
Appointment Slips ................................................................................................................ 34
18.5.
Compliance Notice .............................................................................................................. 35
19.
Appendix B (CVT/Planner Users) ............................................................................................. 36
19.1.
20.
Checking Vehicle in for a test .............................................................................................. 36
Test Results Displayed in FM-Planner ...................................................................................... 38
3
Planner Manual V1.0.4.docx
Table of Figures
Figure 1: Log In ....................................................................................................................................... 6
Figure 2: Access Rights ............................................................................................................................ 6
Figure 3: Bays .......................................................................................................................................... 7
Figure 4: Adding Bays.............................................................................................................................. 7
Figure 5: Tasks ......................................................................................................................................... 8
Figure 6: Adding Tasks ............................................................................................................................ 8
Figure 7: Date Arrows ............................................................................................................................. 9
Figure 8: Month View .............................................................................................................................. 9
Figure 9: Permission Settings ................................................................................................................ 10
Figure 10: Security Check ...................................................................................................................... 10
Figure 11: General Permissions ............................................................................................................ 10
Figure 12: User/Task Access .................................................................................................................. 11
Figure 13: Bay/Task Access ................................................................................................................... 11
Figure 14: Change Depot ....................................................................................................................... 12
Figure 15: Select the Depot .................................................................................................................... 12
Figure 16: Create a Booking .................................................................................................................. 13
Figure 17: Search Options ..................................................................................................................... 13
Figure 18: Vehicle Found ...................................................................................................................... 14
Figure 19: Vehicle not found .................................................................................................................. 14
Figure 20: Select the Customer .............................................................................................................. 15
Figure 21: Accepting the customer ........................................................................................................ 15
Figure 22: Customer Not Found ............................................................................................................ 16
Figure 23: Customers found but correct one not on the list ................................................................... 16
Figure 24: Change the Owner ................................................................................................................ 17
Figure 25: Select the Task ...................................................................................................................... 17
Figure 26: Add Booking ......................................................................................................................... 18
Figure 27: Booking Details .................................................................................................................... 19
Figure 28: Assign to Unallocated List ................................................................................................... 20
Figure 29: Unallocated list .................................................................................................................... 20
Figure 30: Block Booking ...................................................................................................................... 21
Figure 31: Create a Block Booking ........................................................................................................ 21
Figure 32: Block Bookings Created ....................................................................................................... 22
Figure 33: Advance Booking .................................................................................................................. 23
Figure 34: Advance Booking Intervals ................................................................................................... 23
Figure 35: Arrows .................................................................................................................................. 23
Figure 36: Assign a Booking to a Job .................................................................................................... 24
Figure 37: Job Created .......................................................................................................................... 24
Figure 38: Job Status ............................................................................................................................. 25
Figure 39: Job Open Sample .................................................................................................................. 25
Figure 40: Week View ............................................................................................................................ 26
Figure 41: Week view sample ................................................................................................................. 26
Figure 42: Legend .................................................................................................................................. 27
Figure 43: Access the Legend ................................................................................................................ 27
Figure 44: Legend sample ...................................................................................................................... 27
Figure 45: Set SMS Scripts for Tasks ..................................................................................................... 28
Figure 46: Select an SMS Script............................................................................................................. 28
Figure 47: Access Rota Schedule ........................................................................................................... 29
Figure 48: Rota Schedule ....................................................................................................................... 29
Figure 49: Calendar Icon. ...................................................................................................................... 30
Figure 50: Day Rota Sample .................................................................................................................. 30
Figure 51: Week Rota Sample ................................................................................................................ 30
Figure 52: Booking Reoccurrence ......................................................................................................... 31
Figure 53: Reoccurrence Sample ........................................................................................................... 31
Figure 54: VRS Check-In ....................................................................................................................... 32
Figure 55: Validate Check-In ................................................................................................................. 32
Figure 56: Selecting Type of Test ........................................................................................................... 33
Figure 57: Print Reminders.................................................................................................................... 33
4
Planner Manual V1.0.4.docx
Figure 58: Reminders list for week ........................................................................................................ 33
Figure 59: Sample Reminder.................................................................................................................. 34
Figure 60: Appointment Slip Button ....................................................................................................... 34
Figure 61: Appointment Slip .................................................................................................................. 34
Figure 62: Compliance Notice Button.................................................................................................... 35
Figure 63: Compliance Notice ............................................................................................................... 35
Figure 64: Create Job and Check-in ...................................................................................................... 36
Figure 65: Check-in the Vehicle for a Test ............................................................................................ 36
Figure 66: Validate Check-In ................................................................................................................. 37
Figure 67: Test Result on Booking ......................................................................................................... 38
5
Planner Manual V1.0.4.docx
1. Log In
To log in to FM-Planner double click on the icon on the desktop and enter your user
authentication code.
Figure 1: Log In
Once the user has successfully logged into the system, the name and access rights
will be displayed on the top of the screen.
Figure 2: Access Rights
6
Planner Manual V1.0.4.docx
2. Bays/Locations
To set up bay locations click “Options” and then “Bays”
Figure 3: Bays
Click on New Bay, select the depot, type the name of the bay and click Save
Figure 4: Adding Bays
The bay location will be added.
7
Planner Manual V1.0.4.docx
3. Tasks
To view the tasks in FM-Planner click “Options” and then “Tasks”
Figure 5: Tasks
To add a new task click on “Add Task”
Figure 6: Adding Tasks
Enter the task name and duration (in minutes).
You can also set the SMS template to be sent when the booking is created and in
advance of the booking to remind the customer.
[CVT Users Only] The Annual Test check box determines whether the task can be
checked in for a test or not. This is discussed in more detail in Appendix B
8
Planner Manual V1.0.4.docx
The Block Booking check box is used to distinguish the task as a block booking where
no registration number is needed. Multiple bookings can be made at the time of
creation. This will be dealt with in more detail later in the manual. (Section 10)
To edit a task highlight the task and click on edit.
4. Change Date
When the FM-Planner opens, the current date is always shown. There are two ways
to change the date:
The first way is to click on the directional arrows at the top left and right. This will
change the current date by one day in either direction.
Figure 7: Date Arrows
The second means of changing the date is to click on a date within the calendar view
shown below. This allows the user to go to any date without having to scroll through
each day.
Figure 8: Month View
9
Planner Manual V1.0.4.docx
5. Set Permissions
FM-Planner can restrict access so that:
•
•
Only approved users can use specific tasks
Some tasks can be only be used in specific bays
By default FM-Planner does not restrict this access.
To restrict access click on “System” and “Permission Settings”.
Figure 9: Permission Settings
In order to gain access to the permissions section you must enter the password
provided by our support staff.
Figure 10: Security Check
When the user has successfully entered the password the permissions form will
appear. There are three tabs on the form
•
General Permissions
If the checkbox below is ticked FM-Planner will enforce permission checks.
Figure 11: General Permissions
10
Planner Manual V1.0.4.docx
•
User/Task Access
Administrators can set which tasks the users can use. To set the permissions
select the user on the left, tick the tasks that you want him/her to have the
ability to use and click on the “Save” button.
Figure 12: User/Task Access
• Bay/Task Access
Administrators can also restrict or allow certain tasks to be created within certain
bay locations. To set Bay/Task permissions click on the task on the left, tick the
locations where this task can be created and finally click on the save button.
Figure 13: Bay/Task Access
11
Planner Manual V1.0.4.docx
6. Change Depots
To change depots click on “System” and “Change Depot”
Figure 14: Change Depot
Double click the depot or highlight the depot and click on “Select”
Figure 15: Select the Depot
12
Planner Manual V1.0.4.docx
7. Create a Booking
Note: [VRS Interface users please see Appendix A]
Note: [CVT users please see Appendix B]
To create a booking click on “New Booking”.
Figure 16: Create a Booking
7.1. Find the Vehicle
In order to create a booking the user must first find the vehicle they wish to
create the booking for. There are three ways the user can search for the vehicle:
•
•
•
By Registration Number.
By Chassis Number.
By Plate/Fleet Number.
Figure 17: Search Options
Depending on which option is selected will determine how the program searches
for the vehicle.
There are four scenarios that can arise when creating the booking:
1.
2.
3.
4.
The vehicle and owner are known.
The customer is known but the vehicle is not.
Neither the customer nor vehicle is found on the system.
The vehicle is found on the system but has incorrect owner or invoicee
details.
13
Planner Manual V1.0.4.docx
Regardless of the scenario the system has been designed to allow the initial booking
to be created quickly. In the next section below we will demonstrate how the system
deals with the four scenarios.
1. The Vehicle and Owner Are Known.
If the vehicle is found the user will be asked to verify that the current owner and
invoicee details are correct.
Figure 18: Vehicle Found
2. The Customer Is Known but the Vehicle Is Not.
If the user has searched for a vehicle that is not found on the system, a
message will appear indicating this and the user can then proceed to select
the owner and invoicee.
Figure 19: Vehicle not found
14
Planner Manual V1.0.4.docx
When the new vehicle form appears the user should enter all or part of the
customers name and click the “Find” button. This will then return a list of
customers matching what the detail entered. To select a customer click on
the customer and then click “Accept”.
Figure 20: Select the Customer
Figure 21: Accepting the customer
15
Planner Manual V1.0.4.docx
3. Neither the Customer nor Vehicle Found
If there were no matching customers you will be prompted to add the
customer. Enter the details and click the “Add” button.
Figure 22: Customer Not Found
If the customer is not present on the list returned by the program the user
can select the “Not on list” button which will also prompt the user to add the
new customer as shown above.
Figure 23: Customers found but correct one not on the list
16
Planner Manual V1.0.4.docx
4. The Vehicle is Known but has Incorrect Owner or Invoicee Details
If a vehicle found on the system is deemed to have an incorrect
owner/invoicee the user can change this when asked to verify the details.
Delete the owner/invoicee then type the correct owner/invoicee and press
enter to search as shown previously.
Figure 24: Change the Owner
7.2. Select the Task
The next step is to select the task for which the booking is being made.
Figure 25: Select the Task
17
Planner Manual V1.0.4.docx
7.3. Add the Booking
When the task has been selected, click and hold on the “ADD EVENT” button and
drag the booking onto the appropriate time and bay.
Figure 26: Add Booking
Note: You must keep the mouse held down while dragging the booking.
18
Planner Manual V1.0.4.docx
8. Modify a Booking
To move a booking to a different time or location click and hold on the booking and
drag to the new time/location.
To view the booking details double click on the booking. The booking details will be
displayed.
Figure 27: Booking Details
Fields such as the kilometres, order number, driver contact name and number can be
modified. Notes can be added in the Notes section. The SMS section allows the user
to send SMS texts regarding the booking. The SMS section can be view in more detail
in Section 15 of the manual.
The person that created the booking is shown in the section “Booking Created By”.
The bottom section shows anyone currently working on the related job and the
details of the work they are performing.
The owner/invoicee can also be changed on the booking before a job is created by
clicking on “Verify Details”
19
Planner Manual V1.0.4.docx
9. Change the Date for a Booking
The unallocated list can also be used to move a booking to a different date. The
unallocated list can be used to hold bookings which have no current location. To
assign the booking to the unallocated list right click on the booking and click on
“Assign to Unallocated List”. Block bookings and bookings that have been converted
to a job cannot be assigned to the list.
Figure 28: Assign to Unallocated List
Once the booking has been assigned it will appear in the “Unallocated Task List” tab.
Figure 29: Unallocated list
To assign the booking to a new date, select the new date, highlight the booking in
the list, click and hold on the “ADD EVENT” button and drag the booking onto the
bay as before.
20
Planner Manual V1.0.4.docx
10. Block Bookings
Block bookings are used to mark a period of time as being unavailable or to block of
part of the working day. Block bookings can be made across several bays at the same
time.
When a task is being created or edited you can set the task as a block booking by
clicking on the checkbox.
Figure 30: Block Booking
When a task is set as a block booking it will appear on the list of available block
bookings (unless the user is not permitted - see Section 5).
Figure 31: Create a Block Booking
Block bookings can just be created without the need for an associated vehicle or
registration number.
To create a block booking:
•
•
•
Click on the task
Select the bay locations were the booking is to be created.
Click and hold on “ADD EVENT” and drag on to the bay as normal.
21
Planner Manual V1.0.4.docx
Figure 32: Block Bookings Created
Block bookings can only be deleted or set to re-occur. To delete a block booking the
user should right click on the booking and click “delete entry”. Re-occurrence of
bookings will be dealt with a little later in the manual. (Section 17)
22
Planner Manual V1.0.4.docx
11. Advance Bookings
Advance bookings are used to automatically create a repeat booking for a later date
(day/week/month/year).
Advance bookings can be created by double clicking on a booking and clicking on the
“Advance Booking”.
Figure 33: Advance Booking
Once this is done the advance booking tab will appear.
Figure 34: Advance Booking Intervals
Advance bookings can be made using the day, week, month or year ranges as
highlighted above. A preview of that date will be shown allowing you to find a
suitable time and location for the advance booking. You can also scroll through other
days using the arrow buttons if the day selected is not suitable.
Figure 35: Arrows
Once you find a suitable day click on “Save Advance booking”. The booking is saved
and the advance booking has been created.
23
Planner Manual V1.0.4.docx
12. Assign a Booking to a Job
Note: [CVT users please see Appendix B]
To assign a booking to a job right click on the booking and click on “Assign to Job”
Figure 36: Assign a Booking to a Job
If the customer and the vehicle are both known on the system, credit checks are
carried out and the job is created.
Figure 37: Job Created
If either the customer or the vehicle is not known at this point the user will be
prompted to add them using the vehicle wizard.
If the customer requires an order number before the job is created the user will be
prompted to enter one. When the job is created the colour code of the booking will
change from red to green in accordance with the legend.
24
Planner Manual V1.0.4.docx
Figure 38: Job Status
Figure 39: Job Open Sample
25
Planner Manual V1.0.4.docx
13. View a Full Week by Location
To view a full week for one location click on the bay location name.
Figure 40: Week View
The full week view for the location will be displayed.
Figure 41: Week view sample
To return to the normal day view by location: click on
or click on the date you wish to return to.
26
on the top right corner
Planner Manual V1.0.4.docx
14. View Bookings Legend
A preview of the legend is displayed when the user is creating a booking. The legend
represents the status of the booking from creation right through to the closing of the
job.
Figure 42: Legend
You can also view the legend by clicking on Options and View Legend
Figure 43: Access the Legend
The legend is then displayed.
Figure 44: Legend sample
27
Planner Manual V1.0.4.docx
15. Send a Reminder SMS
There are three ways that the user can send an SMS:
15.1.
SMS Sent when booking Created
When the task is created or edited the user has the facility to associate a related
SMS text message. These message templates are created in the main
Fleetminder module. If SMS is switched on and the customer associated to the
booking allows SMS messages then the Planner will prompt you to send an SMS
when the booking is created.
Figure 45: Set SMS Scripts for Tasks
15.2.
Batch SMS
A facility is available that automatically sends an SMS reminder to customers that
have a booking on the following day. To avail of this facility please contact our
support department.
15.3.
Sending an Ad Hoc SMS
There is also a facility to send an SMS from within a booking. Double click on the
booking then click the “SMS” tab. You can select one of the pre-scripted
messages from the list. The message is displayed on the right and can be
modified to suit exactly what the user wishes to send.
Figure 46: Select an SMS Script
28
Planner Manual V1.0.4.docx
16. Rota Schedule
The Rota Schedule allows the operator to associate mechanics with bay locations
over a period of time as part of their work schedule. To access the Rota Schedule
select “Options” from the main menu and then “Rota Schedule”.
Figure 47: Access Rota Schedule
To edit the rota click on “Options" then “Add Work Schedule”.
Figure 48: Rota Schedule
To add work to the schedule:
•
•
•
•
•
Select a employee from the list
Select a date from the calendar (if necessary)
Set the number of days
Select from Scheduled Work, Holidays or Scheduled Absence
Click and hold on the calendar icon and drag the schedule items on to the bay
29
Planner Manual V1.0.4.docx
Figure 49: Calendar Icon.
Once the items have been placed on the work scheduler you can see who is currently
working, on holidays or absent for each of the bay locations.
Figure 50: Day Rota Sample
Figure 51: Week Rota Sample
30
Planner Manual V1.0.4.docx
17. Booking Re-occurrence
To create a booking re-occurrence(s) over a specified time, right click on the booking
and select “Booking Reoccurrence”.
Figure 52: Booking Reoccurrence
Enter the interval and the date until which the booking(s) will be created.
Figure 53: Reoccurrence Sample
The example above shows a reoccurrence booking that will re-occur daily up to and
including the 20/03/2010. The user is free to set any date and any interval for the
booking re-occurrence.
To create the occurrence click on “Book Reoccurrence”
31
Planner Manual V1.0.4.docx
18. Appendix A (VRS Interface users)
18.1.
Create a booking
Creating a booking while using the VRS interface is the same as the normal process
except that FM-Planner checks for the vehicle on the VRS system first. If the vehicle
exists in VRS then the details are retrieved and the booking can be created. If not,
FM-Planner then checks the Fleetminder database. If the vehicle still can’t be found
then the user has the option to add the vehicle/customer to create the booking.
18.2.
Checking Vehicles in for a test
When the booking is created, VRS interface users have the facility to check a vehicle
in for a test. Right click on the booking and click on “DVS Check-In for Test”.
Figure 54: VRS Check-In
FM-Planner checks for the vehicle and displays the Validate Check-in form. This form
shows the details regarding the vehicle, owner, invoicee and the registered owner
(optional). From here the user can verify the details presented and check the vehicle
in for a test by clicking the “Check In” button.
Figure 55: Validate Check-In
32
Planner Manual V1.0.4.docx
VRS interface users also have the facility to select what type of test is to be carried
out. This information is used in CVT to determine where the results of the test are to
be sent (for example P30, VRS)
Figure 56: Selecting Type of Test
18.3.
Print Reminders
VRS interface users can print reminder letters which can be sent to customers. The
reminders option is available within the planner week view.
Figure 57: Print Reminders
Click “Options” then “Print Reminders”. All the bookings for that week will appear,
the list will also show if and when a reminder was sent. The user can pick and choose
which bookings he/she wishes to print reminders for by clicking on the checkbox.
Figure 58: Reminders list for week
Once the print reminders button is clicked the selected reminders will be printed
with the registration number and correct date and time appearing on it.
33
Planner Manual V1.0.4.docx
Figure 59: Sample Reminder
18.4.
Appointment Slips
Appointment slips are available for VRS interface users. To produce an appointment
slip simply double click on the booking and click on “Appointment Slip”.
Figure 60: Appointment Slip Button
The appointment slip will be shown.
Figure 61: Appointment Slip
34
Planner Manual V1.0.4.docx
18.5.
Compliance Notice
Compliance Notices are available for VRS interface users. To produce a compliance
notice double click on the booking and click on “Compliance Notice”.
Figure 62: Compliance Notice Button
Figure 63: Compliance Notice
35
Planner Manual V1.0.4.docx
19. Appendix B (CVT/Planner Users)
19.1.
Checking Vehicle in for a test
Foe CVT users a booking can be converted to a job and checked in for a test. This can
be done in one stage using the FM-Planner.
Figure 64: Create Job and Check-in
The process can be broken up into two stages in which the job is created first and
then the vehicle is checked in for a test at some stage later.
Figure 65: Check-in the Vehicle for a Test
Which ever option is chosen the validate check-in form will appear as before and the
user can proceed to check-in the vehicle. The form shows all the details regarding
the vehicle, owner, invoicee and registered owner (optional). To check-in the vehicle
click the “Check In” button.
36
Planner Manual V1.0.4.docx
Figure 66: Validate Check-In
37
Planner Manual V1.0.4.docx
20. Test Results Displayed in FM-Planner
Once checked-in the vehicle is available for testing using the CVT (Commercial
Vehicle Testing) software. The test will remain on the system until it has been signed
off (closed) by the tester.
If the booking has a test associated to it then the result of the test will be shown on
the booking. There are three possible outcomes of the test which are as follows.
•
•
•
Test Fail ( the header text displays in red with (F) )
Test Pass ( the header text displays in green with (P) )
Test Passed with defects rectified ( the header text displays in orange
with (Pwd) )
Figure 67: Test Result on Booking
38