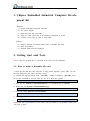
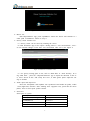
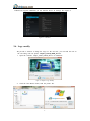
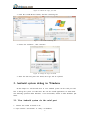
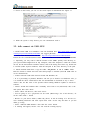
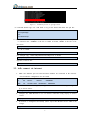
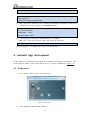
1
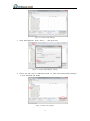
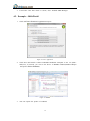
Chipsee Embedded Industrial Computer Android User Manual V1.0.1 Summary: This manual is used to provide users with a fast guide of Chipsee Embed ded Industrial Computer about Android OS development. Through this manual, users can quickly understand the hardware resources; users can build a complet e compilation of Android development environment; users can debug Android OS via serial, USB OTG and Internet Contents 1. 2. 3. 4. Chipsee Embedded Industrial Computer Development Kit ................................................. 1 Getting start and Tests ............................................................................................................ 1 2.1. How to make a bootable SD card ............................................................................ 1 2.2. Start Android OS ......................................................................................................... 2 2.3. Tests .............................................................................................................................. 2 2.4. Logo modify................................................................................................................. 5 Android system debug in Windows ...................................................................................... 6 3.1. View Android system via the serial port ................................................................. 6 3.2. Adb connect via USB OTG....................................................................................... 7 3.3. Adb connect via internet ............................................................................................ 9 Android App development .................................................................................................... 10 4.1. Preparation .................................................................................................................. 10 4.2. Example—HelloWorld ................................................................................................ 12 1. Chipsee Embedded Industrial Computer Develo pment Kit Hardware: (1)Chipsee Embedded Industrial Computer (2)12V power adapter (3)Micro SD card and card reader (4)USB A-A cable (used only if the hardware configured as OTG) (5)Common serial cable or USB to serial cable Software: (1)Chipsee Android 4.2 prebuilt file(to make a bootable SD card) (2)ADT for Windows (3)Android USB driver(for Windows) 2. Getting start and Tests Notes: Using the prebuilt file we provided in the CD to test the hardware. 2.1. How to make a bootable SD card 1、Insert the SD card into your computer, if using virtual machines, please make sure the SD card mounted to the Linux operating system. 2、Confirm the SD card mount point, ―/dev/sdX”, usually it should be ―/dev/sdb”. You c an use this command to find out what the ―X‖ is in the Linux system. $ sudo fdisk –l 3、Copy the file Prebuilt-cs-androidXXXXX.tar.gz to somewhere(such as $HOME). 4、Extract the file Prebuilt-cs-androidXXXXX.tar.gz $ tar xzvf Prebuilt-cs-androidXXXXX.tar.gz 5、Go to the folder Prebuilt-cs-androidXXXXX $ cd ~/Prebuilt-cs-androidXXXXX 6、Flash the Android OS to the SD card $ sudo ./mkmmc-android.sh /dev/sd<?> Notes: The SD card should be at least 2GB, and you’d better to use Sandisk Class4 level SD card or above. 1 2.2. Start Android OS 1、Insert SD card into Embedded Industrial Computer 2、Switch SW2 on Embedded Industrial Computer to uSD 3、Power on the board Notes: The first time starting Android OS will take a little time, after this it will be very quick to start the Android. You can see the Chipsee Logo(it can be changed by using so ftware ChipSee_LOGO_MOD_EN.exe we provided in the CD)shown on the LCD screen. I t is successful start When you see the Android desktop like Figure 1: Figure 1 Android desktop 2.3. Tests 1、 Touch screen test Run MultiTouchTest App, Screen will show the number and position of the touc h point when touching the screen. Resistive screen expansion board only supports sin gle-touch, capacitive screen expansion board supports five-point touch like Figure 2: Figure 2 Touch screen test(Capacitive) After working for some time resistive touch screen may not be accurate, need to be calibr ated, run ChipseeTouchCal App, like Figure 3. 2 Figure 3 Calibration Tool for Resistive touch 2、 Buzzer test Run ChipseeBuzzer App, push ―OpenBuzze‖ button the buzzer will continue to s ound. push ―CloseBuzzer‖ button to stop it. 3、 Gravity sensor function test (1)Gravity sensor can be tested by whirling the screen. (2)Run SensorList App, in the option ―Analog Device 3 axis accelerometer‖, You c an see real-time changes of the three axis acceleration value curve, like Figure 4. Figure 4 Real-time acceleration curve (3)Use gravity sensing game to test, such as ―NFS shift‖ or ―aTilt 3D laby‖. If us ing ―NFS shift‖ , pleas run ―ChipseeSensorTool‖ app to adjust the direction of the ax is, select ―Invert X axis‖ and ―Swap X/Y axes‖, if other games please adjust the sett ings as default. 4、 Audio input and output test Insert the microphone and earphone into expansion board Audio IN (pink), Audio OUT (light blue) interface. Start ―Talking Tom‖ App(Tom Cat), speak into the micro phone, Tom cat will repeat spoken content. 5、 Serial test Serial ports in system Serial port Driver COM1(RS232, Debug) /dev/ttyO0 COM2(RS232) /dev/ttyO1 COM3(RS485) /dev/ttyO2 COM4(RS485) /dev/ttyO4 Form 1 Serial in System 3 (1)Connect COM1 on board to PC. Use software ―SecureCRT‖ or ―Putty‖ or some others in PC. Run ―Serial Port API‖ App to communicate with PC. Like Figure 5. Figure 5 Serial settings (2)Push button ―Send 01010101‖, you will see something in PC like Figure 6. (3)Push button ―Console‖, you can send what you want like Figure 7. Figure 6 Serial send test Figure 7 Serial receive test 6、 USB device 4 Android OS support USB-WiFi, you can find the device in settings, like figure 8: Figure 8 USB-WiFi 2.4. Logo modify We provide a software to change the Logo we the OS start, you can find the tool in the CD along with our product: ChipSee_LOGO_MOD_EN.exe. 1. Open the software: Chipsee_LOGO_MOD_EN.exe in Windows: Figure 9 Chipsee Logo modify 2. Click the first Browse button, find the picture file. 5 Figure 10 Choose the Logo you want 3. Click the second Browse button, find the u-boot.img file. Figure 11 Choose the u-boot.img file 4. Choose the resolution , click ―Execute‖. Figure 12 Change the Logo successful 5. Insert the SD card, power the board, the Logo will be replaced. 3. Android system debug in Windows In this chapter we will describe how to view Android system via the serial port and how to debug the system via USB OTG. We can also install applications via USB OTG. The following operation under Windows 7 x64 environment, similar to other Windows plat forms. 3.1. View Android system via the serial port 1、Connect the COM1 on board to PC 2、Open software ―SecureCRT‖ or ―Putty‖ in Windows. 6 3、Power on the board, you can see the serial output of information like Figure 13. Figure 13 Serial output 4、When the system is fully booted, you can communicate with it. 3.2. Adb connect via USB OTG 1、Install Oracle JDK 6 for Windows. You can download here: http://www.oracle.com/techn etwork/java/javase/downloads/index.html, We suggest jdk-6u45. 2、Install ADT. Download the file here: http://developer.android.com/sdk/index.html. Extract the file somewhere(named ADT). Adb command located<ADT>\sdk\platform-tools. 3、Optionally, you may want to add the location of the SDK's primary tools directory to your system PATH. Right-click on My Computer, and select Properties. Under the Advanc ed tab, hit the Environment Variables button, and in the dialog that comes up, double-clic k on Path (under System Variables). Add the full path to the tools\ directory to the path. 4、Install Android USB driver: Copy the folder ―usb_driver” in CD to <ADT> folder Boot the board as normal and wait until shell prompt is available (micro-B USB cable m ust be disconnected). • Connect micro-B USB cable between board and Windows PC. • If it is proceeding as planned, Windows will tell you it found a new hardware asks yo u to install the driver. Install driver that was downloaded as described in step 3 above: Answer "No, not this time" to the question about running Windows Update to search for software. • Choose "Install the hardware that I manually select from a list (Advanced)" this is the 2nd option, then click "Next" • Select "Show All Devices", then click "Next" • You are going to see a grayed-out text box with "(Retrieving a list of all devices)", cli ck the "Have Disk..." button • Browse" to your driver folder (<ADT>\usb_driver). It will be looking of a .inf file so s elect "android_winusb.inf" and click "Open" then "OK". It's the only file there so you sho uldn't go wrong. • Select "Android ADB Interface" then click the "Next" button. • A warning will appear, answer "Yes" but read the warning anyway. 7 • Click the "Close" when the wizard is completed. Now you can see the driver is installed successfully link Figure 14. Figure 14 ADB driver 5、Test adb: ―Win+r‖ enter ―cmd‖, test like below. > cd <ADT>\sdk\platform-tools\ > adb kill-server > adb start-server > adb devices > adb shell When the "#" prompt appears, it means we connect the board with PC successfully. Figure 15 ADB Command Now you can use Linux commands like ―ls‖, ―cd‖ and so on. Ctrl + C to exit the shell return to Windows system. 6、Use adb command to install Android App: for example SogouInput.apk. > adb install SogouInput.apk If there is a ―SUCCESS‖, the app has already installed in Android. Figure 16 Install App 7、Use adb command to uninstall App (1)Uninstall user app(such as SogouInput.apk): Use command ―pm list‖ to get the full na me of the app, like Figure 17. Then use command ―uninstall‖ to uninstall the app. > adb shell pm list packages > adb uninstall com.sohu.inputmethod.sogou 8 Command ―pm list‖ to get app’s name Figure 17 (2)Uninstall default app: Use ―adb shell‖ to log in the board and delete the apk file: > adb shell # cd /system/app/ # ls # rm Browser.apk 8、Use adb command to transport files between board and PC: ―adb pull‖ and ―adb push‖ (1)Board to PC: <remote> is the file or folder on board, <local> is the file or fol der in PC. >adb pull <remote> <local> (2)PC to board: >adb push <local> <remote> For example copy <ADT>\sdk\platform-tools\chipsee.txt to board: >adb push chipsee.txt /chipsee.txt Opposite, board to PC: >adb pull /testFile.txt testFile.txt 3.3. Adb connect via internet 1. Make sure Ethernet port on board and host machine are connected to the network. Check Ethernet configuration for the board. # netcfg lo UP 127.0.0.1 255.0.0.0 eth0 UP 192.168.1.117/24 0x00000049 255.255.252.0 0x00001043 2. If Ethernet was not configured, configure Ethernet of the board using ifconfig/netc fg as shown below. # netcfg eth0 dhcp 3. Configure the ADB Daemon to use an ethernet connection using setprop as shown below. # setprop service.adb.tcp.port 5555 4. If network is configured successfully (above steps) then Restart service adbd on th e target. # stop adbd 9 # start adbd 5. On the host machine use following commands to establish adb connection $ adb kill-server $ adb start-server $ adb connect <target_ip_address>:5555 6. Verify for device connectivity, by executing the following commands. If connected, find the device name listed as a "IPADDRESS:PORT‖ $ adb devices List of devices attached emulator-5554 device 192.168.1.117:5555 7. device An example of using adb to install software for Android Make sure **.apk at the current folder, and export the adb path. $ adb –s 192.168.1.117:5555 install **.apk Use the argument –s to appoint the device over the internet. 4. Android App development In this chapter, we introduce the development of Android with Eclipse for Windows. We assume that the USB is OTG model and the driver is already installed.(See chapter 3.2) 4.1. Preparation 1. Go to folder <ADT>/eclipse, start eclipse.exe. Figure 18 Start eclipse 2. Click WindowsAndroid SDK Manager: 10 Figure 21 Android SDK Manager 3. Click ToolsOptions, check ―Force…‖ and click close: Figure 22 Android SDK Manager Settings 4. Choose the API, such as Android4.2.2(API 17), then click button Install packages to start download and install. Figure 23 Install API packages 11 5. It will take some time when it is done, close Android SDK Manager. 4.2. Example—HelloWorld 1. Click FileNewAndroid Application Project: Figure 24 New Application 2. Click Next until Finish. Connect Embedded Industrial Computer to PC via USB c able(A-A), If succeed, you can see the device in DDMS window(WindowsOpen PerspectiveOtherDDMS): Figure 25 DDMS 3. You can capture the picture of Android: 12 Figure 26 Capture Android Desktop 4. Click run, choose the device: Figure 27 Run HelloWorld 5. Result: Figure 28 HelloWorld Note: If USB is not configure as OTG model, you can copy and install the file HelloWor ld.apk from the project folder HelloWorld/bin/, or install the apk via the internet(See cha pter 3.3). 13 More information about Android development, you can refer to: https://developer.android.com/guide/index.html https://developer.android.com/develop/index.html http://developer.android.com/support.html http://blog.apptopia.com/android-development-forums/ http://androidforums.com/application-development/ About us: Chipsee Information Technology Co.,Ltd Room 1004, Mansion Haojing 3#,Zhichun Road 108 Haidian District, Beijing, China,100080 TEL:+86-10-62561127 Web: www.chipsee.com E-Mail: [email protected] 14