1
bytes at work
User Manual
industrial byteGATE
Ver. 1.0 – 04. 01. 2013
User Manual
industrial byteGATE
Copyright notice
Copyright 2013 bytes at work AG, CH-8400 Winterthur, Switzerland.
All rights reserved.
Reproduction in any form or by any means without permission is prohibited. bytes at work
reserves the right to make improvements to the products described in this manual at any
time without notice.
No part of this manual may be reproduced, copied, translated, or transmitted in any form
or by any means without the prior written permission of the company. Information provided
in this manual is intended to be accurate and reliable. However, bytes at work assumes no
responsibility for its use, or for any infringements upon the rights of third parties that may
result from its use.
The material in this document is for product information only and is subject to change
without notice. While reasonable efforts have been made in the preparation of this
document to assure its accuracy, bytes at work assumes no liabilities resulting from errors
or omissions in this document, or from the use of the information contained herein. bytes
at work reserves the right to make changes in the product design without notice to its
users .
Trademarks
Product names, logos, brands, and other trademarks featured, or referred to are the
property of their respective trademark holders. These include, but are not limited to, u-boot
and Linux.
2
©bytes at work
User Manual
industrial byteGATE
Licenses
This product includes software code developed by third parties, including software code
subject to the GNU General Public License ("GPL") or GNU Lesser General Public
License ("LGPL").
The GPL Code and LGPL Code used in this product is not actively distributed but can be
obtained by contacting bytes at work. It is delivered WITHOUT ANY WARRANTY and is
subject to the copyrights of one or more authors. For details, see the GPL Code and LGPL
Code for this product and the terms of the GPL and LGPL.
The Emdebian part may contain licenses from:
GNU General Public License
GNU Lesser General Public License
Modified BSD License
Perl Artistic license
Apache License
Expat/MIT-style licenses
zlib-style licenses
LaTeX Project Public License
Python Software Foundation License
Ruby's License
PHP License
W3C Software Notice and License
OpenSSL License
Sleepycat License
Common UNIX Printing System License Agreement
vhf Public License
"No problem Bugroff" license
Unmodified BSD License (also known as the original or 4-clause BSD license. It includes an
advertizing requirement and is now deprecated even by the BSD project.)
public domain (not a license, strictly speaking)
IBM Public License Version 1.0
The source code for all packages of the Emdebian based root file system can be obtained
from: http://www.emdebian.org.
3
©bytes at work
User Manual
industrial byteGATE
Table of contents
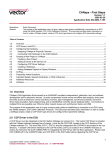
1 General overview........................................................................6
1.1 Introduction..............................................................................................6
1.2 Specification............................................................................................6
1.3 Hardware dimensions..............................................................................6
1.4 Hardware externals.................................................................................7
2 Boot procedure............................................................................8
2.1 Boot procedure details............................................................................8
2.1.1 X-loader...............................................................................................................8
2.1.2 Bootloader............................................................................................................ 9
2.1.3 Kernel................................................................................................................... 9
2.1.4 Basesystem..........................................................................................................9
2.2 Download working images....................................................................10
2.3 Flash layout...........................................................................................10
2.3.1 Kernel flash layout..............................................................................................10
2.3.2 U-boot flash layout (technical)............................................................................10
3 First steps..................................................................................11
3.1 Log in using a serial connection............................................................11
3.2 Log in using ssh....................................................................................12
3.3 Log in using DHCP environment: .........................................................12
4 Linux base system....................................................................13
4.1 Looking at your system.........................................................................13
4.1.1 Know what's installed.........................................................................................13
4.1.2 Updating the package information......................................................................13
4.1.3 Searching for a package....................................................................................14
4.1.4 Install a new package.........................................................................................14
4.1.5 Remove a package............................................................................................14
4.1.6 Upgrading your system......................................................................................14
5 Building your own application...................................................15
5.1 Get a toolchain......................................................................................15
5.2 Cross-compiling the source code..........................................................15
5.3 Packing your application.......................................................................15
6 Accessing byteGATE................................................................16
6.1 Changing the serial connectivity............................................................16
6.1.1 Serial settings for Serial 1 (/dev/ttyO0)...............................................................16
6.1.2 Serial settings for Serial 2 (/dev/ttyO1)...............................................................17
6.1.3 How to change the serial connectivity................................................................17
6.2 Using the application LED.....................................................................18
6.2.1 How to use the application LED.........................................................................18
4
©bytes at work
User Manual
industrial byteGATE
6.3 Using the application button..................................................................19
6.4 Connecting to CAN bus.........................................................................20
7 Pinouts......................................................................................21
7.1 Serial pinouts.........................................................................................21
7.1.1 Serial 1 pinout....................................................................................................21
7.1.2 Serial 2 pinout....................................................................................................21
7.2 Universal extension pinout....................................................................22
7.2.1 On-board PCB pinout.........................................................................................22
7.2.2 Universal extension pinout.................................................................................23
7.2.3 Power pinout......................................................................................................23
7.3 Debug console pinout............................................................................24
7.4 CAN pinout............................................................................................24
8 Troubleshooting........................................................................25
8.1 Factory reset.........................................................................................25
8.2 Creating a bootable SD/MMC card.......................................................25
8.2.1 Card preparation................................................................................................25
8.2.2 Booting the byteGATE from an SD/MMC card....................................................26
8.3 Flash x-loader, bootloader, kernel and file system(s)............................27
8.3.1 Card preparation................................................................................................27
8.3.2 Flash x-loader, bootloader, kernel and file system(s) from an SD/MMC card.....29
9 Contact information...................................................................30
5
©bytes at work
User Manual
1
1.1
industrial byteGATE
General overview
Introduction
Thank you for purchasing our product. The byteGATE is an industrial oriented computer
that offers several interfaces and an open architecture in order to be as flexible as
possible.
It has been designed for maximum lifetime and very low power consumption. Furthermore,
it is very stable and robust since as it comes with a pre-installed Linux (embedded
Debian).
1.2
Specification
1.3
Hardware dimensions
6
©bytes at work
User Manual
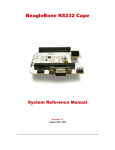
1.4
industrial byteGATE
Hardware externals
7
©bytes at work
User Manual
2
industrial byteGATE
Boot procedure
The boot procedure of the byteGATE is kept very simple. As usual, it normally starts with
the pre-installed software that will be loaded from the NAND flash. Additionally, if a
bootable SD/MMC card is present, the byteGATE first tries to boot from the external
source.
2.1
2.1.1
Boot procedure details
X-loader
The first external bootloader that is loaded from the byteGATE is called x-loader. The xloader application is included in the Linux PSP provided by Texas Instruments and can be
modified by the end user.
For more information about TI's x-loader, please see:
http://processors.wiki.ti.com/index.php/AM35x-OMAP35xPSP_04.02.00.07_Release_Notes
8
©bytes at work
User Manual
industrial byteGATE
or visit:
http://processors.wiki.ti.com/index.php/AM35x-OMAP35x-PSP_04.02.00.07_UserGuide
2.1.2
Bootloader
The pre-installed bootloader on the byteGATE is called 'u-boot' and comes from Denx
Software Engineering (http://www.denx.de/wiki/U-Boot).
bytes at work has just modified the environment for being able to flash and erase its kernel
and filesystem space. By default, the bootloader of the byteGATE is protected from
modifications with the password 'blu3'. To change the password, the bootloader needs to
be modified, cross-compiled and flashed on the byteGATE. To obtain more general
information about u-boot, please see:
http://processors.wiki.ti.com/index.php/AM35x-OMAP35xPSP_04.02.00.07_Release_Notes
2.1.3
Kernel
The pre-installed kernel on the byteGATE is based on the OMAP GIT Linux Kernel
Releases from TI that can be obtained here:
http://processors.wiki.ti.com/index.php/Omap_GIT_Linux_Kernel_Releases
To obtain more information about TI's kernel, please see:
http://processors.wiki.ti.com/index.php/AM35x-OMAP35xPSP_04.02.00.07_Release_Notes
2.1.4
Basesystem
The pre-installed basesystem is based on the embedded Debian variant called
'Emdebian'. It is built with the newest packages of the 'grip/testing' release, using hardfloat
support. Emdebian/Grip is essentially a standard Debian whose packages are optimized
for size. To obtain more information about the Emdebian Linux distribution, please visit:
http://www.emdebian.org/
The file system on the byteGATE is split into two different parts, a / (130MB) and a
separated /usr partition (120MB).
bytes at work provides the Swiss Emdebian mirror to support the further success of
Emdebian.
9
©bytes at work
User Manual
2.2
industrial byteGATE
Download working images
If you want to download a working u-boot, kernel, x-loader or filesystem for the byteGATE
that can be flashed using an external SD/MMC card, please visit:
http://www.bytesatwork.ch/support
for the latest versions of the software.
2.3
2.3.1
Flash layout
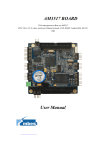
Kernel flash layout
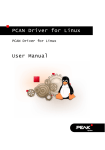
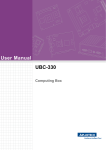
This illustration shows you the details on how the flash is organized and how the kernel
sees the partitions. The flash layout is split into 6 logical partitions. The kernel normally
operates using the 'root' and the 'usr' partition. All the addresses and sizes are given in
HEX.
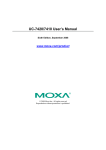
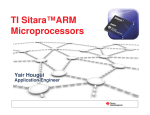
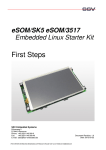
2.3.2
U-boot flash layout (technical)
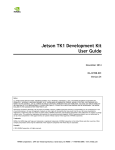
This illustration shows you the technical details on how the u-boot uses the flash, what
parts are currently in use and what parts are reserved for further use. All the addresses
and sizes are given in HEX.
10
©bytes at work
User Manual
industrial byteGATE
First steps
3
This section describes how to connect the byteGATE to your computer and how to perform
a login. You have to choose between connecting using an FTDI USB-Serial adapter
(debug console login) or connecting with ssh over TCP/IP (Ethernet).
The default username and password for a successful login are: root / rootme
3.1
Log in using a serial connection
1. Open your device using a screwdriver.
2. Next to the USB connector find the pins for the debug console. Connect the FTDI
USB-Serial adapter to your byteGATE. If you use an FTDI TTL-232 cable, the black
cable (ground) goes to the pin marked '1'. For more information refer to section:
Debug console pinout.
3.
4.
5.
6.
7.
Connect the FTDI USB-Serial adapter to your computer.
Open a terminal emulation program, e.g. 'minicom'.
Set the baud-rate/parity to 115'200 / 8N1
Power on your byteGATE.
After successful start-up, you will see the login console:
Debian GNU/Linux wheezy/sid bytegate ttyO2
bytegate login:
8. Log in with user 'root' and password 'rootme'.
9. You are now logged in:
Linux bytegate 2.6.37-g6cce1b1-dirty #172 Thu Nov 29 15:16:41 CET 2012
armv7l
The programs included with the Debian GNU/Linux system are free software;
the exact distribution terms for each program are described in the
individual files in /usr/share/doc/*/copyright.
Debian GNU/Linux comes with ABSOLUTELY NO WARRANTY, to the extent
permitted by applicable law.
root@bytegate:~#
11
©bytes at work
User Manual
3.2
industrial byteGATE
Log in using ssh
1. Set your computer's IP address to: 172.16.172.1 with netmask: 255.255.255.0
byteGATE uses a static IP of 172.16.172.16 on the second interface.
byteGATE's first interface is configured using DHCP.
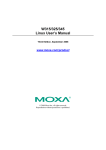
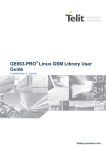
2. Connect the Ethernet cable from your computer to the second interface on the
byteGATE as shown below:
3. Power on the byteGATE.
4. After some time, try to connect to the byteGATE using an ssh client by calling:
user@host:~$ ssh [email protected]
5. Accept the fingerprint provided by the byteGATE.
6. Log in using the password 'rootme'.
7. You are now logged in:
Linux bytegate 2.6.37-g6cce1b1-dirty #172 Thu Nov 29 15:16:41 CET 2012
armv7l
The programs included with the Debian GNU/Linux system are free software;
the exact distribution terms for each program are described in the
individual files in /usr/share/doc/*/copyright.
Debian GNU/Linux comes with ABSOLUTELY NO WARRANTY, to the extent
permitted by applicable law.
root@bytegate:~#
3.3
Log in using DHCP environment:
Logging in using an IP address given by your DHCP Server is also possible. To do this,
connect the byteGATE's first interface (next to the power connector) with your LAN, then
log in to the byteGATE as described in the section Log in using ssh using the IP address
given from the DHCP server.
12
©bytes at work
User Manual
4
industrial byteGATE
Linux base system
Your byteGATE is shipped with a pre-installed version of embedded Debian. Debian itself
is a free Linux operating system for your computer. The embedded version has been
optimized for very low memory footprint, but still serves all the functionality like a normal
Debian. The installed Debian release is 'testing' and comes out of the 'grip' part from
Emdebian with hard-float support.
For more information, please visit:
http://www.debian.org
http://www.emdebian.org
Debian's main advantage is that you don't have to compile each package yourself; instead,
Debian provides packaging servers where you can download and install pre-built
packages. bytes at work supports Emdebian by providing a Swiss Emdebian mirror. It can
be reached at:
http://emdebian.bytesatwork.ch/mirror/grip/
This mirror is the default packaging mirror that is configured on your system.
4.1
4.1.1
Looking at your system
Know what's installed
To see which packages are already installed on your system, type:
root@bytegate:~# dpkg -l
This list served by the 'dpkg' command shows the state of each installed package on the
system.
4.1.2
Updating the package information
If you would like to install new packages or upgrade your system, you have to refresh the
packaging cache first.To update the local packaging information, allow the byteGATE to
connect to the Internet, and then just type:
root@bytegate:~# apt-get update
This command will then connect to the configured Emdebian server and download the new
packaging list.
13
©bytes at work
User Manual
4.1.3
industrial byteGATE
Searching for a package
To install new software when you don't know exactly what the package is called, you can
first search for the package by typing:
root@bytegate:~# apt-cache search <name>
4.1.4
Install a new package
To install a new package, simply type:
root@bytegate:~# apt-get install <package name>
The dependencies (e.g. missing libraries etc.) will be automatically resolved by the ' apt'
command.
4.1.5
Remove a package
To remove a package, simply type:
root@bytegate:~# apt-get remove <package name>
To remove the package configuration as well, use ' purge' instead of 'remove'.
4.1.6
Upgrading your system
To upgrade your system, e.g. check for the newest versions of all installed packages, you
can do this by just type:
root@bytegate:~# apt-get upgrade
This command will automatically update all installed packages and will resolve the
required dependencies itself.
14
©bytes at work
User Manual
5
5.1
industrial byteGATE
Building your own application
Get a toolchain
Before you can start running your own application on the byteGATE, you need to install a
cross toolchain on your computer. The cross compiler is then able to create code for other
CPU architectures, e.g. for the ARM based byteGATE.
There are several free toolchains available that are capable of generating code for the
byteGATE.
To use the standard Emdebian toolchain, visit:
http://www.emdebian.org/crosstools.html
To use an alternative toolchain (e.g. Sourcery CodeBench from Mentor Graphics®), visit:
http://www.mentor.com/embedded-software/sourcery-tools/sourcerycodebench/editions/lite-edition/
5.2
Cross-compiling the source code
To compile your application for the byteGATE, you need to compile the source code with
the tools provided by the toolchain.
For example, to compile a helloworld.c with the cross-compiler, type:
user@host:~$ <path>/arm-none-linux-gnueabi-gcc -o helloworld helloworld.c
Looking at the binary you have created, you can see that it can be run on your byteGATE:
user@host:~$ file helloworld
helloworld: ELF 32-bit LSB executable, ARM, version 1 (SYSV), dynamically
linked (uses shared libs), for GNU/Linux 2.6.16, not stripped
5.3
Packing your application
Debian provides a lot of information on how .deb packages are created.
Please refer to the official documentation for further instructions about package
generation:
http://tldp.org/HOWTO/html_single/Debian-Binary-Package-Building-HOWTO/
15
©bytes at work
User Manual
6
industrial byteGATE
Accessing byteGATE
This section gives an overview on how the serial connectivity is handled, how the color of
the LED can be changed and how CAN/DeviceNet can be used.
6.1
Changing the serial connectivity
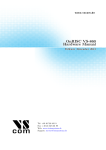
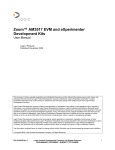
byteGATE comes with 2 D-SUB9 connectors. On the running system, the first serial port
has the filename /dev/ttyO0, and the second serial port has the filename /dev/ttyO1. The
serial connectors support several modes which can be switched by GPIOs. The changes
to the GPIOs are not permanent and have to be made after each boot of the device or
each time the serial connectivity is established. Changes to the GPIOs are always applied
immediately.
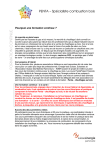
Below you can see an overview of where the serial connectors are located:
By default, both D-SUB9 connectors are configured with RS-232.
6.1.1
GPIO
(default)
Serial settings for Serial 1 (/dev/ttyO0)
152
154
Result
0
0
RS232
0
1
RS422
1
0
RS485
16
©bytes at work
User Manual
6.1.2
Serial settings for Serial 2 (/dev/ttyO1)
GPIO
(default)
6.1.3
industrial byteGATE
153
155
Result
0
0
RS232
0
1
RS422
1
0
RS485
How to change the serial connectivity
As described above, the serial connectivity of both D-SUB9 connectors can be changed by
GPIOs on the running system. By default, both connectors are configured for RS232.
For example, to use RS422 on Serial 2, run:
root@bytegate:~# echo 0 >/sys/class/gpio/gpio153/value
root@bytegate:~# echo 1 >/sys/class/gpio/gpio155/value
To switch back to RS232 on Serial 2, simply run:
root@bytegate:~# echo 0 >/sys/class/gpio/gpio153/value
root@bytegate:~# echo 0 >/sys/class/gpio/gpio155/value
17
©bytes at work
User Manual
6.2
industrial byteGATE
Using the application LED
The byteGATE comes with a programmable application LED. The color of the LED is
controlled by GPIOs. The GPIOs are active-low, so 0 will enable it.
GPIO
Color
137
red
138
green
139
blue
It is possible to mix the colors and enable more than one GPIO.
6.2.1
How to use the application LED
To change the LED's color, e.g. to visualize a state from your application, you can control it
in the following way:
Enabling red:
root@bytegate:~# echo 0 >/sys/class/gpio/gpio137/value
root@bytegate:~# echo 1 >/sys/class/gpio/gpio138/value
root@bytegate:~# echo 1 >/sys/class/gpio/gpio139/value
Enabling green:
root@bytegate:~# echo 1 >/sys/class/gpio/gpio137/value
root@bytegate:~# echo 0 >/sys/class/gpio/gpio138/value
root@bytegate:~# echo 1 >/sys/class/gpio/gpio139/value
Enabling blue:
root@bytegate:~# echo 1 >/sys/class/gpio/gpio137/value
root@bytegate:~# echo 1 >/sys/class/gpio/gpio138/value
root@bytegate:~# echo 0 >/sys/class/gpio/gpio139/value
Enabling purple:
root@bytegate:~# echo 0 >/sys/class/gpio/gpio137/value
root@bytegate:~# echo 1 >/sys/class/gpio/gpio138/value
root@bytegate:~# echo 0 >/sys/class/gpio/gpio139/value
Disabling the LED:
root@bytegate:~# echo 1 >/sys/class/gpio/gpio137/value
root@bytegate:~# echo 1 >/sys/class/gpio/gpio138/value
root@bytegate:~# echo 1 >/sys/class/gpio/gpio139/value
18
©bytes at work
User Manual
6.3
industrial byteGATE
Using the application button
In addition to the reset button, the byteGATE has a second button which can be used by
an application for user interaction. By default it has no functionality.
This button is connected to the GPIO port 24 and is configured as a GPIO key. It can be
accessed through the device /dev/input/event0.
This device returns a struct input_event upon press and release of the button, which is
defined in <linux/input.h>.
Here is a small example on how to access this device:
#include
#include
#include
#include
#include
#include
<sys/types.h>
<sys/stat.h>
<fcntl.h>
<linux/input.h>
<unistd.h>
<stdio.h>
int main(int argc, char *argv[])
{
int fd;
struct input_event ev;
fd = open("/dev/input/event0", O_RDONLY);
while (1) {
read(fd, &ev, sizeof(ev));
if (ev.type == 1) { /* EV_KEY: key event */
if (ev.value == 1) {
printf("Button pressed\n");
} else {
printf("Button released\n");
}
}
}
}
return 0;
19
©bytes at work
User Manual
6.4
industrial byteGATE
Connecting to CAN bus
The byteGATE allows you to connect to CAN/DeviceNet. In order to use the CAN device,
you must first configure can0 on the byteGATE. By default, can0 is unconfigured.
To set up the socket CAN interface, enter the following command on the byteGATE:
root@bytegate:~# ip link set can0 type can bitrate 125000 triple-sampling
on
root@bytegate:~# ip link set can0 up
Your CAN device is now ready. You can check it by calling ' ifconfig
can0'
root@bytegate:~# ifconfig can0
can0
Link encap:UNSPEC
UP RUNNING NOARP
HWaddr 00-00-00-00-00-00-00-00-00-00-00...
MTU:16
Metric:1
RX packets:0 errors:0 dropped:0 overruns:0 frame:0
TX packets:0 errors:0 dropped:0 overruns:0 carrier:0
collisions:0 txqueuelen:10
RX bytes:0 (0.0 B)
TX bytes:0 (0.0 B)
Interrupt:24
After setting up the interface, you are free to use SocketCAN. SocketCAN provides
different userspace tools that can be used to verify CAN connectivity:
•
candump: dump traffic on a CAN network
•
cansend: simple command line tool to send CAN-frames via CAN_RAW sockets
•
cangen: CAN frames generator for testing purpose
SocketCAN utilities can be obtained from:
http://gitorious.org/linux-can
20
©bytes at work
User Manual
7
industrial byteGATE
Pinouts
7.1
7.1.1
Serial pinouts
Serial 1 pinout
connector X13
PIN
RS232
1
RS422
RS485
TxD-
2
RX
TxD+
3
TX
RxD+
A
RxD-
B
GND
GND
RS422
RS485
4
5
GND
6
7
RTS
8
CTS
9
7.1.2
Serial 2 pinout
connector X14
PIN
RS232
1
TxD-
2
RX
TxD+
3
TX
RxD+
A
RxD-
B
GND
GND
4
5
GND
6
7
RTS
8
CTS
9
21
©bytes at work
User Manual
7.2
7.2.1
industrial byteGATE
Universal extension pinout
On-board PCB pinout
connector X18
TYPE
Memory-Card
I2C
McSPI
USB
PIN
Description
1
3,3V
2
MMC2_CLK
3
MMC2_CMD
4
MMC2_D(0)
5
MMC2_D(1)
6
MMC2_D(2)
7
MMC2_D(3)
8
I2C1_SCL
9
I2C1_SDA
10
SPI1_CS2
11
SPI1_CS3
12
SPI1_CLK
13
SPI1_SOMI
14
SPI1_SIMO
15
GND
16
USB0_VBUS
17
USB0_DM
18
USB0_DP
19
USB0_ID
20
USB0_PWR
22
©bytes at work
User Manual
7.2.2
industrial byteGATE
Universal extension pinout
connector X20.1
PIN
on board PIN (X19)
Description
1
1
depends on extension board
2
2
depends on extension board
3
3
depends on extension board
4
4
depends on extension board
5
5
depends on extension board
6
6
depends on extension board
7.2.3
Power pinout
connector X6
PIN
Description
1
GND
2
GND
3
3,3V
4
3,3V
5
+5V
6
+5V
7
GND
8
GND
9
+24V_CAN
10
+24V_CAN
23
©bytes at work
User Manual
7.3
industrial byteGATE
Debug console pinout
connector X16
PIN
Description
1
GND
2
3
4
RX
5
TX
6
The USB serial debug console pinout is compatible with the standard TTL-232R 3v3 FTDI
USB cable. It can be ordered from: http://www.ftdichip.com/Products/Cables.htm or from
http://www.distrelec.ch
7.4
CAN pinout
connector X5
PIN
Description
1
+24V
2
CANH
3
CANL
4
GND
24
©bytes at work
User Manual
industrial byteGATE
Troubleshooting
8
8.1
Factory reset
To reinstall the byteGATE completely and reset it to the factory defaults, please follow the
instructions in the sections: Creating a bootable SD/MMC card and Flash x-loader,
bootloader, kernel and file system(s).
8.2
Creating a bootable SD/MMC card
This short how-to shows how to boot the device from an external SD/MMC card. These
steps are essential if your byteGATE isn't able to boot, or if you just want to reset it to the
factory defaults.
All the data stored on the SD/MMC card will be lost, so please back up your data before
you continuing with this section. Depending on your permissions, it might be necessary to
run this commands as user 'root'.
8.2.1
Card preparation
Define which device will be formatted. Insert an SD/MMC card and determine the device
(e.g. by enter 'dmesg'⁾.
•
DRIVE=/dev/mmcblk0
•
Attention
Make sure you don't refer to a partition, use the whole device instead.
Don't use mmcblk0p1, use mmcblk0
Get the total size in bytes of your card:
•
SIZE=`fdisk -l $DRIVE | grep Disk | grep bytes | awk '{print $5}'`
Calculate the number of cylinders of your card:
•
CYLINDERS=`echo $SIZE/255/63/512 | bc`
Format the card:
•
echo ",,0x0C,*" | sfdisk -D -H 255 -S 63 -C $CYLINDERS $DRIVE
Create a filesystem on the card:
•
mkfs.vfat -F32 -n "boot" $DRIVE\p1
Mount the newely created partition:
•
mkdir /tmp/card
•
mount /dev/mmcblk0p1 /tmp/card
25
©bytes at work
User Manual
industrial byteGATE
Download the x-loader:
•
get latest x-loader from: http://www.bytesatwork.ch/support
Copy the x-loader and rename it on it's destination:
•
cp x-loader.bin.ift /tmp/card/MLO
Download and copy the u-boot to it's destination:
•
get latest u-boot from: http://www.bytesatwork.ch/support
•
cp u-boot.bin /tmp/card/
Your card should now look like this:
/tmp/card/
/tmp/card/MLO
/tmp/card/u-boot.bin
Unmount your card:
•
8.2.2
umount /tmp/card
Booting the byteGATE from an SD/MMC card
Your SD/MMC card is now prepared. To verify the boot procedure, connect the debug
cable to the byteGATE and open a terminal emulation program (e.g. ' minicom').
X-Loader 1.51 (Nov 30 2012 - 10:01:03)
Reading boot sector
Starting OS Bootloader from MMC...
Starting OS Bootloader...
U-Boot 2010.06.11-dirty (Nov 29 2012 - 10:55:55)
If you want to flash the x-loader, bootloader, kernel or the file system(s), please follow the
instructions in section: Flash x-loader, bootloader, kernel and file system(s).
26
©bytes at work
User Manual
8.3
industrial byteGATE
Flash x-loader, bootloader, kernel and file
system(s)
This short how-to shows how to flash the x-loader, bootloader, kernel and file system(s)
from an external SD/MMC card. All the data stored on the SD/MMC card will be lost, so
please back up your data before you continuing with this guide.
If you have already prepared an SD/MMC card from the section: Creating a bootable
SD/MMC card, you can use the same card and just skip the 'format' part in this section.
If you just want to flash a new kernel, skip the parts copying the bootloader, x-loader and
file system(s). Depending on your permissions, it might be necessary to run this
commands as user 'root'.
8.3.1
Card preparation
Define which device partition will be formatted and format it. Insert an SD/MMC card and
determine the device (e.g. by enter 'dmesg').
•
Attention
Make sure you refer to a partition, don't use the whole device.
Don't use mmcblk0, use mmcblk0p1
•
mkfs.vfat /dev/mmcblk0p1
Mount the partition:
•
mkdir /tmp/card
•
mount /dev/mmcblk0p1 /tmp/card
Create the required directory structure:
•
mkdir /tmp/card/batw-sw
Download and copy the x-loader:
•
get latest x-loader from: http://www.bytesatwork.ch/support
•
cp x-loader.bin.ift /tmp/card/batw-sw/
Download and copy the u-boot:
•
get latest u-boot from: http://www.bytesatwork.ch/support
•
cp u-boot.bin /tmp/card/batw-sw/
Download and copy the kernel:
•
get latest kernel from: http://www.bytesatwork.ch/support
•
cp uImage /tmp/card/batw-sw/
27
©bytes at work
User Manual
industrial byteGATE
Download and copy the rootfilesystem(s):
•
get latest filesystem(s) from: http://www.bytesatwork.ch/support
•
cp rootfs.jffs2 /tmp/card/batw-sw/
•
cp usrfs.jffs2 /tmp/card/batw-sw/
Your SD/MMC card should now look like this:
/tmp/card/
/tmp/card/batw-sw
/tmp/card/batw-sw/u-boot.bin
/tmp/card/batw-sw/rootfs.jffs2
/tmp/card/batw-sw/uImage
/tmp/card/batw-sw/usrfs.jffs2
/tmp/card/batw-sw/x-load.bin.ift
Unmount the card:
•
umount /tmp/card
28
©bytes at work
User Manual
8.3.2
industrial byteGATE
Flash x-loader, bootloader, kernel and file system(s) from an
SD/MMC card
Your SD/MMC card is now prepared. To verify the flash procedure, connect the debug
cable to the byteGATE and open a terminal emulation program (e.g. ' minicom').
Insert the SD/MMC card into the byteGATE and power it on. It will now flash all the files
you have provided under the 'batw-sw' directory.
You should now see the parts that are going to be flashed:
reading batw-sw/uImage
2551608 bytes read
Found new kernel, flash it.
4 BIT SW ECC selected
NAND scrub: device 0 offset 0x280000, size 0x300000
Erasing at 0x560000 -- 100% complete.
OK
NAND erase: device 0 offset 0x280000, size 0x300000
Erasing at 0x560000 -- 100% complete.
OK
NAND write: device 0 offset 0x280000, size 0x300000
3145728 bytes written: OK
AM3517_M1 #
Upon completion, remove your SD/MMC card and enter 'boot' or power off/on your device.
29
©bytes at work
User Manual
9
industrial byteGATE
Contact information
bytes at work AG
Konradstrasse 15
CH-8400 Winterthur
Switzerland
phone: +41 (0)52 213 79 79
fax: +41 (0)52 203 27 13
email: [email protected]
help: http://www.bytesatwork.ch/support
30
©bytes at work