1
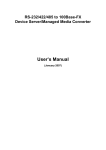
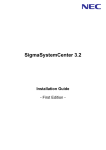
THE
+ SMART WAY
to control access to
TO
YOUR property
Janus
Access Control
Janus
Installation Manual
for version 4.0.0.9
With our software you will know exactly who entered
and left your property, and when.
Nov 2014
Janus 4.0.0.9
Page 1
Janus installation manual
Janus Installation Manual
Overview
This is the installation manual for the Janus 4 system. The user manual is a separate document.
Versions
Available version are listed in the Janus brochure or the Janus user manual. Please ensure you purchased
the desired version before installation.
System Requirements
See the Janus brochure or the Janus user manual for system requirements. Ensure the required networking,
computing and scanner equipment are ready before starting to install.
Versioning
Document: v 4.0.0.9 dated 5 Nov 2014.
Known issues
Some ADO interfaces were changed in Windows 7 SP1 to be associated with new instance identifiers. This
means Windows XP, Windows Server 2007 and other operating systems before Windows 7 SP1 can cause
the software installation to fail, and the Janus software may also not run on these operating systems. See
http://support.microsoft.com/kb/2517589 and http://support.microsoft.com/kb/2640696.
Requirements
Before installing, ensure you have the following:
•
Computer on which Janus is to be installed, with Winfows 7 SP1 or Windows 8 installed.
•
Wifi access point and its installation software.
•
eSkan devices, USB cable supplied with the device. Scanner driver software.
•
[Janus Standard/Professional] Microsoft SQL Server Express 2012 (or the full licensed version).
•
The Janus software and its activation key.
Janus Client Software: installation guide
Installation comprises the sequence of steps below. Depending on your hardware and software
requirements, some of these steps can be skipped, as indicated on the following pages.
Nov 2014
Janus 4.0.0.9
Page 2
Janus installation manual
Installing required third-party hardware and software
Install and configure the wifi router on your network
A wifi router is required if you purchased eSkan 250 scanners for wireless download.
1. Plug in the wifi router on the network, and follow the instructions provided with your device to configure
it as a wifi access point. See the annexures to this document for setup instructions for certain wifi products.
Annexure 3: Network setup and configuration of Ubiquity Picostation M2
2. Configure the computer where Janus is to be installed with a static IP address. This is set in Control Panel,
Network Options.
For a stand-alone PC (Janus Lite or Standard installations), you can typically set the PC to:
IP address of PC: 192.168.1.100, Subnet Mask: 255,255,255,0
[i.e. a static IP address]
Default Gateway: left blank if only a single PC connected to wifi
Preferred DNS Server: Left blank if only a single PC connected to wifi.
This manual describes install based on a static IP.
If you have a DNS server on a larger network, consult the advice of your network
administrator to configure the DNS server. The PC/server where the scans are
delivered as well as each scanner however still require fixed IP addresses.
Install the Excellent ID eSkan driver software
1. The ExcellentID installation manual is included with the scanners and/or with the Janus installation
software. Follow that manual to setup the driver software for the scanners and to open the Windows
firewall as required. Note that with Windows 8 additional procedures are required to restart Windows in a
special mode for the USB setup – make sure to read the provided additional instructions.
2. Make sure the Windows firewall was configured as per the ExcellentID installation manual. See the
section “Windows firewall setup” in the ExcellentID manual. It boils down to access for the eSkan.Service
program on the local PC, or open access to TCP/IP port 7509 on a networked firewall.
3. After successfully installing, open the Decoder Software in administrator mode and set the following:
* Check the mark “Decoder runs on this PC”.
* Make sure the Directory type is set to “Single directory”.
* Change the Root Directory to “c:\scannerdata”
* Change the “XML File” path to “c:\scannerdata\ExIDDecoder.xml”
* Set the “User Directory” path to “c:\scannerdata\Firmware\”
* Make sure the ExID Communications Service is checked.
* Enable the ExID eSkan Reader service.
The Authorisation Service and NetworkRelay service should be left disabled.
Nov 2014
Janus 4.0.0.9
Page 3
Janus installation manual
3. Plug in the scanner on USB, and do a few barcode scans or license scans. Check that after each scan a
couple of files are added in c:\scannerdata. Do not bother at this stage if the sequence in which the
scanners ask for driver or vehicle scans are not suited to your situation. The test at this stage is to
ensure USB based communication between the scanner and the computer is fine. Possible issues at this
stage may be related to USB driver issues, or more likely that the above-mentioned path was not set.
4. Configure the scanner for wifi access as per the ExcellentID manual. Disconnect the scanner from the
USB cable, and test that any scanned files now transmit via wifi and end up in c:\scannerdata. The test
at this stage is to ensure the wifi communication between the scanner and the computer is fine. The
final scanner setup described in the main section in this document “Programming the scanner”. Then
the scanners will also be programmed and configured for use with Janus. Possible issues at this stage:
- the above-mentioned path was not set.
- wifi is switched off or is improperly configured.
- the scanner was not properly configured for wifi. Follow the ExcellentID troubleshooting
instructions. In the bottom middle of the scanner screen shows a dot, that changes to a colon (:)
when the wifi access point is detected. It shows a three-pointed antenna icon when it connected,
and if there are any scans to be transmitted, the scanner icon should turn to a lightning bolt, and
the files should transmit.
Nov 2014
Janus 4.0.0.9
Page 4
Janus installation manual
- If the colon and/or antenna icon does not show, the scanner is probably not yet properly
configured for wifi access. See the section “Configure the eSkan” in the ExcellentID installation
manual. It may also be that the scanner fails to authenticate access to the wifi access point. In
this case inspect the scanner wifi configuration and re-do it. Check the wifi access point is
connected and switched on.
- If the lightning icon does not show, but the antenna icon shows, look for issues related to the
Windows firewall blocking access to ExcellentID (See Annexure 1 as well as the section “Windows
firewall setup” in the ExcellentID installation manual). In the ExcellentID Decoder Setup program,
make sure the ExID Communications Service is checked, as illustrated in Paragraph 2 above.
5. Delete all test scan files from c:\scannerdata directory as they are still formatted incompatibly with
Janus. The section in the install manual “Programming the scanner” describes configuring it for Janus.
Install the database software
Users of Janus Lite can skip database installation instructions and proceed to installing the Janus software.
Instructions below are for installing SQL Server Express 2012 for Janus Standard or Janus Professional. Large
clients who have a paid full licensed Microsoft SQL Server, should consult with their database administrator
about possibly using that instead of SQL Express.
1. Run the installer for SQL Server Express 2012 (or the full SQL Server, if you prefer).
You do not need to check SQL Server Replication and LocalDB in the Features box.
Make sure you enable Mixed mode authentication.
Annexure 2 gives a step-by-step outline of the SQL Server Express installation with specific notes to
be aware of for Janus.
2. After installing SQL Server, start the SQL Server Configuration Manager and enable Named Pipes and
TCP/IP. This is described in Annexure 2 of this document, and in Microsoft's own documentation.
3. For Janus Professional, you may need to set SQL Server for allowing networked connections on SQL
Server. Microsoft suggests two options, one with the SQL Browser enabled, and one with the browser
disabled, depending on your security preferences. The browser version is shown in Annexure 2.
4. Make a note of the 'sa' user's password you used during install, as you will need this for Janus install.
Install the Janus software
1. Run the Janus software installer.
Separate installers are provided for:
* Janus Lite
* Janus Standard
* Janus Professional.
Nov 2014
Janus 4.0.0.9
Page 5
Janus installation manual
Janus Lite installs as 32-bit only. For Janus Standard
and Janus Professional, the 64 bit installers should be
used for fest performance. The 32-bit installers for
Standard and Professional are provided as backup only
as most Windows 7 and Windows 8 machines now are
fully 64 bit compatible.
Activate the desired installation software for your
product.
2. Check the box to accept the license agreement.
3. Janus Standard and Janus Professional require access to the local SQL Server instance.
Choose from the drop down list the instance to which access is required. Provide the login details and click
to test the connection.
Nov 2014
Janus 4.0.0.9
Page 6
Janus installation manual
If the connection succeeds, the red cross will be replaced with a green check and the “NEXT” button will
enable for you to proceed.
For Janus Professional client software you should specify the server's instance name where the Janus
database is located. If you connect to SQL Server Express, the typical SQL instance name is “<my
computer's name>\SQLEXPRESS”, e.g. “SHAKESPEARE\SQLEXPRESS” if your machine name is
“SHAKESPEARE”. Remote clients must specify the server's name to connect to.
Full SQL Server
Full SQL Server Named Instance OR
Default Instance
SQL Server EXPRESS
Comments
SHAKESPEARE
SHAKESPEARE\SQLEXPRESS
SHAKESPEARE\SQL2K8R2
Works for connections either on local machine, or
from a remote machine. (Recommended for Janus
Standard and Janus Professional)
(LOCAL)
(LOCAL)\SQLEXPRESS
(LOCAL)\MYNAMEDINSTANCE
local only, Suitable for Janus Standard.
.
.\SQLEXPRESS
.\MYNAMEDINSTANCE
local only
LOCALHOST
LOCALHOST\SQLEXPRESS
LOCALHOST\MYNAMEDINSTANCE
local only
The installer requires administrator authorisation for creating the Janus database, and to create a new login
for Janus 4. Thereafter Janus will login using the new Janus user. The 'sa' user credentials are not stored by
the installer or used in any way after installation.
Nov 2014
Janus 4.0.0.9
Page 7
Janus installation manual
Once the connection passes testing, the NEXT button enables and you can proceed.
The installer was not tested creating a database on a remote server. If you wish to do that, manually create
an empty database “Janus4” on the remote server. Then finish installing on the local machine (creating a
local database). Afterwards edit the connection string in the Janus config file to connect to the remote
machine. If the connection succeeds, Janus will start and the local database can safely be dropped.
4. Enter the name in which your license was issued, the list of scanners to be used in the software and the
software activation key.
Please obtain a valid license before installing, because the installer software checks the license before
allowing the install to continue.
If the details are not filled in automatically from the accompanied license file, then open the license with
Notepad and copy and paste into the installer. Any spelling differences (or upper/lower case) in the
organisation name or the scanners can invalidate the activation key.
Nov 2014
Janus 4.0.0.9
Page 8
Janus installation manual
5. You can usually accept the default path where Janus will be installed. Janus Standard and Janus
Professional are usually installed as 64-bit applications and install in c:\Program Files.
Janus Lite is a 32-bit application and installs in the 32-bit folder c:\Program Files (x86).
6. You can usually accept the default path where this software gets the scanner files. You will recognise this
is the same path that was set up in the ExIDDecoder tool. The path must be the same both in ExID and in
Janus. By default the path is c:\scannerdata.
Nov 2014
Janus 4.0.0.9
Page 9
Janus installation manual
7. Now you have a last chance to go back and review settings, or to click Next and proceed with the
installation.
8. Click “Install” to proceed with the installation.
As illustrated below, the Janus standard and the Janus professional also login to SQL Server during install to
create a database and user login credentials for the Janus user. If a failure occurs at this moment, it is
usually due to SQL Server not authorizing the user that was provided.
Nov 2014
Janus 4.0.0.9
Page 10
Janus installation manual
9. Once the installation is complete, you can click “Finish” to close the installer.
After installing the Janus software, it is necessary to configure the system according to your preferences,
Thereafter, some of those preferences will be applied to configuring the scanner for your particular needs.
Below, configuring the system is firstly described, and thereafter the scanner configuration.
Configure the Janus software
1. Run the Janus client. An icon is available on the Windows desktop to start Janus.
On first start, the Janus software will create the tables in the database.
2. Configure Janus.
You must be logged in as admin user to be able to configure Janus. Use the
userid and password that were provided to you with your user license.
Nov 2014
Janus 4.0.0.9
Page 11
Janus installation manual
Open the Configure screen
Capture users who may log in and provide restrictions on their use of the system.
(Janus Config screen, Users option)
Make sure that the administrator password is reserved only for one person in charge. Give each guard (or
all the guards as a group) their own user and password to the system.
You can also opt to give the guards no rights, so they cannot log in to special functions, and only the main
screen will be accessible to them.
Create a scanner config file (Janus Config screen, Scanners Option)
Depending on your needs, the scanners can be configured in several ways. The screen allows you to
configure the scanners for up to 6 workflows. The guards will be able to select different workflows using
the red scroll button on the scanner. For each workflow, the scanner will go through a sequence of steps to
scan or otherwise obtain required input.
Initially to get everyone used to the system, you may wish to program scanners for “Visitors” only, and later
as the guards, visitors and residents get better acquainted to the new process, you can re-program the
scanners for more elaborate processes.
Nov 2014
Janus 4.0.0.9
Page 12
Janus installation manual
You can set the “Workflow” to Visitor, Contractor, Pedestrian, or Resident. You can also change the names
of these “Workflows” to your needs, e.g. “personnel” instead of “residents” (if you run a business) or
“guests” for “visitors” (e.g. if you set this up for a hotel).
•
Visitor – processes related to visitors or guests arriving with vehicles.
•
Contractor – similar to visitor, except that you can optionally configure the scanners to
scan RSA ID barcodes for all passengers on entry (requires also scanning them on exit).
•
Pedestrians – RSA ID/personnel card is scanned instead of vehicle disk or driver license.
•
Residents – Process that saves time by scanning barcode (e.g. from a personnel card) on
entry and exit instead of vehicle license and driver license. Also no destination is captured
as these persons should be well known.
For every visitor, contractor or pedestrian workflow, you must set an ENTRY and an EXIT scan sequence.
The last items in each row select the process to follow for scanning; i.e. the sequence of steps that the
scanner will prompt the guard to follow. Select the option that corresponds to your requirements.
* SAVL: Scanner will ask guard to scan a vehicle license disk.
* SADL: Scanner will ask guard to scan driver license
* Destination can be captured in one of the following ways:
- scan barcode – print and laminate barcodes for each
place. Guard then scans the barcode.
- scanner menu – You load up to 15 place names to show
on a menu in the scanner. (see bottom of screen).
- scroll button – guard enters erf number by scrolling digits with the scanner keys.
- menu + number – use the 15 spaces at the bottom of the screen to define a scanner menu for up to 15
street names. Guard selects street, then toggles house number with the scanner keys.
Once you finished setting up the scanner, click the button to create a scanner config file. Save and replace
file c:\scannerdata\firmware\<scanner no>\scannerconfig.dat, where <scanner no> in the path is a
directory with the same name as the scanner serial number. Each scanner gets its own config file. This
button is disabled while you are still editing the data. Click the button with the check mark to commit
changes, then create the config file.
Nov 2014
Janus 4.0.0.9
Page 13
Janus installation manual
This configuration file must be loaded on the specific scanner for which it was prepared in Janus. See the
next main section in this document “Programming the scanner” for this part.
Options for capturing the destination (where visitors are going) on the scanner:
When you select the scanner workflow sequence (see above), you will be
able to select one of several options how the scanner records the
destination where the visitor is going. These destinations also have to be
captured in the Janus system.
The scanner sends a number to the system, and you use this screen to pair
that number with the description of the destination. This description is what
will appear on reports and on the Janus main screen.
In the destinations screen, match each code that can be sent from the scanner to the description you wish
to be shown on reports or on the Janus screen when such a destination was provided:
Use the Destinations screen to pair the code sent from a scanner to the description in the destinations
screen as follows:
Nov 2014
Janus 4.0.0.9
Page 14
Janus installation manual
* If you configure the scanner to get destinations from barcodes:
Configure workflow sequences that indicate the scanner will scan destinations from a barcode. On the
Janus software disk is a Microsoft Word document containing several barcodes. You can print the
document, and laminate the pages for scanning barcodes. For each destination, you must also create an
entry in the Janus Destinations Screen (see further below), using the same code as the barcode you
selected for the destination/address.
Prepare a document with Configure scanner
barcodes for the guards to
scan.
Janus Config:
Janus Config:
Scanners screen
Destinations screen
Select
sequences
destinations
Write or type the address
description under each barcode
so the guard can identify the
code to scan.
Configure the destination
in Janus
for
Scan destination:
Barcode Make sure you use the
same number as the
barcode so Janus can
match the barcode with
the address description
Code 10=”Privet Drive 4”
10
* If you configure the scanner to get destination by scrolling red button on scanner:
The scanner operator pushes the scanner's red button to scroll from 0...9 with the red scroll key on the
scanner, and a blue key to move to the next digit (numbers up to 999 can be captured). This saves time
as the guard does not need to fiddle with pages of barcodes. This also works well if the destinations are
school room numbers, building numbers or stand/erf numbers.
Configure scanner
Configure the destination in Janus
Janus Config: Scanners screen
Janus Config: Destinations screen
Select sequences for entering destinations via scanner scroll key.
Make sure you use the same number
as the number to enter so Janus can
match the number with the address
description
Code 11=”Room 11 - Dursley”
12
Code 12=”Room 12 - McGonagall”
Code 13=”Room 13 - Granger”
Nov 2014
Janus 4.0.0.9
Page 15
Janus installation manual
* Enter destination by menu on scanner:
The scanner can display a menu of up to 15 destinations, which you can configure with names such as
Admin, Workshop, Store Room, Shop, … etc. When the operator chooses an item, the scanner sends a
destination code ranging from 1...15 back to the server. In the Destination Screen, create items with
codes 1,...15 to match the menu items.
Configure scanner
Configure the destination in Janus
Janus Config: Scanners screen
Janus Config: Destinations screen
Select sequences for Menu destinations
Make sure you use the same
number as the menu item so Janus
can match the scanner's number
with the address description
Capture text to show in the menu:
Code 1=”Great Hall”
Code 2=”Dormitories”
Code 3=”Pavilion”
Select destination:
The code in the scanner
menu is sent to Janus and
should match a code in the
destinations screen.
1. Great Hall
Code 4=”Headmaster”
...etc...
* Enter destination by menu and number on scanner:
The scanner can display display a menu of up to 15 destinations, which can be used for street names or
building names. Once the guard selected that from the menu, the scanner then asks for a street number
(or use for a room number in the building) to be captured.
Configure scanner
Configure the destination in Janus
Janus Config: Scanners screen
Janus Config: Destinations screen
Select sequences for Menu destinations
[see next page]
Capture text to show in the menu:
Scanner first shows the menu.
Select destination:
1. Privet Dr
Scanner menu is limited, so use
abbreviated names on scanner
See next page for the second
Nov 2014
Janus 4.0.0.9
Page 16
Janus installation manual
Scanner sequence (continued)
Janus Config: Destinations screen
Make sure you use the same
number as the number sent from
Then it asks for street number and adds it to the menu selection scanner so Janus can match the
number
with
the
address
description
Scanner multiplies menu item with 10000.
Code 10001=”Privet Drive 1”
Code 10002=”Privet Drive 2”
Code 10003=”Privet Drive 3”
Code 10004=”Privet Drive 4”
Menu 2 “Diagon Alley” becomes 2 x 10000 = 20 000.
Add 12, and scanner sends number 20012 to represent the
address “Diagon Alley 12”
...
Code 20001=”Diagon Alley 1”
Code 20002=”Diagon Alley 2”
Code 20003=”Diagon Alley 3”
Code 20004=”Diagon Alley 4”
...
Code 20012=”Diagon Alley 12”
Capture names of allowed pedestrians.
The Pedestrians configuration screen is used to configure regular pedestrians who are allowed, e.g.
domestic workers, gardeners and other people who enter the estate by foot.
Configure scanner
Configure pedestrians in Janus
Janus Config: Scanners screen
Janus Config: Pedestrians screen
Select whether the pedestrian is scanned by RSA ID number, or Make sure you use the same RSA ID or
whether these persons have a personnel card which is scanned. barcode as will be scanned.
7105283082001=”Mr TST Pedestrian”
9018275432006=”Mr. Pedestrian”
Janus will flag alerts if a pedestrian is scanned who is not in the list – treat as attempted security breach.
Nov 2014
Janus 4.0.0.9
Page 17
Janus installation manual
Capture names of allowed residents or personnel.
The Residents configuration screen is used to configure residents who are allowed, e.g. home owners,
rental residents, etc. If you configure Janus for a business, you can rename “Residents” in the “Workflow”
tab to “Personnel”. Then use this for access control on personnel.
Configure scanner
Configure residents or personnel in
Janus
Janus Config: Scanners screen
Janus Config: Residents screen
Select a workflow for scanning residents. The assumption is that Make sure you use the barcode ID as
a resident card (or personnel card) is scanned. The SAVL and will be scanned for the resident.
SADL scans are not performed when they enter.
001=”Mr H Owner”
Janus will flag alerts if a resident is scanned who is not in the list – treat as attempted security breach.
Capturing persons not allowed in the estate
Capture the RSA ID number of persons who are not allowed in the estate. When this ID is scanned in a RSA
Driver License or RSA ID Book, Janus will flag alerts. Treat as an attempted security breach.
Capturing vehicles not allowed in the estate
Capture the registration no of vehicles not allowed in the estate. When this registration number is scanned
in a SAVL scan, Janus will flag alerts. Treat as an attempted security breach.
Nov 2014
Janus 4.0.0.9
Page 18
Janus installation manual
Programming the scanner
1. Ensure the scanner config file you created, is located in c:\scannerdata\firmware\<scanner ID\>. You
should see the following three files in Windows Explorer:
There should exist separate subfolders for each scanner. You can configure them differently (e.g. one
starting up with “Entry” and one starting up with “Exit”, or scanners dedicated to either visitors with
vehicles vs pedestrians). In each scanner folder should exist Janus.pcx and script.ncd. Use Janus Scanners
config screen to create a JanusCfg.dat for each folder.
2. Start the ExID Decoder Setup. It should have an icon on the desktop. For more information, see the ExID
software documentation.
3. Plug in the scanner. The ExID Decoder Setup will display the screen below. Note the option to
automatically update the firmware should be unchecked.
* Double-click the “User Directory” edit box. Select the path (see paragraph 1 above) for the specific
scanner that is now connected.
* Click “Program user dir” : this will load your Janus config settings on the scanner. It will also
program the scanner for access control with the Janus system.
* Click the Configure Button.
The Excellent ID installation manual describes how to configure a scanner, and the instructions
there should be followed. The notes below just outline the specific settings required for operation
with Janus.
Nov 2014
Janus 4.0.0.9
Page 19
Janus installation manual
- Disable menu. You can enable while testing and installing the system, but disable it before
deploying the scanner for use.
- Enable SA Identity numbers, as these are used as backup when driver license is not presented.
RSA ID are also used for pedestrian scans.
- Enable Wifi settings.
Nov 2014
•
SSID is the wifi SSID that you provided when you set up your wifi access point. It should
appear in the drop-down box when your network is correctly set up and the wifi is on.
•
Encryption type should match what you configured for security in your wifi setup.
•
Key is the password you typed when you configured your wifi access point security.
•
Server is the IP address of the computer where the Excellent ID software is installed.
•
Port is always set at 7509.
•
Fixed IP address is an IP address that we provide for the scanner. We usually follow a
convention to use the same network IP as the server (in this illustration 192,168,1,xxx)
where xxx is then the last two digits of the scanner ID. So if your scanner ID is
eID20521, we set its IP address to 192.168.1.21, assuming that the scanner ID's you
purchased, do not overlap in their last digits. So each scanner gets its own unique fixed
IP address on the network.
Janus 4.0.0.9
Page 20
Janus installation manual
4. Start the Janus software.
5. Do a few test scans and check that the scans are processed.
--------------------o0o--------------------
Nov 2014
Janus 4.0.0.9
Page 21
Janus installation manual
Annexure 1. Checking the Windows firewall
The ExcellentID software requires rules on the Windows firewall to ensure that messages from scanners are
not blocked by the firewall. The ExcellentID manual describes the setup of the firewall in detail. These
instructions are intended for Janus troubleshooting and do in no way replace the ExcellentID manual.
Firewall setup for excellent ID Service
The Windows Firewall is activated by the Windows Control Panel, and at the bottom, select “Windows
Firewall”.
After a successful installation as per the ExcellentID manual, you can verify the firewall is configured
correctly by the following steps: Select “Allow an app or feature through Windows Firewall”.
The “eSkan.Service” should display with tick marks both on Private and Public, as shown below.
Nov 2014
Janus 4.0.0.9
Page 22
Janus installation manual
If this does not appear, install by clicking on “Allow another app” and choosing the eSkan.Service program
as described in the ExcellentID installation manual.
You can also inspect the inbound rules list in the firewall. When the Windows firewall starts, select
“Advanced settings”.
Several duplicate entries for eSkan Service
and the eSkan decoder (as shown on the
right) can be cause for disabled wifi
communication.
They can be safely deleted and replaced
either by installing as described above, or
with the port entry described below.
Firewall exclusion based on Port number only:
Start the Windows Control Panel, and select Firewall.
Nov 2014
Janus 4.0.0.9
Page 23
Janus installation manual
Click “Advanced settings” in the Firewall.
Click Inbound Rules, then select “New Rule”
Select to create a rule based on a TCP/IP port.
Nov 2014
Janus 4.0.0.9
Page 24
Janus installation manual
Provide the port for the ExID Communications Service. Confirm it shows in the ExID Decoder Service sreen.
Start the ExIDDecoder Service and confirm the communication service is configured with port number
7509.
Nov 2014
Janus 4.0.0.9
Page 25
Janus installation manual
Back in the firewall wizard, choose the option to allow this connection:
Then set the firewall to open this port on private, public and domain networks:
Lastly, provide a name for this rule (text that will appear in the firewall list of rules). It is optional to provide
a description to remind the network administrator why the port was opened.
Nov 2014
Janus 4.0.0.9
Page 26
Janus installation manual
Firewall setup for Janus
When Janus is started the first time, Windows will ask the user if the firewall may allow Janus. The user
should allow this. Windows then automatically creates an entry for Janus on the local firewall.
To inspect this setting, activate the Windows Control Panel, and at the bottom, select “Windows Firewall”.
Then select “Allow an app or feature through Windows Firewall”. The screen should show Janus in the list.
If you have a network-based firewall, and the Janus Professional configuration, you may need to open the
port for Janus Controller manually. By default this port is 8004. The port is configurable in the SETTINGS
table in the Janus database as CONTROLLERPORT. This port can be changed, but all Janus products on the
network then have to be restarted.
You can also manually open this port as described above for the ExID Communications service.
Nov 2014
Janus 4.0.0.9
Page 27
Janus installation manual
Annexure 2. SQL Server Express installation instructions
SQL Server Express is a product from Microsoft. The instructions below are provided as a quick guide for
installing SQL Express for use with Janus. Please consult Microsoft's manuals and theird online MSDN
documentation for a complete reference.
Installing SQL Express for use with Janus
Start the program SQLEXPRWT_x64_ENU.exe. This is a 64-bit installer, and should be compatible with most
machines running Windows 7 or Windows 8. Use of 32-bit installs are therefore no longer necessary.
The installer may take a while to start. Patiently wait for the screen illustrated below to appear.
Choose the option “New SQL stand-alone installation or add features to an existing installation”.
The SQL Server installer will try to upgrade itself via an Internet. In many cases the computers used for
Janus are not enabled for Internet access, and the SQL installer will display the warning below.
Just ignore this warning and click Next to continue; or establish a temporary Internet link and click “check
again”. The upgrade may take a while to complete and is not covered in this guide. Consult Microsoft for
more information on such upgrades.
The installer then checks whether an existing SQL Server instance is already present on the computer. If
such existing instance is present, you will most likely be able to cancel the install and just use the existing
instance. However in cases where such existing instance is very old, compatibility issues, or performance
may dictate that you could decide to install an instance dedicated to Janus only.
Nov 2014
Janus 4.0.0.9
Page 28
Janus installation manual
In this process, the installer may also stop and require that you first install certain other software on which
SQL Server Express 2012 is dependent. You will only be able to continue if such dependencies are installed.
Click NEXT to continue.
Check the boc to accept the Microsoft license terms for their software, then click NEXT to continue.
Nov 2014
Janus 4.0.0.9
Page 29
Janus installation manual
The Feature Selection screen is displayed next:
Uncheck the SQL Server Replication and the LocalDB boxes. These are not used by Janus.
Check Database Engine Services, Management Tools, and SQL Client Connectivity SDK.
Accept the default instance name that Microsoft provides, usually “SQLEXPRESS”. Select “NEXT”.
Accept the default Server Configuration settings, and select “NEXT” to continue.
Nov 2014
Janus 4.0.0.9
Page 30
Janus installation manual
In the Database Engine configuration screen, make sure that you select “Mixed Mode”.
Provide a password for the “sa” user.
Make a note of the “sa” password that you provide here, as you will have to enter this in the Janus install.
Click “NEXT” to continue.
Hereafter, accept the default settings on all the following screens and let the installation continue.
The install itself may take a while. Do not panic if the progress is standing still for a considerable time, it is
busy in the background.
Configuring SQL Express for use with Janus
In Windows 7 you will find the SQL Server Configuration Manager
in Start, Programs, SQL Server 2012
Nov 2014
Janus 4.0.0.9
Page 31
Janus installation manual
In Windows 8, click Start, and scroll through the tiles
for apps till “S” where you will find SQL Server, as
illustrated on the right.
Activate the program:
“SQL Server Configuration Manager”
Once the SQL Server Configuration Manager started, enable TCP/IP and Named Pipes.
After enabling TCP/IP and Named Pipes, stop SQL Server, wait a few seconds and start it again so it can
apply the changes.
Nov 2014
Janus 4.0.0.9
Page 32
Janus installation manual
Allowing remote connections to SQL Server (Janus professional only)
When you install SQL Server Express, the default settings will only allow programs on the same server or PC
as the SQL Server instance to connect. With Janus Professional installations, we allow someone on another
computer to connect. This requires some changes to SQL Server Express.
We describe here the SQL Server browser method to gain such access. Microsoft also provides alternative
means, so you should consult your network administrator or database administrator or the Microsoft
documentation for remote access on SQL Server before making any changes.
1. Enable TCP/IP and Named Pipes on the network
As described above, only localTCP/IP and named pipes were enabled. Now you will in addition also have to
expand the SQL Server Network Configuration and enable TCP/IP and Named pipes there as well.
2. Turn on the SQL Server Browser.
Using the same SQL Server Configuration Manager that we used to enable TCP/IP, double-click on the SQL
Server Browser, as shown in the illustration below.
In the window that then appears, select the “Service” tab, and then enable the service to start
automatically when the machine starts up.
Nov 2014
Janus 4.0.0.9
Page 33
Janus installation manual
Then right-click on the SQL Server Browser line in the configuration tool, and in the popup menu select
“Start”. The display should change from “Stopped” to “Started”.
3. Allow SQL Server through the Windows Firewall
* Start the Windows Control Panel, and at the bottom select “Windows Firewall”.
* Click “Allow a program through Windows Firewall”.
* Click “Allow another program”.
* Browse to sqlsrvr.exe [usually in C:\Program Files\Microsoft SQL Server\MSSQL11.SQLEXPRESS\MSSQL\
Binn]. This location will vary, depending on the instance name you used during install, and also depending
on the version of SQL Server.
4. Allow SQL Server Browser through the Windows Firewall
* Start the Windows Control Panel, and at the bottom select “Windows Firewall”.
* Click “Allow a program through Windows Firewall”.
* Click “Allow another program”.
* Browse to sqlbrowser.exe [usually in C:\Program Files (x86)\Microsoft SQL Server\90\Shared, also for 64bit installations].
Nov 2014
Janus 4.0.0.9
Page 34
Janus installation manual
Annexure 3. Setup of wifi with the Ubiquity Picostation M2 HP
Connecting
You
will
need
two
Ethernet cables (Cat-5) that are not supplied with the unit.
Connect one to POE socket on the black box, other end into the unit.
Connect other cable to LAN socket on black box, other end goes to PC (or a switch on the network).
PC Setup
Select Control Panel,
then network setup.
Give the PC a static IP
address, and fill in the
Subnet mask. For a single
PC and Wifi, leave the
gateway and DNS blank
If you have a network
with a gateway and a DNS
server, then your IT
department or your
network administrator will be
able to give details for those.
Then still a fixed IP for the PC
is required.
Nov 2014
Janus 4.0.0.9
Page 35
Janus installation manual
Therefore, we set the following IP addresses for the PC:
* PC must have a static IP address, use 192.168.1.100
* PC Subnet mask must be 255.255.255.0
Picostation setup
Start Internet Explorer, point its address to the Picostation, i.e. http://192.168.1.20
If the browser warns about a security certificate, select to continue.
Type the userid and password at the Picostation login window.
Default username: ubnt
Default password: ubnt
The screen may also ask to
select your country and to
accept terms and conditions.
Click login to access the
configuration screen.
Nov 2014
Janus 4.0.0.9
Page 36
Janus installation manual
Select the leftmost tab on the top, left.
The AirMax setting must be disabled. Click “change” to save settings for this screen.
After clicking “Change”, you will notice a bar on which you must click “Apply”. Make sure you remember to
the “apply” button after “change”, else the changes can be lost.
Go to the “wireless” tab and set the Wifi settings as per the diagram below.
If the drop-down boxes are empty, your web browser's javascript feature is probably off. Temporarily
enable javascript in the browser until the Picostation has been set up. After changing the wifi settings,
remember to click both the “change” button at the bottom and “Apply” at the top.
Nov 2014
Janus 4.0.0.9
Page 37
Janus installation manual
Thereafter click on the network tab.
Nov 2014
Janus 4.0.0.9
Page 38
Janus installation manual
REMEMBER TO CLICK “CHANGE” AT BOTTOM THEN “APPLY” AT TOP OF SCREEN,
Go back to the first screen (leftmost tab) to check again that the “Airmax” setting is indeed off, as we
described earlier.
On SYSTEM screen: enable the reset button (in case unit has to be reset), and disable Check for Updates.
Scanners can be programmed as follows (see eID manual for full instructions)
--------------------o0o--------------------
Nov 2014
Janus 4.0.0.9
Page 39