1
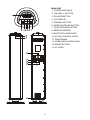
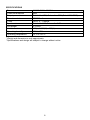
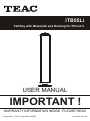
iTB55Li Tall Boy with Bluetooth and Docking for iPhone 5 USER MANUAL IMPORTANT ! WARRANTY INFORMATION INSIDE. PLEASE READ Trademark of TEAC Corporation JAPAN www.teac.com.au WARRANTY PROCEDURE v1.5.2: DEC 2011 Please read the owner’s manual carefully and ensure that you have followed the correct installation and operating procedures. 1. 2. 3. Please read this warranty card. Keep your purchase receipt to enable you to proceed quickly in the event of a Warranty Service. If you require Warranty Service, please contact the TEAC Customer Support Hotline at 1300 553 315 for assistance. Please ensure that you have the model number, serial number and purchase receipt ready when you call. Please complete the section below and keep this information for your own records. Owner’s Name Owner’s Address Postcode Model Name/No. Serial No. Dealer’s Name Dealer’s Address Postcode Authorised Service Centres in Major Australian Cities NSW 151 Arthur Street Homebush West, NSW 2140 Queensland Unit 1, 320 Curtin Ave West Eagle Farm, QLD 4009 South Australia 11 McInnes Street Ridleyton, SA 5008 Victoria 282 Normanby Road South Melbourne, VIC 3205 Western Australia Unit 2, 50 Pilbara Street Welshpool, WA 6106 Thank you for selecting a TEAC product . If you should require assistance with your product regarding its setup or operation, or if any difficulties arise, please call us directly for advice between Monday to Friday at 8.30AM – 6PM AEST at the TEAC Customer Support Hotline 1300 553 315 [email protected] www.teac.com.au WARRANTY INFORMATION v1.5.2: DEC 2011 Our goods come w ith guarantees that cannot be excluded under the Australian Consumer Law . You are entitled to a replacement or refund for a major failure and for compensation for any other reasonably foreseeable loss or damage. You are also entitled to have the goods repaired or replaced if the goods fail to be of acceptable quality and the failure does not amount to a major failure. Warranty Terms & Conditions 1. TEAC warrants that this product is free from defects in material and workmanship under normal domestic use with reasonable care and skill. Maintenance and cleaning (i.e. laser head) is not covered by this warranty. The TEAC warranty only applies to TEAC products purchased, used and serviced in Australia. 2. The benefits to the consumer given by this Warranty are in addition to other rights and remedies of the consumer under a law in relation to goods or services to which the warranty relates, being the Australian Consumer Law. 3. Refund or replacement via your retailer is available for a period of 14 days after purchase for goods that have been inspected and determined to have a major failure. Refund and exchange is not applicable for change of mind. 4. Subject to the terms herein, this warranty effectively covers the equipment as specified in the Warranty Periods Table below from the date of purchase. TEAC PRODUCT LED/LCD TV 32” (80 cm) and above All other TEAC products 5. WARRANTY PERIOD 1 Year (In-Home Service/ Pick up Available)* 1 Year (Carry-in Service) In Home Service/Pick up* Service This service will only be provided as part of this warranty if all the following conditions are met; a) The product is indicated in the Warranty Period Table. b) The product is within the warranty period. c) The product is located within the normal service area of the local TEAC Authorised Service Centre. If TEAC determines that the product is not repairable on site, TEAC can complete the repair by taking the product to a TEAC Authorised Service Centre. Carry-in Service Where In-Home service/Pick up* is not available, the purchaser is required to send the product to the nearest TEAC Authorised Service Centre for repair. In this event, proof of purchase is required to support a warranty claim. After the repair, the product will be available for collection by or return to the purchaser at a fee upon request. TEAC inhome service can be made available at a fee upon request. 6. A 12-month replacement warranty is applicable to all Accessories such as Remote, Power Adaptors and Cables. 7. TEAC will ensure to the best of its abilities that all required parts are made available for any required service/repair. 8. TEAC Australia Pty Ltd and its Authorised Service Centres will use their best endeavours to complete product repairs within a reasonable period based on available resources and workload during the time when service is requested and performed. 9. Refurbished parts may be used to repair the product. In the case of a replacement, the product may be replaced, with a refurbished unit of the same type or, if one is unavailable, a similar refurbished model with equal or better features & specifications. 10. Please be advised that if the product presented for repair is capable of retaining user-generated data, the data may be lost during servicing. Customers are strongly encouraged to back up all important information/data before sending the product in for service/repair. 11. Service will be provided only during normal business hours and under safety conditions and circumstances. TEAC and its authorised service agents can refuse any repair if safety, in relation to OH&S, becomes a concern to its staff or authorised service agents’ personnel. 12. The warranty is void and warranty claims may be refused, subject to the Australian Consumer Law, if: a) The product was not transported, installed, operated or maintained according to manufacturer instruction, or b) The product was abused, damaged, tampered, altered or repaired by any unauthorised persons, or c) Product failure is due to accidents during use, installation or transit, power surges, use of defective or incompatible external devices, exposure to abnormal conditions such as excessive temperatures or humidity, or entry of liquids, objects or creatures into the product. 13. No one is authorised to assume any liability on behalf of TEAC or impose any obligation on it, in connection with the sale of any equipment other than as stated in this warranty and outlined above. 14. TEAC reserves the right to inspect and verify whether the product is exhibiting a major failure as claimed by customers/retailers. 15. LCD dead pixel policy, please contact TEAC Customer Support Hotline on 1300 553 315 for assistance. IMPORTANT SAFETY INSTRUCTIONS • Always read the safety instructions carefully. • Keep this User Manual for future reference. • Keep this device away from humidity. • Lay the equipment on a stable flat surface before setting it up. • Do not place the equipment on soft furnishings. • If any of the following situation arises, get the equipment checked by a service technician: The equipment has been exposed to moisture. The equipment has been dropped and damaged. The equipment has obvious signs of breakage. The equipment has not been working well or you cannot get it to work according to the User Manual. • To prevent the risk of electric shock, do not open the cover or the back of the receiver. Only authorized service personnel may disassemble or repair the equipment. • The equipment shall not be exposed to dripping or splashing and that no objects filled with liquids, such as vases, shall be placed on the equipment. • When the mains plug is used as the disconnect device, the disconnect device shall remain readily operable. To completely disconnect the power input, the mains plug of the apparatus shall be disconnected from the mains completely. • No naked flame sources, such as lighted candles, should be placed on the apparatus. • Allow a minimum distance of 2.0cm around the equipment for sufficient ventilation. The ventilation should not be impeded by covering the ventilation openings with items, such as newspapers, tablecloths, curtains, etc. • Do not block the ventilation holes of the equipment. Leave appropriate gap above and around it to allow for adequate ventilation. • Do not place the equipment in an unventilated cabinet or on top of a unit that emits heat. • To reduce the risk of fire or electric shock, do not expose the equipment to any liquids or extreme heat. • The equipment is suitable for use in tropical and/or moderate climates. • Dispose of batteries in an environmentally responsible manner. CAUTION: Danger of explosion if the battery is incorrectly replaced. Replace only with the same or equivalent type. The battery shall not be exposed to excessive heat such as sunlight, fire or the like. The marking plate is located at the back of the apparatus. ACCESSORY LIST 1. Remote control 2. Battery for remote control: CR2025 x1 3. L/R audio cable 4. User manual 1 MAIN UNIT 1. iPOD/iPHONE DOCK 2. VOLUME +/- BUTTON 3. SOURCE BUTTON 4. LCD DISPLAY 5. STANDBY BUTTON 6. PAIR/PLAY/PAUSE BUTTON 7. TUNE UP/DOWN BUTTON 8. REMOTE SENSOR 9. BLUETOOTH INDICATOR 10. AUX IN L/R AUDIO JACKS 11. FM ANTENNA 12. 3.5MM LINE IN AUDIO JACK 13. RESET BUTTON 14. AC CORD 2 2 4 1 3 5 6 7 8 9 11 REMOTE CONTROL 1. STANDBY BUTTON 2. DIMMER BUTTON 3. SOURCE BUTTON 4. REPEAT BUTTON 5. MENU BUTTON 6. CLOCK SYNC BUTTON 7. NAVIGATION UP BUTTON 8. TUN-/iPOD- BUTTON 9. NAVIGATION DOWN BUTTON 10. STOP BUTTON 11. VOLUME+ BUTTON 12. TREBLE +/- BUTTON 13. VOLUME- BUTTON 14. NUMBER BUTTONS 15. ST BUTTON 16. SLEEP BUTTON 17. MUTE BUTTON 18. RANDOM BUTTON 19. TIME SET BUTTON 20. CLOCK VIEW BUTTON 21. TUN+/iPOD+ BUTTON 22. ENTER BUTTON 23. PAIR/PLAY/PAUSE BUTTON 24. BASS +/- BUTTON 25. MEM+ BUTTON 26. MEM- BUTTON 27. MEMORY BUTTON 16 17 18 19 20 21 10 22 23 12 24 13 14 15 25 26 27 REMOTE CONTROL BATTERY INSTALLATION If the remote control does not have a battery installed or the emitted Infra-Red signals are becoming weak, install/replace a new CR2025 battery. 1. Turn the remote control over and pull out the battery tray. 2. Place a new CR2025 battery onto the tray, with the flat side on top. 3. Push the battery tray back into place securely. POWER SUPPLY Connect power to the unit by plugging the AC power plug into a wall power socket. NOTE: If there is no audio input signal to the unit, it will enter Standby Mode automatically after one hour. (Does not apply to FM Radio Mode) Once the unit is connected to the main power, it will enter Standby Mode directly. The clock numbers will flash on the LCD display. AUTO TIME SYNCHRONIZATION Clock synchronization starts automatically during the first docking after the unit has just been connected to AC power supply. After the first docking, it is necessary to press the CLOCK SYNC button on the remote to conduct clock synchronization. 3 MANUAL TIME SETTING 1. In Standby Mode, press the TIME SET button on the remote, or press and hold the PAIR/PLAY/PAUSE button on the unit. The hour will flash on the screen with "CLK" showing on the screen. 2. Use the TUNE UP/DOWN button on the unit or the TUN+/- button on the remote to adjust the hour. 3. Press the TIME SET button or the PAIR/PLAY/PAUSE button to confirm your adjustment. The minute will start blinking on the screen. 4. Press the TUNE UP/DOWN button or the TUN+/- button to set the minute accordingly. 5. Press the TIME SET button or the PAIR/PLAY/PAUSE again to confirm your setting. 6. During playback, press the CLOCK VIEW button on the remote to check the current time. Press the button again to return to the previous display. NOTE: The time can only be set in Standby Mode. SLEEP TIMER SETTING The Sleep Timer can be set when the unit is powered on: 1. Press the SLEEP button on the remote control repeatedly to cycle through the sleep time options: 90 80 70 60 50 40 30 20 10 OFF 2. Proceed to play your music. Once the sleep time is expired, the unit will switch off automatically. NOTE: To check the remaining sleep time, press the SLEEP button once during playback. iPOD/iPHONE DOCKING 1. Dock the iPod/iPhone onto the unit. Press the SOURCE button repeatedly to switch to iPod mode. 2. Press the PAIR/PLAY/PAUSE button to start or pause the playback. 3. Press the TUNE UP button on the unit or the TUN+/iPod+ button on the remote to skip to the next track; press and hold to fast forward. 4. Press the TUNE DOWN button on the unit or the TUN-/iPod- button on the remote to skip to the previous track; press and hold to fast rewind. 5. Press the MENU button on the remote to return to the iPod menu, press the navigation UP/DOWN buttons on the remote to select your desired track for playback, press the ENTER button on the remote to confirm. 6. Press the RANDOM button on the remote to enable or disable the shuffle function. 7. Press the REPEAT button on the remote repeatedly to cycle through the repeat options. NOTE: The 8-pin Lightning Dock is compatible with Apple products that use this dock (iPhone 5, iPod Touch 5 and iPod nano 7). To use older 30-pin Apple models with this dock, please purchase a dock adapter from your local supplier. BLUETOOTH WIRELESS OPERATION This unit can receive stereo audio signal from a Bluetooth stereo audio source device. 1. Switch to Bluetooth Mode by pressing the SOURCE button repeatedly. 2. The Bluetooth LED indicator will blink blue when the unit is ready to pair. 3. Enable Bluetooth on your audio source device and scan for available Bluetooth devices. 4. Pair and connect to the iTB55Li on the Bluetooth audio source device. If prompted for a passcode, enter “0000”. When pairing is successful (the LED indicator will stop flashing), you are ready to stream music wirelessly. 4 5. Press the PAIR/PLAY/PAUSE button to pause/resume the playback. 6. During playback, press the TUNE UP/DOWN button on the unit or the TUN+/- button on the remote to skip to the next or previous track. Press and hold the TUNE UP/DOWN button or the TUN+/- button to fast forward or rewind on the current track. Note: Pairing mode is canceled after about 1.5 minutes if pairing has not been completed. For more specific instructions on Bluetooth connectivity for your audio source device, please consult your manufacturer’s manual. After the first connection, the unit will detect your last paired Bluetooth device and connect to it automatically. RECONNECTING VIA BLUETOOTH If an audio source device is already paired with the iTB55Li, but became disconnected even with both devices turned on, reconnect them by doing the following: 1. Press and hold the PAIR/PLAY/PAUSE button. The Bluetooth LED indicator will blink for about 1.5 minutes while it is ready for reconnection. 2. Scan for Bluetooth devices on the audio source device and select iTB55Li on the list. The LED Bluetooth indicator will stop blinking when the iTB55Li and the device have been reconnected successfully. FM RADIO OPERATION 1. Switch to TUNER (RADIO) Mode by pressing the SOURCE button repeatedly. 2. Press the TUN UP/DOWN button on the unit or the TUN+/- button on the remote to manually adjust the frequency. Press and hold the TUN UP/DOWN or TUN +/- buttons to auto scan for radio stations by tuning forwards or backwards respectively. (When an available station is found, the unit will broadcast it immediately and auto scan will be stopped). 3. In Tuner Mode, it is possible to tune into a specific frequency using numeric buttons on the remote control. For example, press buttons 8, 9 and 8 to get to 89.8 MHz. If the numbers keyed in are not in the valid frequency range, "ERROR" will display on the screen. 4. During radio playback, press the ST button on the remote to switch between FM STEREO and FM MONO modes. FM MONO may improve sound quality if the reception is poor. NOTE: If the FM signal is weak or if there is background static noise, extend the FM antenna and move it to find the best reception. SETTING UP RADIO STATION PRESETS 1. During playback, press and hold the PAIR/PLAY/PAUSE button on the unit or press the MEMORY button on the remote for storing the current station until a memory cell number flashes on the screen. 2. Use the TUN UP/DOWN button on the unit or the MEM+ or MEM- button on the remote to select the corresponding memory cell for storing the station. 3. Confirm your selection by pressing the PAIR/PLAY/PAUSE button or MEMORY button. 4. During radio playback, press the PAIR/PLAY/PAUSE button on the unit or the MEM+/button repeatedly to recall the stored stations. 5 MUTE THE UNIT During playback, press the MUTE button on the remote to mute audio output. Press the button again to resume audio output. VOLUME LEVEL/TREBLE/BASS ADJUSTMENT Press the VOLUME +/- button to adjust the volume. Press the TREBLE +/- button to adjust the treble effect or BASS +/- button for bass effect. RESET BUTTON In the event that the iTB55Li stops working correctly, you can use a toothpick or a similar small, slender implement to poke the RESET button at the rear of the unit to turn it off automatically. After the unit is rebooted, it should return to normal operation. DIMMER Press the DIMMER button on the remote to adjust the backlight strength of the LCD screen. CONNECTING TO OTHER APPLIANCES CAUTION: Always turn the power off when making or changing cable connections. AUDIO IN 1. Connect the AUX IN jacks on the unit to an external audio source, for example, a DVD player using the L/R audio cable (included). 2. Press the STANDBY button to turn the unit on. 3. Press the SOURCE button repeatedly to switch to AUX Mode. 4. Start and control playback using the external audio source. 6 LINE IN To connect the unit to an external audio source (eg. MP3 player): 1. Use an audio cable with 3.5mm plugs to connect the audio source’s audio output jack with the iTB55Li’s LINE IN jack. 2. Press the STANDBY button to turn the unit on. 3. Press the SOURCE button repeatedly to switch the unit to LINE IN Mode. 4. Start and control playback using the external audio source. TROUBLESHOOTING Symptom Radio sound is poor and distorted. Possible Cause 1. The station is not tuned in. 2. The signal is poor. No radio sound. 1. The unit is not in Tuner Mode. 2. The volume has been muted or is on the minimum setting. The iPod/iPhone will not play through the iTB55Li speakers. 1. The unit is not in iPod Mode. 2. The iPod/iPhone is not connected correctly. No iPod/iPhone sound. 1. The unit is not in iPod Mode. 2. The volume has been muted or is on the minimum setting. No sound in Bluetooth Mode 1. The Bluetooth device is not paired with the unit. 2. The volume has been muted or is on the minimum setting. 7 Solution 1. Fine tune the station. 2. Reposition the unit or the FM antenna. 1. Press the SOURCE button repeatedly to switch to Tuner Mode. 2. Adjust the volume level or press the MUTE button to resume audio. 1. Press the SOURCE button repeatedly to switch to iPod Mode. 2. Reconnect the iPod/iPhone. 1. Press the SOURCE button repeatedly to switch to iPod Mode 2. Adjust the volume level or press the MUTE button to resume audio output. 1. Follow the instructions to pair the Bluetooth device to the unit. 2. Adjust the volume level or press the MUTE button to resume audio output. SPECIFICATIONS Power source Power consumption Output power Remote control Tuner Speaker size Unit weight Unit dimensions Operating humidity Operating temperature AC 100-240V~ 50/60Hz 60W Treble: 2 x 10W, Subwoofer: 30W (Total: 50W RMS) CR2025 x 1 FM 87.5 – 108MHz Treble: 2 x 2.5”, Subwoofer: 3.5” 3.704 kg 199(L) x 172(W) x 835(H) mm 10% to 75% +5°C to +35°C * Weight and dimension is only approximate * Specifications and design are subject to change without notice. 8 TEAC CUSTOMER SUPPORT HOTLINE (TCS) 1300 553 315 Between Monday to Friday – AEST 8.30AM to 6PM