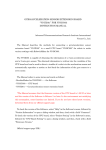
1
KTX – PC User Manual KumoTek 06/25/2010 Tech Support Masahiro Ishida 1 Introduction Thank you for purchasing KTX-PC from us. This Manual explains how we treat this robot and its accessories. Please read this manual before you break your robot. This Manual describes basic use of this robot. Please refer to the other detailed manuals and tutorials for more detailed information. 2 Safety Robot has tremendous power on each servo mounted on his joints, and improper use of the robot may result in serious injuries. Please follow safety issues below. <!> Please hold his body, instead of holding his arms or legs, when the robot is powered up. <!> Do not operate the robot in front of small children. <!> Do not apply any water on its body. It may case short, fire, or electric shock. <!> Do not place any unspecified metal parts into his body. It may case short, fire, or electric shock. 3 Features and Specification 3.1 Name of the Components and Features (Front) 3.2 Name of the Components and Features (Top View) 3.3 Specification Size Weight 20 Degree of Freedom Servo Motor Main CPU Memory Storage Secondary CPU Sensor Exterior Speaker Battery Supported Interface Supported Operating System 390(H)×225(W)×115(D)mm 2.2kg Head (2), Arms (6), Legs (12) VS-S092j x 18, VS-S281 x 2 PICO820 (Intel Atom Z530 1.6GHz) PICO820 (Intel Atom Z530 1.6GHz CF Flash Memory 8GB VS-RC003HV (ARM7 60MHz) USB Camera, VS-IX001 (2 axel gyro sensor and 3 axel accelerometer Shock-absorbing material Mono Speaker 7.2 V Ni Battery, PC board Power Adapter 2 USB 2.0 port, 1 VGA, 1 LAN, 1 Speaker, 1 Microphone XP/Vista/Win7(Partial), Linux 3.4 Joints 4 Parts and Accessories Robot Ni Battery (2 Pack) Ni Battery Charger Battery and Charger Cable USB Communication Cable Wireless Controller VS-C1 PC Power Adapter CF Flash Memory (Inside Robot) SO-DIMM1GB (Inside Robot) CD (Manual, RobovieMaker2, Sample Software) PC Board Accessories USB Camera Accessories 5 Hardware 5.1 Battery 5.1.1 Charging Battery Please follow the step below for charging a battery. 1) Connect battery charger to wall power supply <!> Make sure that no battery is connected to the charger 2) Connect battery to the charger by using connection cable. The LED will turn into red. <!> It will take about 2 hours to recharge the battery <!> If you charge a battery while it still has power left, you may lose some capacity of your battery. <!> Please keep your eyes on your battery and charger while you are charging the battery. <!> Make sure there is no flammable materials or fire around battery or charger. 3) After battery is fully charged (LED turns into Green), unplug the battery. Then, unplug the charger from wall power adapter. 5.1.2 Connecting Battery to Robot 1) Open front panel of the robot by unscrewing two screws holding the panel. You can open the panel without completely removing the screws. 2) Install 2 fully charged batteries. Connect battery cable to the white connecter on the left inside body. <!> Please remove the batteries after the use. 5.2 Connecting Hardware to the PC Board 5.2.1 PC Board Power Adapter You can use PC board Power supply adapter to power the PC board and servo control board. In this case, you will not be able to run the servos off of this power supply. 5.2.2 Connecting USB Devices, Display, and LAN Cable You can connect up to 2 USB devices, 1 VGA, and 1 LAN. <!> If you are connecting USB HDD or USB CD/DVD Drive, please use them on self power mode. <!>If you are running the robot with that hardware connected, make sure that the robot will not fall or damage the cable or the connecters. 5.2.3 Applying Power to the robot from External Power Supply You can use external DC power supply (8.5V or less) to power up the robot without battery. <!> Do not apply any DC power source bigger than 8.5V 5.2.4 Connecting a Speaker and a Microphone You can connect small speaker to the speaker output pins. By default, the wires coming out from the speaker is connected to the servo control board (VS-RC003). You can also connect a condenser microphone to the robot. The pin close to the board is GND and the other pin is the signal. 5.3 Basic Operation and Exterior 5.3.1 Turning on the Servo Power Switch You can turn on the servos and servo control board by servo power switch, circled in red in the above picture. The sign “-” represents ON and “o” represents OFF. White LED next to the switch comes on when the power applied. 5.3.2 Turning on the PC power switch You can turn on the PC board by the PC power switch, circled in Yellow in the above picture. White LED next to the USB port comes on when the power applied. <!> Do not turn off the PC power switch while the PC is still running! 5.4 Internal connection diagram 6 Software 6.1 RobovieMaker2 6.1.1 RobovieMaker2 is a software to create a motion for the robot After the installation of Windows XP to PC board on your robot, you can run RobovieMaker2 from it and create motions. Also, you can create motions from an external PC by connecting a USB to mini USB cable. When you are using an external PC to create a motion, please turn off the internal PC board and the power switch to the board. Please look at a user manual for Roboviemaker2 for more information. <!> Please use latest version of RobovieMaker2, version 9 or version 10 is currently supporting KTX-PC and KTX-PC Pro. 6.1.2 Controlling Servo Controller (VS-RC003) from internal PC 6.1.2.1 USB Communication Please set “Activated Timer” to “-1”. Go to “Project Preferences” -> “CPU Preferences” -> “Basic Preference” -> “Active Timer”. 6.1.2.2 Serial Communication Please set “Activated Timer” to “-1”. Go to “Project Preferences” -> “CPU Preferences” -> “Basic Preference” -> “Active Timer”. Also, Go to “Project Preferences” -> “CPU Preferences” -> “Serial Setting” and set NC7 to “command port”. <!> If you are not seeing “serial setting” feature, you might be using older version of RobovieMaker2. Please install version or 10 upper to do serial communication. 6.2 Initial Setup 6.2.1 Setting up initial position using RobovieMaker2 Before start using the robot or after long use of the robot, the angle of the joint might change. Please setup the initial position by using RobovieMaker2. The detailed instruction to setup initial position is explained in RobovieMaker2 User Manual. <!> Please hold the robot body when you turn the robot power on. If you are holding the part close to the joints, you might pinch your fingers. 6.3 Creating Motion Detailed instruction is on RobovieMaker2 User Manual. 6.4 Installing Operating Systems 6.4.1 Installing Windows <!> Please use external CD/DVD drive with AC Adapter (uses external power supply). If you use the drive on USB power, then the I/O board will burn out and might not work properly anymore. 6.4.1.1 Installing XP Follow the windows installation manual to install <!> Please do not set password for your login. <!> Change the BIOS keyboard setup to “All But Keyboard”. Go to “BIOS setup” -> “Standard CMOS Feature” -> “Halt On” -> “All Bat Keyboard”. 6.4.1.2 Install Drivers Download and install driver from Kumotek Website or the CD came with the robot. After the installation of the driver for the graphics card, the display might not show up again. Please use command “Ctrl+Alt+F1” to go back to the normal display (CRT). If the command is still not make you go back to the normal display, then you might have setup a login password. Try entering "your password" + "Enter" + "Ctrl+Alt+F1". 6.4.1.3 Check the Devices Go to Device Manager and make sure the all the devices is installed and recognized successfully. If you have a device listed under "image devices", then you have camera installed correctly. Also you should see a “COM1” and “COM2” under “Port”. <!> Make sure cable coming out from the camera is connected to your PC board. 7 Maintenance and Fixing the Robot Every time before the use of the robot, please inspect it carefully and make sure that there is no break on the wires or damage on its servo motors. If you see the any of those problems, report it to KumoTek by email or call 972-436-3867 for technical support. 7.1 Protecting Servo Wires from Abrasion In order to protect the servo wires from unnecessary abrasion during routine usage, we suggest using some kind of rubber glue or silicone adhesive on the wire. The picture highlighted in blue depicts one method of securing the cable to the robot. This will help to prevent the cable from getting caught and torn between the frame and servo casing. Another suggested method of tying down the cables is to use the nylon tie straps as depicted. Be sure to replace these straps after they become worn down or lost. This method is highlighted in green. 7.2 Protecting Motors When configuring the robot stand from the sitting position, or to sit from the standing position, assure that the servo horns are behind the forward part of the upper leg bracket, in order to prevent damage to the servo and frame. This must be done manually when the power to the servo is turned OFF when configuring the robot while in the seated position. The procedure highlighted in blue above is correct. The procedure highlighted in red above is incorrect. Another area requiring extreme caution is extending the range of motion past the physical capabilities. This should always be avoided. Failure to do so will most definitely cause damage to the motors and/or the robot’s frame. When you are programming motions or setting the robot’s initial configuration, always be mindful of gap between the servo casing and the metal frame. DO NOT allow the servo casing to touch the metal casing. The gap between the servo casing and metal frame is highlighted in blue in the picture above. Note: If this occurs, quickly undo your last setting in the software, or remove power from the servos, then manually move the slider back to the previous (safe) position. Note: occasionally feel the servo motors to check for excessive heat. DO NOT touch the motors when the robot is in motion, or about to move. This could cause serious injury to the user and may damage the robot.