1
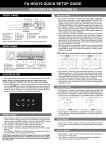
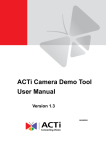
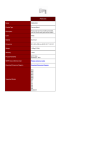
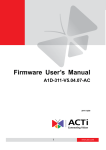
ACTi Demo Tool
User Manual
Version 1.5
2012/07/06
ACTi Demo Tool v1.5.03.06
Table of Contents
1 Overview
3
Introduction.................................................................................... 3
Main Functions............................................................................... 3
System Requirements .................................................................... 3
Installation ...................................................................................... 4
2 Startup
5
Selecting PC Configuration............................................................. 5
Connecting to the Camera ............................................................. 6
Configuring Video Streaming Settings ........................................... 8
3 Live View
9
Live View Options ......................................................................... 10
Multi VGA View Mode ................................................................. 12
ePTZ .............................................................................................. 13
DNR............................................................................................... 14
ExDR ............................................................................................. 15
Edge Enhancement ....................................................................... 16
Snapshot ....................................................................................... 17
4 Playback
18
2
www.acti.com
ACTi Demo Tool v1.5.03.06
Overview
Introduction
ACTi Demo Tool is a Windows based program to help you demo ACTi’s new products - KCM models
more quickly and easily. You don’t need to install NVR or any image codec to do live streaming and
snapshot. The program is designed to be adaptive to various PC hardware conditions and improve its
performance.
Main Functions
1. Two Preset Configuration Profiles for most-used PC environments:
Lenovo X200 / HP HDX16 and HP 4720s / HP 4310
2. Live View modes supporting specific camera features:
Single View, Multi VGA(4VGA, 6VGA) ePTZ, DNR, ExDR, Edge Enhancement.
Functions available for demonstration in given KCM models:
4 VGA View
Y
Y
Y
Y
Y
Y
Y
Y
Y
Y
Y
Y
Y
KCM-7911
Y
KCM-3911
Y
KCM-7311
KCM-5511
Y
KCM-7211
KCM-5311E
Y
KCM-7111
KCM-5211E
Y
KCM-3311
KCM-5311
Y
KCM-3211
KCM-5211
Single(Normal) View
Available Functions
KCM-5611
KCM-5111
Supported KCM Models
Y
Y
Y
Y
Y
Y
Y
Y
6 VGA View
2D+3D DNR
Y
Y
Y
Y
ExDR
Y
Y
Y
Y
Y
Y
Y
Y
Edge Enhancement
Y
Y
Y
Y
Y
Y
Y
Y
Y
Y
Y
Y
Y
Y
Y
Y
Y
Snapshot
Y
Y
Y
Y
Y
Y
Y
Y
ePTZ View
Y
Y
Y
Y
Y
Y
3. Capturing snapshot in Live View
4. Manual recording in Live View
5. Playback RAW files
System Requirements
Operation system: 32-bit Windows 7 Professional/Enterprise/Ultimate
3
www.acti.com
ACTi Demo Tool v1.5.03.06
Installation
1. Download software package.
2. Execute the installer file “ACTi_Demo_Tool_v1.5.01.19.exe”
After the installation, a shortcut
.
will appear on your Desktop. Click it to execute the application.
Note: Demo Tool uses the Active X control components that are different with ACTi NVR software 2.X
versions’; hence you should run Demo Tool on a computer without any ACTi NVR software installed.
4
www.acti.com
ACTi Demo Tool v1.5.03.06
Startup
Before running ACTi Demo Tool, please
1. Get your camera connected to your computer. Start by changing your computer’s IP address
to be in the same network segment with your camera’s, which usually starts with
192.168.0.XXX.
2. Check the camera IP Address, Account, Password and Port number.
Selecting PC Configuration
As you first run this application, please select a PC configuration on Settings page before starting
camera related operations. Based on computer’s speed and processing power, the preset
configurations use appropriate video streaming settings to ensure that your computer can work
reliably and smoothly while streaming. Next time you run ACTi Demo Tool, it will load the
configuration you saved during last session.
ACTi Demo Tool provides two preset PC configurations, select either whose computing capability is
closer to your computer’s, or select the third one for other computer types: Lenovo X200 / HP HDX16
( CPU: Intel Core 2 Duo processor), HP 4720s / HP 4310 ( CPU: Intel Core 2 Duo processor or i7
processor) and Customization.
Fig. 1
Configuration Page
5
www.acti.com
ACTi Demo Tool v1.5.03.06
If you choose “Lenovo X200/HP HDX16” or “HP 4720s/HP 4310s” configuration, the video streaming
settings- Encoder Type, Resolution, Bit rate and FPS are all pre-selected, which are not
configurable during your operation.
If your computer’s performance level is various from those two presets’, or you would like to adjust
certain property for a special need, select “Customization” as PC configuration. Note that the
pre-selected video streaming properties are based on higher computer standard; you should tailor the
video streaming settings to fit your system conditions and achieve good video quality for the purpose
of demonstration.
Connecting to the Camera
After selecting a PC configuration, you can start connecting to your camera, or click “Cancel” to select
another configuration. On Settings page, please key in the correct IP address, HTTP port number,
Account name, and Password, and click “Connect” to see the live view. If your computer is already
connected to a camera with connection settings the same as default, ACTi Demo Tool will
automatically get the live view.
IP Address:
192.168.0.100
Http Port:
80
Account:
Admin
Password:
123456
Connection Settings
Fig. 2
Connection Settings
6
www.acti.com
ACTi Demo Tool v1.5.03.06
After setting is done, click “Save” to save current connection settings for later operations. ACTi Demo
Tool will remember the settings and automatically connect to this camera next time you run it.
Fig. 3
Connection Settings-Save Settings
7
www.acti.com
ACTi Demo Tool v1.5.03.06
Configuring Video Streaming Settings
For specific demo purpose, for example, to use higher bit rate for high quality video stream, you may
need to modify the preset bit rate value. PC Configuration “Customization” allows every video
streaming property to be changed. On Settings page, you can select any of the following view modes
and configure its video streaming settings: Single View, Multi VGA, ePTZ, DNR, ExDR, Edge
Enhancement and Snapshot, then the settings will take effect in Live View.
1. Select a view mode.
2. Fill in the connection settings and click “Connect” to get the video stream.
3. Modify its video streaming properties.
4. Click “Save” to save current settings.
Fig. 4
Video Streaming Settings
Note: By choosing “MJPEG” as encoder type, Bit Rate field is hid and Quality field will appear for you
to modify
Fig. 5
Video Streaming Settings-Encoder Type
Note: The View Mode settings will only take effect in Live View when the camera model supports the
corresponding functions, and vice versa.
8
www.acti.com
ACTi Demo Tool v1.5.03.06
Live View
After configuration is done, switch to Live View page to start watching live streaming. There are few
modes to present KCM-series features in terms of high megapixel video streaming on-demand, multi
VGA cropped video streaming on-demand, ePTZ support, DNR technology, ExDR technology, Edge
Enhancement for video and still image on-demand. A Live View mode tab will only show up when the
camera model supports the corresponding feature. For example, only Single View, Multi- VGA, DNR
and Snapshot mode tabs would be available in Live view when a KCM-5111 camera is connected.
Live View Mode Tabs
Live View
Fig. 6
Live View – KCM-5111 View Mode Tabs
9
www.acti.com
ACTi Demo Tool v1.5.03.06
Live View Options
On top of the windows are Live View control options. Certain options are available when connected to
specific camera models.
1
2
3
4
5
2
2
2
2
2
6
2
Fig. 7
Single-view
When you go to this page, it will automatically connect to the IP address last time saved for a
configuration. The green light on upper right corner of the view means video is streaming normally. To
reconnect the video, you can click on “Single View” tab again.
1.
Zoom Options
Zoom In / Zoom Out
Zoom Speed (1-7)
Refocus
The zoom options are enabled for camera models with optical zooming function.
2. Image Direction Options
Image Flip Switch
Image Mirror Switch
Click on the buttons to switch between different mage directions.
10
www.acti.com
ACTi Demo Tool v1.5.03.06
3. Start/Stop Manual Recording
Click on it to start or stop recording. While recording, a red
light on upper right corner of the view will indicate the
recording is in process.
Fig. 8
Single-view recording
After you stop recording, the recorded video clip is saved under C:\[Users]\[User name]\My Picture\,
named by time code as .RAW file. A text file named after the recording file will automatically be
generated under the same folder. This text file contains all the properties information (e.g. resolution,
encoder type, FPS, bit rate, etc.) of the camera while the recording was taking place, which is very
helpful for further analysis.
Fig. 9
Recordings and video info
Note: Please check if your hard drive is enough for new recordings. Record function will not be able to
carry out if there is not enough memory.
4. Full Screen
Click on this button, image will fit to the entire screen. Double-click on the screen to exit full screen
mode.
5. Hemispherical Camera Options
Camera Position
Select the camera “Wall” or “Ceiling” according to your fisheye camera’s actual installation
position (Default is Wall). These options are only available for fisheye cameras like KCM-3911,
KCM-7911.
Rotate
When the fisheye camera is in “Ceiling” position, these buttons will become available. Click
to rotate the view angle 15 degrees clockwise or
to rotate the view angle 15 degrees
counter-clockwise.
6. Digital Zoom Options
As you move the mouse cursor over the screen, the digital zoom control symbols will appear,
left-click the mouse to execute the zoom function.
Note: Digital Zoom functions are not supported in 6VGA or ePTZ mode.
11
www.acti.com
ACTi Demo Tool v1.5.03.06
Multi VGA View Mode
You can use this mode to demo 4 VGA or 6 VGA modes. If device stream from camera is 4 VGA,
then the layout style will be 2x2 layout style displaying stream 1, 2, 3, and 4. If the device stream
from camera is 6 VGA, then the layout style will be 3x2 layout displaying stream 1, 2, 3, 4, 5, and
6. Before running Multi VGA mode display, please configure desired cropping positions in Web
Configurator in advance. Otherwise, the default position is centered in the image.
Fig. 10 4VGA
Fig. 11 6 VGA
In 6VGA mode, each of 6VGA regions can be independently repositioned using mouse over video
control. You can also set the Rotate buttons to rotate the image.
12
www.acti.com
ACTi Demo Tool v1.5.03.06
ePTZ
For fisheye cameras, you can enter ePTZ mode to operate the ePTZ options. On the live view, ePTZ
navigation can be controlled by dragging the mouse.
Fig. 12 ePTZ
13
www.acti.com
ACTi Demo Tool v1.5.03.06
DNR
DNR aims to do digital noise reduction for video. On DNR mode, DNR button will appear. Click on
it to enable or disable the DNR function. Also, the view will change to single view mode (if it was
Multi VGA or ePTZ before). All other lie view options are same as under "Single View" mode.
Hint for scene settings:
Place your camera in a
low light environment,
and make sure it doesn’t
switch to night mode. The
noise is most likely to be
generated and seen in
this condition.
Fig. 13
DNR Off
Fig. 14 DNR On
14
www.acti.com
ACTi Demo Tool v1.5.03.06
ExDR
ExDR is a new generation WDR. As WDR technology, it will let dark area become clearer for video. In
ExDR mode, you can select the level of ExDR enhancement: High(value =255), Medium(value =64),
or Low(value =1). Default is "Medium". Also, the view will change to single view mode if it was in Multi
VGA or ePTZ mode previously. Upon your selection, the changes take effect immediately without
pressing any additional buttons.
Hint for scene settings:
1. Place an object having
distinct outline in a
shadowed space with
strong back light.
2. Find the best setting that
makes apparent ExDR
effect by adding more
backlight, adjusting
camera direction and
object position.
Fig. 15 ExDR-Low
Fig. 16 ExDR-High
15
www.acti.com
ACTi Demo Tool v1.5.03.06
Edge Enhancement
Edge enhancement technology makes object outline clearer and sharper to identify. In Edge
Enhancement mode, you can select the level of Edge Enhancement: "Sharp Edge, Normal Edge,
Soft Edge" where sharp edge equals 255, normal edge 104 and soft edge 1. Default is "Normal
Edge". Upon your selection, the changes take effect immediately without pressing any additional
buttons. Also, the view is set to single view mode.
Hint for scene settings:
Find a scene where you can
see large portion of lines
(whose color should be
dark enough to stand out on
the background), or objects
in front of high-contrast
colored background.
Fig. 17 Edge Enhancement-Sharp Edge
Fig. 18 Edge Enhancement-Soft Edge
16
www.acti.com
ACTi Demo Tool v1.5.03.06
Snapshot
Once you enter Snapshot mode, streaming will stop and a captured snapshot will be displayed. Move
your mouse over the image and scroll up and down to zoom-in and zoom-out. When you zoom in,
drag&drop on the move to the position you want see.
Fig. 19 Snapshot
The snapshot image is saved under C:\[Users]\[User name]\My Picture\, named by time code
as .JPG format.
Every time you capture a snapshot, a text file named after the recording file will automatically be
generated under the same folder. This text file contains all the properties information (e.g. resolution,
encoder type, FPS, bit rate, etc.) of the camera while the snapshot was being taken, which is very
helpful for further analysis.
17
www.acti.com
ACTi Demo Tool v1.5.03.06
Playback
To play recorded RAW file, switch to Playback page, click on Open File
to invoke Explorer
dialogue to select a RAW file.
Fig. 20 Single-view Recording
Once a RAW file has been selected, time bar will display, and you may control the video playback by
clicking on Play, Pause, Stop, or by dragging the time bar.
Current time
End time
Start time
Fig. 21 Single-view Playback Controls
18
www.acti.com