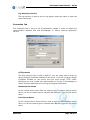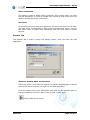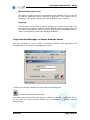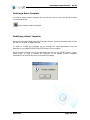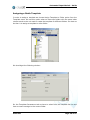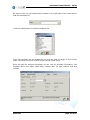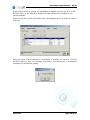
1
Automated Input Module
(AIM)
Version 3.3.0
User Manual
Evolusoft
Boulevard Balboa
Edificio Bay Mall
Technology Plaza
Segundo Piso, Local 213
República de Panamá
Tel.: (507) 263-1096
Fax: (507) 263-0962
Evolusoft Europe
Bernhofstrasse 23
8134 Zurich-Adliswil
Switzerland
Voice: +41 1 709 27 40
Fax: +41 86 079 423 24 82
e-mail: [email protected]
Evolusoft
Automated Input Module - Guide
CONTENTS
PURPOSE
3
INTRODUCTION
4
AIM INDEX RETRIEVAL
FEATURES
HOW THE GUIDE IS ORGANIZED
REQUIREMENTS
EVOLUSOFT AUTOMATED INPUT MODULE – AIM CLIENT
5
5
6
7
8
CHAPTER 1
9
INSTALLING AUTOMATED INPUT MODULE
9
CHAPTER 2:
14
UNINSTALLING AUTOMATED INPUT MODULE
14
CHAPTER 3:
18
GETTING STARTED WITH AUTOMATED INPUT MODULE
INTRODUCTION
CONFIGURING AUTOMATED INPUT MODULE
LOGIN INTO DOCUMANAGER OR SECURE ARCHIVES SERVER
LOGOUT FROM DOCUMANAGER OR SECURE ARCHIVES SERVER
18
18
19
22
23
CHAPTER 4:
24
AUTOMATED INPUT MODULE FIRST SESSION
INTRODUCTION
UNDERSTANDING FILE STRUCTURE WINDOW
24
24
25
CHAPTER 5:
27
UNDERSTANDING TEMPLATES CONCEPTS
CREATING A BATCH TEMPLATE
EDITING A BATCH TEMPLATE
27
28
43
Evolusoft
Page 1 of 97
Evolusoft
Automated Input Module - Guide
DELETING A BATCH TEMPLATE
MODIFYING A BATCH TEMPLATE
ASSIGNING A BATCH TEMPLATE
45
45
46
CHAPTER 6:
49
INPUT CONCEPTS
WHEN TO USE AN INPUT?
CREATING AN INPUT TEMPLATE
EDITING A BATCH TEMPLATE
MODIFYING AN INPUT TEMPLATE
DELETING AN INPUT TEMPLATE
ASSIGNING AN INPUT TEMPLATE
49
49
50
57
59
59
60
CHAPTER 7:
63
INTRODUCTION
CREATING A BATCH FILE PACKAGE
SAVING THE BATCH
RETRIEVING A SAVED BATCH
TRANSFERRING THE BATCH FILE PACKAGE
IMMEDIATE TRANSFER
THESE INSTRUCTIONS APPLY FOR BOTH BATCH AND INPUT PACKAGES.
SCHEDULER TRANSFER
THESE INSTRUCTIONS APPLY FOR BOTH BATCH AND INPUT PACKAGES.
63
64
72
74
76
76
76
78
78
CHAPTER 8:
81
INTRODUCTION
CREATING AN INPUT FILE PACKAGE
SAVING THE INPUT
RETRIEVING A SAVED INPUT FILE PACKAGE
81
82
89
91
CHAPTER 9:
93
VIEWING TRANSFER LOG
DOWNLOADING AN ERRONEOUS TRANSFERRED PACKAGE
93
95
Evolusoft
Page 2 of 97
Automated Input Module - Guide
PURPOSE
Information is exploding in quantity. As much as 80% of the data you need
today is unstructured - not found in a relational database. It can include
images, paper based documents, forms, CAD/engineering drawings,
enterprise reports, e-mail, or anything hard-to-access and utilize.
Evolusoft accelerates your necessary enterprise operations by developing
software to store, access and utilize your unstructured data.
Our impact is immediate. Information you need is available when you want it,
wherever you are. Our products are useful. Their value clearly grows every
day. Our knowledge continues to advance – as we find increasingly effective
information management solutions through our ongoing commitment to
research and development.
This User’s Guide will provide you with general information about document
management, images, and describes the characteristics of the Evolusoft
Automated Input Module, it explains how to install the software, and
teaches you how to accomplish several batch processing documents between
this product and DocuManager or Secure Archives application server.
Evolusoft
Page 3 of 97
Automated Input Module - Guide
INTRODUCTION
Batch scanning is the technique that consists of placing a stack of documents in a
scanner input tray and scan a group of logically connected documents together in
folders or documents. Evolusoft Automated Input Module (AIM) offers several
solutions for batch scanning.
Batch scanning software is designed to allow scanners to run unattended and create
certain levels of automatic indexes. These values are used to create primary index
information.
It is usually more cost effective to spend time preparing and batching the documents
prior to scanning (studies show that people can batch 750 - 1,000 sheets an hour
depending on the levels of activity needed -- remove from envelopes, unfold, remove
staples and some repair) and then scan the extra pages, instead of scanning and
looking at each document for indexing.
Scanners takes around 1-3 seconds per page to digitize the document, by the time
the operator has looked at the image and located and keyed the index data, 20
seconds may have passed. In this time another 6-19 pages could have been
scanned.
AIM is an extension for Secure Archives® that operates popular TWAIN scanners to
capture documents and uses optical character recognition (OCR) to create index key
values from images.
The program allows OCR on zone and automatic index for Secure Archives® or
DocuManager® management software.
AIM is a software product sold as an add-on module to Secure Archives® or
DocuManager® applications. It enables documents to be scanned locally,
automatically indexed with OCR for fast retrieval, then you can transfer this package
of documents on the moment or you can schedule for transferring later on, in order
to be copied directly to your Secure Archives® or DocuManager® server.
Evolusoft
Page 4 of 97
Automated Input Module - Guide
AIM Index Retrieval
Indexes are easily created by several methods:
1. Enter keywords in each image's index field.
2. Use the integrated OCR zoning to automatically enter data from similar forms
into fields.
3. Read Word, Excel, XML and Text documents to import documents and get
index values.
4. Extract data from most common Databases through ODBC Connections.
5. Scans multiple checks and fills out indexes using MICR technology (Magnetic
Ink Character Recognition) with check scanners.
Features
•
•
•
•
•
•
•
•
Fast mid-range scanner models at speeds up to 40 pages per minute. Singleside (simplex) and double side (duplex) scanning.
Unattended, automated batch scanning operations.
Monochrome (grayscale) and color scanning.
Automated batch indexing: Advanced on-the-fly OCR functions.
Converting page zones into data fields.
Fills out indexes using MICR technology (Magnetic Ink Character Recognition)
using check scanners.
OCR text files are automatically linked to the original image.
You can setup a scheduler to transfer the package to your application server.
Evolusoft
Page 5 of 97
Automated Input Module - Guide
How the Guide is organized
This guide is organized on basic step-by-step instructions in order to provided all
users with a fast learning time to perform most of the batch scanning procedure.
It also has each all image window that the original application has. This is to be
easily followed up instruction guide.
This guide has been developed into 9 chapters, each one has all necessary details
from the AIM application in order to provide you with all information needed to
take all advantages from this product.
Chapter 1 and Chapter 2 will guide on the installation and uninstall of the
Automated Input Module on step-by-step procedures showing you all windows
information with all the details clearly explained that you would see during this
process.
Chapter 3 will take you into the first step to the Automated Input Module. You
will see how you must configured this application in order to be able to connect it
to the DocuManager® or Secure Archives® application server. We will go
through the process of login and log out from this application server.
Chapter 4 we will go into our first working session explaining every aspect it, also
we will explain how to work with the file structure in order to understand how to
interact between the client side and the server side.
Chapter 5 we will explain what are a templates and all information related to it.
Since it is the base for the batch scanning process this is a very important
chapter of this guide. Also we will go trough the process of creating a Batch
Template by going on a step-by-step procedures with all window images. We will
go into the process of modifying, deleting and assigning a batch template.
Chapter 6 will explain what are inputs and the different from a batch. When we
need to use an input. Also we will go trough the process of creating an Input
Template by going on a step-by-step procedures with all window images. We will
go into the process of modifying, deleting and assigning an input template.
On Chapter 7 and Chapter 8 we will create a batch and an input package in order
to be able to work on each aspect of a real working session. We will go trough
each part including transferring and scheduler a package transfer.
On chapter 9 we will work on the Transfer log and what happens when we
transfer an erroneous file package to the application server. How can we retrieve
these bad packages and correct them and send back again.
We hope that you get all the advantages of this product. Remember that all this
instructions and descriptions contained in this document we accurate at the time
of printing. However, succeeding products and documents are subject to change
without notice.
Evolusoft
Page 6 of 97
Automated Input Module - Guide
Requirements
To use this product you need to be familiarized with the Microsoft Windows operating
system version 98, 98 Second Edition, Millennium, Windows 2000 Professional. Or if
you are using or will use any printer or scanner, you must also know how to connect
and operate the device.
Also you will require the installation of Imaging for Windows Professional Edition 2.6,
which should come on the installation CD that comes with this software.
Microsoft Office 2000® is also a requirement for this product, since Evolusoft AIM
will use some special files that only comes with this product in order to be able to
process Excel and Word format files. This product must be installed with a legal
license provided by Microsoft ® Corp.
The user must have a legal Evolusoft license in order to have access to the Evolusoft
DocuManager or Secure Archives servers. If you do not have a legal account for this
products please contact your Evolusoft DocuManager or Secure Archives
administrator.
The user must have some experience on using Evolusoft DocuManager or Secure
Archives application basics operations like Login, Logout, Browsing on the File
Structure, Loading, Viewing documents and understanding file and access
permissions.
The client computer must have installed Microsoft Data Access Components (MDAC)
the installation program of this product should come on the installation CD that
comes with this software.
Evolusoft
Page 7 of 97
Automated Input Module - Guide
Evolusoft Automated Input Module – AIM Client
Hardware
Pentium processor 90 MHz or higher
Minimum 128 MB of RAM Memory (recommended 256 RAM Memory)
2GB of Hard Disk free space
CD-ROM
Monitor and adapter Super VGA or higher
Web Card with Internet access
Microsoft mouse or compatible device
Documents Scanner must be compatible with TWAIN ó BUIC (Optional)
Software
Operating System Microsoft ® Windows 98, 98Se, Me, NT WorkStation 4.5,
2000 Pro or XP
Eastman Software Imaging for Windows Professional Edition Version 2.6
Microsoft ® Data Access Components Version 2.5 or higher
Microsoft® Internet Explorer Version 5.5 Service Pack 1 or higher
Note:
For each package of Evolusoft DocuManager acquired, one Eastman Software
Imaging Professional version 2.0 license, is included.
Evolusoft
Page 8 of 97
Automated Input Module - Guide
Chapter 1
Installing Automated Input Module
Step 1:
Please read the Requirements section on this guide, to make sure that you have your
system ready for setting up this product.
Explore on the AIM Installation CD for the file AIM21.MSI, and double click it to start
the setup program.
Step 2:
The installer window should be shown indicating that the setup program is running.
The process will takes few minutes because the installer will check your system in
order to avoid any error during the main installation process.
Evolusoft
Page 9 of 97
Automated Input Module - Guide
Step 3:
Once the installer had checks your system, the welcome window should be shown.
Please take some minutes to read its content in order to avoid further error
messages. Press on the Next button to continue.
Step 4:
The License Agreement window should be shown. Please take some time to read
carefully your license, in order to avoid any law violation. If you do not agree with
this license, check on the proper radio button, otherwise check the “I agree …” radio
button and press NEXT to continue with the installation.
Step 5:
The User information window should be shown. Please type in the company and the
organization information on the correspondence fields. Once you are finish typing,
press the NEXT button to continue.
Evolusoft
Page 10 of 97
Automated Input Module - Guide
Step 6:
The Destination Folder window should be shown. On this window you are able to
change the destination directory for this application by pressing the BROWSE button.
If you want to accept the default value, just press the NEXT button.
Important!
They only way to change the destination directory is by pressing the Browse
button, you are not allowed to type any destination path, this is by design in
order to avoid any typing error.
Step 7:
The Ready to install window should be shown. On this screen you are able to go back
to correct or to review any setting or value before the installation start by pressing
the BACK button. If you are sure that all install information is correct then press the
NEXT button to continue.
Evolusoft
Page 11 of 97
Automated Input Module - Guide
Step 8:
The updating system window should be shown. On the screen the setup program will
start copying all necessary application files onto the computer on the destination
directory that you choose on preview screen. It also will copy all correspondence files
to the windows system directory. A blue progress bar will be shown indicating the
process progress.
Step 9:
Once the setup program had copied and registered all necessary files into the system
and the application directory the Automated Input Module installation had finished.
In some system the operating system will ask for a reboot (Windows 98, Windows
98SE, Windows ME) in other it will not be necessary.
Evolusoft
Page 12 of 97
Automated Input Module - Guide
Step 10:
In order to start the Automated Input Module application, go to the Start button,
choose Programs then look for the link “Automated Input Module” and click it.
Step 11:
Where to go now?
Once you have finished installing the Automated Input Module into your computer,
then you should read the Chapter 3: Getting Started with Automated Input Module.
Evolusoft
Page 13 of 97
Automated Input Module - Guide
Chapter 2:
Uninstalling Automated Input Module
Step 1:
In order to remove the Automated Input Module from your computer, you must use
the ADD/REMOVE program that is locate on the control panel on your system.
Click on the start button, choose Settings then choose Control Panel. A list of
program will be shown, look for the one named “Add/Remove Programs” and double
click it. A list of all installed programs on your computer will be shown.
Step 2:
A list of all installed programs on your computer will be shown. Look for “Automated
Input Module” and click it in order to choose it. Then click the “Remove” button.
Please be sure that you do not have the application running in your system,
otherwise you will receive some errors messages.
Evolusoft
Page 14 of 97
Automated Input Module - Guide
Step 3:
Once you have press the REMOVE button, the application Maintenance windows will
be shown. Choose the REMOVE option in order to remove the Automated Input
Module from your computer. Click on the NEXT button to continue.
Step 4:
The Automated Input Modules uninstall window will be shown, indicating that the
system is ready to start removing all application files. Click on the NEXT button to
continue.
Evolusoft
Page 15 of 97
Automated Input Module - Guide
Step 5:
The Updating System window will be shown, indicating that the uninstall program is
removing all files from your system corresponding to the Automated Input Modules
application. This procedure will take few minutes.
Evolusoft
Page 16 of 97
Automated Input Module - Guide
Step 6:
Once the uninstall program has finished removing all files from your system. The
Uninstall successfully window will be shown. Click on the FINISH button to close the
uninstall program. In some system you will be asked to reboot your system in others
will not be necessary.
Evolusoft
Page 17 of 97
Automated Input Module - Guide
Chapter 3:
Getting started with automated input module
Introduction
This chapter is intended for new user of Automated Input Module. It describes the
basics of configuring up a connection between AIM and DocuManager or Secure
Archives server.
Remember that before setting up AIM you must have a valid license to use this
product and also you must have an active account. If you do not have an account on
DocuManager or Secure Archives application server please contact your system
administrator.
Subjects of the chapter include:
•
•
•
Configuring Automated Input Module
Login into DocuManager or Secure Archives severs using AIM
Logout from DocuManager Server or Secure Archives server
Evolusoft
Page 18 of 97
Automated Input Module - Guide
Configuring Automated Input Module
Once the Automated Input Module (AIM) is started the General Parameter window
will be shown. This windows is use to setup all required connections parameters in
order to be able to connect to a DocuManager or Secure Archives application server.
To load this window you must click the following icon:
This icon is located under the menu bar
Directories Tab
The Directory tab will show you the working directories for the AIM application. On
this tab you are able to change the location for this folders by pressing the browse
button on the left side of their corresponding fields. We recommend you to accept
the default values for each folder location and name.
Batch directory function
The batch directory is used to store all batch packages that you have created
and saved on your computer. Once you transfer any of this package it’s
corresponding directory will be deleted.
Input directory function
The input directory is used to store all input packages that you have created
and saved on your computer. Once you transfer any of this package it’s
corresponding directory will be deleted.
Evolusoft
Page 19 of 97
Automated Input Module - Guide
Log directory function
The log directory is used to store a log registry when any batch or input has
been transferred.
Connection Tab
The connection tab is used to set all parameters needed in order to enable the
communication between AIM and DocuManager or Secure Archives application
servers.
HTTP protocol
The http protocol field is used to define if you are using secure server by
having a Digital Certificate installed on the server. If you do not have a Digital
Certificate installed on your server then you must choose “HTTP” value.
Otherwise you must contact your administrator to find out if DocuManager or
Secure Archives application are running using Digital Certificates.
Remote Server Name
On the remote server name field you need to type the Secure Archive server
name. You do not need to type a complete URL address. Type only the server
name.
Local Server Name
On the remote server name field you need to type the DocuManager server
name. You do not need to type a complete URL address. Type only the server
name.
Evolusoft
Page 20 of 97
Automated Input Module - Guide
Active connection
This option is used to define which connection will be active when you start
the AIM application. In order to change from remote to local serves you only
need to activate the proper connection.
Username
On this field you must type your username, the same one that you use when
you login into a DocuManager or Secure Archives application server. You can
use either lower or upper case. Remember that you must have an active
account.
General Tab
The General tab is used to setup the startup screen, once you start the AIM
application.
Structure window when session starts
Check this option if you want the program to load the DocuManager or Secure
Archives file structure when you login into the AIM application.
If for any reason during your AIM session you loose the file structure click on
this icon located on the menu bar in order to load it back again.
(Click to load file structure)
Evolusoft
Page 21 of 97
Automated Input Module - Guide
Window dialog before scan
This option is used to load the corresponding scan windows. The one you set
all scanner parameter before scanning a document. This window will be
according to the scanner model you have installed on your computer.
Language
On this option you are able to set the language you prefer to work with. You
can choose from English, Spanish, French, German and Portuguese. Once set
your desire language you must exit the AIM application and loaded again in
order for the system to load new language parameter.
Login into DocuManager or Secure Archives server
The login windows is use to create a connection between AIM application and
DocuManager or Secure Archives application servers.
I order to call the login window you must click the following icon.
This icon is located on the menu bar
You must have an active and valid account in order to establish a connection. If you
do not have an account please contact your DocuManager or Secure Archives
administrator.
Evolusoft
Page 22 of 97
Automated Input Module - Guide
Username
On this field you must type in your username or account for DocuManager or
Secure Archives servers.
Password
On this field you must type in your password that you were supplied along
with your account username. Please remember that you password is case
sensitive. This means that when you are entering your password you must
use upper and lower cases if it is necessary.
Host server information
On the host server information you will see to which server you are
establishing a connection. Make sure that you have an account on the proper
server if not you will receive a username error message.
Logout from DocuManager or Secure Archives server
In order to logout from your session on AIM application you must click the following
icon:
This icon is located on the menu bar
Clicking this icon will not close the application, it only close the connection
established with DocuManager or Secure Archives application server.
Evolusoft
Page 23 of 97
Automated Input Module - Guide
Chapter 4:
Automated Input Module first session
Introduction
On this chapter we will go over a first session of Automated Input Module. We will
explain the File Structure over which you will perform most of the work.
Also we are going to explain what are templates. Since they are the foundation for
working with AIM application. What is the different between Batch and Input
packages?
As a remainder, we assume that the user had preview experience using
DocuManager or Secure Archives application. He must have knowledge of basic of
file structure, index values, access permission and scanning documents operations.
Evolusoft
Page 24 of 97
Automated Input Module - Guide
Understanding File Structure window
Showing file structure window
In order to load and unload the file structure window on an AIM working session you
must click on the following icon:
(Click to load file structure)
The file structure is loaded with information from your DocuManager or Secure
Archives application server. Using AIM with not allow you to change this file
structure. The only way to do is trough a DocuManager or Secure Archives
application together with the corresponding create permission.
Before using AIM all file structure, folder and subfolders must have their indexes
already created and defined for a DocuManager or Secure Archives administrator
user. Any change to the file structure or indexes must be accomplished within
DocuManager or Secure Archives application.
The user using AIM must have access to the desire folder in which he wants to load
documents (insert document permission).
Once you have loaded the file structure you have to browse to desire folder in which
you want to create it’s corresponding template in order to be able to load batch or
input packages into that folder.
Evolusoft
Page 25 of 97
Automated Input Module - Guide
You have to place the cursor by clicking the desire folder once. Then you must
choose the type of packages you want to work with. You may want to work with
subfolder, just expand the top folder until you reach the desire one.
Remember if you lose the structure window just go to the menu bar a press the
corresponding icon to loaded back again.
Evolusoft
Page 26 of 97
Automated Input Module - Guide
Chapter 5:
Understanding Templates concepts
What is a template?
A template determines the structure of a document and contains document settings
in order to be able to scan a large amount of documents with the same format.
Why we should use a template?
We should use a template, so we can save the format of a document once and use it
has many times we need it.
When to use a template?
You use a template when you need to scan a great amount of documents that have
the same format, like for example, invoices.
How a template works?
A template stores the coordinates where the indexes should be extracted from the
document, so when we scan the documents, it will locate the coordinates in the scan
page and do an OCR extraction of the text.
Also we use templates to work with word, text, excel and databases files by using
different method so we can read or extract indexes values.
Batch concepts
We think of using a batch template when we know for sure that the large amounts of
documents that we are going to load have the same format (size, same field name,
same field position).
As a requirement all documents information (index values) must be type.
Because the OCR function included on this version of AIM V3.3 will not
process handwriting information.
Remember that all documents must have the same format like invoices, bills, orders,
memo format, checks, forms, etc.
Evolusoft
Page 27 of 97
Automated Input Module - Guide
Creating a batch template
In order to create a BATCH templates we have to browse on the file structure
window the desire folder in which we want to load a package of documents.
Once we over the folder we can click on the menu bar the option BATCH and then
choose NEW. If you have not created a template for this folder the Wizard templates
will load automatically.
You will receive a message box indicating that there is not any existing template for
this folder, so it will loads the Templates Wizard for you in order to create one.
When you click the button OK, the Templates Wizard will start loading, it will take
about 30 seconds depending on how fast and how much memory the workstation
have installed.
Evolusoft
Page 28 of 97
Automated Input Module - Guide
Once the wizard is loaded the welcome screen will be shown.
Click on the NEXT button to proceed with the next screen.
Evolusoft
Page 29 of 97
Automated Input Module - Guide
On this screen you have to type the batch information and type.
Template Batch Name
Type in the batch name, usually we type a name depending of the type of form that
we are going to process. Since we can have invoices but with different type of form.
When you type the batch name, the form name will be filled automatically, that is for
internal used. Please do not change it.
Example. Invoices – f24a
Batch name: invoices of form type 24a
Evolusoft
Page 30 of 97
Automated Input Module - Guide
Batch Types
We have the option of choosing three different types of batch.
Scanner Type
We choose SCANNER type when we want to scan all documents and add them
to the batch package automatically.
BUIC Type
We choose BUIC type when we want to scan check. You must have a scanner
specially design for scanning check. IT must be of BUIC type.
Examples DIGITAL CHECK TS-400
Files Type
We choose FILES type when we have scanned all documents already.
Remember that if you have defined an OCR area to extract index values then
all documents must have the same format and size.
Once we have decided the batch type, we click on the NEXT button to go to the next
parameters screen.
On this window we set the file type that we are going to process.
Evolusoft
Page 31 of 97
Automated Input Module - Guide
Image Files
We choose this options if we are going to work with images files like tif, tiff, jpeg,
pcx, bmp. If you want to extract index values from these images, they must be in
Black and White format and must have the same form type.
You can also load different type of image files but then you must type your index
values. We will see this situation further more.
Excel Files
In order to process an excel files you must have installed on the same computer
Microsoft ® Office 2000.
Since you will need some special components that only come when you install this
product.
TXT Files
We choose this option if we are going to use TXT format file. They are normally used
when we want to migrate document from other software.
Word Files
In order to process an excel files you must have installed on the same computer
Microsoft ® Word 2000.
Since you will need some special components that only come when you install this
product.
Once we have decided which type of files we are going to use, we click on the NEXT
button to proceed with the next screen.
Evolusoft
Page 32 of 97
Automated Input Module - Guide
On the method screen for now we only have one method available for extracting
index values from a black/white printed documents. It should be selected.
What is OCR?
OCR, or optical character recognition, converts image data to text, which you can
then edit, cut and paste, reformat, print, and send. The OCR process evaluates
images, such as scanned text, a fax, or a graphic, and recognizes which shapes
constitute characters and which characters form words. You can save converted text
as any of the following file types: Microsoft Word for Windows/RTF (Rich Text
Format), WordPerfect, HTML, or unformatted text.
Click on the NEXT button to proceed with the next screen.
Evolusoft
Page 33 of 97
Automated Input Module - Guide
On this screen we set the image processing parameters and documents generation
properties.
Image Processing
Align Image
We set this parameter in order to align the image if it get moved while
scanning process.
Rotate Image
We set this option if we want to rotate the scanned image an amount of
degrees. It is used when we scan landscape pages.
Rotate Direction
We use together with Rotate Image option to define how many degrees we
want to rotate the image.
New Documents
We set this option to decide how many pages will make one file by setting the
number of pages on the Pages field.
Evolusoft
Page 34 of 97
Automated Input Module - Guide
Document Name
We set this option to change the default values for the automatic naming
documents. To enable this options we check the NAME DOCUMENT, if we want
to decide the naming for scanned documents, we uncheck this option.
Prefix
We set this option to define the prefix for the scanned document.
Increase
We set this option to define the step number for the scanned document. If we
set this field to 1 the increase amount per file will be one by one. If we scan 5
documents setting the Prefix field to DOCU and the increase field to 1, we will
get the following documents:
Docu0001.tif
Docu0002.tif
Docu0003.tif
Docu0004.tif
Docu0005.tif
Suffix
We set this option to define the suffix or extension name for the scanned
document.
Once we have set all parameters on this screen we click on the NEXT button to
continue.
Evolusoft
Page 35 of 97
Automated Input Module - Guide
On the next screen we normally accept all default values. For now we only have
access to the OCR and MIRC parameters since AIM do not support ICR and BARCODE
on version V3.3.
OCR Parameters
OCR Quality
We set this option depending of the quality we want for our scanned
document. We normally left this option with AutoDetect value.
OCR Language
We set this option depending of the language we want for our OCR scanned
document. We normally left this option with system default value.
MICR Parameters
Scan both sides
We check this option if we want to scan both sides of the check. Remember
the MICR is a driver for special equipment that only scans checks.
MICR font type
You have to find out what font type format in on the magnetic field of all
check that you are going to scan. There are two type E13B and CMC7.
Evolusoft
Page 36 of 97
Automated Input Module - Guide
One we have set OCR and MICR parameters click on the NEXT button to continue.
On the index name and coordinates window we set all default values if we have some
or we set all coordinates in order to define the area on the document where the OCR
will be apply.
We will see a list of all indexes name for the folder on which we are creating a
template. Here we decide if we are going to extract some index values from the
document by using OCR method.
On the columns Begin and End we do not have to type anything, it is filled with the
coordinates automatically if we set the corresponding method on the method
column.
Method Columns
OCR
We choose this option if we want to extract the value for the corresponding
index. Once we choose OCR we have to click on the rule icon button to
extract the coordinates:
Coordinates button.
Once we click the coordinates button the next window will be shown.
Evolusoft
Page 37 of 97
Automated Input Module - Guide
On the setting coordinates windows we have to load the file in order to set
the coordinates for extracting the index value by the OCR method.
We can either load a scanned document by clicking the OPEN TIFF EXAMPLE
button or you can scan directly to this window by clicking the SCANNER
button.
Loading image by clicking the Open Example Tiff button
Evolusoft
Page 38 of 97
Automated Input Module - Guide
Scanning image by click the Scanner button
Once we have loaded the example image we have to draw the text zone for
OCR with the mouse by pressing right click button and hold down while we
select the area.
Evolusoft
Page 39 of 97
Automated Input Module - Guide
To move a zone, or to change the frame size, click on it with the selection
pointer, then drag.
To delete a zone, point to it with the selection pointer, click the right mouse
button, then click Clear.
Once we have set our coordinates we can click on the TEST button to check if
we set our coordinates correctly.
After checking you OCR function click on the ACCEPT button to load the
correct coordinates to the corresponding field.
The others method options have special purpose:
NONE
We use this option when we want to leave blank any index value. Remember
if define an index as required you can leave in blank this field.
TODAY
We set this option if we want to fill any index with the actual date value.
Evolusoft
Page 40 of 97
Automated Input Module - Guide
DAYBATCH
We set this option if we want to fill any index with the batch creation date.
STANDARD VALUE
We set this option if we want to fill any index with a default value. You can
type the value under the VALUE column.
Once we have set all indexes parameters we click on the NEXT button to continue.
The Batch Wizard will create the batch template using all parameters we have set so
far.
The template will be send to the server, you should see a small progress bar and you
must receive a Process Completed message.
Next time you choose the same folder a list of all templates for this objects will be
shown, in order to choose one.
Evolusoft
Page 41 of 97
Automated Input Module - Guide
If you want to create a new template, then click over the menu bar the option
“TEMPLATES” then choose “Templates for Batch”, then choose “New Templates”. The
Wizard Template will be loaded.
Evolusoft
Page 42 of 97
Automated Input Module - Guide
Editing a batch template
If you wish to make any correction of coordinates or default values or anything on a
templates that already exists, we have to edit the template.
When we are editing the template we have the option to modify it, assigned to other
folder and to delete it.
When we click on the Edit template option, if we do not have any template for this
folder, you will get a message indicating that the template list is empty.
If there are any templates already created for the folder, when we click the Edit
Template options we will get the following window:
Evolusoft
Page 43 of 97
Automated Input Module - Guide
We have to choose from the template list for the one we want to modify. Then we
click the accept button (green check mark) and the following window will be show.
Evolusoft
Page 44 of 97
Automated Input Module - Guide
Deleting a Batch Template
In order to delete a batch template we only have to click on the trash button located
on the General tab.
Click to delete a batch template
Modifying a Batch Template
Once when we have loaded the Edit Template Wizard, we have the same options that
we did on the NEW Template Wizard.
In order to modify the template we go through the same parameters that we
describe on the CREATE NEW TEMPLATE section on this chapter.
Once we have set and correct all parameters we click on the ACCEPT button (green
check mark) in order to update our template. If the update process complete
successfully we should receive a confirmation message.
Evolusoft
Page 45 of 97
Automated Input Module - Guide
Assigning a Batch Template
In order to assign a template we choose Assign Template to Folder option form the
Template menu. We use this option when we have two folders with the same index
structure and we do not want to create the template for different folders. So what we
do then is to assign a template to other folder.
We should get the following window:
On the Templates Parameters tab we have to select form the template list the one
that we want to assign to the current folder.
Evolusoft
Page 46 of 97
Automated Input Module - Guide
We have to click on the browse button located on the right side of the name field to
load the templates list.
Click the doted button to load the templates list
From the templates list we choose the one that we want to assign to the current
folder. We have to click the ACCEPT button (green check mark).
Once we load the assigned templates we can view all template information, like
template name, form name, batch date, creation date, file type, scanner type and
method.
Evolusoft
Page 47 of 97
Automated Input Module - Guide
If we want to review or change any coordinates or default value we can do it on the
DETAILS tab. You are allowed to change any index values with out affecting the
source template.
Since we are just copying information from the template source in order to create a
new one.
When we have finished defining or associating a template we have to click the
ACCEPT button to save our template information. You should get a confirmation
message of a successfully update.
Evolusoft
Page 48 of 97
Automated Input Module - Guide
Chapter 6:
Input concepts
We think of using an input template when we have our information on database,
plain text, excel sheet, word documents, xml documents and also when our
documents do not have the same format, size and file type.
When to use an Input?
In order to decide when or when not to use an input, we will give you some
examples that need to be treated with an input template.
Database information data
When we have some database table in which we have all our index
values and the image file path. The table must have a least one field
with the image file path.
Excel files
When we have and excel sheet with several column containing the
index values and one column must containing the image file path.
These images can be from different types.
Text files (.txt)
When we have some kind of report fro a third party application and
the only way to export data is by generating text file.
Evolusoft
Page 49 of 97
Automated Input Module - Guide
Creating an Input template
In order to create an INPUT templates we have to browse on the file structure
window the desire folder in which we want to load a package of documents.
Once we over the folder we can click on the menu bar the option INPUT and then
choose NEW. If you have not created a template for this folder the Wizard templates
will load automatically.
You will receive a message box indicating that there is not any existing template for
this folder, so it will loads the Templates Wizard for you in order to create one.
When you click the button OK, the Templates Wizard will start loading, it will take
about 30 seconds depending on how fast and how much memory the workstation
have installed.
Evolusoft
Page 50 of 97
Automated Input Module - Guide
Once the wizard is loaded the welcome screen will be shown.
This wizard will help you to create a new index extraction template by specifying an
index data source (i.e., text file, spreadsheet or database) and assign the
information contained therein to a Secure-Archives / DocuManager server.
Click on the NEXT button to continue.
Evolusoft
Page 51 of 97
Automated Input Module - Guide
The template name window will be shown.
Here we type the template name. As an example we are going to create an input
template for an Excel spreadsheet.
We will choose FILE as a source type. Click on the NEXT button to continue to the
next screen.
On this screen we have to browse for our source file and define how data is
separated or defined on our file.
Evolusoft
Page 52 of 97
Automated Input Module - Guide
We need to click on the BROWSE
in order to load the search file window.
We will use a MS Excel file as a source file.
Evolusoft
Page 53 of 97
Automated Input Module - Guide
As you can see our excel file have some data columns form A to column E we have
some data and on column F we have the image file path.
On the OPEN file window we have to look for our source file in order to loaded into
our template.
Once we load our source file we are ready to continue. In case we load a TEXT file
we have then to define the data separator. We should find out what type of data
separator does the text file has in order to check the correct one.
We click on the NEXT button to continue.
Evolusoft
Page 54 of 97
Automated Input Module - Guide
On the Index field relation window we have to define the relation between our source
file and our index structure.
On the DATA column you will see a list of the columns defined on our MS Excel file
columns A to F.
On the folder Indexes columns you will see all index list from your folder. We need to
assign from which Data columns our Folder Index will take its value. Also we need to
define which column data will have our image file path.
Once we have finished assigning index value we click on the NEXT button to
continue. If you need to correct any settings you always have the BACK button
available to go to previews windows and make any corrections.
Evolusoft
Page 55 of 97
Automated Input Module - Guide
The template will be send to the server, you should see a small progress bar and you
must receive a Process Completed message.
Next time you choose the same folder a list of all templates for this objects will be
shown, in order for you to choose one.
If you want to create a new template, then click over the menu bar the option
“TEMPLATES” then choose “Templates for INPUT”, then choose “New Templates”.
The Wizard Template will be loaded.
Evolusoft
Page 56 of 97
Automated Input Module - Guide
Editing a batch template
If you wish to make any correction of coordinates or default values or anything on a
templates that already exists, we have to edit the template.
When we are editing the template we have the option to modify it, assigned to other
folder and to delete it.
When we click on the Edit template option, if we do not have any template for this
folder, you will get a message indicating that the template list is empty.
Evolusoft
Page 57 of 97
Automated Input Module - Guide
If there are any templates already created for this folder, when we click the Edit
Template options we will get the following window:
We have to choose from the template list for the one we want to modify. Then we
click the accept button (green check mark) and the following window will be show.
Evolusoft
Page 58 of 97
Automated Input Module - Guide
Modifying an Input Template
Once when we have loaded the Edit Template Wizard, we have the same options that
we did on the NEW Template Wizard for Input.
In order to modify the template we go through the same parameters that we
describe on the CREATE NEW TEMPLATE for Input section on this chapter.
On the Data Source tab we will find information about our template. In order to
modify this information we need to click on the Association Tab.
On this tab we can change our source file by pressing the BROWSE button
we can change our Excel columns – Folder Indexes relation.
We can delete any unwanted index by pressing the trash icon
. Also
.
Once we have set and correct all parameters we click on the ACCEPT button (green
check mark) in order to update our template. If the update process complete
successfully we should receive a confirmation message.
Deleting an Input Template
In order to delete an Input template we only have to click on the trash button
located on the Data Source tab.
Click to delete an Input template
Evolusoft
Page 59 of 97
Automated Input Module - Guide
Assigning an Input Template
In order to assign a template we choose Assign Template to Folder option form the
Template menu. We use this option when we have two folders with the same index
structure and we do not want to create the template for different folders. So what we
do then is to assign a template to other folder.
We should get the following window:
On the Templates Parameters tab we have to select form the template list the one
that we want to assign to the current folder.
Evolusoft
Page 60 of 97
Automated Input Module - Guide
We have to click on the browse button located on the right side of the name field to
load the templates list.
Click the doted button to load the templates list.
From the templates list we choose the one that we want to assign to the current
folder. We have to click the ACCEPT button (green check mark).
Once we load the assigned templates we can view all template information, like
template name, input date, creation date and file type.
Evolusoft
Page 61 of 97
Automated Input Module - Guide
If we want to review or change any value we can do it on the DETAILS tab.
You are allowed to change any index values with out affecting the source template.
Since we are just copying information from the template source in order to create a
new one.
When we have finished defining or associating a template we have to click the
ACCEPT button to save our template information. You should get a confirmation
message of a successfully update.
Evolusoft
Page 62 of 97
Automated Input Module - Guide
Chapter 7:
Introduction
On this chapter we are going to create a batch file package using a template that we
have already created.
We are going trough a step-by-step procedures in order to guide you easily trough
the processing of a batch file package.
Remember that you must have an active account to a DocuManager or Secure
Archive server. Also you must have installed on you computer the Automated Input
Module.
If you have not created any template please refer to the CHAPTER 5 on this guide.
The success of a good batch file processing depends on the template that we are
going to use. If there is any error on the template it will be passed to the batch file
package.
Evolusoft
Page 63 of 97
Automated Input Module - Guide
Creating a Batch file package
For reference we will look of the parameters that we set on the batch template.
Our batch templates name is: GENERALDOCS
Batch Type: Files
File Type: Image files
We set all our indexes to get standard or default values as you can see on the
following window. So when we process our batch of images files all indexes for each
image will have the values that we set.
Evolusoft
Page 64 of 97
Automated Input Module - Guide
STEP 1:
We have to select the folder on which we want to place our batch file package. Then
we go to the menu bar click on BATCH and choose NEW. If we have created a batch
template for this folder we should get a list of them in order to choose one.
Otherwise we will receive a message box indicating that there is not any template
created for this folder so it will load the Wizard Template for Batch.
STEP 2:
From the batch list we choose or select the one that correspond to the type of
documents that we are going to work with. Also we can check it properties by click
the Batch Properties button.
Evolusoft
Page 65 of 97
Automated Input Module - Guide
Once we select the batch template we need to type the package name and click the
accept button (green check mark).
STEP 3:
In some AIM version you will receive a message box asking you if you want to start
processing the batch.
In other version you may not get this message, so you need to go to the menu bar
click on BATCH and choose Process Batch.
Evolusoft
Page 66 of 97
Automated Input Module - Guide
STEP 4:
Once we select or decide to process our batch package the following window will be
shown. We have to tell the AIM application where are our files that we want to
included on this batch package. By pressing the BROWSE button to locate this files
.
STEP 5:
Once we press the BROWSE button we need to find our source file by double clicking
the folder structure.
Evolusoft
Page 67 of 97
Automated Input Module - Guide
STEP 6:
Once we have found our source file path. We need to press the button OK from the
previews window in order to load all image files into the Select File window.
On this window we will have some options on the menu bar available.
Select all image files
unselect all image files
Delete selected image files
Delete unselected images files
When we have loaded all images we can decide which image to process and which
not by using the icon command from the menu bar.
Evolusoft
Page 68 of 97
Automated Input Module - Guide
STEP 7:
On this example we will process all image files. So we press the select all icon
.
Then we need to click on the ACCEPT button (green check mark) to start processing
all image file.
If for any reason you get this message box. You need to check access permission on
the source file path.
Evolusoft
Page 69 of 97
Automated Input Module - Guide
STEP 9:
The AIM application will start loading all image files into the image viewer and
simultaneously will load all indexes values using the method that we have defined on
our batch template.
If you click on each record or line the image file will update the window to the
corresponding or related image.
On the index information window you can see the total of image processed. Also you
can see the cells color definitions “yellow” for cells with errors and “white” for cells
without errors.
In order to check all cells for errors we have to make use of the cells icons:
It use to refresh the image on the image window
It use to check all indexes on the batch package
It use to check just one cell on the indexes grid
It use to check jut one line of cell on the indexes grid
Evolusoft
Page 70 of 97
Automated Input Module - Guide
For date type indexes please check on the date format or try typing another date
format to see which one the index accept as a valid date.
Once you check the package of file for errors you should not get any errors and the
cells errors counter should now be at cero.
At this moment you can add more files to the same package by processing the batch
again. It will load the Select image window and then you can select new files in order
to add them to the previews list of files that already has been processed.
Also there is help for each index type. You need to place the cursor or mouse pointer
above the desire cell for 4 seconds and a yellow window will load for you with all
index information. This window is useful to know how indexes have been defined.
Evolusoft
Page 71 of 97
Automated Input Module - Guide
You can also delete one or all rows from the indexes list. By using the options on the
BATCH menu.
It is useful if we want to eliminate some records (rows) from our index list. It will
delete index record together with its related image.
STEP 10:
Saving the batch
If we want to save the batch to continue working on it later on, we need to go to the
menu bar, click on BATCH then choose SAVE. You will be prompted with a
confirmation window.
Evolusoft
Page 72 of 97
Automated Input Module - Guide
This is the confirmation message box that indicates the batch has been saved.
Once we have saved our batch it wont close the batch working session, we have to
do it manually by going menu bar click on BATCH and then choose CLOSE.
You will be prompted with a confirmation message box, warning you about closing a
batch with out saving it first. If you have previously saved the batch just click on the
YES button, if not from the menu click BATCH then choose SAVE. Then you can close
the batch.
Evolusoft
Page 73 of 97
Automated Input Module - Guide
STEP 11:
Retrieving a saved Batch
In order to retrieve a saved batch we need to go to the menu bar and click on the
BATCH option then choose OPEN.
A list of all saved batch will be loaded. All you need to do is to choose the one that
you want to work with. It can be anyone from the batch list.
Evolusoft
Page 74 of 97
Automated Input Module - Guide
Also you can see the batch properties by pressing the batch Properties button.
In order to load a saved batch we select it and then pres the ACCEPT button (green
check mark).
The loading process will take few seconds. Once it has been loaded a conformation
message box will be shown. Jus click the OK button to start working with your saved
batch.
Every time we load a saved batch you will see that all indexes will be loaded on
yellow color. This is by design in order to force you to check every time for indexes
errors.
Evolusoft
Page 75 of 97
Automated Input Module - Guide
STEP 12:
Transferring the Batch File Package
Once we have saved or load a saved batch package we then proceed to transfer the
batch to the DocuManager or Secure Archives application server.
We have to options to transfer the package, transfer immediately and transfer by
scheduler.
Immediate Transfer
These instructions apply for both Batch and Input packages.
We go to the menu bar click on the BATCH option then choose TRANSFER option.
A confirmation message box will be shown to make sure that you really want to
transfer the batch package.
We click on the YES button if we want to proceed with the immediate transfer
operation. If not we click on the NO button.
Evolusoft
Page 76 of 97
Automated Input Module - Guide
Once we choose to proceed with the immediate transfer by clicking the YES button
the transfer window will be shown.
On some version this window may vary. You will be able to see all transfer progress.
If you have some error during the transfer process you will receive a message on the
same window.
If you do not have any error during the transfer process you should get a
confirmation message, batch has been transferred successfully.
You can check if the package has been loaded into the DocuManager or Secure
Archives server on few minutes.
Remember that you should check you package before transferred in order to make
sure that all your indexes have the correct values and the correct image related.
Evolusoft
Page 77 of 97
Automated Input Module - Guide
Scheduler Transfer
We also have the option to program when we want to transfer our batch or input
packages.
These instructions apply for both Batch and Input packages.
To schedule a batch or input transfer we need to go to the menu bar click on the
BATCH option and then choose Scheduler Transfer option.
This option will load a small application that allow you to program the date and time
on which you want to transfer the file package.
Evolusoft
Page 78 of 97
Automated Input Module - Guide
On the left side panel we can see the table time on interval of 15 minutes, each rows
represents 15 minutes corresponding to the date we have choused from the right
side panel. Also you can see the date on the top of window.
Make sure that you select the correct time (am or pm). Right click over the desire
cell and from the pop up menu click the Add Appointment option.
A properties window will be shown. Click on the ACCEPT button (green check mark).
Evolusoft
Page 79 of 97
Automated Input Module - Guide
Please type a reference name on the corresponding hour cell. This is if you have
programmed several transfer packages.
The right side panel contains the calendar that allows us to select the date on which
we want to perform the transfer.
One important thing is to choose the package that we want to transfer. We can do
this by clicking on the list control that is located over the calendar. If for some
reason you cannot see any batches or input name, please exit this application and
load it back again.
Once we have set all our parameters for the scheduler transfer we must left this
application running. We can close the AIM application but again we cannot close the
scheduler transfer application. You can minimize the application in order to use you
computer with other application.
Evolusoft
Page 80 of 97
Automated Input Module - Guide
Chapter 8:
Introduction
On this chapter we are going to create an input file package using a template that
we have already created.
We are going trough a step-by-step procedures in order to guide you easily trough
the processing of an input file package.
Remember that you must have an active account to a DocuManager or Secure
Archive server. Also you must have installed on you computer the Automated Input
Module.
If you have not created any template please refer to the CHAPTER 5 on this guide.
The success of a good input file processing depends on the template that we are
going to use. If there is any error on the template it will be passed to the input file
package.
Evolusoft
Page 81 of 97
Automated Input Module - Guide
Creating an Input file package
For reference we will look of the parameters that we set on the Input template.
Our Input template name is: Excel – General Docs
Input Type: Files
File Type: Microsoft® Excel sheet
When we build up our template to process Microsoft® Excel files we match our
columns with our folder indexes. Remember that always there must be a column
with the image file path. You can process any excel file with out a related image.
This means that you cannot load only indexes values without a related image.
Here is the source file a Microsoft® excel sheet. As you can see we have column with
data and the last column has the related image file path.
When you work with excel files you may encounter problems with the data format
type. They may not match the data format type that you have defined for your folder
indexes. We recommend that on the excel file you define you data of text data type
to avoid any mismatch.
Evolusoft
Page 82 of 97
Automated Input Module - Guide
When we defined our excel template we match each column with our folder indexes.
Also we check the column that represents the image file path.
STEP 1:
We have to select the folder on which we want to place our input file package. Then
we go to the menu bar click on INPUT and choose NEW.
Evolusoft
Page 83 of 97
Automated Input Module - Guide
If we have created an input template for this folder we should get a list of them in
order to choose one.
Otherwise we will receive a message box indicating that there is not any template
created for this folder so it will load the Wizard Template for INPUT.
STEP 2:
From the batch list we choose or select the one that correspond to the type of
documents that we are going to work with. Also we can check it properties by click
the Batch Properties button.
Evolusoft
Page 84 of 97
Automated Input Module - Guide
Once we select the batch template we need to type the package name and click the
accept button (green check mark).
STEP 3:
In some AIM version you will receive a message box asking you if you want to start
processing the batch.
In other version you may not get this message, so you need to go to the menu bar
and click on BATCH then choose Process Batch.
Evolusoft
Page 85 of 97
Automated Input Module - Guide
STEP 4:
Once we select or decide to process our batch package the following window will be
shown. We will be able to see the number of files that has been processed together
with a progress bar.
STEP 5:
The AIM application will start loading all image files into the image viewer and
simultaneously will load all indexes values using the method that we have defined on
our batch template.
If you click on each record or line the image file will update the window to the
corresponding or related image.
Evolusoft
Page 86 of 97
Automated Input Module - Guide
If you don’t see any images at all. Please CLOSE the input, confirm that you don’t
want to save it. Check on the excel files the column that contains the image path and
make sure that it is a valid path. Process the input package again.
On the index information window you can see the total of image processed. Also you
can see the cells color definitions “yellow” for cells with errors and “white” for cells
without errors.
Once the AIM application finished to process all the Microsoft® Excel source file, it
will load all images and the list of all the indexes values. To see the related image
just click on the row and the images will be updated automatically.
In order to check all cells for errors we have to make use of the cells icons:
It use to refresh the image on the image window
It use to check all indexes on the batch package
It use to check just one cell on the indexes grid
It use to check jut one line of cell on the indexes grid
For date type indexes please check on the date format or try typing another date
format to see which one the index accept as a valid date.
Once you check the package of file for errors you should not get any errors and the
cells errors counter should now be at cero.
At this moment you can add more files to the same package by processing the input
again. It will load more files to the previews list of files that already has been
processed.
Evolusoft
Page 87 of 97
Automated Input Module - Guide
Also there is help for each index type. You need to place the cursor or mouse pointer
above the desire cell for 4 seconds and a yellow window will load for you with all
index information. This window is useful to know how indexes have been defined.
You can also delete one or all rows from the indexes list. By using the options on the
INPUT menu.
It is useful if we want to eliminate some records (rows) from our index list. It will
delete index record together with its related image.
Evolusoft
Page 88 of 97
Automated Input Module - Guide
STEP 10:
Saving the input
If we want to save the batch to continue working on it later on, we need to go to the
menu bar, click on BATCH then choose SAVE. You will be prompted with a
confirmation window.
This is the confirmation message box that indicates the batch has been saved.
Evolusoft
Page 89 of 97
Automated Input Module - Guide
Once we have saved our batch it wont close the batch working session, we have to
do it manually by going menu bar click on BATCH and then choose CLOSE.
You will be prompted with a confirmation message box, warning you about closing a
batch with out saving it first. If you have previously saved the batch just click on the
YES button, if not from the menu click BATCH then choose SAVE. Then you can close
the batch.
Evolusoft
Page 90 of 97
Automated Input Module - Guide
STEP 11:
Retrieving a saved Input File Package
In order to retrieve a saved batch we need to go to the menu bar and click on the
INPUT option then choose OPEN.
A list of all saved batch will be loaded. All you need to do is to choose the one that
you want to work with. It can be anyone from the input list.
Evolusoft
Page 91 of 97
Automated Input Module - Guide
Also you can see the batch properties by pressing the input Properties button.
In order to load a saved batch we select it and then pres the ACCEPT button (green
check mark).
The loading process will take few seconds. Once it has been loaded a conformation
message box will be shown. Jus click the OK button to start working with your saved
input.
Every time we load a saved batch you will see that all indexes will be loaded on
yellow color. This is by design in order to force you to check every time for indexes
errors.
STEP 12:
In order to transfer an input package, please read how to transfer a batch package,
all instruction and procedure apply for both types of packages.
Evolusoft
Page 92 of 97
Automated Input Module - Guide
Chapter 9:
Viewing Transfer Log
If during a transfer operation we receive any error message we can go to the
transfer log to see exactly what is going on with the transfer.
We can do this by going to the menu bar and click on VIEW, choose View Log
Transfer and then choose either for BATCH or INPUT.
Once we have choused the package type, the transfer log window will be loaded.
Here we can see the batch or input package name, the transfer date, status, mode
and result.
Evolusoft
Page 93 of 97
Automated Input Module - Guide
We also have several options on this window by clicking the following buttons.
Click for details information sends by the server.
Click to delete the log file.
Click to refresh the transfer log window.
Click to exit the transfer log window.
One common error is “server error”, on this case you must check with your
DocuManager or Secure Archives administrator that the Evolusoft Queue
Manager service is working.
This service is very important, because is the one that receive all packages
transferred by AIM application.
Evolusoft
Page 94 of 97
Automated Input Module - Guide
Downloading an erroneous transferred package
Once you transfer a package it goes to the server into a special folder and some
information is registered on a messaging queue. The Evolusoft Queue Manager will
receive this message and it will start processing this package. It will unzip the
package and then will try to load all files into the DocuManager or Secure Archives
database and file system.
If it encounters any error on the package during this process the Evolusoft Queue
Manager will return it to you.
Once you login into the AIM application, it automatically will show you a window with
all packages that could not be processed by the server.
Also if you want to check manually if you have any package with errors you can go
to the menu bar click on the VIEW option then choose View Error Messages.
In order to download an erroneous packages we have to select it from the list and
then click on the ACCEPT button. A download window
Evolusoft
Page 95 of 97
Automated Input Module - Guide
Additional Support
If you need additional support please contact us at [email protected] or call us at +507
223 1954.
You can also visit our support website at http://support.evolusoft.com
Evolusoft
Boulevard Balboa
Edificio Bay Mall
Technology Plaza
Segundo Piso, Local 213
República de Panamá
Tel.: (507) 263-1096
Fax: (507) 263-0962
Evolusoft Europe
Bernhofstrasse 23
8134 Zurich-Adliswil
Switzerland
Voice: +41 1 709 27 40
Fax: +41 86 079 423 24 82
e-mail: [email protected]
Evolusoft
Page 96 of 97