1
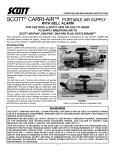
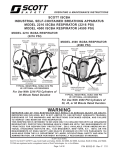
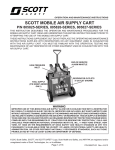
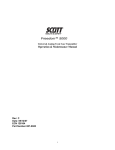
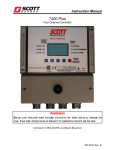
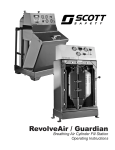
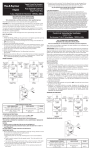
OPERATION AND MAINTENANCE INSTRUCTIONS
SCOTT® ELSA®
EMERGENCY LIFE SUPPORT APPARATUS
ELSA 5 / ELSA 5HF / ELSA 10 / ELSA 15
WARNING
IMPROPER USE OF THIS RESPIRATOR MAY RESULT IN SERIOUS INJURY OR DEATH. IMPROPER
USE INCLUDES, BUT IS NOT LIMITED TO, USE WITHOUT ADEQUATE TRAINING, DISREGARD OF
THE WARNINGS AND INSTRUCTIONS CONTAINED HEREIN, AND FAILURE TO INSPECT AND
MAINTAIN THIS RESPIRATOR.
THIS RESPIRATOR IS INTENDED TO BE USED ONLY IN CONJUNCTION WITH AN ORGANIZED
RESPIRATORY PROTECTION PROGRAM WHICH COMPLIES WITH THE REQUIREMENTS OF
“PRACTICES FOR RESPIRATORY PROTECTION,” Z88.2 AVAILABLE FROM AMERICAN NATIONAL
STANDARDS INSTITUTE INC., 1430 BROADWAY, NEW YORK, N.Y., 10018, OR THE REQUIREMENTS
OF OSHA SAFETY AND HEALTH STANDARD 29 CFR 1910 PARAGRAPH 134 AVAILABLE FROM
THE U.S. DEPARTMENT OF LABOR, OCCUPATIONAL SAFETY AND HEALTH ADMINISTRATION,
OR OTHER PERTINENT NATIONALLY RECOGNIZED STANDARDS.
DESCRIPTION
The SCOTT ELSA respirator is a lightweight, compact, self-contained
breathing apparatus for emergency escape use only. When properly
used, the SCOTT ELSA respirator provides emergency respiratory
protection for escape from atmospheres which contain irritating or
toxic contaminants, or are oxygen deficient. During use, it provides
a constant flow of breathable air to the wearer for a limited time. The
airflow is supplied to a loose fitting hood which can be donned quickly
and encapsulates the entire head, sealing at the neck. The respirator may be worn in a ready position by the user or stored at the point
of anticipated use. This respirator is for use at temperatures above
10° F/-12° C.
The ELSA 5 and 5HF respirators have a rated duration of 5 minutes,
the ELSA 10 respirator has a rated duration of 10 minutes, and the
ELSA 15 respirator has a rated duration of 15 minutes. All four are
intended for personal escape where the duration provided has been
found to be sufficient to exit the area of hazardous atmosphere. The
ELSA 5HF (Higher Flow) is intended for situations where the user may
have to exert extra effort in the escape, such as in climbing ladders or
stairs along the escape route.
The ELSA respirator consists of three (3) major subassemblies:
1. The hood assembly with anti-fog wipe AFW 45 applied
2. The cylinder and valve/regulator/hose assembly
3. The pouch and harness assembly
The ELSA respirator is approved by the National Institute of Occupational Safety and Health (NIOSH) for use during escape only.
The ELSA respirator is intended for use only as described in these instructions and within the limitations of the label located on the cylinder
and valve assembly and the NIOSH approval label located in the
centerfold of this instruction.
COPYRIGHT © 2004 SCOTT, ALL RIGHTS RESERVED
1
FIGURE 1
GENERAL LIMITATIONS ON USE
The following general limitations are IN ADDITION TO AND DO NOT
REPLACE THE SPECIFIC LIMITATIONS ON THE RESPIRATOR.
1. Personnel who intend to use this protective breathing equipment in
a dangerous atmosphere MUST recognize its limitations and have
the proper training in donning and operation of the equipment prior
to use.
2. The protection offered by this respirator depends upon the training
of the user, the suitability of the respirator to the application, and
the condition of the respirator.
3. This respirator is intended for ESCAPE ONLY from atmospheres
which become immediately dangerous to life and health.
4. This respirator only protects the user’s respiratory system, the head,
and a portion of the neck from hazardous environments. If the environment contains substances which may irritate or poison through
the skin, take the appropriate actions to protect the body such as
the use of protective clothing, etc.
5. Do not use oxygen in this protective breathing equipment. Use only
clean dry air in accordance with CGA Specification G-7.1 Type 1,
Grade D or better with a dew point of -65° F/-54°C or lower.
6. This respirator MUST NOT be used for fire fighting.
7. This equipment must be properly maintained, inspected and tested
by properly trained personnel in accordance with an organized respiratory protection program and these instructions.
8. This equipment must be protected from abuse or neglect which
may cause malfunction.
9. Do not use this equipment for underwater use.
10. Use only in accordance with the NIOSH approval label located in
the centerfold of this instruction and with the label located on the
cylinder and valve assembly.
WARNING
DO NOT OPERATE THIS EQUIPMENT WHILE
UNDER THE INFLUENCE OF DRUGS, ALCOHOL, OR ANY MEDICATIONS OR
SUBSTANCES WHICH MAY AFFECT VISION,
DEXTERITY, OR JUDGMENT. USERS OF THIS
EQUIPMENT MUST BE IN GOOD PHYSICAL
AND MENTAL HEALTH IN ORDER TO OPERATE SAFELY. DO NOT USE THIS EQUIPMENT
WHEN FATIGUE PREVENTS SAFE OPERATION. STAY ALERT WHEN OPERATING THIS
EQUIPMENT. INATTENTION OR CARELESSNESS WHILE OPERATING THIS EQUIPMENT
MAY RESULT IN SERIOUS INJURY OR DEATH.
WARNING
THE IMPROPER USE OF A RESPIRATOR MAY
RESULT IN SERIOUS INJURY OR DEATH.
READ AND UNDERSTAND THESE INSTRUCTIONS AND ALL LABELS AND WARNINGS
BEFORE ATTEMPTING TO USE THIS RESPIRATOR. RETAIN THESE INSTRUCTIONS FOR
TRAINING AND FUTURE REFERENCE.
WARNING
ANY UNAUTHORIZED MODIFICATIONS TO
THIS UNIT OR IN THE MAINTENANCE PROCEDURES, MATERIALS, OR PARTS USED
MAY RESULT IN A MALFUNCTION OF THE
RESPIRATOR WHICH COULD RESULT IN SERIOUS INJURY OR DEATH.
WARNING
THE SCOTT ELSA 5, ELSA 5HF, ELSA 10, AND ELSA 15 ARE EMERGENCY ESCAPE
BREATHING APPARATUS INTENDED FOR USE BY PERSONNEL WHO HAVE COMPLETED A USER-TRAINING PROGRAM AS PART OF AN ORGANIZED RESPIRATORY
PROTECTION PROGRAM. IMPROPER OR INCOMPLETE TRAINING IN THE USE OF THIS
DEVICE OR FAILURE TO CAREFULLY FOLLOW THE INSTRUCTIONS IN THIS MANUAL
MAY RESULT IN SERIOUS INJURY OR DEATH.
2
REGULAR OPERATIONAL INSPECTION
NOTE
THE FOLLOWING PROCEDURE MUST BE USED FOR NEWLY
RECEIVED UNITS, AS WELL AS DURING ROUTINE INSPECTION
OF UNITS IN ACCORDANCE WITH AN ORGANIZED RESPIRATORY
PROTECTION PROGRAM. HEAVY USE AND EXTREME ENVIRONMENTAL CONDITIONS MAY WARRANT MORE FREQUENT
ROUTINE INSPECTIONS. UNITS STORED FOR EMERGENCY
USE MUST BE CHECKED AS DESCRIBED BELOW AT LEAST
EVERY 30 DAYS.
1.
2.
3.
4.
WARNING
FOLLOW THE REGULAR OPERATIONAL
INSPECTION PROCEDURE EXACTLY. IF
ANY OPERATIONAL MALFUNCTION IS
NOTED, DO NOT USE THE RESPIRATOR.
REMOVE THE RESPIRATOR FROM SERVICE
AND TAG IT FOR REPAIR BY AUTHORIZED
PERSONNEL. FAILURE TO PROPERLY
IDENTIFY MALFUNCTIONS MAY RESULT IN
SERIOUS INJURY OR DEATH.
Open flap of pouch and harness assembly and remove hood.
Inspect the hood for discrepancies such as tears, cuts or abrasions, and for cracked or broken plastic parts. Inspect the neck
opening to be sure that elastic band is not damaged or broken. The
neck seal shall open and close easily and freely by hand.
Inspect the diffuser and for the presence of the diffuser foam located inside the diffuser. See FIGURE 2.
Remove the hose from the hood by unthreading the hose collar
from the hood diffuser.
DIFFUSER
FIGURE 2
5.
6.
Inspect the hose assembly for discrepancies such as tears, cuts or
abrasions of the hose. Verify that the O-ring is present on the hose
coupling. See FIGURE 3. The hose must be securely attached to
the regulator but rotate freely at the regulator end.
Inspect the regulator for exterior damage.
O-RING
FIGURE 3
3
7.
8.
9.
Loosen the drawstring on the carrying bag and remove the cylinder. Check the latest cylinder hydrostatic test date to ensure it is
current. All cylinders used with SCOTT self-contained breathing
apparatus must be visually inspected regularly and hydrostatically
tested by a licensed cylinder retester in accordance with the appropriate US Department of Transportation (DOT) specification or the
applicable DOT exemption. For a complete listing of retest date
requirements, refer to the current revision of Safety Precautions
for Air-Pak Cylinders, Scott P/N 89080-01, available on request
from Scott Health and Safety. The date of manufacture marked on
the cylinder is also the date of the first hydrostatic test. It is the
responsibility of your organized respiratory protection program to
arrange for inspection and hydrostatic testing of cylinders by a licensed retester, in accordance with DOT standards.
Visually inspect cylinder and valve assembly for physical damage
such as dents or gouges in metal. Cylinders which show physical
damage or exposure to high heat or flame, such as paint turned
brown or black, decals charred or missing, pressure gauge lens
melted or valve knob distorted, and cylinders which show evidence
of exposure to chemicals such as discoloration, cracks in the cylinder and/or bulging of the cylinder wall, shall be removed from service and emptied of compressed air. Refer to current applicable
publications on compressed gas cylinder inspection available from
Compressed Gas Association Inc. (703-413-4341), 1725 Jefferson
Davis Hwy., #1004, Arlington, VA 22202.
Ensure cylinder is fully charged. At room temperature, the tip of
the gauge pointer must be touching any part of the full band. See
FIGURE 4. If the cylinder is not full, remove from service and tag
for refilling by authorized personnel. See CYLINDER CHARGING PROCEDURE section of this instruction.
WARNING
DO NOT USE AN ELSA RESPIRATOR WITH A
PARTIALLY DEPLETED CYLINDER. AN AIR
SUPPLY CYLINDER THAT IS LESS THAN FULL
WILL NOT PROVIDE THE FULL DURATION TO
THE RESPIRATOR USER. SUDDEN AND UNEXPECTED TERMINATION OF AIR FLOW MAY
RESULT IN SERIOUS INJURY OR DEATH.
FIGURE 4
10. Inspect the carrying bag for cuts or tears and for damage to the
strap, the strap hangers, and the strap clip.
11. If any discrepancies are noted, tag the unit for repair and remove
from service. Discrepancies must be corrected by authorized personnel before returning unit to service.
4
After inspection, repack the ELSA respirator with a FULL air supply
cylinder as follows:
1. On a smooth, flat surface, refold the hood as follows:
a) Starting at the side opposite the diffuser, fold the longest dimension as shown in FIGURE 5A, making a rectangle, and gently
flatten the hood.
FIGURE 5A
FIGURE 5B
b) Fold the top part of the hood over the center, keeping the rest of
the hood as flat as possible as shown in FIGURE 5B.
c) Fold from top again overlapping the diffuser as shown in
FIGURE 5C.
FIGURE 5C
d) Fold the neck opening to overlap the hood top. Flatted the hood
toward the diffuser as shown in FIGURE 5D.
e) Fold the neck opening over on itself as shown in FIGURE 5E.
FIGURE 5E
f)
FIGURE 5D
FIGURE 5F
Position the diffuser on top of the folded hood as shown in
FIGURE 5F.
5
2.
3.
4.
Place the cylinder and valve assembly back in the carrying bag
and secure the drawstring. Orient cylinder so the gauge will be
visible through the transparent window.
Attach the folded hood to the hose by threading the hose coupling
collar onto the diffuser. Collar should be hand tight.
Coil the hose into the hood pouch on the carrying bag followed by
the folded hood. See FIGURE 6.
TOOLS
CAUTION
SHALL NOT BE USED TO TIGHTEN
THE HOSE COUPLING. USE OF TOOLS OR
OVER TIGHTENING THE HOSE COUPLING
MAY DAMAGE THE COUPLING, THE DIFFUSER, OR THE HOOD.
WARNING
HOSE COUPLING MUST BE PROPERLY
THREADED ONTO THE DIFFUSER AND
HAND TIGHTENED. A LOOSE OR CROSSTHREADED COUPLING MAY PERMIT LOSS
OF BREATHING AIR WHICH COULD RESULT
IN A FAILURE TO PROTECT THE USER
FROM THE HAZARDOUS ATMOSPHERE
CAUSING SERIOUS INJURY OR DEATH.
FIGURE 6
5.
6.
FIGURE 7
Close the cover of the carrying bag and secure with the hook and
loop fastener. Verify that gauge is visible through transparent
window. See FIGURE 7.
Fully extend carrying bag strap and place unit back in service.
FIGURE 8
6
DONNING AND USE OF THE ELSA RESPIRATOR
DONNING FOR STANDBY
The ELSA respirator may be worn in standby position either around the
neck on the chest as shown in FIGURE 9A, or around the neck and
under the left arm as shown in FIGURE 9B. The carrying bag must
always be positioned with the gauge window facing out and with the
pull tab on the hood pouch easily accessible. Move the harness strap to
the appropriate “D” ring and adjust the strap length as desired for comfort.
If the unit is stored at the point of intended use, the harness strap is to
be stored in the fully extended position.
FIGURE 9A
FIGURE 9B
USE OF THE ELSA RESPIRATOR
Place the unit into operation as required with the following procedure:
1.
2.
LIFT FLAP - to open carry pouch and expose hood.
REMOVE HOOD – pull the hood fully out of the pouch. See
FIGURE 10.
FIGURE 10
3.
WARNING
FIGURE 11
OPEN VALVE - the valve must be completely opened by turning
valve knob counterclockwise until it spins freely, approximately two
full rotations. See FIGURE 11. The rated duration of the air supply
begins when the valve is opened.
T H E R AT E D D U R AT I O N O F T H E E L S A
R E S P I R ATO R B E G I N S W H E N T H E A I R
SUPPLY CYLINDER VALVE IS OPENED.
DON THE HOOD IMMEDIATELY AFTER
OPENING THE CYLINDER VALVE. FAILURE
TO DON THE HOOD IMMEDIATELY MAY
WASTE THE BREATHING AIR SUPPLY AND
LEAVE INSUFFICIENT AIR FOR ESCAPE
WHICH COULD RESULT IN SERIOUS INJURY
OR DEATH.
7
4.
VERIFY AIRFLOW – air must begin immediately to flow into hood
as evidenced by sound of rushing air into the hood.
5. DON THE HOOD – remove any headgear and proceed as follows:
a) Locate the elastic neck seal at the large diameter opening into
which the head will be inserted and place hands into neck seal
as shown in FIGURE 12.
WARNING
IF NO AIRFLOW IS DETECTED AS EVIDENCED BY SOUND OF RUSHING AIR,
DO NOT USE THE RESPIRATOR. OBTAIN
A N O T H E R U N I T. U N D E T E C T E D A I R FLOW MAY INDICATE INSUFFICIENT AIR
FOR ESCAPE WHICH COULD RESULT IN
SERIOUS INJURY OR DEATH.
FIGURE 12
b) Spread hands to stretch open the neck seal and lower the hood
over the head until the neck seal is around the neck. See
FIGURE 13.
FIGURE 13
FIGURE 14
c) Position the diffuser assembly in front of the face.
d) Remove hands from the neck seal. There must be good contact
between the neck seal and the neck. Be certain that clothing is
not trapped in the seal and that long hair or beards do not protrude between the seal and the neck. See FIGURE 14.
e) Verify that air is being delivered to the hood. The sound of air
rushing into the hood and the inflation of the hood when holding
your breath indicate that air is flowing into the hood.
WARNING
MAINTAIN GOOD CONTACT BETWEEN THE
NECK SEAL AND THE NECK. POOR CONTACT
BETWEEN NECK SEAL AND NECK MAY REDUCE THE PROTECTION OFFERED BY THE
RESPIRATOR AND MAY RESULT IN EXPOSURE TO THE HAZARDOUS ATMOSPHERE
WHICH COULD CAUSE SERIOUS INJURY OR
DEATH.
8
6.
7.
LEAVE HAZARDOUS AREA FOR SAFE AREA - While departing
for safe area, hold the air supply to the body to keep the unit from
moving excessively.
FIGURE 15
REMOVE HOOD WHEN IN SAFE AREA - After use and when in a
safe area:
a) Remove the hood by reversing the donning procedure above.
See FIGURE 16.
FIGURE 16
FIGURE 17
b) Rotate the cylinder valve knob clockwise to close the valve. See
FIGURE 17.,
c) Remove the carry pouch from the body
d) Tag unit for inspection, cleaning, and recharging by authorized
personnel.
WARNING
DO NOT WEAR HOOD AFTER AIR FLOW
STOPS. WHEN THE SOUND OF RUSHING
AIR STOPS, OR WHEN THE HOOD STOPS
INFLATING WHEN THE USER MOMENTARILY HOLDS HIS/HER BREATH, THE
BREATHING AIR SUPPLY IS EXPENDED.
FAILURE TO REMOVE THE HOOD FROM
THE HEAD AFTER THE AIRFLOW STOPS
MAY RESULT IN SUFFOCATION WHICH MAY
CAUSE SERIOUS INJURY OR DEATH.
9
CLEANING AND MAINTENANCE
This procedure does not address any specific types of decontamination
that may be necessary. Any required decontamination procedures must
be established by the user’s respiratory protection program and performed before completion of routine cleaning and maintenance.
The following procedures must be performed following each use.
Separate the unit into its major subassemblies as follows:
1. Remove the hose from the hood by unthreading the hose collar
from the hood diffuser as shown in FIGURE 18.
2.
3.
4.
5.
6.
7.
8.
9.
FIGURE 18
Remove the cylinder and valve assembly from the carrying bag
assembly by loosening the drawstring and lifting the cylinder and
valve assembly out of the bag..
Clean the exterior surfaces of the cylinder and valve assembly, the
hose, and the carrying bag with a damp sponge and allowed to
completely air dry. If heavy soil must be removed, use a mild detergent solution, rinse thoroughly, and allow to completely air dry.
Carefully wash the hood assembly, the diffuser cap and the diffuser foam insert with warm (110° F/ 44° C maximum) mild soap or
detergent solution. Use care to avoid any scratching or abrasion of
the hood. Rinse the hood assembly and associated parts by flushing with water, allowing water to flow through hood.
Disinfect the hood and associated parts sponging the inside of
hood with a 70% solution of Isopropyl Alcohol.
Allow hood to completely air dry. Diffuser foam must be completely
dry before reassembly.
Turn hood inside out. Apply anti-fog wipe AFW 45 to each half of
the hood and buff to a clear finish with a lint free cloth. The anti-fog
wipe AFW 45 provides improved vision when the unit is used at
temperatures below 32° F/0°C. Turn hood right side out.
Recharge the air supply cylinder according to the CYLINDER
CHARGING PROCEDURE section of this instruction.
Perform the REGULAR OPERATIONAL INSPECTION as described
in this instruction and repack the ELSA respirator for its next use.
WARNING
APPLY THE ANTI-FOG WIPE AFW 45 TO THE
INSIDE OF THE HOOD AS INSTRUCTED.
FAILURE TO APPLY ANTI-FOG WIPE AFW 45
TO THE INSIDE OF THE HOOD MAY RESULT
IN FOGGING OF THE HOOD WHEN USED
CAUSING OBSCURED VISION WHICH
COULD LEAD TO SERIOUS INJURY OR
DEATH.
10
CYLINDER CHARGING PROCEDURE
Two different pressure cylinders are used with the SCOTT ELSA respirator: 1) 2216 psig for the 5 minute, and 2) 3000 psig for the 5 minute
HF (high flow), for the 10 minute, and for the 15 minute. Verify that the
charging equipment recharge pressure does not exceed the rated cylinder pressure. If cylinder pressure gauge does not read “FULL,” recharge is required. Proceed as follows:
1. Lift pouch flap and detach the supply hose assembly from the escape hood by unscrewing the knurled collar from the diffuser.
2. Turn cylinder valve clockwise to ensure cylinder valve is closed.
3. Loosen the drawstring and remove the cylinder and valve assembly
from the carrying bag.
4. Inspect cylinder and valve assembly for hydrostatic test date, deep
nicks, cuts, damage to the cylinder valve or evidence of high heat
exposure. If discrepancies are noted, do not refill. Tag cylinder “Do
not use - out of service.” Do not refill any cylinder which is not within
the prescribed test date.
5. Place cylinder in a suitable “fragmentation” container. The container
must be constructed to prevent personal injury in the event of component failure while recharging. SCOTT does not recommend the
use of a water bath while charging cylinders. A water bath must not
be used as a fragmentation container.
6. Remove the protective cap from the charging inlet port on the cylinder valve.
7. Connect Coupling Assembly, (.825 –14 NS-RH Thread) from air
source to inlet port of cylinder valve. Be sure recharge pressure
does not exceed rated pressure of cylinder: 1) 2216 psig for the 5
minute, and 2) 3000 psig for the 5 minute HF (high flow), for the 10
minute, and for the 15 minute. Use clean dry air in accordance with
CGA Specification G-7.1 Type 1, Grade D or better with a dew point
of -65° F/-54° C or lower.
8. With cylinder valve fully closed, slowly open charging valve and fill
cylinder to “FULL” at a rate not exceeding 1500 psig per minute.
Cylinder charging causes a rise in temperature. Allow cylinder to
cool to room temperature. After cooling, cylinder must be topped to
service pressure.
9. Close charging valve. Bleed residual pressure from charging line
before disconnecting charging fitting.
10. Disconnect charging fitting. Replace the protective cap on the
charging inlet.
11. Check for leaks from the end of the supply hose by immersing the
open end of the hose in clean water. If bubbles are detected leaking
from the open end of the supply hose, tighten the cylinder valve
knob until the leak disappears. Do not use excessive force on the
cylinder valve knob. If the leak does not disappear, remove the unit
from service and tag for repair by authorized personnel.
12. Check for leaks in the cylinder valve area by applying leak detector
fluid around the cylinder gauge connector. Soapy water may also
be used to detect leaks. Wipe clean afterwards.
13. Place the cylinder back into the carrying bag. Reconnect the supply
hose assembly to the escape hood by screwing the knurled collar
onto the diffuser hand tight. Repack the escape hood as detailed in
REGULAR OPERATIONAL INSPECTION section of this instruction.
WARNING
HIGH PRESSURE AIR IS INHERENTLY DANGEROUS. FAILURE TO FOLLOW THE CHARGING PROCEDURE AND FAILURE TO EXERCISE CAUTION WHILE WORKING WITH HIGH
PRESSURE AIR MAY RESULT IN A SITUATION
WHICH COULD CAUSE SERIOUS INJURY OR
DEATH.
WARNING
IF ANY LEAKS ARE DETECTED, REMOVE THE
UNIT FROM SERVICE AND TAG FOR REPAIR
BY AUTHORIZED PERSONNEL. FAILURE TO
REMOVE LEAKING APPARATUS FROM SERVICE MAY RESULT IN INSUFFICIENT BREATHING AIR IN THE SUPPLY CYLINDER WHEN
NEEDED IN TIME OF EMERGENCY WHICH
COULD LEAD TO SERIOUS INJURY OR
DEATH.
11
CAUTIONS AND LIMITATIONS
JMNOS-
Failure to properly use and maintain this product could result in injury or death
All approved respirators shall be selected, fitted, used & maintained in accordance with MSHA, OSHA,
& other applicable regulations.
Never substitute, modify, add or omit parts. Use only exact replacement parts in the configuration as
specified by the manufacturer.
Refer to User’s Instructions, and/or maintenance manuals for information on use and maintenance of
these respirators.
Special or critical User’s Instructions and/or specific use limitations apply. Refer to User’s Instructions
before donning.
S-SPECIAL OR CRITICAL USER’S INSTRUCTIONS
The ELSA 5, ELSA 5HF, ELSA 10, and ELSA 15 respirators are NIOSH approved to supply breathable air for
a limited period of time to permit emergency escape only from oxygen deficient or other life-threatening gas
or vapor atmospheres.
Ensure that the anti-fog wipe AFW 45 has been applied to the inside of the escape hood when the unit must
be used at temperatures below 32° F / 0°C.
Do not use this apparatus in temperatures below 10° F / -12° C.
Health & Safety Products
Monroe Corporate Center
PO Box 569
Monroe, NC 28111
Telephone 1-800-247-7257
FAX (704) 291-8330
www.scotthealthsafety.com
Printed in USA
P/N 89504-01 Rev. B 11/04
12