1
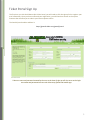
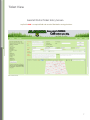
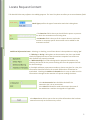
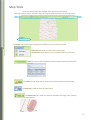
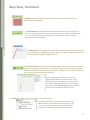
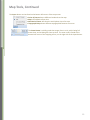
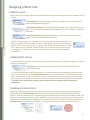
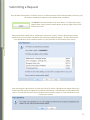
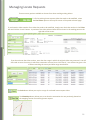
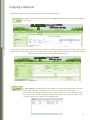
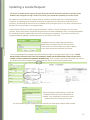
GeoCall Remote Ticket Entry User Manual and Tutorial For additional assistance please contact: Jennifer Lee Trainer [email protected] Kim Jenkins Operations Manager [email protected] Revised December, 2014 Table of Contents General Information 3 Ticket Entry Guidelines 4 Ticket Portal Sign Up 5 Logging In 6 Ticket View 7 Locate Request Content 8 Worksite Information 10 Map Tools 11 Mapping a Worksite 14 Submitting a Request 15 Managing Locate Requests 16 Copying a Request 17 Updating a Request 18 Quick Reference 19 2 General Information Holiday Schedule The following holidays are not part of the 48 hour notice. Holidays that fall on Saturday are observed on Friday. Holidays that fall on Sunday are observed on Monday. New Year’s Day Thanksgiving Day Memorial Day Friday after Thanksgiving Day Independence Day Christmas Day **Please note that Veterans Day is an observed holiday. AL811 will be open, however the legal dates of tickets processed that day will follow a holiday schedule.** Excavation Notice The Legal Start Date and Time is 48 hours, or two working days after a notification is made. Working Day is a 24 hour period commencing from the time of receipt of the notification, excluding Saturday, Sunday and the nine holidays outlined in Alabama Act 94-487. The notification will be good for 10 working days. Notifications should be renewed two days prior to its expiration date, if you will be working longer than 10 working days from the original excavation start date. This will allow for another 48 hour notification period to have the lines re-marked prior to the expiration of the locate request. A notice for demolition work shall be valid for a period of 20 working days from the start date given. Locate request notices are only for proposed excavation activities. Except for design or survey locate requests, notice of excavation should only be placed for excavation scheduled to start. No repeated updates for remarking should be made unless the work is continuing and underway. If the work has halted, the requests should be updated 2 working days prior to the restart of the work. In the event a minimum 48 hours notice cannot be given, you may request the underground facilities be located at an earlier date and time. The underground facilities may or may not be located by the requested time frame and may not be located after the excavation begins. If you proceed with excavation prior to the site being marked, damage could occur to surrounding underground facilities, and injuries could be encountered as a result. Your company/organization could be held responsible for the repairs. Tolerance Zone The Alabama Underground Damage Prevention Act 94-487 requires that the excavator observe a Tolerance Zone when excavation near the marked underground utilities. The tolerance zone is the width of the underground facility plus 18” on either side of the outside edge of the underground facility on a horizontal plane. Private Lines AL811 member facility owners and/or their contract locators will only mark the underground utility lines that they service and/or maintain. For example, water and sewer companies only mark the lines they install and maintain, up to their meters and taps. It is the excavator’s responsibility to have all private lines marked. The excavator is also responsible for notifying all non-member utility companies not participating in AL811’s service. 3 Ticket Entry Guidelines To ensure the correct members are notified, accurate information should be provided on each locate request. AL811 closely monitors all tickets entered via our online ticket entry program. Individual locate requests must be submitted for: Each street requesting to be marked, only one road can be requested per ticket. Each intersection requested to be marked, only one intersection can be requested per ticket. An entire intersection and down one of the corresponding streets can be requested on one ticket. Only one building/structure is allowed to be requested per ticket. Only one property/lot can be requested per ticket, locating entire subdivisions is not allowed. Multiple address on the same street may be entered on one ticket, but only if the work is being done in a continuous line or trench. If the lines need to be marked up to the house or structure, or if a pole along the pole line is skipped, then separate tickets will need to be entered. Road name data must be entered in a specific format in the designated Street and Intersection fields of the ticket for them to be recognized by the system. *Entering road name data in any other format that listed below could result in the correct member utilities not being notified.* ALL highways (US and STATE) are to be entered as follows: Hwy 214 Old Hwy 214 Hwy 214 BUS Hwy 214 ALT ALL interstates should be listed with the capital letter “I” and the corresponding interstate number. Example: I65 or I85 ALL county roads (including Lee County Roads) are to be entered as CORD and the corresponding road number. Example: CORD 184 • • • • Use the tab button to navigate forward through each field. If you are in a field that has a drop down arrow, such as the county field, you can enter the first few letters of the name you are searching for and the software will auto complete the word for you. Any field in RED is a required field and must be filled in before you can save and close a ticket. Distance requested to be located per ticket needs to be under 2 miles if possible. 4 Ticket Portal Sign Up The first time you visit the Alabama 811 Online Portal, you will need to click the sign up link to register your user information. Once you have confirmed your registration, you will then have access to the system features that will allow you to submit your locate requests online. The GeoCall portal website address is: https://geocall.al811.com/geocall/portal **the user name and password created by the user at the time of sign up will also serve as the login user name and password to access the ticket entry portal and mobile app. 5 Logging In You will need to log in to the portal to have access to the ticket entry features. **the user name is your email address. The password is created by the user at the time of sign up. Main GeoCall Portal Screen 6 Ticket View GeoCall Portal Ticket Entry Screen Any field in RED is a required field and must be filled before saving the ticket. 7 Locate Request Content *The GeoCall ticket entry software is a tabbing program. The ‘enter’ key does not allow you to move between fields. Work Type specifies the type of excavation work that is being done. • The Done For field is where you should list the person or persons for which the excavation work is being done. • Job Number field is the area of the request where a work order number or company specific item number can be added for the excavators records. Additional information boxes. Selecting, or checking, one of these boxes is the equivalent to saying ‘yes’. If Blasting or Boring is being done at the excavation site, then you should check the appropriate box so that the member companies can make sure their facilities are properly protected. If White Markings are used to designate the proposed excavation site, checking this box will let the person marking the site to be prepared to look for those markings. If multiple addresses, apartment numbers or letters are given for a site, this information should be listed in the remarks field and can sometimes be overlooked. Checking the Address in Remarks box is a way to make sure this information is brought to the attention of a person reading the ticket. the At Intersection Box should be checked if the excavation site is in an intersection. the Subd field should be used to document the name of the subdivision a worksite is assigned to if applicable. the Reset button allows you to clear any ticket information that has been entered incorrectly on the ticket entry screen. 8 Locate Request Content, Continued The Work On date and time boxes, which are referred to as the 48 Hour notice date, show the date and time in which the underground utility lines should be marked at an excavation site. To manually change the date in which the lines need to be marked at the excavation site, simply click the small calendar icon beside the date field and choose the requested date from the drop down calendar. Selecting the drop down arrow beside the time field will allow you to manually change the time in which the lines need to be marked at the excavation site **The 48hour notice date and time can be manually changed by the user, however, Alabama State Law requires excavators to give at least 48 hours notice (excluding weekends and holidays) before excavation work begins. In the event a minimum of 48hours cannot be given, you may REQUEST the underground facilities be marked at an earlier date and time. Please note that this is just a request, there is no guarantee the lines will be marked before the 48 hour notice. Should you request a short notice on your locate request, a pop up will appear to remind you of the required 48hour wait time. If you proceed with excavation prior to the underground utilities having been marked, damage could occur and injuries can be encountered as a result. Your company/organization may be held responsible for any repairs. The Good Through Date and Times of a locate request are shown to the right of the Work on date and time fields. The legal start date and time is 48 hours or two working days from the time of notification. Tickets are valid for 10 working days from the start date, and should be renewed two working days prior to the expiration date. •The Update By date, is the date that an extension or renewal ticket must be made in order to have continuous coverage at an excavation site. • The Good Until date is the date a ticket will expire. 9 Work Site Information The Work Site Information section requires you to enter specific information about the excavation site. The County and City in which the excavation will occur should be selected from the options available in the drop down lists provided by GeoCall. A listing of all the counties in Alabama are available in the county selection category. Once a county is chosen, a listing of the cities available on the map for that specific county will be shown in the drop down box in the place field. The place/city field is a free field. If the excavation site is in a city or town that is not on the drop down list, it can still be entered in the city field and saved on the ticket. The Address for the excavation site is broken down into several different fields. The Numeric portion of the address should be entered in the first field on the address line. If an address has a Directional Prefix listed before the street name, i.e. SW, SE, NE, or NW, this information should be entered in the second box on the address line. The Name of the Road the worksite is address to, or the name of the road the work is being done on, should be listed in the third box, (which is the largest box) on the address line. The Road Type, whether it is a Street, Drive, Avenue, Circle, etc.., should be listed in the fourth box on the address line. If an address has a Directional Suffix listed after the street name, i.e.: SW, SE, NE or NW, this information should be listed in the fifth field on the address line. The Intersection field should contain the road that is nearest to the worksite, that directly intersects with the road the worksite is on. The intersection field is not broken down into separate parts like the address field. The complete road name, including the type of road, should be listed in the intersection field. The area of excavation, or where the underground utilities need to be located/marked, should be listed in the Locate Directions box. *If the locate information includes directions that cannot be put in a separate field, then all the information should be listed together in the Locate Directions box. Please list any additional information or notes that the locators may need on how to find and/or mark the excavation site in the Remarks box. Locate information does not belong in this field. The Remarks box is NOT a required field. This box can be left blank. 10 Map Tools There are several map tools available when working with the map. The map tools are shown across the top and along the bottom portions of the map screen. The Zoom tool will allow you to view several different screen shots of the map. Full Extent will zoom to a view of the entire state. To Selected zooms directly to any selected features on the map. To XY will zoom to GPS coordinates that have been entered on the ticket. The Clear tool will allow you to remove an incorrectly plotted map marking. The Pan Tool is used to scroll the map screen. The Mark Line tool is used to mark the excavation site along a line, usually a road segment. 11 Map Tools, Continued The Mark Area tool should be used to mark an area on the map, such as a new subdivision or large property. The Use Selection button should be used to automatically mark on the map, any correctly returned results that were complied from the Use ticket search the map. i.e., exact address, exact street segment or intersection if the work is being performed at the intersection) The Measure tool uses a pencil to draw and/or trace any requested distance on the map. The distance is calculated along the route as it is drawn. Measure line results are calculated in mileage, footage and yards. Click the Use Ticket button to search the map using the address information previously entered on the locate request form. You will be presented with several search results based on the different values entered on the form. Clicking any one of these results will zoom to and select that feature on the map. If the Use Ticket search returns a result that appropriately defines the work site(i.e., exact address, exact street segment or intersection if the work is being performed at the intersection) you can click the Use Selection button to use the selection to automatically mark the map. The Find tool is used to search for a specific road on the map. Any results found after the system searches for a road will be shown in the attached search results box. The search results are categorized in several different categories, depending on the information entered. 12 Map Tools, Continued The Layers button can be found at the bottom left corner of the map screen. Points Of Interest layers different landmarks on the map. Map is the default street view. 2013 Aerial Photos will show the aerial photo view of an area. Topographic Map shows different topographical features of an area. The Zoom Button is a sliding scale that ranges from 1 to 10, with 1 being full extent view, and 10 being the close up view. The zoom scale is found at the bottom left corner of the mapping screen, on the right side of the layers button. 13 Mapping a Work Site Address Found When searching for a specific address, GeoCall provides several options for you to mark the excavation site on the map. • Exact Address – shows the pin point location of a property on the map. The exact address is designated by a green X. •Exact Property Boundary – shows the property boundary of an address found on the map. The exact property boundary shows a green outline of the shape of the property boundaries. •Exact Street Segment – designates the section of road that contains the address range in which the specific address is located. To mark the map using any of the above features, select the appropriate option from the Search results box. Once the desired selection is highlighted in green, click the Selected Results tool from the map tools bar. The green property indicator should then turn red in color. Once the area is marked, the utility buffer zone is shown around the marking tool and property. The buffer zone ensures the correct member companies are notified on each request. Address NOT Found If a specific address is unable to return an exact result, GeoCall will still provide additional options to correctly mark the excavation site. • Exact Street – shows the exact road that was typed in the address road name section of the ticket To mark the map using the Exact street feature, you should the select the corresponding road name from search results box, then click the Selected Results tool from the map tools bar. This will then change the green road selection to red. Once the area is marked, the utility buffer zone is shown around the marking tool and property. The buffer zone ensures the correct member companies are notified on each request. *If a road is more then 2 miles in length, you will need to know the distance to the site from the intersection. Marking an Intersection When work is being done at the intersection of two roads, you will need to select the exact street name option found in the Search Results box. Once selected, this will open up a secondary listing of all roads shown to touch the selected road. From the listing of intersecting roads, select the name of the second road name of the intersection where the work is being done. The map will zoom to the found intersection, it will be indicated by a green X. After verifying the area found by the system is correct, you should the select the Selected Results tool from the map tools bar. This will then mark the excavation site with a red circle. 14 Submitting a Request Once all ticket information is verified as correct and the excavation site has been plotted on the map, you are ready to submit your request to the member utility companies The Submit is the same feature as the save button. To submit your locate request ticket, simply click the submit button at the top right corner of the ticket entry screen. After pressing the submit button, GeoRemote users (level 3 users) will see a box listing the ticket number and a list of member companies that are being notified will appear. This box will also ask if you would like to enter another request or if you would like to close and exit your session. After pressing the submit button, E-ticket users (level 2) will see a dialog box will appear letting you know your ticket has been submitted and will be processed by a representative at the Alabama 811 center. This box will also ask if you would like to enter another request or if you would like to close and exit your session 15 Managing Locate Requests There are many options available to choose from when working existing tickets. To find an existing locate request ticket that needs to be modified, select the Find Ticket option at the top left corner of the portal welcome page. If you know the ticket number for a ticket that needs to be modified, simply enter the ticket number in the Ticket box and click the ‘search’ button. A preview of the ticket selected ticket will be shown in the reading pane on the right side of the screen. jlee If you do not know the ticket number, enter the date range in which the original ticket was processed. You will also need to enter the county in which the excavation occurred, then click ‘search’. You will then be given a list of tickets matching the county and date range searched for. The Print button allows you to print a copy of a selected locate request ticket. The Show Map button allows you to see how the excavation site was previously plotted on the mapping section of an existing locate request. 16 Copying a Request A duplicate copy of a ticket can be made by replicating the existing ticket. To make a copy of an existing ticket, click the Copy button from the menu options at the top of the ticket. A new ticket, containing the exact information as the first (including the previous area marked on the map) will appear on the ticket entry screen. Users should then enter the new address or lot number, AND mark the new excavation site on the map, then select the submit button. A Ticket History is created when a user updates, or resends an existing ticket. The new ticket holds a reference to the old ticket so that an audit trail of a ticket can be determined. This option displays the times a specific ticket was sent, in historical order from most recent to oldest. Simply click the history button at the top of the ticket menu to view the history of a specific locate request ticket. 17 Updating a Locate Request The option to update locate requests through the portal must be manually enabled by a member of the Alabama 811 management staff. Please let us know if you would like to update your tickets online. An update is a continuation of an existing ticket for jobs that will take longer than 10 working days to complete. An update gives the member companies an opportunity to check and re-mark their lines if necessary, and extends the ticket time for an additional 10 working day period. The utility companies have 48 hours to re-mark all lines on an updated ticket. Locate request notices are only for proposed excavation activities. Except for design or survey locate requests, notice of excavation should only be placed for excavation scheduled to start. No repeated updates for remarking should be made unless the work is continuing and underway. If the work has halted, the requests should be updated 2 working days prior to the restart of the work. To update a request, simply click the find ticket button that is on found on the far left side of the screen, enter the ticket number you need to update in the ticket number box and then click search. The corresponding locate request ticket should then be visible on the right side of your screen. PLEASE DOUBLE CHECK TO MAKE SURE THAT THE COMPANY NAME AND INFORMATION LISTED ON THE TICKET FOUND IS YOUR COMPANY’S NAME AND INFORMATION. If the company and ticket information are correct, you should now click the update option that is found at the top of your locate request ticket. After selecting the update button, you will be prompted to edit the contact information in needed. If no modifications need to be made, simply click ok to proceed with the save. You should then be given a pop up box that contains your new locate request ticket number. 18 Quick Reference Guide Thank you for signing up for Alabama 811’s GeoRemote program. This site streamlines the ticket data entry process and allows you to define your worksite directly on our maps, resulting in quicker processing times and a more accurate locate. If you have any questions not addressed in this guide please feel free to contact Jennifer Lee at 205-731-3210. Step 1: Enter the Worksite and Locate Area Information Please input information about your excavation site, including a detailed description of the area that needs to be checked for underground utilities, in the corresponding boxes on the locate request form. *All RED fields are required Step 2: Identify the Excavation Site on the Map Note: The area marked on the map is used to determine which utilities should be notified of the pending excavation. Once the site has been marked, you will see a 100 meter buffer appear around the marking. Please try to be as concise as possible with your map markings while making sure the mark plus buffer fully covers the excavation site. Click the Use Ticket button to search the map using the address information previously entered on the locate request form. You will be presented with several search results based on the different values entered on the form. Clicking any one of these results will zoom to and select that feature on the map. You will then need to use one of the following tools to mark the excavation site on the map. If the Use Ticket search returns a result that appropriately defines the work site(i.e., exact property boundary, exact address, exact street segment or intersection if the work is being performed at the intersection) you can click the Use Selection button to use the selection to automatically mark the map. The Mark Area tool should be used to mark a specific area on the map, such as a new subdivision or large property. The Mark Line tool should be used to mark the excavation site along a line, usually a road segment. The x y Coordinate tool allows you to enter the GPS coordinates for an excavation site Step 3: Submit the Request To submit your locate request ticket, simply click the submit button. You will then be prompted to enter another request or to close and exit your session. 19