1
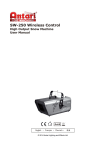
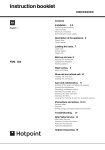
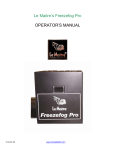
Le Maitre Ltd.
LE MAITRE LTD - ARCTIC SNOW MACHINE
User Manual
Introduction
Thank you for choosing Le Maitre’s Arctic Snow Machine. Prior to use, we
suggest that you read all the instructions provided, you can then look forward
to it’s reliable and satisfactory performance.
DANGER OF ELECTRIC SHOCK!
●
●
●
●.
●
Keep the device dry and away from rain and moisture! Never open the
housing!
Always unplug your Arctic Snow Machine before filling its tank and turn off
or unplug when not in use.
Use a grounded electrical outlet only, prior to use take care to determine
that the unit is installed at the rated voltage.
Never aim the output nozzle directly at people or animals and locate the
machine in a well-ventilated area.
Never touch the device during the operation.
.
●
●
●
DANGER OF BURNING!
Never add flammable liquids of any kind (oil, gas, perfume) to the snow
liquid.
Always use Le Maitre approved snow fluid to avoid damage to the unit and
to ensure the machine works effectively.
Always make sure there is sufficient liquid in the machine's liquid tank.
Contents
●
●
●
●
●
Arctic Snow machine with power cable
Volume remote controller
Fluid tank
Hanging bracket
Screw set and user manual
Arctic Snow external View
01. Housing
11. Indicator
02. Escape Nozzle
12. Control Outlet Socket (3-pin XLR for DMX)
03. Hanging Bracket
13. Control Inlet Socket (4-pin XLR for remote)
04. Handle
14. Control Outlet Socket(4-pin XLR for remote)
05. Safety Ring
15. Rocker Switch/Volume
06. Washer
16. Rocker Switch/Power
07. Tightening Screw
17. Power Inlet Socket
08. Tank
18. Foot
09. Control Inlet Socket
19. Power Cord and Plug
(3-pin XLR for DMX)
10. DMX DIP Switches
03
01
02
05
08
04
19
06
18
07
09
10
11
12
13
14
15
16
17
Setup
● Remove all packing materials including foam and plastic padding and
place machine on a flat surface and follow step set up instructions.
Tank cap
PU Liquid Tube
Adaptor
with Nut
F ilter
Tank
A ssem b lin g Tan k & F ilter
Please note that "adaptor w ith nut"
set must be tightly connected.
●
Assemble the hanging bracket on the machine, use the M8 screws to
position the hanging bracket with the machine, the tightening screws are
for adjusting the machine’s angle when in the air.
Hanging Bracket
M8 Screw
Tightening
Screw
Washer
Assembling Hanging Bracket
Assemble 4 w ashers on both inner sides of the hanging
bracket w ith M8 screw s on outer sides as indicated.
●
●
Fill with Le Maitre Snow Fluid and replace cap.
Firmly attach the 4-pin connector on the remote control cable to the proper
input on the rear of the machine.
Installation Note
●
This unit can be installed at floor level or suspended overhead where it will
work at its best. When mounting the unit overhead, always ensure that the
unit is secure, connected by the cable wires passing the safety ring. Do
not angle at more than 15 degrees..
●
Always monitor tank fluid level during operation as running the snow
machine without fluid can permanently damage the unit. If you experience
low output, mechanical noise or no output at all, unplug immediately.
Check the fluid level, the external fuse, remote connection and power from
the wall. If all of the above appears to be working correctly plug the unit in
again. If snow does not come out after holding the remote ON/OFF button
down , check the hose attached to the tank to make sure there are no
blockages in the hose.
Operation
●
●
●
●
Plug the power cable into a grounded electrical outlet.
Press the red power switch to turn on the machine and make sure the red
indicator located above the power switch is lit.
The units can be controlled by DMX or the volume remote control, see
below.
Connect the remote control’s male 4-pin plug to the machines INPUT
socket and make sure the red POWER indicator is lit.
C ab l e l en g t h : 1 0 m
C o nn ect o r: 4 -PIN XLR
Fu n ct i o n s : On / Off an d Vo l u m e
Vol ul m e Knob
Indi cator /G r een
I ndicator / Red
4-PI N XLR
●
●
●
Press ON/OFF button, once the IN USE indicator lights up green the
machine is ready to operate (during this procedure, the machine’s fan and
motors are operating.)
Use the adjustable OUTPUT VOLUME on the volume remote controller to
set an output value between 10% to 100%.
Use the AIR VOLUME button located at the rear of the machine to adjust
the fan output volume. When the fan output is increased the snow flakes
produced are smaller, when the fan output is decreased, bigger snow
flakes will be produced. The snow output volume will not be affected.
DMX Control
●
●
Connect the DMX lead to the DMX-IN socket on the rear of the machine.
Test the system by activating the machines selected DMX channel. When
the channel value is increased the snow machine should produce snow at
a steadily increasing rate. The unit is OFF when a value between 0-5 is
selected. It will reach 100% output once the channel is set to 255.
DMX protocol
DMX value
0-5
6-255
OFF
ON
Addressing
Each device occupies 1 channel. To ensure that the control signals are
properly directed to each device they will need to be addressed. This will need
to be adjusted for each device by changing the DIP-switches as set out in the
table below.
The starting address is defined as the first channel from which the device will
respond to the controller. Make sure that you do not have any overlapping
channels in order to control each device correctly and independently from any
other fixture on the DMX data link. If two, three or more devices are addressed
similarly, they will work similarly.
Occupation of the DIP-switches:
Setting the
DMX-starting
DIP-switch no.
1
2
3
4
5
6
7
8
9
1
2
4
8
16
32
64
128
256
OFF
▽
▽
▽
▽
▽
▽
▽
▽
ON
▲
▽
▽
▽
▽
▽
▽
▽
OFF
▽
▽
▽
▽
▽
▽
▽
ON
▲
▽
▽
▽
▽
▽
▽
▽
▽
▽
▽
▽
▽
address:
Device number
Starting
& channels
address
Device 1 - Channel 1
Device 2 - Channel 2
Device 3 - Channel 3
Device 4 - Channel 4
Device 5 – Channel 5
ON
▲
OFF
▽
ON
▲
OFF
▽
ON
▲
OFF
▲
▽
▲
▽
Maintenance
●
●
●
Do not allow the snow liquid to become contaminated, replace caps on the
liquid container and the snow machine tank immediately after filling.
When storing the unit rinse the system with pure water and let it pump for
at least 1-2 minutes to ensure a longer life-span of the motor and the
nozzle.
We strongly recommend that you regularly clean the residue around snow
machines vent holes (on both sides of the machine) with a soft brush.
Technical Specifications
Model
Arctic Snow Machine
Power Supply
AC100/120/230/240V, 50-60Hz
Motor
600W
Output Volume
140 ml/min
Tank Capacity
5 Liters
Fluid Consumption
650 seconds/liter
Remote Included
SC-2
10 meter Remote extension
EXT-6
DMX
ON-Board
Weight
12Kg
Dimensions (LxWxH)
525*276*228mm
Warm-up Time
N/A
Le Maitre Ltd
6 Forval Close
Wandle Way, Mitcham
Surrey, CR4 4NE
Tel: +44 208 646 2222
www.lemaitreltd.com