1
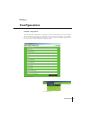
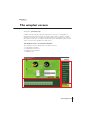
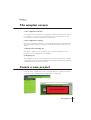
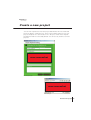
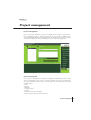
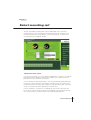
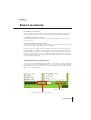
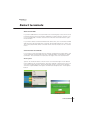
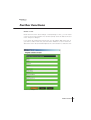
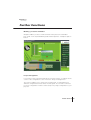
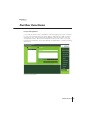
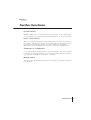
wieplan
Manual
Getting started
05.563.6389.0
© 2001-2002 Wieland Electric GmbH, Bamberg Germany
Wieland wieplan 1.5 - Build 45 user manual for Windows.
User manual: JMS-Multimedia.de, Regensburg
Programming: JMS-Multimedia.de, Pcb Cad
The contents of this manual are solely for information purposes. They can be modified without
prior notice and should not be regarded as an obligation on the part of Wieland Electric GmbH.
Wieland Electric GmbH does not guarantee the correctness or accuracy of the information in
this manual.
wieplan 1.5
User manual
Contents
Introduction
6
7
Registration, Installing wieplan, Uninstall wieplan
Help system, Programme start-up
Configuration
8
wieplan configuration
wieplan screen
9
10
Explanation of the screen
Explanation of the screen
Create a project
11
Project data, “Save” dialogue
Select mounting rail
12
13
Project management, select mounting rail
- Work perforation
Select terminals
14
14
15
16
17
17
17
Select end clamp
Select terminals
- Search functions
- Add terminals
- Remove terminals
- Later insertions of terminals
- Insert space
Marking
18
18
Marking
- Mark in ascending order
Position jumpers
19
20
Position jumpers
Position jumpers
Position covers
21
Position covers
Accessories
22
Accessories
Order data
22/23
Order data
Output
24
25
Output
Drawing frame
Further functions
26
27
Create co-user
Place busbar
28
29
Place busbar
Labelling - protective earth conductor character
29/30
31
Project management
Favourites
32
Copying of terminal blocks
Contents 3
Introduction 4
Introduction
Welcome to wieplan, your new software for the configuration of Wieland terminal
rails. wieplan enables you to plan a complete terminal rail in a very simple way
and to then place an order with Wieland. The configured terminal rail can be
stored in DXF format and read into a CAD tool for further processing. Due to
the intuitive user interface, the configuration of terminal rails with wieplan is
easy.
5
wieplan 1.5
User manual
Introduction
Registration
Please take the time to fill in the enclosed registration form and send it to
Wieland. We will then inform you about updates and new functions of wieplan
and other Wieland software.
Installing wieplan
1. Insert the wieplan CD into the CD ROM drive.
2. If you activate the auto-start function, a short intro starts where you can
choose your favourite language for wieplan.
3. If you deactivated the auto-start function, please open the folder ”data” on
the CD ROM and double click the file “wieplan_install”.
4. Follow the installation instructions on the screen.
new screenshot
wieplan installation dialogue
Uninstalling wieplan
Once wieplan has been installed, the folder “wieplan 1.5” is located in the
“Programmes” folder in the Windows “Start” menu. This folder contains both the
programme and the uninstall software.
If you wish to uninstall wieplan, locate the wieplan folder and start the “wieplan
1.5 deinstall”. Please follow the notes on the screen during the removal of the
software.
Introduction 6
wieplan 1.5
User manual
Help system
During the installation of wieplan, the manual is also copied to your computer in
PDF format. You can view PDF files using the Adobe Acrobat Reader software
which you can find on the wieplan CD. In addition to the printed manual, the
electronic manual gives you a brief overview of all the wieplan functions. The
electronic manual can be retrieved in the programme via the menu item “Help –
Manual” or directly from the wieplan programme folder.
Further information about the software can be found under the internet address
http://www.wieland-electric.com/wieplan/.
Programme start-up
Start wieplan by double clicking on the programme icon on your desktop or via
the “Start” menu.
new screenshot
Start wieplan by double clicking on the programme icon on your desktop or via the “Start” menu.
Introduction 7
wieplan 1.5
User manual
Configuration
wieplan configuration
The first time the programme is started, you are requested to enter your master
data. This data is required for order processing. Click on the button “Save data”
to store your master data permanently. You can modify the data at any time via
the menu item “User settings – Change data”.
“Base data” dialogue
“User settings” menu
Configuration 8
wieplan 1.5
User manual
The wieplan screen
wieplan - your new tool!
wieplan was developed to provide a powerful tool for the configuration of
Wieland terminal rails which is both intuitive and simple to operate. wieplan
guides you through the complete configuration process step by step. You are
then able to order your configured terminal rails from Wieland in a premounted
state. You thus save valuable time and money.
The wieplan screen – your new workstation
The wieplan screen is divided into four different areas:
1. Configuration window
2. Configuration sequence
3. Display of mounting rail
4. Shopping cart
1
2
4
3
The various sections of wieplan
The wieplan-screen 9
wieplan 1.5
User manual
The wieplan screen
1. The configuration window
You design your terminal rail in the configuration window with the items required.
For example, you select the mounting rail, place the terminal blocks on the
mounting rail, mark them and order the terminal rail.
2. The configuration sequence
Using the configuration sequence, you can navigate through the individual steps.
The configuration sequence keeps you informed about the progress of your
design.
3. Display of the mounting rail
WYSIWYG – What you see is what you get. You can immediately see the
progress of your configuration in the display.
4. Shopping cart
The shopping cart shows you the number of selected items during the complete
configuration. By clicking on the shopping cart, a dialogue is displayed containing
a detailed list of all the items in the cart.
Create a new project
A new project is created via the menu command “Projects – Create new project”
or via the “Start” dialogue when the application is started up.
new screenshot
“Projects” menu
wieplan “Start” dialogue
The wieplan screen 10
wieplan 1.5
User manual
Create a new project
You are first requested to enter the project data. Please fill in the fields and
press the button “Create project”. Then select a target folder for your new
project and press the “Save” button. The “Projects” folder in the wieplan
programme folder is selected by default. You can use any folder to store the
projects.
new screenshot
Record project data
new screenshot
“Save” dialogue
Create a new project 11
wieplan 1.5
User manual
Project management
Project management
Once your project has been stored, the wieplan main window is opened. The
first configuration step is “Project management”. This window enables you to
store and manage different configurations of mounting rails in one project. More
informations about the project management you will find on page 29.
wieplan project management
Select mounting rail
Choose your configuration in the project management and change via the course
of the configuration to the screen “Select mounting rail”. Here you determine
the type and characteristics of the mounting rail. You can specify the following
characteristics:
- Type
- Height
- Material
- Slotting yes/no
- Length
- End of rail to first end clamp
- Space between blocks and end of rail
Project management 12
wieplan 1.5
User manual
Select mounting rail
The list of possible mounting rails reduces depending on the specified
characteristics. Select the required mounting rail, put in the length for your
mounting rail and click on the button “Select mounting rail” to transfer the
mounting rail into the display window.
Select mounting rail
“Work perforation” option
If you select the value “no” for the product characteristic “Slotting”, the “Work
perforation” button appears. This function enables you to define your own
perforation for the selected mounting rail.
Click on the button “Work perforation”. You can automatically add round holes,
long holes or slots. Enter the required slot interval from the zero point of the
rail (measured from the left) in the “Distance” field, specify the type of the hole
(long or round) as well as the diameter (for round holes).
Click on the button “Create hole” to display the hole on the rail. Delete the
holes via the “Delete” button. Return to the display of the mounting rail with
the “Close” button. Your defined holes are automatically adopted.
Select mounting rail 13
wieplan 1.5
User manual
Select end clamp
work perforation
Select end clamp
You select the required end clamp on the “Select end clamp” screen. Only the
appropriate end clamps for the selected mounting rail appear. Click on the
required end clamp to display its technical data. The end clamp is transferred
to the mounting rail via the button “Place end clamp”. Pressing the “Continue”
button takes you to the configuration step “Select terminals”.
Select end clamp
Select end clamp 14
wieplan 1.5
User manual
Select terminals
Select terminals
Before you reach the dialogue for selecting the terminal blocks, wieplan displays
a “Start” screen the first time the function is retrieved, where you can specify
a terminal family.
Once you have made your selection, the “Select terminals” screen is opened.
The window is divided into three areas. A list with all the possible terminals for
your mounting rail appears in the centre of the screen. You can limit the list
using the various search and filter options on the left-hand side so that you can
directly retrieve your required terminals.
Search functions
Terminal selection
Technical data
Select terminals
Select terminals – Search functions
wieplan offers you numerous possibilities for refining your search for the
appropriate terminal.
a) Searching according to the terminal family
Clicking on the “taris” button for example only displays a list of taris terminals.
Select terminals 15
wieplan 1.5
User manual
Select terminals
b) Terminal functionality
You can limit your list according to the terminal functionality. If you select the
term “Feed-through terminal”, all the feed-through terminals are displayed.
c) Voltage/Current/Cross section
You can further refine your selection via the fields “Voltage”, “Current” and
“Cross section”.
d) Type and purchase order number
If you can remember the type or order number, you can search for those terms
via the fields “Type” and “Purchase order number”.
Once you have restricted the list of available terminals, click on the required
type designation to display a representation of the terminal together with the
technical data. If required, you can display the order number instead of the type.
To do so, select the option “Nr.” (see diagram). The restrictions are removed
by selecting the button “Show all” and all the suitable terminals for the selected
mounting rail are displayed.
Adding terminals to the mounting rail
If you have selected an appropriate terminal, you can add it to the mounting rail
by clicking on the button “Add terminals”. If you wish to add several terminals
at the same time, enter the required number of terminals in the “Quantity” field
and click on “Add terminals”.
Adding terminals
“Add terminals” button
Toggle switch between order number and type
Select terminals 16
wieplan 1.5
User manual
Select terminals
Remove terminals
If you have added an incorrect terminal to the mounting rail, select the incorrect
terminal with the left mouse button and delete it again with the “Delete” key
(on your keyboard) or via the context menu which is retrieved with the right
mouse button.
If you wish to delete several terminals at the same time, click on the first terminal
and select the last terminal to be removed, while holding down the “Shift” key.
The selected terminal can be removed via the “Delete” button or the context
menu.
Later insertion of terminals
If you wish to insert terminals into an existing configuration at a later date, click
on the required terminal and insert the required number via the button “Add
terminals”. The terminals are inserted to the right of the selected terminal.
Insert space
Spaces are inserted via the context menu. Click with the right mouse button
in the display of the mounting rail to open the wieplan context menu. Here you
can insert a space after the selected terminal via this context menu. Please
enter the required width of the space in millimetres and press the “Insert space”
button.
Context menu “Insert space”
“Insert space” dialogue
Select terminals 17
wieplan 1.5
User manual
Marking
Marking
wieplan offers you the option of labelling your terminals. If you click on the
required terminal, the terminal is displayed together with the technical data and
the number of possible labelling fields. Enter your inscription in the labelling
fields and then press the button “Adopt inscription”. Your text is now displayed
on the selected terminals.
If you wish to delete the inscription again, click on the terminals, delete the
marking values and adopt the new inscription with the button. If you enter a
space in a labelling field, an empty marker plate is added in the display of the
mounting rail.
Mark terminals
Mark terminals in ascending order
If you wish to mark several terminals in ascending order, first select the required
terminals while holding down the “Shift” key. You are then able to enter a
constant value (e.g. a letter), a starting value and a step value. Click on the
button “Adopt inscription” to mark the selected terminals in ascending order.
Marking 18
wieplan 1.5
User manual
Mark terminals in ascending order
Position jumpers
The next configuration step involves positioning jumpers on your terminals.
First select the required terminals while holding down the “Shift” key (note:
you can only bridge terminals of the same type and size). If you have selected
the terminals, a magnified display of the terminal appears. Green dots on the
terminal indicate the possible jumper positions. If a jumper has already been
placed above a bridging point, this is indicated by a red dot. Now determine the
position of the jumper by clicking on the corresponding button. wieplan then
indicates the possible jumper types for the selected terminal and position on
the right-hand side of the screen.
Position jumpers 19
wieplan 1.5
User manual
Position jumpers
Position jumpers
The jumper is positioned on the terminals by clicking on the required diagram.
To remove a jumper at a later date, select the function “Remove jumper” from
the context menu which is accessed via the right mouse button. Select the
required jumper in the subsequent dialogue and remove it by pressing the button
“Remove jumper”.
new screenshot
“Remove jumper” context menu
“Remove jumper” dialogue
Position jumpers 20
wieplan 1.5
User manual
Position covers
Covers
To position a cover on the terminal, first click on the required terminal. wieplan
indicates the possible covers for the selected terminal. Click on a cover to
position it on the terminal.
Position covers
If you wish to remove the cover, select the terminal followed by the function
“Remove cover” from the context menu using the right mouse button.
Context menu “Remove cover”
Position covers 21
wieplan 1.5
User manual
Accessories
Accessories
To add accessories to the order or the configuration, change to the configuration
step “Accessories”. In this screen, you can add accessories to the rail and/or
the order. Click on the required accessory in the list and press the button “Simply
add it to your order” or “Add to the rail” to put the accessory in your shopping
cart.
You can also place a busbar in this screen (read also page 27).
Accessories
Order data
Order data
In the “Order data” screen, you enter your personal details such as the invoice
address or delivery address and add comments to your order such as special
requirements or a specific delivery date. When you have entered the order
data, you access the last step via the “Continue” button: the output.
Accessories 22
wieplan 1.5
User manual
Order data
Order data - invoice address
Order data - delivery address and order options
Order data 23
wieplan 1.5
User manual
Output
Output
In the last configuration step, you have the option to output your project in
various formats:
Output
- Output piece list
With this function, you print out a component list for retention in the control
cabinet.
- Output drawing data
With this option, you open the drawing frame with a plan view of your
configuration. You can export the terminal rail in DXF format via this menu or
print out the drawing frame.
- Print order
Please click on the “Print order” button to print out your order.
- Output inscription in CSV format
You can output the labelling data in CSV format for further processing of the
data in a plotter which can import programmes such as Excel.
Output 24
wieplan 1.5
User manual
Output
new screenshot
new screenshot
Output piece list
Output - Print order
new screenshot
Drawing frame
Output 25
wieplan 1.5
User manual
Further functions
Create co-user
Under the menu item “User settings – Create/change co-user”, you can create
a new co-user for the software. You can thus quickly select the data of the user
in the “Projects” dialogue.
If you select an existing user from the list, you can edit the data of the user. If
you wish to create a new user, select the item “Add new co-user”. Enter the
data of the user in the text fields and press the “Save” button to create the user.
“Create co-user” dialogue
Further functions 26
wieplan 1.5
User manual
Further Functions
Place busbar
If you wish to place a busbar with wieplan, first place the required neutral
disconnect terminal on your mounting rail in the configuration step “Select
terminals”.
Then switch to the “Accessories” window and click on the “place busbar”
button.
new screenshot
Place busbar
Select the area you want to bridge in the mounting rail display while holding
down the “Shift” key. After you choose the required busbar and the type of
terminal. If you selected all options, wieplan will place the busbar after clicking
the “place busbar” button.
You delete the busbar by removing one of the neutral disconnect terminals.
Further functions 27
wieplan 1.5
User manual
Further functions
new screenshot
Place busbar
new screenshot
Place busbar
Further functions 28
wieplan 1.5
User manual
Further functions
Marking - protective earth label
Wieplan enables you also to mark terminals with a protective earth label.
Put “%PE” in the required labelling field and then push the “Adopt inscription”
button.
Marking - special characters
Project management
If you wish to save several terminal rails as one project name, so change via the
course of the configuration to the menu item “Project management”.
This screen enables you to create new mounting rails, to change between
different configurations and to delete mounting rails. You can save comments
for every configuration in order to relate easily every single configuration to your
projects.
Further functions 29
wieplan 1.5
User manual
Further functions
Project management
If you want to create a new configuration in an existing project, so put in a name
for your new mounting rail in the field “ Name” and push the “add mounting
rail” button. Your new mounting rail will appear in the selection list. You can
change between the different mounting rails in this selection list. If you want
to delete a mounting rail, choose the required one and push the “ Delete mounting
rail” button.
wieplan project management
Further functions 30
wieplan 1.5
User manual
Further functions
Favorites function
Wieplan enables you to create favorites of your terminals, to save and manage.
So you can place very fast frequently used configurations on your mounting rail.
How to create a favorite
Mark your required configuration while holding down the “Shift” key and select
the function “Add favorite” via the context menu (right mouse button). You can
put a name in the following dialogue for easy relating your configuration.
Alternatively create the favorite via “Favorites” menu item “Add favorites”.
Add favorites to a configuration
If you want to add an existing favorite to your configuration, click on the required
terminal on your mounting rail where the favorite should be added to and select
your required configuration via the menu “ favorites”.
Manage favorites
The menu item “Presetting-manage favorites” enables you to delete and rename
your favorites.
Further functions 31
wieplan 1.5
User manual
Further functions
Copy terminal blocks
Mark your required terminals while holding down the “Shift” key and select
the function “Copy terminal block” via the context menu (right mouse
button). Then choose the position where you want to place the terminal
block and select the function “Insert terminal block” via the context menu.
Further functions 32