1
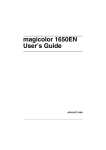
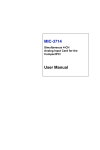
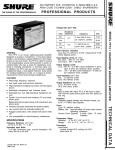
User’s Manual Home CR-H212 2.5” 2-BAY RAID Storage Enclosure 1 Introduction 1.1 Features - 2-Bay Bus Powered Portable RAID Enclosure -Works with SATA HDD or SSD -Supports Big (JBOD), RAID0, RAID1, and Normal mode -Enhanced data protection and high-performances storage -Automatic disk rebuild -Supports USB3.0 Super speed up to 5.0Gbps -Supports Plug-and-Play and Hot-plug -RAID mode setting directly by hardware switch 1.2 Specifications HDD device Interface: SATA I/II, or SSD External Host Interface: USB3.0 Super Speed Data Transfer rate: at 5Gbps via USB 3.0 super-speed mode Compliant to USB 2.0 high speed (480Mbps), USB 1.1 Low speed (1.5Mbps) Suitability: 2 x 2.5” SATA HDD, total capacity up to 6TB. Supports Plug-and-Play and Hot-plug Power Supply: DC5V from USB port of the Computer Material: Aluminum OS Compatibility: Windows 2000/XP/Vista/7, Linux and MAC OS 10.4 or above Dimension: 6 x 3-3/8 x 1-1/8" (L x W xH) 1.3 Package Contents: CR-H212 HDD Enclosure User’s Manual USB 3.0 Cable USB Cable for DC-5V Power input Screw x 8 & Screw Driver Function Descriptions: 1.4 System Requirements PC Requirements · Minimum Intel Processor Pentium II/50MHz, 64MB RAM · Windows 2000 / XP / VISTA/7 · An active USB port MAC Requirements · Minimum Apple G processor, 64MB RAM · Mac OS 10.4 and above · An active USB port Device Requirements: Hard Drives or SSD · 1 or 2 2.5” SATA-I or II hard drives (1.5Gbps or 3.0Gbps) or SSD · Total Capacity up to 6TB · Hard drives of identical capacities are recommended · Supports large volumes up to 3TB each bay Note: In order for the computer to access volumes larger than 2TB. Both the hardware and OS need to have the capacity to support large volumes (e.g.: Windows 7/Vista or Mac OS 10.4 and above). 2 The RAID Function What is RAID? RAID (redundant array of independent disks, originally redundant array of inexpensive disks) is a storage technology that combines multiple disk drive components into a logical unit. Data is distributed across the drives in one of several ways called "RAID levels", depending on what level of redundancy and performance (via parallel communication) is required. Why RAID? Increased data protection, in case of a drive fails; the data in the failed drive is preserved on the mirrored drive. Intelligent array controller that deploys different RAID levels for different hard disk drives. Increased overall network system data capacity. Increased I/O read/write efficiency. Setting the RAID Mode: The RAID mode should be set before installing the drives and then first formatting the drives. 1. Unlock and remove the rear cover, then pull out the inner plastic frame from the aluminum-shell. 2. Set the RAID Mode Setting switch to select the desired RAID mode. There are a mode switch on the inner plastic frame inside of the enclosure, follow the below 4 switch setting charts to set to the respective RAID mode: 3. Install the hard drives and replace the aluminum shell and the rear cover. 4. Initiate the selected mode: Connect the HDD enclosure onto the computer’s USB 3.0 port with the enclosed USB3.0 cable; the HDD LED will start blinking that indicates the selected mode is now activated and ready for use. During the enclosure is in use, the LED stays ON indicates the HDD(‘s) in the enclosure is detected by computer and is connected, the LED blinks while the enclosure is in read/write process. 5. Format the drives: the below formatting modes under various OS are recommended: Windows XP/VISTA/7: use NTFS formatting Mac OS X: use HFS+ (Mac OS Extended) formatting To use both with PC and Mac: use FAT32 formatting(single file size is limited to 4GB) Note: Changing to a new RAID mode (JBOD, RAID0, and RAID1) requires re-formatting the HDD in the enclosure. Please must backup all the data in the HDD first! if you select the Normal mode, then re-formatting the hard disk(s) is not needed. 6. The CR-H212 enclosure is ready for use after the drive(s) is formatted ※ Normal Mode (Non-Raid): Normal mode, this is the default setting of HDD enclosure, and RAID mode is acting under this setting. In Normal condition, both of the two hard disks installed in the enclosure are working independently, as two separate disks in the system, users can choose either hard drive to store files. So, any error or damage of either disk will not cause any error on the other disk. ※ BIG Mode (JBOD or Spanning): JBOD, meaning "Just a Bunch Of Drives", is used to refer to one distinct concept: all disks are independently addressed, with no collective properties. Each physical disk, with all the logical partitions each may contain, is mapped to a different logical volume: just a bunch of disks. The concept of concatenation, where all the physical disks are concatenated and presented as a single disk, is NOT a JBOD, but is properly called BIG or SPAN. The usage of "JBOD" and BIG or SPAN are frequently confused. This can create confusion and frustration, given the significantly different logical arrangement of the various types. Concatenation, referred to by such unambiguous terms as SPAN or BIG, requires software to bond/append drives together, where JBOD does not. ※ RAID 0/FAST Mode(Striping): FAST mode: is also known as RAID 0 mode. A RAID 0 splits data evenly across two or more disks (striped) without parity information for speed. RAID 0 was not one of the original RAID levels and provides no data redundancy. RAID 0 is normally used to increase performance, although it can also be used as a way to create a large logical disk out of a 2 or more physical disks. A RAID 0 can be created with disks of differing sizes, but the storage space added to the array by each disk is limited to the size of the smallest disk. For example, if a 100 GB disk is striped together with a 350 GB disk, the size of the array will be 200 GB (100 GB x 2). At RAID 0 mode, any data loss or error in either hard disk will cause the data error in both disks of the enclosure. Recommended Application: HD Movie or video storage. ※ RAID 1/SAFE Mode(Mirroring): Safe mode is also known as RAID 1 mode,RAID 1 is an exact copy (or mirror) of a set of data on two disks. This is useful when read performance or reliability is more important than data storage capacity. RAID 1 array can only be as big as the smallest member disk. A classic RAID 1 mirrored pair contains two disks (see reliability geometrically) over a single disk. Since each member contains a complete copy and can be addressed independently, ordinary wear-and-tear reliability is raised by the power of the number of self-contained copies. Recommended Applications: To store very important data or files, such as databases, personal data. 3 The Enclosure Setup 3.1 Hard Drive Assembly The drives or SSD can be installed starting with either slot # 1 or # 2, there is no specific order required. Step 1: Slide the switch inward to unlock the rear cover and open it. Step 2: Pull out the inner plastic frame from the aluminum-shell Step 3: Insert the HDDs or SSDs to the 7+15P SATA connectors respectively. Then fix two HDDs by the screws Step 4: Inset the plastic frame back into the aluminum housing Step 5: Close the rear cover and slide the lock switch outward to lock in position, HDD Installation completed 3.2 Connect to computer 1.Connect the Mini type end of the USB cable into the mini USB Port of your HDD enclosure. 2.Connect the other end of the USB cable (type A) into any active USB port of the computer. You can also Connect DC Power cable to get extra power supply from the computer. 3.The new set mode will be automatically detected and initiated after the enclosure is connected to USB port of the computer, during the initiation the HDD LED(s) will start blinking that indicates the selected mode is now activated. 4.The computer will detect and install the storage driver automatically for CR-H212. 5.Use the disk management tool(PC) or disk utility(MAC) to create a new partition and format the drives. Recommended File Formatting Modes: Windows XP/VISTA/7: use NTFS formatting Mac OS X: use HFS+ (Mac OS Extended) formatting To use both with PC and Mac: use FAT32 formatting(single file size is limited to 4GB) Note: Changing to a new RAID mode (JBOD, RAID0, and RAID1) requires re-formatting the HDD in the enclosure. Please must backup all the data in the HDD first! if you select the Normal mode, then re-formatting the hard disk(s) is not needed. 6.Open “My Computer” to see your external hard drive is ready to use. The LED blinks – HDD is in READ/WRITE process The LED ON – the HDD is connected The LED OFF – the HDD or the USB is not connected, or HDD error. NOTE: To have USB 3.0 super speed up to 5Gbps, your computer must be equipped either with built-in USB 3.0 ports, or a USB 3.0 host PCI-e adapter card Use the enclosed USB DC power cable to connect the computer for providing extra power. Setting a new RAID mode (JBOD, RAID0, or RAID1)requires re-formatting the installed hard disk(s). When adding the 2nd drive after the 1st is installed formatted, initialed, and used, the new installed drive will only be detected after the drive(s) have been re-formatted and the device has been restarted. 3.3 Replacing Hard Drives When one drive fails or is not well connected, the HDD LED will stay OFF. The HDD enclosure cannot be accessed until the new disk(s) have been replaced. If one drive fails at the RAID0 or BIG(JBOD) mode, the whole data in both drives will be lost; at the Normal mode, only the data in the failed drive will be lost; at the RAID 1 mode, the data will be recovered with REBUILD process after the new drive is replaced. 1. Check if the HDD LED status to verify which disk(s) fails(LED OFF), and replace the failed disk. Make sure the USB DC cable and USB carble are disconnected when replacing the disk. 2. Please note the rebuild can be proceeded ONLY IF with the new drive in the same or larger capacity than the old failed disk (under RAID 1 Mode) 3. Auto Rebuild at RAID 1, the RAID array will be rebuilt automatically. The auto rebuild will auto run when a new HDD is replaced and and the enclosure is initiated after connected to the PC, but will auto stop when read/write is in process. During the rebuild, the HDD LED’s will blink rapidly (HDD R/W). The Rebuild the RAID array will probably take several hours, depending on the rebuilt data volume, nd the HDD LED will stop blinking and stay ON when the rebuild is done. 4. For RAID 0 and JBOD, re-initiate the enclosure and then format the drives again. 5. For Normal Mode, simply format the new drive. Note: RAID 1 mode supports hot plug and play during the rebuild, however, we still recommend not upplug the USB cable from the computer until the whole rebuild process is completely done. FAQs: Q: Can I use external USB hub? A: Yes, USB hub works in the same way as the computer USB ports Q: My computer doesn't have USB 3.0 port, Can I use USB 3.0 host adaptor? A: Yes. USB 3.0 host adapter works in the same way as the built-in USB ports. Q: What file system should I choose to format my drive? A: This will depend on how you want to use the drive but in general, we recommend: Windows XP/VISTA/7 NTFS Mac OS X HFS+ (Mac OS Extended) To use it on both PC and Mac FAT32 (single file size is limited to 4GB) Q: How many drives can fail before I lose my data? A: For RAID 0 and JBOD, failure in any drive will result a lost of complete data. For RAID 1, the failure on both 2 drives at the same time will lose the complete data and cannot be recovered anymore. For the Normal Mode, only the data on the defective drive is lost. FCC PART 15 STATEMENT This device complies with Part 15 of the FCC Rules. Operation and is subject to the following two conditions: (1) This device may not cause harmful interference, and (2) This device must accept any interference received, including interference that may cause undesired operation. Warning: Changes or modifications to this unit not expressly approved by the party responsible for compliance could void the user’s authority to operate the equipment. NOTE: This equipment has been tested and found to comply with the limits for a Class B digital device, pursuant to Part 15 of the FCC Rules. These limits are designed to provide reasonable protection against harmful interference in a residential installation. This equipment generates, uses and can radiate radio frequency energy and, if not installed and used in accordance with the instructions, may cause harmful interference to radio communications. However, there is no guarantee that interference will not occur in a particular installation. If this equipment does cause harmful interference to radio or television reception, which can be determined by turning the equipment off and on, the user is encouraged to try to correct the interference by one or more of the following measures: Reorient or relocate the receiving antenna. Increase the separation between the equipment and receiver. Connect the equipment into an outlet on a circuit different from that to which the receiver is connected. Consult the dealer or an experienced radio/TV technician for help. For Technical Support Email: [email protected] Telephone: 714-961-0800 Ext.107 FAX: 714-961-0899