1
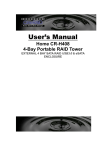
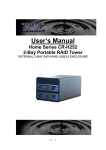
Quick Start Guide Home CR-H458 4-Bay Portable RAID Tower EXTERNAL 4 BAY SATA RAID USB3.0 +eSATA ENCLOSURE 1 Package contents Please check the package contents when you open the package. 1. CineRAID Home 458 main unit 2. USB 3.0 Cable 3. Power Adapter 4. Software & User Manual CD 5. eSATA Cable 6. AC Power cord 7. This Quick Start Guide Main USB3.0 Power body X1 cable X1 Adapter User Manual CD 2 eSATA Power cable X1 Cord Remove items in the package 3 To install the Hard disks Please remove the plug from the power supply outlet before assembling the hard disk, it will cause an electric shock and/or damage if not disconnected. 1. Press 2 blue door latches inward to release the tray lock, and then pull out the tray. 2. Put the HDD on the tray and make sure the HDD screw holes on the bottom are aligned to the 4 posts on the tray. 3. Lock the HDD in the tray by pressing the side plate onto each side of the tray, and connect with the HDD. 4. Slide the installed trays back to the enclosure, a click sound will be heard to confirm the tray is locked in the enclosure. Then connect the eSATA or USB 3.0 cable and turn ON the device 4 Connect Home CR-H408 to the computer The HDD Power setting. The HDD Power setting DIP S/W on the rear side can set the power connection of each individual HDD installed in CR-H408, the HDD Power setting provides excellent protection on the HDD which is not working. Each DIP switch controls each of 4 HDD trays 5 To RESET RAID mode before RAID mode setting Setting the RAID mode 6 RAID Mode Chart ITEM S/W 1 S/W2 S/W3 S/W4 MODE 1 OFF ON ON ON RAID0 ON ON OFF RAID1/RAID10 2 OFF 3 OFF ON OFF OFF RAID3 4 OFF OFF ON OFF RAID5 5 OFF OFF ON ON CLONE 6 OFF ON OFF ON LARGE 7 OFF OFF OFF OFF NORMAL The Mode Function S/W definition 7 8 The Mode Setting via RAID Manager software. Home CR-H458 comes with a RAID Manager software disk. Insert the CD onto CD-ROM drive of you computer, then click “CineRAID” folder in the CD, double click on “Setup” to run the Management software installation: The display screen will pop up the Installation Wizard dialog box, click “Install” to start software installation; click “Finish” after the installation is done 9 10 11 To set the RAID mode with RAID Manager software, click the RAID Manager icon to run the program, then follow the instructions on the RAID Manager dialog box to set the RAID mode by PC For Technical Support Email: [email protected] Telephone: 714-961-0800 Ext.107 FAX: 714-961-0899 12