1
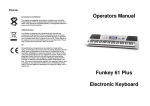
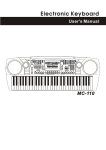
Disposal
Rechargeable Batteries and Batteries
Operators Manual
The supplied rechargeable batteries or batteries are recyclable. Please
dispose of them at special waste collection points or your local dealer.
Only dispose of exhausted batteries or rechargeable batteries to ensure
environmental protection.
WEEE-Declaration
Your product is designed and manufactured with materials and
components of high quality, which are recyclable and can be reused.
The symbol means that your product should be disposed of separately
from household waste when it reaches its end of life. Please dispose of
this equipment at your local collection point or recycling center. Please
help to protect the environment in which we all live.
CE
All specifications and appearances are subject to change without
notice. All information was correct at time of printing. Musikhaus Kirstein
GmbH does not guarantee for the accuracy or completeness of any
description, photograph or statement contained in this manual. Printed
colors and specifications may vary slightly from product. Products from
Musikhaus Kirstein GmbH are only sold through authorized dealer.
Distributors and dealers are not agents of Musikhaus Kirstein GmbH
and have no authority to bind Musikhaus Kirstein GmbH legally in any
way. This manual is protected by copyright. Any copying or reprint, even
in excerpts, is only allowed with written consent of Musikhaus Kirstein
GmbH. The same applies to reproduction or copying of images, even in
altered form.
Funkey DP-61 II
Digital Piano
Appendix V. Technical Specifications
14
Carried Standard
· GB/ T12105- 1998、GB/ 8898- 2001
· GB13837- 2003、GB17625. 1- 2003
Display
LCD display
Tone
128 kinds of tone
Style
128 kinds of auto accompaniments
Demo
12 pcs of demo
Effect control
Touch、Split、Dual、Sustain、Vibrato、Metronome、Data Wheel
Recording and programming
Recording、Playback
Learning
Lesson1、Lesson2
Accompaniment control
Start/Stop,Sync,Fill-in,Intro/Ending
Chord control
Single Finger , Fingered , Chord Close
Other control
Power Switch、Master Volume、Accompaniment Volume、Tempo、Chord Volume
External Jacks
Headphone Out、Line out、Pedal Sustain
Diapason
C3~C8
Intonation
≤3cent
Carton Size
· 1070×490×265(mm)
Gross Weight
· 26KGS
Power
AC230V 50Hz
Output power
· 6W×2
Parts were equipped with this electric grand piano
· Mounting Screw、Operation Instruction、Power Adaptor
Caution
Be sure to obey the following basic notice in use so as not to harm yourself or others and
damage this instrument or other external equipment. These notice includes (but are not limited to)
the following.
Warning
◆Do not disassemble or modify this instrument in any way, otherwise it will cause the shock,scalding and
personal injury risk.You should entrust the internal inspection,debugging and maintenance to your dealer or the
place you bought it.
◆If there is wear and tear occurs in power cord or power plug, or a sudden power failure in use,and noticing
the smell of abnormal smell or the electric grand piano smoking, you should turn off power,unplug the power plug
immediately and find qualified repairman to carry out the overhauling.
◆Before cleaning the electric grand piano, you should turn off power and upplug the power plug,do not do
the charged operation with wet hands. Do not wipe and clean the electric grand piano with corrosive solvent.
◆Do not put the electric grand piano on vibrating, slantwise or unstable surface, otherwise the electric grand
piano may overturn to hurt human body. You should always ensure that you use the screws provided to fix the electric
grand piano on the bracket. The electric grand piano may overturn from the bracket and cause the risk of personal
risk if the electric grand piano is unstable ◆Avoid the electric grand piano in the rain or use it in the washy and wet place.Do not put the
following objects on the electric grand piano.
•Containers (vase, potted plant, cup, cosmetic bottle or medicine bottle) are full of water or other liquid;
•Small metal objects (including hairpin, sewing needle and coin);
•The fire source of the naked fire,such as the lighted candle. Prevent the water,liquid,small metal objects
and fire soure from spraying out into this instrument,then,it may cause the fire disaster or electric shock.
Caution
◆Avoid placing the electric grand piano at the following places in order to avoid damaging the
electric grand piano and internal components
·The place of high temperature and much dust.
·Kitchen or other places with oil fume.
·The neighborhood of the air conditioner ,The place where the direct sunlight shines or any other
places that prompt the instrument to create the high temperature ◆Do not place the electric grand piano in the neighborhood of other electric appliance,it may cause the
mutual interference between the electric appliance ,do not put the heavy objects on the electric grand
piano,do not use excessive force to press the piano's keys and poke the control switches.
◆When you don't use the electric grand piano for a long time, you should upplug the power plug,you should
hold the power plug and should not pull the power cord when you upplug the power plug of this instrument.
◆Be sure to install brackets according to the instruction and ensure all the connection is very firm.
Moreover,you should choose the appropriate position to install the brackets
•When you place the electric grand piano on the bracket, take care not to let your fingers be clamped
between the piano and rack.
•When you move the electric grand piano,there should be two persons carry together at least. The brackets
may overturn and cause the risk of personal injury if you try to move the electric grand piano by yourself
•Besides, examine whether screws are untight regularly. You should tighten them if you have found the
untight screws
◆Keep the AC power cord from the heating source such as radiator etc. Do not overbend the power cord.
Do not put heavy objects on the power cord. Do not place the power cord where the people walk.Do not wrap
other thing around the power cord in order to avoid damaging it.
◆Do not play music loudly for a long time. The excessive volume will damage your hearing,so you should
take special care to use headphone
Table of Contents
Panel control and external function
1、Panel Control
2、LCD Display Screen Diagram
3、External Jacks
Preparation before performance
Power Connection
External function
1、Pedal Sustain
2、Use of Headphone
3、Connection with Amplifier of Hi-Fi Equipment
Basic Operation Method
Basic Operation
1、Turn on Power
2、Adjustment of Master Volume
Tone
Tone Selection
Effect&Control
1、Touch
2、Keyboard Split
3、Dual Voice
4、Sustain
5、Vibrato
6、Metronome
7、Data Wheel
Style&The Relative Function of the Style
1、Selecting Style
2、Start/stop
3、Sync
4、Fill-in
5、Intro/Ending
6、Tempo Adjustment
7、Accompaniment Volume Adjustment
8、Chord Volume Adjustment
Chord Function
1、Single Finger
2、Fingered
3、Chord Close
Recording Function
1、Recording
2、Playback
The Playback of the Demo
Intelligent Teaching
1、Lesson 1
2、Lesson 2
Installation of piano body
Assembly Drawing
Appendix ,Table of Tone
AppendixⅡ ,Table of Style
Appendix Ⅲ,Table of Demo
Appendix Ⅳ,Trouble shooting
Appendix Ⅴ,Technical specifications
Appendix III. Table of Demo
13
1
1
1
1
2
2
2
2
2
2
2
2
2
3
3
3
3
3
3
3
3
4
4
4
4
4
4
5
5
5
5
5
5
6
6
6
6
6
6
6
7
7
7
7
7
8
9 -1 0
11-12
13
13
14
NO.
Code of song
01
Turkish March
07
The Song Of Season
02
Impromptu
08
Serenade
03
Red River
09
Lieder
04
Oh Susanna
10
Katiollia
05
American Patrol
11
Espano
Haw - Tree
12
Mozart Piano Sonata
06
NO. Code of song
Appendix IV. Trouble Shooting
Trouble
Possible Reason/Resolution
Accompanying a slight noise in turning Normal phenomenon. Please do not worry.
ON/OFF power.
After turned on power, pressed the Check whether main volume button was set proper
position.Check whether headphone out jack was
key,there was no sound.
connected with other equipment so that the built-in
speaker system cutted off automatically.
When you use the sustain function,
some tone has the long sustain,
some tone has the short sustain
This is normal phenomenon.it is because the sustain
setting of the different tone of the grand
electric piano was best length.
In a tone,note and note quality has the This is normal phenomenon caused by different tone
Sampling system of the electric grand piano.
slight difference.
The master volume or the accompaniment Please check whether the master volume control or
accompaniment volume control was set the suitable
volume is abnormal.
position
Please check whether single finger or fingered was
In SYNC status, auto accompament
set.Now,play a note at left-hand keyboard area
does not start.
(19 keys in the left-hand keyboard area).
When use the external power,there was
no sound when the piao was open,there
was anything displayed on the LCD.
Please check whether the power socket has the
electricity,whether the power adaptor was inserrted
well.Check whether the power jack has the bad
contact or the voltage isn't enough.
When use the mobile phone,the electri c
gran d pian o has the noise.
Mobile phone can disturb the electric grand piano.
To avoid the noise, please turn off the mobile phone
or use it in far away.
Panel Control and External Jacks
Appendix II. Table of Style
12
LCD display
LCD display
LCD display
LCD display
01
Panel Control and External Jacks
1、Panel Control
ClubPop
PopWltz
Calypso
DscoPrty
16Pop
USAMarch
GuadDanc
DscoSmba
8Pop
HullGull
Reggae12
UKPop
8Soul
Tarantla
Reggae16
ClubDnce
8Rock
LmboRock
SloRock1
ModernRB
RapPop
SwgWaltz
SloRock2
HipShffl
PopRock
PubPiano
SloRock3
ChrlSton
1.Power Switch Button
2.Master Volume Button
60sSoul
JzzWltz1
SlowSoul
DiscoPop
3.Start/Stop/Sync/Fill in /
9.Style/Tone
/Intro/Ending Button
4.Accompaniment Volume Button
10.Touch/Keyboard Split/Dual Voice
/Sustain/Vibrato Button
CH OR D
VO LU ME
AC CO MPANI ME NT
VO LU ME
主音量
RE C
ST YL E
PLAY
TONE
TOUC H
START/S TOP SY NC
FI LL IN
IN TR O/ EN DI NG
TE MP O
ME TR ON OM E
DE MO
AC CO MPANI ME NT CON TR O
70sSoul
JzzWltz2
8BtAdria
DiscSoul
Funk
ShowTune
ClssPno
DiscTrot
16Shuffl
Polka
Unpluggd
EuroBeat
Twist
Waltz
PopBalld
Rap
BritPop
ChaCha
PopNewAg
Rave
HardRock
Rumba
8BModern
BndShfl1
Fusion
Jive
CntryBld
BndShfl2
FunkShuf
Pasodobl
LoveSong
BndShfl3
FusShufl
Samba1
MdCnPop
FastBnd1
RockRol1
Samba2
ElecPop
FastBnd2
RockRol2
SchlRck1
AcouBlld
CatGrve
StrtRock
SchlRck2
PianoBld
DixieJzz
JazzRock
FoxTrot
RBBallad
MedJazz
FastGosp
VieWaltz
RckBlld
JazzBand
FolkRock
Tango1
SlowEasy
JazzClub
RkBilly
Tango2
AnaBlld
Ragtime
RkBoogie
Bosanova
EBallad
Country1
RkChaCha
Mambo1
Techno1
Country2
RkClassi
Mambo2
Techno2
RkShuffl
Bolero
FnkyDsco
RockPop
Cumbia
SatNight
OberPoka
LatnRock
ClubLtn
PolkaPop
DiscoLtn
DscoChoc
BluGrss1
Tijuana
DiscoFox
BluGrss2
Reggae
DiscoFnk
BluGrss3
Salsa
DscoHand
SP LI T
DU AL
SU STAIN
VI BR ATOL
ON
OF F
GU ID E1
GU ID E2
SI NG LE
FI NG ER
CH OR D
CL EA R
PO WE R
2
1
智能教学
3
4
5
6
7
5.Metronome、Tempo Button
6.Chord Volume Button
8
9
10
11
CH OR D FU NC TI ON
12
DATA WH EE L
13
7.Recording/ Playback Button
8.LCD Display screen
11.Demo、Lesson1、Lesson2 Button
12.Single Finger/Fingered/Chord Close Button
13.Data Wheel Button
2、LCD Display Screen Diagram
SINGLE
VELOCLTY
FINGER
SPLIT
LEARN
DUAL
SUSTAIN
RECDRD
VIBRA
1.Tone
2.Style
3.Song
6.Chord Volume
11.Single Finger
7.Accompaniment Volume
12.Fingered
8.Metronome
13.Learning
16.Touch
17.Keyboard split
18.Dual Voice
4.Digit Display
9.Staff
10.B/W Keys Display
14.Sustain
19.Recording
5.Tempo Display
15.Vibrato
3、External Jacks
Pedal Sustain
1
220V
2
Headphone Line Out
3
4
1.Pedal Sustain
2.220V Input
3.Headphone out
4.Line Out
02
Appendix II. Table of Style
Preparation before performance
11
Power Connection
Name of Style
Name of Style
Name of Style
Name of Style
1. First Make sure whether the power switch of Electric
Grand piano is at OFF position.If not,pull the Switch to OFF
position.
2. Conect power cord: Insert power cord in power
AC 22 0 V
socket.
Club Pop
Pop Waltz
Calypso
Disco Party
16 Beat Pop
USA March
GuadDance
Disco Samba
8 Beat Pop
Hully Gully
Reggae12Beat
UK Pop
8 Beat Soul
Tarantella
Reggae16Beat
Club Dance
8 Beat Rock
Limbo Rock
Slow Rock 1
Modern R&B
Rap Pop
Swing Waltz
Slow Rock 2
Hip Shuffle
Pop Rock
Pub Piano
Slow Rock 3
Charleston
60’s Soul
Jazz Waltz 1
Slow Soul
DiscoPop
70’s Soul
Jazz Waltz 2
8 Beat Adria
DiscoSoul
Funk
Show Tune
Classic Piano
DiscoTrot
16 Beat Shuffle
Polka
Unplugged
EuroBeat
Twist
Waltz
Pop Ballad
Rap
British Pop
Cha Cha
Pop New Age
Hard Rock
Rumba
8 Beat Modern
Big Band Shuffle1
Fusion
Jive
Country Ballad
Big Band Shuffle2
FunkShuffl
Pasodoble
Love Song
Big Band Shuffle3
FusionShuffl
Samba 1
Rock'n Roll 1
Samba 2
Caution:When you do not use this piano, you should unplug the plug of AC power 220V from
power socket safely in oder to avoid the obstacle of piano parts or other accident for the power is
on for long-time.
Caution
+ 10 % , Too high or low Voltage will cause the damage of the
Be sure power voltage is AC 220V electric grand piano.
Do not unplug the power cord from power socket when the power is on.
Fuse replacement shall be only made by qualified person.
External Function
1.Pedal Sustain:
The sustain function can produce natural sustain by stepping upon sustain pedal when you
perform.Please insert the plug of sustain pedal into SUS PEDAL jack. You can open/close the sustain
function through the sustain pedal plug.
SUSTAIN PEDAL JACK
2.Use of headphone:
Insert headphone plug into“HEADPHONE”jack in the rear of the electric grand piano.The
internal speaker cuts off automatically . It does not interfere with others,if you use headphone
during performance.It is special for personal monitor and exercising at night.
3.Connection wlth Amplifier or Hi-Fi Equipment:
This electric grand piano has built-in speaker system.It can be connected with other external amplifier
or speaker system.First turn off the power of electric grand piano and external equipments,then
insert one end of stereo audio cable into LINE IN or Aux IN jack of other hi-fi equipment and insert
the other end into LINE OUT jack in rear panel of electric piano.
Line out
Amplifier
L I NE O U T
Speaker box
Note: All the above external facilities are not equipped with this product,users need to buy
themsevles, please forgive us for this.
Modern Country Pop
Rave
Fast Band 1
Electro Pop
Fast Band 2
Rock'n Roll 2
Schlager Rock 1
Acoustic Ballad
Cat Groove
Straight Rock
Schlager Rock 2
Piano Ballad
Dixie Jazz
R&B Ballad
Medium Jazz
Rock Ballad
Jazz Big Band
Jazz Rock
FastGospel
FoxTrot
Viennese Waltz
FolkRock
Tango1
Slow & Easy
Jazz Club
RockBilly
Tango2
Analog Ballad
Ragtime
RockBoogie
Bossanova
E_Ballad
Country 1
RockChaCha
Mambo 1
Techno 1
Country 2
RockClassical
Mambo 2
Techno 2
RockShuffle
Bolero
Funky Disco
RockPop
Cumbia
Saturday Night
Ober Polka
Latin Rock
Club Latin
Polka Pop
Disco Latin
Disco Chocolate
Blue Grass
Tijuana
Disco Fox
Blue Grass 2
Reggae
Disco Funk
Blue Grass 3
Salsa
Disco Hands
Appendix I.Table of Tone
10
Basic Operation
LCD display
LCD display
LCD display
LCD display
03
Basic Operation
1.Turn on power :
Press[POWER] button to turn on"power",press it again to turn off power of electric grand piano.
AcoPiano
BassPick
Oboe
Echoes
BrtPiano
FretBass
EngHorn
Sci-Fi
ElcPiano
SlpBass1
Bassoon
Sitar
HnkPiano
SlpBass2
Clarinet
Banjo
RhoPiano
SynBass1
Piccolo
Shamisen
ChoPiano
SynBass2
Flute
Koto
Hrpchord
Violin
Recorder
Kalimba
Clvichrd
Viola
PanFlute
BagPipe
Celesta
Cello
BottBlow
Fiddle
Glcknspl
CntrBass
Shakuhac
Shanai
MusicBox
TremoStr
Whistle
TinklBel
Vibphone
PizziStr
Ocarina
Agogo
Marimba
OrchHarp
Square
SteelDrm
Xylophon
Timpani
Sawtooth
WoodBlck
TubBells
String1
Calliope
TaikoDrm
Dulcimer
String2
Chiff
MelodTom
DrawOrg
SynStr1
Charang
SynthDrm
PercOrg
SynStr2
Voice
RevCymbl
Effect & Control
RockOrg
ChoirAah
Fifths
GtrFrt
ChurhOrg
VoiceOoh
Bas+Lead
BrthNse
ReedOrg
SynVoice
New Age
Seashore
Accrdion
OrchHit
Warm
BrdTweet
1.Touch:
The keyboard of this pianois the touch response keyboard.When the piano is open,touch function
starts automatically.When you play keyboard with different touch,the piano will play different size
volume .Press [TOUCH] button ,the touch function exits and keyboard touch was cancelled. Press
[TOUCH] button again,the touch function will start again.
Harmnica
Trumpet
Polysyn
TeleRing
TangoAcc
Trombone
Choir
Helicopt
NylonGtr
Tuba
Bowed
Applause
SteelGtr
MuteTrmp
Metallic
GunShot
JazzGtr
FrnchHrn
Halo
CleanGtr
BrassSec
Sweep
MutedGtr
SynBrss1
Rain
OverGtr
SynBrss2
Soundtrk
DstorGtr
SoprnSax
Crystal
GtrHrmnc
AltoSax
Atmosphe
AcoBass
TenorSax
Brights
ElecBass
BariSax
Goblins
ON
OFF
Power
2.Master Volume Adjustment:
Press[ MASTER VOLUME] "+,-"button,Users can do the suitable adjustment on the whole
volume depend on their requirement .You also can use data wheel rotary button to adjust.The
default Volume is14,When the eletric grand piano is open.
MASTER
VOLUME
TONE
Tone Selection:
The default status is "TONE",When the electric grandpiano is open.If current status is not
tone.You need to press[TONE]button.or you can select tone by data wheel rotary button.
STYLE
TONE
TO U C H
S P L IT
DUAL
S U S T AI N
VIBRATO
2.Keyboard Split:
Press[SPLIT ]button, from the left 24th key, the keyboard forms left and right two tone keyboards.
In''tone'' model, press data wheel button to adjust the tone of the right Keyboard.
TOUCH
SPLIT
DUAL
SUSTAIN
VI B R A T O
3.Dual Voice:
Under normal status,press [DUAL] button ,the keyboard enters the model of dual voice.Namely
each note is composed of two voices,The first voice is the voice before you pressed dual voice
button,and the second voice is the selected voice after pressed dual voice button.
TOUCH
SPLIT
DUAL
SUSTAIN
VIBRATO
04
Appendix I.Table of Tone
Basic Operation
4.Sustain:
Press[sustain]button to start sustain function. It will produce prolonged effect if you play with B/W
keys at the same time. Press [sustain] button again to exit the function.
TOUCH
DUAL
SPLIT
SUSTAIN
V IBRATO
5.Vibrato
Press[ VIBRATO] button to start vibrato function.It will produce the aquiver effect tone if you play
with B/W keys at the same time.Press[VIBRATO]botton again to exit the function.
TOUCH
DUAL
SP LIT
SUSTAIN
V IBRATO
6.Metronome
Press[METRONOME]button,the tick - tock beat sound will occur. Here are four kinds of beats
can be chosen, Press this button again, it goes into the next kind of beat. The LCD has the relative
display . Press[START/STOP] button to exit this function.
METRONOME
TEMPO
7 . Data Wheel :
The data wheel can adjust your own favourite tone or style convenientlly during performance,
The LCD has the relative display when the data wheel was rotated as to you can choose your favorite
tone or style rapidly . users aslo can adjust the volume size(Press the volume button firstly , then
rotate the data wheel , the L C D has the relative display)
Style & The Relative Function of the Style
DATA WHEEL
1.Selecting Style:
This electric grand piano has 128 kinds of style for your choice.For style table,please refer it to
the detailed Appendix II. Press [STYLE]button to enter style selection function.LCD displays current
style number.To select 001-128style,Use data wheel rotary button to choose.
STYLE
TONE
2.Start/Stop:
In default satus when the piano is open, press the [ START/STOP ] button to play
style. Press [ START/STOP ] button again , It can exit other function.
START / STOP
SYNC
FILL IN
ACCOMP CONTROL
INTRO / ENDING
Name of Tone
Name of Tone
Name of Tone
09
Name of Tone
Acoustic Grand Piano
Electric Bass (pick)
Oboe
FX 7 (echoes)
Bright Acoustic Piano
Fretless Bass
English Horn
FX 8 (sci-fi)
Electric Grand Piano
Slap Bass 1
Bassoon
Sitar
Honky-tonk Piano
Slap Bass 2
Clarinet
Banjo
Rhodes Piano
Synth Bass 1
Piccolo
Shamisen
Chorused Piano
Synth Bass 2
Flute
Koto
Harpsichord
Violin
Recorder
Kalimba
Clavichord
Viola
Pan Flute
Bagpipe
Celesta
Cello
Bottle Blow
Fiddle
Glockenspiel
Contrabass
Shakuhachi
Shanai
Music box
Tremolo Strings
Whistle
Tinkle Bell
Vibraphone
Pizzicato Strings
Ocarina
Agogo
Marimba
Orchestral Harp
Lead 1 (square)
Steel Drums
Xylophone
Timpani
Lead 2 (sawtooth)
Woodblock
Tubular Bell
String Ensemble 1
Lead 3(calliope lead)
Taiko Drum
Dulcimer
String Ensemble 2
Lead 4 (chiff lead)
Melodic Tom
Drawbar Organ
Synth Strings 1
Lead 5 (charang)
Synth Drum
Percussive Organ
Synth Strings 2
Lead 6 (voice)
Reverse Cymbal
Rock Organ
Choir Aahs
Lead 7 (fifths)
Guitar Fret Noise
Church Organ
Voice Oohs
Lead 8(bass+lead)
Breath Noise
Reed Organ
Synth Voice
Pad 1 (new age)
Seashore
Accordion
Orchestra Hit
Pad 2 (warm)
Bird Tweet
Harmonica
Trumpet
Pad 3 (polysynth)
Telephone Ring
Tango Accordion
Trombone
Pad 4 (choir)
Helicopter
Acoustic Guitar (nylon)
Tuba
Pad 5 (bowed)
Applause
Acoustic Guitar (steel)
Muted Trumpet
Pad 6 (metallic)
Gunshot
Electric Guitar (jazz)
French Horn
Pad 7 (halo)
Electric Guitar (clean)
Brass Section
Pad 8 (sweep)
Electric Guitar (muted)
Synth Brass 1
FX 1 (rain)
Overdriven Guitar
Synth Brass 2
FX 2 (soundtrack)
Distortion Guitar
Soprano Sax
FX 3 (crystal)
Guitar Harmonics
Alto Sax
FX 4(atmosphere)
Acoustic Bass
Tenor Sax
FX 5 (brightness)
Electric Bass(finger)
Baritone Sax
FX 6 (goblins)
Assembly Drawing
08
Basic Operation
05
3.Sync Function:
Press[SYNC]button to start sync accompaniment function and press any key of 19 keys in
left hand to start style synchronously.If chord function is started,press relevant key of 19 keys in
chord area to start auto chord synchronously.If a style was being played previously.press[SYNC]
button to stop style and start sync accompaniment function.
START / STOP
SYNC
FILL IN
INTRO / ENDING
ACCOMPANIMENT CONTROL
4.Fill-lN:
Press[FILL-IN]button to insert a intermezzo during style playback as to enhance the performane
effect,then play based on the original style.
START / STOP
SYNC
FILL IN
INTRO / ENDING
ACCOMPANIMENT CONTROL
5.Intro/Ending:
When you press[INTRO/ENDING]button,an intro will be played,and then it contitues to play after
gone to the normal style,when you press [INTRO/ENDING] button during style playback,the style
playback will be finished after a paragraph of ending is played.
1
1
2
3
START / STOP
SYNC
FILL IN
INTRO/ ENDING
1
ACCOMPANIMENT CONTROL
1
6.Tempo Adjustment:
Press [ TEMPO ] +/- buttons , it can adjust the playback tempo of style,metronome,demo . The
adjustment range is 30-240,the default is “120” after the power is on.
2
M E T RO N O M E
TE M P O
3
7.Accompaniment Volume Adjustment:
T h e d e f a u l t A c c o m p a n i m e n t Vo l i s 1 6 , y o u c a n a d j u s t A c o m p a n i m e n t Vo l b y p r e s s i n g
[ACCOMPANIMENT] + or - button.The LCD has the relative display when you adjust.The system
will restore the default Accompaniment Vol automatically if you press the Accompaniment Vol +/buttons at the same time.The default is 16 after the power is on.
3
3
ACCOMPANIMENT
VOLUME
8.Chord Volume Adjustment:
The default Chord Vol is 16,you can adjust Chord Vol by pressing[CHORD VOL]+ or - button.The
LCD has the relative display when you adjust.The system will restore the default Chord Vol automatically
if you press the [ CHORD VOL ] button at the same time.The default is16 after the power is on.
3
3
CH OR D
VOL UME
Basic Operation
06
The Playback of the Demo:
Chord Accompaniment
1.Single Finger :
When style is started,press [SINGLE FINGER] button to enter the function of single finger auto
chord,Now in 1~19 keys of the chord area,applying different fingerings to hear different chord
accompaniment,press [START/STOP] button to exit this function.
SINGLE
FINGER
07
FINGERED
Press[DEMO]button to play song. Press this button again,It will play the next song.(Please
refer the 11th page DEMO Appendix).Press [START/STOP] button,the playback of the Demo will
stop.
DEMO
LESSON1 LESSON2
CHORD
CLEAR
INTELLIGENT TEACHING
Intelligent Teaching:
CHORD FUNCTION
2.Fingered:
When style is started,press[ FINGERED] button to enter the function of fingered auto bass
chord.Now in 1-19 keys of the chord area,applying different fingerings to hear different chord
accompaniments.Press[START/STOP]button to exit this function.
SINGLE
FINGER
FINGERED
1.Lesson-1:Whe you press any button for learning,no matter whether the performance is
right or wrong.It will produce the correct melody notes, and repeats its accompaniment that is one
button one note model.
DEMO
LESSON1 LESSON2
CHORD
CLEAR
INTELLIGENT TEACHING
CHORD FUNCTION
3.Chod Close:
Aft e r the chord was started,press[CHORD CLOSE]button to stop chord accompaniment while
style continues to play.
SINGLE
FINGER
FINGERED
2.Lesson-2:the master volume will be closed over when you play the piano key and follow the
piano key notes.The master volume will recover the performance of learning the piano key of of this
song if you don't play the piano key for 3 seconds.
DEMO
LESSON1 LESSON2
CHORD
CLEAR
INTELLIGENT TEACHING
CHORD FUNCTION
Caution: Press[INTELLIGENT TEACHING]button to enter teaching model ,then,
press white keys to choose different songs.Press this button again,exits teaching function.The
Recording Function
1.Press[RECORDING]button to enter recording model.The metronome sound sounds and the
default tempo is 120.Now press any key to start recording.The maximum recording quantity is 180.
When the maximum quantity is full,metronome sound will stop and the next note cann't be recorded.
Everytimeyou press this button,the previous memory will be cleared and the piano will enter into the
recording model again.
RECORDING
PLAYBACK
current tone can choose different songs.Press this button again,exits teaching function.The current
tone can can be changed If you press [TONE]button and adjust the data wheel in the playback
course.
Installation of piano body:
1.As shown in the figure, first assemble the stands into one body and fasten with 4pcs of M5×60
screws.
2.As shown in the figure, connect left and right stands and supporting plates with pedal rack
and front baffle and fasten with 4pcs of M5×60 screws.
3.As shown in the figure, place piano body on the base and fasten with 12 pcs of M4x14 screws
and 4pcs of M6X20 screws.
Parts:
2.Press [ PLAYBACK] button to play the recorded notes.
M4*14 Screw 12 pieces
RECORDING
M6*20 Screw 4 pieces
PLAYBACK
M5*60 Screw 8 pieces
Note : Pls refer the assembly drawing on the page 08.