1
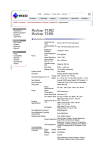
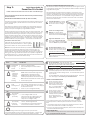
Step 2: Quick Setup Guide for Powerline Pro Socket T1501 Powerline Socket with built-in WiFi and USB Charger These instructions should be read and understood fully and should be kept for future reference. INTRODUCING THE POWERLINE PRO SOCKET (PE 500AV T1501 WIFI) The Powerline Pro Socket is the first hybrid Powerline networking solution built into a power socket designed to provide Ethernet and “local room” WiFi access where ever it is installed. SETTING UP A POWERLINE NETWORK FOR THE FIRST TIME The Powerline Pro Sockets are designed to automatically connect together to form a single Powerline network which is encrypted by the Powerline Network Password using 128bit AES encryption. Once the Powerline Pro Sockets have been installed, it is important to run the Installation and Setup Wizards to secure and configure the Powerline and the WiFi networks. The Wizards will automatically configure all the Powerline Pro Sockets connected in the same network. It is recommended running the Wizards on the Powerline Pro Socket that will be connected to the Internet router so this Socket will become the master device. 1 Each Powerline Pro Socket has 2 Ethernet RJ45 ports; 2 filtered power outlets (to improve the Powerline performance); a USB charging connection and 2x2 B/G/N wireless access point all managed by a single Web Admin interface. Powerline networking uses the existing mains wiring to send and receive data. Two or more Powerline Pro Sockets are required to create a network and they must be electrically connected sharing the same power rail or phase in order to provide a network connection between them. Up to 8 Powerline Pro Sockets can be joined together in the same Powerline network. The network has a maximum throughput of 500Mbps (gross) which is fast enough to stream HD video. If required, multiple Powerline networks can be joined together — further details are included in the Powerline Pro Socket User Guide. 2 3 Underneath the two Ethernet ports are 3 LED status lights each with a push button beneath them. These are grouped by function as follows: WiFi control, Powerline and Power. Press the WiFi Button for 5 seconds. The WiFi light will blink red meaning that this unit is now in “Configure mode” Connect to “PS Configure” WiFi Network. On a laptop, tablet or smartphone connect to the new open Wireless network called “PS Configure” Login to the Web Admin. In a web browser, go to http://172.16.16.16 At the prompt, login in with the default username admin and password admin Login NOTE: When the power has been switched on, the Powerline Pro Sockets will take a minute to start-up and will then display their status via the front lights. The Powerline light should be a solid colour meaning that it is connected to other Powerline devices. The Power light should be either blinking green or solid green: a blinking green Power light means that the device has not yet been configured and the Wizards need to be run, a solid green Power light means that the wizards have been completed and the Powerline Pro Socket is ready. LIGHTS WiFi Powerline STATE Off Blinking Red Orange Green Off Solid (Solid colour denotes the Powerline connection speed) Blinking Power DESCRIPTION 4 Powerline Network Password 5 6 WiFi PRESSES Power All done! Your network is now configured and the above settings have been automatically deployed to the other connected Powerline Pro Sockets. CONNECT YOUR NETWORK DEVICES 7 Power is on, unit is configured and ready DESCRIPTION Turns WiFi on or off (0-3 seconds) Long press (5 seconds +) Turns “Configure Mode” on or off Any press Web Admin Password The newly defined WiFi network has been automatically started. Disconnect from “PS Configure” and connect to your new WiFi network. Powerline pairing mode Short press Powerline Short press (0-3 seconds) Long press (5 seconds +) WiFi Password Run Setup Wizard A summary with the above settings is shown. It is recommended to print this for your records. the Powerline Pro Socket BUTTON Run the Setup Wizard: enter the WiFi Name, WiFi Password and a new Web Admin password to secure the Web Admin interface. Make a note of these passwords. WiFi Name Green: Powerline detected with high transfer speed (suitable for HD video streaming) Orange: Powerline detected with medium transfer speed (suitable for SD video streaming) Red: Powerline detected with low transfer speed Off No power Red Unit is booting. Please wait for it to turn green Blinking Green Power is on. Wizards needs to be run to configure Solid Green Secure the Powerline Network Enter a Powerline Network Password of your choice and click on “Secure the Powerline network”. WiFi is off Device is in “Configure mode” WiFi is disabled by the automatic Schedule WiFi is on No Powerline networking connection Run the Powerline Wizard: Choose “Setup the Powerline Network for the Setup the Powerline Network for the first time first time” which runs a series of tests and shows the number of Powerline Pro Sockets installed. (When the Power light is flashing green then the device is not configured and WiFi will always start in “Configure mode”) Initiate Powerline pairing mode for next 2 minutes. Powerline light will blink Device leaves the current Powerline network Run the Powerline wizard to reconnect it Reboots the device NOTE: The flashing network activity lights on Ethernet ports have been intentionally disabled to minimise the amount of blinking lights. A solid link light is shown on an Ethernet port when an active Ethernet cable is connected. 8 Connect the Internet router to any one of the Powerline Pro Sockets using a CAT5/6 cable to share Internet access amongst them. It is recommended to use shielded CAT5 cables (STP). Connect your PCs, printers, settop boxes, game consoles or any other network devices using a CAT5/6 cable to any Ethernet port on the Powerline Pro Socket. Mobile devices should connect via WiFi. It’s that simple! Now enjoy a fast secure network with Internet connectivity accessible by Ethernet or WiFi everywhere a Powerline Pro Socket is installed. NOTE: The Configure mode is only for configuring the Powerline Pro Socket. Internet access is not available when connected to “PS Configure” If there are any 3rd party Powerline adapters, these will need to manually have their Network Passwords changed.) NEED FURTHER HELP? All documentation including the latest User Guides and FAQs can be found online at http://help.powerethernet.com/t1501 EXPANDING THE NETWORK The network can be expanded up to 8 Powerline Pro Sockets on a single Powerline network. To Join an existing Powerline Network add additional Powerline Pro Sockets to an existing network, log on into the Web Admin interface on the newly installed device and run the Powerline Wizard. Choose the option “Join an existing Powerline network”, enter the existing Powerline Network Password and click continue. The new Powerline Pro Socket will automatically connect to the existing Powerline network and will have its WiFi and Web Admin changed to match the existing Powerline Pro Sockets. ADVANCED MANAGEMENT OF THE POWERLINE PRO SOCKET The Powerline Pro Socket has a built in 2 port managed switch which provides automatic Quality of Service (QoS) and advanced networking functionality. Each Powerline Pro Socket can have its own advanced configuration. All settings configured via the Wizards are automatically deployed to the other Powerline Pro Sockets connected in the same network. For example, if you want to change the WiFi Password for all the Powerline Pro Sockets, simply re-run the Setup Wizard. All settings made in the “Local Device Configuration” menus are for that specific CONNECTING TO THE WEB ADMIN INTERFACE If you want to make changes in the Powerline Pro Sockets’ settings, there are three ways to connect back to the Web Admin page. 1) Use Configure Mode: a long press of the WiFi button turns Configure mode on (the WiFi light blinks red), connect to the “PS Configure” WiFi network using your computer, smart phone or tablet and go to http://172.16.16.16 to login in. 2) Network Explorer Mode: on a Microsoft Windows computer, go to Start → Computer → Network and look for Powerline Sockets under Network Infrastructure. Double click on any Powerline Socket entry to go directly to its Web Admin page. Powerline Pro Socket. Changes made here are not deployed to the other devices. Advanced functions include: Name each Powerline Pro Socket See the estimate Powerline speeds between devices See the IP addresses of the Powerline Pro Sockets Set up a WiFi Access Point specific for this Powerline Pro Socket Define WiFi Schedules which automatically switch the WiFi on and off Enable or disable the front buttons if used in a public space Define a time when the Powerline Pro Socket should automatically switch off all its lights to go dark Further information can be found in the Powerline Pro Socket User Manual including tips and techniques for larger or more complex installations and creating networks across multiple electrical phases. The Powerline Pro User Manual can be downloaded from http://help.powerethernet.com/t1501 BEST PRACTICES: The best practice is to hardwire all Ethernet enable devices with an Ethernet cable to free up the WiFi network for the truly Wireless devices. The Powerline Pro Socket includes: Two Ethernet ports: connect your PCs, set-top boxes, game consoles, Blu-ray players, networked TVs to the Ethernet ports which frees up the WiFi network to provide a better experience for the truly mobile devices. Built-in “Local Room” WiFi: to provide network access to the laptops, tablets and smart phones. Filtered Power outlets: plug any electrically noisy devices like transformers directly into the Powerline Pro Socket to filter out the locally generated electrical noise. This improves the Powerline performance. USB charger: Includes a 1.1A USB charge point suitable for the majority of mobile phones and tablets. Note: the latest generation Apple iPads need to be charged with their own chargers. HOMEPLUG COMPATIBLE The Powerline Pro Socket is compatible with the HomePlug AV standard. If there are any other Powerline devices plugged in that are not HomePlug AV compatible, then they will stop the Powerline network from working properly. CONFIGURE MODE Configure Mode is purely for accessing the Powerline Socket web admin pages and does not provide Internet access. Configure Mode can be enabled at with a long press of the WiFi button (more than 5 seconds). When enabled, the WiFi light will blink red. Configure Mode automatically switches off after 40 minutes. MOBILE DEVICE SUPPORT The Powerline Socket Mobile Apps enables direct access and management of the Powerline Socket 500AV from an Apple iPhone, iPad or Android smartphone or tablet. Download links are available at http://help.powerethernet.com/t1501 or scan the QR Code. 3) Mobile Apps: For Apple and Android mobile phones and tablets, install and use the Powerline Mobile App described on the next page. Connect to the existing WiFi network (or via PS Configure) and run the Mobile App. Once logged into a Web Admin page, the other Powerline Sockets can be found in the Powerline Devices page along with their IP addresses and web links to their Web Admin pages. A NOTE ON POWERLINE BANDWIDTH SPEEDS The estimated Powerline bandwidth between one device and the others can be viewed in the Powerline devices page. If the bandwidth figures appear low, click on the Generate Bandwidth button to generate test bandwidth. The available bandwidth on Powerline networks is depended on a number of factors including: The amount of electrical interference on the power circuit: Electrical noise on the mains wiring impacts the amount of available bandwidth on a Powerline network. Lamps with dimmers, scent plugins, mobile phone chargers, power transformers are amongst the noisiest devices. Its good practice to plug any offending devices directly into a Powerline Pro Socket as its filter will minimise the effect of this electrical noise. RCBs and RCBOs: RCBs work fine with Powerline but RCBOs can filter the Powerline signal strength because of their large internal choke. The Powerline signal can still permeate around circuit if the source of the signal is close. Installing a Powerline Pro Socket as close to the consumer unit as possible helps gets around these issues. Cable distance between the Powerline Pro sockets: The available bandwidth will decline over distance and the maximum range between Powerline Pro Sockets is 300 metres. If the electrical cables between them are longer than 300m or the quality of the power cables is not optimal, the range of communication between sockets will be reduced. Quality of the electrical cable: Old electrical cable is likely to perform less well than newer cable. FACTORY RESET If required, a Factory Reset can be performed in any one of three ways: a) Hold down WiFi and Powerline buttons simultaneously for more than 10 secs b) Choose “Forgot Password” button from the Web Admin login page c) Via Maintenance → Factory Reset menu within the Web Admin pages All the lights will blink during the factory reset. Please wait 5 minutes before using. The services described in this publication are subject to availability and may be modified from time to time and are subject to change without notice. No liability for technical errors or omissions. Brand names referred to may be registered or unregistered trademarks of their respective owners. NEED FURTHER HELP? All documentation including the latest User Guides and FAQs can be found online at http://help.powerethernet.com/t1501 Power Ethernet PE 500AV T1501 WIFI Quick Setup Guide 20141203