1
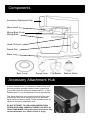
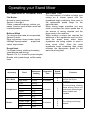
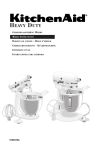
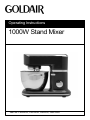
Operating Instructions
1000W Stand Mixer
Item No: FMX350G, FMX350R, GMX350, GMX350G
General care and safety guide
Thank you for choosing this GOLDAIR Stand Mixer. This GOLDAIR
appliance has been designed and manufactured to high standards
of engineering and with proper use and care, as described in this
leaflet, will give you years of useful service. Please read these
instructions carefully and keep them safely for future reference.
NEVER
✘ Never use this appliance outdoors.
✘ Never use this appliance for any purpose
other than its intended use. This appliance is
intended for household use only or in similar
applications such as:
•
Staff kitchen areas in shops, offices and
other working environments;
•
Farm houses
•
By clients in hotels, motels and other
residential type environments;
•
Bed and breakfast type environments.
✘ This appliance is not intended for use by
persons (including children) with reduced
physical, sensory or mental capabilities or lack
of experience and knowledge, unless they are
supervised or have been given instruction
concerning the use of the Stand Mixer by a
person responsible for their safety.
✘ Close supervision is necessary when the
appliance is near children.
✘ Never leave the appliance unattended when
in use.
✘ Never allow the power cord to overhang the
edge of a table or bench top or to touch any
hot surface.
✘ Never place this appliance on or near a hot
gas or electric burner or where it could touch a
heated oven or microwave oven. Do not place
in a hot oven.
✘ Never immerse the Stand Mixer’s power
base, the cord set or plug in water or any other
liquid to protect against electrical hazards.
✘ Never place the Stand Mixer in a
dishwasher.
✘ Never use harsh, abrasive or caustic
cleaners to clean this appliance.
✘ Never operate the appliance with a
damaged cord or plug, after it malfunctions, or
if it has been damaged in any manner. Have
the appliance checked and repaired buy a
qualified electrician if repair is necessary. If the
supply cord is damaged, it must be replaced by
the manufacturer, its service agent or similarly
qualified persons in order to avoid a hazard.
✘ The Stand Mixer is not intended to be
operated by means of an external timer or
separate remote-control system. The use of an
extension cord is not recommended.
✘ Never use metal scouring pads for cleaning.
Small metal pieces can come loose and cause
short-circuiting of electrical components, which
can cause electric shock or damage the
appliance.
✘ Never exceed the maximum capacity of the
Stand Mixer.
✘Do not operate continuously on heavy loads
for more than 2 minutes.
✘Never continue to operate the Stand Mixer if
an object such as a spoon or spatula or other
item falls into the bowl. IMMEDIATELY turn
speed dial to OFF, turn the Stand Mixer off,
unplug at power and remove the object.
✘Never restrain the mixing bowl while it is
moving.
Due to the risk of injury, the use of third
party accessories is not recommended by
the manufacturer. Use only the bowl, beater,
whisk and dough hook provided with the
Stand Mixer. Using third party accessories
may cause malfunction, fire, electric shock
or injury.
TECHNICAL SPECIFICATION
Item No:
FMX350G, FMX350R, GMX350, GMX350G
Power Supply:
220-240VAC, 50Hz.
Power:
1000W
General care and safety guide, continued
ALWAYS
✔ Always ensure hands are dry before
handling the plug or the Stand Mixer.
✔ Always operate the Stand Mixer in the
middle of a secure, dry, level surface. Do not
operate the Stand Mixer near the edge of a
bench or table. Vibration during operation may
cause the Stand Mixer to move.
✔ Always allow adequate air space above and
on all sides for air circulation. Do not allow the
Stand Mixer to touch curtains, wall coverings,
clothing, dishtowels or other flammable
materials during use. Do not use under
cupboards or curtains.
✔ Always be sure to set to ‘off’ and unplug
from the socket when not in use and before
cleaning.
✔ Always allow the Stand Mixer to cool before
cleaning and storing and before removing
and/or cleaning its components.
✔ Carry out regular checks of the supply cord
to ensure no damage is evident.
✔ Return the Stand Mixer after a malfunction,
or if it has been damaged in any manner, to an
authorised electrical service technician for
examination, repair or adjustment as special
purpose tools are required.
✔ Children should be supervised to ensure
that they do not play with the appliance.
✔ Ensure the Stand Mixer is completely
assembled before operation. Follow the
instructions provided in this manual.
✔ Avoid contact with moving parts and fitted
attachments during operation. In order to
reduce the risk of injury to persons and/or
damage to the mixer, always keep hands, hair,
clothing, as well as spatulas and other utensils,
away from beaters during operation.
✔ Ensure the motor and beater, whisk or
dough hook have come to a complete stop
before disassembling or attempting to raise
Stand Mixer head and before ejecting the
accessories or removing the bowl.
✔ Remove attachments from the Stand Mixer
before cleaning.
✔ Remove and safely dispose of the protective
cover on the power plug. This may present a
choking hazard for children.
✔ Always ensure hair, fingers and clothing are
kept well away from moving beaters or dough
hooks.
✔ Switch off the appliance and disconnect
from supply before changing accessories or
approaching parts that move in use.
WARNING:
To prevent the risk of electric shock this appliance is equipped with a plug for a grounded electrical
outlet that only fits in a matching wall outlet. If the plug dos not fit, contact a qualified electrician for
assistance. Never attempt to change the plug yourself.
To reduce the risk of electric shock or fire do not attempt to disassemble the power base.
There are no components included that could be useful separately. Repairs only by approved
professionals.
Before first use
Carefully unpack the mixer and remove all Wipe mixer unit with soft, clean cloth.
packaging material.
Be sure to read this user manual
Wash all accessories including the bowl
thoroughly.
but not the mixer itself in warm soapy
water. Rinse and dry thoroughly before use.
Components
Accessory Attachment Hub
Mixer Head
Mixing Bowl Cover
Mixing Bowl
Head Tilt Lever
Speed Dial
Base
Bowl Cover
Dough Hook
Flat Beater
Accessory Attachment Hub
In some markets there is a demand for attachments such
as meat grinders, sausage makers, slicers, graters and
juicers that utilise the accessory attachment hub. In New
Zealand there is very little demand for these accessories.
This Stand Mixer has been supplied with the most used
accessories; bowl cover with pouring chute, flat beater,
dough hook and balloon whisk. These accessories do not
utilise the accessory attachment hub.
DO NOT ATTEMPT TO USE ACCESSORIES FROM
OTHER SUPPLIERS, MANUFACTURERS OR UNITS IN
THIS STAND MIXER. Using third party accessories may
cause malfunction, fire, electric shock or injury.
Balloon Whisk
Assembly instructions
Before beginning assembly of product,
make sure all parts are present by
comparing parts with components list.
Before assembling make sure the power
cord is unplugged from the power outlet
and the speed control knob is in the “0”
position.
Press the Head Tilt Lever and swing the
mixer head up.
Place the Mixing Bowl on the base so that
it is sitting evenly. To fully lock the Mixing
Bowl onto the base, turn the bowl in a
clockwise direction until the bowl clicks into
position. To remove the Mixing Bowl, turn
the bowl from its locked position anticlockwise until the bowl dislodges rom the
base and can be lifted away.
Note: When fitting or removing the Mixing
Bowl you must ensure the mixer head is
locked into the tilt back position and all the
attachments have been ejected.
Place the Mixing Bowl Cover in place by
rotating it clockwise to lock into position.
Place the cover AFTER placing the Mixing
Bowl on the mixer’s base.
Insert the mixer attachments (Balloon
Whisk or Dough Hook or Flat Beater) by
fitting it into the off-center attachment point
and ensure the attachments lock into
position.
Operating your Stand Mixer
Assemble Stand Mixer as per instructions
in this manual.
Unplug mixer before touching beaters
or dough hooks.
Put the ingredients into the Mixing Bowl
and slightly press the Mixer Head to lower
the head until a “click” sound indicates the
Mixer Head is securely in position.
Do not scrape bowl while mixer is
operating.
Plug the power cord into main power outlet
and switch it ON. Use the Speed Dial to
turn the mixer “ON” and to control the
mixing speeds, from “MIN” through 1 to 6
and “MAX”. Turn the mixer to “OFF”
position to turn off.
Refer to the “SPEED CONTROL GUIDE”
for information about what speed to use.
The mixer will stop if you tilt up the Mixer
Head during operation. Lower the Mixer
Head down to continue operation. NOTE:
you will need to reset the machine (turn to
“OFF" then back to required speed again)
if you wish to continue operation after tilting
the Mixer head up. This is a safety feature.
The Stand Mixer may warm up during
use. Under heavy loads with extended
mixing time, you may not be able to
comfortably touch the top of the unit.
This is normal. However, when mixing
heavy loads, it is strongly
recommended that you do not operate
the Stand Mixer for more than 2
minutes.
If the motor overheats, the unit will
automatically shut off. Turn dial to off
and turn off at supply. DO NOT operate
unit until it has completely cooled
down. DO NOT attempt to remove
accessories or otherwise handle mixer
while it is in shut down mode unless
you have disconnected from power.
Operating your Stand Mixer
RECOMMENDED ATTACHMENT USES
Flat Beater
Normal to heavy mixtures:
Speeds 1 through 4
Cakes, creamed frostings, cookies, pie
pastry, biscuits, quick breads, meat loaf,
mashed potatoes
Balloon Whisk
For mixtures that need air incorporated:
Speeds 3 and 4
Eggs, egg whites, heavy cream, boiled
frostings, sponge cakes , angel food
cakes, mayonnaise
Dough Hook
For slower mixing, mashing, kneading
yeast doughs and stirring:
Speeds 1 to 2 (1 is best for yeast doughs)
Breads, rolls, pizza dough, coffee cakes,
buns
Maximum
Loading
Operation
Time
Speed
Control
Function
Cream
250 ml
10 minutes
Egg White
12 pcs
3 minutes
5
6
For whipping cream, egg
whites and boiled
frostings
Flour
1000 g
Salt
8g
Yeast
20 g
Sugar
10 g
5 minutes
1
2
Water
500 g
For slow mixing, mashing,
faster stiming. Use to mix
and knead yeast doughs,
heavy batters and
candies
Lard
20 g
Flour
100 g
Castor Sugar
100 g
Margarine
100 g
5 minutes
For mixing semi-heavy
batters
Egg
2 pcs
1
2
3
4
Accessory
Wire Whip
Dough hook
Beater
HINTS AND TIPS
For most recipes, it is better to begin your
mixing on a slower speed until the
ingredients begin combining, then move to
the appropriate speed range for the
particular task.
When mixing larger quantities you may
need to increase the mixer speed due to
the amount of mixing required and the
larger load on the machine.
When building a recipe that requires the
additional of dry ingredients such as flour,
slow the speed down whilst these
ingredients are being added to avoid a
snow storm effect. Once the extra
ingredients begin combining then slowly
increase the appropriate speed for the
particular mixing task.
Food
Care and cleaning
CARE
Never continue to operate the Stand Mixer
if an object such as a spoon or spatula or
other item falls into the bowl.
IMMEDIATELY turn speed dial to OFF,
turn the Stand Mixer off, unplug at power
and remove the object.
DO NOT continuously operate the Stand
Mixer for more than 2 minutes if you have
a heavy load in the bowl.
DO NOT overload the Stand Mixer.
CLEANING
Before cleaning, unplug your Stand Mixer
and make sure it cools down.
For the power unit: Wipe with a damp
cloth and dry. Never use abrasive
cleaners. NEVER immerse in water.
Tools: Hand wash only. DO NOT place in
dishwasher. Dry thoroughly.
STAINLESS STEEL BOWL
The bowl for your Goldair mixer is
made from stainless steel. While it is
very durable, stainless steel does
require care to maintain its good looks.
Please read the notes below:
Before first use: hand wash, rinse and
thoroughly dry your stainless steel bowl to
remove any manufacturing residue.
After every use: hand wash, rinse and
thoroughly dry. Leave standing upright for
a period to allow any water trapped in base
of bowl to drain out or dry.
Periodically: use a powdered cleaner or
polisher for stainless steel. Follow the
“grain” of the stainless steel.
Do not use steel wool, a wire brush, bleach
or abrasive cleaners. Steel wool can leave
particles of steel on the bowl, and these
can cause rust marks.
Do not use the stainless steel bowl in
microwave, oven or on a direct heat
source.
Do not place the stainless steel bowl in the
dishwasher.
Metal utensils may scratch the surface of
the stainless steel bowl; this is quite
normal and occurs with all stainless steel.
“Hard” water can cause a discolouration on
stainless steel.
If your stainless steel bowl becomes dull
looking, you may refresh it by sprinkling it
with baking soda while the bowl’s surface
is wet. Gently rub the bowl, then rinse and
thoroughly dry.
SUPPORT AND TECHNICAL ADVICE
Goldair – New Zealand
Monday – Friday 8am-5pm
Phone +64 (0)9 917 4000
Phone 0800 232 633
[email protected]
Goldair – Australia
Monday – Friday 8am-5pm
Phone +61 (0)3 9336 4423
Phone 1300 465 324
[email protected]
Two year warranty
Thank you for purchasing this Goldair product. Your product is warranted against faults and manufacture
when used in normal domestic use for a period of two years. In non-domestic use Goldair limits the
voluntary warranty to three months.
Goldair undertake to repair or replace this product at no charge if found to be defective due to a
manufacturing fault during the warranty period.
This warranty excludes damage caused by misuse, neglect, shipping accident, incorrect installation, or
work carried out by anyone other than a qualified electrical service technician.
PLEASE KEEP YOUR RECEIPT AS THIS WILL HELP VERIFY YOUR WARRANTY.
The benefits given to you by this warranty are in addition to other rights and remedies available to you
under law in relation to the goods or services to which this warranty relates.
In Australia, our goods come with guarantees that cannot be excluded under the Australian Consumer
Law. You are entitled to a replacement or refund for a major failure and compensation for any other
reasonably foreseeable loss or damage. You are also entitled to have the goods repaired or replaced if the
goods fail to be of acceptable quality and the failure does not amount to a major failure.
In New Zealand this warranty is additional to the conditions and guarantees of the Consumers Guarantee
Act (1993).
Goldair – New Zealand
CDB Goldair
PO Box 100-707
N.S.M.C
Auckland
Phone +64 (0)9 917 4000
Phone 0800 232 633
www.goldair.co.nz
Goldair – Australia
CDB Goldair Australia Pty
PO Box 574
South Morang
Victoria, 3752
Phone +61 (0)3 9336 4423
Phone 1300 GOLDAIR (1300 465 324)
www.goldair.com.au
IMPORTANT: Please complete and retain this warranty card
Name ……………………………………………… Purchased from …………………………………
Address …………………………………………… Date of purchase …………………………………
………………………………………………………. Name of product …………………………………
Suburb …………………………………………… Model no ……………………………………………
Attach a copy of the purchase receipt to this warranty card
Due to continual design improvements, the product illustrated in this User Manual may differ slightly from the actual product.