1
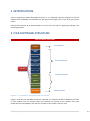
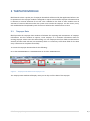
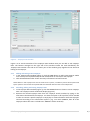
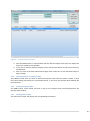
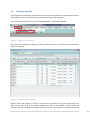
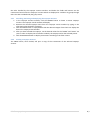
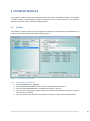
Table of Contents
1
INTRODUCTION ............................................................................................................................... 2
2
ITAX SOFTWARE STRUCTURE .......................................................................................................... 2
3
TAXPAYER MODULE ........................................................................................................................ 4
3.1
3.1.1
Adding and Saving a New Taxpayer ................................................................................ 5
3.1.2
Searching, Editing and Saving Taxpayer Data ................................................................. 5
3.1.3
Cancelling Button on Taxpayer Data ............................................................................... 6
3.1.4
Printing a Taxpayer Data ................................................................................................. 6
3.1.5
Viewing Data on Tabs...................................................................................................... 6
3.2
4
Taxpayer Data ......................................................................................................................... 4
Taxpayer Account.................................................................................................................... 7
3.2.1
Searching, Retrieving and Displaying the Taxpayer Account .......................................... 8
3.2.2
Printing a Taxpayer Account ........................................................................................... 8
PAYMENT MODULE ......................................................................................................................... 9
4.1
Cashier..................................................................................................................................... 9
4.1.1
5
New Payment Transactions ............................................................................................ 9
ACCRONYMS AND ABBREVIATIONS .............................................................................................. 11
1 INTRODUCTION
iTAX or Integrated Taxation Management System is an integrated software composed of several
modules that individually accommodate the procedures that signify each of the local government
offices.
iTAX provide Taxpayer & Payment Modules for the use by the LGA for registering taxpayers and
receiving payments.
2 ITAX SOFTWARE STRUCTURE
iTAX SOFTWARE STRUCTURE
Taxpayer
Focal Module
Property
Rate
Service Levy
Guest House
Levy
Thematic Module
Billboard Fee
iTAX
Other Taxes
Payment
Functional Module
Reports
Maintenance
Online Help
Added Function
Figure 1 - iTAX Structure Arranged by Role and Function
Figure 1 illustrates how the iTAX software is organized. The Taxpayer module is labelled as the focal
or main module since all activities within the software are centred on this module. Every task
established and completed by each function is linked to this module, and vice versa.
iTAX: Taxpayer & Payment Modules User’s Manual
2|P
Thematic modules in the iTAX software include the Property Rate, Service Levy, Guest House Levy
and Billboards Fee. These modules carry a distinct area of assistance (or we call it a “theme”), based
on the LGA as outlined in the table below.
Module
Property Rate
Service Levy
Guest House Levy
Billboard Fee
Function
This module handles property assessment and all
the functions involved.
This module handles the processes of corporate
entities registration and subsequent revenue
collection functions.
This module handles the processes of guest
house registration and revenue collection
procedures.
This module handles the processes of billboard
registration and revenue collection processes
The Functional modules consist of different functions that directly provide assistance to other
modules in the iTAX software. These modules are Payment, Reports and Maintenance.
The Payment module handles all types of payment transactions. The Reports module keeps all the
functions that generate reports through iTAX. The Maintenance module is where you can setup or
define all types of parameters used in the system, e.g. create users, setup tax and penalty rates, tax
types, setup LGA parameters, etc.
iTAX: Taxpayer & Payment Modules User’s Manual
3|P
3 TAXPAYER MODULE
iTAX needs to have a quality set of Taxpayer data which will be used by the application before it can
be operational. The Taxpayer module is designed to capture and maintain taxpayer information that
is relevant to revenue collection for an LGA. This is labelled as the focal or main module since all
activities of revenue collection within the system must involve the taxpayer. For this reason, every
task established and completed by each function is linked to this module and vice versa.
3.1
Taxpayer Data
iTAX provides the Taxpayer data window to facilitate the capturing and maintenance of Taxpayer
information. Use this window to capture a new taxpayer or to maintain information about an
existing taxpayer. Please note that when filling in a new Taxpayer Data form fields marked with an
asterisk (and also with red text) are mandatory fields. It is necessary to fill these fields for the data
entry transaction to complete successfully.
To access the Taxpayer data window do the following:
Go to the TAXPAYER Menu > TAXPAYER DATA or click the TAXPAYER Icon.
Figure 2 – Taxpayer Data Menu and Taxpayer Icon
The Taxpayer Data window will display. Here you can key in all the data of the taxpayer.
iTAX: Taxpayer & Payment Modules User’s Manual
4|P
Figure 3 – Taxpayer Data window
Figure 3 is an actual screenshot of the Taxpayer Data window. Here you can add or edit Taxpayer
Data. The buttons arranged on the right side of the window initiate the tasks handled by the
Taxpayer Data window. The tabs on the lower part of the window group together those data that
belong to the taxpayer.
3.1.1 Adding and Saving a New Taxpayer
1. In the Taxpayer Data window (Figure 3), click the NEW button to add a new taxpayer. Make
sure to fill up the required fields (red text marked with an asterisk) for the taxpayer.
2. Click the SAVE button after all the necessary information has been entered.
NOTE: Before a new Taxpayer Data can be saved into the system, a validation process will be performed
by the system to ensure that the required fields are filled with data and also to check duplicates.
3.1.2 Searching, Editing and Saving Taxpayer Data
1. In the Taxpayer Data window (Figure 3), click the SEARCH button to locate a certain Taxpayer
Data. The Taxpayer Search window will display (Figure 4).
2. Retrieve the desired Taxpayer Data from the Taxpayer Search window by typing in the
information that identifies the taxpayer. You have the option to fill up all the entries needed
in order to retrieve a specific taxpayer or simply key in some information and have taxpayers
retrieved according to the information keyed in. (e.g. Last name: MWINYI, then all of the
taxpayers whose last name includes text “MWINYI” will be retrieved).
iTAX: Taxpayer & Payment Modules User’s Manual
5|P
Figure 4 – Taxpayer Search window
3. Click the OPEN button or simply double-click the desired taxpayer from the list to display the
data in the Taxpayer Data window.
4. If you wish to edit the selected Taxpayer Data, click the EDIT button and do some necessary
modifications.
5. After you have successfully edited the Taxpayer Data, make sure to click the SAVE button to
apply changes.
3.1.3 Cancelling Button on Taxpayer Data
The CANCEL button does not cancel or delete the Taxpayer Data from the system; instead, it stops
the process being executed by the concerned function. In this case, the Taxpayer Data window will
be inactivated.
3.1.4 Printing a Taxpayer Data
The PRINT button, when clicked, will print a copy of the Taxpayer Data actively displayed on the
taxpayer data window.
3.1.5 Viewing Data on Tabs
The tabs, when clicked, will display the corresponding information.
iTAX: Taxpayer & Payment Modules User’s Manual
6|P
3.2
Taxpayer Account
The Taxpayer account displays all assessments and payments transaction for the selected Taxpayer.
This window is used to view transactions grouped by tax type, date and status
To access the Taxpayer Account go to the TAXPAYER Menu > TAXPAYER ACCOUNT.
Figure 5 – Taxpayer Account menu
The system then displays the Taxpayer Account window where you can search and view transaction
details of a taxpayer.
Figure 6 – Taxpayer Account Window
Figure 6 shows the Taxpayer’s account transactions for selected tax type, period and status. The
fields on the upper part of the window display some data of the taxpayer. Directly below the
Taxpayer data are the FROM and UNTIL fields for the tax year. The buttons on the right side initiate
iTAX: Taxpayer & Payment Modules User’s Manual
7|P
the tasks handled by the taxpayer account window. And below the fields and buttons are the
transactions found under the taxpayers’ account which are displayed as a whole or by group through
tabs. The tabs are labelled by the group name.
3.2.1 Searching, Retrieving and Displaying the Taxpayer Account
1. In the Taxpayer Account window, click the SEARCH button to locate a certain Taxpayer
account. The Taxpayer search window will display.
2. Retrieve the desired Taxpayer Data from the Taxpayer search window by typing in the
information that identifies a taxpayer.
3. Click the OPEN button or simply double-click the desired taxpayer from the list to display the
data in the Taxpayer Data window.
4. After you have selected the taxpayer, set the desired values for the “FROM” and “UNTIL” tax
years in order to display the transactions made by the taxpayer within the selected period.
5. Click the RETRIEVE button to display transactions according to the filter criteria.
3.2.2 Printing a Taxpayer Account
The PRINT button, when clicked, will print a copy of the transactions of the selected taxpayer
account.
iTAX: Taxpayer & Payment Modules User’s Manual
8|P
4 PAYMENT MODULE
The Payment module provides an integrated payment service for all thematic modules. The module
is flexible enough to allow different types of payments such as partial payment, cash payment,
payment by cheque, and in the future mobile payment.
4.1
Cashier
This window is used to process all types of payment transactions. The left side of the window lists all
payment transactions made by the cashier during the day.
Figure 7 - Payment posting window
4.1.1
1.
2.
3.
4.
New Payment Transactions
Go to PAYMENT Menu > CASHIER.
Click the RETRIEVE and NEW buttons to start a new payment transaction.
Click the FIND TAXPAYER button to identify the taxpayer’s account.
Once you have the taxpayer details, select the tax type radio button to specify the payment
transaction to be settled.
5. After you have set the details for the payment transaction, click the GET TAX DUE button.
iTAX: Taxpayer & Payment Modules User’s Manual
9|P
Figure 8 - Get Tax Due window
6. Once the Taxpayer Debits window is displayed select the debit line that the taxpayer wishes
to pay; or click the SELECT ALL button to put a check mark on all listed debit lines.
7. Click the RETURN button to display the details and total amount the taxpayer will be paying
on the Payment Posting window.
8. To cancel the process of identifying the payables of the taxpayer, simply click the CANCEL
button. The Taxpayer Debits window will be closed, and the payment posting will be
displayed.
Printing of Receipts and Closing Payment Transactions
1. Once you have specified the amount to be paid by the taxpayer, key in the receipt number
of the payment transaction.
2. Click the RECEIPT button to post a payment transaction and preview a receipt.
3. Click the PRINT to print a receipt.
iTAX: Taxpayer & Payment Modules User’s Manual
10 |
5 ACCRONYMS AND ABBREVIATIONS
GIZ/GTZ
iTAX
German Development Cooperation, Eschborn, Germany
Integrated Tax Management System
iTAX: Taxpayer & Payment Modules User’s Manual
11 |